Chapter 05 · Linux Users, File Permissions, ACLs & sudo
Chapter Overview
Linux is an operating system renowned for its multi-user, multi-tasking capabilities, celebrated for its exceptional stability and security. However, ensuring the security of Linux systems behind the scenes involves a series of complex configuration tasks.This chapter will thoroughly explain how to configure permissions for file owners, groups, and other users regarding read (r), write (w), and execute (x) operations. Additionally, it will cover adding, removing, and modifying user account information in Linux systems.
We will explore how to leverage special permissions like SUID, SGID, and SBIT to configure system permissions more flexibly. This approach overcomes the limitations of relying solely on standard operation permissions for file access, enabling finer-grained, more sophisticated permission management tailored to complex scenarios.Hidden permissions add an invisible layer of protection to the system, ensuring that even if hackers can view critical log information, they cannot tamper with or delete it. File Access Control Lists (ACLs) further enable specific permissions to be assigned to individual users or groups for particular files or directories, implementing the principle of least privilege to meet operational requirements.
This chapter concludes by explaining how to use the su command and sudo service to grant ordinary users administrative privileges. This approach not only fulfills daily operational requirements but also safeguards system security.
5.1 User Identity and Capabilities
Influenced by 1970s computer development, one of Linux's core design goals was to support concurrent multi-user operations. This necessitated robust security, particularly ensuring that a single service failure wouldn't compromise the entire server. In Chapter 1, we learned how to install Linux, emphasizing the critical importance of setting the root administrator password.This root administrator is the superuser present in all UNIX-like systems, equivalent to the administrator role in Windows. It holds the highest system privileges, enabling management of all system functions—such as adding/removing users, starting/stopping service processes, and enabling/disabling hardware devices.
While working as root imposes no system restrictions, the adage holds true: "With great power comes great responsibility." Executing an erroneous command with these powerful privileges could directly destroy the entire system. Whether to use root access requires careful consideration.
Should one use root privileges to control the entire system during the learning process? Numerous online articles advocate operating as a regular user, claiming this approach is safer and carries less "liability." Today, I'll boldly defy conventional wisdom and share my personal insight—I strongly recommend using root privileges during your studies!
This unapologetic defense of root privileges is likely rare online. My reason for strongly advocating root access is straightforward: when learning Linux, operating as a regular user makes it difficult to diagnose errors after configuring services. You'll struggle to determine whether issues stem from system flaws or insufficient permissions, unnecessarily complicating your learning journey.Moreover, our lab environment is built using VMware virtual machine software. You can set up snapshots for the installed system, allowing you to restore a fresh system within 5 seconds even if it crashes completely, without worrying about data loss.
In summary, during training, Instructor Liu Chuan recommends that every student learn the Linux system using root administrator privileges. When transitioning to actual work, the choice of user privileges should be determined based on the production environment—this is more a matter of preference than a technical requirement.
Additionally, many books or instructors claim that the administrator in Linux is simply "root." This is actually incorrect. The reason the administrator is called "root" in Linux is not because of its name, but because its user ID (UID) is 0. In Linux, each UID is unique, much like a personal ID number, allowing user identity to be determined by their UID value.In RHEL 10, user identities are categorized as follows:
Administrator (UID 0): The system administrator user.
System Users (UID 1–999): To prevent hackers from exploiting vulnerabilities in service programs, Linux systems run service programs by default under restricted, isolated system users. This effectively limits the scope of potential damage.
Regular Users (UIDs starting from 1000): Users created by administrators for daily operations.
Note that UIDs must not conflict, and administrator-created regular users default to UIDs starting at 1000 (even if lower numbers are unused).
To facilitate managing users belonging to the same group, Linux introduces the concept of user groups. Using the group ID (GID), multiple users can be added to the same group, enabling unified permission planning and task assignment for group members. Suppose a company has multiple departments, each with numerous employees. If you only want employees to access resources within their own department, you can set permissions for the department (rather than individual employees). For example, you could configure permissions for the technical department so that only its employees are allowed to access the company's database information.
Additionally, when creating each user in a Linux system, a primary user group with the same name is automatically created, containing only that user. If the user is later added to other groups, those groups are referred to as supplementary groups. A user has only one primary group but can belong to multiple supplementary groups, meeting daily work requirements.
Tips:
Think of the primary group as your birth family—created automatically when the account is created and unique to you. Supplementary groups are more like workplaces—you join them manually to fulfill different responsibilities, and you can belong to many of them at once.
1. id command
The id command displays detailed user information. Its syntax is id username.
This command is essential throughout user management, so mastering it is recommended. It effortlessly displays fundamental user details—such as user ID, primary group ID, and supplementary group IDs—enabling you to verify a user's existence and inspect associated information.
Below, we use the id command to view information for a user named linuxprobe:
root@linuxprobe:~# id linuxprobe
uid=1000(linuxprobe) gid=1000(linuxprobe) groups=1000(linuxprobe),10(wheel)
2. useradd Command
The useradd command creates new user accounts. Its syntax is useradd [options] username.
When creating a user account with useradd, the default home directory is placed in /home, the default shell interpreter is /bin/bash, and a basic user group matching the user's name is created by default. These defaults can be modified using the useradd command parameters listed in Table 5-1.
Table 5-1 useradd command parameters and their functions
| Parameter | Function |
|---|---|
| -d | Specifies the user's home directory (default is /home/username) |
| -e | Account expiration date, in YYYY-MM-DD format. |
| -u | Specifies the user's default UID |
| -g | Specifies an initial primary user group (must already exist) |
| -G | Specifies one or more extended user groups |
| -N | Does not create a primary user group with the same name as the user |
| -s | Specifies the default shell interpreter for the user |
Below, we use the useradd command to create a user named linuxcool and verify the information with the id command:
root@linuxprobe:~# useradd linuxcool
root@linuxprobe:~# id linuxcool
uid=1001(linuxcool) gid=1001(linuxcool) groups=1001(linuxcool)
Now let's increase the difficulty by creating a regular user while specifying the home directory path, user UID, and shell interpreter. Note /sbin/nologin in the following command—it belongs to the terminal interpreter family and differs significantly from the Bash interpreter. Setting a user's interpreter to nologin prevents them from logging into the system:
root@linuxprobe:~# useradd -d /home/linux -u 8888 -s /sbin/nologin linuxdown
root@linuxprobe:~# id linuxdown
uid=8888(linuxdown) gid=8888(linuxdown) groups=8888(linuxdown)
3. groupadd Command
The groupadd command creates new user groups. Its syntax is groupadd [options] groupname. To efficiently assign permissions to users, it's common practice to add multiple users to the same group.
group to uniformly manage permissions for a category of users. For example, creating a department group allows new colleagues to automatically inherit the same permissions as existing members upon joining, eliminating tedious manual configuration.
Creating a user group is straightforward. For instance, use the following command to create a user group named winston:
root@linuxprobe:~# groupadd winston
4. usermod Command
The usermod command modifies user attributes, standing for "user modify." Its syntax is usermod [options] username.
As previously emphasized, everything in Linux is a file. Therefore, creating a user involves modifying configuration files. User information is stored in the /etc/passwd file. You can directly edit user parameters using a text editor or use the usermod command to modify existing user details, such as the user ID (UID), primary/secondary groups, and default terminal. The parameters and functions of the usermod command are shown in Table 5-2.
Table 5-2 Parameters and Functions of the usermod Command
| Parameter | Function |
|---|---|
| -c | Specifies a comment for the user account |
| -d -m | When used together with the -d option, allows re-specifying the user's home directory and automatically migrates old data |
| -e | Account expiration date, formatted as YYYY-MM-DD |
| -g | Change the primary user group |
| -G | Change the supplementary user groups |
| -L | Lock the user to prevent system login |
| -U | Unlock the user, allowing system login |
| -s | Change the default terminal |
| -u | Modify the user's UID |
Don't be intimidated by all these parameters. First, let's examine the default information for the linuxprobe account:
root@linuxprobe:~# id linuxprobe
uid=1000(linuxprobe) gid=1000(linuxprobe) groups=1000(linuxprobe),10(wheel)
Then add the user linuxprobe to the root user group. This will display the root user group in the additional group list, while the primary user group remains unchanged:
root@linuxprobe:~# usermod -G root linuxprobe
root@linuxprobe:~# id linuxprobe
uid=1000(linuxprobe) gid=1000(linuxprobe) groups=1000(linuxprobe),0(root)
Next, attempt to modify the UID of the linuxprobe user using the -u parameter:
root@linuxprobe:~# usermod -u 9999 linuxprobe
root@linuxprobe:~# id linuxprobe
uid=9999(linuxprobe) gid=1000(linuxprobe) groups=1000(linuxprobe),0(root)
Beyond that, what students are most curious about is what happens when you change a user's terminal interpreter from the default /bin/bash to /sbin/nologin. Let's test it:
root@linuxprobe:~# usermod -s /sbin/nologin linuxprobe
root@linuxprobe:~# su - linuxprobe
This account is currently not available.
The result is quite straightforward! After setting the user's terminal to /sbin/nologin, the user immediately loses login access (including switching identities). However, this user can still be invoked by a specific service to manage that particular service. The advantage here is that if a hacker successfully compromises the system through this service, the damage remains confined to that specific service. The hacker cannot use this user identity to log into the entire server, thereby minimizing potential losses as much as possible.
5. passwd Command
The passwd command is used to modify user passwords, expiration times, and other related information. Its full English name is "password." The syntax is passwd [options] username.
Regular users can only use the passwd command to change their own system passwords, while root administrators have the authority to modify passwords for all other users. Even cooler, root administrators in Linux systems don't need to verify the old password when changing their own or others' passwords, which is particularly convenient. Since root administrators can modify other users' passwords, it means they have complete administrative privileges over those users. The parameters and their functions in the passwd command are shown in Table 5-3.
Table 5-3 Parameters and Functions in the passwd Command
| Parameter | Function |
|---|---|
| -l | Lock user, preventing login |
| -u | Unlock user, allowing login |
| --stdin | Allow password modification via standard input |
| -d | Enables login with an empty password |
| -e | Forces the user to change their password at the next login |
| -S | Displays whether the user's password is locked and the name of the encryption algorithm used |
To change your own password, simply enter the command and press Enter:
root@linuxprobe:~# passwd
New password: Enter your password here
Retype new password: Confirm the password
passwd: password updated successfully
To change another user's password, first verify you have root privileges, then specify the target user's name after the command:
root@linuxprobe:~# passwd linuxprobe
New password: Enter password here
Retype new password: Re-enter for confirmation
passwd: password updated successfully
If re-entering the password twice is inconvenient, use the --stdin parameter to accept standard input piped from another command. The passwd command will treat this as the specified user's password—not only convenient, but also ideal for use in batch scripts.
root@linuxprobe:~# echo "NewPass0107" | passwd --stdin linuxprobe
Changing password for user linuxprobe.
passwd: all authentication tokens updated successfully.
Suppose a colleague is on an extended vacation. You can use the passwd command to lock their account during this period. When they return to work, simply use the same command to unlock the account instead of deleting it. This approach ensures system security while avoiding the hassle of repeatedly adding and removing users.
root@linuxprobe:~# passwd -l linuxprobe
passwd: password changed.
root@linuxprobe:~# passwd -S linuxprobe
linuxprobe L 2025-03-13 0 99999 7 -1
When unlocking, remember to use administrator privileges. Otherwise, if regular users also had locking permissions, the system would inevitably descend into chaos:
root@linuxprobe:~# passwd -u linuxprobe
passwd: password changed.
root@linuxprobe:~# passwd -S linuxprobe
linuxprobe P 2025-03-13 0 99999 7 -1
6. userdel Command
The userdel command is used to delete existing user accounts. Its full English name is "user delete," and the syntax is userdel [options] username.
If you confirm a user will no longer log into the system, you can use the userdel command to remove all information associated with that user. By default, the user's home directory remains after deletion. To remove it, use the -r parameter. The parameters and their functions for the userdel command are shown in Table 5-4.
Table 5-4 Parameters and Functions of the userdel Command
| Parameter | Function |
|---|---|
| -f | Force deletion of user |
| -r | Delete user and home directory simultaneously |
When deleting a user, it is generally recommended to retain their home directory data to prevent accidental deletion of important files. Therefore, when using the userdel command, you can omit parameters and simply specify the username to be deleted:
root@linuxprobe:~# userdel linuxprobe
root@linuxprobe:~# id linuxprobe
id: 'linuxprobe': no such user
Although the user is now deleted, their home directory data remains in the /home directory. Manually remove it once you confirm it won't be needed in the future:
root@linuxprobe:~# cd /home
root@linuxprobe:/home# ls
linuxcool  linuxdown  linuxprobe
root@linuxprobe:/home# rm -rf linuxprobe
root@linuxprobe:/home# ls
linuxcool  linuxdown
As a rule, avoid habitually using the -rf parameter. If you must completely erase account information and home directory files, split the deletion into two separate steps: use the userdel command to remove the user account, then use the rm command to delete the home directory files. This creates an operational buffer, preventing irreversible data loss from accidental actions.It's like when a couple argues—don't rush to throw away mementos. Take time to cool down first. If you regret it later, you can always go back home (recreate the account). Everything will remain as before (files and data intact), with no loss whatsoever.
5.2 File Permissions and Ownership
In Linux systems, every file has an owner and a group to which it belongs. It also specifies the permissions granted to the owner, group, and others for reading (read, abbreviated as r), writing (write, abbreviated as w), and executing (execute, abbreviated as x) the file.For regular files, permissions are relatively straightforward: "read" means accessing the file's content; "write" allows editing, adding, modifying, or deleting content; "execute" enables running scripts. However, understanding directory permissions is less intuitive.Many experienced Linux users still don't fully grasp them. For directories, "read" means you can view the list of files within the directory; "write" means you can create, delete, or rename files within the directory; and "execute" means you can enter the directory itself.
The commands corresponding to read, write, and execute permissions differ between files and directories. Refer to Table 5-5 for specifics.
Table 5-5: Differences in Commands for Read, Write, and Execute Permissions Between Files and Directories

File read, write, and execute permissions can also be represented numerically as 4, 2, and 1 respectively. There is no direct correlation between permissions for the file owner, the file's group, and other users, as shown in Table 5-6.
Table 5-6 Character and Numeric Representations of File Permissions

The numeric representation of file permissions is derived from the character permissions (rwx) to simplify their notation.For example, if a file has permission 7, it signifies read, write, and execute (4+2+1); if permission is 6, it signifies read and write (4+2). Consider this example: A file grants its owner read, write, and execute permissions; its group has read and write permissions; while others have only read permission. Thus, the file's permissions are rwxrw-r--, represented numerically as 764. However, do not add these three digits together (7+6+4=17) as if performing elementary arithmetic. This is not how Linux numeric permissions work—there is no direct correlation between the three digits.
Below, using the rw-r-x-w- permissions as an example, we'll explain how to convert character permissions to numeric permissions. First, replace each character with its corresponding number, as shown in Figure 5-1.
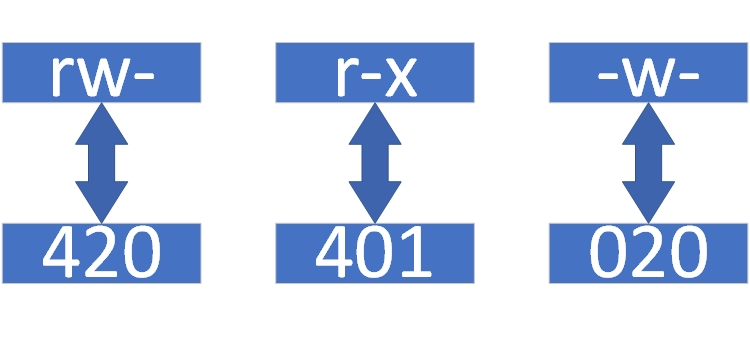
Figure 5-1: Character-to-Numeric Permission Conversion Diagram
The hyphen serves as a placeholder, indicating no permission is granted at that position. In numerical notation, this is represented by 0. Thus, rw- converts to 420, r-x converts to 401, and -w- converts to 020. Next, add the digits within each group: 4 + 2 + 0 = 6, and the digits between groups: 2 + 1 = 3. The sum of these two groups is 652, which is the converted numeric permission.
Converting back from numeric permissions to character permissions is relatively more complex. We'll use the 652 permission as an example.
First, the digit 6 is derived from 4+2. It cannot be 4+1+1 (since each permission appears only once; two execute [x] permissions cannot coexist simultaneously).The digit 5 is derived from 4+1; the digit 2 is the base value itself, and no permission corresponds to the null value 0. Next, write the sequence according to the format shown in Table 5-6, yielding the string 420401020. With this information, the string can be converted back into characters, as illustrated in Figure 5-2.
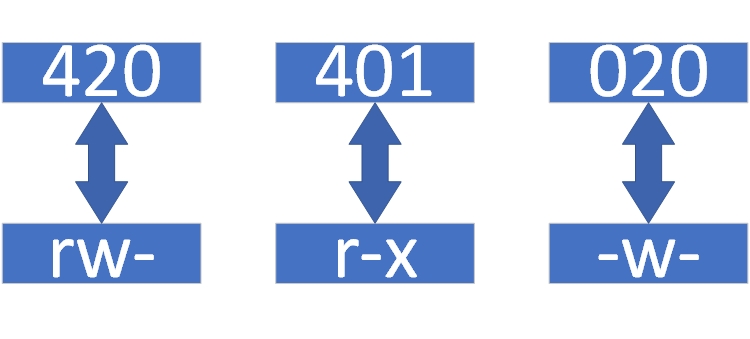
Figure 5-2: Numeric-to-Character Permission Conversion Diagram
It is crucial to remember that permissions for the file owner, group, and other users are independent of each other. Do not write them as rrwwx---. Instead, ensure the rwx permission bits are correctly aligned in the rw-r-x-w- format.
File permissions in Linux are quite complex but widely applicable. It is recommended to thoroughly understand them before proceeding to the next section. Now let's practice.Calculate the character-based permissions corresponding to the numeric representations 764, 652, 153, and 731. Then convert the character-based permissions rwxrw-r--, rw--w--wx, and rw-r--r-- into their numeric equivalents.
Using the knowledge covered earlier, let's analyze the file information shown in Figure 5-3.
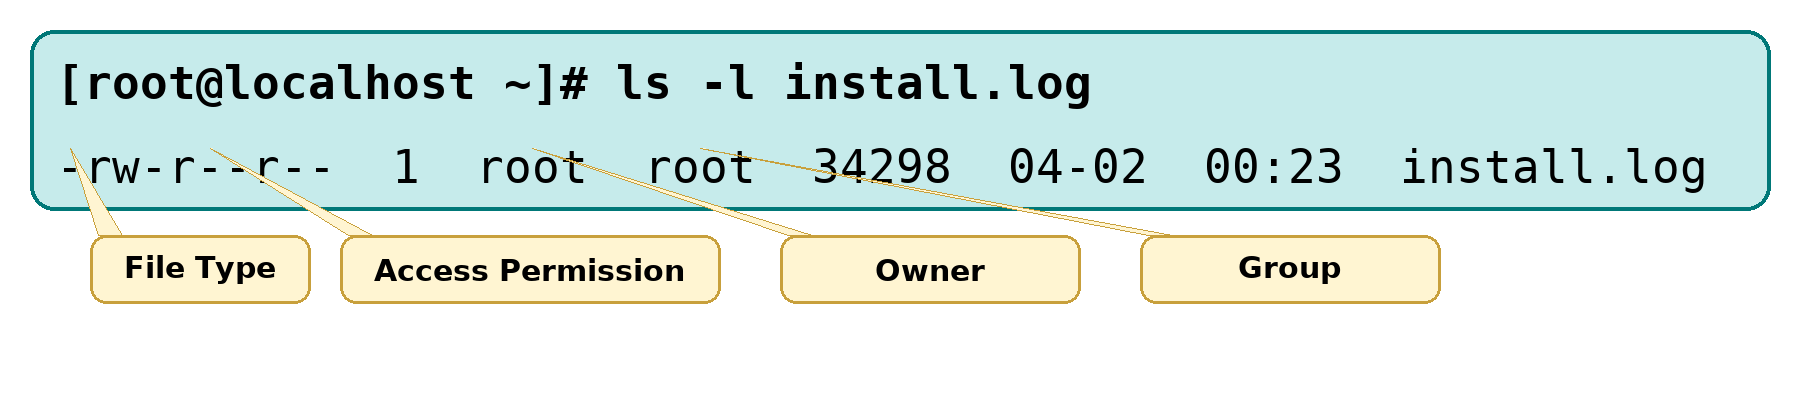
Figure 5-3 File attribute information displayed by the ls command
Figure 5-3 includes details such as file type, access permissions, owner, group, disk space occupied, last modification time, and filename.Analysis reveals the file type is a regular file. The owner has read and write permissions (rw-), the group has read permission (r--), and all others have read-only access (r--). The file occupies 34,298 bytes of disk space, was last modified on April 2 at 0:23, and is named install.log.
The hyphen (-) preceding the permissions indicates the file type (hyphen denotes a regular file). Beginners often confuse this with "no permissions." Although everything is a file in Linux, different files serve different purposes and thus have distinct types (somewhat analogous to file extensions in Windows).Common file types include regular files (-), directories (d), symbolic links (l), pipes (p), block device files (b), and character device files (c).
Regular files encompass a wide range of content, including plain text files, service configuration files, log files, and shell scripts.Regular files (-) and directory files (d) are found in nearly every directory. Block device files (b) and character device files (c) typically represent hardware devices like mice, keyboards, optical drives, and disks, most commonly located in the /dev/ directory. Few users would manage mice or keyboards at the hardware level.
5.3 Special File Permissions
In complex and dynamic production environments, setting only the rwx permissions for files often fails to meet security and flexibility requirements. This is where special permission bits like SUID, SGID, and SBIT come into play. These are special features for configuring file permissions that can be used alongside standard permissions to achieve functionality beyond what standard permissions alone can provide. Below is a detailed explanation of the functions and usage of these three special permission bits.
1. SUID
SUID is a special permission applied to binary programs, allowing the program's executor to temporarily assume the owner's privileges (effective only for executable binaries). For example, any user can execute the passwd command to change their password and save the new password to the /etc/shadow file.Upon closer inspection, this file's default permissions are 000, meaning no user except the root administrator has permission to view or edit it. However, when the SUID bit is set on the passwd command, ordinary users can temporarily assume the identity of the program's owner and write the modified password information to the shadow file.This resembles the imperial envoys wielding the imperial sword seen in historical dramas. Their sword symbolizes the emperor's authority, enabling them to punish corrupt officials—yet it doesn't grant them permanent imperial power. Thus, this represents a conditional, temporary method of granting special privileges.
When examining the passwd command's attributes, you'll notice the owner's permissions change from rwx to rws. The shift from x to s indicates the file has been granted SUID permission. Some readers might wonder: what if the original permissions were rw-? If the original permission bit lacked the x (execute) permission, the special permission bit will become an uppercase S after being granted.
root@linuxprobe:~# ls -l /etc/shadow
----------. 1 root root 1048 Mar 13 13:11 /etc/shadow
root@linuxprobe:~# ls -l /bin/passwd
-rwsr-xr-x. 1 root root 91616 Jun 24  2024 /bin/passwd
Tips:
The bolded text serves as a warning to exercise extreme caution with this permission. Once a command has SUID, anyone who runs it can temporarily assume the owner's privileges. Never set SUID on commands like vim, cat, or rm!
2. SGID
SGID special permissions have two applications: When applied to binary programs, it allows the executor to temporarily assume the permissions of the file's owning group. When applied to directories, newly created files within that directory automatically inherit the original user group name of the directory.
The first function of SGID was designed with SUID in mind, differing in that the user executing the program no longer gains temporary permissions from the file owner, but instead acquires permissions from the file's owning group. For example, in early Linux systems, /dev/kmem was a character device file used to store data accessed by kernel programs, with permissions set as:
cr--r----- 1 root system 2, 1 Feb 11 2024 kmem
Can you spot the problem? Except for the root administrator or members of the system group, no user has permission to read this file. Since it's often necessary to view the system's process status, the ps command file used for checking process status can be granted the SGID special permission bit to enable this functionality. Below are the attributes of the ps command file:
-r-xr-sr-x 1 bin system 59346 Feb 11 2024 ps
With the SGID bit set on the ps command, users executing it temporarily gain permissions of the system group, allowing them to successfully read the device file.
As mentioned earlier, every file has an owner and a group to which it belongs. After a file is created or transferred, it automatically belongs to the user who performed the operation (i.e., that user becomes the file's owner). If you now need to set up a shared directory within a department so that all department members can read its contents, you can set the SGID special permission bit on the directory after creating the departmental shared directory.This ensures that any file created within the directory by department members will belong to the directory's group, rather than the user's primary group. This utilizes the second function of SGID: files created in a directory automatically inherit the directory's group name (this setting applies only to directories).
root@linuxprobe:~# cd /tmp
root@linuxprobe:/tmp# mkdir testdir
root@linuxprobe:/tmp# ls -ald testdir
drwxr-xr-x. 2 root root 6 Mar 13 13:16 testdir
root@linuxprobe:/tmp# chmod -R 777 testdir
root@linuxprobe:/tmp# chmod -R g+s testdir
root@linuxprobe:/tmp# ls -ald testdir
drwxrwsrwx. 2 root root 6 Mar 13 13:16 testdir
After setting the directory permissions to 777 using the above commands (ensuring regular users can write files into it) and enabling the SGID special permission bit for the directory, immediately switch to a regular user. Attempt to create a file within this directory and verify whether the newly created file inherits the group name of the directory it resides in:
root@linuxprobe:/tmp# su - linuxprobe
linuxprobe@linuxprobe:~$ cd /tmp/testdir
linuxprobe@linuxprobe:/tmp/testdir$ echo "linuxprobe.com" > test
linuxprobe@linuxprobe:/tmp/testdir$ ls -al test
-rw-r--r--. 1 linuxprobe root 15 Mar 13 13:16 test
linuxprobe@linuxprobe:/tmp/testdir$ exit
Beyond the two SGID features mentioned above, we'll introduce two additional commands relevant to this section: chmod and chown.
The chmod command sets general and special permissions for files. Its full name is "change mode," and the syntax is chmod [options] filename.
This command is closely tied to daily file permission management. For example, to grant the file owner read, write, and execute permissions; the group owner read and write permissions; and deny all other users any permissions, the corresponding character representation is rwxrw----, and the numerical representation is 760. The usage of this command is illustrated in Figure 5-4.
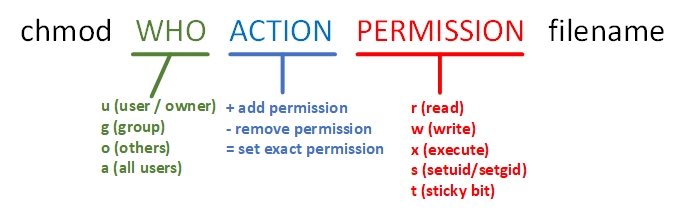
Figure 5-4: Illustration of chmod command usage
root@linuxprobe:/tmp# cd ~
root@linuxprobe:~# ls -l anaconda-ks.cfg
-rw-------. 1 root root 1064 Mar 13 03:41 anaconda-ks.cfg
root@linuxprobe:~# chmod 760 anaconda-ks.cfg
root@linuxprobe:~# ls -l anaconda-ks.cfg
-rwxrw----. 1 root root 1064 Mar 13 03:41 anaconda-ks.cfg
The chown command changes a file's owner and group ownership. Its full English name is "change owner," with the syntax: chown [owner]:[group] filename.
The chmod and chown commands are the most commonly used tools for modifying file attributes and permissions. They share a key feature: when operating on directories, the -R parameter must be added to indicate recursive processing—applying the operation to all files within the directory.
Below, we'll easily modify the ownership of the previous file using the "owner:group" format. The result after modification is as follows:
root@linuxprobe:~# chown linuxprobe:linuxprobe anaconda-ks.cfg
root@linuxprobe:~# ls -l anaconda-ks.cfg
-rwxrw----. 1 linuxprobe linuxprobe 1064 Mar 13 03:41 anaconda-ks.cfg
3. SBIT
Nowadays, many university professors require students to upload assignments to specific shared directories on servers. However, there are always a few "troublemakers" who enjoy deleting other students' work. This is where setting the SBIT (Sticky Bit) special permission bit comes in (also known as the sticky bit).The SBIT special permission bit ensures users can only delete their own files, not others'. In other words, once the SBIT sticky bit is set on a directory, only the file owner can execute deletion operations on files within that directory.
Originally, it's unclear which non-technical individual translated Sticky Bit as "sticky position." Instructor Liu Chuan prefers calling it the "protection bit," which is both memorable and immediately conveys its function. In RHEL 10 systems, /tmp serves as a shared file directory and has the SBIT special permission bit enabled by default. Consequently, users can delete only their own files in this directory, not files owned by others.
Unlike the display methods for SUID and SGID permissions discussed earlier, when a directory has the SBIT special permission bit set, the x (execute) permission in the other users' permissions section for files is replaced with t or T—files that originally had x execute permission are displayed as t, while those without x execute permission are displayed as T.
As shown below, the SBIT permission is present by default on the /tmp directory, reflected by the "other users" permission field changing to rwt:
root@linuxprobe:~# ls -ald /tmp
drwxrwxrwt. 17 root root 4096 Oct 28 00:29 /tmp
In reality, whether a file can be deleted depends not on its own permissions, but on whether its directory has write permissions (the underlying principle will be explained in the next chapter). To alleviate concerns for many readers, the following commands grant the test file the maximum 777 permissions (rwxrwxrwx):
root@linuxprobe:~# cd /tmp
root@linuxprobe:/tmp# echo "Welcome to linuxprobe.com" > test
root@linuxprobe:/tmp# chmod 777 test
root@linuxprobe:/tmp# ls -al test
-rwxrwxrwx. 1 root root 26 Mar 13 13:18 test
Next, switch to a regular user account and attempt to delete this file created by another user. You'll find that even with full read, write, and execute permissions enabled, the file remains undeletable due to the SBIT special permission bit:
root@linuxprobe:/tmp# su - linuxprobe
linuxprobe@linuxprobe:~$ cd /tmp
linuxprobe@linuxprobe:/tmp$ rm -f test
rm: cannot remove 'test': Operation not permitted
In practical scenarios, skillful use of special permissions can enable many clever functionalities. Parameters for setting special permissions using the chmod command are shown in Table 5-7.
Table 5-7 Parameters for Setting SUID, SGID, and SBIT Special Permissions
| Parameter | Function |
|---|---|
| u+s | Set SUID permission |
| u-s | Remove SUID permission |
| g+s | Set SGID permission |
| g-s | Remove SGID permission |
| o+t | Set SBIT permission |
| o-t | Remove SBIT permission |
Switch back to root administrator mode, create a new directory named linux in the home directory, then set SBIT permissions for it:
linuxprobe@linuxprobe:/tmp$ exit
root@linuxprobe:/tmp# cd ~
root@linuxprobe:~# mkdir linux
root@linuxprobe:~# chmod -R o+t linux
root@linuxprobe:~# ls -ld linux
drwxr-xr-t. 2 root root 6 Mar 13 13:19 linux
The o+t parameter in the above code adds a special permission after standard permissions are already set. Is there a more efficient way to set both standard and special permissions together?
Actually, SUID, SGID, and SBIT also have corresponding numerical representations: 4, 2, and 1 respectively. This means 777 isn't the maximum permissions; the maximum should be 7777, where the first digit represents the special permission bit. Now that we know the numerical representation consists of "special permissions + general permissions," let's use the permissions of the linux directory above as an example to outline the calculation method.
In the rwxr-xr-t permissions, the last digit is t, indicating the file has standard permissions of rwxr-xr-x with SBIT special permissions.You should be familiar with the numerical representation for read (r), write (w), and execute (x) permissions—rwxr-xr-x equals 755. The SBIT special permission bit is 1, so the combined result is 1755.
Now, let's increase the difficulty. What if the permissions are rwsrwSr--? First, don't panic. The uppercase S indicates that the original file lacked execute permission, so the general permissions are rwxrw-r--. Converting this to numerical representation yields 764.The numeric equivalents for SUID and SGID special permissions are 4 and 2, respectively. Mentally calculating yields 6, resulting in a combined value of 6764. This example is indeed more challenging. Refer to the calculation process in Figure 5-5 for reference. Proceed only after fully understanding it.
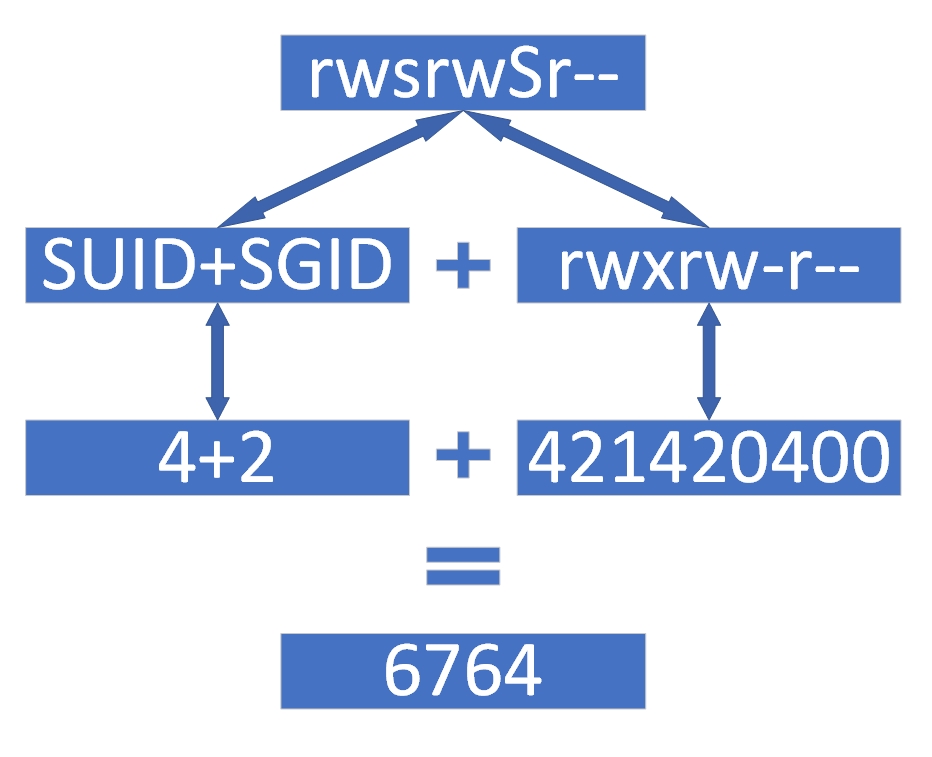
Figure 5-5: Converting Permission Character Representation to Numeric Representation
Converting the numeric representation of special permissions back to character form is slightly more complex. Let's use 5537 as an example.First, the special permission 5 is composed of 4+1, indicating the presence of SUID and SBIT. SUID and SGID are represented as follows: if executable permission originally existed, it is denoted by lowercase s; if not, it is denoted by uppercase S. SBIT is represented as: if executable permission originally existed, it is denoted by lowercase t; if not, it is denoted by uppercase T.The standard permissions 537 convert to r-x-wxrwx. Adding the special SUID and SBIT permissions yields the combined result r-s-wxrwt. Refer to the calculation process shown in Figure 5-6 for clarification.
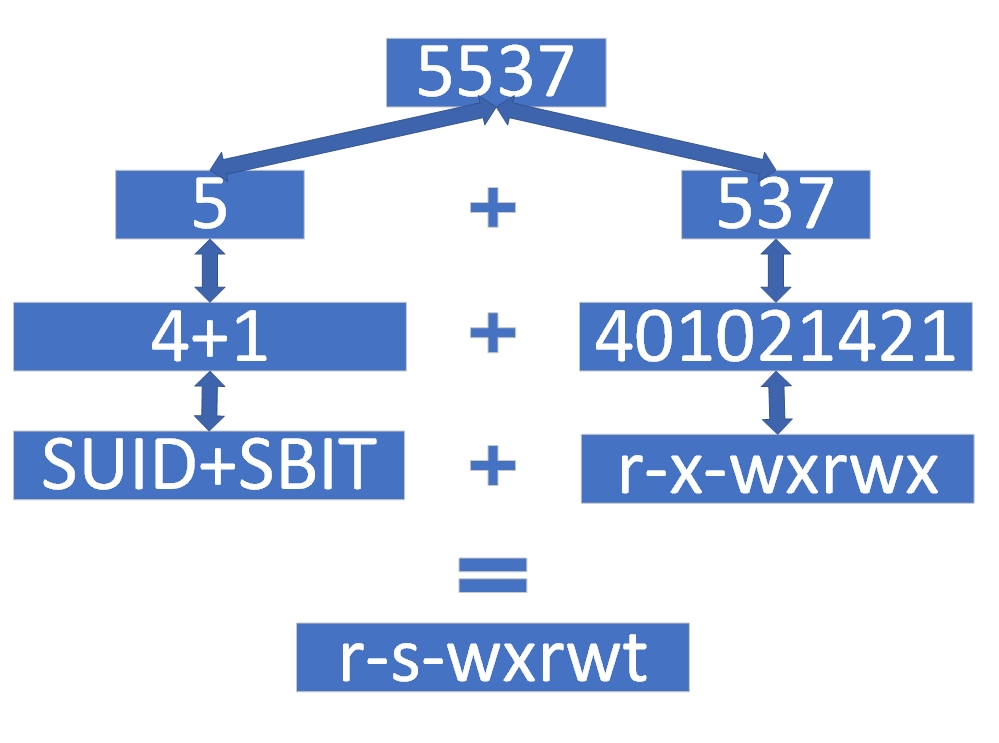
Figure 5-6: Converting Numeric Permission Representation to Character Symbols
Tips:
In Linux systems, file permission bits are like Beijing real estate—every bit is precious. A single permission bit carries so much meaning; exercise extreme caution when working with them.
5.4 Hidden File Attributes
Beyond standard and special permissions, Linux files possess hidden attributes—permissions concealed by default and not immediately visible to users.Users have encountered situations in production environments and RHCE exam questions where files couldn't be deleted despite sufficient permissions, or where log files could only be appended to but not modified or deleted. This feature thwarts hackers' attempts to tamper with system logs, making these "peculiar" file permissions a safeguard for Linux security.
Since they are called hidden attributes, they cannot be seen using the standard ls command. The dedicated command for setting hidden attributes is chattr, and the dedicated command for viewing them is lsattr.
1. chattr Command
The chattr command is used to set hidden attributes on files. Its full name is "change attributes," and its syntax is "chattr [options] filename."
To add a hidden attribute to a file, append "+ parameter" to the command. To remove a hidden attribute, append "- parameter". The chattr command offers a wide range of hidden attribute parameters, as detailed in Table 5-8.
Table 5-8 Hidden Permission Parameters in the chattr Command and Their Functions
| Parameter | Function |
|---|---|
| i | Prevents modification of the file; if applied to a directory, only subfiles can be modified, not created or deleted |
| a | Allows only appending content; overwriting/deleting is prohibited (Append Only) |
| S | Immediately synchronizes file changes to disk (sync) |
| s | Permanently deletes from disk without recovery (overwrites original disk space with zeros) |
| A | Prevents modification of the last access time (Atime) for this file or directory |
| b | Prevents modification of the access time for this file or directory |
| D | Checks for errors in compressed files |
| d | Ignore this file/directory when backing up with the dump command |
| c | Compress the file or directory by default |
| u | Retain the file's data on disk after deletion for future recovery |
| t | Enable tail-merging support in the filesystem |
| x | Allow direct access to contents within compressed files |
To better demonstrate the effects of hidden permissions, let's first create a regular file and immediately attempt to delete it (this operation will definitely succeed):
root@linuxprobe:~# echo "for Test" > linuxprobe
root@linuxprobe:~# rm linuxprobe
rm: remove regular file 'linuxprobe'? y
Practice is the ultimate test of truth. Unless you witness the power of hidden permissions firsthand, you won't believe how secure Linux systems can be. Next, create another regular file and set it with "no deletion or overwrite" permissions (+a parameter), then attempt to delete it:
root@linuxprobe:~# echo "for Test" > linuxprobe
root@linuxprobe:~# chattr +a linuxprobe
root@linuxprobe:~# rm linuxprobe
rm: remove regular file 'linuxprobe'? y
rm: cannot remove 'linuxprobe': Operation not permitted
As seen, the above operation failed.
2. lsattr Command
The lsattr command is used to view a file's hidden attributes. Its full name is "list attributes," and its syntax is "lsattr [options] filename".
In Linux systems, hidden file permissions must be viewed using the lsattr command; common commands like ls cannot reveal them:
root@linuxprobe:~# ls -al linuxprobe
-rw-r--r--. 1 root root 9 Mar 13 13:20 linuxprobe
However, using lsattr immediately reveals the hidden attributes assigned to the file:
root@linuxprobe:~# lsattr linuxprobe
-----a---------------- linuxprobe
Now, based on the displayed hidden attribute type (letter), use the chattr command to remove it:
root@linuxprobe:~# chattr -a linuxprobe
root@linuxprobe:~# lsattr linuxprobe
---------------------- linuxprobe
root@linuxprobe:~# rm linuxprobe
rm: remove regular file 'linuxprobe'? y
We typically apply the -a parameter to log files (like /var/log/messages) to prevent hackers from erasing their evidence without disrupting normal system logging. For complete protection against modification or deletion, try adding the -i parameter—it works exceptionally well.
In the first season of the American TV series Prison Break, protagonist Michael Scofield threw a disk containing the escape plan out the window into a lake. However, in the second season, detectives retrieved it and recovered the data—leading to Seasons 2, 3, 4, and 5, chronicling his escape with his brother. Therefore, to permanently delete a file, use the
+s parameter to ensure it cannot be recovered after deletion—the file data on the disk will be overwritten with zero blocks, making it more secure.
5.5 File Access Control Lists
You may have noticed that the general permissions, special permissions, and hidden permissions discussed earlier share a common trait—they apply to a category of users, affecting many simultaneously. To grant precise, individualized permissions to a specific user, you need to use a file's Access Control List (ACL).Simply put, setting ACLs on regular files or directories allows you to assign specific operational permissions to designated users or groups, enabling more precise permission distribution. Additionally, if an ACL is set on a directory, the files within it inherit its ACL permissions; conversely, if an ACL is set on a file, it no longer inherits the ACL permissions from its parent directory.
To visually demonstrate ACL's powerful effect on file permission control, let's first switch to a regular user and attempt to enter the root administrator's home directory. Before setting ACLs for the root home directory for regular users, the execution result appears as follows:
root@linuxprobe:~# su - linuxprobe
linuxprobe@linuxprobe:~$ cd /root
-bash: cd: /root: Permission denied
linuxprobe@linuxprobe:~$ exit
1. setfacl Command
The setfacl command manages file ACL permission rules, standing for "set file access control lists." Its syntax is setfacl [options] filename.
ACL permissions provide special access controls beyond the standard read/write/execute permissions for the owner, group, and others.The setfacl command allows controlling read/write/execute permissions for individual users or groups, files, or directories. Use the -R parameter to apply changes recursively to subdirectories and files, and use -m to add or modify ACL entries. To remove all ACLs from a file or directory, use the -b parameter. Common setfacl parameters and their functions are shown in Table 5-9.
Table 5-9 Common Parameters and Functions of the setfacl Command
| Option | Function |
|---|---|
| -m | Modify permissions |
| -M | Read permissions from file |
| -x | Remove a specific permission |
| -b | Remove all permissions |
| -R | Recursively apply to subdirectories |
For example, if we originally couldn't access the /root directory, we can now set permissions specifically for a regular user:
root@linuxprobe:~# setfacl -Rm u:linuxprobe:rwx /root
After switching to this regular user's identity, we can now access it normally:
root@linuxprobe:~# su - linuxprobe
linuxprobe@linuxprobe:~$ cd /root
linuxprobe@linuxprobe:/root$ ls
anaconda-ks.cfg  Documents  Music     Public     Videos
Desktop          Downloads  Pictures  Templates
linuxprobe@linuxprobe:/root$ exit
Pretty cool, right? But now there's a small issue—how do we check if a file has ACLs set? The common ls command doesn't display ACL info, but you can see the last dot (.) in the file permissions has changed to a plus sign (+). This indicates the file has ACLs configured.Doesn't it feel like the more you learn, the less confident you are in claiming Linux mastery? Just this unassuming dot (.) represents such a crucial permission indicator.
root@linuxprobe:~# ls -ld /root
dr-xrwx---+ 14 root root 4096 Mar 13 13:22 /root
2. The getfacl Command
The getfacl command is used to view a file's ACL permission rules. Its full name is "get file access control lists," and its syntax is "getfacl [options] filename".
Linux commands are delightfully memorable. To set ACLs, use setfacl; to view them, use getfacl. Below, we use getfacl to display all ACL information set on the root administrator's home directory:
root@linuxprobe:~# getfacl /root
getfacl: Removing leading '/' from absolute path names
# file: root
# owner: root
# group: root
user::r-x
user:linuxprobe:rwx
group::r-x
mask::rwx
other::---
ACL permissions can also be set for specific user groups. For example, to allow users in a group to read and write the /etc/fstab file:
root@linuxprobe:~# setfacl -m g:linuxprobe:rw /etc/fstab
root@linuxprobe:~# getfacl /etc/fstab
getfacl: Removing leading '/' from absolute path names
# file: etc/fstab
# owner: root
# group: root
user::rw-
group::r--
group:linuxprobe:rw-
mask::rw-
other::r--
Need to remove ACLs after a mistake? No problem! Use the -b option to clear all ACL permissions; use the -x option to remove a specific permission:
root@linuxprobe:~# setfacl -x g:linuxprobe /etc/fstab
root@linuxprobe:~# getfacl /etc/fstab
getfacl: Removing leading '/' from absolute path names
# file: etc/fstab
# owner: root
# group: root
user::rw-
group::r--
mask::r--
other::r--
ACL permissions take effect immediately and permanently without requiring further configuration file edits, which is exceptionally convenient. However, this also introduces a security risk: accidentally setting incorrect permissions will overwrite the file's original permission information, making it permanently unrecoverable.
Backing up before making changes is always a good practice.
For example, when backing up ACL permissions on the /home directory, use the -R recursive parameter. This not only backs up the directory's own permissions but also automatically backs up the permissions of all files within it. Additionally, by combining this with the output redirection operation learned in Chapter 3, you can easily achieve permission backups. Note that getfacl cannot use absolute paths when backing up directory permissions. Therefore, you must first change to the top-level root directory before performing the operation.
root@linuxprobe:~# cd /
root@linuxprobe:/# getfacl -R home > backup.acl
root@linuxprobe:/# ls -l backup.acl
-rw-r--r--. 1 root root 945 Mar 13 13:24 backup.acl
Restoring ACL permissions is equally straightforward using the --restore parameter. Since the backup explicitly targeted the /home directory, no directory specification is required—it automatically locates the target for restoration:
root@linuxprobe:/# setfacl --restore backup.acl
5.6 The su Command and sudo Service
Readers rarely encounter security issues in lab environments. To avoid configuration failures due to permission constraints, we recommend learning this book using root privileges. However, in production environments, we must maintain a deep respect for security and avoid performing all tasks as root.A single misplaced command could crash the system. This would not only draw customer complaints and management criticism but might even jeopardize your bonus. Yet, while Linux prioritizes security by restricting many commands and services to root, this imposes significant limitations on regular users, hindering certain tasks.
The su command addresses the need to switch user identities, allowing the current user to seamlessly transition to another user without logging out. For example, switching from root administrator to a regular user:
root@linuxprobe:/# su - linuxprobe
linuxprobe@linuxprobe:~$ id
uid=1000(linuxprobe) gid=1000(linuxprobe) groups=1000(linuxprobe),10(wheel) context=unconfined_u:unconfined_r:unconfined_t:s0-s0:c0.c1023
Observant readers will note the hyphen (-) between the su command and the username. This signifies a full switch to the new user, meaning the environment variables are also updated to the new user's corresponding information rather than retaining the original details. It is strongly recommended to include this hyphen (-) when switching user identities.
Additionally, switching from root administrator to a regular user does not require password verification, whereas switching from a regular user to root administrator does require password verification. This serves as a necessary security check:
linuxprobe@linuxprobe:~$ su - root
Password: Enter administrator password here
Although using the su command as shown above allows regular users to fully switch to root privileges to complete tasks, it exposes the root password, increasing the risk of hackers obtaining system credentials. This is not the most secure approach.
Next, we'll learn how to use the sudo command to grant specific users permission to execute particular commands. This approach ensures regular users can complete necessary tasks while preventing exposure of the root administrator password. Our goal is to configure the sudo service appropriately, balancing system security with user convenience.
Tips:
Authorization Principle: Grant the minimum necessary privileges to regular users while ensuring they can complete their tasks.
The sudo command grants ordinary users temporary elevated privileges to execute specific commands, following the syntax "sudo [options] command".
Using sudo enables regular users to perform tasks traditionally reserved for root administrators. It also allows restricting users to specific commands, logging every command executed, centrally managing users and permissions (/etc/sudoers), and permitting password-free access for a set period after initial authentication. Common sudo parameters and their functions are detailed in Table 5-10.
Table 5-10 Common Parameters and Their Functions for the sudo Command
| Parameter | Function |
|---|---|
| -h | Display help information |
| -l | List commands available to the current user |
| -u username or UID value | Execute the command as the specified user |
| -k | Clear the password's validity period; password verification will be required again on the next sudo execution |
| -b | Run the specified command in the background |
| -p | Change the password prompt message |
Of course, if you're concerned about issues arising from directly modifying configuration files, it's recommended to use the visudo command, which complements sudo, to configure user permissions.
The visudo command is used to edit and configure the sudo user permission file. Its syntax is "visudo [options]". This command automatically invokes the Vi editor to configure the /etc/sudoers permission file, resolving conflicts caused by multiple users simultaneously
conflicts that arise when multiple users modify permissions simultaneously. Moreover, the visudo command performs syntax checks on configuration file parameters and issues error warnings when parameter errors are detected. This approach is more user-friendly, secure, and convenient than direct manual file editing.
/etc/sudoers:1:7: syntax error
aaabbbcccddd
      ^
What now?
When configuring the permissions file with visudo, the operation method is identical to that used in the Vim editor. Therefore, remember to save and exit in last line mode after completing your edits. When configuring the permissions file, enter the specified information on approximately line 101 using the format below.
Who can use the list of allowed hosts = (as which user) can execute commands
Who can use: Specifies which user will be authorized to execute commands later.
Hosts allowed: Enter ALL to permit unrestricted host origins, or specify a network segment like 192.168.10.0/24 to limit access to authorized sources.
As which user: Enter ALL for root privileges, or specify another user's name.
List of executable commands: Enter ALL for unrestricted commands, or specify filenames like /usr/bin/cat to limit the command list. Separate multiple commands with commas (,).
When configuring service files in Linux systems, while there are no strict rules, experience suggests avoiding placing new parameters too high in the file. This prevents newly added parameters from failing during execution, which could cause essential service functions to fail to load. It's generally recommended to locate similar parameters in the configuration file and make new modifications adjacent to them, or add changes in the middle to lower sections of the file.
root@linuxprobe:~# visudo
 99 ## Allow root to run any commands anywhere
100 root            ALL=(ALL)       ALL
101 linuxprobe      ALL=(ALL)       ALL
After making changes, remember to save and exit first. Then switch to the specified regular user account. At this point, you can use the sudo -l command to view all executable commands (Note: This command verifies the regular user's password, not the root administrator's password—please do not confuse the two):
root@linuxprobe:~# su - linuxprobe
linuxprobe@linuxprobe:~$ sudo -l

We trust you have received the usual lecture from the local System
Administrator. It usually boils down to these three things:

    #1) Respect the privacy of others.
    #2) Think before you type.
    #3) With great power comes great responsibility.

For security reasons, the password you type will not be visible.

[sudo] password for linuxprobe:
Matching Defaults entries for linuxprobe on linuxprobe:
    !visiblepw, always_set_home, match_group_by_gid, always_query_group_plugin,
    env_reset, env_keep="COLORS DISPLAY HOSTNAME HISTSIZE KDEDIR LS_COLORS",
    env_keep+="MAIL PS1 PS2 QTDIR USERNAME LANG LC_ADDRESS LC_CTYPE",
    env_keep+="LC_COLLATE LC_IDENTIFICATION LC_MEASUREMENT LC_MESSAGES",
    env_keep+="LC_MONETARY LC_NAME LC_NUMERIC LC_PAPER LC_TELEPHONE",
    env_keep+="LC_TIME LC_ALL LANGUAGE LINGUAS _XKB_CHARSET XAUTHORITY",
    secure_path=/sbin\:/bin\:/usr/sbin\:/usr/bin

User linuxprobe may run the following commands on linuxprobe:
    (ALL) ALL
    (ALL) ALL
Now comes the moment of truth! As a regular user, you certainly cannot view files in the root administrator's home directory (/root). However, simply prefix the command you wish to execute with sudo:
linuxprobe@linuxprobe:~$ ls /root
ls: cannot open directory '/root': Permission denied
linuxprobe@linuxprobe:~$ sudo ls /root
anaconda-ks.cfg  Documents  Music     Public	 Videos
Desktop			 Downloads  Pictures  Templates
Instant results! However, considering that in production environments, a regular user should not possess the highest execution privileges for all commands across the entire system (which also violates the previously mentioned principle of least privilege, i.e., granting the minimum necessary permissions), the ALL parameter is somewhat inappropriate. Therefore, specific commands must be granted to regular users to meet work requirements, subject to necessary permission constraints.If you need to restrict a user to executing specific commands only as the root administrator, remember to provide the absolute path to the command. Otherwise, the system won't recognize it. First, use the whereis command to find the command's storage path:
linuxprobe@linuxprobe:~$ exit
root@linuxprobe:~# whereis cat
cat: /usr/bin/cat /usr/share/man/man1/cat.1.gz
root@linuxprobe:~# whereis reboot
reboot: /usr/sbin/reboot /usr/share/man/man2/reboot.2.gz /usr/share/man/man8/reboot.8.gz
Then use the visudo command to continue editing the permissions file. Modify the parameters added to line 101 as follows, separating multiple commands with commas (,).
root@linuxprobe:~# visudo
99 ## Allow root to run any commands anywhere
100 root       ALL=(ALL)   ALL
101 linuxprobe ALL=(ALL)   /usr/bin/cat,/usr/sbin/reboot
After editing, save and exit as before.Switch back to the specified regular user and attempt to view a system file normally. The system will now prompt "Permission denied." Using the sudo command will then allow you to view the file content successfully:
root@linuxprobe:~# su - linuxprobe
linuxprobe@linuxprobe:~$ cat /etc/shadow
cat: /etc/shadow: Permission denied
linuxprobe@linuxprobe:~$ sudo cat /etc/shadow
root:$y$j9T$pg8bgLsCm0JreeO8laDHb8qW$cNPfXxGES.qDqkCTrpJUgM3GKju1jD3T9qQ1HMcxvr/::0:99999:7:::
bin:*:19898:0:99999:7:::
daemon:*:19898:0:99999:7:::
adm:*:19898:0:99999:7:::
lp:*:19898:0:99999:7:::
sync:*:19898:0:99999:7:::
shutdown:*:19898:0:99999:7:::
[... output omitted ...]
linuxprobe@linuxprobe:~$ exit
Don't think this is the end—Instructor Liu Chuan has even more tricks up his sleeve. Have you noticed that every time you run a sudo command, it asks for password verification? Although this password is the same as the currently logged-in user's password, having to enter it each time can be quite cumbersome. This is where the NOPASSWD parameter comes in handy. Adding it allows users to bypass password verification for subsequent sudo commands:
root@linuxprobe:~# visudo
 99 ## Allow root to run any commands anywhere
100 root       ALL=(ALL)   ALL
101 linuxprobe ALL=(ALL)   NOPASSWD:/usr/bin/cat,/usr/sbin/reboot
This way, when switching back to the regular user and running those specific commands with sudo, you won't need to re-enter your password each time, which makes daily work smoother.
root@linuxprobe:~# su - linuxprobe
linuxprobe@linuxprobe:~$ reboot
User root is logged in on tty2.
Please retry operation after closing inhibitors and logging out other users.
Alternatively, ignore inhibitors and users with 'systemctl reboot -i'.
linuxprobe@linuxprobe:~$ sudo reboot
Students should carefully observe the user identity transition above. The visudo command can only be executed by root administrators; regular users will receive an insufficient privileges prompt when attempting to use it.
Review Questions
- In Linux systems, who is root?
Answer: The user with UID 0, possessing the highest privileges (and greatest responsibility) and fewest restrictions.
- What are the commands for adding and removing users in Linux?
Answer: The commands for adding and removing users are useradd and userdel, respectively.
- If a file's owner has read/write/execute permissions while others have only read permission, what should the numeric representation be?
Answer: The owner's permissions are rwx, while the group and others have r-- permissions. Therefore, the numerical representation is 744.
- If a file's character permissions are rwxrw-r--, what should the corresponding numeric permissions be?
Answer: The numeric permission should be 764.
- If the permissions for a symbolic link are represented numerically as 755, what is the corresponding character representation?
Answer: In Linux systems, different files have different types, so it should be written as lrwxr-xr-x.
- If you want a user to temporarily have the same permissions as the owner when executing a command, what special permission should you set?
Answer: The SUID bit in the special permissions.
- What does setting the hidden permission (+i parameter) on a file mean?
Answer: The file cannot be modified. If this parameter is set for a directory, only subfiles within it can be modified; new files cannot be created, and existing files cannot be deleted.
- Use an access control list (ACL) to restrict the linuxprobe user group, preventing all members from writing to the /tmp directory.
Answer: To set ACLs for a user group, replace "u" with "g" in the command, e.g., setfacl -Rm g:linuxprobe:r-x /tmp.
- Do regular users need to verify their password when using the sudo command?
Answer: By default, the system requires password verification for the currently logged-in user. To bypass this, add the NOPASSWD parameter.
- How can I configure the user named linuxprobe to bypass password verification when using the sudo command? Please suggest the appropriate parameter.
Answer: linuxprobe ALL=(ALL) NOPASSWD:ALL.