Chapter 19 · Unattended OS Deployment with PXE and Kickstart
Chapter Overview
Newly hired operations and maintenance (O&M) personnel are often tasked with installing operating systems. Using CD images as described in Chapter 1 is not only time-consuming but also highly inefficient. This chapter introduces a solution for unattended installation: the PXE+Kickstart service. We will guide you through installing and deploying PXE+TFTP+FTP+DHCP+Kickstart services to build a batch unattended Linux installation system. After completing this chapter, new O&M personnel can bid farewell to tedious repetitive tasks and significantly improve system installation efficiency.
19.1 Unattended Systems
Chapter 1 covered installing Linux using disc images. Frankly, this method suits only small-scale installations. When hundreds of machines require system deployment in production environments, it becomes impractical. In such scenarios, an unattended installation system built using PXE+TFTP+FTP+DHCP+Kickstart services becomes essential. This unattended system can automatically install Linux on dozens or even hundreds of machines. This not only liberates operations personnel from repetitive tasks but also dramatically boosts system installation efficiency.
The workflow of the unattended installation system is illustrated in Figure 19-1.

Figure 19-1 Workflow of the Unattended Installation System
PXE (Preboot eXecute Environment) is a technology developed by Intel that enables computers to boot operating systems over a network (provided the network card supports PXE). It is primarily used in unattended installation systems to boot client hosts for Linux installation. Kickstart is an unattended installation method. It works by pre-saving parameters that would otherwise require manual input by system administrators into a ks.cfg file. During the installation process, when parameters need to be filled in, the system automatically references the file generated by Kickstart. Therefore, as long as the Kickstart file contains all parameters that would otherwise require manual input during installation, the installation can theoretically be completed automatically without any intervention from system administrators.The configuration and deployment of TFTP, FTP, and DHCP services were covered in detail in Chapters 11 and 14; they will not be repeated here.
Since the client host lacks a complete operating system, FTP authentication is impossible. Consequently, TFTP is required to assist the client in obtaining boot files and drivers. The vsftpd service is used to transfer the complete system installation image to the client over the network. Naturally, image transfer is not limited to FTP; the httpd service can be used as an alternative to vsftpd, provided it successfully transfers the image files.
19.2 Deploying Related Service Programs
This chapter covers deploying multiple services, detailed in Table 19-1. Since some services were thoroughly covered in earlier chapters, subsequent sections will proceed at a faster pace when discussing their configuration and deployment. Refer back to previous chapters as needed for review.
Table 19-1 Services and Functions Used in Subsequent Experiments
| Service Name | Primary Function |
|---|---|
| kea | Assign network card information and guide driver file retrieval |
| tftp-server | Transfers drivers and boot files |
| SYSLinux | Provides drivers and boot files |
| vsftpd | Transfers complete system images |
| Kickstart | Stores installation options in an automated answer file (ks.cfg) |
19.2.1 Configuring the DHCP Service Program
The DHCP service program assigns available IP addresses to client hosts and forms the foundation for file transfers between the server and client hosts. Therefore, configure the DHCP service program first. First, set the IP address for the unattended system according to Table 19-2. Then, disable your own DHCP service in the virtual machine's virtual network editor by unchecking the corresponding checkbox, as shown in Figures 19-2 and 19-3. This prevents conflicts with the service you are configuring.
Table 19-2 Settings for Unattended System and Clients
| Hostname | Operating System | IP Address |
|---|---|---|
| Unattended System | RHEL 10 | 192.168.10.10 |
| Client | No OS installed | - |

Figure 19-2 Opening the Virtual Network Editor for the Virtual Machine
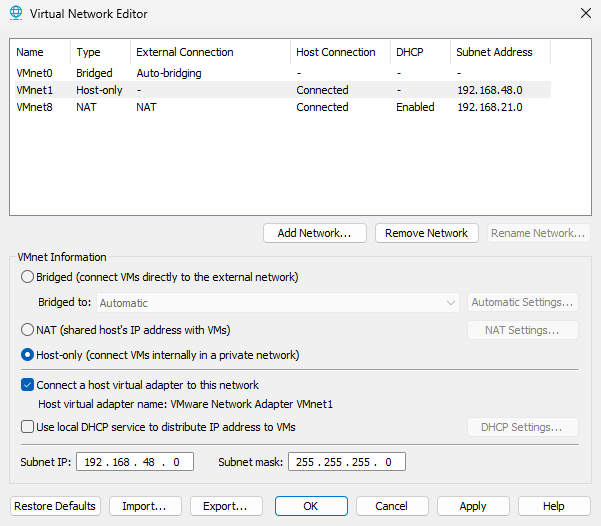
Figure 19-3 Disabling the virtual machine's built-in DHCP service
In addition to the services mentioned above, the PXE+KickStart unattended system installation also relies on various related service daemons and helper protocols (for example, NFS and mountd). Therefore, this experiment will temporarily disable the firewalld firewall to ensure that data can be transmitted normally:
root@linuxprobe:~# systemctl stop firewalld
After mounting the disk image and configuring the repository files, install the kea service package:
root@linuxprobe:~# dnf install -y kea
Updating Subscription Management repositories.
Last metadata expiration check: 0:02:33 ago on Sat 05 Apr 2025 12:09:27 AM CST.
Dependencies resolved.
==========================================================================
 Package                       Arch      Version          Repo       Size
==========================================================================
Installing:
 kea                           x86_64    2.6.1-4.el10     BaseOS    1.3 M
Installing dependencies:
 boost-system                  x86_64    1.83.0-4.el10    BaseOS     16 k
 kea-libs                      x86_64    2.6.1-4.el10     BaseOS    3.1 M
 libpq                         x86_64    16.1-7.el10      BaseOS    253 k
 log4cplus                     x86_64    2.1.1-7.el10     BaseOS    355 k
 mariadb-connector-c           x86_64    3.4.1-1.el10     BaseOS    214 k
 mariadb-connector-c-config    noarch    3.4.1-1.el10     BaseOS     10 k
[... output omitted ...]
Installed:
  boost-system-1.83.0-4.el10.x86_64
  kea-2.6.1-4.el10.x86_64
  kea-libs-2.6.1-4.el10.x86_64
  libpq-16.1-7.el10.x86_64
  log4cplus-2.1.1-7.el10.x86_64
  mariadb-connector-c-3.4.1-1.el10.x86_64
  mariadb-connector-c-config-3.4.1-1.el10.noarch

Complete!
Chapter 14 has already provided a detailed explanation of the DHCP service program configuration and deployment methods. Readers should still recall some of the relevant configuration parameters. However, the configuration file used here differs from the one in Chapter 14 in the following two main aspects.
The boot driver file pxelinux.0 (created in subsequent steps) is loaded at the bottom of the configuration file. This enables client hosts to actively retrieve the boot driver file after obtaining an IP address, allowing them to proceed autonomously to the next installation phase.
The IP address of the TFTP server is specified, enabling automatic retrieval of initial drivers and boot files during installation.
root@linuxprobe:~# vim /etc/kea/kea-dhcp4.conf
{
  "Dhcp4": {
    "interfaces-config": {
      "interfaces": [ "ens160" ]
    },
    "subnet4": [
      {
        "id": 1,
        "subnet": "192.168.10.0/24",
        "pools": [
          {
            "pool": "192.168.10.100 - 192.168.10.200"
          }
        ],
        "option-data": [
          {
            "name": "routers",
            "data": "192.168.10.10"
          },
          {
            "name": "boot-file-name",
            "data": "pxelinux.0"
          },
          {
            "name": "tftp-server-name",
            "data": "192.168.10.10"
          }
        ]
      }
    ]
  }
}
Tips:
The pxelinux.0 file does not currently exist, but don't worry—it will be located later.
After confirming all DHCP service parameters are correctly configured, restart the service and add it to the system startup items. This ensures the client host automatically installs the system upon the next reboot without manual intervention.
root@linuxprobe:~# systemctl restart kea-dhcp4
root@linuxprobe:~# systemctl enable  kea-dhcp4
Created symlink '/etc/systemd/system/multi-user.target.wants/kea-dhcp4.service' → '/usr/lib/systemd/system/kea-dhcp4.service'.
Unlike previous Red Hat Enterprise Linux versions, RHEL 10 contains some "tricky" services where parameter errors may cause startup failures without displaying any on-screen prompts. It is recommended to check the service status after starting kea to prevent clients from failing to obtain network interface information during subsequent experiments. A status output of "active (running)" indicates the service is functioning correctly:
root@linuxprobe:~# systemctl status kea-dhcp4
● kea-dhcp4.service - Kea DHCPv4 Server
     Loaded: loaded (/usr/lib/systemd/system/kea-dhcp4.service; enabled; pres>
     Active: active (running) since Sat 2025-04-05 00:25:25 CST; 29s ago
 Invocation: 6b06921a371a4856ad8ce1c0189d8b30
       Docs: man:kea-dhcp4(8)
   Main PID: 4092 (kea-dhcp4)
      Tasks: 29 (limit: 24371)
     Memory: 3.3M (peak: 9M)
        CPU: 36ms
     CGroup: /system.slice/kea-dhcp4.service
             └─4092 /usr/sbin/kea-dhcp4 -c /etc/kea/kea-dhcp4.conf
[... output omitted ...]
19.2.2 Configuring the TFTP Service Program
In Chapter 11, we covered the vsftpd service and TFTP service. vsftpd is a feature-rich file transfer service program that allows user access authentication via anonymous open mode, local user mode, or virtual user mode. However, since the client host currently lacks an installed operating system, how can login authentication be performed?
TFTP, a simple file transfer protocol based on UDP, enables retrieval of required files without user authentication. Therefore, we will configure the TFTP service to provide boot and driver files for client hosts. Once the client hosts have basic drivers, the full disk image file will be transferred via the vsftpd service.
root@linuxprobe:~# dnf install -y tftp-server
Updating Subscription Management repositories.
Last metadata expiration check: 0:18:20 ago on Sat 05 Apr 2025 12:09:27 AM CST.
Dependencies resolved.
==============================================================================
 Package            Architecture  Version              Repository        Size
==============================================================================
Installing:
 tftp-server        x86_64        5.2-47.el10          AppStream         44 k
[... output omitted ...]
Installed:
  tftp-server-5.2-47.el10.x86_64

Complete!
No files need to be placed in the TFTP directory for now. Simply start the service after installation:
root@linuxprobe:~# systemctl restart tftp
root@linuxprobe:~# systemctl enable  tftp
Created symlink '/etc/systemd/system/sockets.target.wants/tftp.socket' → '/usr/lib/systemd/system/tftp.socket'.
19.2.3 Configuring the SYSLinux Service
SYSLinux is a service program that provides boot loading functionality. Rather than being a service program per se, it functions more as a directory containing numerous boot files. After installing the SYSLinux service program, multiple boot files will appear in the /usr/share/syslinux directory.
root@linuxprobe:~# dnf install -y syslinux
Updating Subscription Management repositories.
Last metadata expiration check: 0:21:45 ago on Sat 05 Apr 2025 12:09:27 AM CST.
Dependencies resolved.
==============================================================================
 Package                 Architecture Version              Repository    Size
==============================================================================
Installing:
 syslinux                x86_64       6.04-0.29.el10       BaseOS       576 k
Installing dependencies:
 syslinux-nonlinux       noarch       6.04-0.29.el10       BaseOS       605 k
[... output omitted ...]
Installed:
  syslinux-6.04-0.29.el10.x86_64    syslinux-nonlinux-6.04-0.29.el10.noarch

Complete!
First, we need to copy the boot files provided by SYSLinux (including the previously mentioned pxelinux.0 file) to the default directory of the TFTP server program. This ensures client hosts can successfully retrieve the boot files.
Additionally, certain boot files from the RHEL 10 system disc image must be retrieved. After confirming the disc image is mounted at /media/cdrom, use the copy command to transfer these boot files from the disc image to the TFTP server's default directory.
root@linuxprobe:~# cd /var/lib/tftpboot
root@linuxprobe:/var/lib/tftpboot# cp -r /usr/share/syslinux/* .
root@linuxprobe:/var/lib/tftpboot# cp /media/cdrom/images/pxeboot/* .
The period (.) following the cp command denotes the current working directory. Thus, the above cp commands copy files to the current working directory (i.e., /var/lib/tftpboot). During copying, if multiple directories contain identical files, manually press the y key to overwrite them.
Next, create a new directory named pxelinux.cfg within the TFTP server directory. Although this directory name includes a suffix, it is still a directory, not a file! Inside it, create a file named default to serve as the system's boot menu interface (similar to the functionality shown in Figure 19-4).
Figure 19-4 Linux System Boot Menu Interface
The default boot menu offers three options: install the system, verify the installation media, and debug mode. Since we've chosen an unattended installation approach, manually selecting options for each host would contradict our core objective (unattended installation).
Therefore, we will not provide three options. Instead, we will offer only one function to install RHEL 10. This option will be selected and loaded automatically by the system (equivalent to the user pressing the Enter key), eliminating the need for manual user selection.
root@linuxprobe:/var/lib/tftpboot# mkdir pxelinux.cfg
root@linuxprobe:/var/lib/tftpboot# vim pxelinux.cfg/default
1 DEFAULT auto
2   LABEL auto
3        KERNEL vmlinuz
4        APPEND initrd=initrd.img inst.ks=ftp://192.168.10.10/pub/ks.cfg inst.stage2=ftp://192.168.10.10 inst.repo=ftp://192.168.10.10/BaseOS quiet
root@linuxprobe:/var/lib/tftpboot# cd ~
Here, DEFAULT specifies the auto-loading options, which we name auto. On line 3, the KERNEL vmlinuz parameter loads the kernel file, which was previously copied to the TFTP directory and resides at /var/lib/tftpboot/vmlinuz.
Next, load the ks.cfg file to automatically respond to issues encountered during installation and load the system installation source, which will be copied to the FTP directory later. Finally, it is recommended to add the quiet parameter after the installation source, indicating a silent installation mode that no longer requires user confirmation. Save the file after making modifications. The boot options menu is a called file, so no separate service restart is required.
19.2.4 Configuring the vsftpd Service Program
Within this unattended installation system, CD images are transferred via FTP, necessitating the use of the vsftpd service program. Alternatively, the httpd service can be used to provide web access to the CD images, as long as it ensures smooth delivery to client hosts. If opting for web-based CD image distribution, remember to update the CD image URL and Kickstart response file URL in the configuration file above.
root@linuxprobe:~# dnf install -y vsftpd
Updating Subscription Management repositories.
Last metadata expiration check: 0:43:08 ago on Sat 05 Apr 2025 12:09:27 AM CST.
Dependencies resolved.
========================================================================================
 Package           Architecture      Version                   Repository            Size
========================================================================================
Installing:
 vsftpd            x86_64            3.0.5-8.el10              AppStream            174 k
[... output omitted ...]
Installed:
  vsftpd-3.0.5-8.el10.x86_64
Complete!
The vsftpd service on RHEL 10 does not allow anonymous public access by default. Therefore, it must be manually enabled:
root@linuxprobe:~# vim /etc/vsftpd/vsftpd.conf
# Example config file /etc/vsftpd/vsftpd.conf
#
# The default compiled in settings are fairly paranoid. This sample file
# loosens things up a bit, to make the ftp daemon more usable.
# Please see vsftpd.conf.5 for all compiled in defaults.
#
# READ THIS: This example file is NOT an exhaustive list of vsftpd options.
# Please read the vsftpd.conf.5 manual page to get a full idea of vsftpd's
# capabilities.
#
# Allow anonymous FTP? (Beware - allowed by default if you comment this out).
anonymous_enable=YES
[... output omitted ...]
Instructor Liu Chuan reiterates: After correctly modifying the configuration file, be sure to add the corresponding service program to the startup items. This ensures the service remains available after a device reboot, whether in production environments or during Red Hat certification exams. Readers are strongly encouraged to cultivate this good habit.
root@linuxprobe:~# systemctl restart vsftpd
root@linuxprobe:~# systemctl enable  vsftpd
Created symlink '/etc/systemd/system/multi-user.target.wants/vsftpd.service' → '/usr/lib/systemd/system/vsftpd.service'.
After confirming the system CD image is properly mounted at /media/cdrom, copy all image files from this directory to the working directory of the vsftpd service:
root@linuxprobe:~# cp -r /media/cdrom/* /var/ftp
This process takes approximately 3–5 minutes. During this time, let's not idle—set the SELinux security subsystem's FTP allow policy to on (enabled).
root@linuxprobe:~# setsebool -P ftpd_connect_all_unreserved=on
19.2.5 Creating the Kickstart Response File
After all, we're deploying an "unattended system installation service" via PXE+Kickstart, not an "unattended system disk image transfer service." Therefore, we also need to enable client hosts to automatically fill in installation options for users while retrieving the disk image.Simply put, if a production environment has 100 machines requiring identical system installations, the buttons clicked and information entered during installation should be consistent across all instances. Why not create a requirements checklist akin to a memo? This way, during unattended system installation, the corresponding option values are retrieved from this checklist, eliminating the need for manual input.More importantly, this approach eliminates human intervention, enabling fully automated unattended system installation—not merely transferring a system disc image.
With the groundwork laid above, you can probably guess that Kickstart isn't actually a service program, but rather a response file. That's right! The Kickstart response file contains the options and parameter information needed during system installation. The system automatically retrieves the contents of this response file, enabling fully unattended installation. So, since this file is so crucial, where can you find it? It resides in the root administrator's home directory as anaconda-ks.cfg. Next, copy this file to the working directory of the vsftpd service program
(The path to this file is already defined in the boot menu configuration file, specifically the pub subdirectory within the vsftpd service data directory). Use the chmod command to set file permissions, ensuring all users have read access to guarantee client hosts can successfully retrieve the response file and its contents:
root@linuxprobe:~# cp ~/anaconda-ks.cfg /var/ftp/pub/ks.cfg
root@linuxprobe:~# chmod +r /var/ftp/pub/ks.cfg
The Kickstart response file isn't as complex as one might imagine. It contains only about 41 lines of parameters and comments. You can quickly grasp each parameter's function by reviewing its name and description. Instructor Liu Chuan has selected several representative parameters for explanation here; we recommend testing other parameters through your own modifications.
Lines 1–15 primarily contain comments and blank lines. These specify the system to install in graphical mode, disable the KDUMP service, define the keyboard layout, and set the system language. No modifications are needed here.
root@linuxprobe:~# vim /var/ftp/pub/ks.cfg
  1 # Generated by Anaconda 40.22.3.12
  2 # Generated by pykickstart v3.52.5
  3 #version=RHEL10
  4 # Use graphical install
  5 graphical
  6
  7 %addon com_redhat_kdump --disable
  8
  9 %end
 10
 11 # Keyboard layouts
 12 keyboard --vckeymap=us --xlayouts='us'
 13 # System language
 14 lang en_US.UTF-8
 15
Lines 16–18 must ensure the network interface defaults to DHCP mode. Otherwise, after installing systems on dozens or hundreds of machines, IP address conflicts will prevent subsequent management. The default hostname is acceptable here.
 16 # Network information
 17 network  --bootproto=dhcp --device=ens160 --onboot=on --ipv6=auto --activate
 18 network  --hostname=linuxprobe.com
On lines 19–24, remember to add the BaseOS system repository information and switch AppStream to FTP network source mode. The graphical-server-environment option corresponds to the Server With GUI selection in the installation interface.
 19 repo --name="BaseOS" --baseurl=ftp://192.168.10.10/BaseOS
 20 repo --name="AppStream" --baseurl=ftp://192.168.10.10/AppStream
 21
 22 %packages
 23 @^graphical-server-environment
 24
On lines 25–29, insert a reboot command between %end and firstboot. This ensures the system automatically reboots after installation completes, eliminating the need for manual user intervention. Without this statement, as shown in Figure 19-5, you would need to manually click to restart.
 25 %end
 26 reboot
 27 # Run the Setup Agent on first boot
 28 firstboot --enable
 29
Figure 19-5 System installation complete, requiring manual reboot
Lines 31–35 indicate the installation disk is named sda and will be automatically partitioned. This requires selecting SCSI or SATA disk types when creating new client virtual machines (see Figure 19-6). Otherwise, the disk name will start with /dev/hd or /dev/nvme, causing the installation to terminate due to unrecognized hardware. The default settings here are acceptable and require no modification.
30 # Generated using Blivet version 3.10.0
31 ignoredisk --only-use=sda
32 autopart
33 # Partition clearing information
34 clearpart --none --initlabel
35

Figure 19-6 Selecting SCSI or SATA hard drive type
In the final lines 36–41, the timezone parameter sets the system's default time zone to Shanghai. If your server's time is inaccurate, modify it as follows. Additionally, a regular user named linuxprobe is created, whose password is the encrypted ciphertext stored in the /etc/shadow file—automatically generated by the system. Leave this setting as default without modification.
 36 # System timezone
 37 timezone Asia/Shanghai --utc
 38
 39 # Root password
 40 rootpw --iscrypted --allow-ssh $y$j9T$MacHqEWCBAHDZWft7rBQjYSA$h5ypm01FEHP.1    VKG80r0iiv9H9AU6UDRnycTdwCEyhA
 41 user --groups=wheel --name=linuxprobe --password=$y$j9T$O1Btaze/IJPvCKbVOfQi    IJw.$ZjwvTAeWD1NYuqNHl3FeLFqeLDmxFvmsXR19KCKbUE6 --iscrypted --gecos="linuxprobe"
As seen above, the actual modifications to the Kickstart response file are minimal, as the default parameters are already quite suitable. Finally, let's preview the full ks.cfg file.
root@linuxprobe:~# cat /var/ftp/pub/ks.cfg
# Generated by Anaconda 40.22.3.12
# Generated by pykickstart v3.52.5
#version=RHEL10
# Use graphical install
graphical

%addon com_redhat_kdump --disable

%end

# Keyboard layouts
keyboard --vckeymap=us --xlayouts='us'
# System language
lang en_US.UTF-8

# Network information
network  --bootproto=dhcp --device=ens160 --onboot=on --ipv6=auto --activate
network  --hostname=linuxprobe.com
repo --name="BaseOS" --baseurl=ftp://192.168.10.10/BaseOS
repo --name="AppStream" --baseurl=ftp://192.168.10.10/AppStream

%packages
@^graphical-server-environment

%end
reboot
# Run the Setup Agent on first boot
firstboot --enable

# Generated using Blivet version 3.10.0
ignoredisk --only-use=sda
autopart
# Partition clearing information
clearpart --none --initlabel

# System timezone
timezone Asia/Shanghai --utc

# Root password
rootpw --iscrypted --allow-ssh $y$j9T$pg8bgLsCm0JreeO8laDHb8qW$cNPfXxGES.qDqkCTrpJUgM3GKju1jD3T9qQ1HMcxvr/
user --groups=wheel --name=linuxprobe --password=$y$j9T$UH7lJoF0c2H0zav1zlYatL.y$jtv7wke6M6zT7m1cLkIHz2W7FcP.grvhnxKa3PbnGyA --iscrypted --gecos="linuxprobe"
If you need to use this file in a production environment, you can directly copy and use the content above.
The Kickstart response file will be transferred via FTP service and then invoked by the installation wizard, so no service restart is required.
19.3 Automated Client Deployment
After successfully deploying all relevant services as described above, you can proceed with unattended system installation using PXE+Kickstart. When creating the virtual machine following the steps below, ensure the client's network mode is set to "Host-only mode" matching the server's configuration. Otherwise, communication between the two devices will fail, preventing automated system installation. Other hardware configuration options are not mandatory; you may refer to the settings provided here for reference.
Step 1: Open the "New Virtual Machine Wizard," select the "Custom (Advanced)" configuration type, then click the "Next" button, as shown in Figure 19-7. In the subsequent virtual machine hardware compatibility options, choose the default "Workstation 17.x or later"; steps omitted.
Step 2: Set the virtual machine operating system installation source to "Install an operating system later." This ensures the virtual machine retrieves the system installation image from the network and prevents VMware Workstation from automatically installing the system using its built-in method. Click the "Next" button, as shown in Figure 19-8.
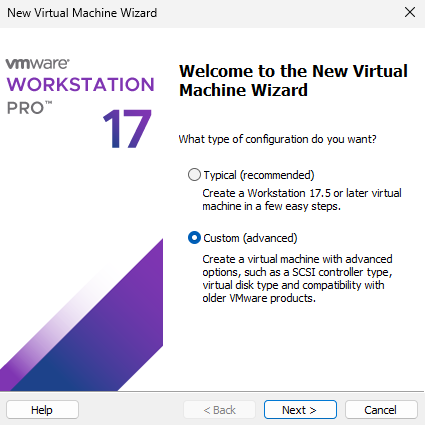
Figure 19-7 Selecting the virtual machine configuration type
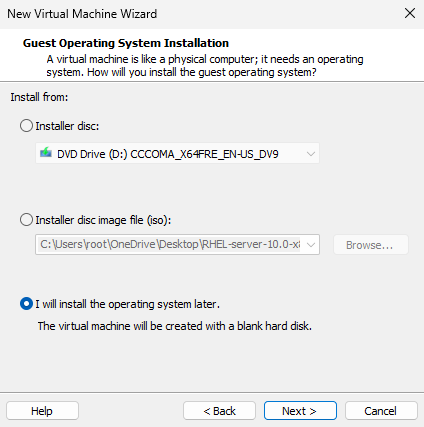
Figure 19-8 Setting the virtual machine operating system installation source
Step 3: Set the "Guest OS" to Linux, with the version as "Red Hat Enterprise Linux 9 64-bit," then click the "Next" button, as shown in Figure 19-9. Hopefully, by the time you read this book, VMware Workstation will already support the RHEL 10 option.
Step 4: Name the virtual machine and set the installation location. You can define the virtual machine name as desired, while selecting a partition with ample disk space for the installation location. Then click the "Next" button, as shown in Figure 19-10. When subsequently configuring the number of virtual machine processors, cores, and memory capacity, please select values based on your actual requirements. These steps are omitted here.
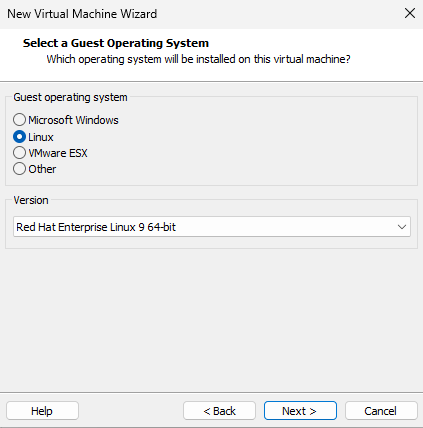
Figure 19-9 Selecting the Client Host Operating System
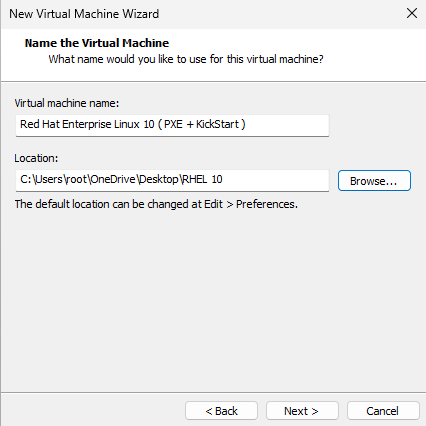
Figure 19-10 Naming the Virtual Machine and Setting the Installation Location
Step 5: Set the virtual machine's network connection type to "Use Host-Only Network," as shown in Figure 19-11. Ensure the server and client share the same network mode; otherwise, the client cannot receive the system image and response files transmitted from the server. Select the default LSI Logic for the SCSI controller type. Steps omitted.
Step 6: Set the disk type and specify its capacity. Set the "Virtual Disk Type" to SCSI or SATA, as shown in Figure 19-12. Subsequently, on the disk creation confirmation screen, select the "Create New Virtual Disk" option. Steps omitted.
Here, set the "Maximum Disk Size" to 20GB. Note that this 20GB represents the maximum limit available to the virtual machine system. This space will not be immediately filled, so setting it slightly larger is acceptable. Then click the "Next" button, as shown in Figure 19-13. On the subsequent disk file name confirmation interface, select the default value; steps omitted.
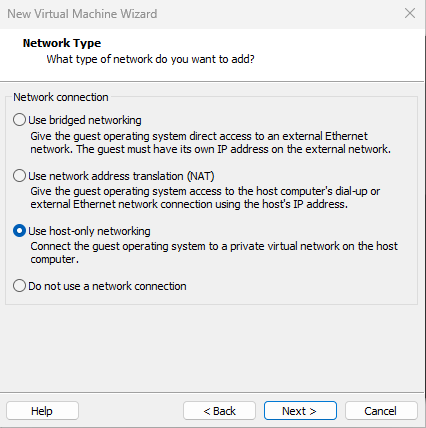
Figure 19-11 Configuring the client's network mode

Figure 19-12: Setting the virtual hard disk type to SCSI or SATA
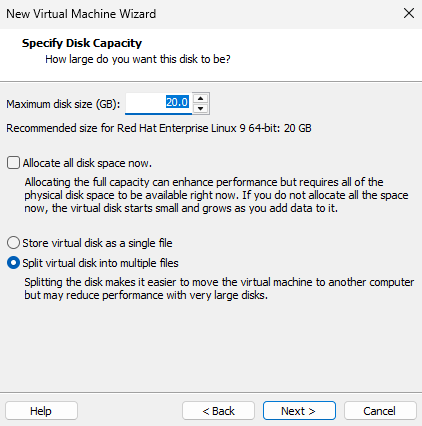
Figure 19-13: Specifying the disk capacity as 20GB
Step 7: After completing the "New Virtual Machine Wizard," do not rush to start the virtual machine system. You must first click the "Customize Hardware" button shown in Figure 19-14. In the interface that appears (as shown in Figure 19-15), set the "Network Adapter" device to "Host-only mode" as well (this step is crucial), and remove any other unnecessary hardware.
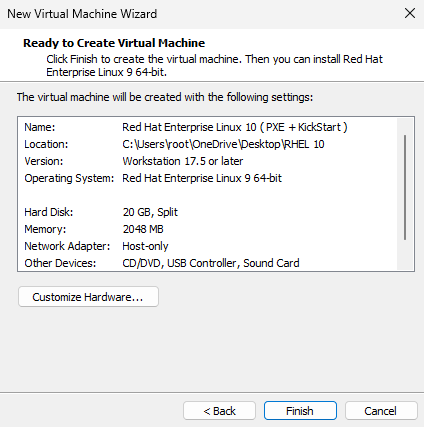
Figure 19-14 Click the "Customize Hardware" button for the virtual machine
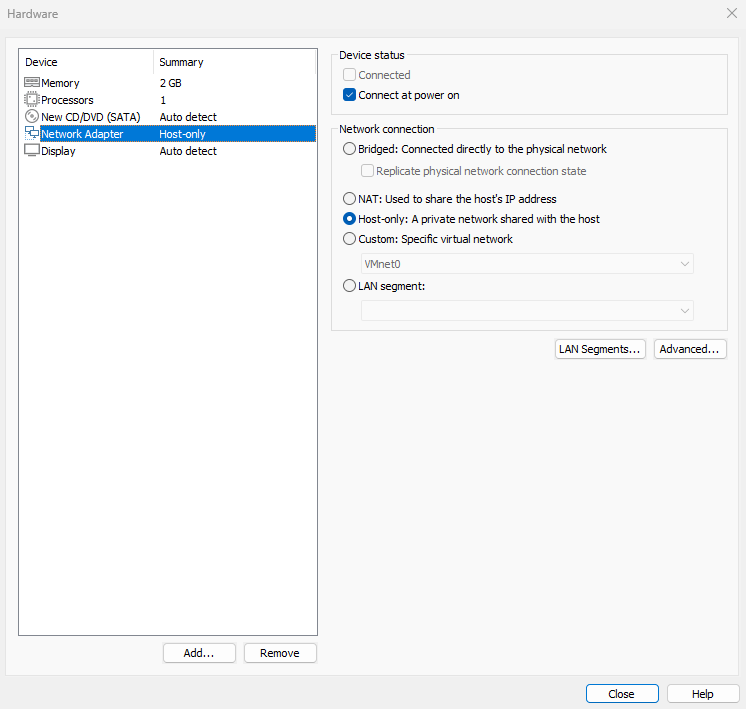
Figure 19-15 Set the virtual machine's network adapter device to Host-only mode
Step 8: Some users may find their virtual machine unable to enter the installation interface because it is not set to BIOS mode. To resolve this, navigate to the "Options" tab, click the "Advanced" button, select "BIOS" in the "Firmware Type" field, then click the "Confirm" button, as shown in Figure 19-16.
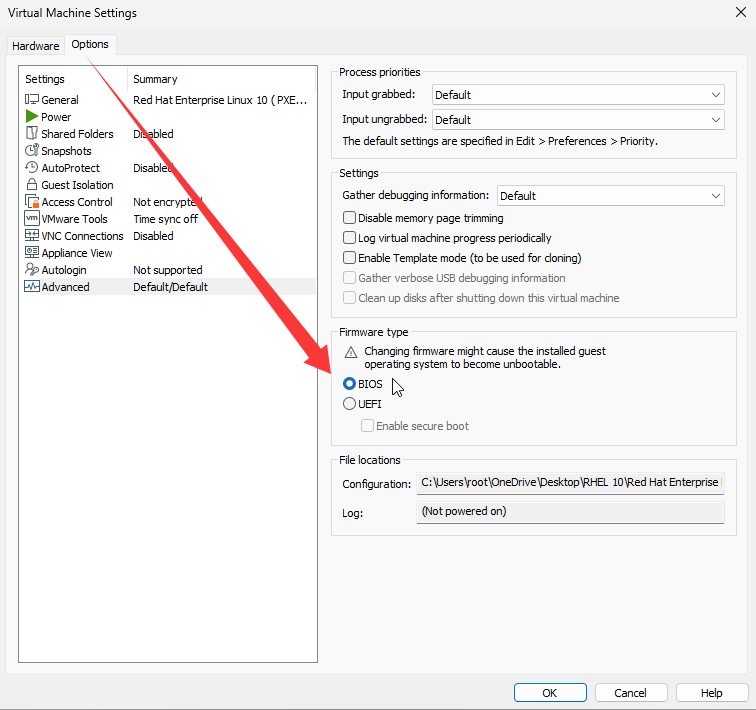
Figure 19-16 Confirming BIOS as the firmware type
Now, both the PXE+Kickstart unattended installation system and the virtual machine are ready. In a production environment, you simply need to rack the properly configured server, connect the network cable between the server and the virtual machine, and then boot the client. The process will then proceed as shown in Figures 19-17 to 19-20, automatically transferring the CD image file and performing the installation—all without any manual intervention.
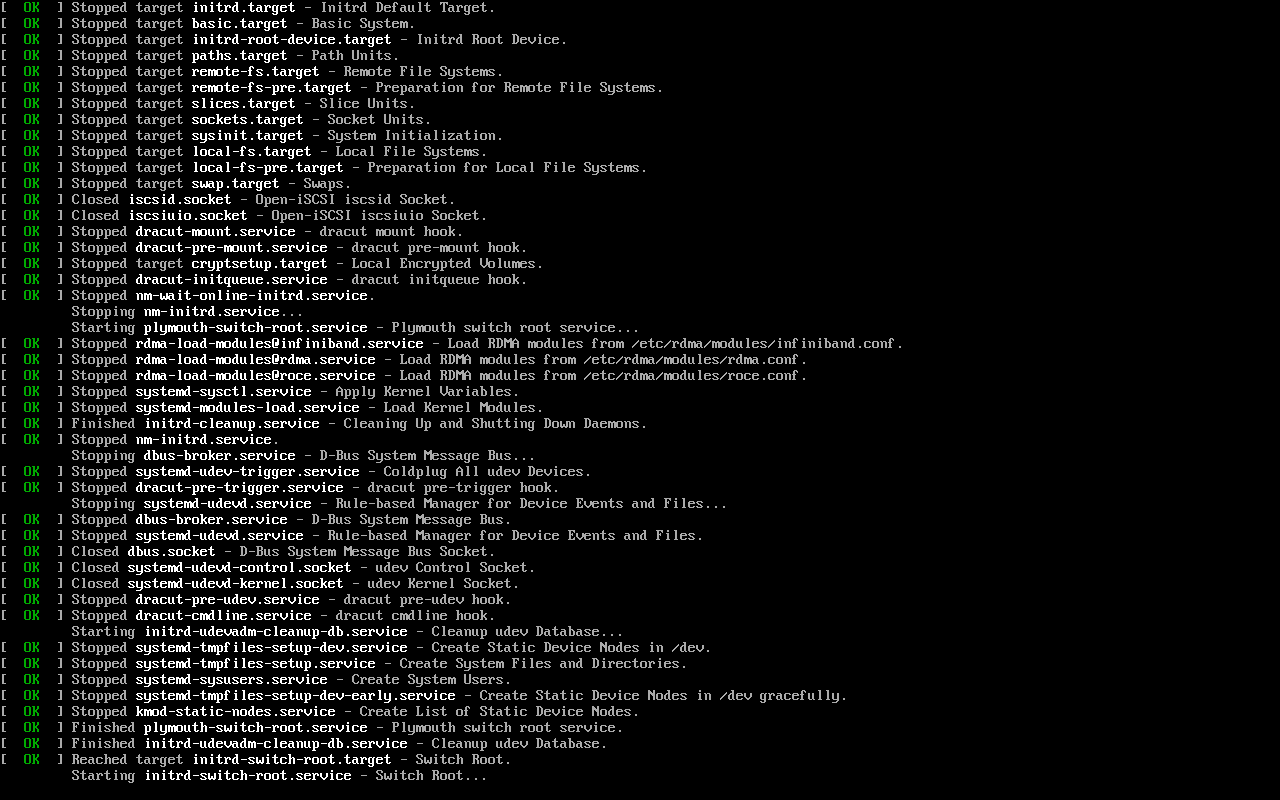
Figure 19-17 Automatically transferring the CD image file and installing the system
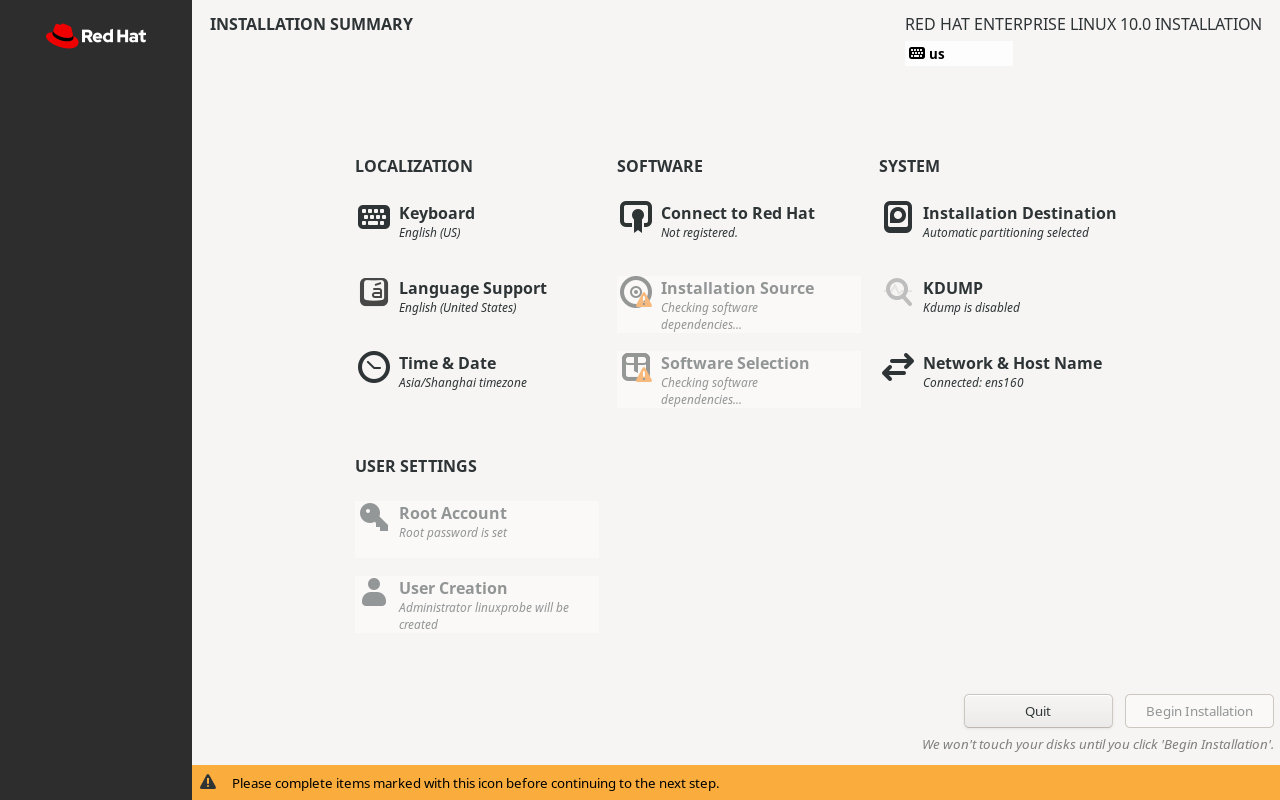
Figure 19-18: Automatically populating installation information based on the answer file
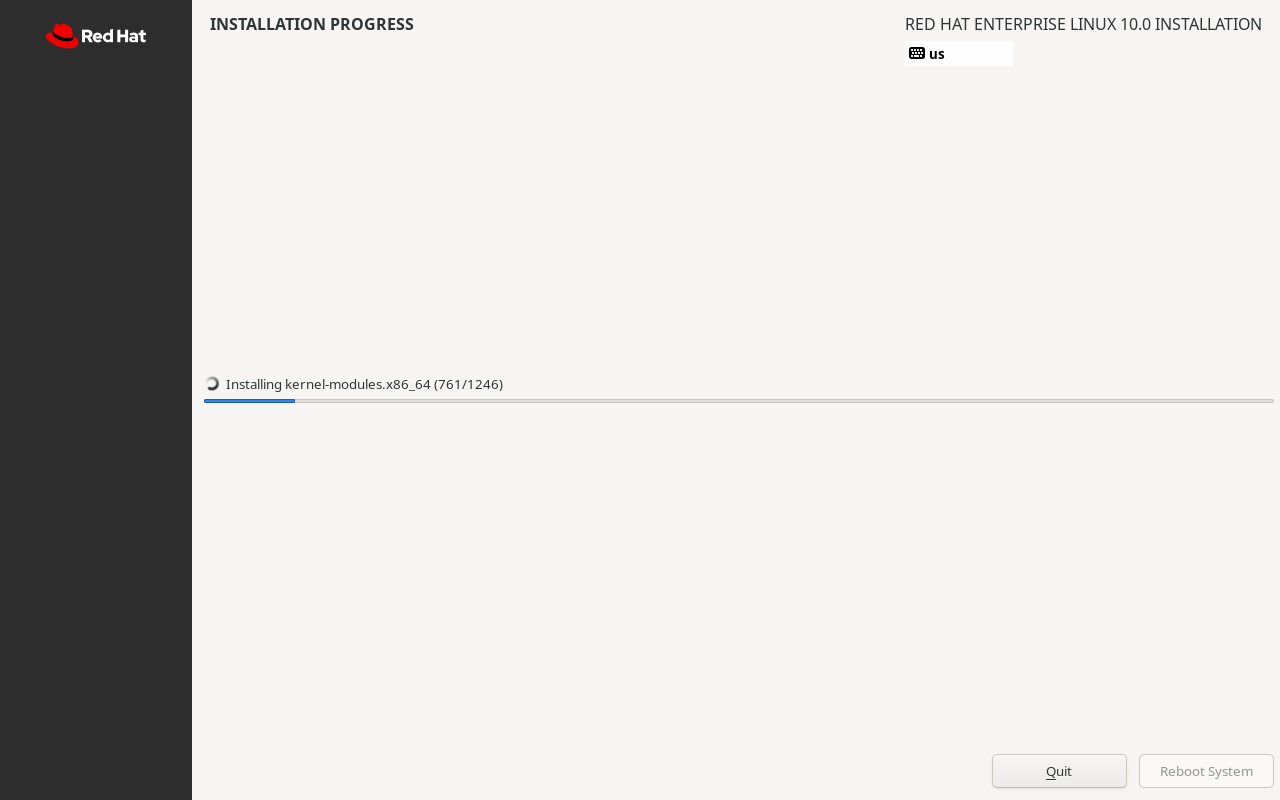
Figure 19-19: Automatic system installation without manual intervention
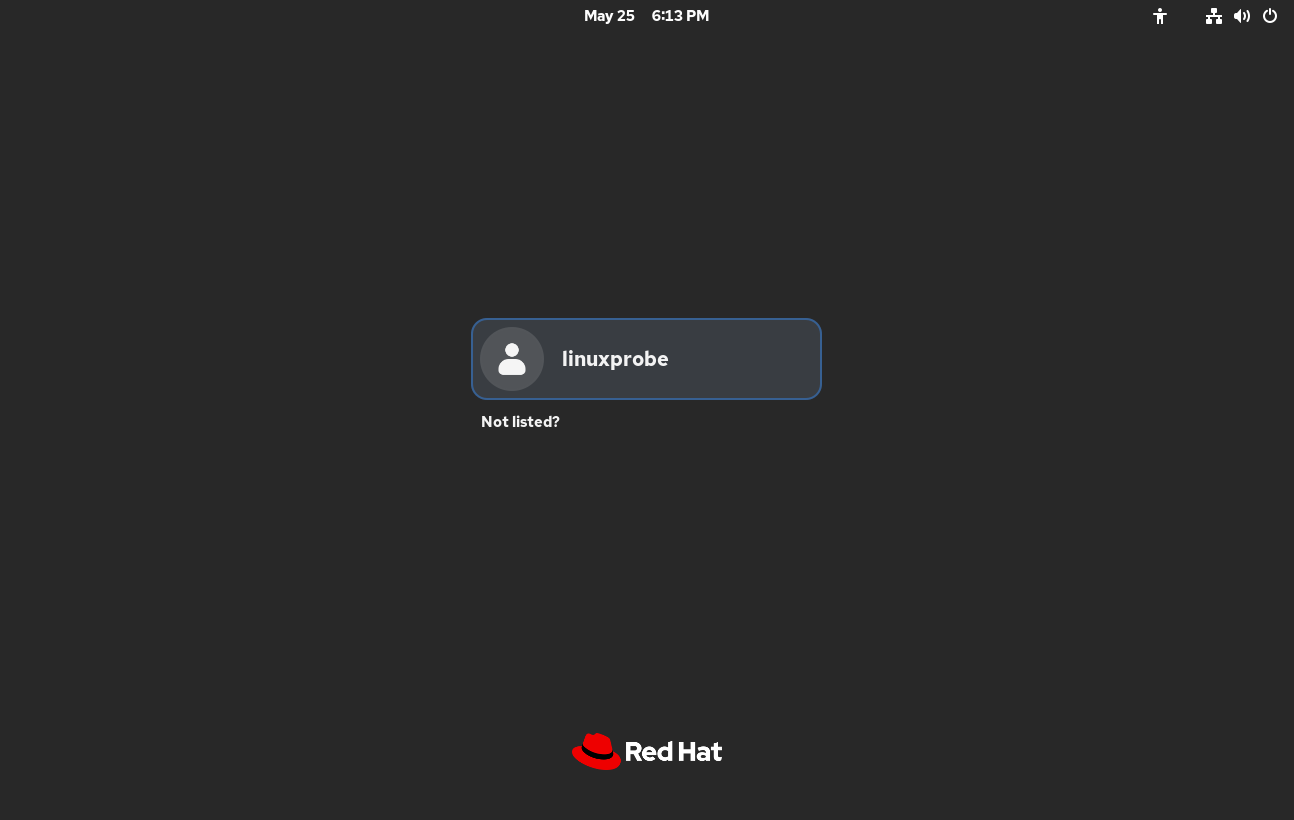
Figure 19-20 Successfully entering the system interface
As evident, when deploying systems across hundreds of machines in production environments, the convenience of unattended installation is undeniable.
Review Questions
- What services and files are required when deploying an unattended installation system?
Answer: The bootloader files provided by SYSLinux, a DHCP service, a vsftpd file transfer service (or an httpd web service), a TFTP service, and the Kickstart response file.
- In VMware Workstation virtual machine software, the DHCP service consistently assigns incorrect IP addresses. What could be the cause?
Answer: The built-in DHCP service in the virtual machine's virtual network editor may not have been disabled, leading to incorrect IP address assignments.
- How do I enable TFTP and vsftpd services?
Answer: Execute the commands systemctl start tftp and systemctl start vsftpd respectively.
- After successfully installing the SYSLinux service program, in which directory can the boot files be found?
Answer: After installing the SYSLinux service package, numerous boot files will appear in the /usr/share/syslinux directory. Select the required boot file from this directory.
- What is the purpose of setting the
defaultparameter toautoin the boot options menu file?
Answer: This enables the system to automatically initiate the installation process without requiring the operator to choose between installing the system or verifying the image file.
- Why must the client's network card mode be set to DHCP (dynamic mode) in the configuration file?
Answer: Because unattended bulk installations deploy identical operating systems. If the NIC mode is set to STATIC (static), all systems would share the same IP address, causing network conflicts.
- What is the purpose of installing the vsftpd file transfer service or the httpd web service?
Answer: To ensure the complete and smooth transfer of the CD image file to the client.
- What is the purpose of the Kickstart response file?
Answer: The Kickstart response file contains options and parameter information required during system installation. Clients can automatically retrieve content from this response file during system installation, thereby fully enabling unattended system installation.
- Briefly describe the function of the ks.cfg file.
Answer: It automatically responds to information that would otherwise require user input and confirmation during system installation, enabling truly unattended bulk system installation.
- If a client fails to automatically obtain and install the system after booting, despite following all configurations described in this chapter and confirming no errors exist, what could be the underlying cause?
Answer: The issue may stem from the client's boot method. Access the virtual machine's BIOS settings, change the boot method to network boot, and then restart.