Chapter 15 · Mail Server Deployment with Postfix and Dovecot
Chapter Overview
Email systems are among the most frequently used network services in our daily work and lives. This chapter begins by exploring the origins of email systems, followed by a detailed explanation of common email protocols such as SMTP, POP3, and IMAP4, along with the roles of the three key services: MUA, MTA, and MDA.
This chapter comprehensively demonstrates how to configure an email system using the Postfix and Dovecot services on Linux, with a focus on commonly used configuration parameters. Additionally, it integrates the DNS domain name resolution service provided by the bind service to verify email sending and receiving functionality between clients and servers. Finally, the chapter explains how to set up user aliases within the email system to help users better control and manage email accounts and mailbox addresses in production environments.
15.1 Email System
During the 1960s, the United States and the Soviet Union were locked in the Cold War. The U.S. military believed maintaining technological superiority was crucial for gaining an advantage in future conflicts. Consequently, the U.S. Department of Defense launched a research project named ARPANET—now widely recognized as the ARPANET initiative. ARPANET served as the precursor to today's internet and was the world's first operational packet-switched network. However, it faced a critical challenge: participating scientists were scattered across the United States, and time zone differences often prevented timely sharing of research findings. Consequently, scientists urgently needed a method to transmit data between computers via a network.
Although the Web services and FTP file transfer services introduced in Chapters 10 and 11 of this book could also facilitate data exchange, their data transmission method resembled making a phone call—both parties needed to be online simultaneously to complete the transfer. If the other party's host crashed or the researcher left for any reason, it could delay the delivery of research findings.At that time, Dr. Ray Tomlinson of MIT was also involved in research related to the ARPANET. He recognized the need to design a transmission service akin to "mail," complete with a "mailbox" for messages. This would allow data to be received even if the recipient was temporarily offline, ready for processing upon their return.Thus, Dr. Ray Tomlinson spent nearly a year designing the email (E-mail) system. In the fall of 1971, using the SNDMSG software, he sent the first email in human history to another computer—marking the birth of the email system on the internet!
To send emails to others over the internet, the recipient's email address must be unique. Otherwise, emails might be delivered to multiple users with identical names, or no one would receive the message at all.Therefore, Dr. Ray Tomlinson decided to standardize email addresses using the format "name@computer hostname." The choice of the @ symbol as the separator was quite simple: Dr. Tomlinson reasoned that neither human names nor computer hostnames would likely contain an @ symbol, making it an ideal choice.
Email systems rely on mail protocols to transmit messages. Common mail protocols include the following:
Simple Mail Transfer Protocol (SMTP): Used for sending and relaying emails; uses TCP port 25 on the server.
Post Office Protocol Version 3 (POP3): Used to download and store emails on the local host; uses TCP port 110 on the server.
Internet Message Access Protocol Version 4 (IMAP4): Used to access and manage email messages stored on the mail server while keeping them on the server; uses TCP port 143 on the server.
In email systems, the client program that users run to compose, send, and read messages is called the Mail User Agent (MUA). Examples include Outlook, Thunderbird, or command-line tools such as s-nail. Additionally, because email systems allow users to receive data offline, there must be a “mailbox” component on the server to store user messages. This server-side program is called the Mail Delivery Agent (MDA), whose role is to save messages received from the Mail Transfer Agent (MTA) into the local inbox. The MTA’s role is to relay messages between different mail service providers, forwarding messages from MUAs to the appropriate MTA servers. For example, when sending an email from Sina Mail to Gmail, the transmission process is illustrated in Figure 15-1.

Figure 15-1 Email Transmission Process
Generally, standard network services operate like phone calls during data transfer, requiring both parties to remain online simultaneously. In contrast, email systems allow users to disconnect immediately after sending a message without waiting for delivery completion.If the recipient's mail server is down or temporarily offline, the sending server (MTA) automatically stores the message locally. It will attempt delivery again immediately upon detecting the recipient's server is back online, without requiring any intervention from operations personnel. The recipient (MUA) can then find the message in their inbox.
When deploying enterprise-grade email systems in production environments, prioritize the following 10 critical considerations:
Add Anti-Spam and Anti-Virus Modules: Integrate anti-spam and anti-virus protection modules to effectively block spam and virus-infected emails from compromising corporate mailboxes.
Encrypt Email: Utilize encryption protocols such as SSL/TLS to secure email content during transmission and while stored, preventing data theft or tampering by hackers.
Implement Email Monitoring and Auditing: Deploy monitoring and auditing modules to conduct real-time content screening, accurately identifying violations such as sensitive keywords or corporate data leaks.
Ensure System Stability: Maintaining stable email system operation is critical. Operations teams must establish comprehensive contingency plans to promptly counter DDoS attacks.
Backup and Recovery Mechanisms: Establish robust email server data backup protocols, performing full or incremental backups at fixed intervals to prevent data loss. Develop detailed, actionable disaster recovery plans.
User Authentication and Access Control: Implement strict user authentication policies requiring strong passwords with regular updates. Strengthen access controls through multi-factor authentication to prevent unauthorized access.
Logging and Monitoring: Enable detailed system operation logging to comprehensively record critical data such as email sending, receiving, and error messages. This provides thorough documentation for subsequent audits and troubleshooting.
Regular Updates and Security Patches: Regularly update email server software and promptly install officially released security patches. Ensure software remains at the latest version to effectively address known security vulnerabilities.
Prevent Email Abuse: To curb email abuse and spam proliferation, reasonably configure sending and receiving limits while strengthening monitoring of email behavior to prevent excessive system resource consumption.
Scalability and Load Balancing: When designing the email system architecture, fully consider system scalability. Utilize load balancing technology to achieve reasonable resource allocation, ensuring the system can scale smoothly as the number of users increases.
15.2 Deploying a Basic Email System
A fundamental email system must provide both sending and receiving capabilities. To achieve this, the SMTP-based Postfix service program is used for sending functionality, while the POP3-based Dovecot service program handles receiving. This enables users to send and receive emails normally using client programs like Outlook Express or Foxmail.The workflow of the email system is illustrated in Figure 15-2.
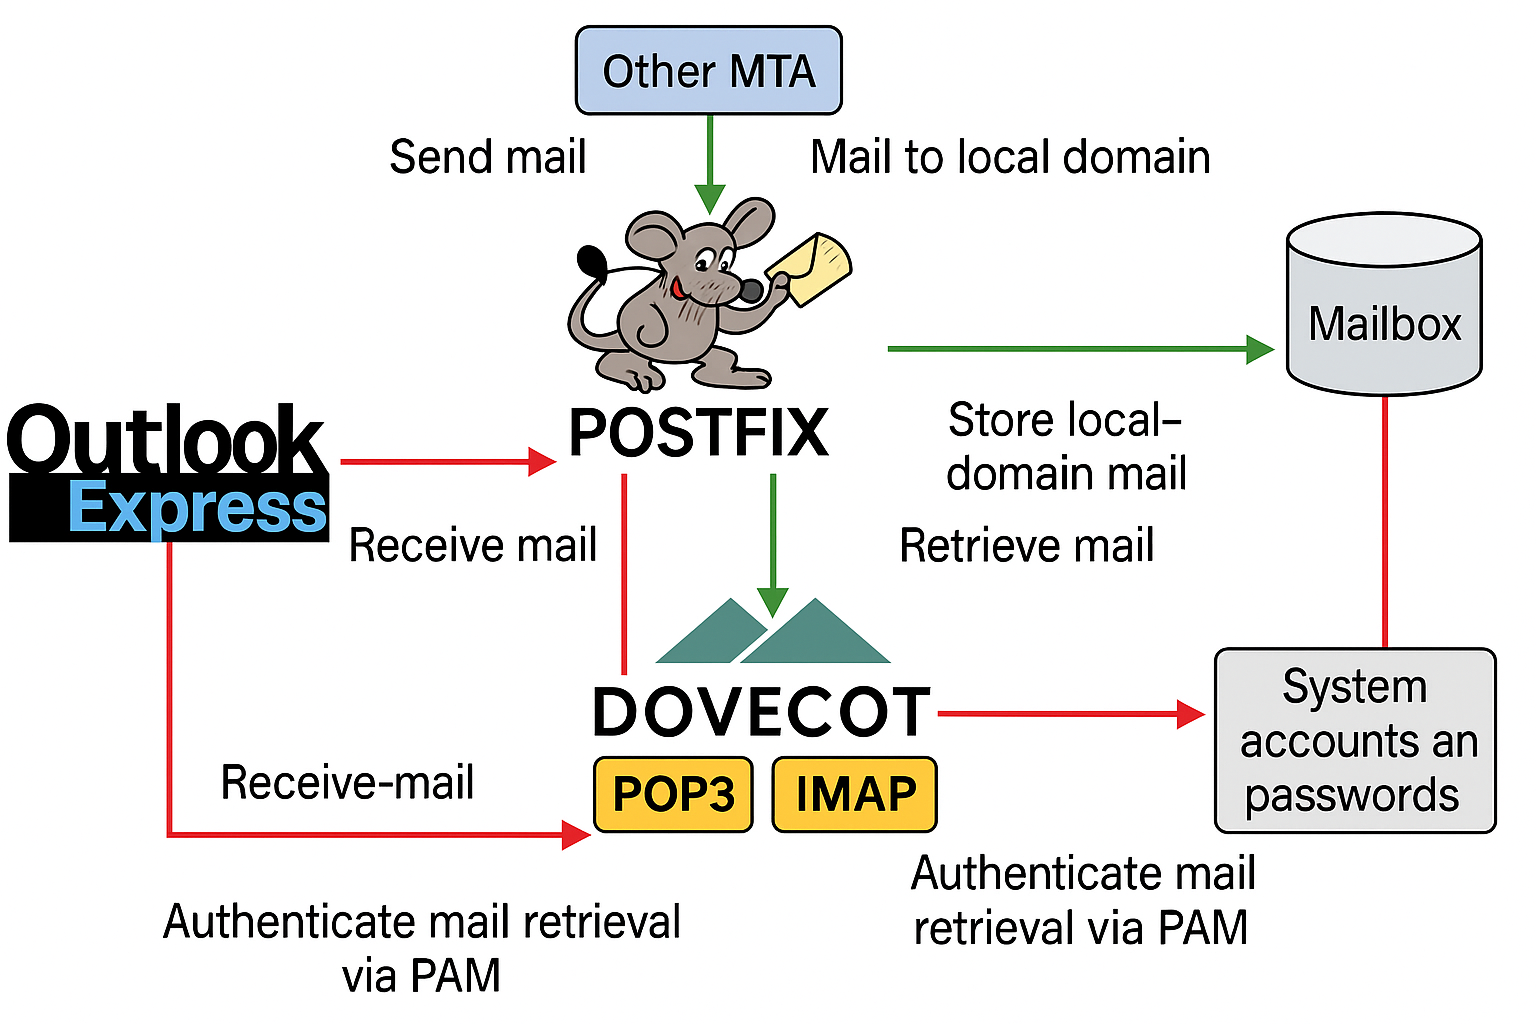
Figure 15-2 Email System Workflow
In many early Linux systems, the default outgoing mail service was provided by the Sendmail service. However, in RHEL 10, it has been replaced by the Postfix service. Compared to Sendmail, Postfix reduces many unnecessary configuration steps and offers significant improvements in stability and concurrency.
Generally, our mailbox addresses resemble root@linuxprobe.com, adhering to the format "username@host address (domain name)".If you provided me with a string like root@192.168.10.10, I might not recognize it as an email address and could even mistake it for SSH connection information. Therefore, to better verify the configuration of the email system, we first need to deploy the bind service program to provide DNS domain name resolution services for the email server and clients.
Step 1: Configure the server hostname to ensure it matches the sending domain name.
root@linuxprobe:~# vim /etc/hostname
mail.linuxprobe.com
root@linuxprobe:~# hostname
mail.linuxprobe.com
Tips:
If the hostname change doesn't take effect immediately after editing the file, restart the server. Alternatively, execute the commandhostnamectl set-hostname mail.linuxprobe.comto apply the new hostname instantly.
Step 2: Add the DNS protocol to the firewalld firewall's allow list to permit client traffic for domain name resolution.
root@linuxprobe:~# firewall-cmd --permanent --add-service=dns
success
root@linuxprobe:~# firewall-cmd --reload
success
Step 3: Provide domain name resolution for the email system. Since Chapter 13 covered configuring the bind-chroot service, only the main configuration file, zone configuration file, and domain data file settings are provided here. Complete the remaining configuration steps independently.
 root@linuxprobe:~# dnf install bind-chroot
 root@linuxprobe:~# cat /etc/named.conf
  1 //
  2 // named.conf
  3 //
  4 // Provided by Red Hat bind package to configure the ISC BIND named(8) DNS
  5 // server as a caching only nameserver (as a localhost DNS resolver only).
  6 //
  7 // See /usr/share/doc/bind*/sample/ for example named configuration files.
  8 //
  9
 10 options {
 11         listen-on port 53 { any; };
 12         listen-on-v6 port 53 { ::1; };
 13         directory       "/var/named";
 14         dump-file       "/var/named/data/cache_dump.db";
 15         statistics-file "/var/named/data/named_stats.txt";
 16         memstatistics-file "/var/named/data/named_mem_stats.txt";
 17         secroots-file   "/var/named/data/named.secroots";
 18         recursing-file  "/var/named/data/named.recursing";
 19         allow-query     { any; };
 20
[... output omitted ...]
root@linuxprobe:~# cat /etc/named.rfc1912.zones
zone "linuxprobe.com" IN {
        type master;
        file "linuxprobe.com.zone";
        allow-update {none;};
};
When copying the forward resolution template file, it is recommended to append the -a parameter after the cp command to ensure the new file inherits the original file's attributes and permissions.
root@linuxprobe:~# cp -a /var/named/named.localhost /var/named/linuxprobe.com.zone
root@linuxprobe:~# cat /var/named/linuxprobe.com.zone
| $TTL 1D | ||||
|---|---|---|---|---|
| @ | IN SOA | linuxprobe.com. | root.linuxprobe.com. | ( |
| 0;serial | ||||
| 1D;refresh | ||||
| 1H;retry | ||||
| 1W;expire | ||||
| 3H);minimum | ||||
| NS | ns.linuxprobe.com. | |||
| ns | IN A | 192.168.10.10 | ||
| @ | IN MX 10 | mail.linuxprobe.com. | ||
| IN A | 192.168.10.10 |
root@linuxprobe:~# systemctl restart named
root@linuxprobe:~# systemctl enable  named
Created symlink '/etc/systemd/system/multi-user.target.wants/named.service' → '/usr/lib/systemd/system/named.service'.
After modifying the configuration file, remember to restart the BIND service. This ensures that the mail server hostname resolves correctly as mail.linuxprobe.com and that mailbox addresses using @linuxprobe.com can be resolved by DNS. Change the server's DNS address to its local IP address, as shown in Figure 15-3.
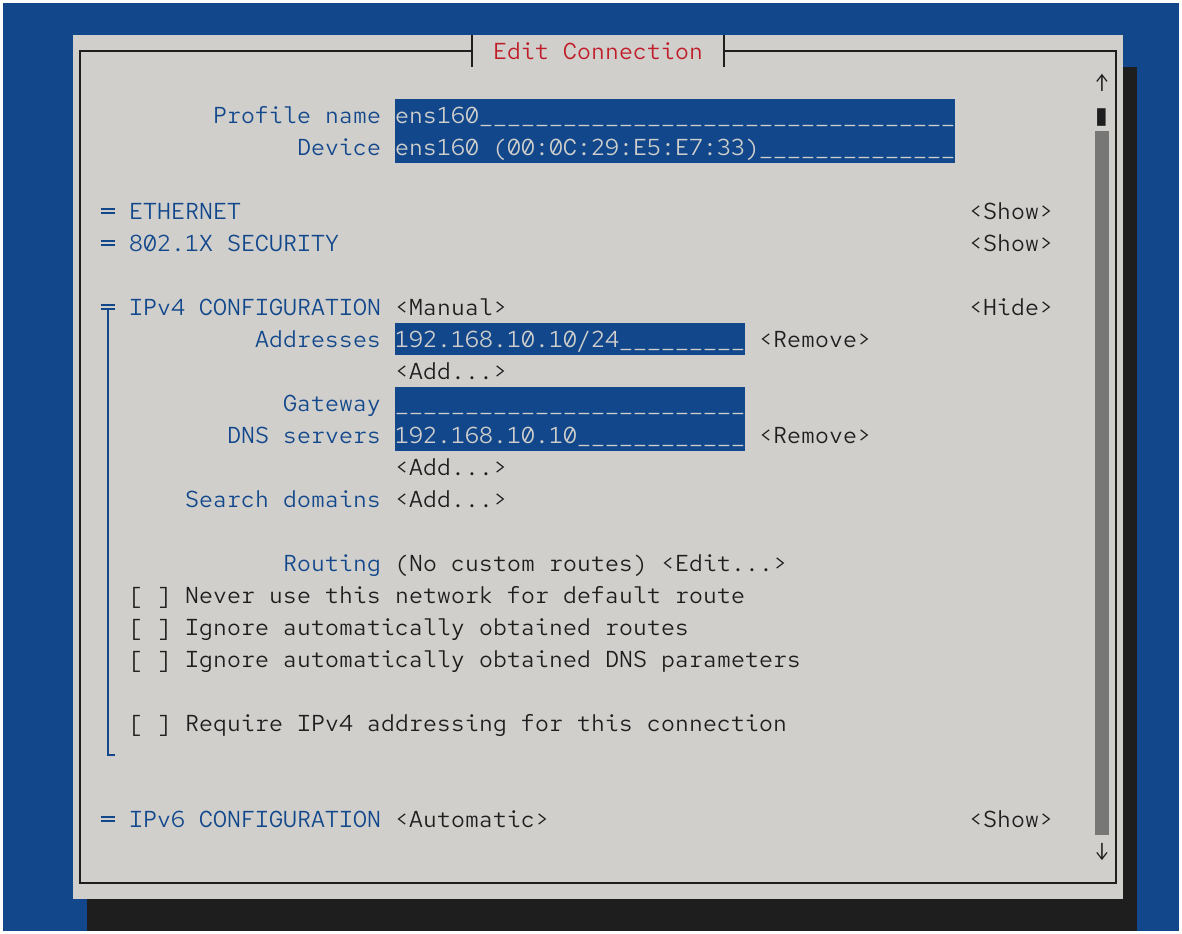
Figure 15-3 Configuring the Server's DNS Address
Apply the newly configured network interface settings immediately:
root@linuxprobe:~# nmcli connection up ens160
Connection successfully activated (D-Bus active path: /org/freedesktop/NetworkManager/ActiveConnection/3)
Finally, execute the ping command on the hostname. If ping succeeds, it confirms all previous operations were correct. Note that during the ping operation, you will also obtain the IP address corresponding to the hostname, further validating the correctness of the preceding steps.
root@linuxprobe:~# ping -c 4  mail.linuxprobe.com
PING mail.linuxprobe.com (192.168.10.10) 56(84) bytes of data.
64 bytes from mail.linuxprobe.com (192.168.10.10): icmp_seq=1 ttl=64 time=0.040 ms
64 bytes from mail.linuxprobe.com (192.168.10.10): icmp_seq=2 ttl=64 time=0.057 ms
64 bytes from mail.linuxprobe.com (192.168.10.10): icmp_seq=3 ttl=64 time=0.037 ms
64 bytes from mail.linuxprobe.com (192.168.10.10): icmp_seq=4 ttl=64 time=0.052 ms

--- mail.linuxprobe.com ping statistics ---
4 packets transmitted, 4 received, 0% packet loss, time 45ms
rtt min/avg/max/mdev = 0.037/0.046/0.057/0.010 ms
15.2.1 Configuring the Postfix Service Program

Figure 15-4 Postfix Logo
Postfix is a free, open-source email server program developed with IBM funding (see its logo in Figure 15-4). It offers excellent compatibility with Sendmail, facilitating migration for Sendmail users.The Postfix service demonstrates superior email transmission capabilities compared to Sendmail and automatically adjusts process counts to ensure high performance and stability of the email system. Additionally, the Postfix service comprises numerous small modules, each performing specific functions, allowing flexible configuration in production environments based on requirements.
Step 1: Install the Postfix service.
root@linuxprobe:~# dnf install postfix
Updating Subscription Management repositories.
Last metadata expiration check: 0:08:54 ago on Mon 31 Mar 2025 09:36:17 AM CST.
Dependencies resolved.
====================================================================================
 Package              Architecture   Version                Repository         Size
====================================================================================
Installing:
 postfix              x86_64         2:3.8.5-7.el10         AppStream         1.5 M
Installing dependencies:
 postfix-lmdb         x86_64         2:3.8.5-7.el10         AppStream          28 k
[... output omitted ...]
Installed:
  postfix-2:3.8.5-7.el10.x86_64          postfix-lmdb-2:3.8.5-7.el10.x86_64

Complete!
Step 2: Configure the Postfix service program. If this is your first time seeing the main configuration file for the Postfix service program (/etc/postfix/main.cf), you might be intimidated by the content on line 749. Don't worry—most of it is still commented-out information. Throughout this book, the author emphasizes the correct approach to learning Linux systems, firmly believing that "a responsible teacher should not merely be a book carrier but a distiller of quality content." After thoroughly reviewing configuration parameter documentation and drawing on years of operations experience, he has distilled the seven most essential parameters to master, as shown in Table 15-1.
Table 15-1 Key Parameters in the Postfix Service Program's Main Configuration File
| Parameter | Function |
|---|---|
| myhostname | Hostname of the mail server system |
| mydomain | Domain name of the mail server system |
| myorigin | Domain name for outgoing mail from this host |
| inet_interfaces | Network interfaces to listen on |
| mydestination | Hostnames or domains allowed to receive mail |
| mynetworks | Client hosts that are allowed to relay mail through this server |
| relay_domains | Domains for which this server will relay mail to other servers |
In the main configuration file for the Postfix service, a total of 5 modifications are required. First, on line 99, define a variable named myhostname to store the server's hostname. Please remember this variable name, as subsequent parameters will reference it.
root@linuxprobe:~# vim /etc/postfix/main.cf
 91 # INTERNET HOST AND DOMAIN NAMES
 92 #
 93 # The myhostname parameter specifies the internet hostname of this
 94 # mail system. The default is to use the fully-qualified domain name
 95 # from gethostname(). $myhostname is used as a default value for many
 96 # other configuration parameters.
 97 #
 98 #myhostname = host.domain.tld
 99 myhostname = mail.linuxprobe.com
Then, on line 106, define a variable named mydomain to store the mail domain name. Remember this variable name, as it will be referenced later.
101 # The mydomain parameter specifies the local internet domain name.
102 # The default is to use $myhostname minus the first component.
103 # $mydomain is used as a default value for many other configuration
104 # parameters.
105 #
106 mydomain = linuxprobe.com
On line 122, the previously defined mydomain variable is referenced to specify the domain from which emails are sent. Using variables avoids redundant data entry and facilitates future unified modifications.
108 # SENDING MAIL
109 #
110 # The myorigin parameter specifies the domain that locally-posted
111 # mail appears to come from. The default is to append $myhostname,
112 # which is fine for small sites.  If you run a domain with multiple
113 # machines, you should (1) change this to $mydomain and (2) set up
114 # a domain-wide alias database that aliases each user to
115 # user@that.users.mailhost.
116 #
117 # For the sake of consistency between sender and recipient addresses,
118 # myorigin also specifies the default domain name that is appended
119 # to recipient addresses that have no @domain part.
120 #
121 #myorigin = $myhostname
122 myorigin = $mydomain
The fourth modification is on line 139, defining the network interface listening address. You can specify which IP addresses of the server will provide email services externally; alternatively, you can simply write all to indicate that all IP addresses can provide email services.
124 # RECEIVING MAIL
125
126 # The inet_interfaces parameter specifies the network interface
127 # addresses that this mail system receives mail on.  By default,
128 # the software claims all active interfaces on the machine. The
129 # parameter also controls delivery of mail to user@[ip.address].
130 #
131 # See also the proxy_interfaces parameter, for network addresses that
132 # are forwarded to us via a proxy or network address translator.
133 #
134 # Note: you need to stop/start Postfix when this parameter changes.
135 #
136 #inet_interfaces = all
137 #inet_interfaces = $myhostname
138 #inet_interfaces = $myhostname, localhost
139 inet_interfaces = all
The final modification defines the list of hostnames or domain names authorized to receive mail on line 187. Here, the previously defined variables myhostname and mydomain are directly referenced (alternatively, their values can be referenced directly if variables are not desired).
156 # The mydestination parameter specifies the list of domains that this
157 # machine considers itself the final destination for.
158 #
159 # These domains are routed to the delivery agent specified with the
160 # local_transport parameter setting. By default, that is the UNIX
161 # compatible delivery agent that lookups all recipients in /etc/passwd
162 # and /etc/aliases or their equivalent.
163 #
164 # The default is $myhostname + localhost.$mydomain + localhost.  On
165 # a mail domain gateway, you should also include $mydomain.
166 #
167 # Do not specify the names of virtual domains - those domains are
168 # specified elsewhere (see VIRTUAL_README).
169 #
170 # Do not specify the names of domains that this machine is backup MX
171 # host for. Specify those names via the relay_domains settings for
172 # the SMTP server, or use permit_mx_backup if you are lazy (see
173 # STANDARD_CONFIGURATION_README).
174 #
175 # The local machine is always the final destination for mail addressed
176 # to user@[the.net.work.address] of an interface that the mail system
177 # receives mail on (see the inet_interfaces parameter).
178 #
179 # Specify a list of host or domain names, /file/name or type:table
180 # patterns, separated by commas and/or whitespace. A /file/name
181 # pattern is replaced by its contents; a type:table is matched when
182 # a name matches a lookup key (the right-hand side is ignored).
183 # Continue long lines by starting the next line with whitespace.
184 #
185 # See also below, section "REJECTING MAIL FOR UNKNOWN LOCAL USERS".
186 #
187 mydestination = $myhostname, $mydomain
Step 3: Create login accounts for the email system. Like the vsftpd service, Postfix can access local system accounts and passwords, so creating regular accounts on the local system is sufficient. Finally, restart the properly configured Postfix service and add it to the system startup items. All done!
root@linuxprobe:~# useradd liuchuan
root@linuxprobe:~# echo "linuxprobe" | passwd --stdin liuchuan
root@linuxprobe:~# systemctl restart postfix
root@linuxprobe:~# systemctl enable  postfix
Created symlink '/etc/systemd/system/multi-user.target.wants/postfix.service' → '/usr/lib/systemd/system/postfix.service'.
15.2.2 Configuring the Dovecot Service

Figure 15-5 Dovecot Logo
Dovecot is an open-source service program that provides IMAP and POP3 email services for Linux systems (see its logo in Figure 15-5). It offers high security, simple configuration, fast execution, and minimal server hardware resource consumption, making it a highly recommended mail server program.
Step 1: Install the Dovecot service package.
root@linuxprobe:~# dnf install -y dovecot
Updating Subscription Management repositories.
Last metadata expiration check: 0:09:34 ago on Mon 31 Mar 2025 10:32:48 AM CST.
Dependencies resolved.
====================================================================================
 Package         Architecture   Version                     Repository         Size
====================================================================================
Installing:
 dovecot         x86_64         1:2.3.21-14.el10            AppStream         4.9 M
[... output omitted ...]
Installed:
  dovecot-1:2.3.21-14.el10.x86_64

Complete!
Step 2: Configure and deploy the Dovecot service. Make the following modifications in the main configuration file for the Dovecot service. First, on line 24, modify the email protocols supported by the Dovecot service to include imap, pop3, lmtp, and submission. The submission protocol is used for mail submission on port 587 and is typically combined with SMTP authentication, often via a submission service provided by the MTA (such as Postfix). Dovecot can also provide a submission proxy. In this simple lab environment, you can omit it if you are not using port 587.
Next, add a parameter below line 24 to allow users to authenticate with plaintext passwords. This is necessary because Dovecot enforces encrypted passwords by default for security reasons. Since no encryption system is currently in place, this parameter must be added to permit plaintext login.
root@linuxprobe:~# vim /etc/dovecot/dovecot.conf
 23 # Protocols we want to be serving.
 24 protocols = imap pop3 lmtp submission
 25 disable_plaintext_auth = no
On line 48 of the main configuration file, configure the login_trusted_networks option. This option lists client network ranges that Dovecot should treat as “trusted”. For connections coming from these networks, Dovecot relaxes certain checks (for example, it can ignore the disable_plaintext_auth setting and allows address/port overrides for logging). It does not, by itself, block access from other networks, so real access control over who can connect is still best enforced with firewall rules.
 43
 44 # Space separated list of trusted network ranges. Connections from these
 45 # IPs are allowed to override their IP addresses and ports (for logging and
 46 # for authentication checks). disable_plaintext_auth is also ignored for
 47 # these networks. Typically you'd specify your IMAP proxy servers here.
 48 login_trusted_networks = 192.168.10.0/24
 49
Step 3: Configure email format and storage path. In a separate sub-configuration file for the Dovecot service, define a path specifying where received mail should be stored locally on the server. This path is already defined by default; simply remove the hash symbol (#) preceding line 25 in this configuration file.
root@linuxprobe:~# vim /etc/dovecot/conf.d/10-mail.conf
  1 ##
  2 ## Mailbox locations and namespaces
  3 ##
  4
  5 # Location for users' mailboxes. The default is empty, which means that Dovecot
  6 # tries to find the mailboxes automatically. This won't work if the user
  7 # doesn't yet have any mail, so you should explicitly tell Dovecot the full
  8 # location.
  9 #
 10 # If you're using mbox, giving a path to the INBOX file (eg. /var/mail/%u)
 11 # isn't enough. You'll also need to tell Dovecot where the other mailboxes are
 12 # kept. This is called the "root mail directory", and it must be the first
 13 # path given in the mail_location setting.
 14 #
 15 # There are a few special variables you can use, eg.:
 16 #
 17 #   %u - username
 18 #   %n - user part in user@domain, same as %u if there's no domain
 19 #   %d - domain part in user@domain, empty if there's no domain
 20 #   %h - home directory
 21 #
 22 # See doc/wiki/Variables.txt for full list. Some examples:
 23 #
 24 #   mail_location = maildir:~/Maildir
 25     mail_location = mbox:~/mail:INBOX=/var/mail/%u
 26 #   mail_location = mbox:/var/mail/%d/%1n/%n:INDEX=/var/indexes/%d/%1n/%n
 27 #
[... output omitted ...]
Then switch to the liuchuan account created during Postfix configuration and create a directory in the home directory to store emails.Remember to restart the Dovecot service and add it to the system startup items. This completes all configuration and deployment steps for the Dovecot service.
root@linuxprobe:~# su - liuchuan
liuchuan@mail:~$ mkdir -p mail/.imap/INBOX
liuchuan@mail:~$ exit
logout
root@linuxprobe:~# systemctl restart dovecot
root@linuxprobe:~# systemctl enable  dovecot
Created symlink '/etc/systemd/system/multi-user.target.wants/dovecot.service' → '/usr/lib/systemd/system/dovecot.service'.
You're probably thinking something's missing. Yes, don't forget to allow the email protocols mentioned above in your firewall policy so clients can access them properly.
root@linuxprobe:~# firewall-cmd --permanent --add-service=imap
success
root@linuxprobe:~# firewall-cmd --permanent --add-service=pop3
success
root@linuxprobe:~# firewall-cmd --permanent --add-service=smtp
success
root@linuxprobe:~# firewall-cmd --reload
success
15.2.3 Client Email System Usage
How can we verify that the email system is now capable of sending and receiving emails? We will use the Outlook software included with the Windows operating system for testing (other email clients, such as Foxmail, can also be used). Please configure the email system, DNS servers, and client IP addresses according to Table 15-2 to ensure proper resolution of email domain names. The configuration results are shown in Figure 15-6.
Table 15-2 Server and Client Operating Systems and IP Addresses
| Hostname | Operating System | IP Address |
|---|---|---|
| Email System and DNS Server | RHEL 10 | 192.168.10.10 |
| Client | Windows 11 | 192.168.10.30 |
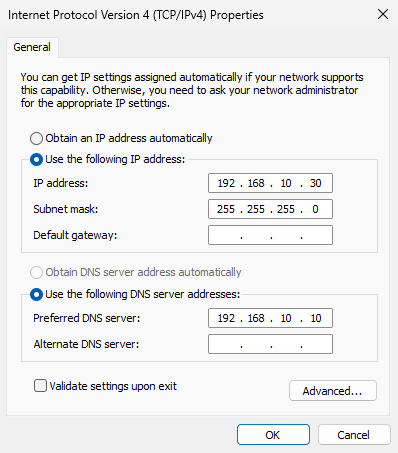
Figure 15-6 Configuring Network Parameters for Windows 11
Step 1: Run the Outlook software on the Windows 11 system. Since readers may be using different versions of Windows 11, this book uses Outlook 2013 as the experimental environment. To replicate the setup described here, download and install Outlook 2013 from the book's companion website.Upon first launch, the "Welcome to Microsoft Outlook 2013" interface appears, guiding you through the configuration process, as shown in Figure 15-7.
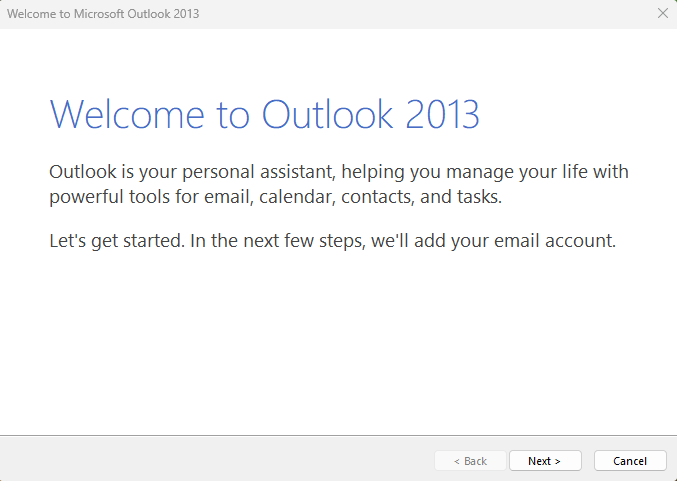
Figure 15-7 Outlook 2013 Startup Wizard
Step 2: Configure your email account. In the account configuration interface shown in Figure 15-8, click the "Yes" radio button, then click the "Next" button.
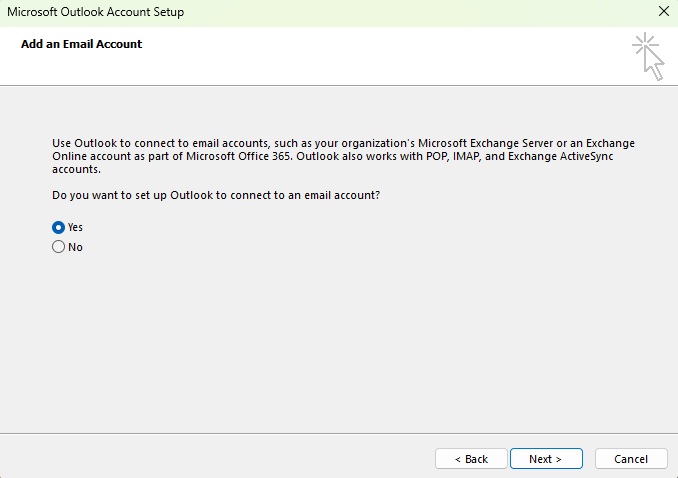
Figure 15-8 Configuring Email Account
Step 3: Enter email account information. In the interface shown in Figure 15-9, enter your name (can be any custom name) in the "Your Name" text box, enter the account name and sending domain within the server system in the "Email Address" text box, and enter the login password for this account on the server in the "Password" text box. After completing the entries, click the "Next" button.
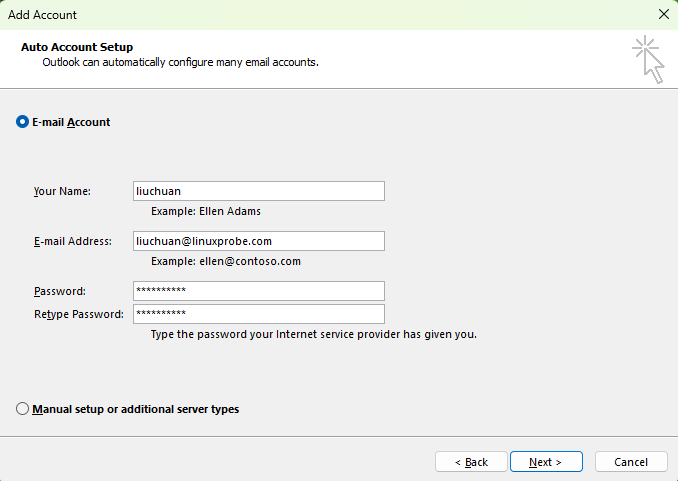
Figure 15-9 Filling in Email Account Information
Step 4: Perform email service login verification. Since no SSL encryption service is currently available, a parameter has been added to the main configuration file of the Dovecot service program, allowing users to log in to the email service using unencrypted plaintext passwords.By default, Outlook attempts to log in to the email service via SSL encryption. Therefore, after approximately 30–60 seconds of the "Searching for liuchuan@linuxprobe.com settings" process shown in Figure 15-10, the system will display a login failure error message.At this point, simply click the "Next" button again to have Outlook verify the login using an unencrypted method, as shown in Figure 15-11. The final successful configuration interface is shown in Figure 15-12. Click the "Finish" button, and you're all set!
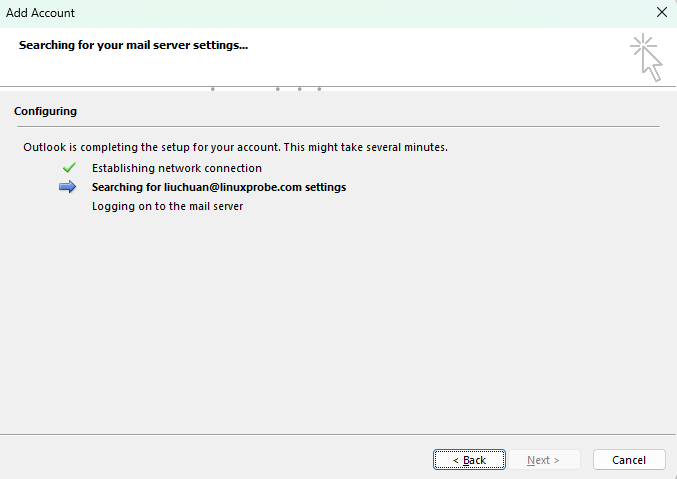
Figure 15-10 Performing Email Service Login Verification
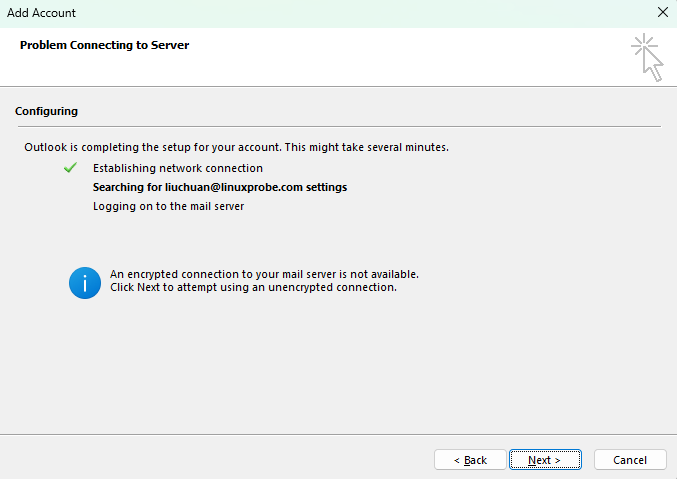
Figure 15-11 Email service login verification using non-encrypted method
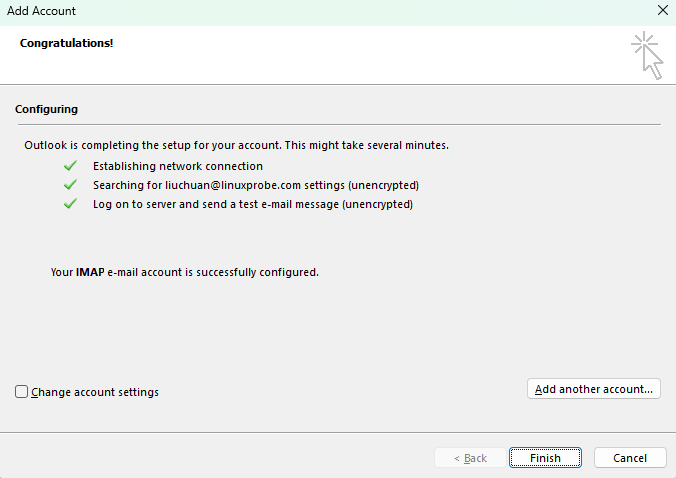
Figure 15-12 Account configuration successful using non-encrypted method
Step 5: Send an email to another mailbox.After successfully logging into Outlook, you can attempt to compose and send a new email. Simply right-click in the blank area of the software interface, select the "New Email" option from the pop-up menu (see Figure 15-13), then fill in the recipient's email address and complete message content in the email interface before clicking the "Send" button, as shown in Figure 15-14.
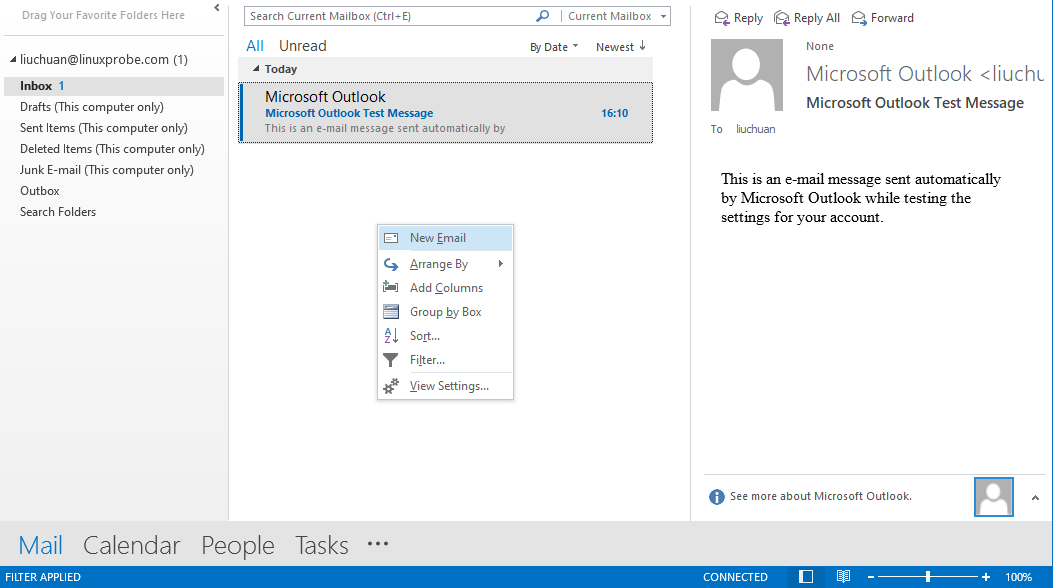
Figure 15-13 Sending an email to another mailbox
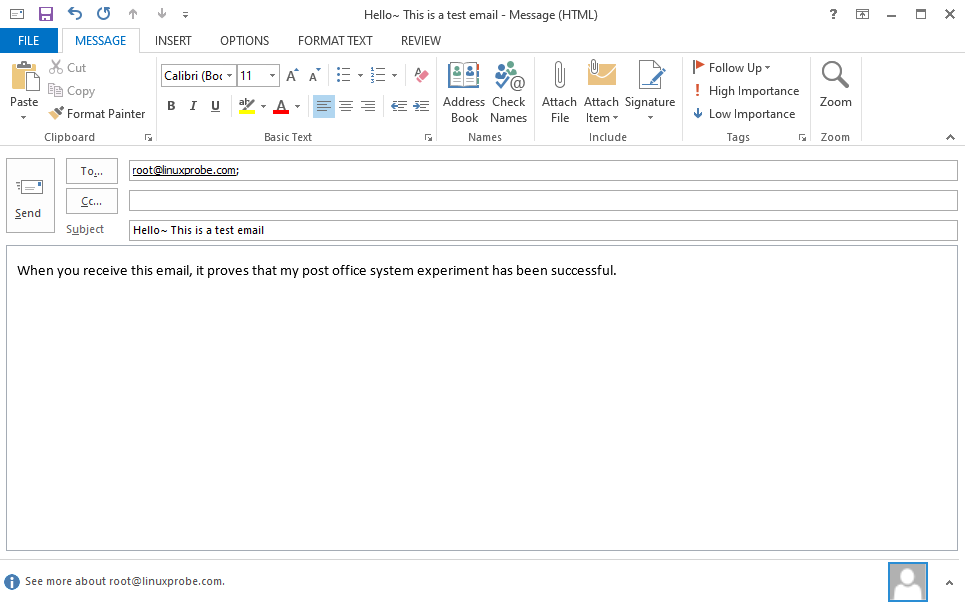
Figure 15-14 Entering the recipient's email address and composing the full message content
After successfully sending an email using Outlook, you can view the new message notification on the email server. On RHEL 10 systems, the command to check emails is s-nail, which requires manual installation (output details omitted). To view the full email content, simply enter the number preceding the recipient's name.
root@linuxprobe:~# dnf install s-nail
root@linuxprobe:~# s-nail
s-nail version v14.9.24.  Type `?' for help
/var/spool/mail/root: 1 message 1 new
▸N  1 liuchuan              2025-03-31 11:11   98/3307  "Hello ~ This is a test email"
& 1
[-- Message  1 -- 98 lines, 3307 bytes --]:
From: "liuchuan" <liuchuan@linuxprobe.com>
To: <root@linuxprobe.com>
Subject: Hello ~ This is a test email
Date: Mon, 31 Mar 2025 11:11:43 +0800
Message-ID: <000001dba1ea$a11f8be0$e35ea3a0$@linuxprobe.com>

[-- #1.1 6/152 text/plain, base64, gb2312 --]

When you receive this email, it confirms that my mail server system experiment has succeeded.

[-- #1.2 66/2194 text/html, quoted-printable, gb2312 --]
& quit
Held 1 message in /var/spool/mail/root
You have mail in /var/spool/mail/root
root@linuxprobe:~#
15.3 Setting Up User Alias Mailboxes
User alias functionality is a simple yet practical email account masking technique. It allows setting up multiple virtual mailbox accounts to receive incoming mail, thereby protecting your actual email address from disclosure. It can also be used to consolidate mail from multiple personal accounts. Having successfully sent mail to the root account earlier, we will now send an email to the bin account, as shown in Figure 15-15.

Figure 15-15: Sending an email to the bin account on the server
After sending the email, log in to the server and attempt to log in as the bin account. Since the bin account is a system account in Linux, its default shell is /sbin/nologin. Consequently, attempting to log in as bin will result in a prompt stating the account is unavailable.However, after running the s-nail command on the email server, you observe that the email intended for the bin account has been delivered to the root account's mailbox instead.
root@linuxprobe:~# su - bin
This account is currently not available.
root@linuxprobe:~# s-nail
s-nail version v14.9.24.  Type `?' for help
/var/spool/mail/root: 2 messages 1 new
    1 liuchuan              2025-03-31 11:11   99/3318  "Hello ~ This is a test email  "
▸N  2 liuchuan              2025-03-31 11:15   98/3262  "Hello, user bin.           "
& 2
[-- Message  2 -- 98 lines, 3262 bytes --]:
From: "liuchuan" <liuchuan@linuxprobe.com>
To: <bin@linuxprobe.com>
Subject: Hello, user bin.
Date: Mon, 31 Mar 2025 11:15:50 +0800
Message-ID: <000501dba1eb$342925e0$9c7b71a0$@linuxprobe.com>

[-- #1.1 6/124 text/plain, base64, gb2312 --]

This is an email addressed to user bin.

[-- #1.2 66/2193 text/html, quoted-printable, gb2312 --]
& quit
Held 2 messages in /var/spool/mail/root
You have mail in /var/spool/mail/root
root@linuxprobe:~#
How strange! Why did the email sent to the bin account end up in the root account's inbox?This is actually achieved using user alias technology. In the aliases mail alias service configuration file, you can see numerous user aliases defined. Most of these aliases correspond to local system accounts on the Linux system, while the root account following the colon (:) separator is designated to receive mail for these accounts. User aliases can be local users within the Linux system or entirely fictitious usernames.
Tips:
The following command displays extensive content. Due to space constraints, partial omissions have been made here. The actual output list will be more than twice as long.
root@linuxprobe:~# cat /etc/aliases
#
#  Aliases in this file will NOT be expanded in the header from
#  Mail, but WILL be visible over networks or from /bin/mail.
#
#	>>>>>>>>>>	The program "newaliases" must be run after
#	>> NOTE >>	this file is updated for any changes to
#	>>>>>>>>>>	show through to sendmail.
#

# Basic system aliases -- these MUST be present.
mailer-daemon:	postmaster
postmaster:	root

# General redirections for pseudo accounts.
bin:		root
daemon:		root
adm:		root
lp:			root
sync:		root
shutdown:	root
halt:		root
mail:		root
[... output omitted ...]
Now you can probably guess what's going on. The aliases configuration file specifically defines mappings between user aliases and mail recipients. Besides using aliases for system accounts on the local system, we can also define custom aliases to receive mail. For example, create an account named winston, where the root account should actually receive its mail.
root@linuxprobe:~# cat /etc/aliases
#
#  Aliases in this file will NOT be expanded in the header from
#  Mail, but WILL be visible over networks or from /bin/mail.
#
#       >>>>>>>>>>      The program "newaliases" must be run after
#       >> NOTE >>      this file is updated for any changes to
#       >>>>>>>>>>      show through to sendmail.
#

# Basic system aliases -- these MUST be present.
mailer-daemon:  postmaster
postmaster:     root

# General redirections for pseudo accounts.
winston:        root
bin:            root
daemon:         root
adm:            root
lp:             root
sync:           root
shutdown:       root
halt:           root
mail:           root
[... output omitted ...]
After saving and exiting the aliases configuration file, execute the newaliases command to immediately activate the new user alias settings. Then attempt sending an email again, as shown in Figure 15-16.
root@linuxprobe:~# newaliases
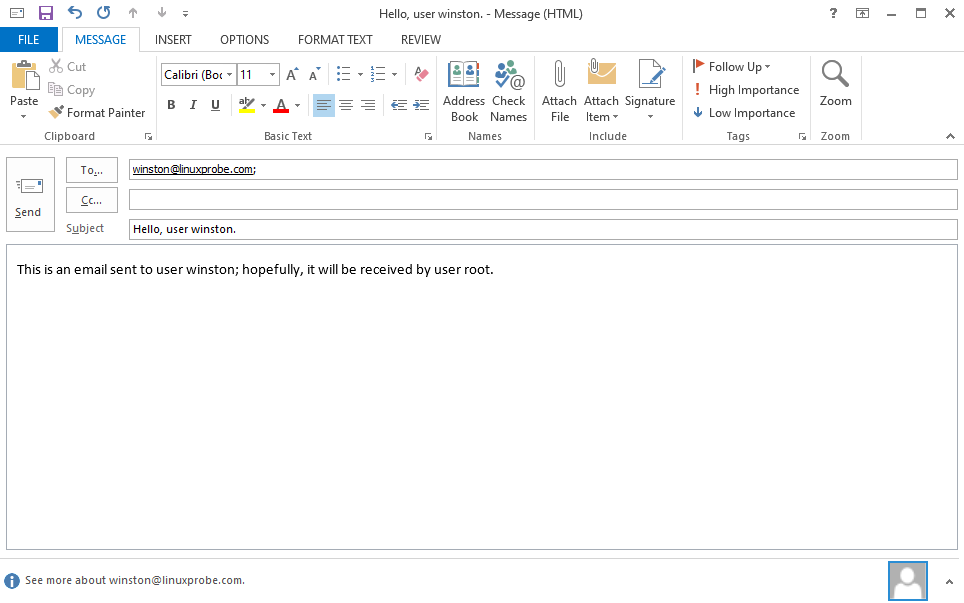
Figure 15-16: Sending an email to the winston user on the server
Now, when executing the s-nail command on the server using the root account, you can see this email intended for the winston account. Finally, a word of caution: user aliasing is not only widely used but also simple to configure. So remember—never blindly trust websites listing numerous customer service email addresses. Emails sent to these addresses might end up in the same person's inbox.
root@linuxprobe:~# s-nail
s-nail version v14.9.24.  Type `?' for help
/var/spool/mail/root: 3 messages 1 new
    1 liuchuan              2025-03-31 11:11   99/3318  "Hello ~ This is a test email  "
    2 liuchuan              2025-03-31 11:15   99/3273  "Hello, user bin.           "
▸N  3 liuchuan              2025-03-31 11:20  103/3597  "Hello, user winston.       "
& 3
[-- Message 3 -- 103 lines, 3597 bytes --]:
From: "liuchuan" <liuchuan@linuxprobe.com>
To: <winston@linuxprobe.com>
Subject: Hello, user winston.
Date: Mon, 31 Mar 2025 11:20:55 +0800
Message-ID: <000a01dba1eb$e9e30f40$bda92dc0$@linuxprobe.com>

[-- #1.1 7/169 text/plain, base64, gb2312 --]

This is an email for user winston;

If all goes well, it will be received by the root user.

[-- #1.2 70/2459 text/html, quoted-printable, gb2312 --]
& quit
Held 3 messages in /var/spool/mail/root
You have mail in /var/spool/mail/root
Review Questions
- What is the primary difference between email service and the service models of programs like HTTP, FTP, or NFS?
Answer: Email service can still send data even when the recipient host is down or temporarily offline.
- What are the common email protocols?
Answer: SMTP, POP3, and IMAP4.
- What are the respective roles of MUA, MTA, and MDA in an email system?
Answer: The MUA is the client program users run to send and read emails; the MTA forwards and relays messages between mail servers; and the MDA stores messages in the user's mailbox on the server.
- What must be done before deploying an email system using Postfix and Dovecot?
Answer: You must first configure and deploy a DNS domain name resolution service to provide mailbox address resolution functionality.
- Can the Dovecot service program restrict the range of allowed connecting hosts?
Answer: In practice you should restrict which hosts are allowed to connect by using firewall rules on the mail server (for example, with firewalld). Dovecot’s login_trusted_networks option only tells Dovecot which client networks to treat as “trusted” (for logging and plaintext authentication purposes); it does not, by itself, block connections from other networks.
- When connecting to the mail server mail.linuxprobe.com using Outlook, I receive a "Server not found" or "Connection timed out" error. What could be causing this?
Answer: This is likely caused by DNS resolution issues leading to connection timeouts. Test whether the IP address resolves correctly by executing the ping mail.linuxprobe.com command on both the server and client.
- How can I define a user alias mailbox and make it effective immediately?
Answer: Directly modify the mail alias service configuration file. After saving and exiting, execute the newaliases command to activate the new user aliases immediately.