Chapter 08 · Using Firewalld Firewall for Network Security
Chapter Overview
Ensuring data security is the most critical task following data availability. As a protective barrier between public and internal networks, firewalls play an indispensable role in safeguarding data integrity.
This chapter will utilize both the firewall-cmd and firewall-config tools to complete dozens of firewall policy configuration experiments designed based on real-world operational requirements. After completing these experiments, readers will not only be proficient in filtering incoming traffic and allowing/denying traffic based on service program names, but also be able to effortlessly monitor system status using Cockpit, ensuring the network security of Linux systems is foolproof.
8.1 Firewall Management Tools
It is widely recognized that the external public network environment is far more hostile and rife with threats compared to corporate intranets. Firewalls (see Figure 8-1), acting as protective barriers between the public network and corporate intranets, may be software or hardware-based but primarily function to filter traffic traversing the firewall itself based on predefined policies. Much like installing a security door at home to protect loved ones and property, firewall policies can be customized based on traffic attributes such as source/destination addresses, port numbers, protocols, and applications. The firewall then monitors incoming and outgoing traffic against these predefined policy rules. If traffic matches a rule, the corresponding action is executed; if it fails to match any rule, the firewall typically discards it. This ensures only legitimate traffic flows between the corporate internal network and the external public network.
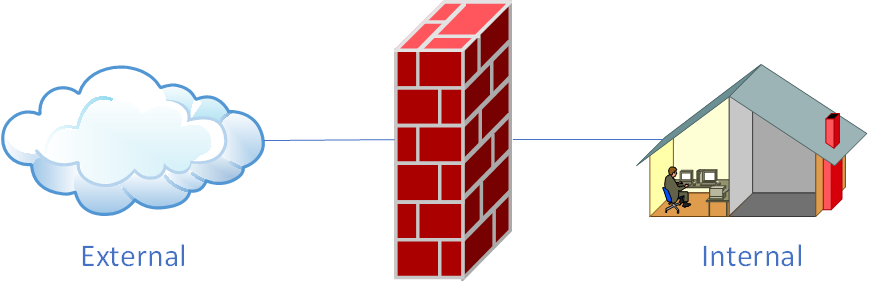
Figure 8-1 Firewall as a protective barrier between the public network and internal network
Starting with the RHEL 10 system, the firewalld firewall officially replaced the iptables firewall. Readers who encountered Linux earlier or studied RHEL systems may feel resistant when discovering their iptables knowledge is no longer applicable and they must learn firewalld from scratch. In reality, neither iptables nor firewalld are actual firewalls; they are merely firewall management tools used to define firewall policies—or, put simply, they are services.The iptables service delegates configured firewall policies to the kernel-level netfilter network filter for processing, while the firewalld service delegates configured firewall policies to the kernel-level nftables packet filtering framework for processing. In other words, multiple firewall management tools currently exist within Linux systems, designed to facilitate flexible management of firewall policies for system administrators. It is sufficient to master configuration of just one of these tools.
While these tools have their respective strengths and weaknesses, they share a consistent approach to firewall policy configuration. You don't even need to master all the content covered in this chapter. Simply choose one of these firewall management tools and learn it thoroughly—that alone will suffice for daily operational needs.
8.2 Iptables
In early Linux systems, the iptables firewall management service was the default for firewall configuration. Although the newer firewalld service has been in use for years, many enterprises continue to rely on iptables in production environments for various reasons. Given iptables' enduring presence in current production environments and to ensure you can confidently answer iptables-related questions during job interviews, Instructor Liu Chuan believes it's essential to thoroughly cover this technology in this book. Moreover, as mentioned earlier, the configuration principles for various firewall management tools are consistent. Mastering iptables configuration provides valuable insights and reference points for learning other firewall management tools.
The iptables firewall reads policy rules in a top-down order. Upon finding a match, it immediately terminates the matching process and executes the defined action (permit or deny, also termed "allow or block"). If no match is found after reading all policy rules, the default policy is enforced.Typically, firewall policy rules have two settings: allow (permit) and deny (block). When the firewall's default policy is deny (block), you must set allow rules (permit); otherwise, no one can enter. If the firewall's default policy is allow (permit), you must set deny rules (block); otherwise, anyone can enter, and the firewall loses its protective function.
The iptables service refers to policy entries used for processing or filtering traffic as rules. Multiple rules can form a rule chain, which is categorized based on the packet processing location as follows:
Processing packets before routing decisions (PREROUTING);
Handling incoming packets (INPUT);
Managing outgoing packets (OUTPUT);
Handling forwarded packets (FORWARD);
Processing packets after routing decisions (POSTROUTING).
Generally, traffic sent from the internal network to the external network is controllable and benign. Therefore, the most frequently used is the INPUT rule chain, which increases the difficulty for hackers to infiltrate the internal network from the external network.
For example, consider two rules enforced by your residential community's management: - No street vendors allowed within the community; - All vehicles must register upon entering the community.Clearly, these rules should apply at the main gate (a mandatory entry point for traffic), not at every household's security door. Based on the previously mentioned firewall policy matching order, multiple scenarios may arise. For instance, if a visitor is a street vendor, they would be directly denied entry by the security guard, eliminating the need for vehicle registration.If a visitor enters the main gate by car, the first rule ("Prohibit small vendors from entering the community") will not match. Consequently, the second rule will be matched sequentially, requiring vehicle registration. If a resident enters the main gate, neither rule will match, triggering the default allow policy.
However, policy rules alone cannot guarantee community security. Security personnel must also know which actions to take for matched traffic—such as "allow," "reject," "register," or "ignore." These actions correspond to iptables terminology: ACCEPT (allow traffic), REJECT (deny traffic), LOG (log information), and DROP (discard traffic)."Allow traffic through" and "log information" are relatively straightforward. The key distinction here lies between REJECT and DROP. DROP discards traffic outright without any response. REJECT, however, sends a "message received but discarded" response after rejecting the traffic, clearly indicating to the sender that their data was denied.
Consider this example to illustrate the distinction between these two rejection actions:Imagine you're watching TV at home when someone knocks on the door. Peering through the peephole, you see a salesperson. You open the door to decline their offer (REJECT). But if you spot a debt collector accompanied by a dozen henchmen demanding payment, you not only refuse entry but also remain silent, pretending no one is home (DROP).
When the firewall policy in a Linux system is set to the REJECT action, the traffic sender will receive an immediate ICMP error (such as "Destination Host Unreachable" or "Port Unreachable"), rather than just waiting for timeouts:
root@linuxprobe:~# ping -c 4 192.168.10.10
PING 192.168.10.10 (192.168.10.10) 56(84) bytes of data.
From 192.168.10.10 icmp_seq=1 Destination Host Unreachable
From 192.168.10.10 icmp_seq=2 Destination Host Unreachable
From 192.168.10.10 icmp_seq=3 Destination Host Unreachable
From 192.168.10.10 icmp_seq=4 Destination Host Unreachable

--- 192.168.10.10 ping statistics ---
4 packets transmitted, 0 received, +4 errors, 100% packet loss, time 3099ms
pipe 4
After modifying the Linux firewall policy to DROP action, the traffic sender will see a "response timeout" alert.However, the sender cannot determine whether the traffic was rejected or if the destination host is currently offline:
root@linuxprobe:~# ping -c 4 192.168.10.10
PING 192.168.10.10 (192.168.10.10) 56(84) bytes of data.

--- 192.168.10.10 ping statistics ---
4 packets transmitted, 0 received, 100% packet loss, time 3000ms
According to the OSI seven-layer model, iptables operates at layers two, three, and four. It can match traffic based on source address, destination address, transport protocol, service type, and other information. Upon a successful match, iptables processes the traffic according to the actions defined in the policy rules.Additionally, it is important to note that firewall policy rules are evaluated in a top-down order. Therefore, stricter and higher-priority rules should be placed earlier to avoid conflicts. Table 8-1 summarizes the commonly used parameters and their functions for iptables commands. Again, there is no need to memorize these parameters; simply refer back to this table when needed.
Since this book is based on the Red Hat RHEL 10 system, which no longer supports the iptables firewall management tool, you can use older versions of RHEL for hands-on practice with iptables commands.
Table 8-1 Common Parameters and Functions of iptables Commands
| Parameter | Function |
|---|---|
| -P | Set the default policy |
| -F | Flush the rule chain |
| -L | List the rule chain |
| -A | Append a new rule to the end of the chain |
| -I num | Insert a new rule at the beginning of the chain |
| -D num | Delete the specified rule |
| -s | Match the source address (IP/MASK). Prefixing with an exclamation mark (!) excludes that IP |
| -d | Match the destination address |
| -i interface_name | Matches data flowing into the specified interface |
| -o interface_name | Matches data flowing out of the specified interface |
| -p | Matches protocol, e.g., TCP, UDP, ICMP |
| --dport num | Matches destination port number |
| --sport num | Matches source port number |
8.3 firewalld
The default firewall management tool in RHEL 10 is firewalld, which offers both CLI (Command Line Interface) and GUI (Graphical User Interface) management options.
Compared to traditional firewall configuration tools, firewalld supports dynamic updates and incorporates the concept of zones. Simply put, zones are predefined sets of firewall policy templates. Users can select appropriate policy sets based on different operational scenarios, enabling rapid switching between firewall policies. For example, consider a laptop used daily in an office, a coffee shop, and at home. Typically, security levels for these locations rank from highest to lowest: home, office, and coffee shop. We now want to configure the following firewall rules for this laptop: allow all services at home; permit only file sharing in the office; and restrict access to web browsing at the coffee shop.Previously, we had to manually configure firewall policy rules frequently. Now, we only need to predefine zone sets and switch them automatically with a simple mouse click, significantly improving the efficiency of applying firewall policies. Common zone names in firewalld (default: public) and their corresponding policy rules are shown in Table 8-2.
Table 8-2 Common Zone Names and Policy Rules in firewalld
| Zone | Default Policy |
|---|---|
| trusted | Allows all packets |
| home | Denies incoming traffic unless associated with outgoing traffic; allows traffic related to ssh, mdns, ipp-client, samba-client, or dhcpv6-client services |
| internal | Equivalent to home zone |
| work | Deny inbound traffic unless associated with outbound traffic; allow traffic if related to ssh, ipp-client, dhcpv6-client services |
| public | Deny inbound traffic unless associated with outbound traffic; allow traffic if related to ssh, dhcpv6-client services |
| external | Deny incoming traffic unless related to outbound traffic; allow traffic if related to ssh service |
| dmz | Deny incoming traffic unless related to outbound traffic; allow traffic if related to ssh service |
| block | Deny incoming traffic unless related to outbound traffic |
| drop | Deny incoming traffic unless related to outbound traffic |
8.3.1 Terminal Management Tools
Chapter 2 mentioned that the command-line terminal is an extremely efficient way to work. firewall-cmd is the CLI (command-line interface) version of the firewalld firewall configuration management tool. Its parameters are typically provided in "long format." Don't let the term "long format" intimidate you, because RHEL 10 supports parameter completion for certain commands, including this one (pretty cool, right?). This means that in addition to using the Tab key for auto-completing commands or filenames, you can now use it to complete the long-format parameters shown in Table 8-3. Awesome!
Table 8-3 Parameters used in the firewall-cmd command and their functions
| Parameter | Function |
|---|---|
| --get-zones | Display all available zones |
| --get-services | Display all predefined services |
| --get-active-zones | Display currently active zones and their corresponding network interface names |
| --get-default-zone | Query the default zone name |
| --set-default-zone=<zone name> | Set the default zone and make it permanent |
| --add-source= | Route traffic originating from specified IPs or subnets to a designated zone |
| --remove-source= | Remove routing of traffic originating from specified IPs or subnets to a zone |
| --add-interface=<interface name> | Route all traffic originating from specified interface to designated zone |
| --change-interface=<interface name> | Associate specified interface with designated zone |
| --list-services | List services allowed in the current zone |
| --list-ports | List ports allowed in the current zone |
| --list-all | Display all configuration parameters, resources, ports, and service information for the current zone |
| --list-all-zones | Display configuration parameters, resources, ports, and service information for all zones |
| --add-service=<service name> | Allow specified service traffic in the default zone |
| --remove-service=<service name> | Block specified service traffic in the default zone |
| --add-port=<port number or protocol> | Allow specified port traffic in the default zone |
| --remove-port=<port number or protocol> | Block specified port traffic in the default zone |
| --query-service=<service name> | Query whether a specified service is allowed |
| --query-port=<port number or protocol> | Query whether a specified port is allowed |
| --add-rich-rule='<rule>' | Add a complex rule |
| --remove-rich-rule='<rule>' | Remove a complex rule |
| --reload | Reload configuration to immediately apply permanent rules, overwriting current settings |
| --panic-on | Enable panic mode, reject all traffic |
| --panic-off | Disable panic mode, resume normal traffic processing |
| --permanent | Set rules to be permanent (persist after reboot) |
Similar to other firewall configuration tools in Linux systems, firewall policies configured with firewalld default to Runtime mode (also known as current active mode) and become invalid after system reboots.To make configurations persist, use Permanent mode. Simply add the --permanent parameter when setting firewall policies with firewall-cmd commands. This ensures the configured policies remain active permanently.
However, Permanent mode has an inconvenient characteristic: policies set using it only take effect automatically after a system reboot. To make configured policies take effect immediately, you must manually execute the firewall-cmd --reload command.
Tips:
Runtime: Takes effect immediately but is lost after reboot.
Permanent: Stored on disk and restored on reboot (or after
firewall-cmd --reload).
The following experiments are straightforward, but be sure to carefully check whether you're using Runtime or Permanent mode. Neglecting this detail may prevent firewall policies from achieving the desired effect even if configured correctly.
Experiment 1: Check the current zone used by the firewalld service.
This is a crucial step. Before configuring firewall policies, you must verify which zone is currently active. Otherwise, your firewall policy changes will not take effect immediately.
root@linuxprobe:~# firewall-cmd --get-default-zone
public
Experiment 2: Query the zone bound to a specific network interface in the firewalld service.
In production environments, servers typically have multiple network interfaces. Servers acting as gateways often have two interfaces: one facing the public network and another facing the internal network. The policies applied to traffic inspection for these interfaces must differ. Therefore, you can bind different zones to interfaces based on their traffic sources, enabling flexible firewall policy management.
root@linuxprobe:~# firewall-cmd --get-zone-of-interface=ens160
public
Experiment 3: Change the default interface zone to external and apply the change after system reboot.
Use the change-interface parameter with the specified network interface name (ensure it matches the actual interface; use ifconfig to verify if uncertain). After successful configuration, use the get-zone-of-interface parameter to verify the updated interface zone.
root@linuxprobe:~# firewall-cmd --permanent --zone=external --change-interface=ens160
The interface is under control of NetworkManager, setting zone to 'external'.
success
root@linuxprobe:~# firewall-cmd --permanent --get-zone-of-interface=ens160
external
Experiment 4: Set the default zone for the firewalld service to public.
The default zone, also known as the global configuration, applies to all network interfaces and has lower priority. As shown in the code below, the current default zone is public, while the ens160 interface is set to external—in this case, the interface's zone takes precedence.
In layman's terms, the default zone is a universal policy. For example, a cafeteria provides disposable utensils for everyone, while environmentalists bring their own bowls and chopsticks. If you bring your own, you use those; otherwise, you use the cafeteria's standard issue.
root@linuxprobe:~# firewall-cmd --set-default-zone=public
Warning: ZONE_ALREADY_SET: public
success
root@linuxprobe:~# firewall-cmd --get-default-zone
public
root@linuxprobe:~# firewall-cmd --get-zone-of-interface=ens160
external
Experiment 5: Enabling and Disabling firewalld Emergency Mode.
What's the best way to block all network connections within 1 second? The instinctive response is: "Unplug the network cable!" This is a clever physical solution. But what if you're in Beijing and the server is elsewhere? That's where panic mode comes in handy. Using the --panic-on parameter immediately severs all network connections, while --panic-off restores them.Remember: Emergency Mode severs all network connections. Exercise extreme caution when remotely managing servers—think twice before hitting Enter.
root@linuxprobe:~# firewall-cmd --panic-on
success
root@linuxprobe:~# firewall-cmd --panic-off
success
Experiment 6: Checking SSH and HTTPS Traffic Permissions.
In practice, you can omit the --zone parameter to specify the zone name. The firewall-cmd command will automatically query based on the default zone, reducing user input. However, conflicts may occur if the default zone differs from the one bound to the network interface. Therefore, the zone parameter should always be included for standard practice.
root@linuxprobe:~# firewall-cmd --query-service=ssh
yes
root@linuxprobe:~# firewall-cmd --query-service=https
no
Experiment 7: Permanently Allow HTTPS Traffic with Immediate Effect.
By default, firewall policy modifications operate in Runtime mode—effective immediately but lost after reboot. Avoid this mode for production or exams. Using the --permanent parameter delays immediate effect; changes take hold only after reboot or reload. After adding the HTTPS allow rule, querying the current policy still shows HTTPS blocked:
root@linuxprobe:~# firewall-cmd --permanent --add-service=https
success
root@linuxprobe:~# firewall-cmd --query-service=https
no
If you don't want to restart the server, use the --reload parameter:
root@linuxprobe:~# firewall-cmd --reload
success
root@linuxprobe:~# firewall-cmd --query-service=https
yes
Experiment 8: Permanently deny HTTP traffic with immediate effect.
Since HTTP traffic isn't allowed by default, you'll see a warning like Warning: NOT_ENABLED: http. This warning has no practical impact on the operation.
root@linuxprobe:~# firewall-cmd --permanent --remove-service=http
Warning: NOT_ENABLED: http
success
root@linuxprobe:~# firewall-cmd --reload
success
Experiment 9: Set traffic policies for ports 8080 and 8081 to allow access, but only for the current session.
Since this change is only effective for the current session, the --permanent parameter is unnecessary. After successful configuration, run firewall-cmd --list-ports to query all firewall policies for these port numbers in the system.
to query all firewall policies for these port numbers in the system.
root@linuxprobe:~# firewall-cmd --add-port=8080-8081/tcp
success
root@linuxprobe:~# firewall-cmd --list-ports
8080-8081/tcp
Experiment 10: Forward traffic originally destined for port 888 to port 22, requiring both immediate and persistent effect.
The SSH remote control protocol introduced in Chapter 9 transmits control commands over TCP port 22. To enable users to access SSH services through alternative ports, port forwarding technology can be employed. This technique automatically redirects incoming requests on the new port to the original service port, allowing users to access the service via the new port.
Let's illustrate with an example. Suppose Xiao Qiang, a worker at an electronics factory, has developed feelings for Xiao Hua, a worker on Assembly Line 3. Too shy to confess, he writes a love letter and gives it to security guard Zhang Da Ye, hoping he'll deliver it to Xiao Hua. This way, the transmission of the love letter (information) shifts from Xiao Qiang to Xiao Hua to Xiao Hua via Zhang Da Ye, yet the letter (information) still reaches its destination successfully.
The syntax for configuring port forwarding using the firewall-cmd command can be lengthy. Here's a concise summary for your reference:
firewall-cmd --permanent --zone=<zone> --add-forward-port=port=<source port>:proto=<proto>:toport=<destination port>:toaddr=<destination IP address>
The destination IP address in the above command is typically the server's local IP address:
root@linuxprobe:~# firewall-cmd --permanent --add-forward-port=port=888:proto=tcp:toport=22:toaddr=192.168.10.10
success
root@linuxprobe:~# firewall-cmd --reload
success
Attempting to access port 888 on host 192.168.10.10 via the ssh command from the client succeeds:
[root@client A ~]# ssh -p 888 192.168.10.10
The authenticity of host '[192.168.10.10]:888 ([192.168.10.10]:888)' can't be established.
ED25519 key fingerprint is SHA256:0R7Kuk/yCTlJ+E4G9y9iX/A/hAklHkALm5ZUgnJ01cc.
This key is not known by any other names.
Are you sure you want to continue connecting (yes/no/[fingerprint])? yes
Warning: Permanently added '[192.168.10.10]:888' (ED25519) to the list of known hosts.
root@192.168.10.10's password: Enter the password for the remote root administrator here.
Last login: Thu Mar 20 11:36:54 2025 from 192.168.10.20
Experiment 11: Configuring Rich Rules. Rich rules, also known as complex rules, represent more granular and detailed firewall policy configurations. They enable targeted policy settings based on system services, port numbers, source addresses, destination addresses, and other information. They also hold the highest priority among all firewall policies.For example, configure a rich rule in the firewalld service to deny all users from the 192.168.10.0/24 network segment access to the local SSH service (port 22):
root@linuxprobe:~# firewall-cmd --permanent --add-rich-rule='rule family="ipv4" source address="192.168.10.0/24" service name="ssh" reject'
success
root@linuxprobe:~# firewall-cmd --reload
success
Attempt to access the SSH service (port 22) on host 192.168.10.10 using the ssh command from the client:
[root@client A ~]# ssh 192.168.10.10
ssh: connect to host 192.168.10.10 port 22: Connection refused
Tips:
Compared to "a man," the description "a tall man with big eyes and a dimple on the right side of his face" is clearly more precise, reducing the probability of incorrect matches and should be prioritized.
8.3.2 Graphical Management Tools
Across various Linux distributions, few graphical tools meet Instructor Liu Chuan's standards for recommendation—except firewall-config. As the GUI version of the firewalld firewall configuration manager, it enables nearly all operations achievable via command line.Without exaggeration, even readers without a solid foundation in Linux commands can use it to properly configure firewall policies in RHEL 10. However, firewall-config is not provided by default. We need to install it using the dnf command, which requires configuring software repositories first.
First, set the virtual machine's "CD/DVD (SATA)" drive option to "Use ISO image file," then select the downloaded system image, as shown in Figure 8-2.
Download the accompanying software resources here: https://www.linuxzone.net/tools
Red Hat Enterprise Linux (RHEL) 10 —— Red Hat Operating System (Required):
Produced by Red Hat, Inc., the world's leading provider of open-source software and enterprise services, this is a highly stable and outstanding Linux operating system.
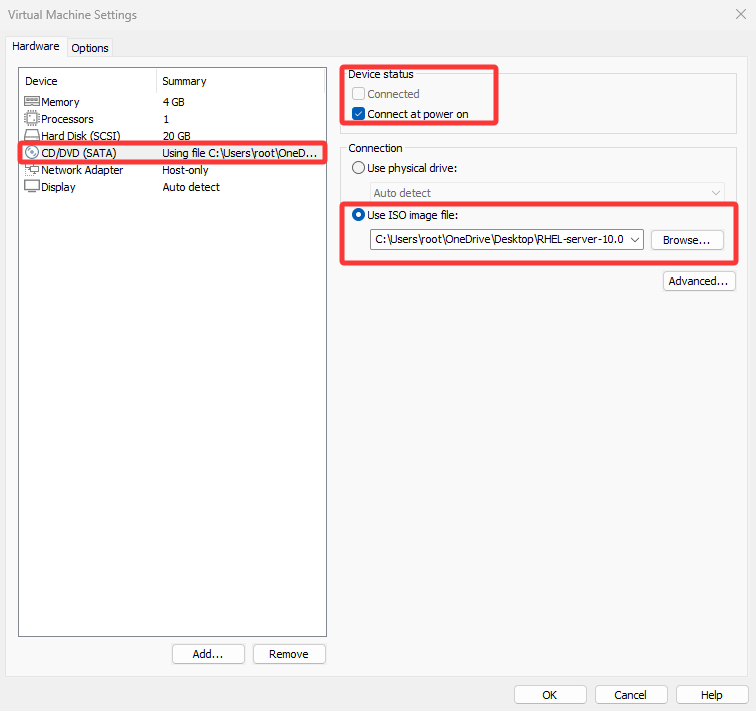
8-2 Pointing the virtual machine's CD-ROM device to the ISO image
Tips:
The downloaded system image is a file ending with .iso. Simply select it; no decompression is required.
Next, mount the system image from the CD-ROM device to the /media/cdrom directory:
root@linuxprobe:~# mkdir -p /media/cdrom
root@linuxprobe:~# mount /dev/cdrom /media/cdrom
mount: /media/cdrom: WARNING: source write-protected, mounted read-only.
To ensure the software repository remains consistently available to users, a more rigorous approach is to write the system image mount information into the /etc/fstab file for absolute reliability:
root@linuxprobe:~# vim /etc/fstab
#
# /etc/fstab
# Created by anaconda on Wed Mar 12 19:35:26 2025
#
# Accessible filesystems, by reference, are maintained under '/dev/disk/'.
# See man pages fstab(5), findfs(8), mount(8) and/or blkid(8) for more info.
#
# After editing this file, run 'systemctl daemon-reload' to update systemd
# units generated from this file.
#
UUID=408f4a3d-a4d3-4a44-bb23-6988cdbd10bf /                  xfs     defaults        0 0
UUID=4cf8ecae-bcb6-4b1e-8001-968b33643a8a /boot              xfs     defaults        0 0
UUID=1FB8-9199          /boot/efi               vfat    umask=0077,shortname=winnt	 0 2
UUID=d936c726-45a7-4ca2-8932-c54f84a3d787 none               swap    defaults        0 0
/dev/cdrom 								  /media/cdrom		iso9660	 defaults 		 0 0
Finally, use the Vim text editor to create the configuration file for the software repository. Unlike previous system versions, RHEL 10 requires configuring two software repositories ([BaseOS] and [AppStream]), both of which are essential.The specific parameters used in the following commands are explained in Section 4.1.4.
root@linuxprobe:~# vim /etc/yum.repos.d/rhel10.repo
[BaseOS]
name=BaseOS
baseurl=file:///media/cdrom/BaseOS
enabled=1
gpgcheck=0
[AppStream]
name=AppStream
baseurl=file:///media/cdrom/AppStream
enabled=1
gpgcheck=0
After correctly configuring the repository file, you can begin installing software using the yum or dnf commands. In practice, these two commands function identically except for their names; you may substitute yum for dnf at any time. Below, we install the firewalld graphical user interface tool:
root@linuxprobe:~# dnf install firewall-config
Updating Subscription Management repositories.
BaseOS                                          2.7 MB/s | 2.7 kB     00:00
AppStream                                       2.7 MB/s | 2.8 kB     00:00
Dependencies resolved.
================================================================================
 Package              Arch        Version                  Repository      Size
================================================================================
Installing:
 firewall-config      noarch      2.2.1-1.el10             AppStream       90 k
Installing dependencies:
 dbus-x11             x86_64      1:1.14.10-4.el10         AppStream       26 k

Transaction Summary
================================================================================
Install  2 Packages

Total size: 116 k
Installed size: 1.0 M
Is this ok [y/N]: y
Downloading Packages:
Running transaction check
Transaction check succeeded.
Running transaction test
Transaction test succeeded.
Running transaction
  Preparing        :                                                        1/1
  Installing       : dbus-x11-1:1.14.10-4.el10.x86_64                       1/2
  Installing       : firewall-config-2.2.1-1.el10.noarch                    2/2
  Running scriptlet: firewall-config-2.2.1-1.el10.noarch                    2/2
Installed products updated.

Installed:
  dbus-x11-1:1.14.10-4.el10.x86_64      firewall-config-2.2.1-1.el10.noarch

Complete!
After successful installation, the graphical interface of the firewall-config tool appears as shown in Figure 8-3. Its specific functions are as follows:
1: Select configurations for Runtime or Permanent mode.
2: Optional policy set area list.
3: Common system service list.
4: Host address blacklist and whitelist.
5: Currently active zone.
6: Manage services within the currently selected zone.
7: Manage ports within the currently selected zone.
8: Configure permitted protocols for access.
9: Set permitted ports for access.
10: Enable or disable SNAT (Source Network Address Translation) technology.
11: Configure port forwarding policies.
12: Control traffic requesting ICMP services.
13: Manage firewall rich rules.
14: Services in the selected zone. Checking the corresponding checkbox indicates that related traffic is permitted.
15: Operational status of the firewall-config tool.
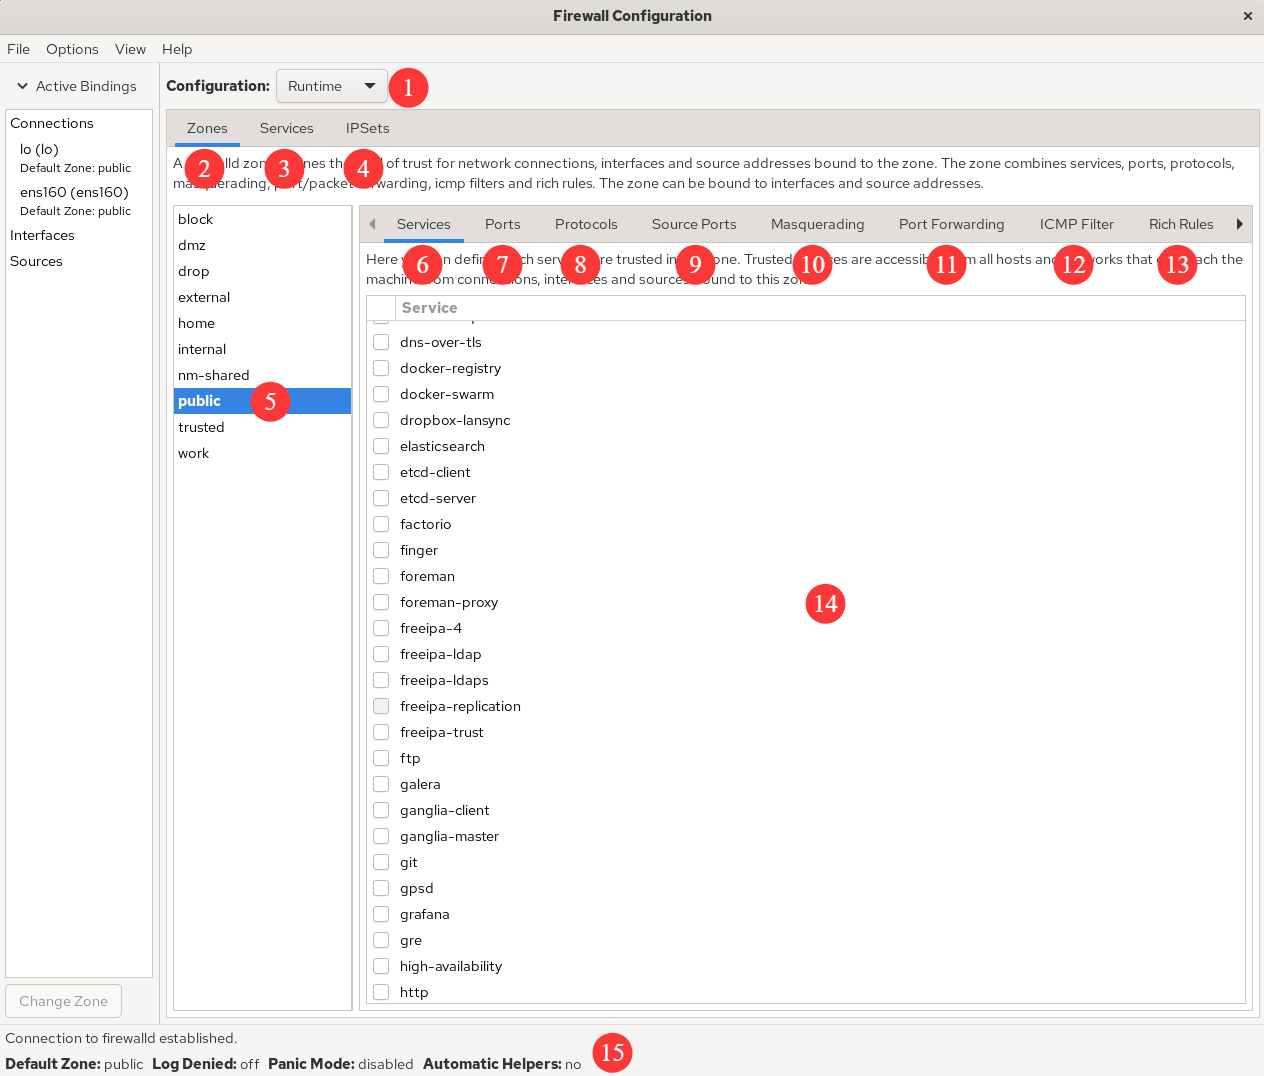
Figure 8-3 Graphical interface of firewall-config
Beyond the features listed in Figure 8-3, additional options include Interfaces for binding network interfaces to zones and Sources for binding IP addresses to zones. One more thing: after configuring firewall policies with the firewall-config tool, no secondary confirmation is required—it automatically saves any changes.
Let's proceed to the hands-on practice section. First, configure the current zone to allow HTTP service traffic, but only for the current session. The specific configuration is shown in Figure 8-4.
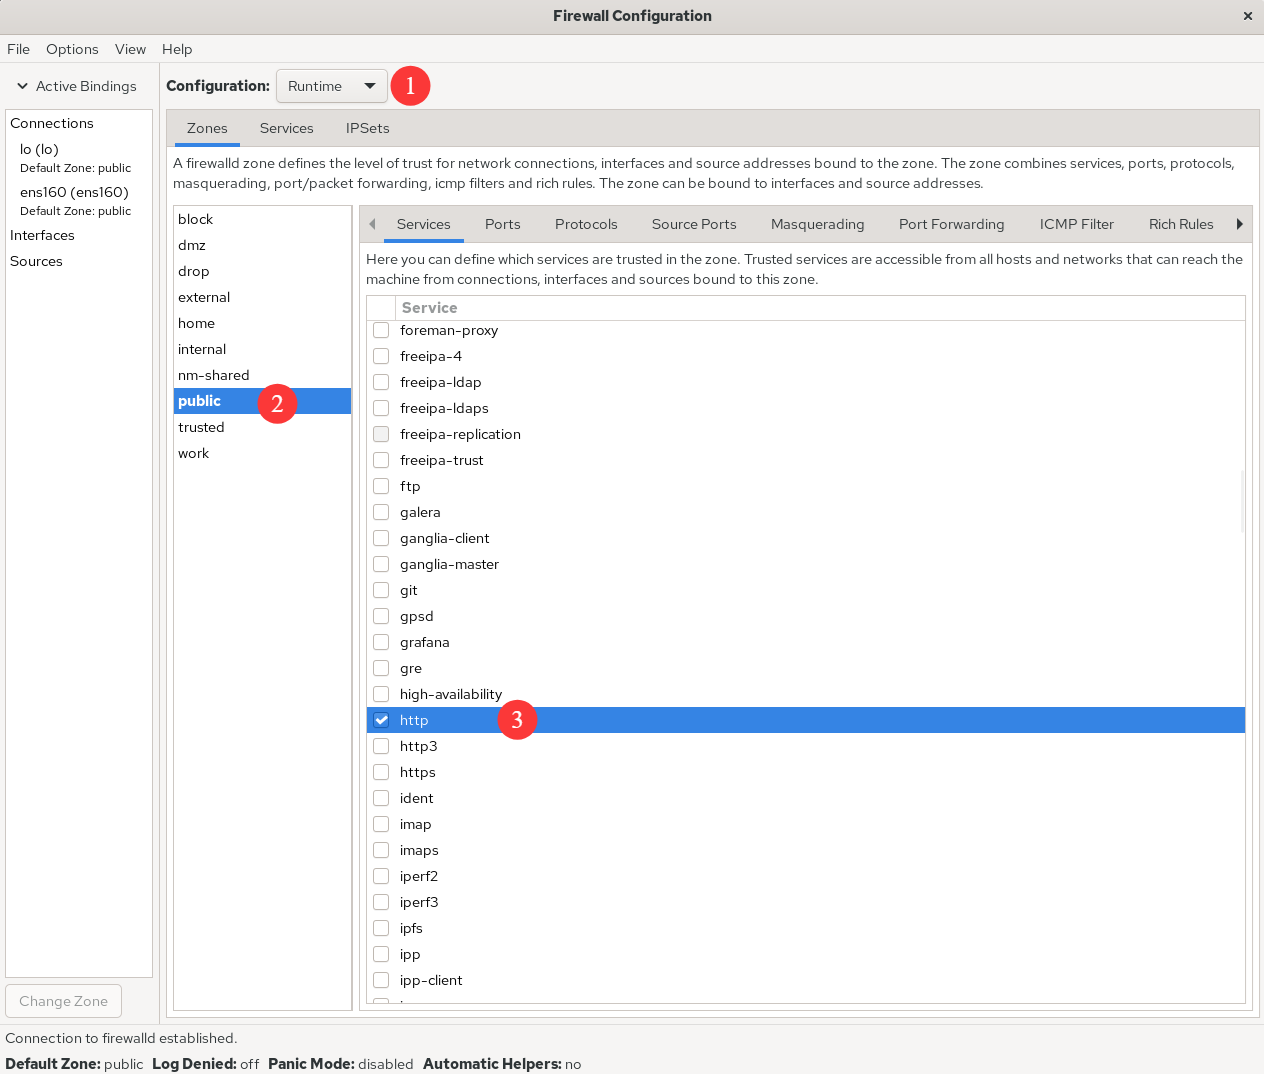
Figure 8-4 Allow traffic requesting HTTP services
Attempt to add a firewall policy rule to allow traffic accessing ports 8080–8088 (TCP) and set it to be permanent. This ensures the firewall policy remains effective after a system reboot.After configuring the interface as shown in Figure 8-5, click the Reload Firewalld command in the Options menu to immediately apply the firewall policy (see Figure 8-6). This achieves the same effect as using the --reload parameter in the command line.
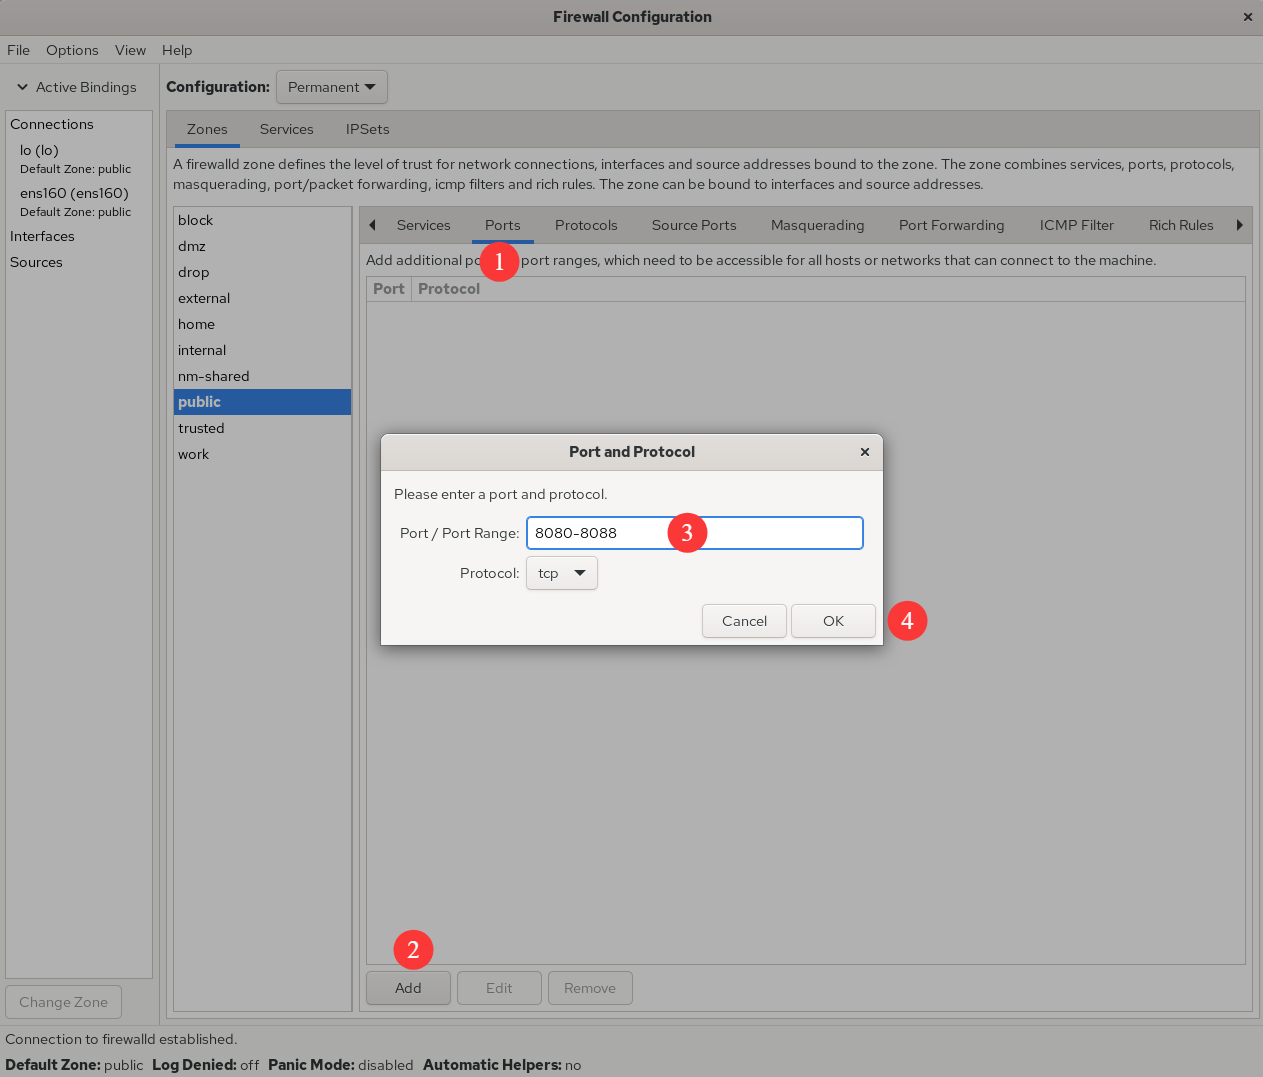
Figure 8-5 Allowing Traffic to Ports 8080–8088
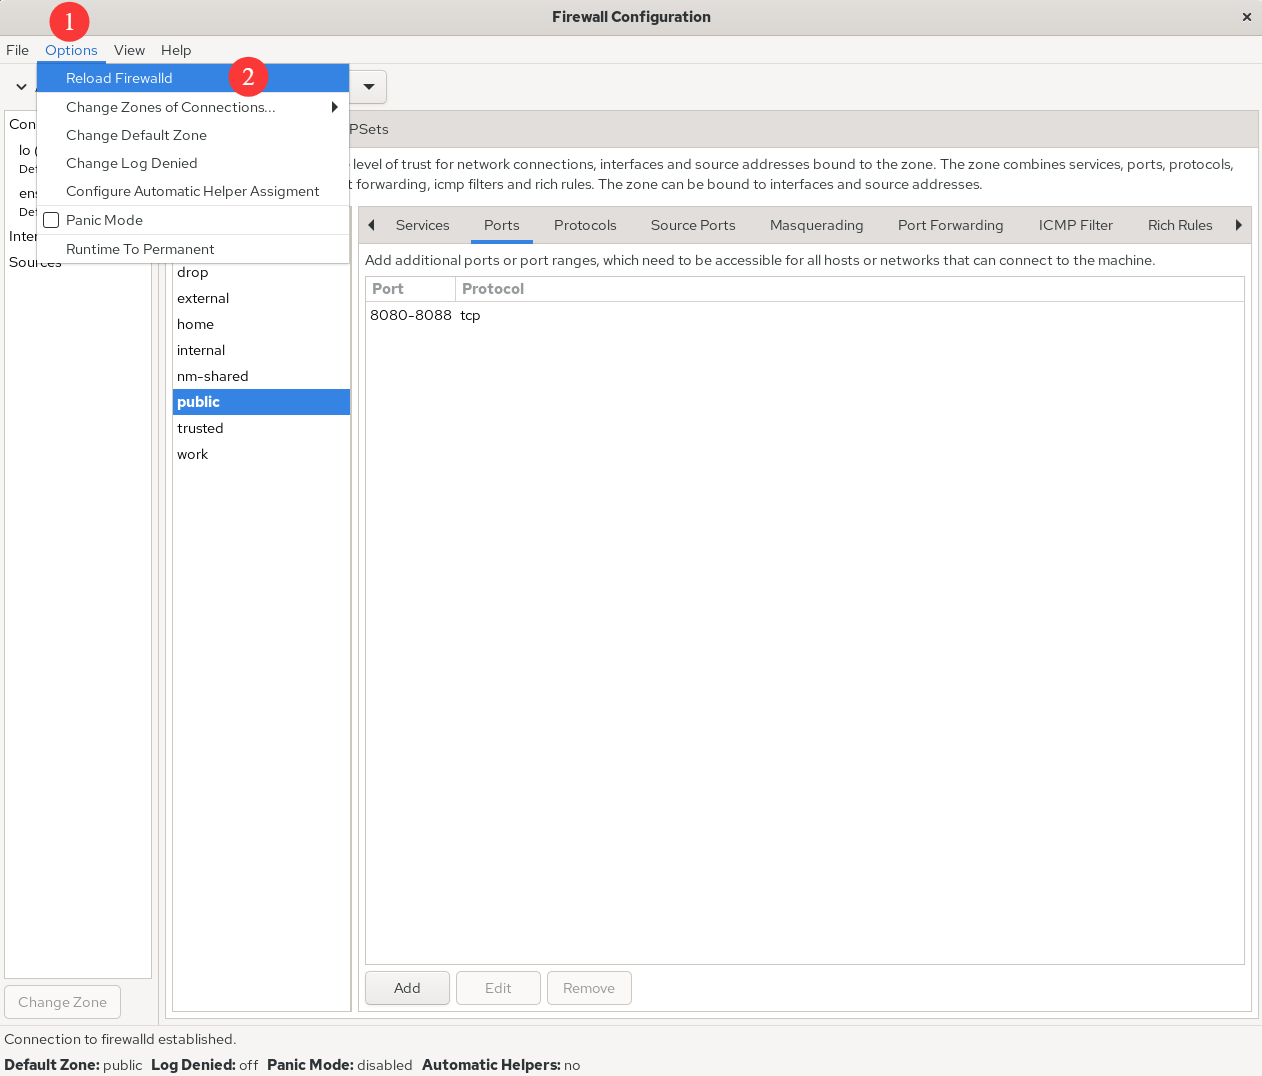
Figure 8-6 Immediately Enforcing Configured Firewall Policy Rules
Earlier, when discussing the firewall-config tool's functionality, we mentioned SNAT (Source Network Address Translation) technology. SNAT is a technique designed to address IP address scarcity, enabling multiple users within an internal network to access the internet through a single external IP address.This technology is extremely widespread, and we use it daily without even realizing it. For example, when accessing the companion site for this book www.linuxzone.net through your home gateway device (wireless router), SNAT technology is being utilized.
Consider the differences between a network without SNAT (see Figure 8-7) and one with SNAT (see Figure 8-8). In the LAN depicted in Figure 8-7, multiple PCs exist. If the gateway server does not apply SNAT technology, when a website server on the Internet receives a request packet from a PC and sends a response packet back, it cannot locate the IP address of this private network within the network. Consequently, the PC will not receive the response packet.In the LAN depicted in Figure 8-8, because the gateway server applies SNAT technology, the website server on the Internet sends the response packet to the gateway server, which then forwards it to the PC within the LAN.
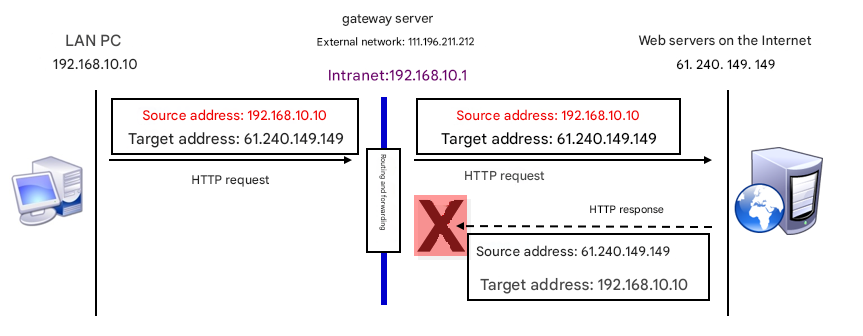
Figure 8-7 Network without SNAT Technology
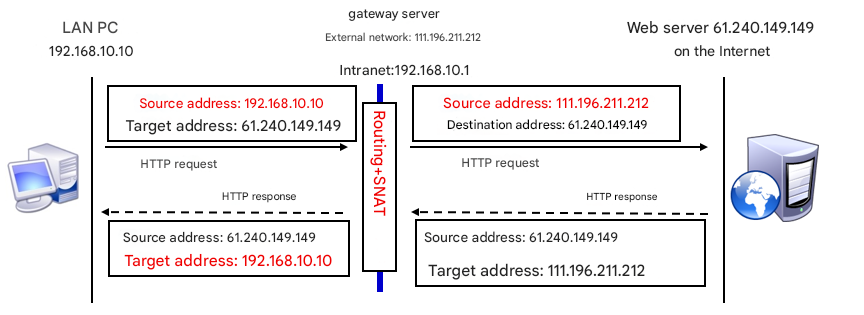
Figure 8-8 Network with SNAT Technology Applied
Implementing SNAT using iptables commands is quite cumbersome, but it's a breeze in firewall-config. Users simply need to configure as shown in Figure 8-9 and select the Masquerade zone checkbox to automatically enable SNAT technology.
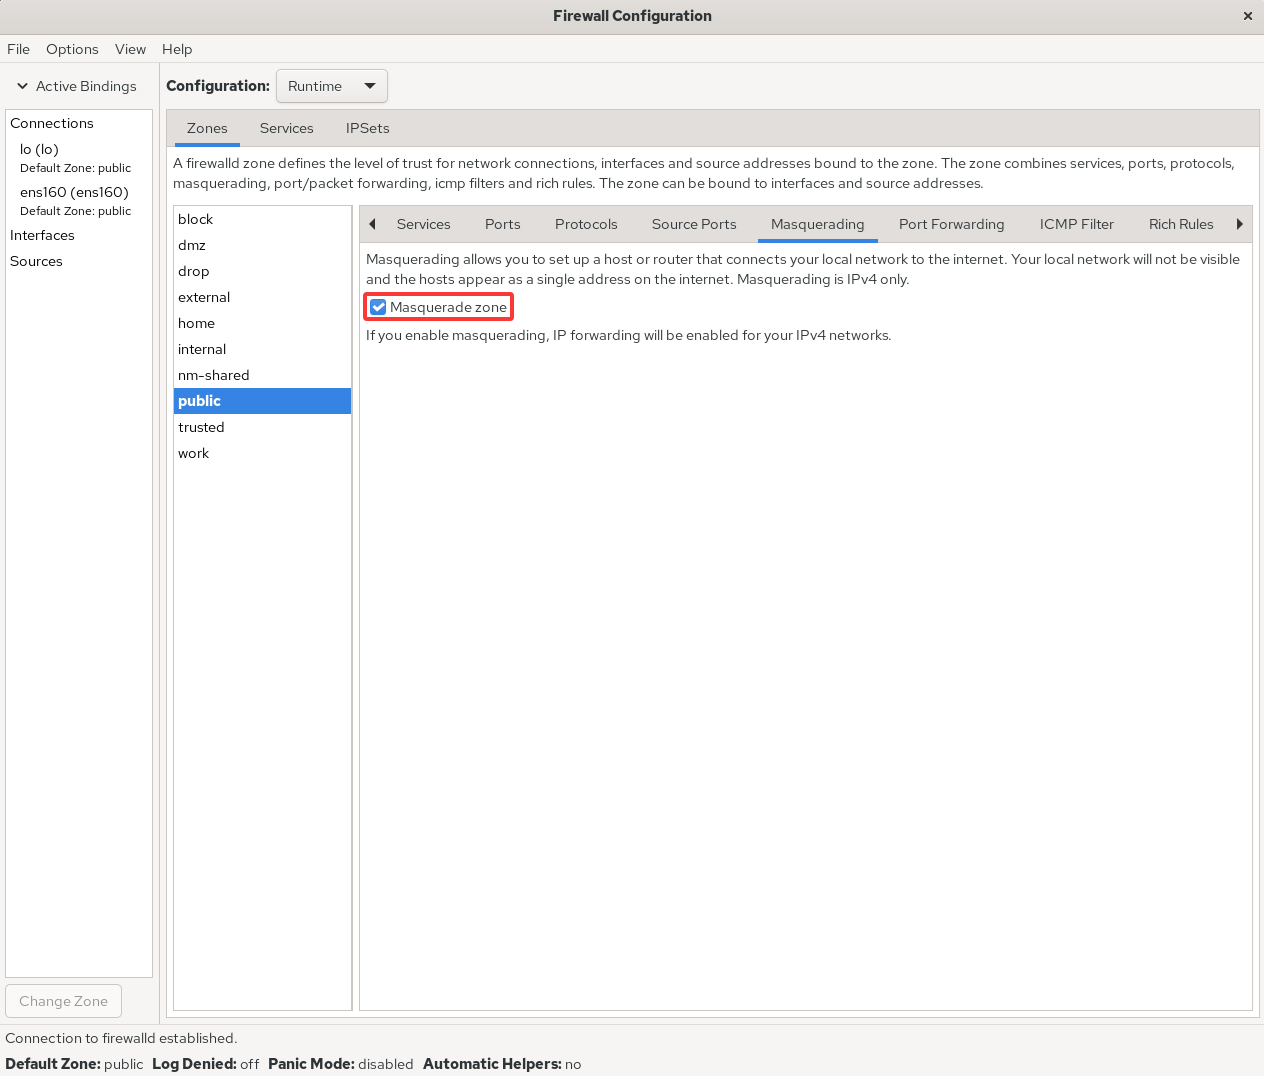
Figure 8-9 Enabling SNAT Technology in the Firewall
To visually demonstrate how different tools achieve the same functionality, we'll re-demonstrate the firewall policy rules previously configured with firewall-cmd using firewall-config: forwarding local port 888 traffic to port 22, with both immediate and persistent effect. See Figures 8-10 and 8-11 for details.
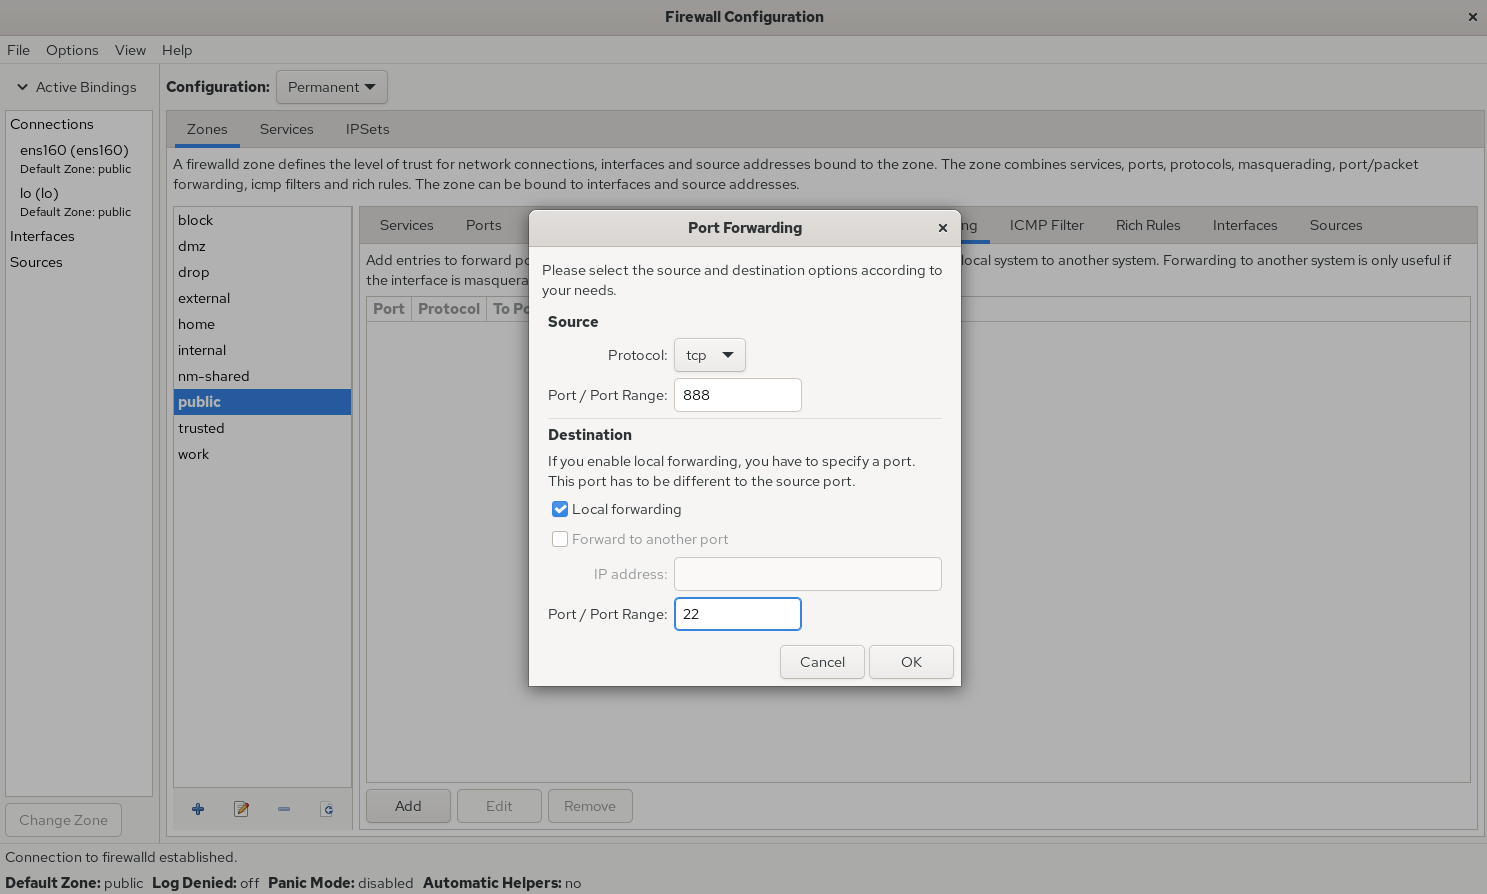
Figure 8-10 Configuring Local Port Forwarding
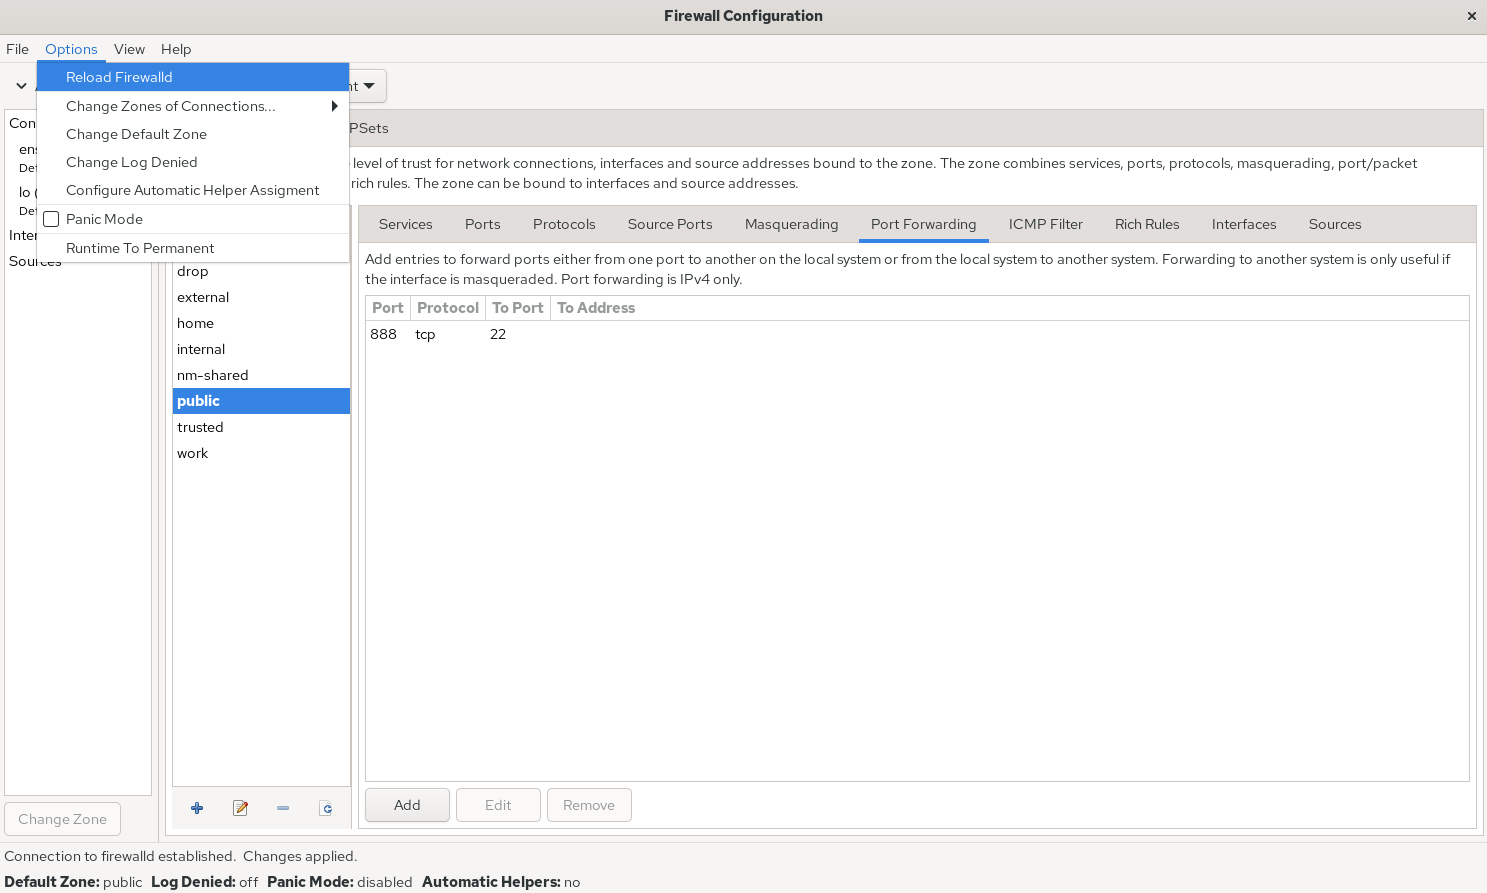
Figure 8-11 Enabling Firewall Policy Rules Immediately
Configuring rich rules with commands is quite tedious, but fortunately we now have graphical user interface tools. As shown in Figure 8-12, we can set actions for the firewall to automatically execute when the host 192.168.10.20 accesses port 1234 on this machine. The Element option enables matching based on service name, port number, protocol, and other information; The inverted checkbox following the Source and Destination options represents an inverse selection function. Checking it selects the opposite of the specified information, i.e., selecting host addresses not included in the specified information. When the Log checkbox is selected, logs are not only recorded to the log file but also logged to the log file after setting the log level (Level), facilitating subsequent screening.
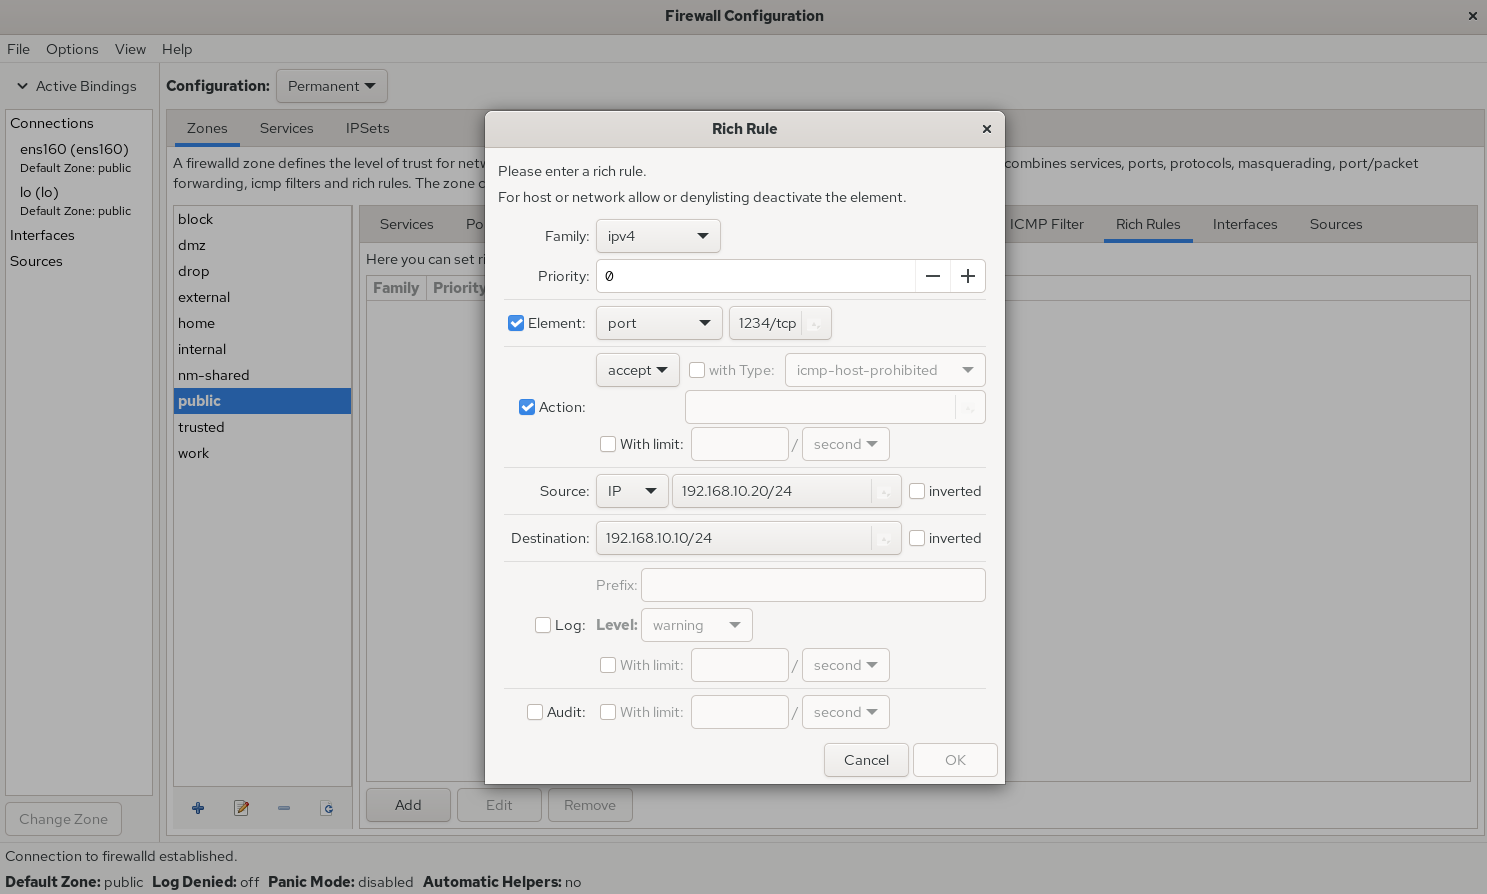
Figure 8-12 Configuring Firewall Rich Rule Policies
If a production server has multiple network interfaces simultaneously providing services (a common scenario), the firewall policy zones selected for interfaces serving internal and external networks should differ. This means network interfaces can be bound to specific firewall policy zones (see Figures 8-13 and 8-14). This enables targeted monitoring of traffic originating from different interfaces using distinct firewall zone policies, yielding more effective results.
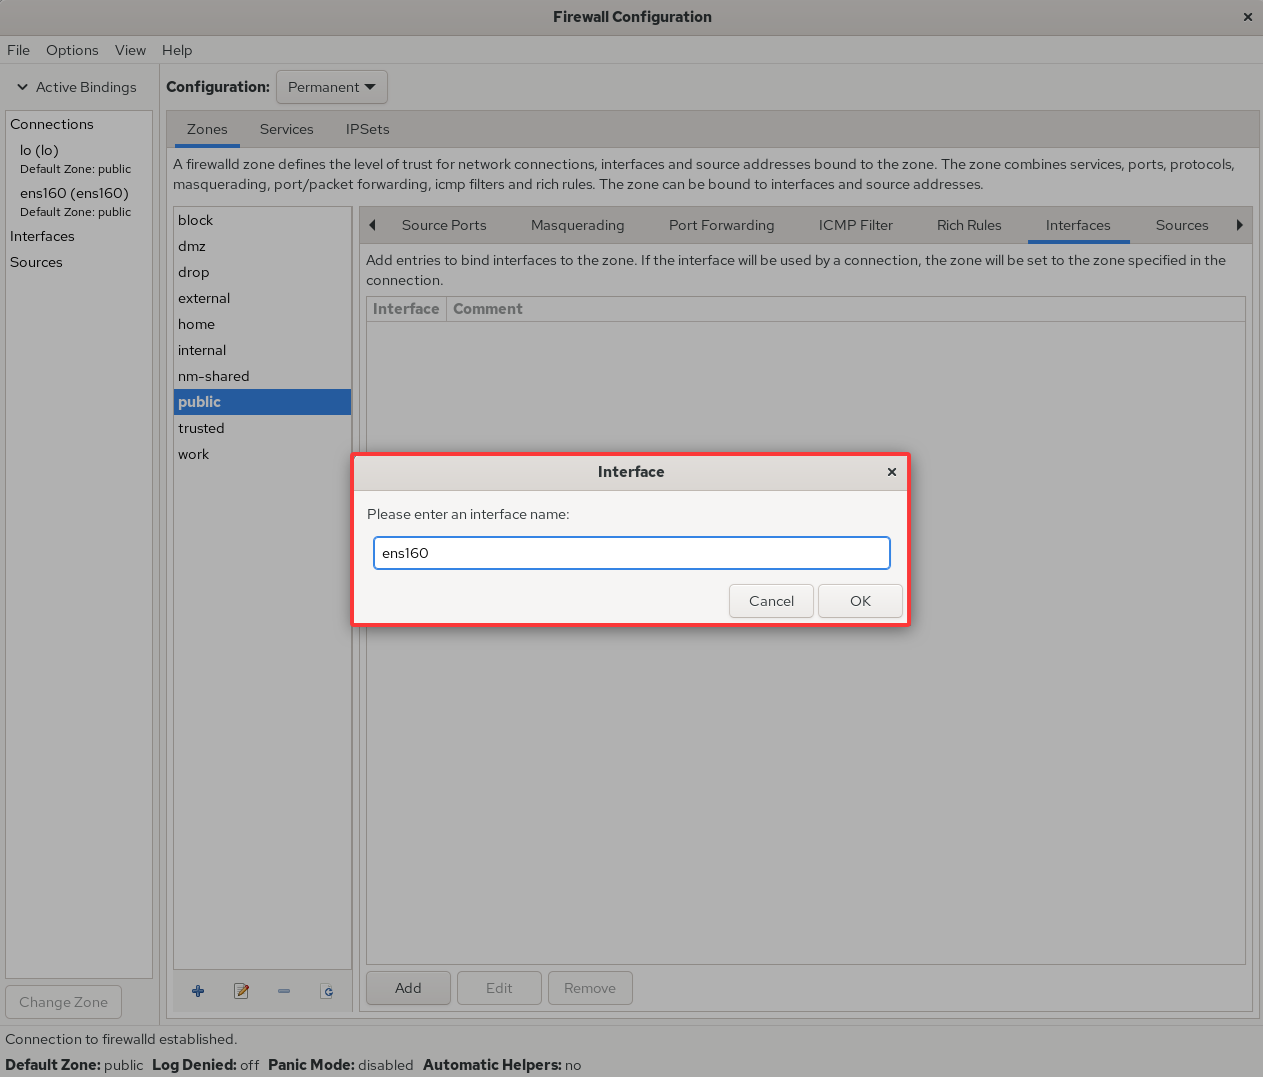
Figure 8-13 Binding Network Interfaces to Firewall Policy Zones
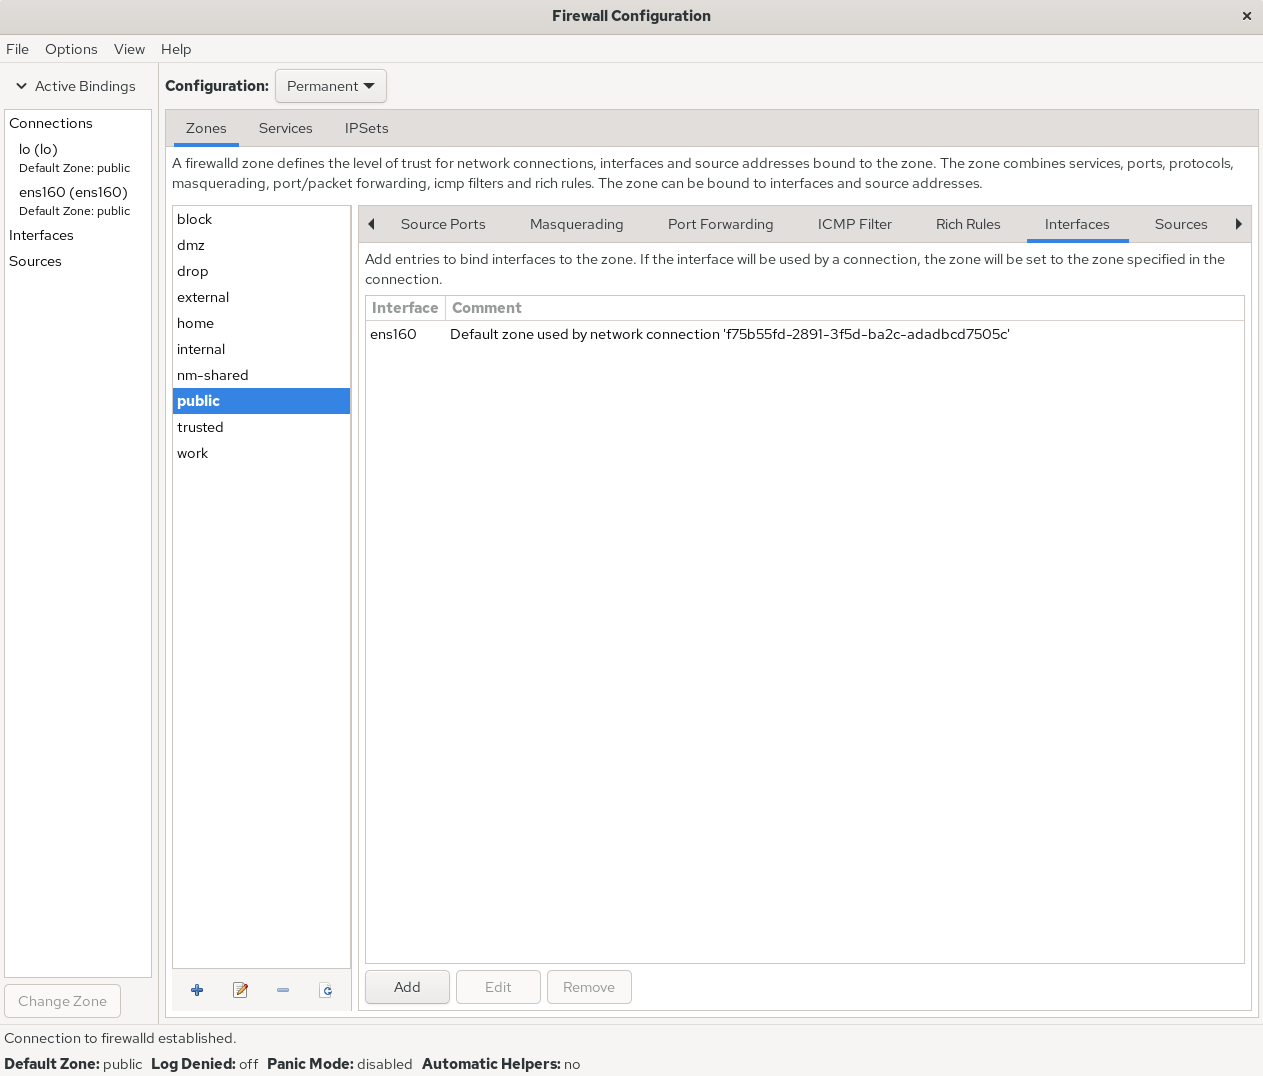
Figure 8-14 Network Interface Card Binding to Policy Zone Complete
Finally, it's worth reiterating that the firewall-config tool is exceptionally practical. It replaces many complex, lengthy commands with graphical buttons, making rule configuration straightforward and clear—sufficient for daily tasks. Therefore, I emphasize once more the principle of firewall policy configuration: as long as the desired functionality is achieved, the choice of tool is entirely up to you.
8.4 Service Access Control Lists
TCP Wrapper is a service access control program enabled by default in RHEL 5/6 systems. It allows or denies access based on the source host's address and the target service program on the local machine. In RHEL 10, it has been officially replaced by firewalld.In other words, Linux systems actually have two layers of firewall functionality. The first is the TCP/IP-based traffic filtering tool discussed earlier, while the TCP Wrapper service acts as a firewall that permits or denies Linux system services, providing higher-level protection for secure system operation.
The firewall policies of the TCP Wrapper service are governed by two control list files. Users can edit the allow control list file to permit incoming requests to services, or edit the deny control list file to block incoming requests to services.Changes to these files take effect immediately. The system first checks the allow list file (/etc/hosts.allow). If a matching allow policy is found, traffic is permitted. If no match is found, it then checks the deny list file (/etc/hosts.deny). If a match is found, the traffic is denied. If no match is found in either file, traffic is permitted by default.
Since RHEL 10 no longer supports the TCP Wrapper service program, we will conduct our experiments on an older server version. Configuring the TCP Wrapper service's control list files is straightforward, with common client address matching patterns shown in Table 8-4.
Table 8-4 Common Client Address Matching Patterns in TCP Wrappers Service Control List Files
| Client Address Matching Pattern | Example | Client List Matching the Example |
|---|---|---|
| Single Host | 192.168.10.10 | Host with IP address 192.168.10.10 |
| Specified Subnet | 192.168.10. | Hosts with IP range 192.168.10.0/24 |
| Specified Subnet | 192.168.10.0/255.255.255.0 | Hosts within IP range 192.168.10.0/24 |
| Specified DNS suffix | .linuxprobe.com | Hosts with DNS suffix .linuxprobe.com |
| Specified Hostname | www.linuxprobe.com | Hostname www.linuxprobe.com |
| Specified All Clients | ALL | All hosts included |
When configuring TCP Wrapper services, adhere to two principles:
When writing deny policy rules, specify the service name, not the protocol name;
It is recommended to write deny policy rules first, followed by allow policy rules, to visually assess the corresponding effects.
Below is a denial policy rule file to block all traffic accessing the local sshd service (no need to modify existing comments in /etc/hosts.deny):
root@linuxprobe:~# vim /etc/hosts.deny
#
# hosts.deny This file contains access rules which are used to
# deny connections to network services that either use
# the tcp_wrappers library or that have been
# started through a tcp_wrappers-enabled xinetd.
#
# The rules in this file can also be set up in
# /etc/hosts.allow with a 'deny' option instead.
#
# See 'man 5 hosts_options' and 'man 5 hosts_access'
# for information on rule syntax.
# See 'man tcpd' for information on tcp_wrappers
sshd:*
root@linuxprobe:~# ssh 192.168.10.10
ssh_exchange_identification: read: Connection reset by peer
Next, add a rule to the allow policy file to permit all traffic originating from the 192.168.10.0/24 network segment accessing the local sshd service. You can see the server immediately permits access to the sshd service, demonstrating very intuitive results:
root@linuxprobe:~# vim /etc/hosts.allow
#
# hosts.allow This file contains access rules which are used to
# allow or deny connections to network services that
# either use the tcp_wrappers library or that have been
# started through a tcp_wrappers-enabled xinetd.
#
# See 'man 5 hosts_options' and 'man 5 hosts_access'
# for information on rule syntax.
# See 'man tcpd' for information on tcp_wrappers
sshd:192.168.10.

root@linuxprobe:~# ssh 192.168.10.10
The authenticity of host '192.168.10.10 (192.168.10.10)' can't be established.
ECDSA key fingerprint is 70:3b:5d:37:96:7b:2e:a5:28:0d:7e:dc:47:6a:fe:5c.
Are you sure you want to continue connecting (yes/no)? yes
Warning: Permanently added '192.168.10.10' (ECDSA) to the list of known hosts.
root@192.168.10.10's password: Enter root administrator password here
Last login: Wed May 4 07:56:29 2025
root@linuxprobe:~#
8.5 Cockpit Management Tool
First, Cockpit is an English word meaning "cockpit (of an aircraft, ship, or race car)" (see Figure 8-15), a name that conveys its feature-rich nature.Second, Cockpit is a web-based graphical service management tool that is highly user-friendly, allowing even beginners to get started easily. It also inherently possesses excellent cross-platform compatibility, making it widely applicable across various management scenarios such as servers, containers, and virtual machines. Finally, Red Hat places significant importance on Cockpit, installing it by default in RHEL 10 and CentOS Stream systems. Naturally, Fedora, derived from these distributions, also includes Cockpit as standard.

Figure 8-15 Cockpit Interface Diagram
Cockpit is pre-installed by default. Verify its presence using the dnf command:
root@linuxprobe:~# dnf install cockpit
Updating Subscription Management repositories.
BaseOS                                          2.7 MB/s | 2.7 kB     00:00
AppStream                                       2.7 MB/s | 2.8 kB     00:00
Package cockpit-323-1.el10.x86_64 is already installed.
Dependencies resolved.
Nothing to do.
Complete!
However, the Cockpit service did not start automatically. It needs to be enabled and added to the startup items:
root@linuxprobe:~# systemctl start cockpit
root@linuxprobe:~# systemctl enable cockpit.socket
Next, open the "Network & Internet" → "Advanced Network Settings" interface on the local physical machine. Locate the VMnet1 network adapter and click the "Edit" button. Configure an IP address within the same subnet as the virtual machine system, following the steps shown in Figures 8-16 and 8-17. This enables network communication between the physical machine and the virtual machine system:
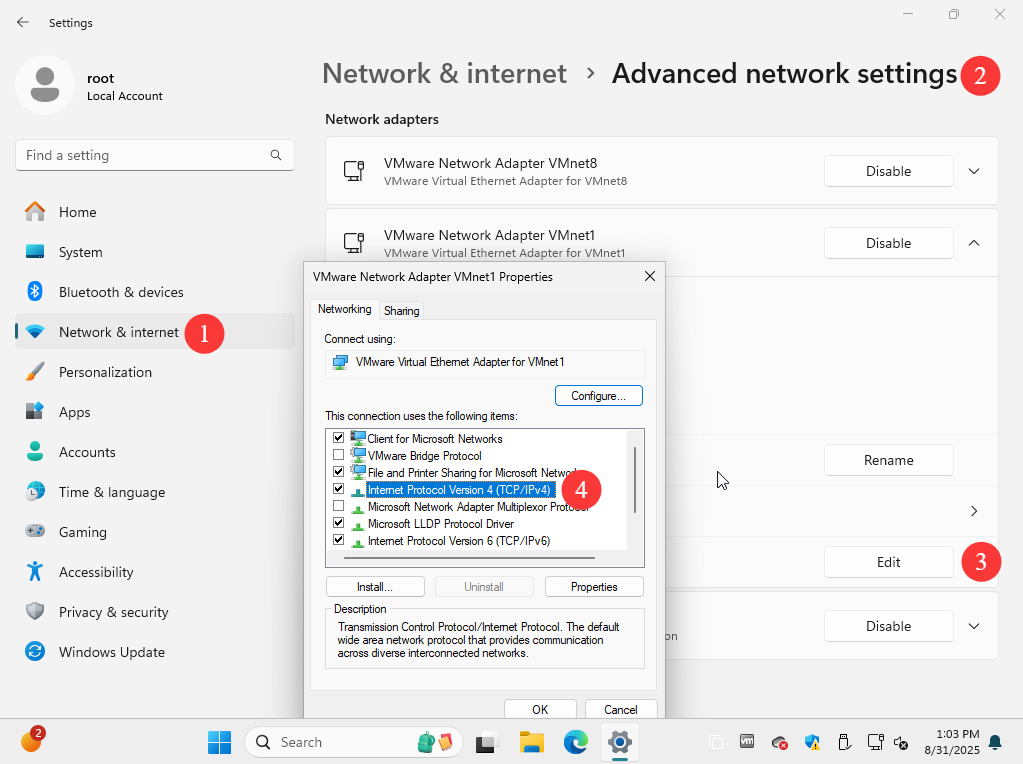
Figure 8-16: Accessing the Advanced Network Settings Interface
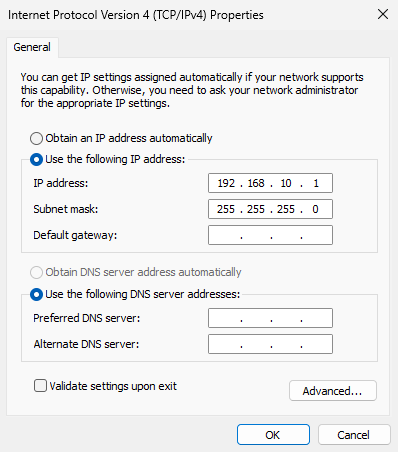
Figure 8-17 Configuring the network interface IP address information
Open the browser on the physical machine and enter "Virtual Machine IP Address:9090" in the address bar to access Cockpit. Since traffic to Cockpit is encrypted using HTTPS and the certificate is self-signed locally, you must trust the certificate before proceeding, as shown in Figure 8-18.
Additionally, if you haven't yet configured the Linux system's network interface IP address using the method described in Chapter 4, don't worry. Chapter 9 will cover graphical configuration methods, so you can perform this task later.
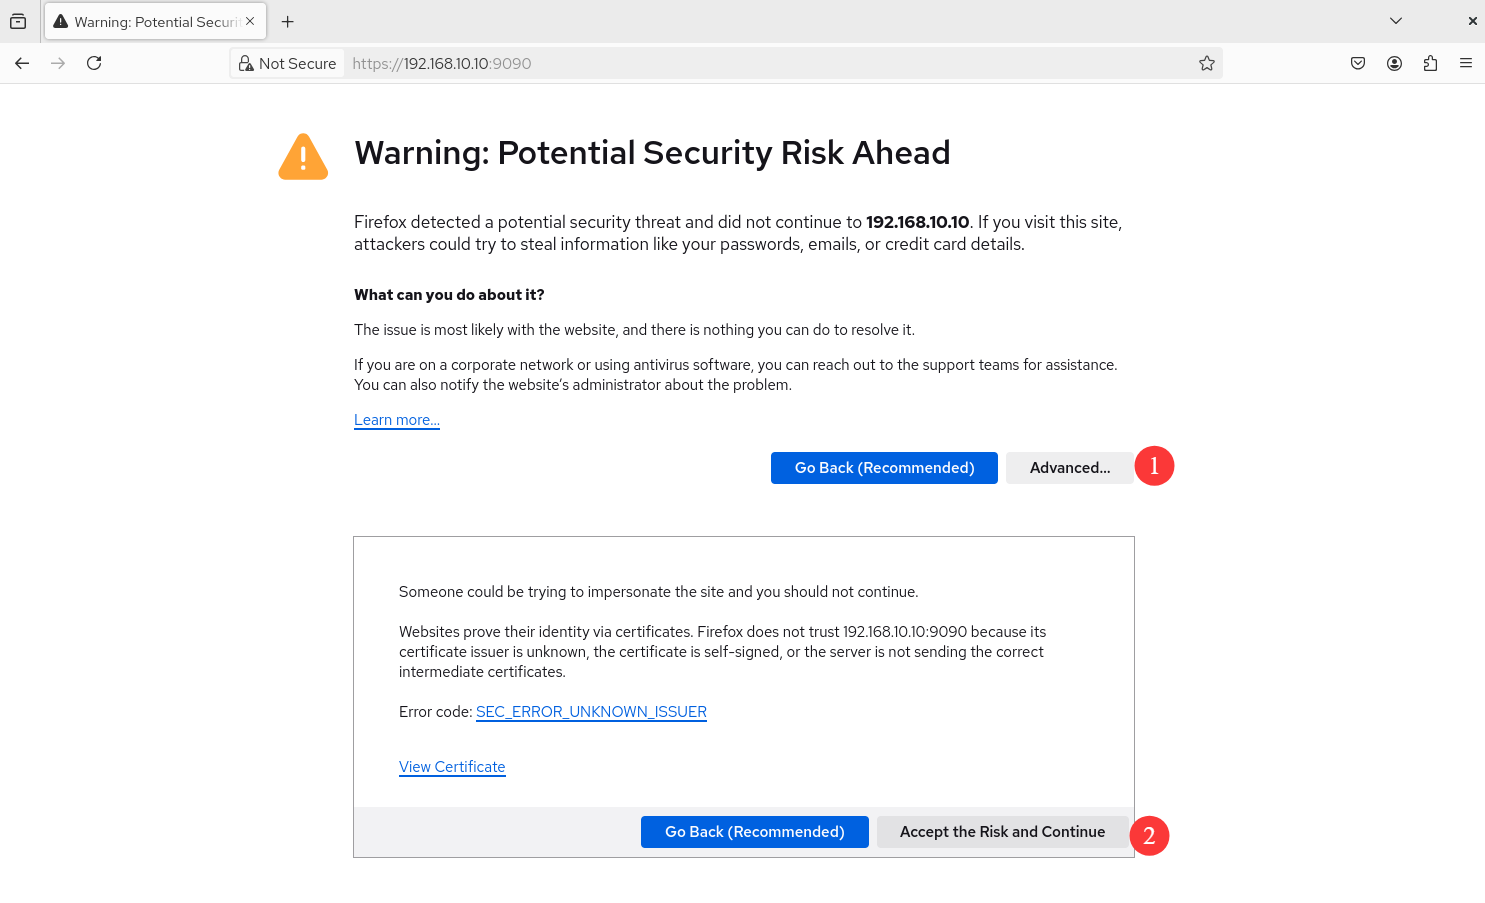
Figure 8-18 Select Continue
After entering the Cockpit login interface, enter the root administrator account and password, then click the "Login" button, as shown in Figure 8-19.
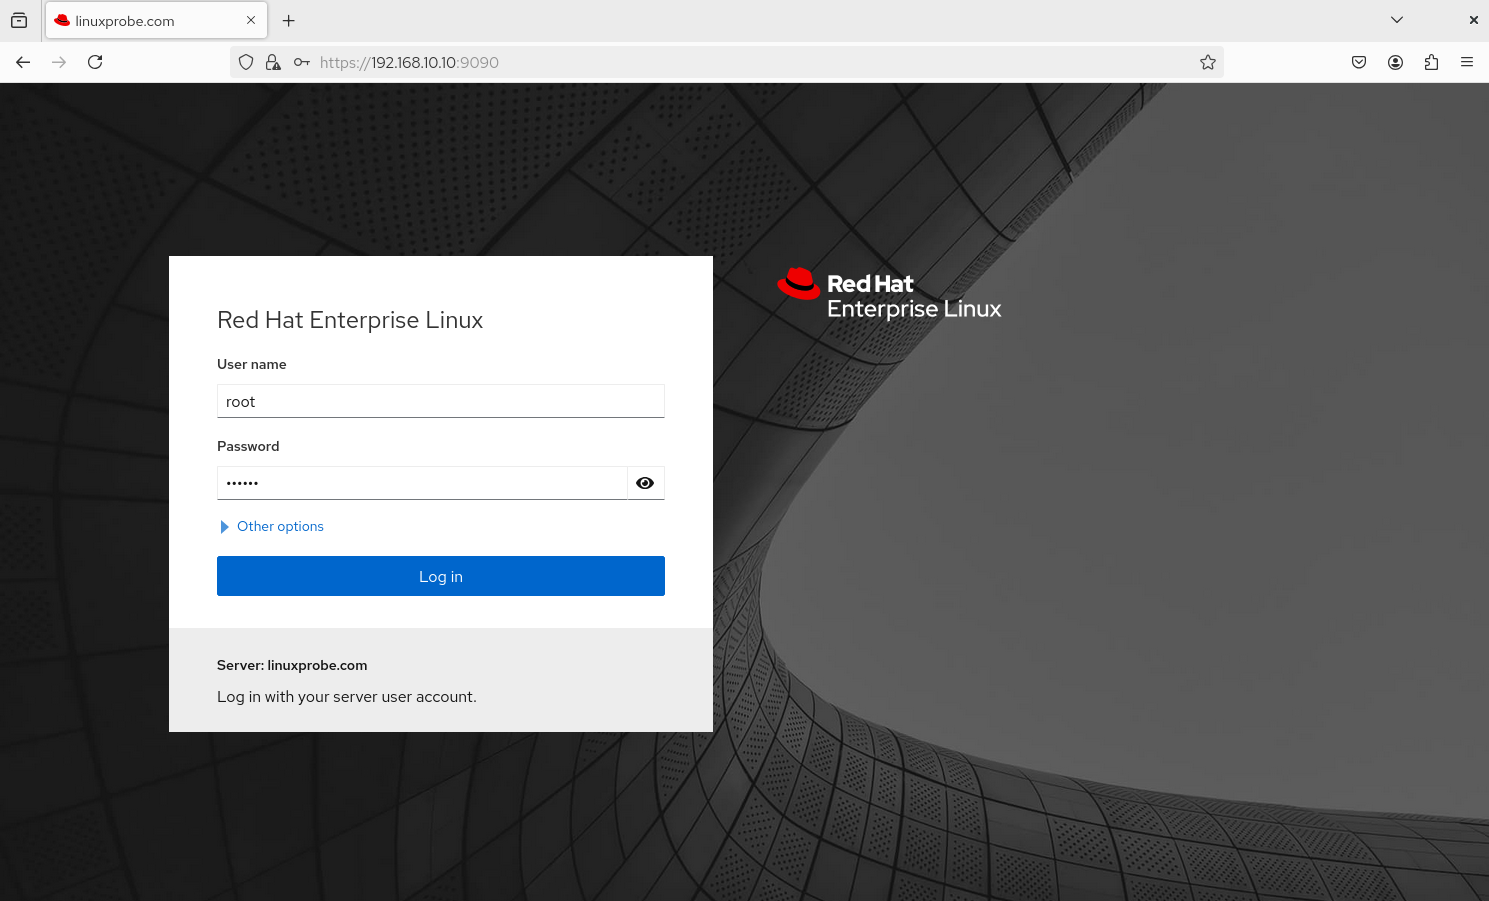
Figure 8-19 Entering root Administrator Account and System Password
As shown in Figure 8-20, if you encounter a "Permission denied" error, don't panic. For security reasons, RHEL 10 disables remote login for the root user by default. Remember in Chapter 1 when we manually allowed the root administrator to use SSH (see Figure 1-40)? Here, you also need to manually grant access. Remove the root user's name from the following file:
root@linuxprobe:~# vim /etc/cockpit/disallowed-users
List of users which are not allowed to login to Cockpit
root
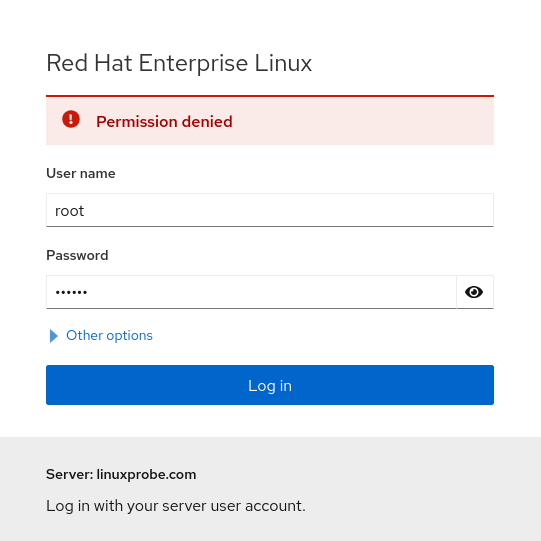
Figure 8-20 Permission Denied
No service restart is needed. Simply click the "Login" button again.
Upon entering Cockpit's web interface, you'll discover a whole new world. Cockpit is divided into 14 functional modules: Overview, Logs, Storage, Network, Podman Containers, User Accounts, Services, Subscriptions, Kernel Dumps, Software Updates, Applications, Diagnostic Reports, Terminal, and SELinux. We'll cover each one in detail below.
1. Overview Upon entering the Cockpit interface, the "Overview" module is displayed by default. This interface shows system architecture, version, hostname, and time information. Clicking the "View Metrics and History" button allows real-time monitoring of CPU, memory, disk, and network usage dynamics. This interface resembles a web-based version of the "Windows Task Manager" and is genuinely useful, as shown in Figure 8-21.
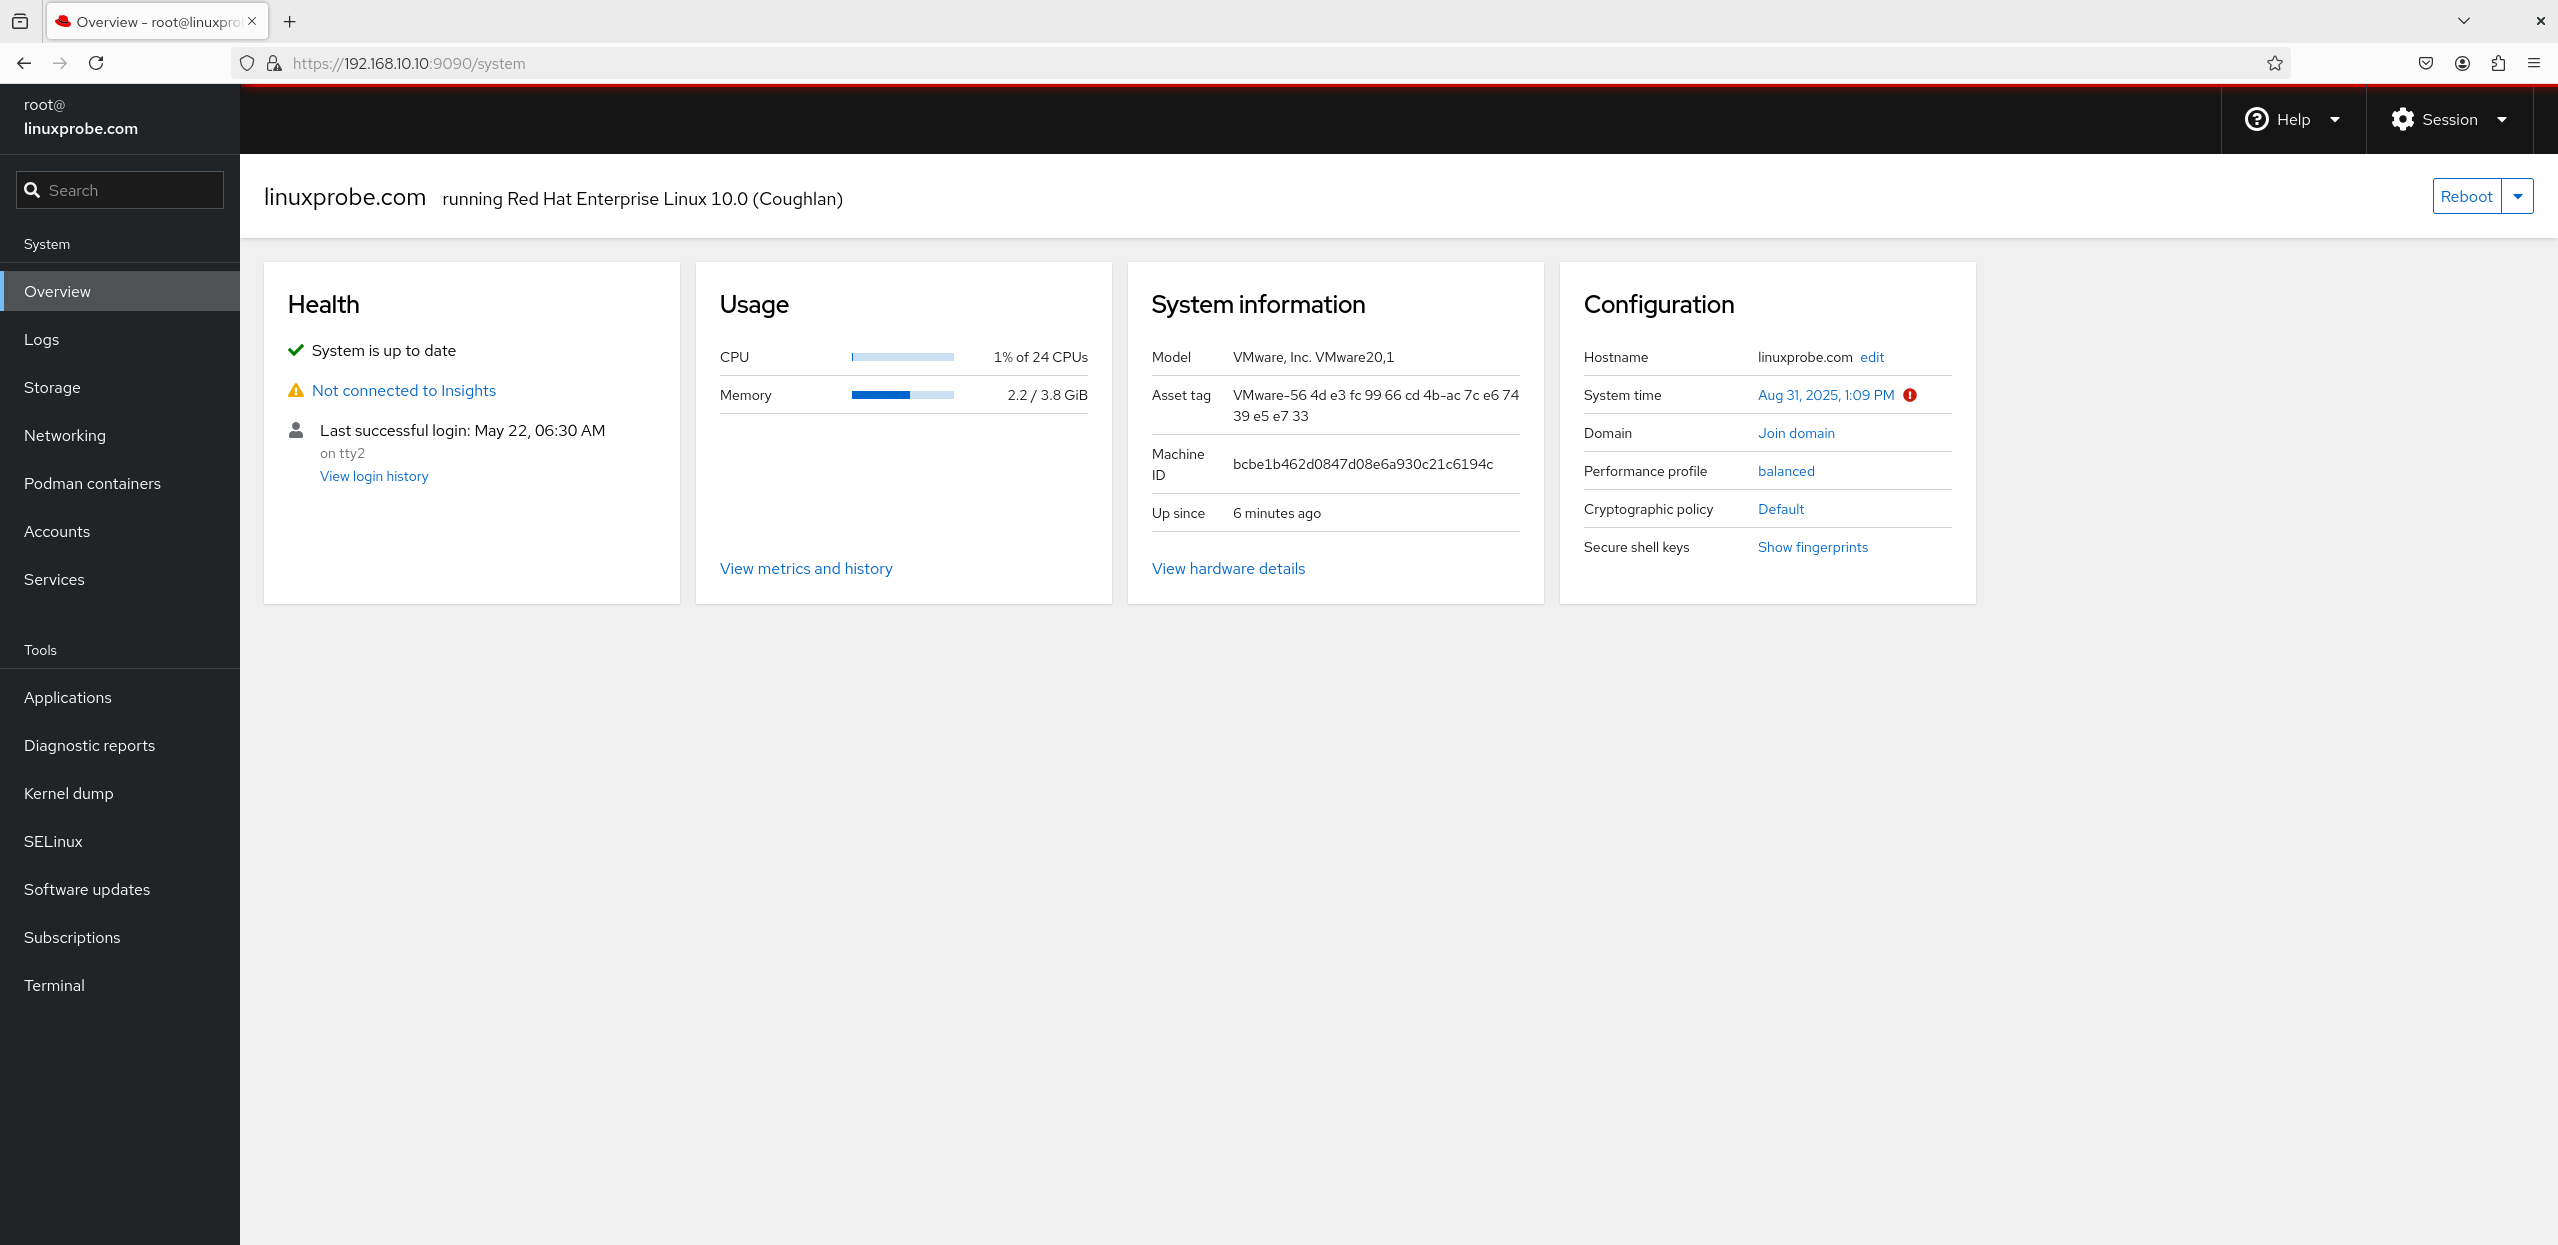
Figure 8-21 System Status Interface
2. Logs This module provides all system logs, but some readers might wonder why the content appears sparse. The reason lies in the two options shown in Figure 8-22: Time and Priority. These filters allow users to quickly locate specific information, rather than dumping everything onto the screen like the /var/log/messages file does.
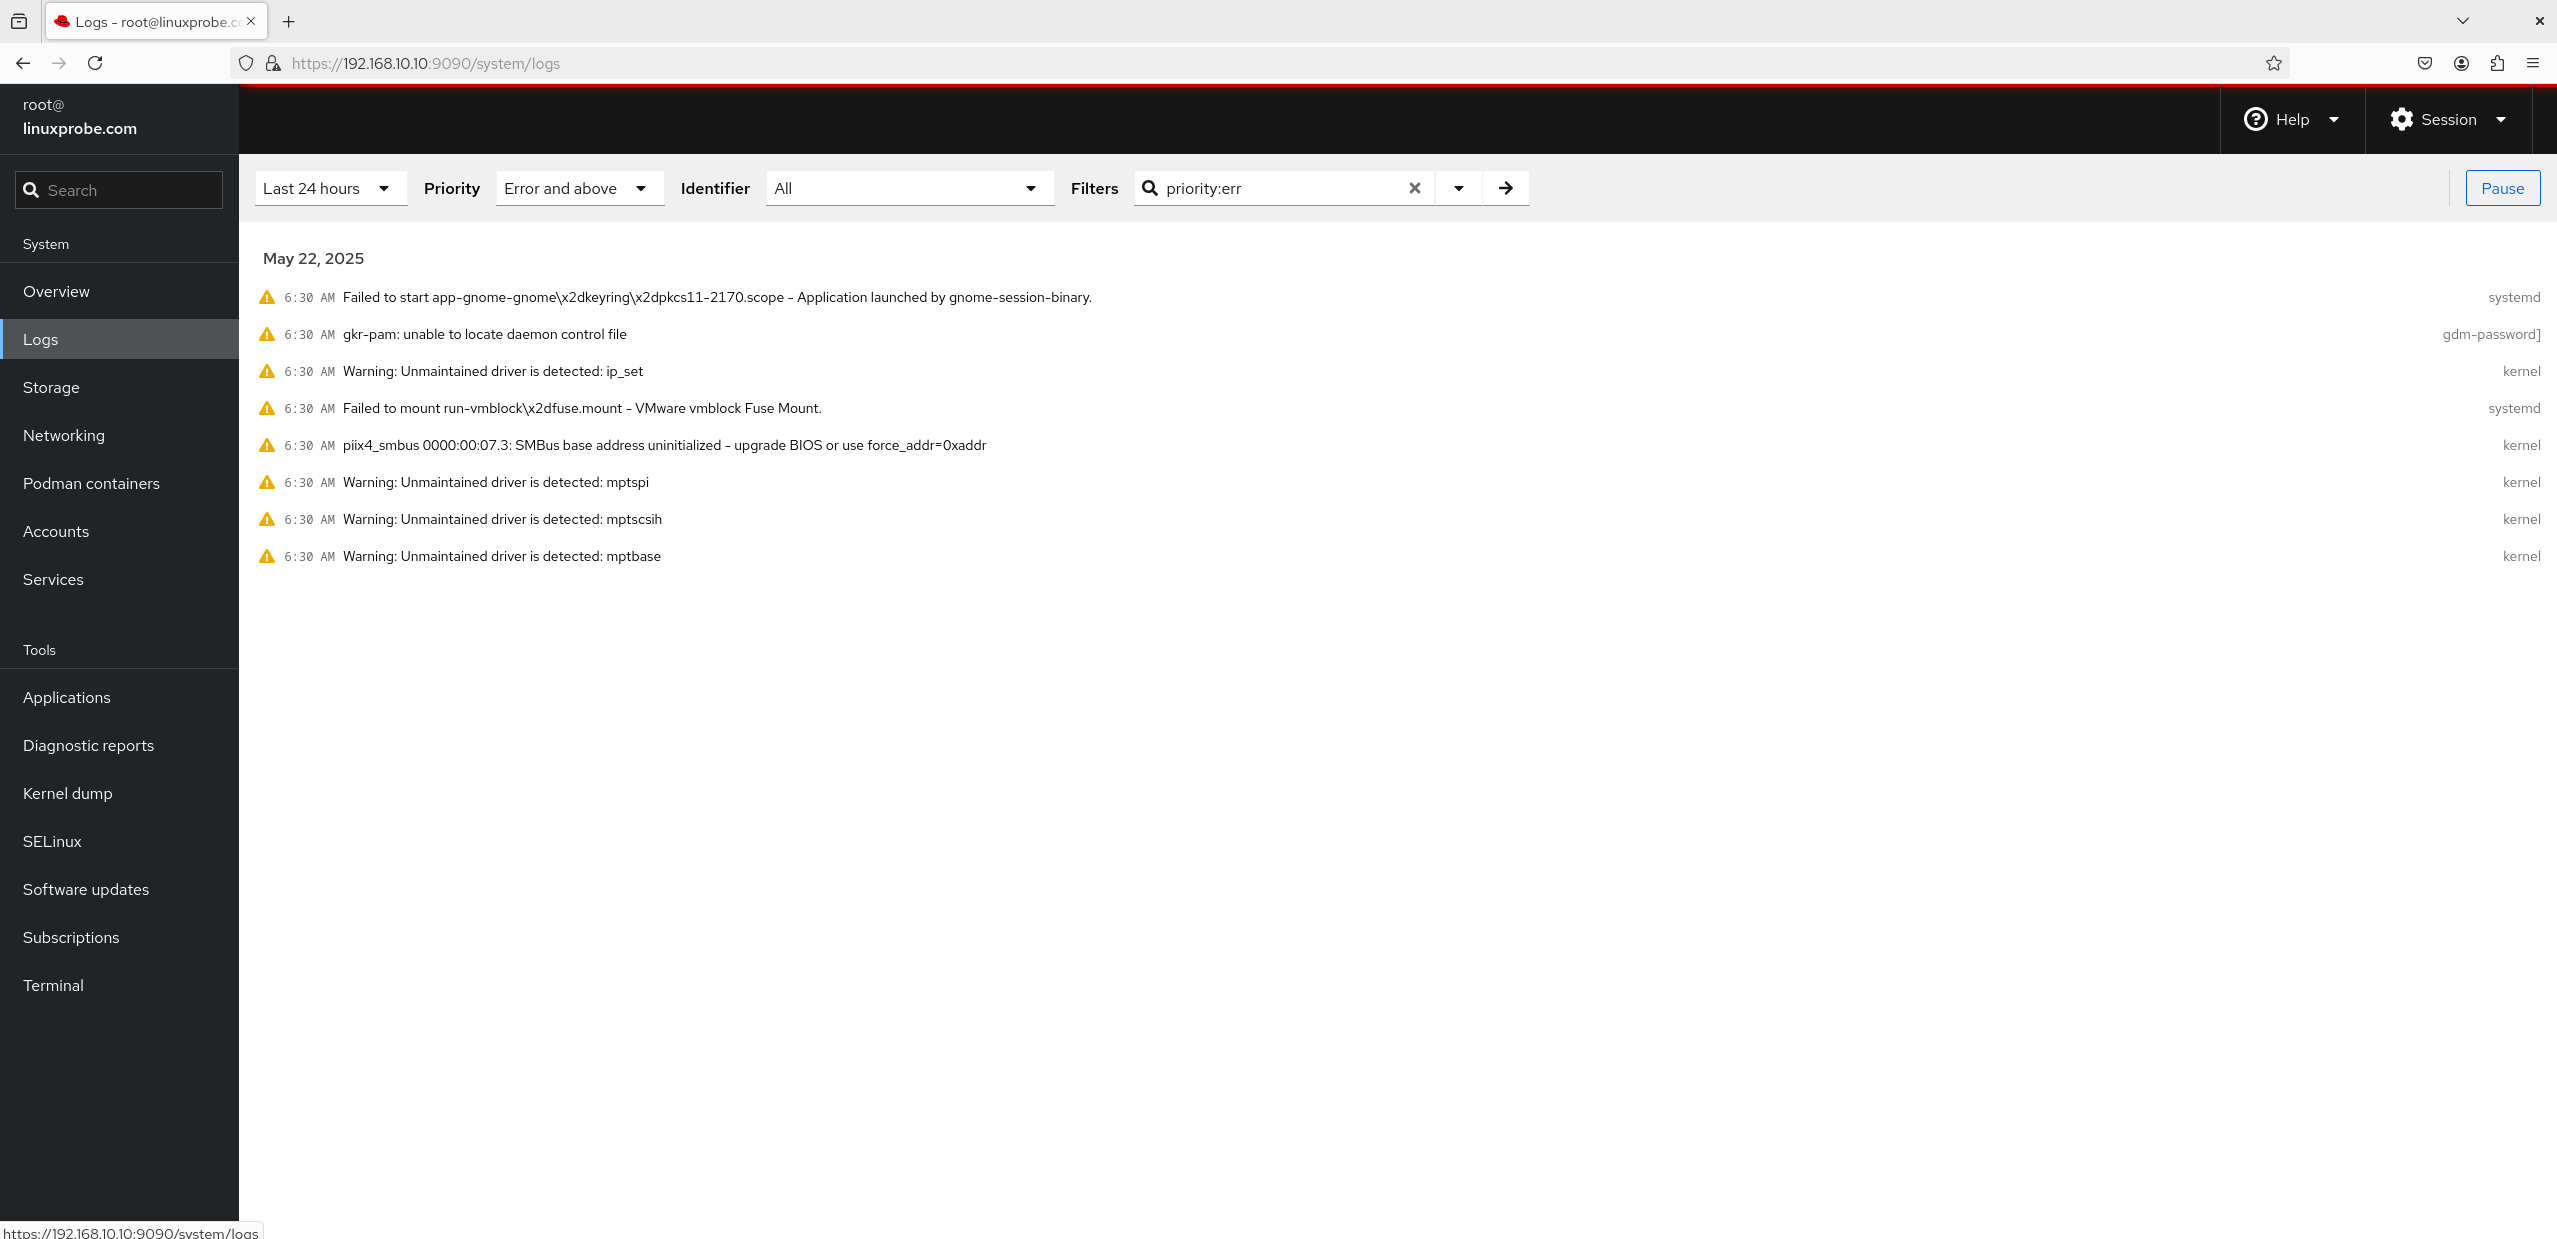
Figure 8-22 Log Information Interface
3. Storage This functional module is the students' favorite, not because it displays disk I/O load, but because it allows users to create storage devices like RAID, LVM, VDO, and iSCSI directly via the module's interface using a mouse, as shown in Figure 8-23. Yes, you read that correctly—RAID and LVM can now be created with a mouse. Isn't that exciting?
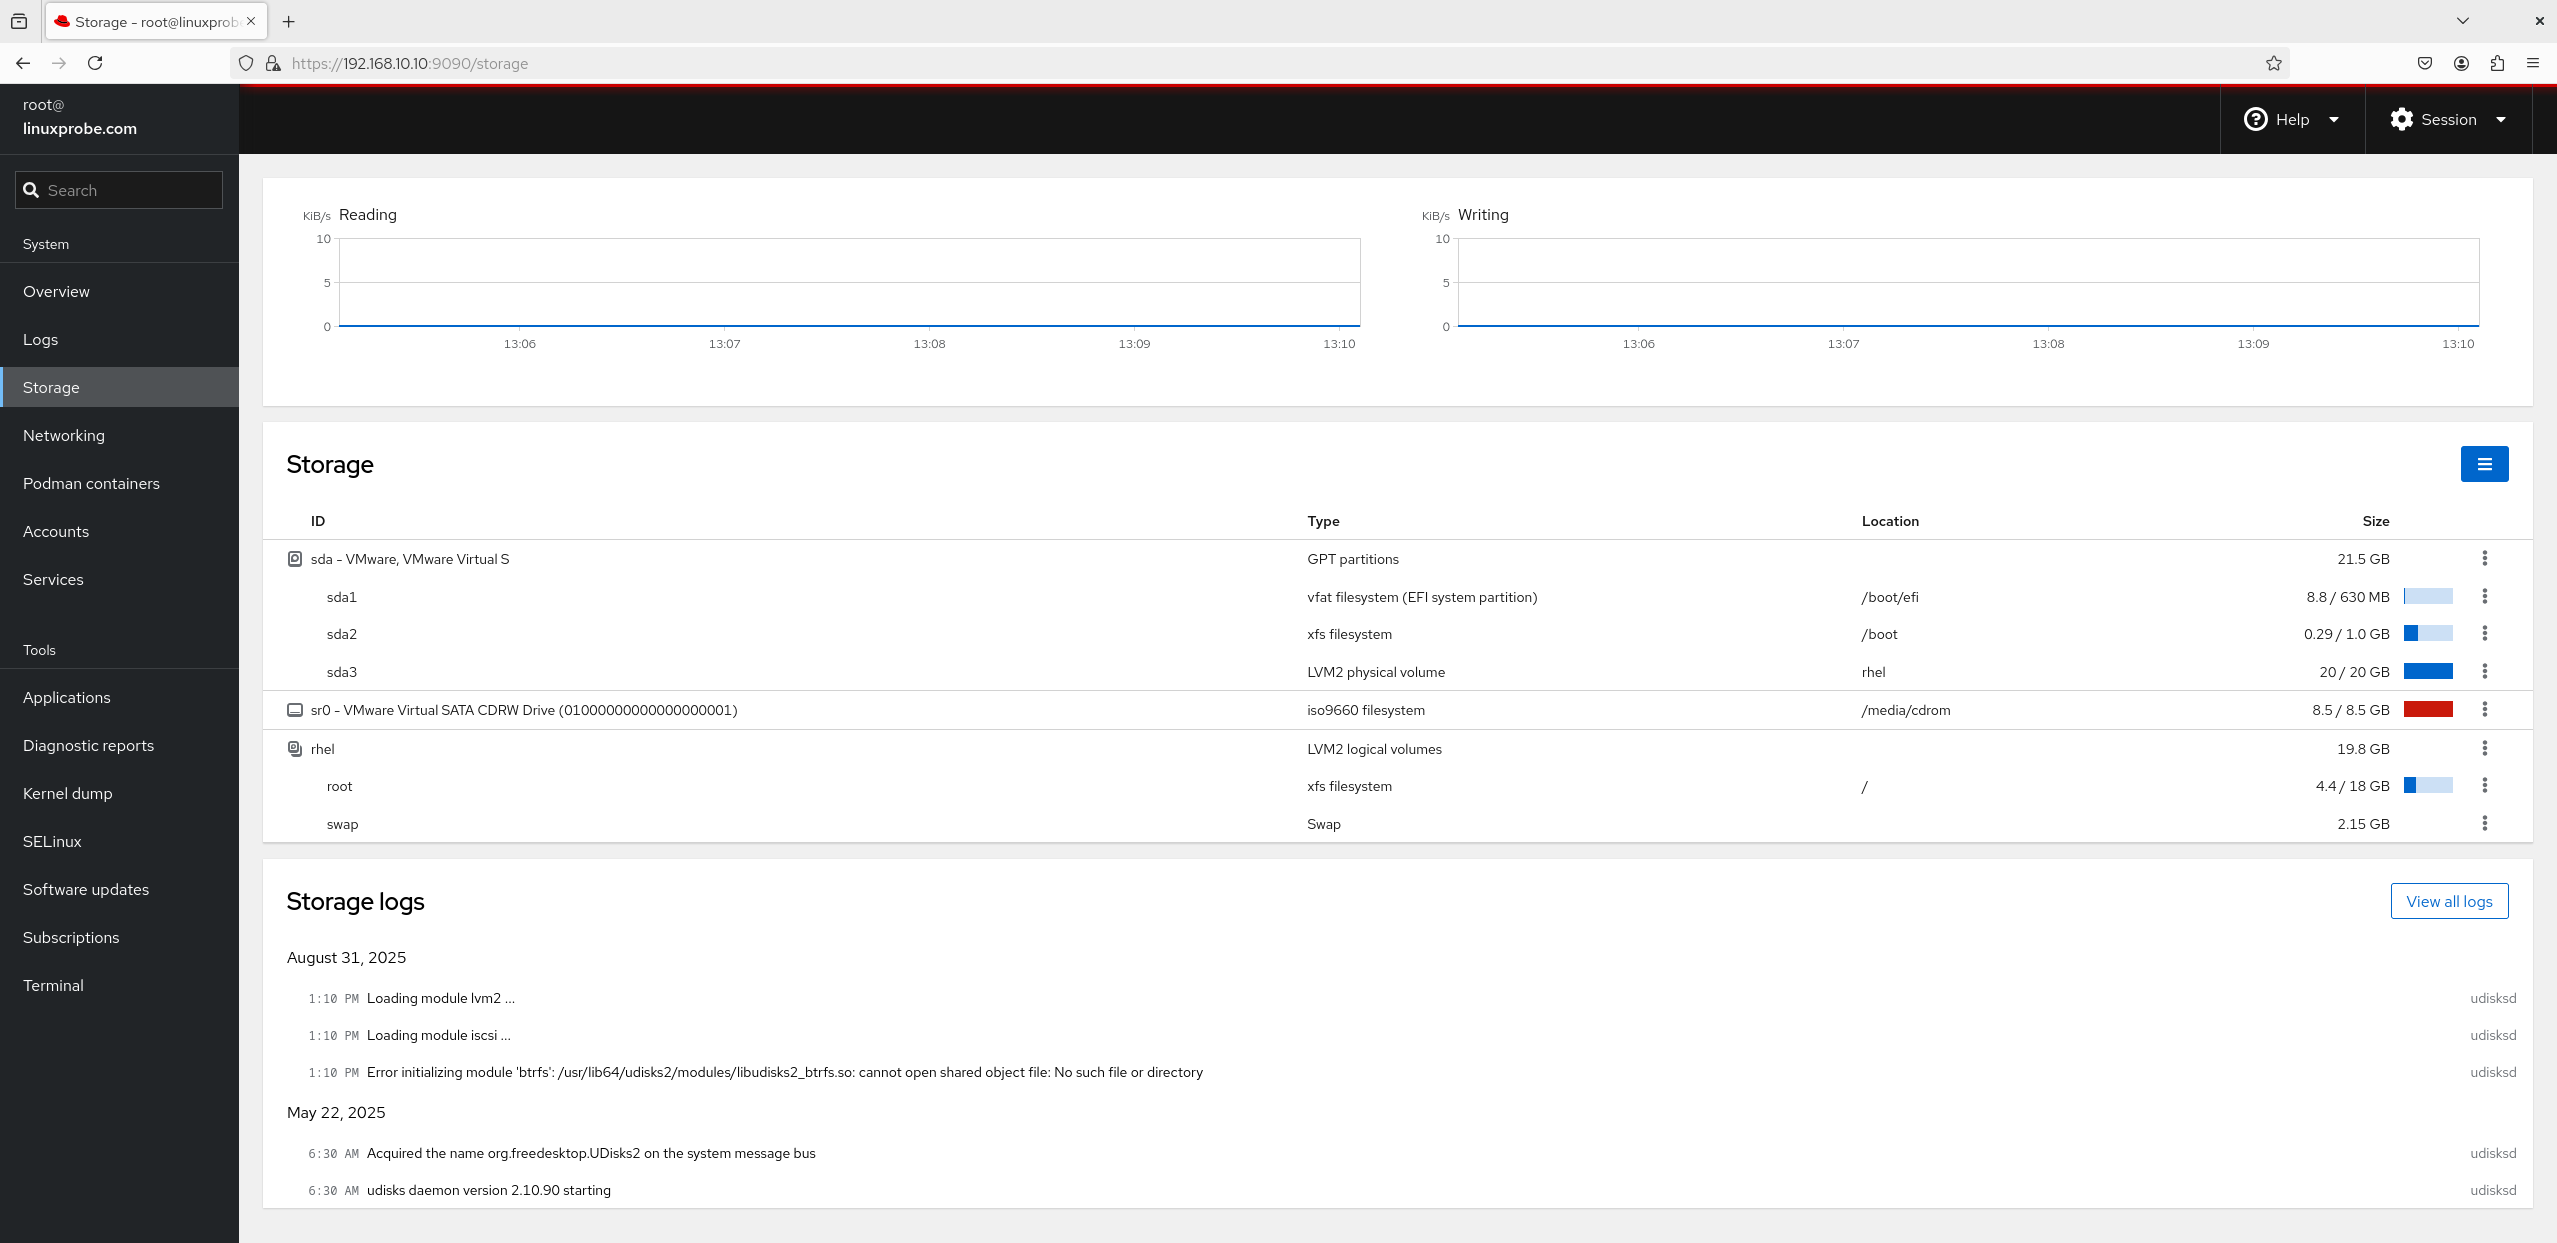
Figure 8-23 Disk Storage Interface
4. Network As the "Network" module suggests, dynamically viewing network interface output and input values is a standard feature here. As shown in Figure 8-24, you can not only perform interface bonding and teaming but also create bridged interfaces and add VLANs. Network interface-related log information is displayed separately at the bottom of Figure 8-24.
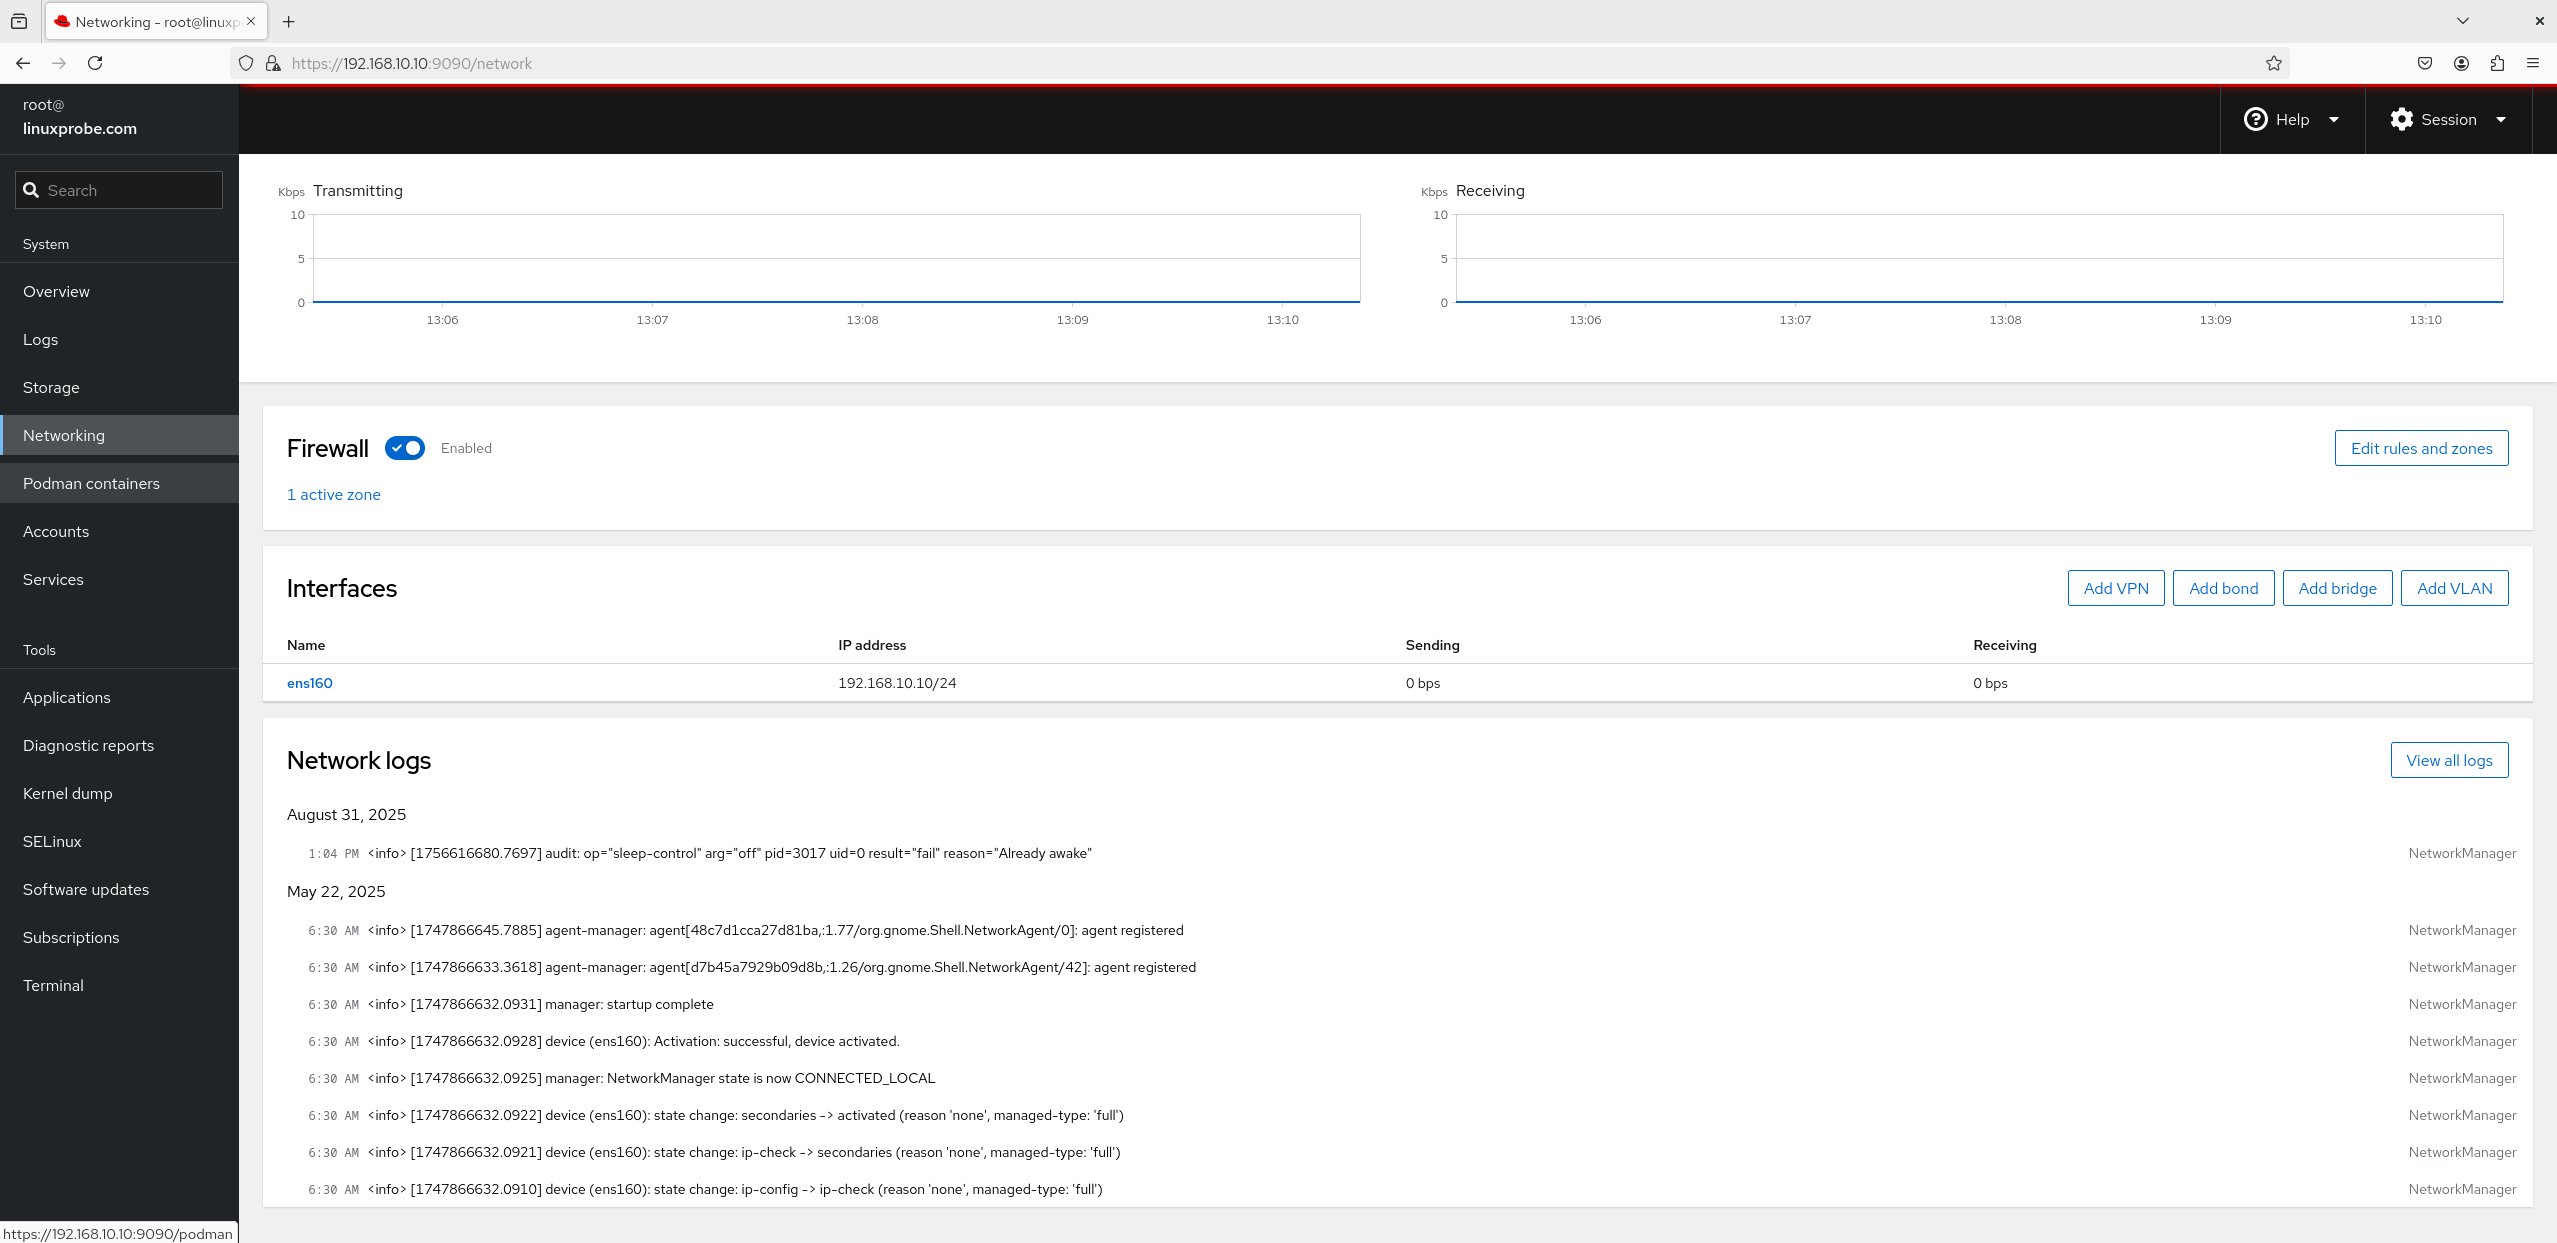
8-24 Network Interface for Network Cards
5. Podman Containers Podman containers are pre-installed in RHEL 10 by default but remain inactive. Simply click the "Start Podman" button to launch the service. Additionally, creating and managing images and containers no longer requires command-line operations—all actions can be performed directly within the graphical interface, as shown in Figures 8-25 and 8-26.
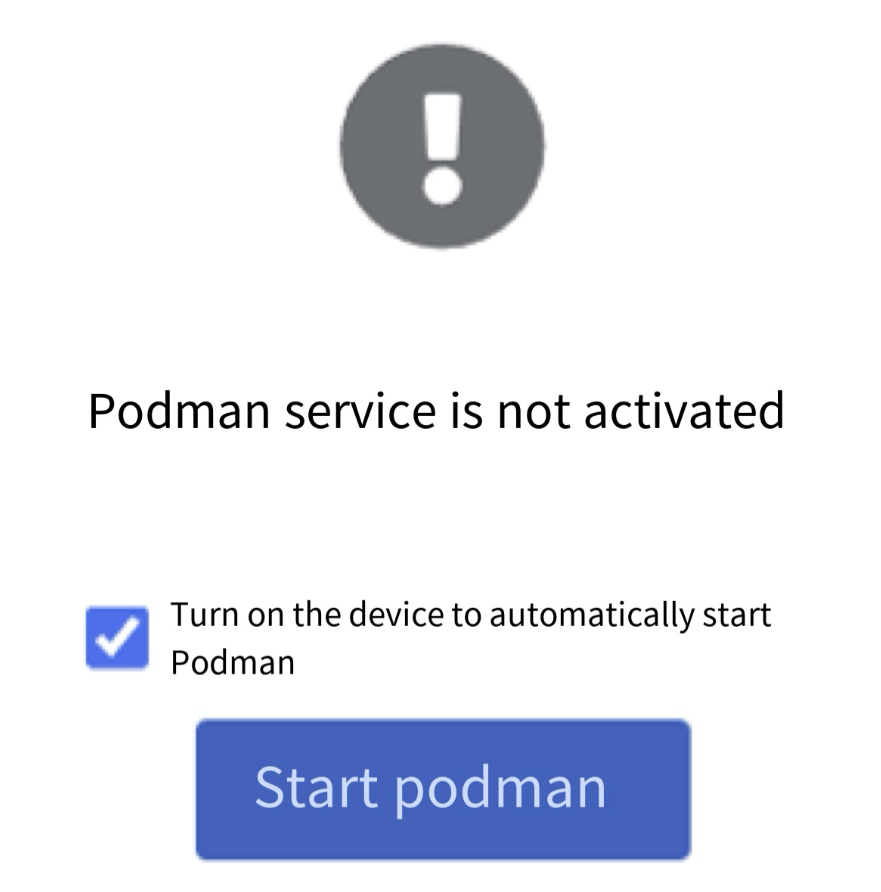
Figure 8-25 Podman Container Service Interface
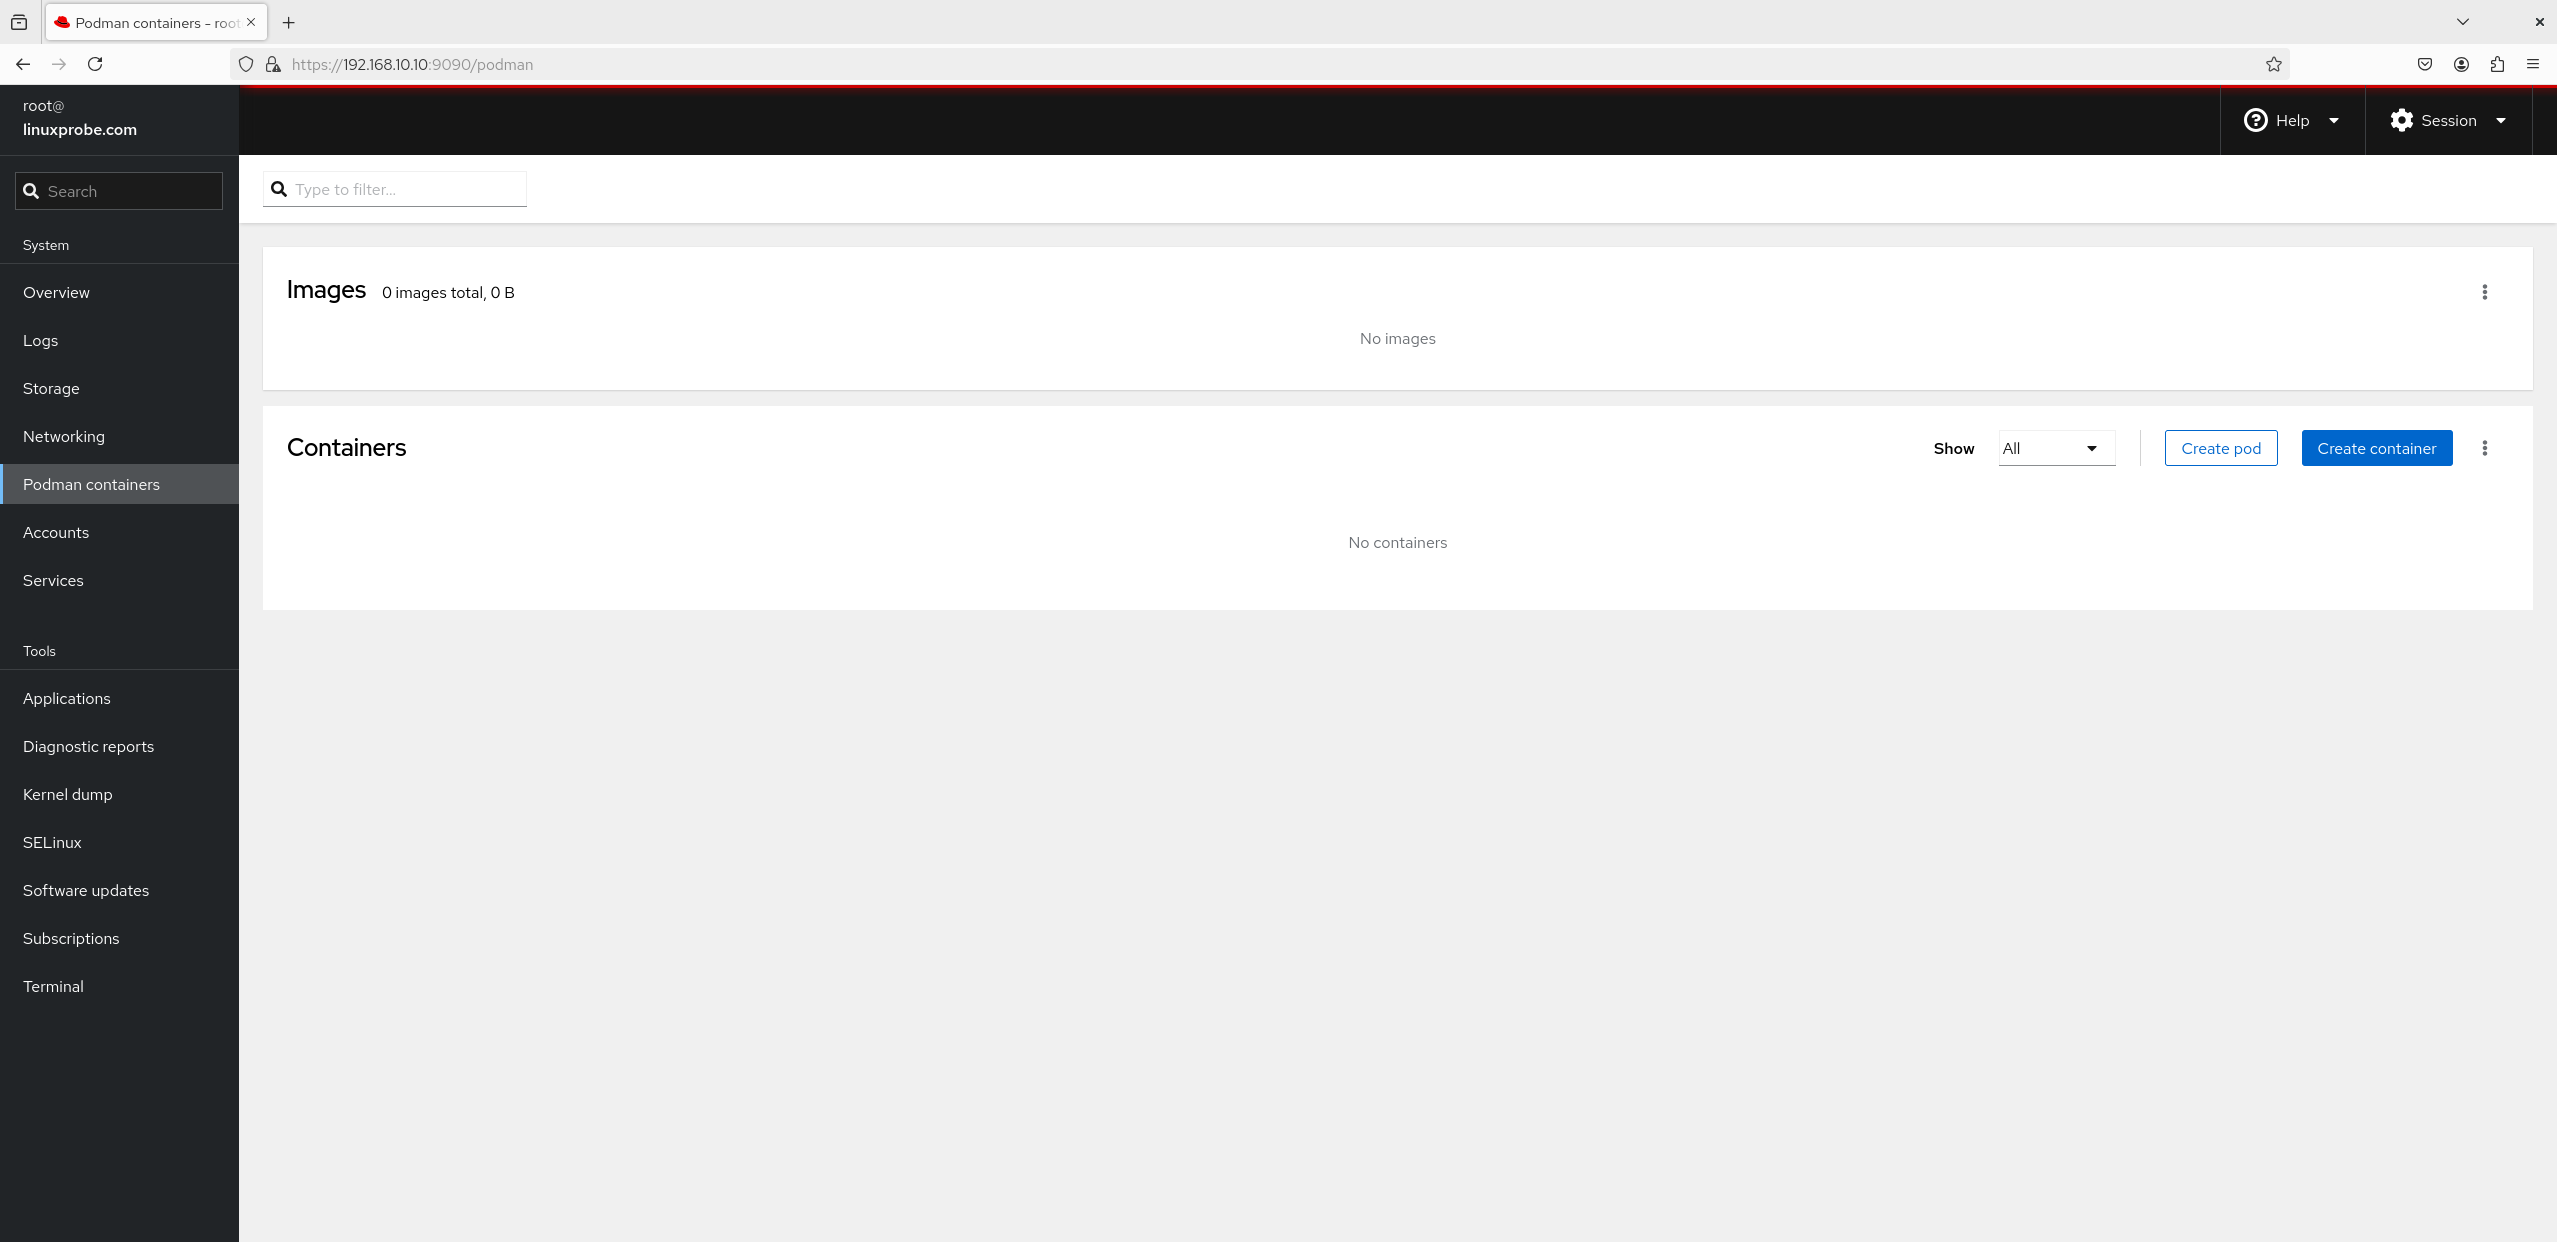
Figure 8-26 Image and Container Management Interface
6. User Accounts Don't underestimate the "User Accounts" module. Although its interface appears basic (see Figure 8-27), featuring only a single button for account creation, clicking into any account's management interface reveals a wealth of functionality, as shown in Figure 8-28.This interface offers extensive capabilities: renaming accounts, configuring permissions, locking accounts, resetting passwords, and generating SSH key information.
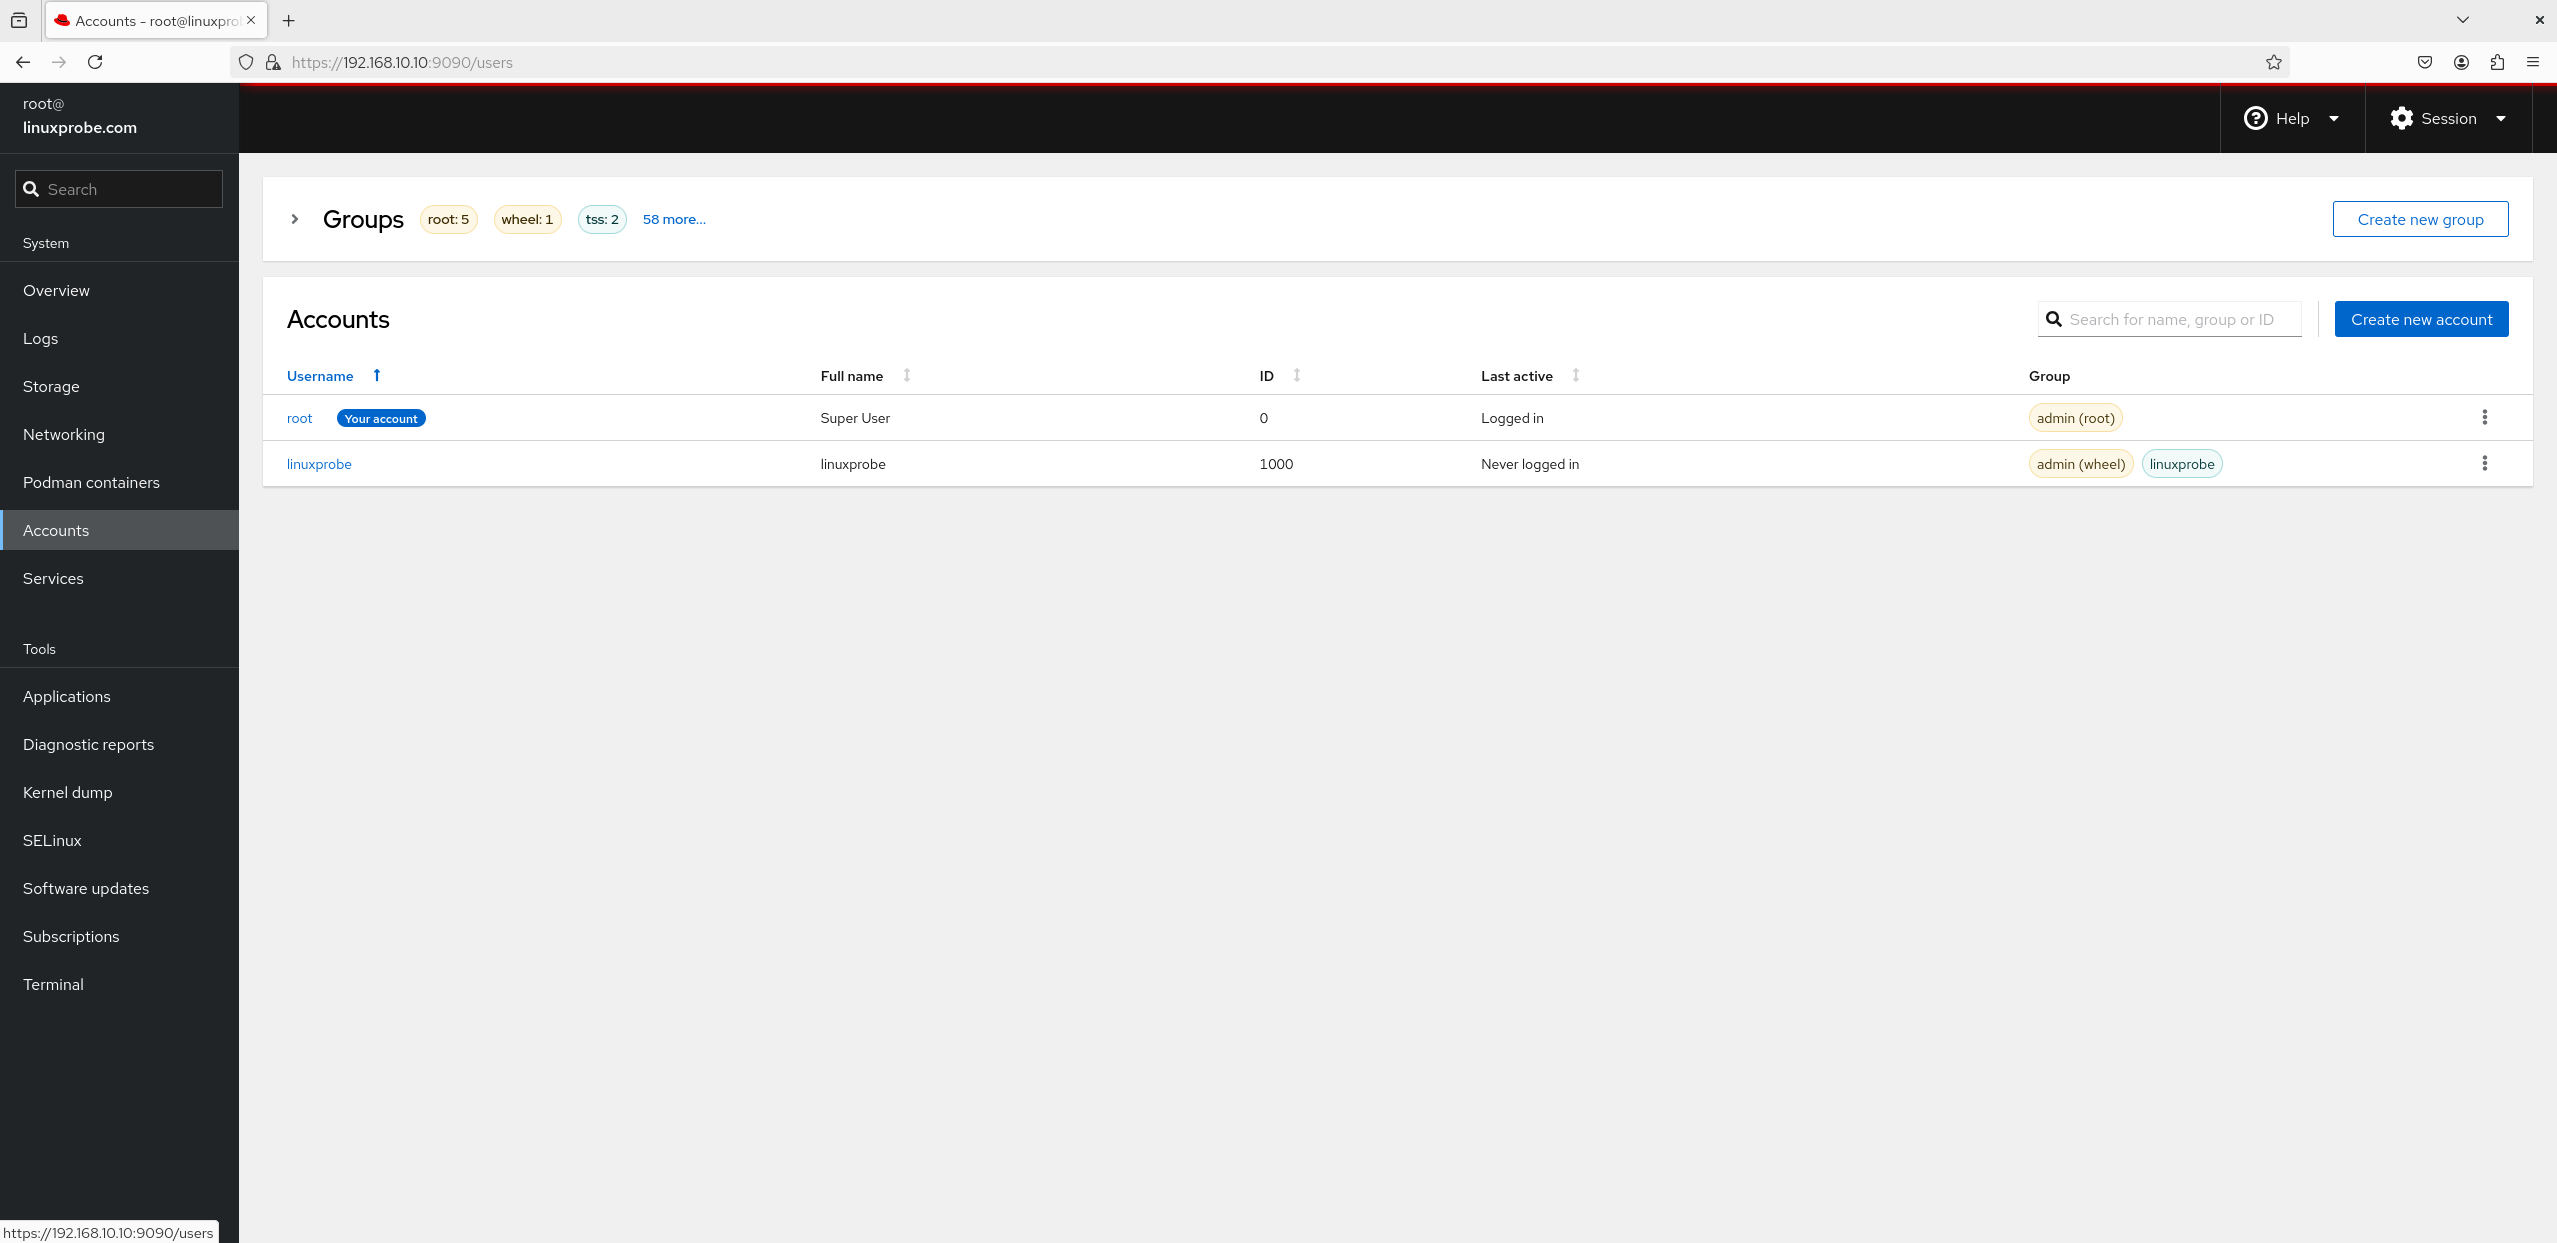
Figure 8-27 Account Security Interface
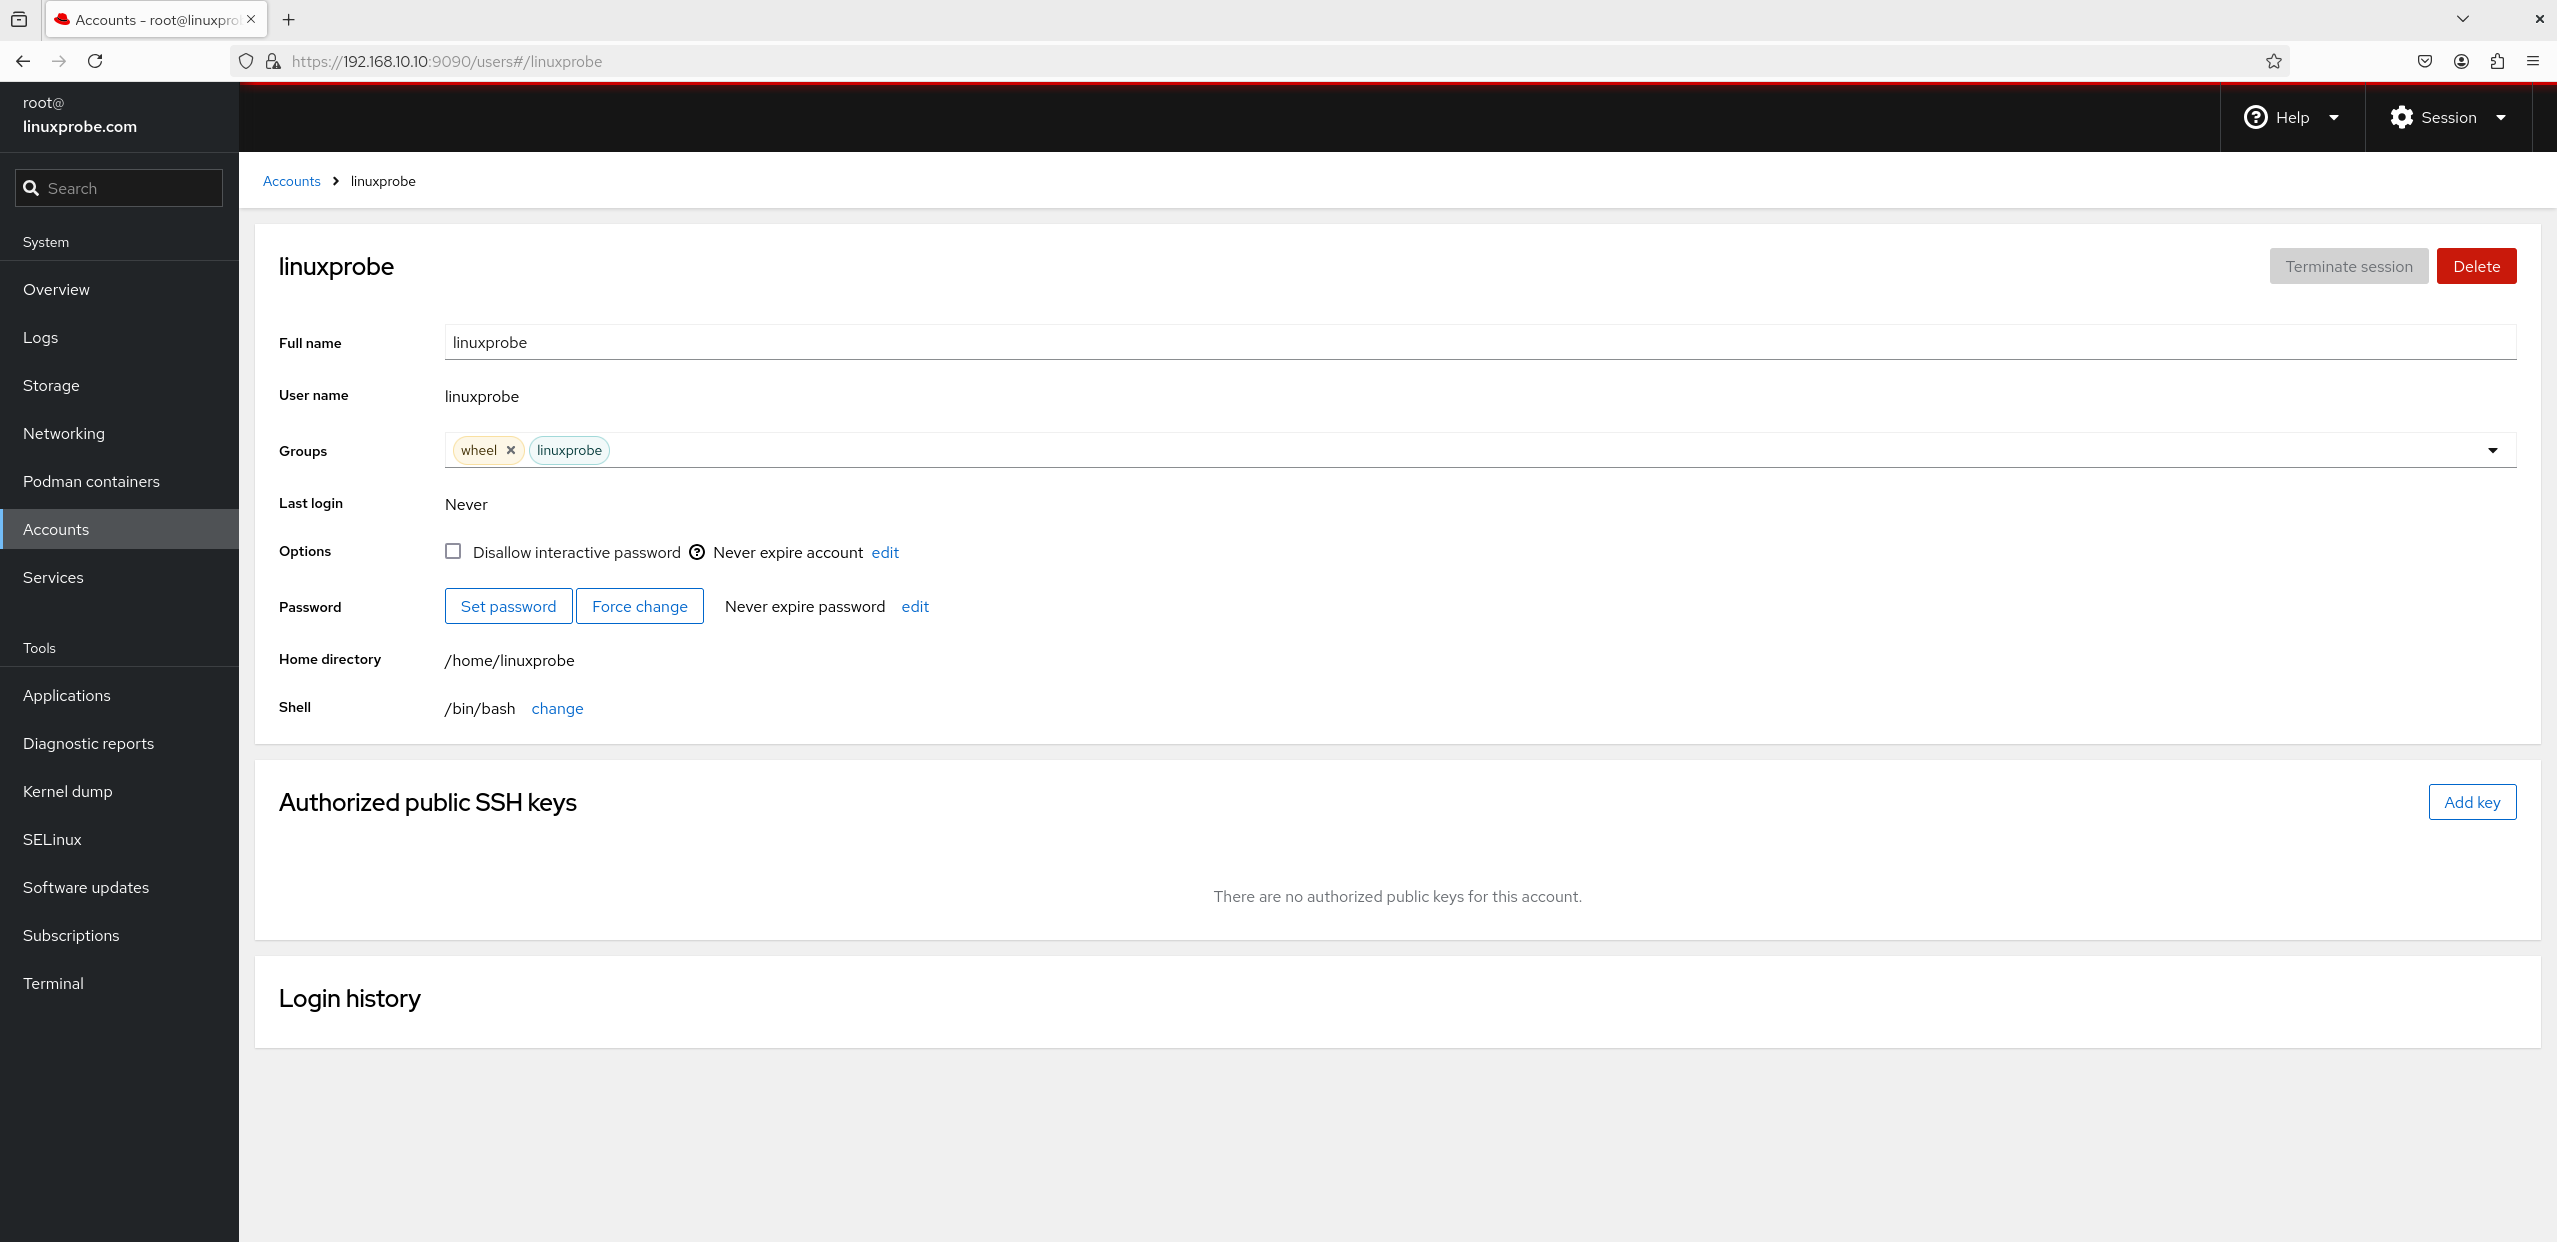
Figure 8-28 Account Management Interface
7. Services Within the "Services" module interface (see Figure 8-29), you can view the list of existing services and their operational statuses. Clicking a specific service opens its management interface (see Figure 8-30), where you can enable or disable that service. Services configured in the "Services" module and added to the startup items will continue providing services to users even after system reboots.
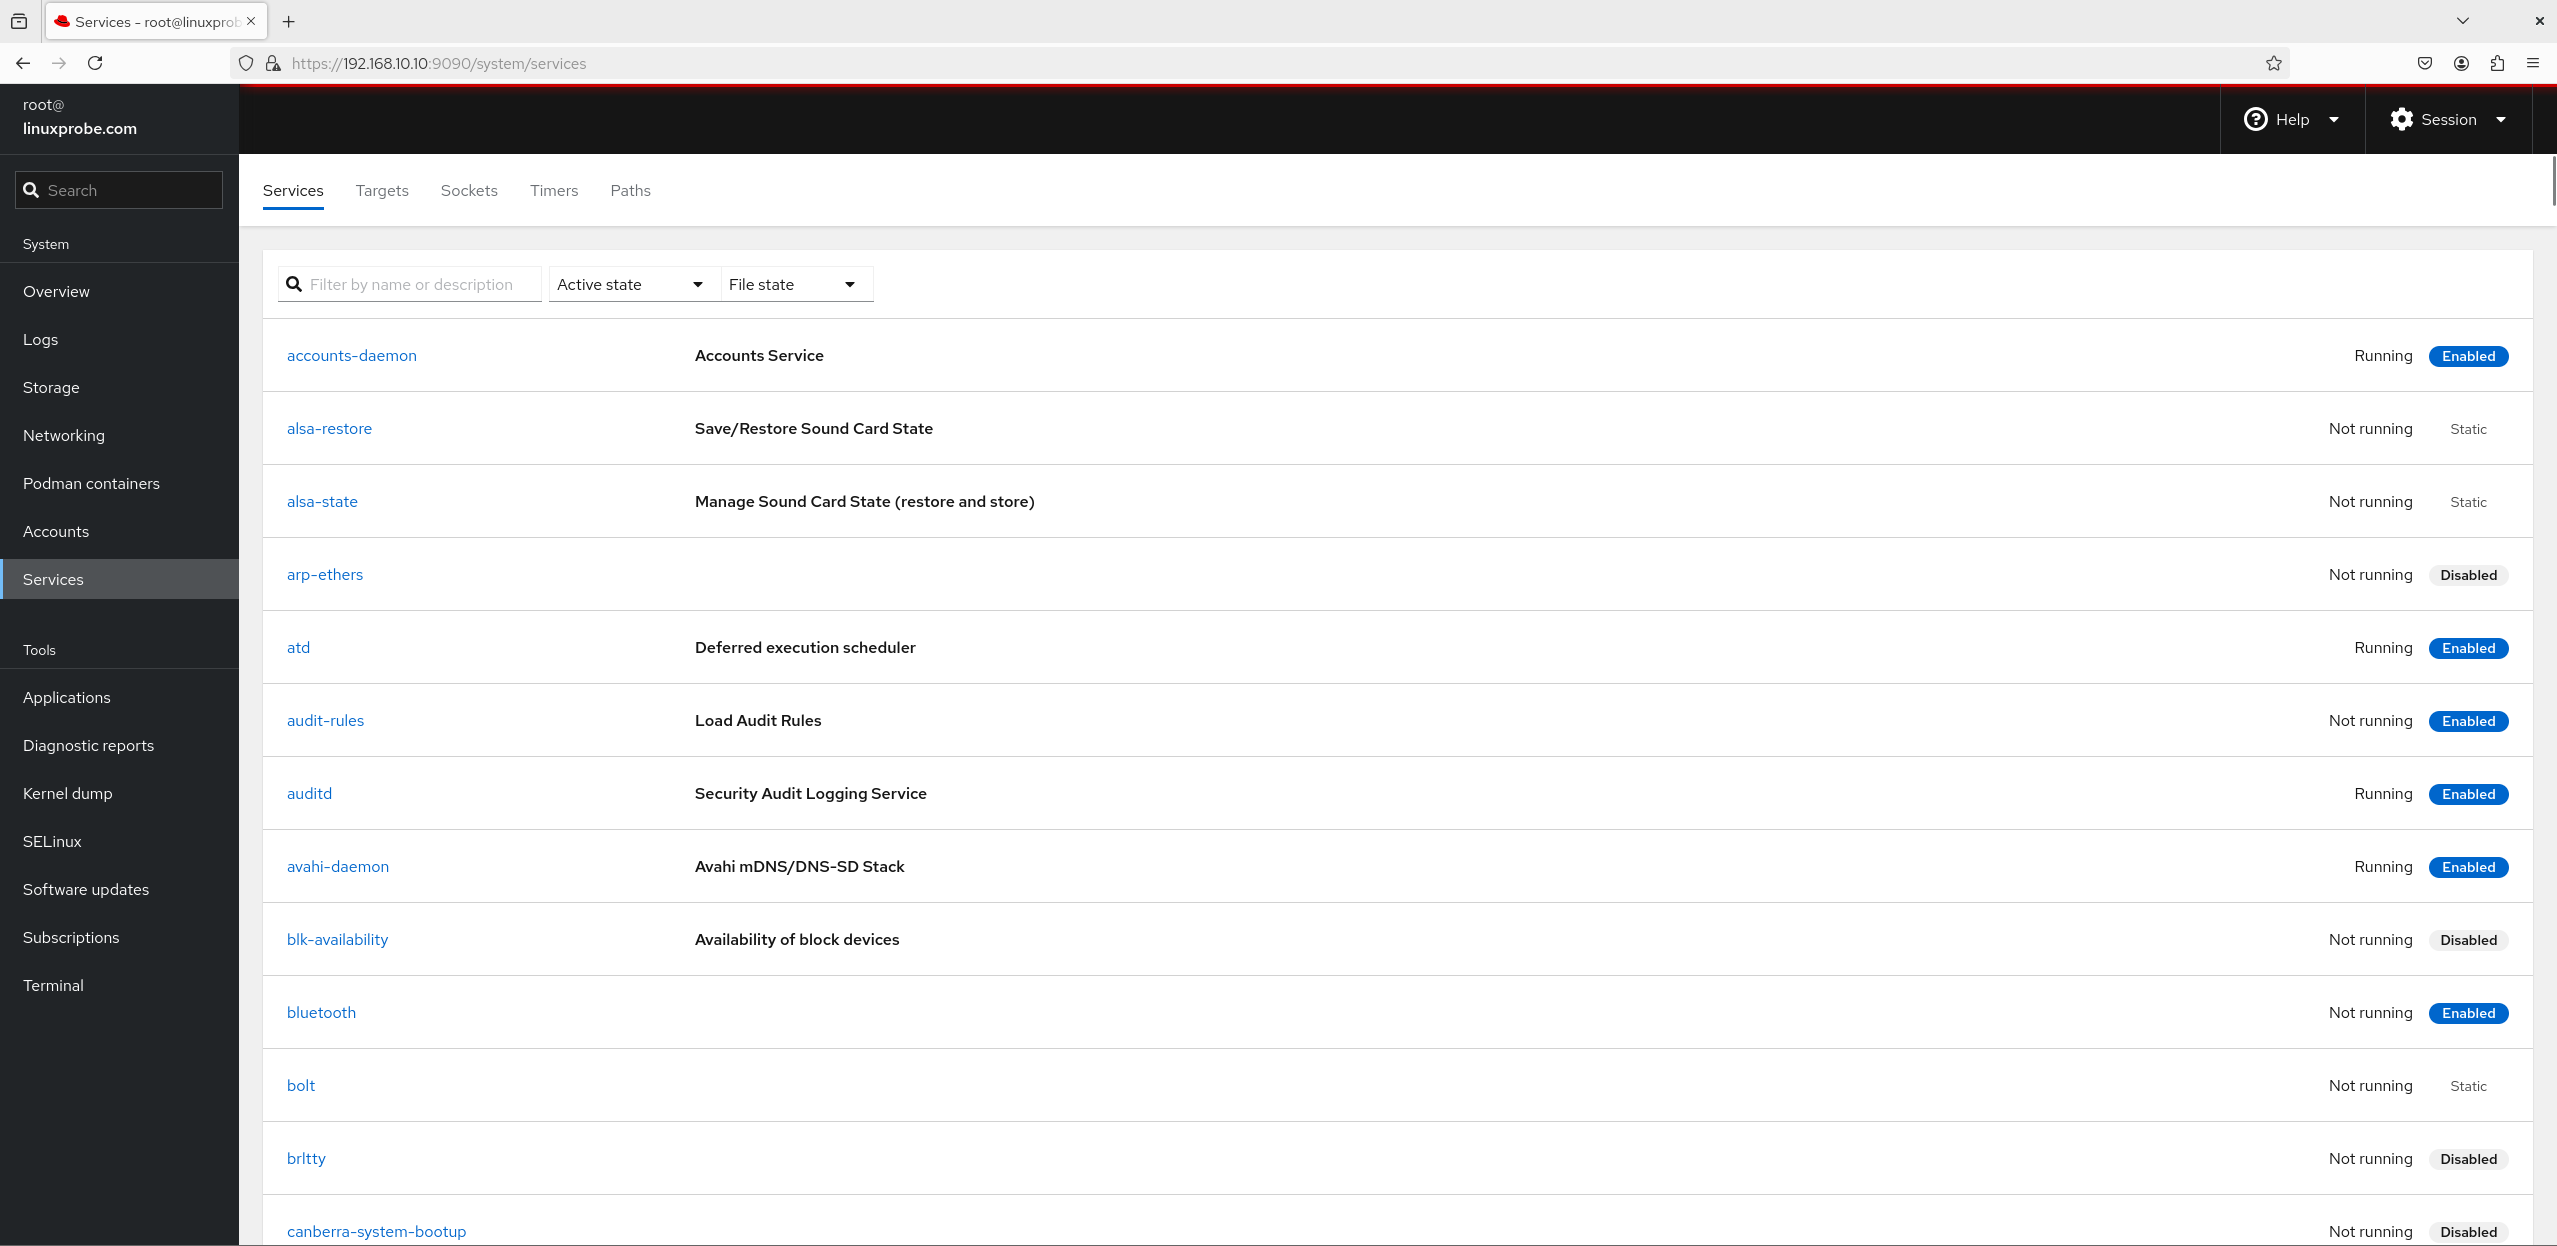
Figure 8-29 Service Program Interface

Figure 8-30 Service Management Interface
8. Subscription The interface for the "Subscription" module is shown in Figure 8-31. Here, we again see a small advertisement from Red Hat—to become a valued Red Hat service user, you must purchase a subscription. Individual users need not purchase this, and it has no impact on our subsequent experiments.
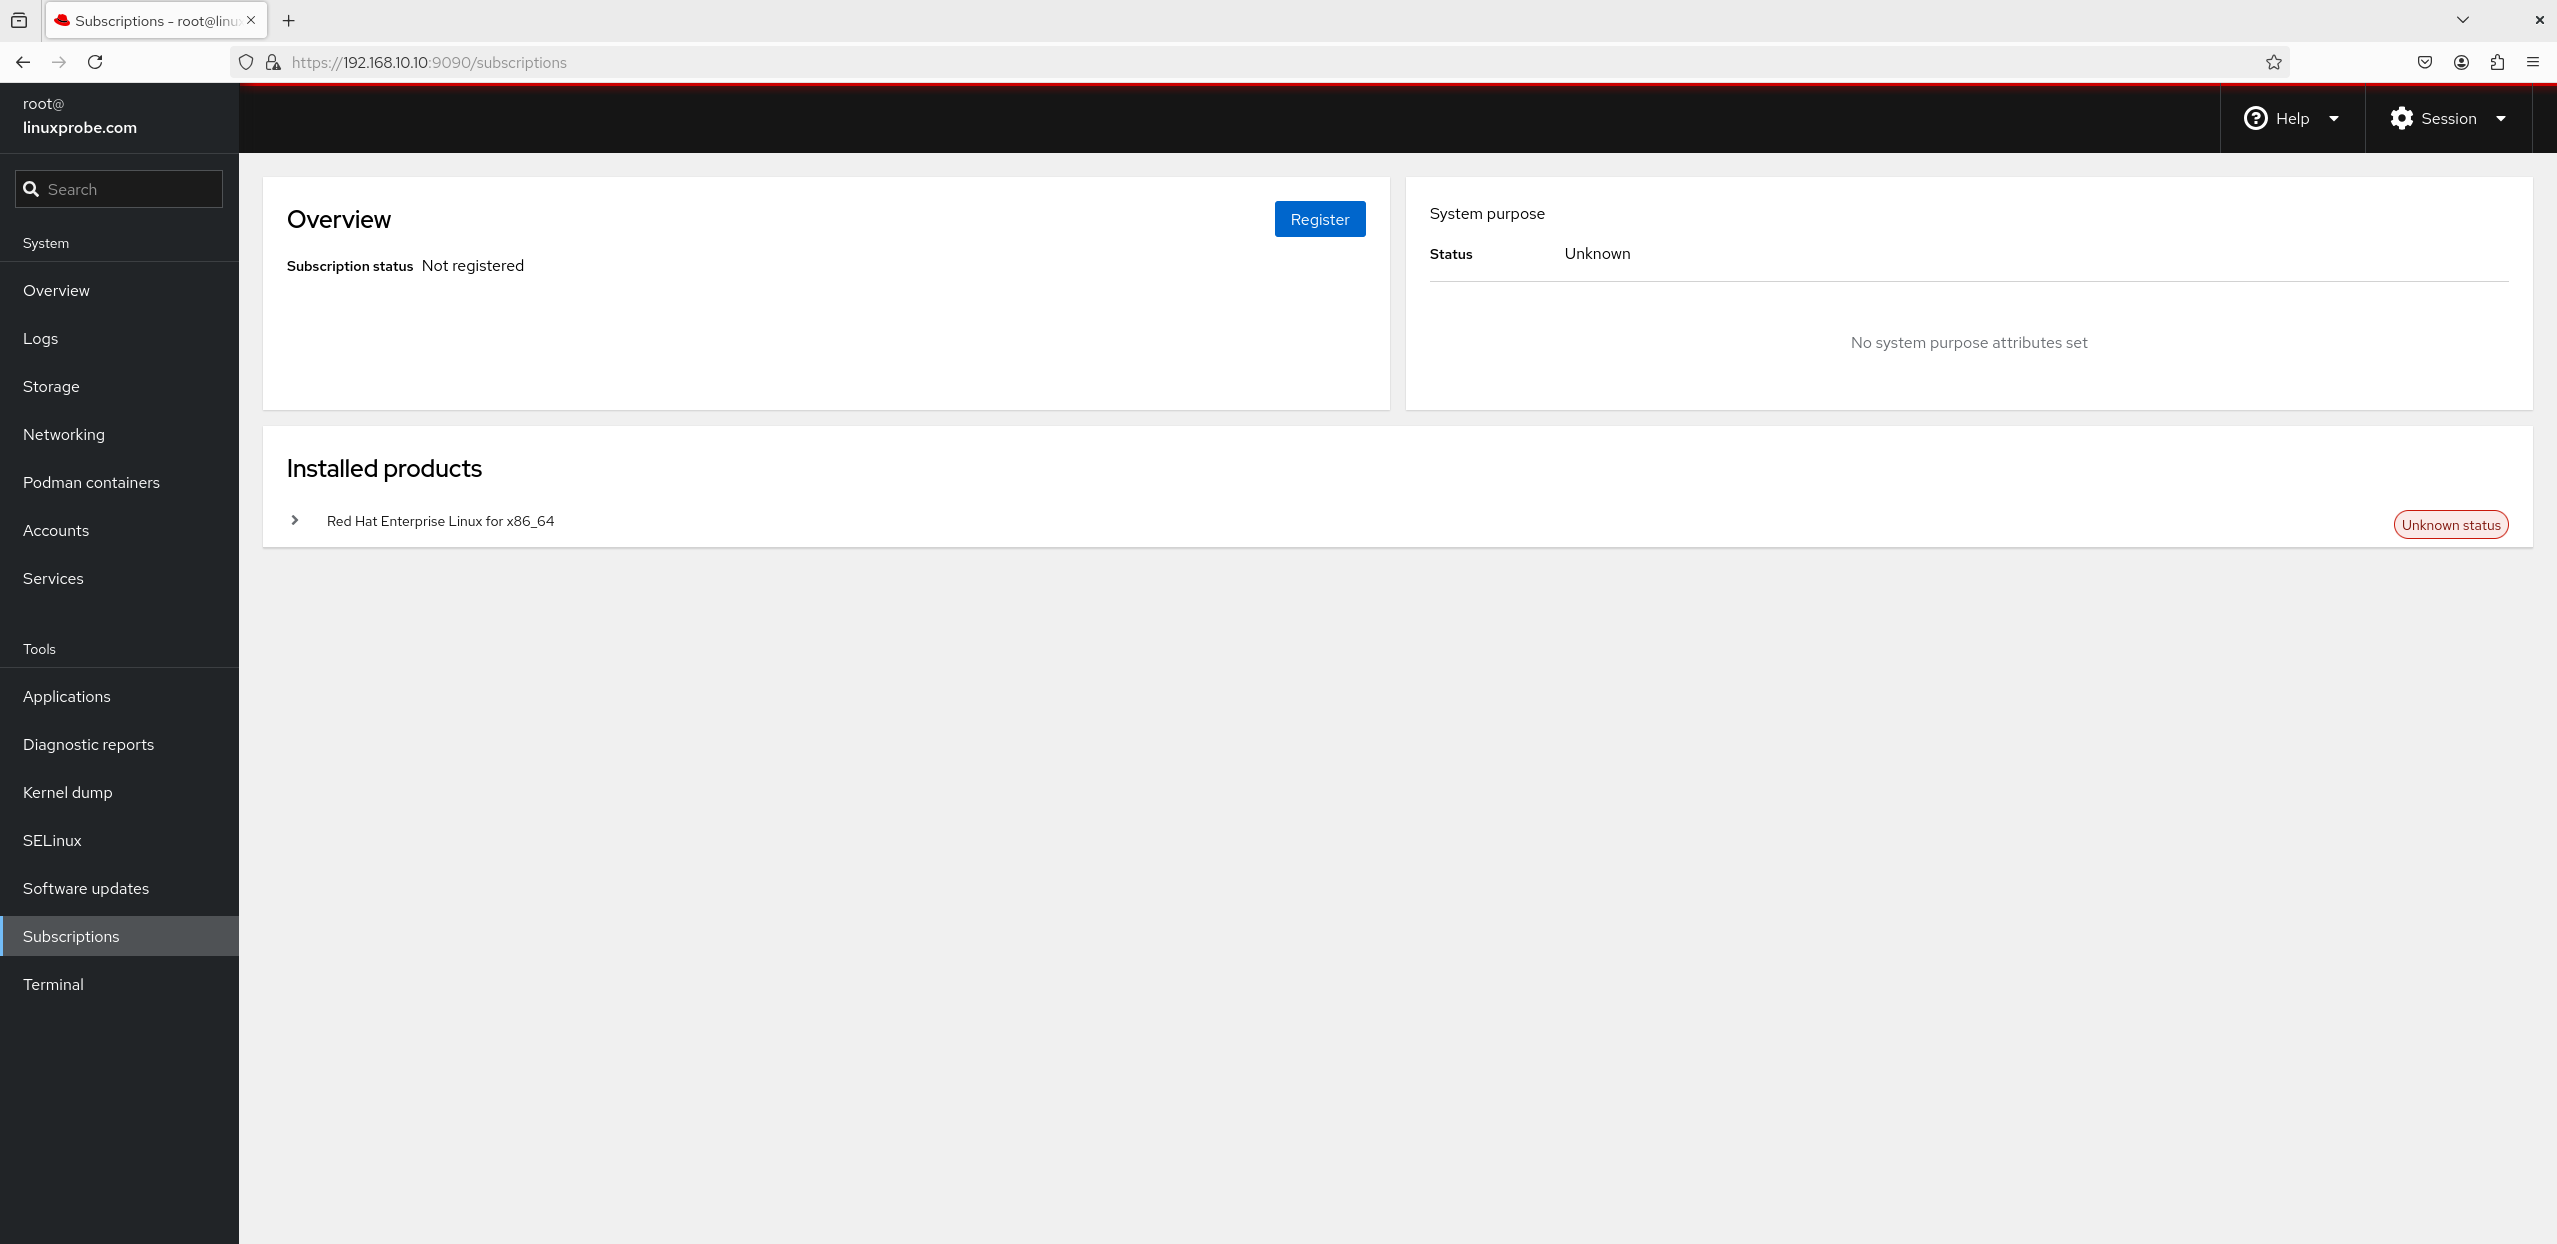
Figure 8-31 Subscription Service Interface
9. Kernel Crash Dump
Kernel Dump is a service that collects kernel parameters during system crashes, deadlocks, or freezes. For example, if the system crashes one day, the KDUMP service will activate, collecting the system's operational state and kernel data into a file named dump core. This enables operations personnel to analyze and identify the root cause later. Since we did not enable this service during system installation, it can be activated later via the module interface (see Figure 8-32).

Figure 8-32 Kernel Debugging Interface
10. Software Updates The interface for the "Software Updates" module is shown in Figure 8-33. However, this "Software Updates" interface is not used for updating other conventional software. Instead, it is specifically designed for updating services covered by Red Hat subscriptions. After purchasing a Red Hat subscription, users can download the latest and stable versions of corresponding service programs here.
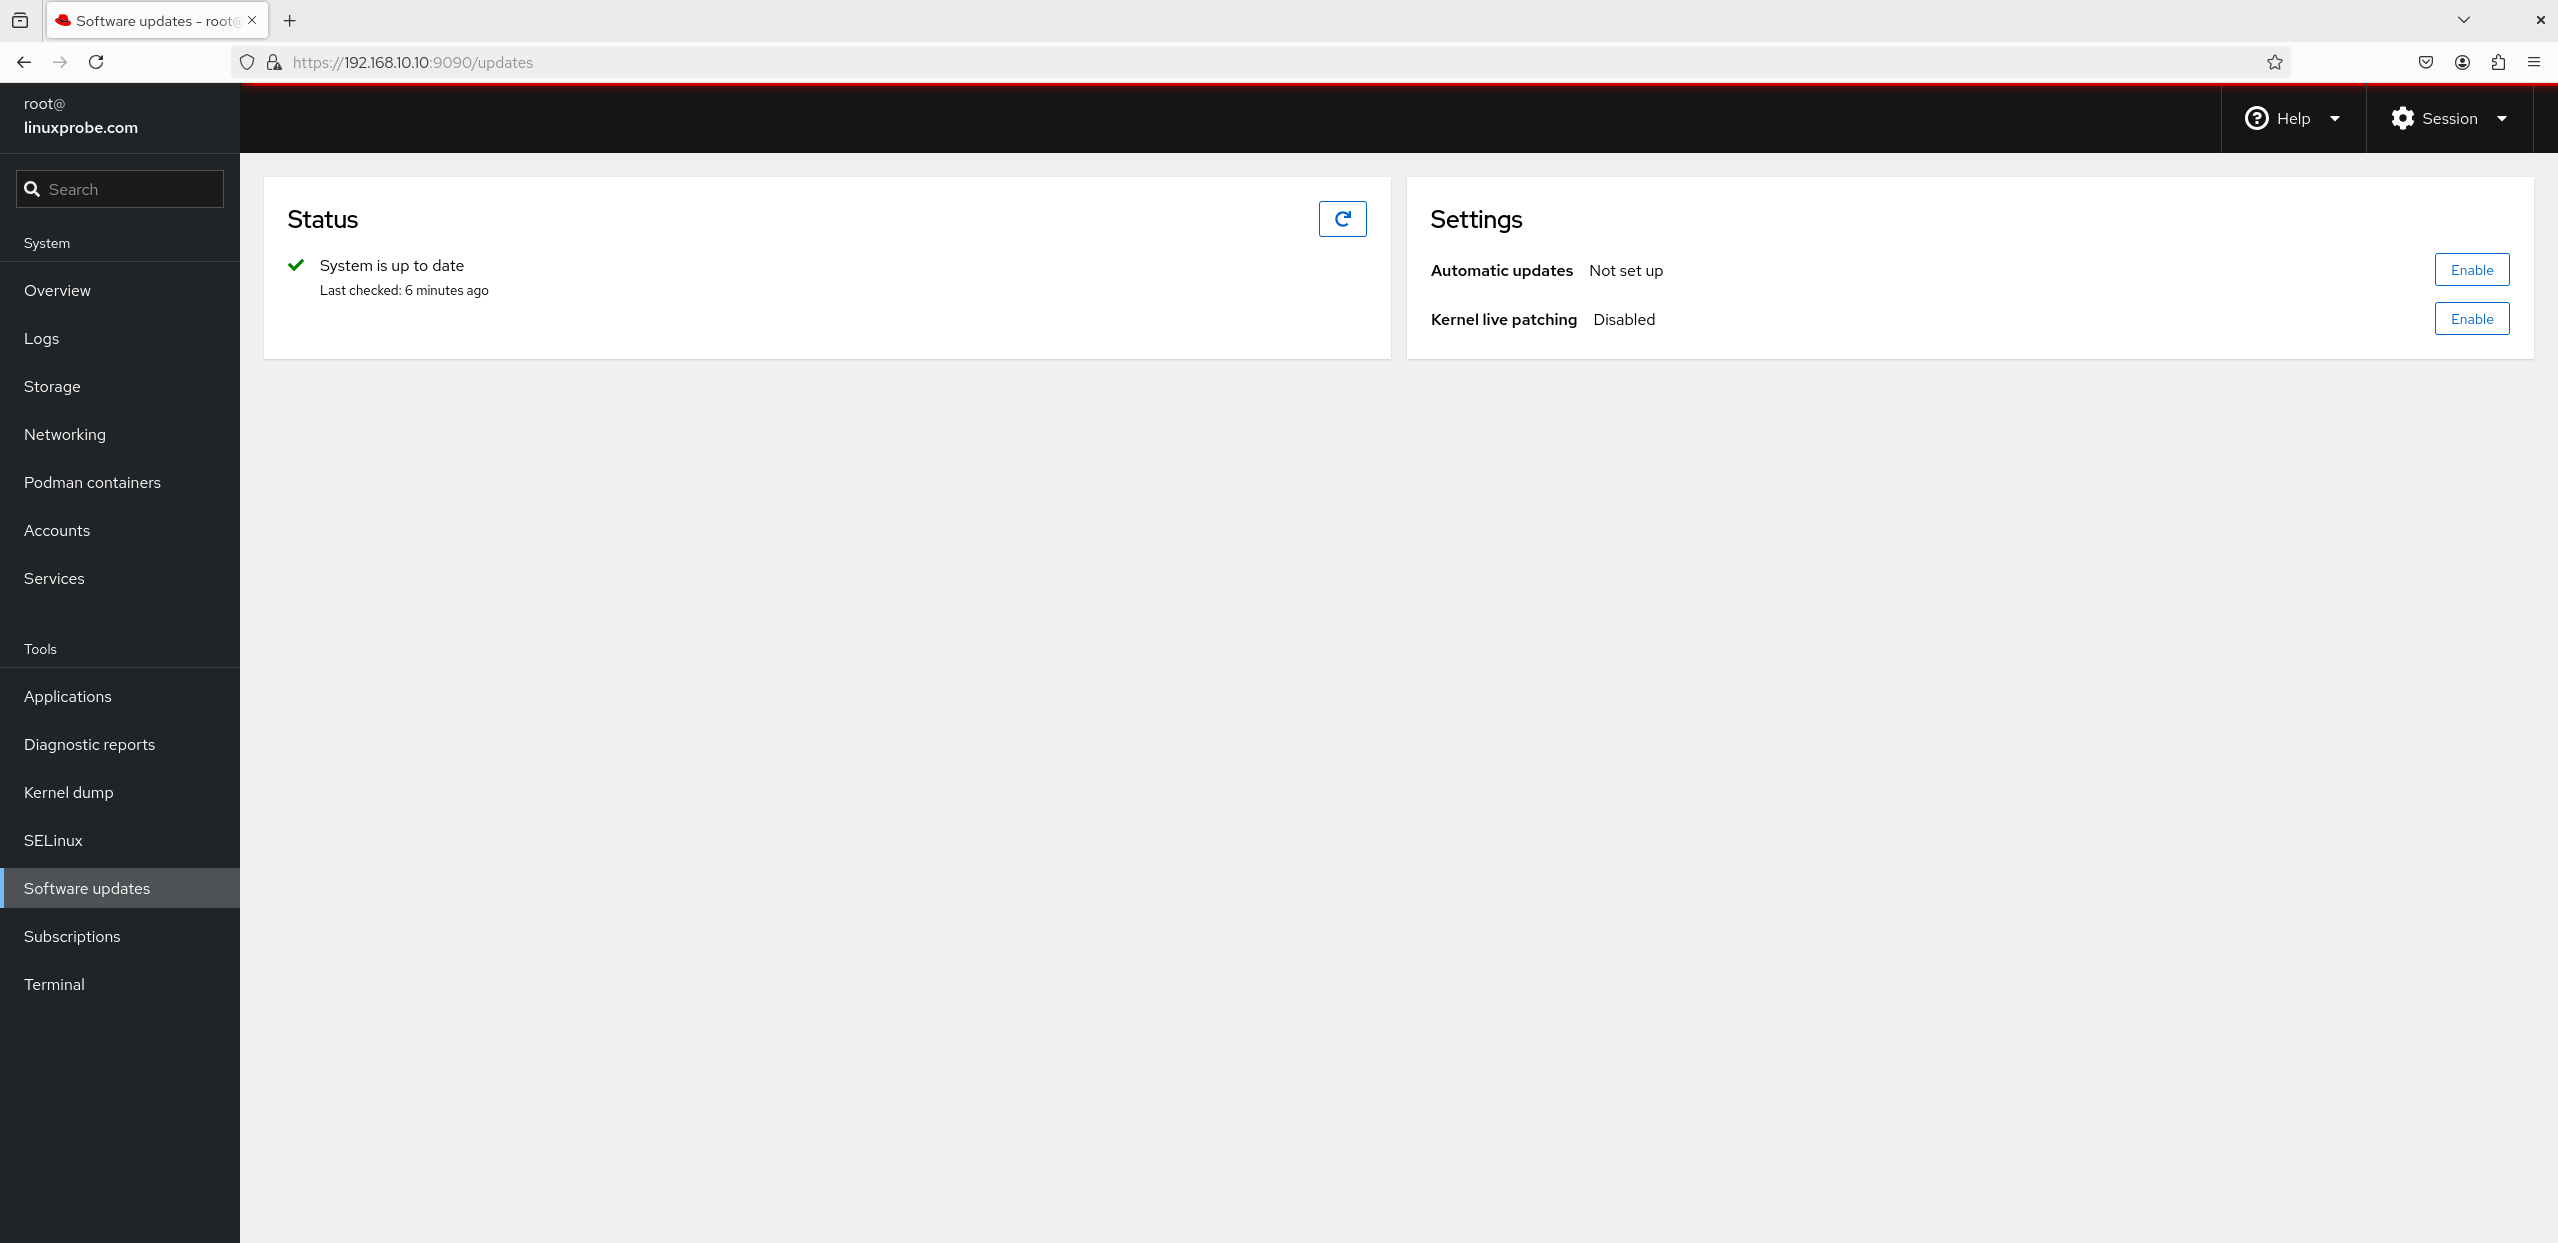
Figure 8-33 Software Update Interface
11. Applications Software installed later via Cockpit or Red Hat Subscription Services will appear in this module, as shown in Figure 8-34.
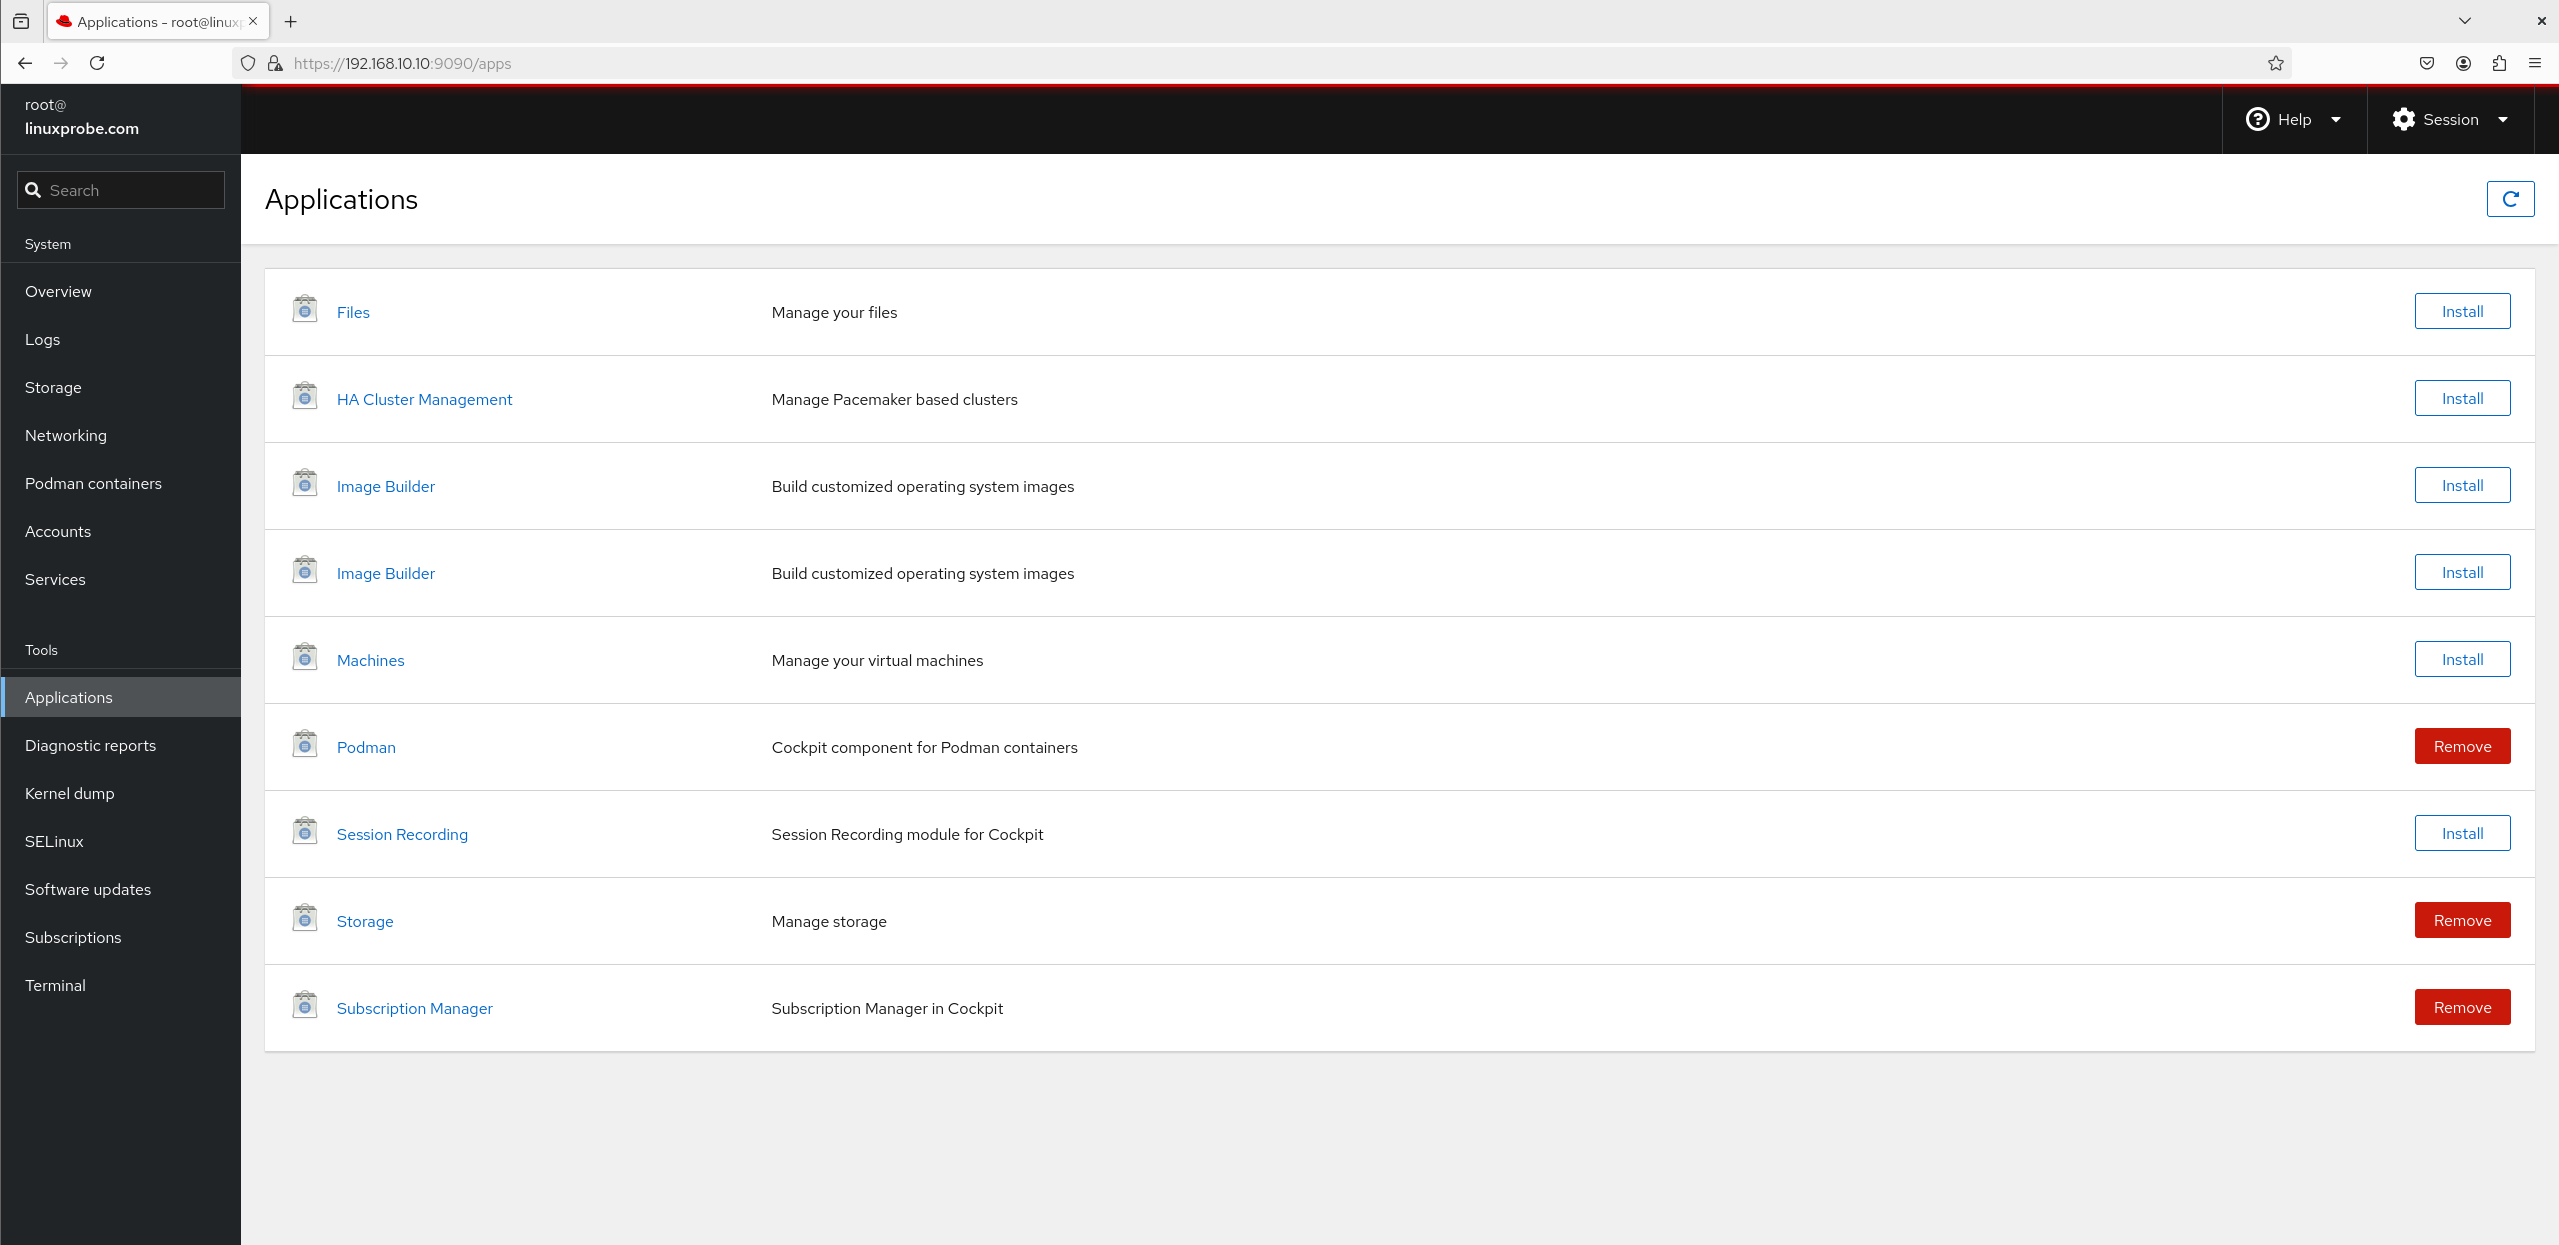
Figure 8-34 Software Repository Interface
12. System Diagnostics
The "System Diagnostics" module assists users in collecting and analyzing system information to identify the root causes of system issues. Its interface is shown in Figure 8-35. After clicking the "Run Report" button, the interface depicted in Figure 8-36 appears within approximately two minutes. Alright, let's be honest—this feature is rather useless. It essentially turns the sosreport command into a button on a webpage.
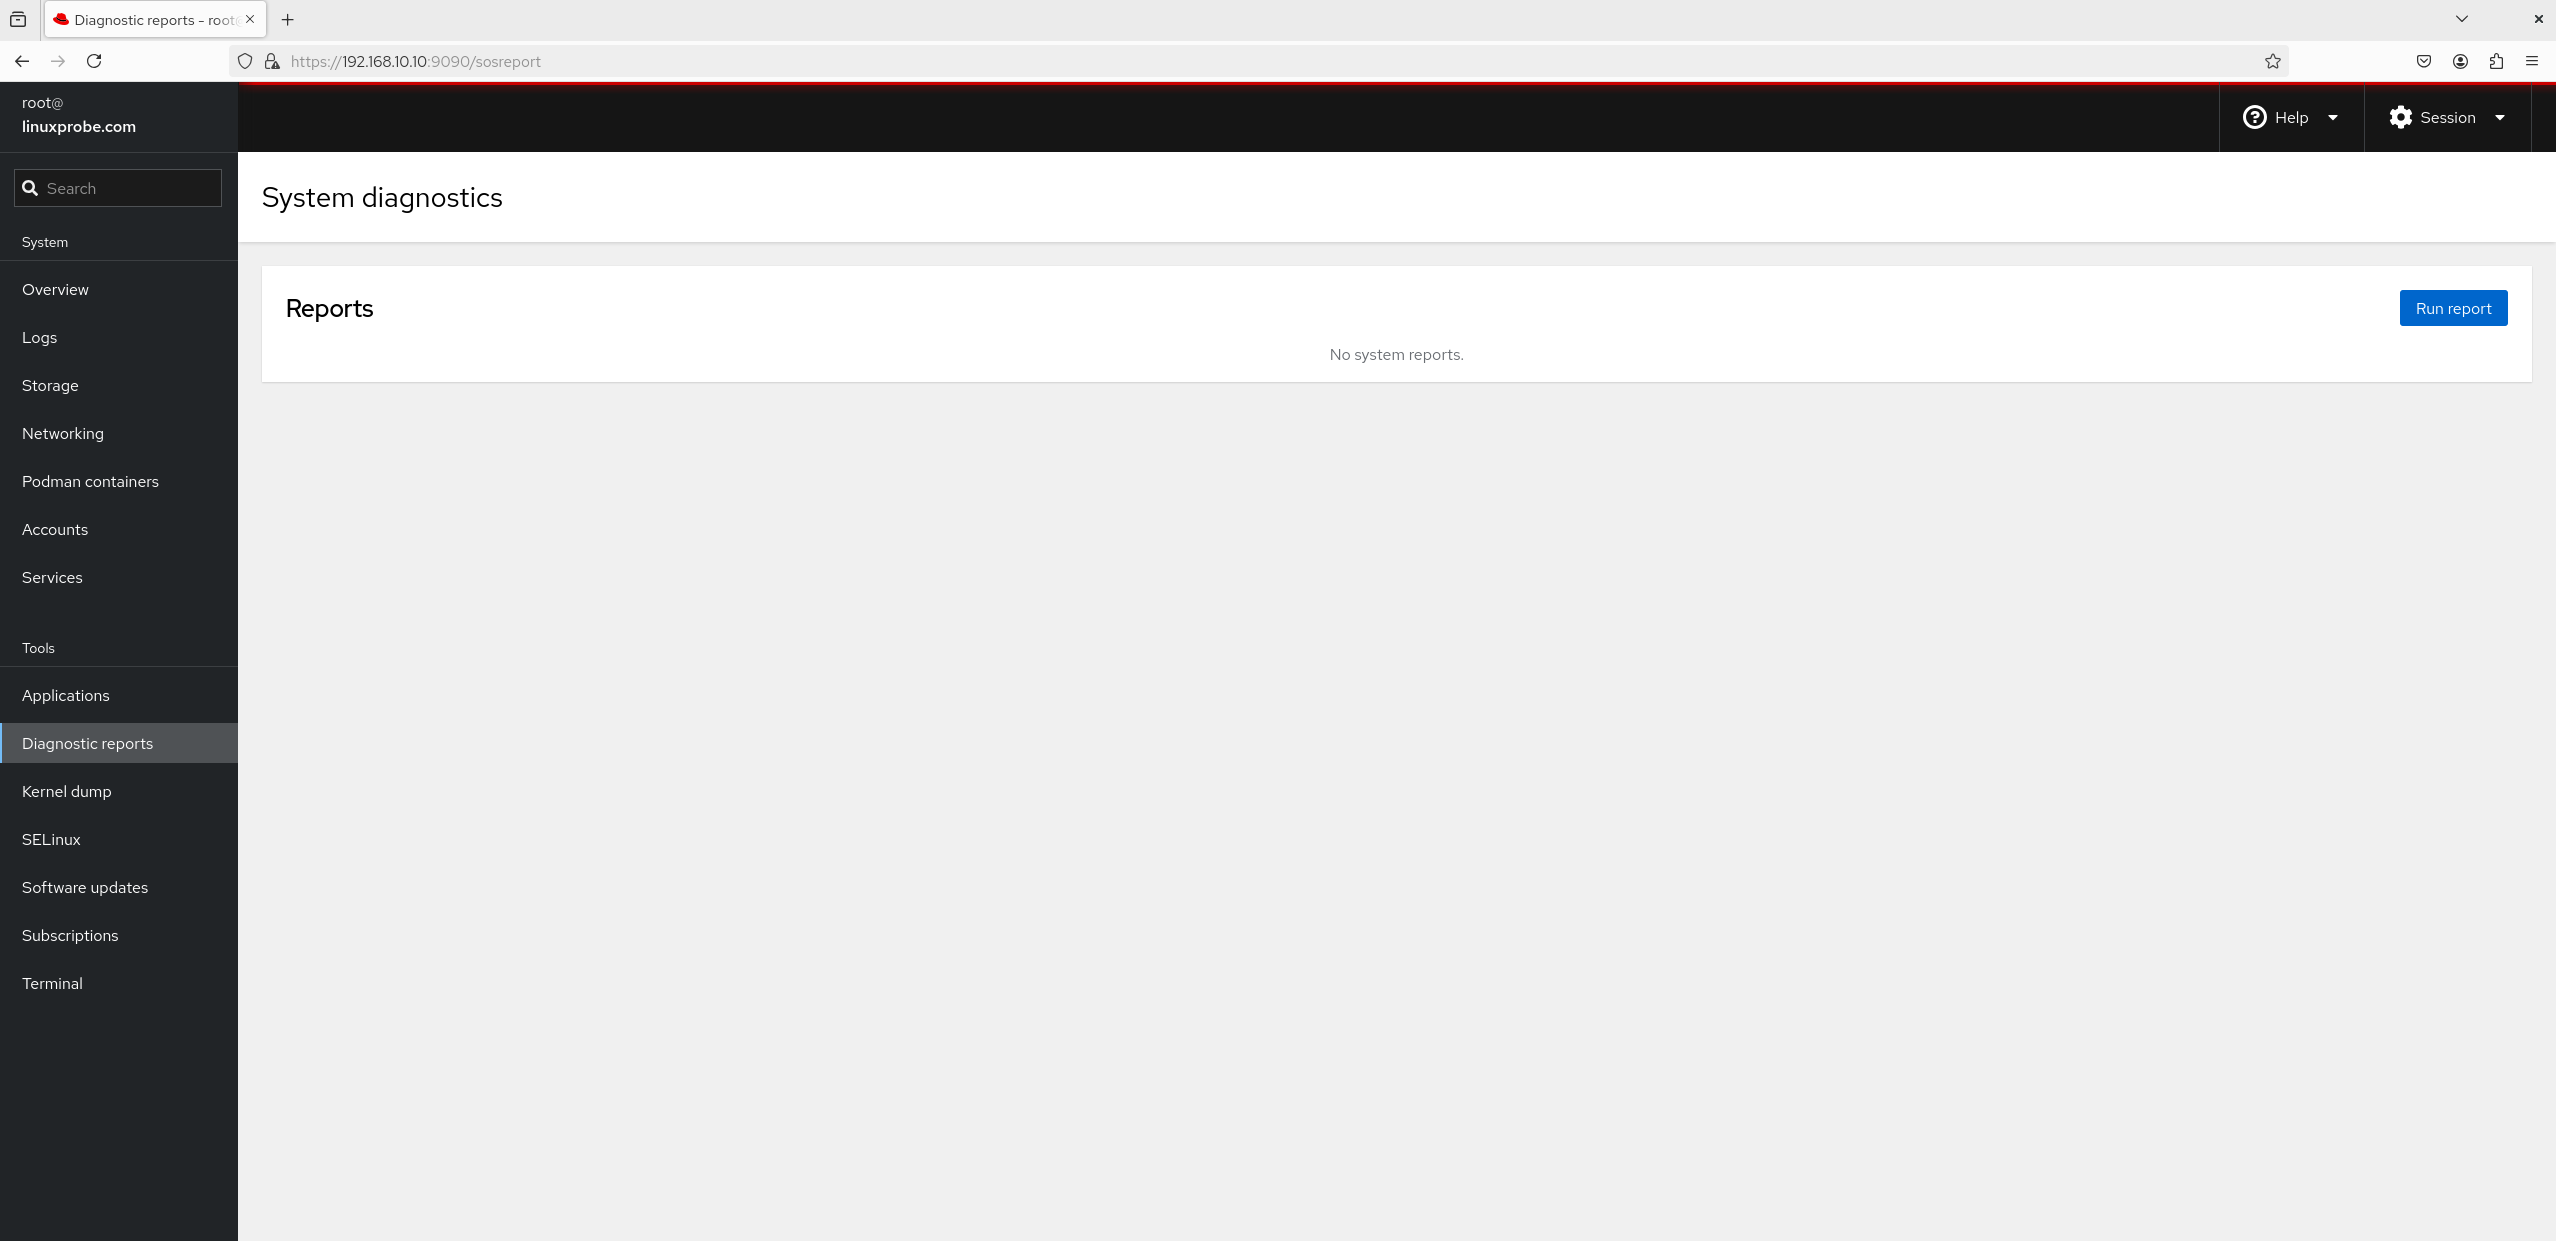
Figure 8-35 Report Analysis Interface
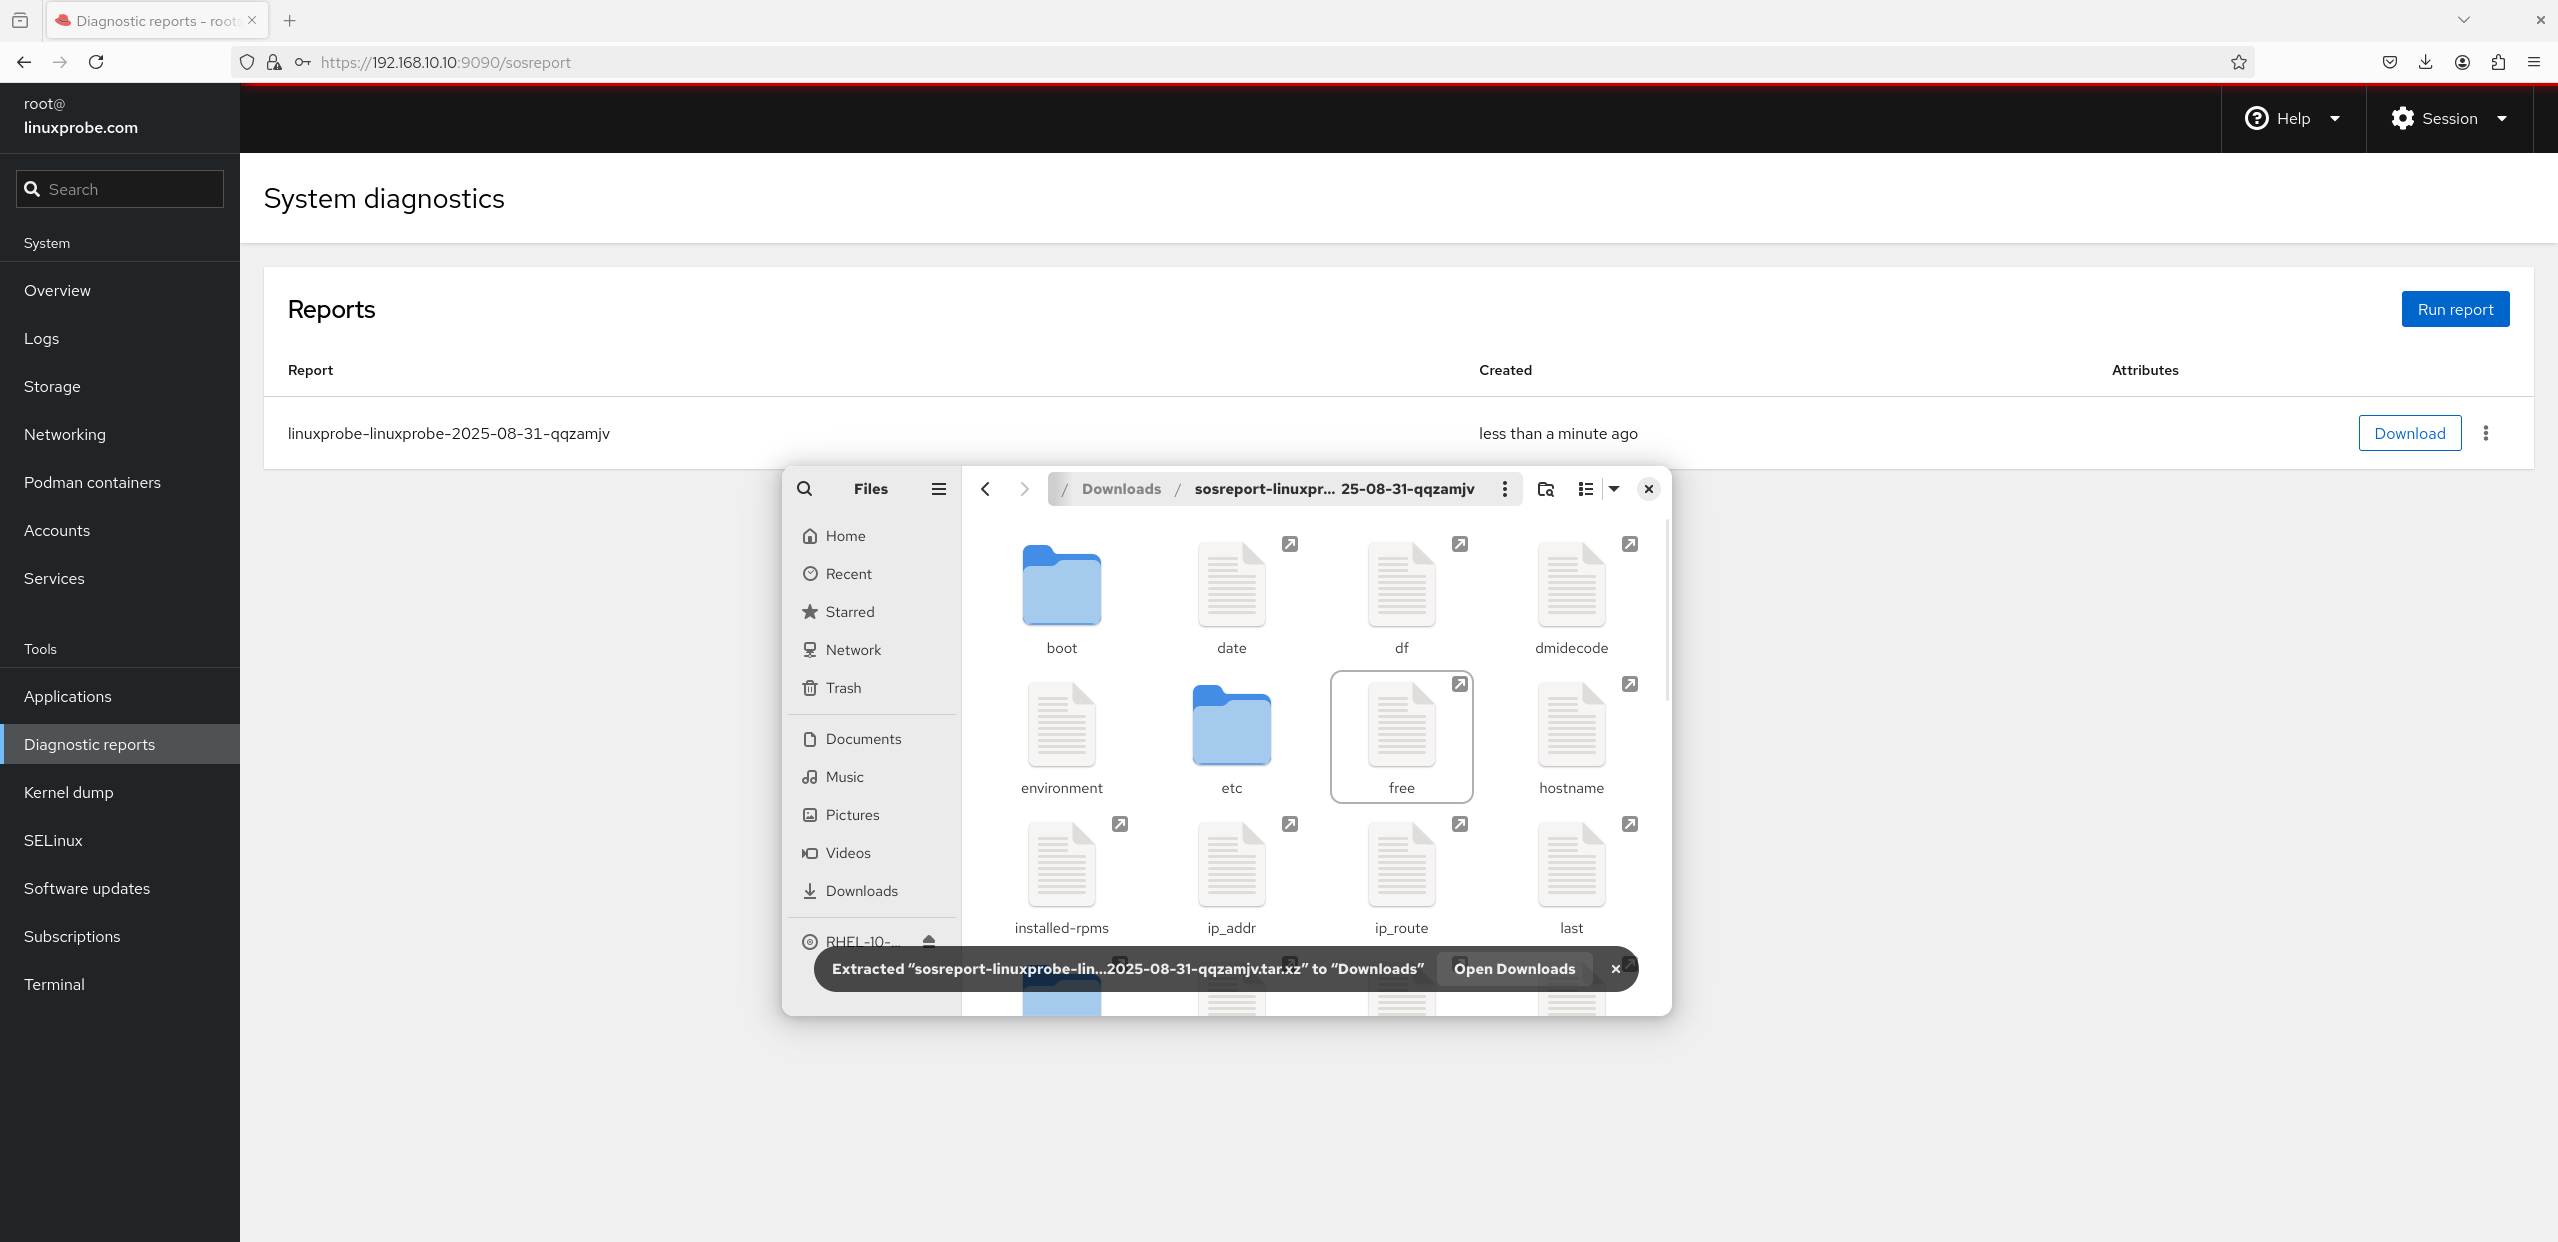
Figure 8-36 Report Generation Complete
13. Terminal The interface for the "Terminal" module is shown in Figure 8-37. The Cockpit service provides an online control platform for Shell terminals, allowing users to conveniently manage servers through the terminal functionality on the web page. This feature is highly favored by operations personnel.
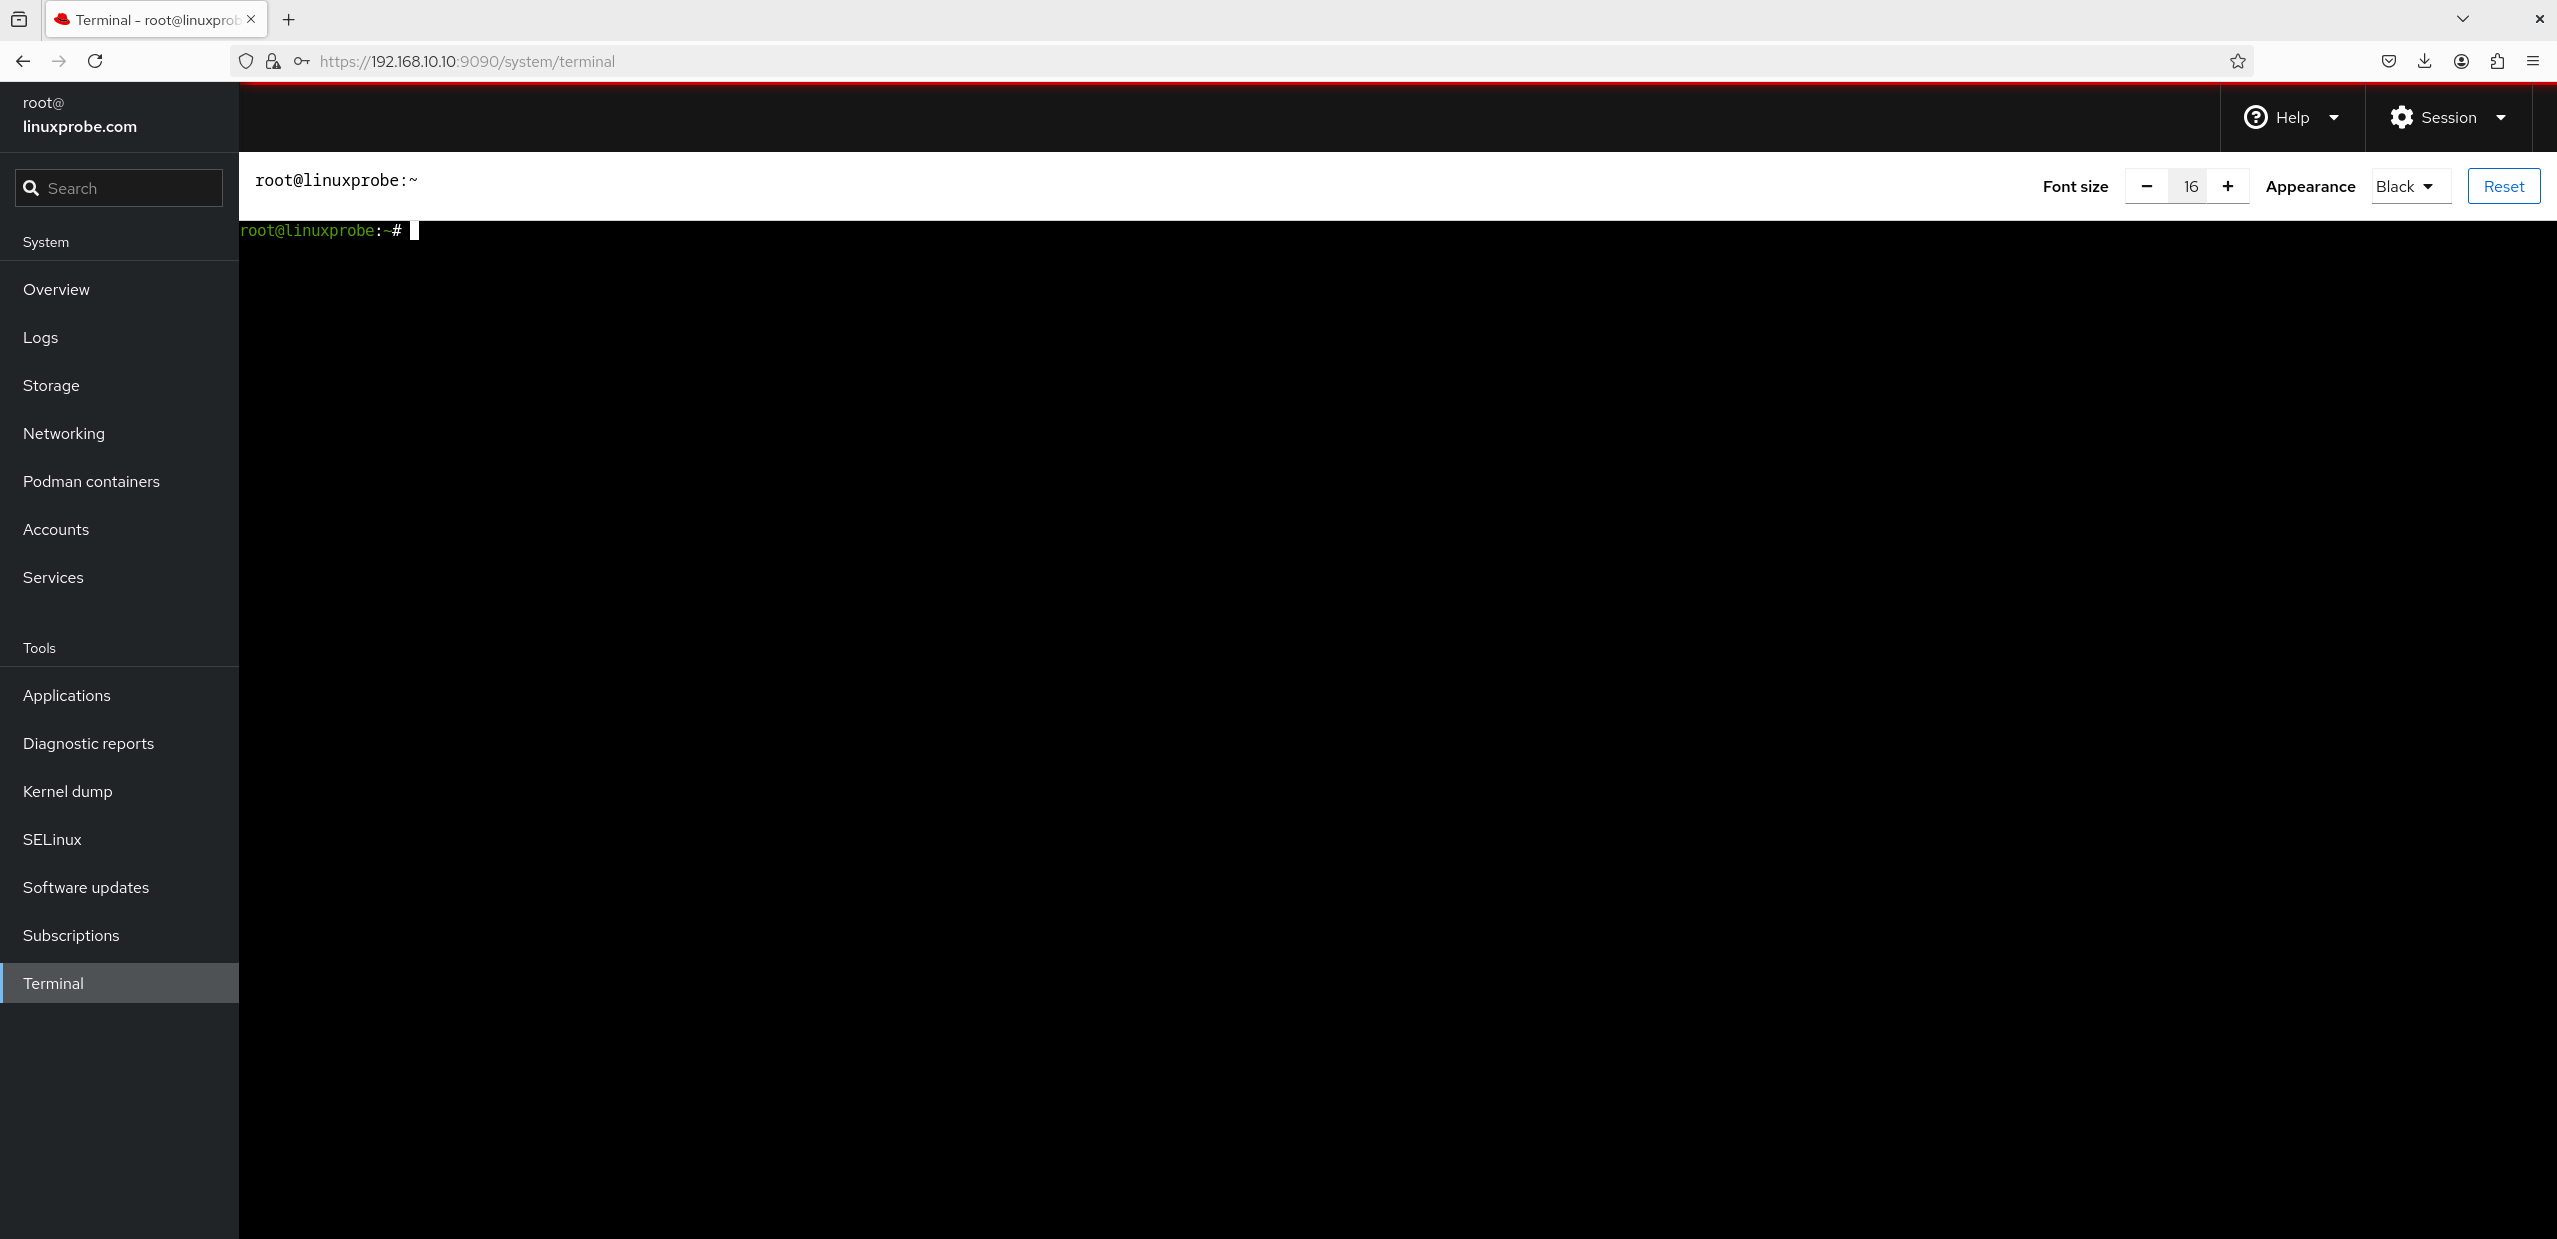
Figure 8-37 Terminal Management Interface
14. SELinux Policy Figure 8-38 displays the SELinux policy control buttons and warning message interface. Chapter 10 will provide a detailed introduction to the SELinux security subsystem; this topic is temporarily omitted here.
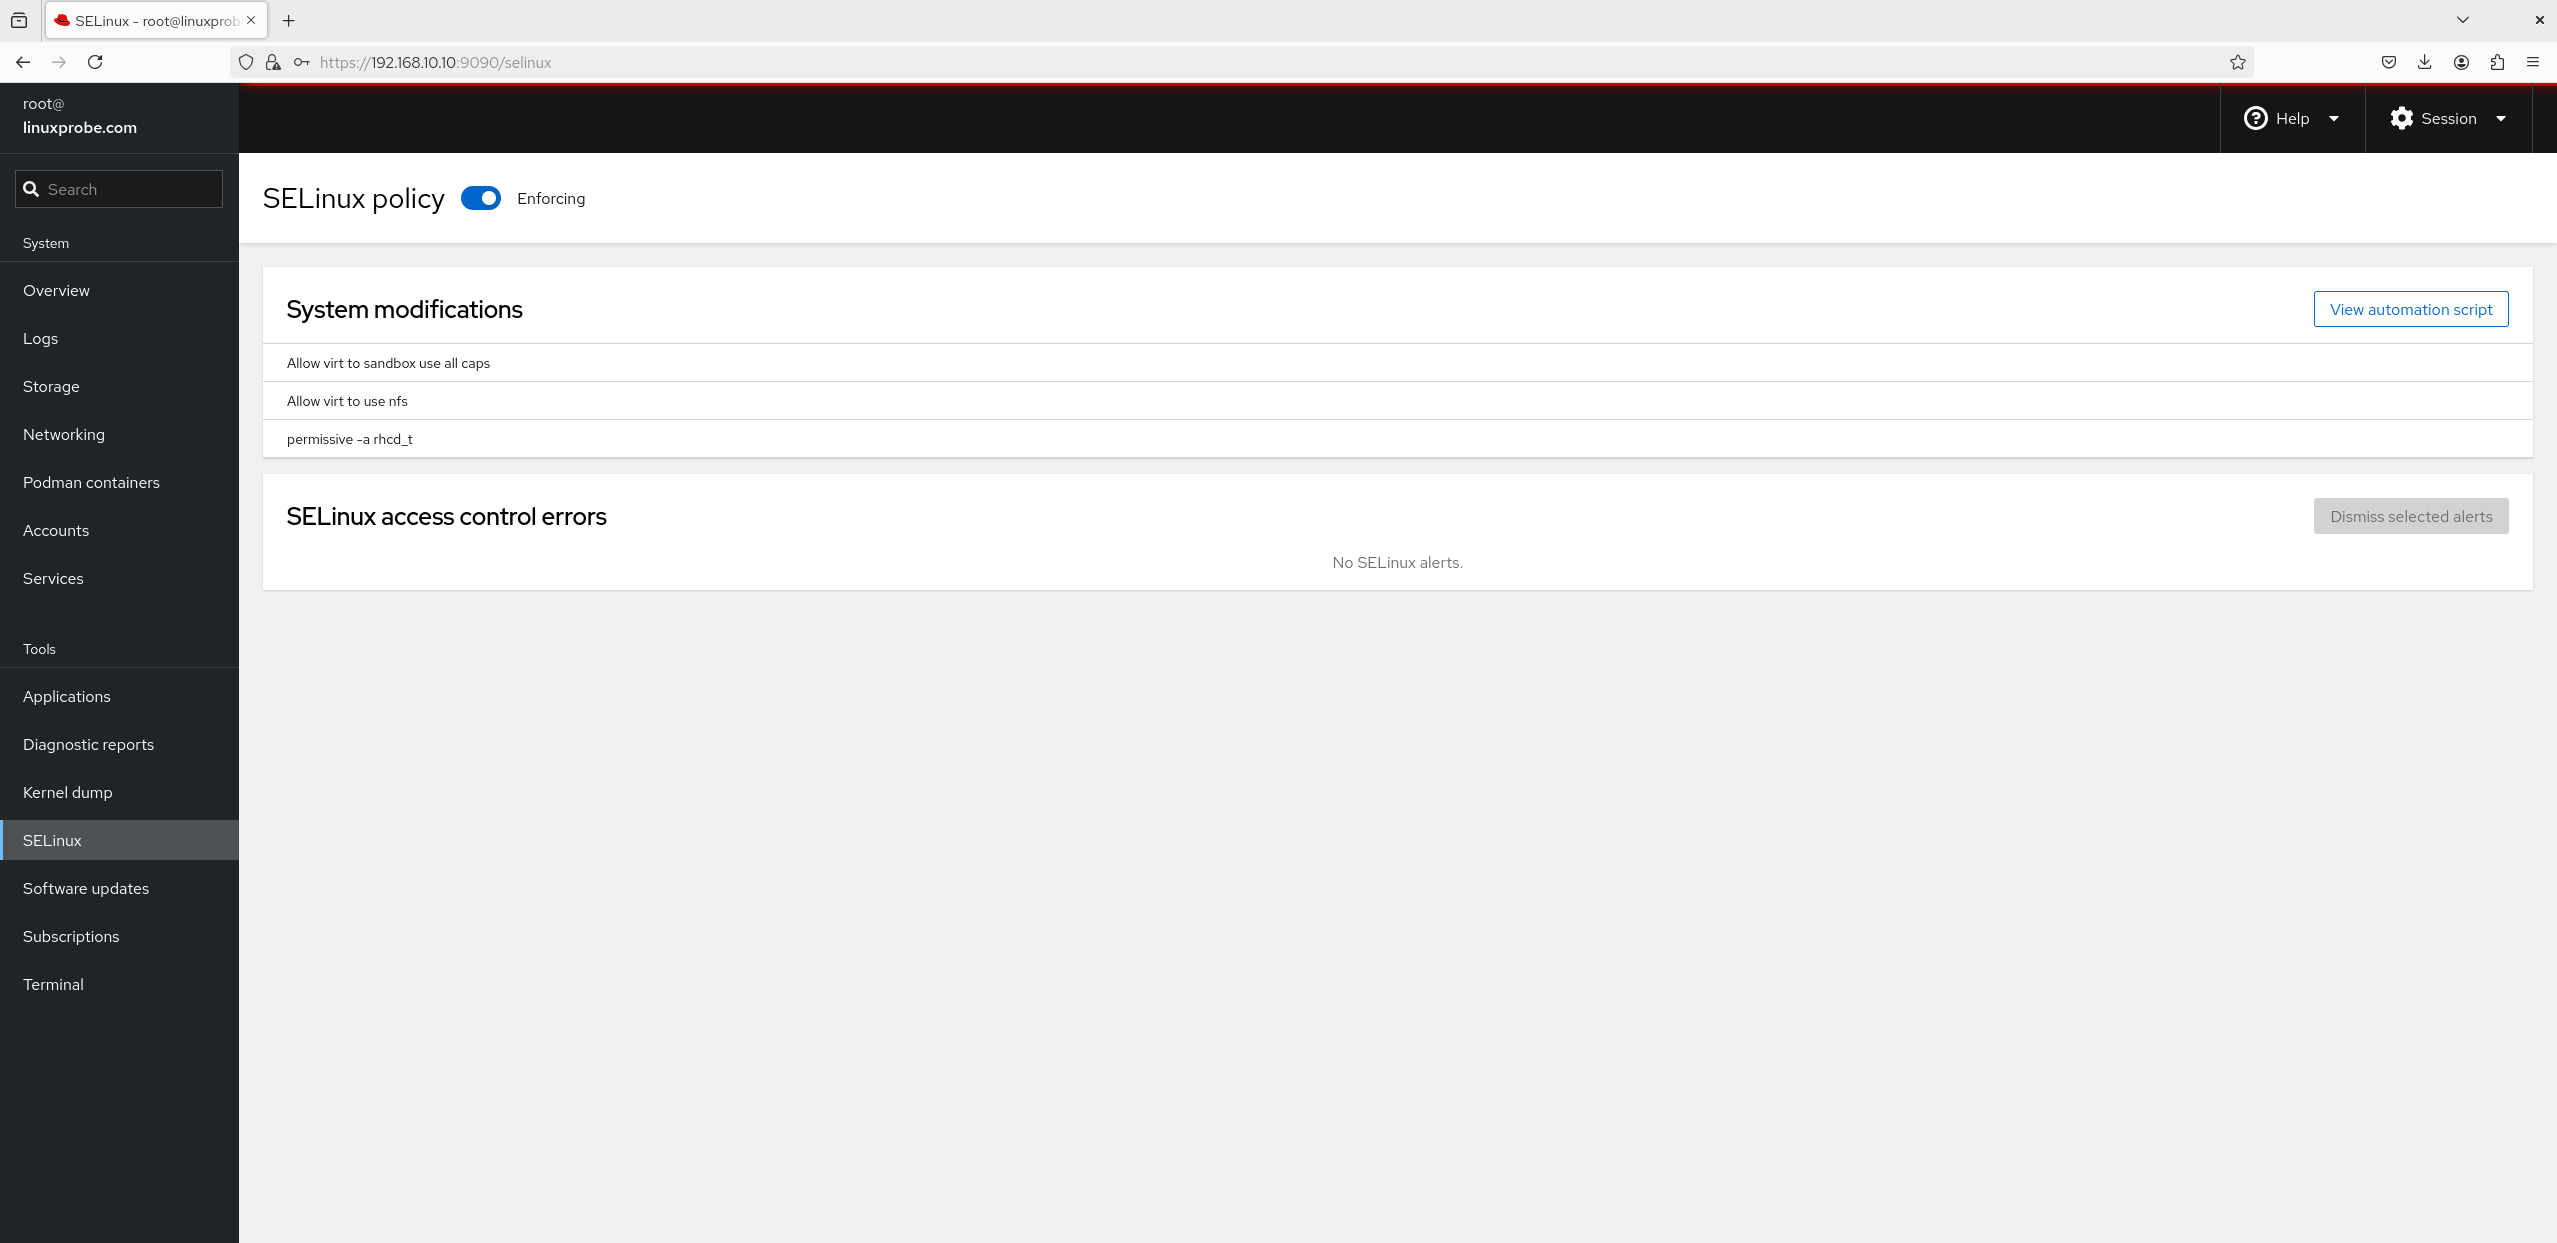
Figure 8-38 SELinux Management Interface
By now, readers should have gained a solid grasp of firewall management capabilities. With numerous firewall management tools available, selecting any one suffices. Before configuring subsequent services, remember to verify network and firewall status. This prevents situations where correctly configured services remain inaccessible externally, ultimately compromising experiment outcomes.
Alright, take a break and prepare for the next chapter!
Review Questions
- In RHEL 10, has iptables been completely replaced by the firewalld service?
Answer: Yes, it has been completely replaced. The iptables command is no longer available.
- Briefly describe the difference between DROP and REJECT in firewall policy rules.
Answer: DROP discards the packet without response; REJECT denies the request and sends a rejection message back to the sender.
- How do you set the default policy of the INPUT rule chain in the iptables service to DROP?
Answer: Execute the command iptables -P INPUT DROP.
- How do you write a firewall policy rule to prevent traffic originating from the 192.168.10.0/24 network segment from accessing the local sshd service (port 22) via the iptables service?
Answer: Execute the command iptables -I INPUT -s 192.168.10.0/24 -p tcp --dport 22 -j REJECT.
- Briefly describe the purpose of zones in firewalld.
Answer: Different firewalld zones can be invoked based on varying operational scenarios, enabling rapid switching of numerous firewall policy rules.
- How do I set the default zone to dmz in firewalld?
Answer: Execute the command firewall-cmd --set-default-zone=dmz.
- How can firewall rules configured in Permanent mode take effect immediately in firewalld?
Answer: Execute the command firewall-cmd --reload.
- What is the purpose of using SNAT technology?
Answer: SNAT is a technology designed to address IP address scarcity. It enables multiple users within internal networks to access the internet through a single external IP address.
- TCP Wrapper services have both allow policy configuration files and deny policy configuration files. What is the matching order?
Answer: TCP Wrapper first matches allow policy configuration files sequentially, then matches deny policy configuration files sequentially. If no match is found, traffic is allowed by default.
- How do you access the Cockpit service by default?
Answer: The Cockpit service uses port 9090 by default. You can directly access the Cockpit web interface using a browser.