Chapter 12 · Implementing File Sharing Using Samba or NFS
Chapter Overview
This chapter begins by comparing file transfer and file sharing as methods for resource exchange, introducing the theoretical foundations of Samba services. It details the origins and evolution of the SMB protocol and Samba service programs. Through hands-on deployment of file sharing services, readers gain deep insight into the functions of relevant Samba configuration parameters. The experiment concludes with accessing shared file resources using both Windows and Linux systems, ensuring mastery of file sharing service configuration methods.
This chapter also explains how to configure Network File System (NFS) services to simplify file sharing between Linux systems. Through deploying NFS services, resources can be mounted and utilized across multiple Linux systems. When managing device mount information, the autofs service not only fulfills device mounting requirements but also further enhances the utilization of server hardware resources and network bandwidth.
instructor Liu Chuan believes that after thoroughly studying this chapter, readers will gain a deep understanding of the mechanisms for sharing file resources between Linux systems and between Linux and Windows systems, and will fully master the corresponding configuration methods.
12.1 Samba File Sharing Service
While the FTP file transfer service covered in the previous chapter simplifies file transfers between hosts, FTP is fundamentally a file transfer protocol rather than a file sharing solution. Consequently, directly modifying file content on the server via a client remains cumbersome.
In 1987, Microsoft and Intel jointly developed the SMB (Server Message Block) protocol to address resource sharing—such as files and printers—within local area networks. This made file sharing across multiple hosts increasingly straightforward. By 1991, Andrew Tridgell, then a university student, developed the SMBServer service program based on the SMB protocol to solve file sharing between Linux and Windows systems.This open-source file-sharing software enabled straightforward configuration for file sharing between Linux and Windows systems. When Tridgell sought to trademark the name "SMBServer," the trademark office rejected the application, stating that "SMB is a meaningless character sequence."Later, while repeatedly consulting dictionaries, Tridgell suddenly came across the name of a Latin dance—Samba. This vibrant dance name coincidentally contained the letters SMB, thus giving birth to the name Samba for the service program (see its logo in Figure 12-1). The Samba service program has since become a common and excellent choice for sharing files between Linux and Windows systems.

Figure 12-1 Samba service logo
Configuring the Samba service follows a similar approach to many previously discussed services. First, install the Samba service via the software repository (the service name coincidentally matches the package name). Additionally, install the samba-client package (this client program will be used later to test the shared directory):
root@linuxprobe:~# dnf install samba samba-client
Updating Subscription Management repositories.
BaseOS                                          2.7 MB/s | 2.7 kB     00:00
AppStream                                       2.7 MB/s | 2.8 kB     00:00
Dependencies resolved.
================================================================================
 Package                    Arch       Version              Repository     Size
================================================================================
Installing:
 samba                      x86_64     4.20.2-104.el10      BaseOS        991 k
 samba-client               x86_64     4.20.2-104.el10      AppStream     757 k
Installing dependencies:
 libnetapi                  x86_64     4.20.2-104.el10      BaseOS        151 k
 samba-common-tools         x86_64     4.20.2-104.el10      BaseOS        485 k
 samba-dcerpc               x86_64     4.20.2-104.el10      BaseOS        727 k
 samba-ldb-ldap-modules     x86_64     4.20.2-104.el10      BaseOS         34 k
 samba-libs                 x86_64     4.20.2-104.el10      BaseOS        135 k
[... output omitted ...]
Installed:
  libnetapi-4.20.2-104.el10.x86_64
  samba-4.20.2-104.el10.x86_64
  samba-client-4.20.2-104.el10.x86_64
  samba-common-tools-4.20.2-104.el10.x86_64
  samba-dcerpc-4.20.2-104.el10.x86_64
  samba-ldb-ldap-modules-4.20.2-104.el10.x86_64
  samba-libs-4.20.2-104.el10.x86_64

Complete!
After installation, open the main configuration file for the Samba service. Fortunately, it contains only 44 lines. Lines 24–29 represent sharing the home directory contents for each logged-in user. While this can simplify file sharing in certain scenarios, the default behavior poses significant security risks. It is strongly recommended to disable this sharing by deleting these lines.Lines 31–36 configure SMB protocol sharing for local printer devices, enabling remote printer access for LAN users. Since we currently lack printer hardware, it's also advisable to remove these settings. The final lines 38–44 continue printer sharing parameters—again, deletion is recommended.
root@linuxprobe:~# vim /etc/samba/smb.conf
  1 # See smb.conf.example for a more detailed config file or
  2 # read the smb.conf manpage.
  3 # Run 'testparm' to verify the config is correct after
  4 # you modified it.
  5 #
  6 # Note:
  7 # SMB1 is disabled by default. This means clients without support for SMB2 o    r
  8 # SMB3 are no longer able to connect to smbd (by default).
  9
 10 [global]
 11         workgroup = SAMBA
 12         security = user
 13
 14         passdb backend = tdbsam
 15
 16         printing = cups
 17         printcap name = cups
 18         load printers = yes
 19         cups options = raw
 20
 21         # Install samba-usershares package for support
 22         include = /etc/samba/usershares.conf
 23
 24 [homes]
 25         comment = Home Directories
 26         valid users = %S, %D%w%S
 27         browseable = No
 28         read only = No
 29         inherit acls = Yes
 30
 31 [printers]
 32         comment = All Printers
 33         path = /var/tmp
 34         printable = Yes
 35         create mask = 0600
 36         browseable = No
 37
 38 [print$]
 39         comment = Printer Drivers
 40         path = /var/lib/samba/drivers
 41         write list = @printadmin root
 42         force group = @printadmin
 43         create mask = 0664
 44         directory mask = 0775
After extensively trimming the main configuration file for the Samba service, only 9 valid configuration parameters remained. Among the few remaining parameters, unnecessary ones could still be removed. For example, the parameters mentioned in lines 5–8 refer to CUPS, which stands for Common UNIX Printing System. Since it is still used for printers or print servers, it should be removed.
root@linuxprobe:~# cat /etc/samba/smb.conf
  1 [global]
  2         workgroup = SAMBA
  3         security = user
  4         passdb backend = tdbsam
  5         printing = cups
  6         printcap name = cups
  7         load printers = yes
  8         cups options = raw
  9         include = /etc/samba/usershares.conf
The final streamlined configuration file appears as follows:
root@linuxprobe:~# cat /etc/samba/smb.conf
  1 [global]
  2         workgroup = SAMBA
  3         security = user
  4         passdb backend = tdbsam
  5         include = /etc/samba/usershares.conf
Tips:
Removing unnecessary code is standard practice. By disabling non-essential features, the service can operate with a "lightweight" configuration, ensuring hardware resources are used efficiently for optimal performance. It also allows administrators to locate required code more quickly. Finding a parameter in fewer than ten lines of code is far easier than searching through dozens of lines. So, with a clear understanding of the parameters, feel free to make bold changes!
In the code above, the security parameter defines the authentication method used when users log into the Samba service. There are four options in total.
share: No password verification is required on the host. This is equivalent to the anonymous public access mode of the vsftpd service. While convenient, it offers very poor security.
user: Requires account and password verification to access files. This is the default and most common authentication method.
domain: Performs authentication through a domain controller to restrict users to their originating domain.
server: Verifies passwords provided by visiting users using standalone host authentication. This allows centralized account management but is rarely used.
In earlier RHEL/CentOS systems, Samba services utilized PAM (Pluggable Authentication Modules) to access local account and password information. Later, in versions 5 and 6, this was replaced by the smbpasswd command to configure dedicated Samba service accounts and passwords. RHEL 7 introduced another reform to traditional authentication methods, shifting to tdbsam database-based verification.tdbsam is a database specifically designed to store Samba service accounts and passwords. Users must employ the pdbedit command to add accounts and passwords independently, as demonstrated in the practical examples below.
12.1.1 Configuring Shared Resources
The main configuration file for the Samba service program closely resembles that of the Apache service previously covered, containing both global configuration parameters and zone-specific configuration parameters. Global configuration parameters set the overall resource sharing environment and apply to every individual shared resource.Section-specific parameters configure individual shared resources and apply only to that resource. Creating a shared resource is straightforward: simply write the parameters from Table 12-1 into the Samba service's main configuration file, then restart the service.
Table 12-1 Parameters for configuring the Samba service program and their functions
| Parameter | Function |
|---|---|
| [database] | Share name: database |
| comment = Do not arbitrarily modify the database file | Warn users against modifying the database file arbitrarily |
| path = /home/database | Share directory: /home/database |
| public = no | Disable "public visibility" |
| writable = yes | Allow write operations |
Step 1: Create account information for accessing shared resources. In RHEL 10, the Samba service uses user-based authentication by default. This method ensures that only trusted accounts with passwords can access shared resources, and the authentication process is very simple. However, user-based authentication can only be used after an account information database has been created. Furthermore, the Samba service database requires that the accounts already exist on the current system; otherwise, file permission attributes will be confused when creating files, leading to errors.
The pdbedit command manages the Samba service's account database. Its format is pdbedit [options] account. The -a option is required when writing account information to the database for the first time. Subsequent operations like password changes or account deletions do not require this option. The parameters used with pdbedit and their functions are listed in Table 12-2.
Table 12-2 pdbedit Command Parameters and Their Functions
| Parameter | Function |
|---|---|
| -a account_name | Create Samba account |
| -x account_name | Delete Samba account |
| -L | List account names |
| -Lv | List account details |
root@linuxprobe:~# id linuxprobe
uid=1000(linuxprobe) gid=1000(linuxprobe) groups=1000(linuxprobe),10(wheel)
root@linuxprobe:~# pdbedit -a -u linuxprobe
new password: Enter the password for this account in the Samba service database here
retype new password: Re-enter the password to confirm
Unix username:        linuxprobe
NT username:
Account Flags:        [U          ]
User SID:             S-1-5-21-1663959641-2503989833-3304495206-1000
Primary Group SID:    S-1-5-21-1663959641-2503989833-3304495206-513
Full Name:            linuxprobe
Home Directory:       \\LINUXPROBE\linuxprobe
HomeDir Drive:
Logon Script:
Profile Path:         \\LINUXPROBE\linuxprobe\profile
Domain:               LINUXPROBE
Account desc:
Workstations:
Munged dial:
Logon time:           0
Logoff time:          Wed, 06 Feb 2036 23:06:39 CST
Kickoff time:         Wed, 06 Feb 2036 23:06:39 CST
Password last set:    Tue, 25 Mar 2025 21:48:33 CST
Password can change:  Tue, 25 Mar 2025 21:48:33 CST
Password must change: never
Last bad password   : 0
Bad password count  : 0
Logon hours         : FFFFFFFFFFFFFFFFFFFFFFFFFFFFFFFFFFFFFFFFFF
Step 2: Create the file directory for sharing resources. When creating it, consider not only file read/write permissions but also the restrictions imposed by the SELinux security context applied to this directory, as /home is the home directory for regular users on the system. The Samba manual indicates that the correct file context value should be samba_share_t. After making the necessary modifications, simply execute the restorecon command to immediately apply the new SELinux security context to the directory.
root@linuxprobe:~# mkdir /home/database
root@linuxprobe:~# chown -Rf linuxprobe:linuxprobe /home/database
root@linuxprobe:~# semanage fcontext -a -t samba_share_t /home/database
root@linuxprobe:~# restorecon -Rv /home/database
Relabeled /home/database from unconfined_u:object_r:user_home_dir_t:s0 to unconfined_u:object_r:samba_share_t:s0
Step 3: Configure the SELinux service and policy to permit access to regular user home directories via the Samba service. Execute the getsebool command to filter all SELinux domain policies related to the Samba service. Based on the policy names (and experience), select the correct policy entries to enable.
root@linuxprobe:~# getsebool -a | grep samba
samba_create_home_dirs --> off
samba_domain_controller --> off
samba_enable_home_dirs --> off
samba_export_all_ro --> off
samba_export_all_rw --> off
samba_load_libgfapi --> off
samba_portmapper --> off
samba_run_unconfined --> off
samba_share_fusefs --> off
samba_share_nfs --> off
sanlock_use_samba --> off
tmpreaper_use_samba --> off
use_samba_home_dirs --> off
virt_use_samba --> off
root@linuxprobe:~# setsebool -P samba_enable_home_dirs on
Step 4: In the main configuration file for the Samba service program, write the share information according to the format mentioned in Table 12-1.
root@linuxprobe:~# vim /etc/samba/smb.conf
[global]
        workgroup = SAMBA
        security = user
        passdb backend = tdbsam
        include = /etc/samba/usershares.conf
[database]
        comment = Do not arbitrarily modify the database file
        path = /home/database
        public = no
        writable = yes
Step 5: The Samba service configuration is essentially complete. The Samba service runs as smb on Linux systems. Restart the smb service and add it to the startup items to ensure continuous service availability after server reboots.
root@linuxprobe:~# systemctl restart smb
root@linuxprobe:~# systemctl enable smb
Created symlink '/etc/systemd/system/multi-user.target.wants/smb.service' → '/usr/lib/systemd/system/smb.service'.
To prevent firewall restrictions from blocking user access, remember to add the Samba service to the firewalld firewall for comprehensive coverage.
root@linuxprobe:~# firewall-cmd --permanent --add-service=samba
success
root@linuxprobe:~# firewall-cmd --reload
success
Step 6: Use the systemctl status smb command to verify if the Samba service is running. To further inspect which directories are shared by the Samba service, use the smbclient command to view sharing details: - The -U parameter specifies the username (use the username that mounted the Samba service to view details as that user). - The -L parameter lists the shared directories.
root@linuxprobe:~# smbclient -U linuxprobe -L 192.168.10.10
Password for [SAMBA\linuxprobe]: Enter the password for this account in the Samba service database here
    Sharename       Type      Comment
	---------       ----      -------
    database        Disk      Do not arbitrarily modify the database file
    IPC$            IPC       IPC Service (Samba 4.20.2)
SMB1 disabled -- no workgroup available
12.1.2 Mounting Windows Shares
Whether the Samba share service is deployed on a Windows system or a Linux system, the steps and methods for accessing it via a Windows system remain the same. In the following example, we assume the Samba share service is deployed on a Linux system and accessed from a Windows system. The IP addresses for the Samba share server and Windows client can be configured according to Table 12-3.
Table 12-3 Operating Systems and IP Addresses Used by Samba Server and Windows Client
| Hostname | Operating System | IP Address |
|---|---|---|
| Samba Share Server | RHEL 10 | 192.168.10.10 |
| Linux Client | RHEL 10 | 192.168.10.20 |
| Windows Client | Windows 11 | 192.168.10.30 |
To access shared resources on a Windows system, simply click the Windows Start button, type two backslashes (\), and then add the server's IP address, as shown in Figure 12-2.
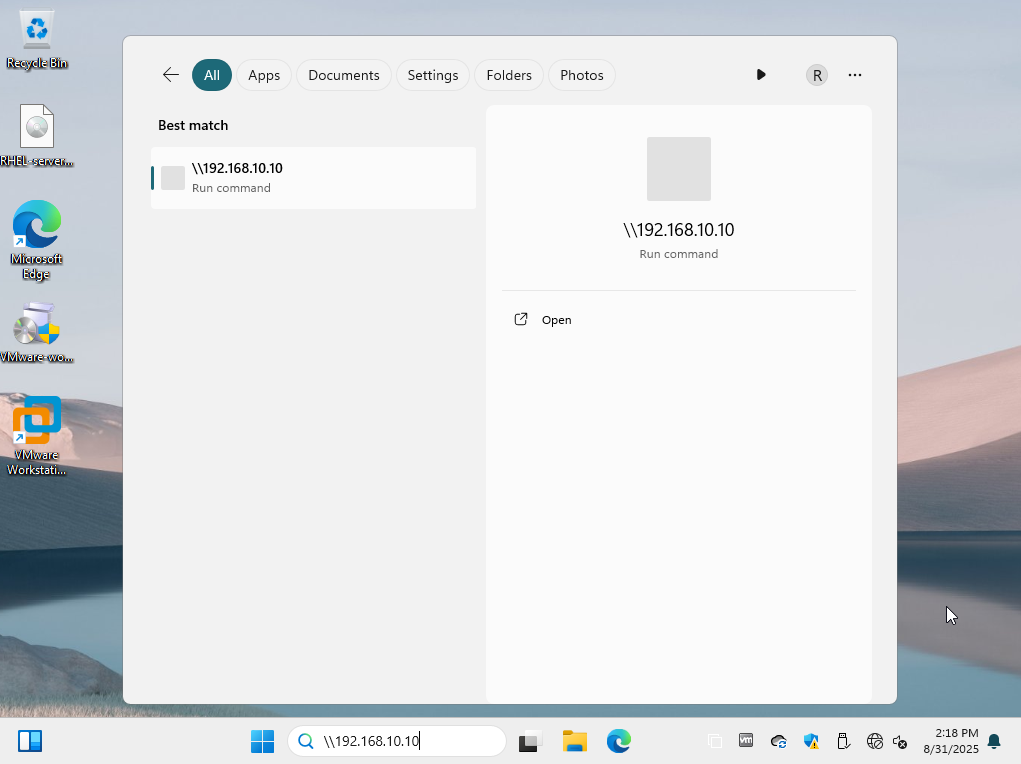
Figure 12-2 Accessing Shared Resources on Windows
You should now see the Samba shared service login interface. instructor Liu Chuan first attempts to log in using the local system password for the linuxprobe account, resulting in the error message shown in Figure 12-3. This confirms that in RHEL 10, the Samba service uses an independent account information database.Within the account systems of Linux and the Samba service, even if an account named linuxprobe exists in both, they must not be conflated. These accounts reside in separate databases, each corresponding to an independent password. While sharing the same name, they must be strictly distinguished during actual use.
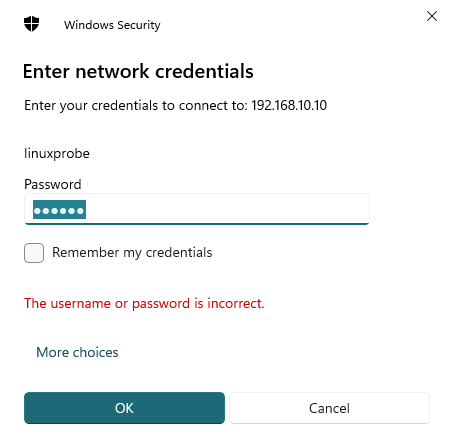
Figure 12-3 Error prompt when accessing Samba shared service
After correctly entering the linuxprobe account name from the Samba service database and the password set via the pdbedit command, you can log into the Samba service program's shared interface, as shown in Figure 12-4. At this point, you can attempt operations such as viewing, writing, renaming, or deleting files.
Due to Windows caching, you may encounter errors on subsequent logins even with correct credentials. Simply restart the Windows client to resolve this (if errors persist, review the preceding steps for errors).
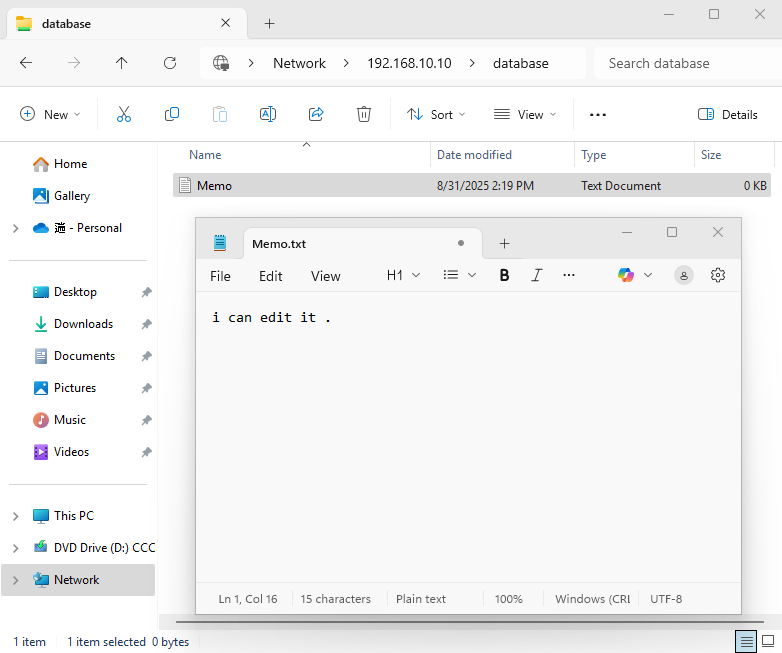
Figure 12-4 Successful Access to Samba Shared Service
12.1.3 Mounting Shares on Linux
The above experiment might lead readers to mistakenly believe that the Samba service is designed solely for resource sharing between Linux and Windows systems. In fact, the Samba service can also enable file sharing between Linux systems. Readers should configure the IP addresses for the host running the Samba service (i.e., the Samba share server) and the Linux client according to Table 12-4. Then, install the software package supporting file sharing services (cifs-utils) on the client.
Table 12-4 Operating Systems and IP Addresses Used by Samba Share Server and Linux Clients
| Hostname | Operating System | IP Address |
|---|---|---|
| Samba Share Server | RHEL 10 | 192.168.10.10 |
| Linux Client | RHEL 10 | 192.168.10.20 |
| Windows Client | Windows 11 | 192.168.10.30 |
root@linuxprobe:~# dnf install cifs-utils
Updating Subscription Management repositories.
Last metadata expiration check: 0:17:57 ago on Tue 25 Mar 2025 09:45:22 PM CST.
Dependencies resolved.
================================================================================
 Package            Architecture   Version                 Repository      Size
================================================================================
Installing:
 cifs-utils         x86_64         7.0-5.el10              BaseOS         100 k
Installing dependencies:
 keyutils           x86_64         1.6.3-4.el10            BaseOS          80 k
[... output omitted ...]
Installed:
  cifs-utils-7.0-5.el10.x86_64           keyutils-1.6.3-4.el10.x86_64

Complete!
After installing the packages, create a directory on the Linux client for mounting the Samba service share. This directory can share the same name as the share on the server for easier identification later. The -t parameter in the mount command specifies the protocol type, the -o parameter specifies the username and password, and finally append the server IP address, share name, and local mount directory.The share name following the server IP address refers to the value in the [database] section of the configuration file, not the name of the locally mounted directory on the server. While these values may be identical, it's important to note their distinction.
root@linuxprobe:~# mkdir /database
root@linuxprobe:~# mount -t cifs -o username=linuxprobe,password=redhat //192.168.10.10/database /database
root@linuxprobe:~# df -h
Filesystem                Size  Used Avail Use% Mounted on
/dev/mapper/rhel-root      17G  3.8G   13G  23% /
devtmpfs                  4.0M     0  4.0M   0% /dev
tmpfs                     1.9G   84K  1.9G   1% /dev/shm
efivarfs                  256K   56K  196K  23% /sys/firmware/efi/efivars
tmpfs                     776M  9.7M  767M   2% /run
tmpfs                     1.0M     0  1.0M   0% /run/credentials/systemd-journald.service
/dev/sda2                 960M  272M  689M  29% /boot
/dev/sr0                  6.5G  6.5G     0 100% /media/cdrom
/dev/sda1                 599M  8.3M  591M   2% /boot/efi
tmpfs                     388M  124K  388M   1% /run/user/0
//192.168.10.10/database   17G  3.7G   13G  23% /database
If you have to manually mount the remote shared directory using the mount command after every system reboot, doesn't that feel cumbersome? Actually, you can write the relevant information—in the order of Samba service username, password, and share domain—into an authentication file. Then, have the /etc/fstab file automatically load it with the system. To prevent unauthorized access, finally change the permissions of this authentication file so that only the root administrator can read and write it.
root@linuxprobe:~# vim auth.smb
username=linuxprobe
password=redhat
domain=SAMBA
root@linuxprobe:~# chmod 600 auth.smb
Write the mount information into the /etc/fstab file to ensure the shared mount settings persist after server reboots.
root@linuxprobe:~# vim /etc/fstab
#
# /etc/fstab
# Created by anaconda on Wed Mar 12 20:08:04 2025
#
# Accessible filesystems, by reference, are maintained under '/dev/disk/'.
# See man pages fstab(5), findfs(8), mount(8) and/or blkid(8) for more info.
#
# After editing this file, run 'systemctl daemon-reload' to update systemd
# units generated from this file.
#
UUID=016bb74f-bfa8-4d80-aa6d-d5693c39a844 /                xfs     defaults         0 0
UUID=c34124dd-c66e-4cbe-ba04-528666d30dc0 /boot            xfs     defaults         0 0
UUID=9A1A-B195          /boot/efi               vfat    umask=0077,shortname=winnt  0 2
UUID=299dacfd-f999-48d8-bca4-e5274ac600a8 none             swap    defaults         0 0
/dev/cdrom 								  /media/cdrom     iso9660 defaults 	    0 0
//192.168.10.10/database          /database     cifs    credentials=/root/auth.smb  0 0
root@linuxprobe:~# systemctl daemon-reload
root@linuxprobe:~# mount -a
The Linux client successfully mounted the Samba service's shared resource. After navigating to the mounted directory /database, you can see the file Memo.txt left behind when the Windows system accessed the Samba service. Of course, you can also read/write to this file and save changes.
root@linuxprobe:~# cat /database/Memo.txt
i can edit it .
12.2 NFS
If configuring the Samba service seems too cumbersome and all hosts requiring file sharing happen to be Linux systems, we highly recommend deploying the NFS (Network File System) service on the client to share files.The NFS service allows you to mount shared resources from a remote Linux system onto a directory on your local host. This enables the local host (Linux client) to read and write shared files on the remote Linux system over TCP/IP, just as if they were local resources.
Configuring NFS on RHEL 10 is so straightforward that the author playfully refers to it as "Need For Speed" during lectures.
Step 1: Install the software packages required for the NFS service.
root@linuxprobe:~# dnf install nfs-utils
Updating Subscription Management repositories.
BaseOS                                          2.7 MB/s | 2.7 kB     00:00
AppStream                                       2.7 MB/s | 2.8 kB     00:00
Dependencies resolved.
================================================================================
 Package              Architecture Version                   Repository    Size
================================================================================
Installing:
 nfs-utils            x86_64       1:2.7.1-1.el10            BaseOS       481 k
Installing dependencies:
 gssproxy             x86_64       0.9.2-7.el10              BaseOS       122 k
 keyutils             x86_64       1.6.3-4.el10              BaseOS        80 k
 libev                x86_64       4.33-12.el10              BaseOS        56 k
 libnfsidmap          x86_64       1:2.7.1-1.el10            BaseOS        67 k
 libverto-libev       x86_64       0.3.2-9.el10              BaseOS        15 k
 rpcbind              x86_64       1.2.7-2.el10              BaseOS        62 k
 sssd-nfs-idmap       x86_64       2.10.0~beta2-3.el10       BaseOS        34 k
[... output omitted ...]
Installed:
  gssproxy-0.9.2-7.el10.x86_64        keyutils-1.6.3-4.el10.x86_64
  libev-4.33-12.el10.x86_64           libnfsidmap-1:2.7.1-1.el10.x86_64
  libverto-libev-0.3.2-9.el10.x86_64  nfs-utils-1:2.7.1-1.el10.x86_64
  rpcbind-1.2.7-2.el10.x86_64         sssd-nfs-idmap-2.10.0~beta2-3.el10.x86_64

Complete!
Step 2: To verify the effectiveness of the NFS service configuration, we need to use two Linux hosts (one acting as the NFS server and one as the NFS client) and set their IP addresses according to Table 12-5.
Table 12-5 Operating Systems and IP Addresses Used by the Two Linux Hosts
| Hostname | Operating System | IP Address |
|---|---|---|
| NFS Server | RHEL 10 | 192.168.10.10 |
| NFS Client | RHEL 10 | 192.168.10.20 |
Additionally, do not forget to configure the firewall to prevent the default firewall policy from blocking normal NFS services.
root@linuxprobe:~# firewall-cmd --permanent --add-service=nfs
success
root@linuxprobe:~# firewall-cmd --permanent --add-service=rpc-bind
success
root@linuxprobe:~# firewall-cmd --permanent --add-service=mountd
success
root@linuxprobe:~# firewall-cmd --reload
success
Step 3: Create a directory on the NFS server for file sharing and set appropriate permissions to ensure others have write access.
root@linuxprobe:~# mkdir /nfsfile
root@linuxprobe:~# chmod -R 777 /nfsfile
root@linuxprobe:~# echo "welcome to linuxprobe.com" > /nfsfile/readme
Step 4: The NFS service configuration file is /etc/exports, which is empty by default. Define shared directories and corresponding permissions using the format: shared_directory_path NFS_client_access_permissions.
For example, to share the /nfsfile directory with all hosts in the 192.168.10.0/24 network segment, granting them read/write permissions, ensuring operations complete only after data is written to the NFS server's disk,to maximize data integrity, and map the root administrator of the accessing client to the local anonymous user, you can write the parameters from Table 12-6 into the NFS service program configuration file using the format shown in the following command.
Table 12-6 Parameters for configuring the NFS service program configuration file
| Parameter | Function |
|---|---|
| ro | Read-only |
| rw | Read-write |
| root_squash | Maps root administrators accessing as root to the server's anonymous user |
| no_root_squash | Maps root administrators accessing as root to the server's root administrator |
| all_squash | Always maps to the NFS server's anonymous user, regardless of the client account used |
| sync | Writes data to both memory and disk simultaneously, ensuring no data loss |
| async | Prioritizes saving data to memory before writing to disk; more efficient but may result in data loss |
Note that there should be no space between the NFS client address and permissions.
root@linuxprobe:~# vim /etc/exports
/nfsfile 192.168.10.20(rw,sync,root_squash)
Wisely using wildcards in NFS service configuration files enables many convenient features. For example, there are three methods to match IP addresses: The first is to directly write the * symbol, representing access for any host;The second method, used in this experiment, is the 192.168.10.* wildcard format, allowing access from hosts within the 192.168.10.0/24 network segment; The third method involves specifying a specific IP address, such as 192.168.10.20, permitting access only from that particular host.
Step 5: Start and enable the NFS service. Before using NFS for file sharing, the RPC (Remote Procedure Call) service must send the NFS server's IP address and port number to clients. Therefore, before starting NFS, also restart and enable the rpcbind service, and add both services to the system startup items.
root@linuxprobe:~# systemctl restart rpcbind
root@linuxprobe:~# systemctl enable rpcbind
root@linuxprobe:~# systemctl restart nfs-server
root@linuxprobe:~# systemctl enable nfs-server
Created symlink '/etc/systemd/system/multi-user.target.wants/nfs-server.service' → '/usr/lib/systemd/system/nfs-server.service'.
Configuring the NFS client is also straightforward. First, use the showmount command to query the remote shares available from the NFS server. Refer to Table 12-7 for required parameters. The output format is "shared directory name allowed client addresses".
Table 12-7 Available parameters and their functions in the showmount command
| Parameter | Function |
|---|---|
| -e | Display the list of shares on the NFS server |
| -a | Display all client hostnames and mount points for mounted NFS shares |
| -v | Display the version number |
Execute the following command to install the NFS client tools (including the showmount utility):
root@linuxprobe:~# dnf install showmount
Updating Subscription Management repositories.
BaseOS                                          2.7 MB/s | 2.7 kB     00:00
AppStream                                       2.7 MB/s | 2.8 kB     00:00
Dependencies resolved.
================================================================================
 Package              Architecture Version                   Repository    Size
================================================================================
Installing:
 nfs-utils            x86_64       1:2.7.1-1.el10            BaseOS       481 k
Installing dependencies:
 gssproxy             x86_64       0.9.2-7.el10              BaseOS       122 k
 keyutils             x86_64       1.6.3-4.el10              BaseOS        80 k
 libev                x86_64       4.33-12.el10              BaseOS        56 k
 libnfsidmap          x86_64       1:2.7.1-1.el10            BaseOS        67 k
 libverto-libev       x86_64       0.3.2-9.el10              BaseOS        15 k
 rpcbind              x86_64       1.2.7-2.el10              BaseOS        62 k
 sssd-nfs-idmap       x86_64       2.10.0~beta2-3.el10       BaseOS        34 k
[... output omitted ...]
Installed:
  gssproxy-0.9.2-7.el10.x86_64        keyutils-1.6.3-4.el10.x86_64
  libev-4.33-12.el10.x86_64           libnfsidmap-1:2.7.1-1.el10.x86_64
  libverto-libev-0.3.2-9.el10.x86_64  nfs-utils-1:2.7.1-1.el10.x86_64
  rpcbind-1.2.7-2.el10.x86_64         sssd-nfs-idmap-2.10.0~beta2-3.el10.x86_64

Complete!
Then check the shared directory information on the server:
root@linuxprobe:~# showmount -e 192.168.10.10
Export list for 192.168.10.10:
/nfsfile 192.168.10.20
Finally, create a mount directory on the NFS client. Use the mount command with the -t parameter to specify the filesystem type, followed by the server's IP address, the shared directory on the server, and the directory on the local system (i.e., the client) where it should be mounted.
root@linuxprobe:~# mkdir /nfsfile
root@linuxprobe:~# mount -t nfs 192.168.10.10:/nfsfile /nfsfile
root@linuxprobe:~# df -h
Filesystem              Size  Used Avail Use% Mounted on
/dev/mapper/rhel-root    17G  3.8G   13G  23% /
devtmpfs                4.0M     0  4.0M   0% /dev
tmpfs                   1.9G   84K  1.9G   1% /dev/shm
efivarfs                256K   56K  196K  23% /sys/firmware/efi/efivars
tmpfs                   776M  9.7M  767M   2% /run
tmpfs                   1.0M     0  1.0M   0% /run/credentials/systemd-journald.service
/dev/sda2               960M  272M  689M  29% /boot
/dev/sr0                6.5G  6.5G     0 100% /media/cdrom
/dev/sda1               599M  8.3M  591M   2% /boot/efi
tmpfs                   388M  124K  388M   1% /run/user/0
192.168.10.10:/nfsfile   17G  3.7G   13G  23% /nfsfile
After successful mounting, you should be able to view the file contents written during the previous operation.
root@linuxprobe:~# cat /nfsfile/readme
welcome to linuxprobe.com
To ensure the NFS file sharing service remains active, add it to the fstab file:
#
# /etc/fstab
# Created by anaconda on Wed Mar 12 20:08:04 2025
#
# Accessible filesystems, by reference, are maintained under '/dev/disk/'.
# See man pages fstab(5), findfs(8), mount(8) and/or blkid(8) for more info.
#
# After editing this file, run 'systemctl daemon-reload' to update systemd
# units generated from this file.
#
UUID=016bb74f-bfa8-4d80-aa6d-d5693c39a844 /             xfs     defaults        0 0
UUID=c34124dd-c66e-4cbe-ba04-528666d30dc0 /boot         xfs     defaults        0 0
UUID=9A1A-B195          /boot/efi            vfat    umask=0077,shortname=winnt 0 2
UUID=299dacfd-f999-48d8-bca4-e5274ac600a8 none          swap    defaults        0 0
/dev/cdrom 							/media/cdrom 	   iso9660  defaults 		0 0
192.168.10.10:/nfsfile                    /nfsfile      nfs     defaults        0 0
12.3 autofs Automatic Mounting Service
Both Samba and NFS services require mount information to be written into the /etc/fstab file. This ensures remote shared resources are automatically mounted when the server boots. While convenient, mounting too many remote resources can significantly burden network bandwidth and server hardware resources.Additionally, resources that remain mounted long-term without use can waste server hardware resources. Some might suggest, "You can manually mount them using the mount command each time before use." While this is an option, having to mount every time before accessing the resource is indeed cumbersome.
The autofs automatic mounting service resolves this issue. Unlike the mount command, the autofs service is a Linux daemon that automatically mounts a filesystem when it detects a user attempting to access an unmounted filesystem.In other words, while entries in /etc/fstab trigger automatic mounting at each system boot, the autofs service dynamically mounts filesystems only when users need them. This approach conserves network resources and server hardware capacity.
First, install the autofs service program:
root@linuxprobe:~# dnf install autofs
Updating Subscription Management repositories.
Last metadata expiration check: 0:12:01 ago on Tue 25 Mar 2025 11:37:58 PM CST.
Dependencies resolved.
================================================================================
 Package             Architecture Version                    Repository    Size
================================================================================
Installing:
 autofs              x86_64       1:5.1.9-10.el10            BaseOS       395 k
Installing dependencies:
 libsss_autofs       x86_64       2.10.0~beta2-3.el10        BaseOS        36 k
[... output omitted ...]
Installed:
  autofs-1:5.1.9-10.el10.x86_64     libsss_autofs-2.10.0~beta2-3.el10.x86_64

Complete!
Linux servers in production environments typically manage mount operations for numerous devices simultaneously. Writing all these device mount information into the main configuration file of the autofs service would inevitably bloat the main configuration file. This not only slows down the autofs service's response time but also reduces the readability of the main configuration file, causing significant inconvenience for subsequent modifications and maintenance work. Therefore, the main configuration file for the autofs service should follow the format "mount directory subconfiguration file". The mount directory refers to the parent directory of the device's mount point. For example, if a CD-ROM device typically mounts to the /media/cdrom directory, the mount directory should be specified as /media. The corresponding subconfiguration file then provides further details about the devices mounted within this directory.Sub-configuration files must be user-defined. While filenames are not strictly regulated, the .misc suffix is recommended. Specific configuration parameters are illustrated in line 7.
root@linuxprobe:~# vim /etc/auto.master
  1 #
  2 # Sample auto.master file
  3 # This is a 'master' automounter map and it has the following format:
  4 # mount-point [map-type[,format]:]map [options]
  5 # For details of the format look at auto.master(5).
  6 #
  7 /media  /etc/iso.misc
  8 /misc   /etc/auto.misc
  9 #
 10 # NOTE: mounts done from a hosts map will be mounted with the
 11 #       "nosuid" and "nodev" options unless the "suid" and "dev"
 12 #       options are explicitly given.
 13 #
 14 /net    -hosts
 15 #
 16 # Include /etc/auto.master.d/*.autofs
 17 # To add an extra map using this mechanism you will need to add
 18 # two configuration items - one /etc/auto.master.d/extra.autofs file
 19 # (using the same line format as the auto.master file)
 20 # and a separate mount map (e.g. /etc/auto.extra or an auto.extra NIS map)
 21 # that is referred to by the extra.autofs file.
 22 #
 23 +dir:/etc/auto.master.d
 24 #
 25 # If you have fedfs set up and the related binaries, either
 26 # built as part of autofs or installed from another package,
 27 # uncomment this line to use the fedfs program map to access
 28 # your fedfs mounts.
 29 #/nfs4  /usr/sbin/fedfs-map-nfs4 nobind
 30 #
 31 # Include central master map if it can be found using
 32 # nsswitch sources.
 33 #
 34 # Note that if there are entries for /net or /misc (as
 35 # above) in the included master map any keys that are the
 36 # same will not be seen as the first read key seen takes
 37 # precedence.
 38 #
 39 +auto.master
In the subconfiguration files, entries should follow the format "mount_directory mount_type_and_permissions :device_name". For example, to mount a CD-ROM device to the /media/iso directory: - Set the mount directory to iso - Use -fstype as the filesystem format parameter (iso9660 for CD-ROM) - Specify ro, nosuid, and nodev as specific permission parameters - Define /dev/cdrom as the device name to mount After configuration, start the autofs service and add it to system startup:
root@linuxprobe:~# vim /etc/iso.misc
iso   -fstype=iso9660,ro,nosuid,nodev :/dev/cdrom
root@linuxprobe:~# systemctl start autofs
root@linuxprobe:~# systemctl enable autofs
Created symlink '/etc/systemd/system/multi-user.target.wants/autofs.service' → '/usr/lib/systemd/system/autofs.service'.
Next, something quite interesting will happen. First, check the current CD-ROM device mount status to confirm the CD-ROM device is not mounted, and there is no /media/iso subdirectory at all:
root@linuxprobe:~# umount /dev/cdrom
root@linuxprobe:~# df -h
Filesystem             Size  Used Avail Use% Mounted on
/dev/mapper/rhel-root   17G  3.8G   13G  23% /
devtmpfs               4.0M     0  4.0M   0% /dev
tmpfs                  1.9G   84K  1.9G   1% /dev/shm
efivarfs               256K   56K  196K  23% /sys/firmware/efi/efivars
tmpfs                  776M  9.7M  767M   2% /run
tmpfs                  1.0M     0  1.0M   0% /run/credentials/systemd-journald.service
/dev/sda2              960M  272M  689M  29% /boot
/dev/sda1              599M  8.3M  591M   2% /boot/efi
tmpfs                  388M  128K  388M   1% /run/user/0
root@linuxprobe:~# cd /media
root@linuxprobe:/media# ls
root@linuxprobe:/media#
However, we can use the cd command to navigate into this iso subdirectory. The optical drive will then be automatically mounted immediately, allowing us to successfully view the contents of the disc.
root@linuxprobe:/media# cd iso
root@linuxprobe:/media/iso# ls
AppStream  EFI               GPL         RPM-GPG-KEY-redhat-beta
BaseOS     EULA              images      RPM-GPG-KEY-redhat-release
boot       extra_files.json  media.repo
root@linuxprobe:/media/iso# df -h
Filesystem             Size  Used Avail Use% Mounted on
/dev/mapper/rhel-root   17G  3.8G   13G  23% /
devtmpfs               4.0M     0  4.0M   0% /dev
tmpfs                  1.9G   84K  1.9G   1% /dev/shm
efivarfs               256K   56K  196K  23% /sys/firmware/efi/efivars
tmpfs                  776M  9.7M  767M   2% /run
tmpfs                  1.0M     0  1.0M   0% /run/credentials/systemd-journald.service
/dev/sda2              960M  272M  689M  29% /boot
/dev/sr0               6.5G  6.5G     0 100% /media/iso
/dev/sda1              599M  8.3M  591M   2% /boot/efi
tmpfs                  388M  128K  388M   1% /run/user/0
Tips:
Huh? Why did the CD-ROM device name change to /dev/sr0? It's actually a shortcut for /dev/cdrom—just a different name.root@linuxprobe:~# ls -l /dev/cdrom
lrwxrwxrwx. 1 root root 3 Mar 13 04:06 /dev/cdrom -> sr0
Pretty convenient, right?! While the knowledge is still fresh, let's try our hand at the NFS service.
First, unmount the NFS shared directory. In the main configuration file for the autofs service, there's a /misc/etc/auto.misc parameter. This auto.misc file serves as a reference for automatic mounts and already exists by default, so no action is needed here.
root@linuxprobe:~# umount /nfsfile
root@linuxprobe:~# vim /etc/auto.master
#
# Sample auto.master file
# This is a 'master' automounter map and it has the following format:
# mount-point [map-type[,format]:]map [options]
# For details of the format look at auto.master(5).
#
/media  /etc/iso.misc
/misc   /etc/auto.misc
[... output omitted ...]
Next, locate the corresponding auto.misc file and fill in the local mount path and NFS server mount information:
root@linuxprobe:~# vim /etc/auto.misc
#
# This is an automounter map and it has the following format
# key [ -mount-options-separated-by-comma ] location
# Details may be found in the autofs(5) manpage
nfsfile         192.168.10.10:/nfsfile
cd              -fstype=iso9660,ro,nosuid,nodev :/dev/cdrom

# the following entries are samples to pique your imagination
#linux          -ro,soft                ftp.example.org:/pub/linux
#boot           -fstype=ext2            :/dev/hda1
#floppy         -fstype=auto            :/dev/fd0
#floppy         -fstype=ext2            :/dev/fd0
#e2floppy       -fstype=ext2            :/dev/fd0
#jaz            -fstype=ext2            :/dev/sdc1
#removable      -fstype=ext2            :/dev/hdd
After completing the entries, restart the autofs service. When users access the /misc/nfsfile directory, shared information will be automatically mounted.
root@linuxprobe:~# systemctl restart autofs
root@linuxprobe:~# cd /misc/nfsfile
root@linuxprobe:/misc/nfsfile# df -h
Filesystem              Size  Used Avail Use% Mounted on
/dev/mapper/rhel-root    17G  3.8G   13G  23% /
devtmpfs                4.0M     0  4.0M   0% /dev
tmpfs                   1.9G   84K  1.9G   1% /dev/shm
efivarfs                256K   56K  196K  23% /sys/firmware/efi/efivars
tmpfs                   776M  9.7M  767M   2% /run
tmpfs                   1.0M     0  1.0M   0% /run/credentials/systemd-journald.service
/dev/sda2               960M  272M  689M  29% /boot
/dev/sr0                6.5G  6.5G     0 100% /media/cdrom
/dev/sda1               599M  8.3M  591M   2% /boot/efi
tmpfs                   388M  124K  388M   1% /run/user/0
192.168.10.10:/nfsfile   17G  3.8G   13G  23% /misc/nfsfile
Awesome! Learned a whole new skill. With the autofs service, our work becomes much more convenient—no more worrying about mounting devices manually. It handles it automatically for us.
Time for a quick break before moving forward!
Review Questions
- Can NFS be used for file sharing between Linux and Windows systems?
Answer: No, you should use the Samba service program. NFS service can only achieve file sharing between Linux systems.
- What command manages the independent account information database for the Samba service?
Answer: The pdbedit command.
- Briefly describe how to share resources using the Samba service program in Windows.
Answer: Enter the access command in the Windows "Run" dialog box using the format \192.168.10.10 and press Enter.
- Briefly describe the method for sharing resources using the Samba service program in a Linux system.
Answer: First create a password authentication file and mount directory, then write the mount information to the /etc/fstab file. Finally, execute the mount -a command to mount and use it.
- If the NFS service is not installed by default on a Linux system, what software package should be installed?
Answer: The package name for the NFS service is nfs-utils. Therefore, execute the command yum install nfs-utils.
- When sharing resources via NFS, if you want all NFS clients accessing shared resources to be mapped to a local anonymous user regardless of their login credentials, which parameter should be added?
Answer: Add the all_squash parameter. This enhances server security.
- What command should a client use to view the list of shared resources on a remote NFS server?
Answer: Use the showmount command to view the shared resources on the NFS server.
- Briefly describe the function of the autofs service program.
Answer: It enables dynamic and flexible device mounting operations. It automatically mounts a filesystem only when it detects a user attempting to access an unmounted filesystem.
- Where is the main configuration file for the autofs service located?
Answer: It is located at /etc/auto.master.
- What is the suffix for autofs service subconfiguration files?
Answer: The recommended suffix is .misc, but testing shows other suffixes work without issues.