Chapter 06 · Linux Storage Layout & Disk Management
Chapter Overview
The distinctive file storage structure in Linux systems often confuses newcomers. This chapter begins with the file storage architecture in Linux, explaining the Filesystem Hierarchy Standard (FHS), udev hardware naming conventions, and the working principles of disk devices.
To help readers better understand the role of file systems, Instructor Liu Chuan will thoroughly analyze the differences between common Linux file systems—Ext3, Ext4, and XFS—and guide readers through hands-on practice with essential disk management operations. These include partitioning, formatting, and mounting disk devices, enabling readers to master file system usage.
After solidifying theoretical foundations, we will thoroughly cover deploying swap partitions, configuring disk quota services, and using the ln command to create soft and hard links. By the end of this chapter, readers will gain deep insights into disk storage and file systems within both Linux and Windows environments.
6.1 Everything Starts with "/"
In Linux, directories, character devices, sockets, disks, optical drives, printers, and more are all abstracted as files—embodying the principle Professor Liu Chuan consistently emphasizes: "Everything in Linux is a file." Since we primarily interact with files, how do we locate them?
In Windows systems, locating a file requires navigating sequentially through the disk partition (also called a drive letter) where the file resides, then entering the specific directory (also known as a "folder") within that partition, and finally finding the file itself. However, Linux does not use drive letters such as C, D, E, or F. All files originate from the root directory (/) and are organized in an inverted tree structure according to the Filesystem Hierarchy Standard (FHS), which defines the purpose of common directories.
File and directory names in Linux are case-sensitive. For example, root, rOOt, Root, and rooT are all treated as distinct directories. Additionally, filenames cannot contain forward slashes (/). The file storage structure in Linux is illustrated in Figure 6-1.
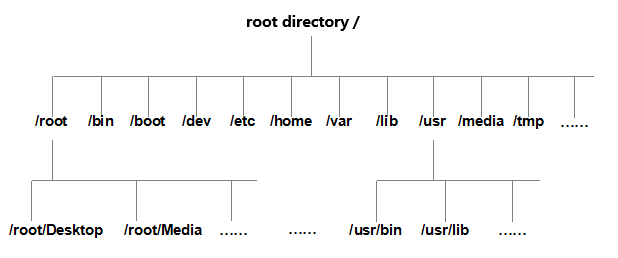
Figure 6-1 File Storage Structure in Linux Systems
The Filesystem Hierarchy Standard (FHS) mentioned earlier is a set of rules derived from the collective experience of countless Linux users and developers. It guides users on where to store files and where to find them. However, for users, the FHS is more of a moral guideline than a strict mandate. Some users simply ignore it, placing files wherever they please, while others have never even heard of it. This is not meant to condemn such users, but rather to encourage you to apply what you’ve learned flexibly. Never get stuck on the FHS as a rigid rulebook, or you'll be the one who suffers. Common directory names in Linux systems and their corresponding contents are shown in Table 6-1.
Table 6-1 Common Directory Names and Their Corresponding Contents
| Directory Name | Content to be Stored |
|---|---|
| /boot | System boot files, such as kernel and boot menu |
| /dev | Hardware device files within the system |
| /etc | Configuration files for the system and various services |
| /root | Administrator's home directory |
| /home | User home directories |
| /bin | Basic user commands, usable in single-user mode |
| /sbin | System administration commands for administrators |
| /lib | System shared libraries used by /bin and /sbin commands |
| /media | Mount point directory for removable devices |
| /opt | Third-party application packages |
| /srv | Service data directory for network services |
| /tmp | Temporary file directory accessible to all users |
| /proc | Virtual filesystem providing process and kernel info |
| /usr/local | Locally installed software and applications |
| /usr/sbin | Non-basic administrative commands for system administrators |
| /usr/share | Shared data, such as documentation and help files |
| /var | Dynamic data, such as log files and temporary files |
| /lost+found | File system recovery area, storing lost file fragments |
In Linux systems, another crucial concept is the path. A path indicates how to locate a file within the system, categorized into absolute paths and relative paths.
An absolute path specifies a file or directory name starting from the root directory (/). A relative path, on the other hand, is a path representation relative to the current working directory. Let's look at the following example to help better understand absolute and relative paths.
Imagine a foreign tourist visiting Beijing's Panjiayuan market. Suddenly needing to use the restroom but unable to find one, they ask you for directions. Here are two correct ways to guide them:
Absolute Path: First, fly to China. After arriving in Beijing, exit Capital Airport (assuming arrival at Capital Airport), take the Airport Express to Sanyuanqiao, then transfer to Subway Line 10 to Panjiayuan Station. After exiting the station, take Bus Route 34 to Nongguangli. After getting off, turn left at the intersection.
Relative Path: Turn left at the intersection ahead.
Both methods are correct. If you provide absolute directions, any foreign tourist could find the restroom at Panjiayuan following these instructions, but it's overly cumbersome. Relative directions, while concise, only guide the tourist from their current location. Thus, relative paths lack universality.
If you haven't fully grasped the difference between relative and absolute paths yet, don't worry. You'll definitely master these concepts through hands-on practice later. For now, focus on memorizing the directory functions defined in the FHS—this knowledge will prove invaluable down the road.
6.2 Naming Conventions for Physical Devices
In Linux, everything is a file—hardware devices included. As files, they require names. The udev device manager within the kernel automatically standardizes hardware names. This allows users to infer a device's general attributes and partition information from its device file name, which is especially convenient for unfamiliar hardware.Furthermore, the udev service runs continuously as a daemon, monitoring kernel signals to manage device files within the /dev directory. Common hardware devices and their corresponding file names in Linux systems are listed in Table 6-2.
Table 6-2 Common Hardware Devices and Their File Names
| Hardware Device | File Name |
|---|---|
| IDE Device | /dev/hd[a-d] |
| NVMe Device | /dev/nvme[0-n] |
| SCSI/SATA/USB Drive | /dev/sd[a-z] |
| Virtio Device | /dev/vd[a-z] |
| Floppy Drive | /dev/fd[0-1] |
| Printer | /dev/lp[0-15] |
| CD-ROM Drive | /dev/cdrom |
| Mouse | /dev/mouse |
| Tape Drive | /dev/st0 or /dev/ht0 |
Since IDE devices are now rare, most disk devices start with /dev/sd. A host may have multiple disks, so the system uses letters a–z to represent 26 distinct disks (defaulting to start with a). Additionally, disk partition numbering follows specific rules:
Primary or extended partitions are numbered from 1 to 4;
Logical partitions start from number 5.
- Misinterpretation of Device Names.
Many trainers and Linux technical books claim that /dev/sda represents the storage device connected to the first slot on the motherboard. Learners or readers who observe this naming matching the slot order during hands-on practice often take this as gospel truth. However, in reality,
the letter 'a' in /dev/sda is not determined by physical slot location, but rather by the order in which the system kernel discovers storage devices. This misconception arises because the motherboard's device connection sequence often coincides with the kernel's discovery order. Take an iSCSI network storage device as an example: even if the second slot on the motherboard is empty, the system might still recognize a /dev/sdb device. This occurs because the kernel assigns names based on its scanning logic, not physical slot placement.
- Misconceptions about partition naming.
Many Linux instructors teach students that "partition numbers equate to partition count," such as interpreting sda3 as the third partition on the device. Students often observe similar patterns during experiments. However, this theory contains a fundamental flaw: partition numbering is not necessarily sequential. Users can manually configure partition numbers.Therefore, sda3 merely denotes the partition numbered 3 and cannot be used to infer that the sda device already contains three partitions.
Having addressed these two common pitfalls, let's now analyze the information contained within the device file name /dev/sda5, as shown in Figure 6-2.
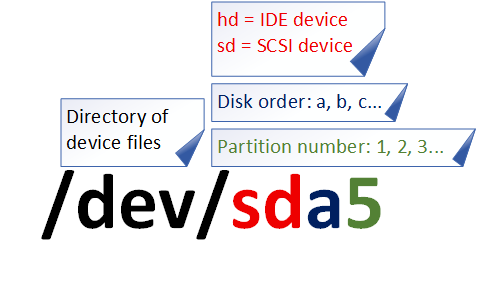
Figure 6-2 Device File Name
First, the /dev directory stores hardware device files. Second, "sd" denotes a storage device. Third, "a" indicates the first device recognized on that interface type within the system. Finally, "5" signifies this device is a logical partition. In short, /dev/sda5 represents "the device file for the logical partition numbered 5 on the first hardware device recognized in the system."
Additionally, an increasing number of servers now utilize the NVMe transfer protocol. This technology, which fully leverages solid-state drive performance, offers significantly faster data throughput than traditional serial SATA and SCSI interfaces. It is highly likely that the next edition of this book will use NVMe disks as the experimental subject. The correspondence between SATA/SCSI and NVMe disk names is shown in Figure 6-3.
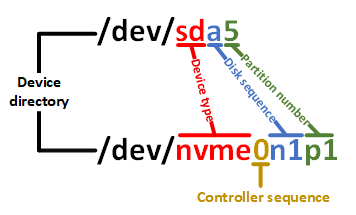
Figure 6-3 NVMe Disk Naming Correspondence
Considering many readers lack Linux fundamentals and may find the concepts of primary partitions, extended partitions, and logical partitions challenging, we'll briefly cover disk-related knowledge.
It is precisely because computers have disk devices that we can save our progress during gameplay or after completing a game, rather than starting over from the beginning each time. Disk devices are composed of numerous sectors, each with a capacity of 512 bytes. The first sector is the most critical, as it stores the Master Boot Record (MBR) and partition table information.Regarding the first sector: the MBR occupies 446 bytes, the partition table occupies 64 bytes, and the end marker occupies 2 bytes. Each partition entry in the partition table requires 16 bytes. Consequently, only up to four partition entries can be written to the first sector. These four partitions are the four primary partitions.The data information within the first sector is illustrated in Figure 6-4.
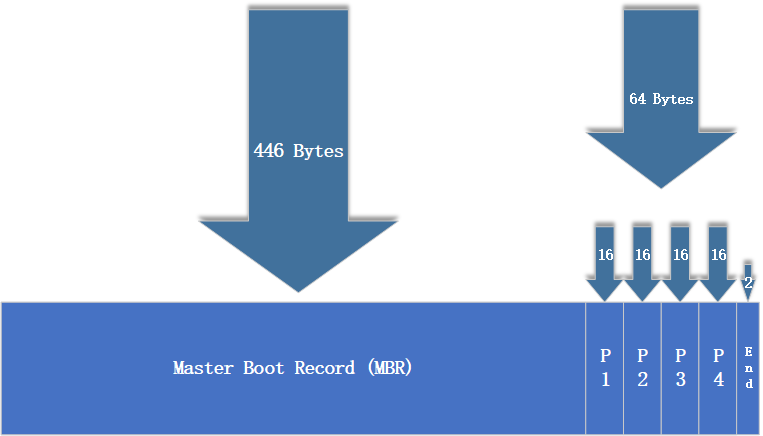
Figure 6-4 Data Information in the First Sector
Now, the question arises: Can each disk only create a maximum of 4 partitions? This is clearly unreasonable and insufficient.
To address the limitation on partition count, the 16-byte space in the partition table of the first sector (originally intended for primary partition information) can be used as an extended partition, pointing to another partition. An extended partition is not a true partition itself but rather a pointer to other partitions.Thus, users typically opt for three primary partitions and one extended partition, then create multiple logical partitions within the extended partition to meet diverse partitioning needs. Understanding why primary partitions are limited to four is sufficient. Primary partitions, extended partitions, and logical partitions can be planned as shown in Figure 6-5.
Tips:
Strictly speaking, the extended partition is not a meaningful partition itself but merely a pointer to other partitions. This pointer structure forms a singly linked list. Therefore, the extended partition cannot store data directly; users must operate on the corresponding partitions it points to (known as logical partitions).

Figure 6-5 Hard Disk Partition Layout
Try to interpret what /dev/hdc8 represents.
Answer: This denotes the eighth logical partition on the third IDE device (now relatively uncommon).
Correct! If you take the Red Hat RHCE exam or purchase a cloud server, you may also encounter devices like /dev/vda or /dev/vdb. These devices starting with "vd" are called Virtio devices—essentially virtualized devices. Virtual machine monitors (hypervisors) like KVM and Xen use these devices by default for data interaction. You'll likely encounter them more frequently once you enter the workforce.
6.3 File Systems and Data Storage
Take a sheet of A4 paper and write a few lines horizontally. As you write, you'll notice your handwriting gradually slants, eventually tilting the entire line upward or downward. To help maintain neatness and improve readability, stationery stores offer various notebooks—single-ruled, double-ruled, grid-ruled, music-ruled, and more.This illustrates that content, once freed from formatting constraints, becomes entirely beyond our subjective control. All user operations on hardware storage devices—such as creating, writing, reading, modifying, transferring, and controlling files—rely on the file system to execute. The file system's role is to efficiently manage and optimize disk space usage, ensuring users' normal operational needs are met.
The Linux system supports dozens of file systems, with the most common ones listed below.
Ext2: Dating back to 1993, it was Linux's first commercial-grade file system, largely adhering to UNIX file system design standards. Without journaling capabilities, Ext2 struggles to recover data after system crashes, posing a high risk of data loss. Therefore, it's advisable to avoid using it whenever possible, or at most reserve it for SD cards or USB drives.
Ext3: A journaling file system that logs details of each write operation before performing the actual write. This allows tracing interrupted operations after an abnormal shutdown. Ext3 prevents data loss during unexpected system crashes and automatically repairs data inconsistencies and errors. However, repair times become lengthy with larger disk capacities, and it cannot guarantee 100% data preservation.
Ext4: An enhanced version of Ext3, serving as the default file system in RHEL 6. It supports storage capacities up to 1EB (1EB = 1,073,741,824 GB) and accommodates extensive subdirectory structures. Ext4 achieves significantly improved read/write efficiency through block allocation batching. It is now widely adopted by mainstream servers.
XFS: A high-performance journaling file system that became the default for RHEL starting with RHEL 7. It enables rapid recovery of corrupted files after unexpected crashes, while its robust journaling consumes minimal computational and storage resources. Supporting up to 18EB of storage capacity, it meets virtually all requirements.
A major change introduced in RHEL 7, and continued in RHEL 10, is the adoption of XFS as the default file system. While Red Hat's official documentation touts this as a significant advancement, Professor Liu Chuan's practical testing revealed the reality is not entirely as portrayed.Evaluating a file system's "read" performance involves numerous variables, including the number and size of files read, CPU and memory utilization, and the impact of different hardware configurations. Therefore, official claims should not be accepted uncritically. While XFS does offer performance improvements over Ext4, these gains are not overwhelming. XFS's most outstanding feature is undoubtedly its support for storage capacities up to 18EB.
18EB equals 18,874,368TB. Assuming each disk has a capacity of 100TB, approximately 190,000 disks would be required to store 18EB of data.In short, with XFS, the upper limit of file storage no longer depends on technology, but on your wallet. There's a classic joke in tech circles: "If you have 18EB of data in a Shanghai data center and want to transfer it to Beijing as quickly as possible, what's the best method?" The answer is "Take the Beijing-Shanghai high-speed rail."
When acquiring a new disk storage device, you must first partition it, then format the file system, and finally mount it for normal use. Disk partitioning depends on your needs and the disk size; you can choose not to partition it, but you must format the disk.
Tips:
It's like receiving a full-size sheet of uncut paper. First, you trim it to make it usable (partitioning). Next, you draw grid lines on the trimmed paper to write neatly (formatting). Finally, you put it to use (mounting).
Next, let's briefly explain what happens to a disk after formatting. Again, no need to memorize this—just understand the concept.
The sheer volume of data stored on disks daily necessitates a "disk map" called the superblock in Linux systems. Linux doesn't write file contents directly into this "disk map"; instead, it records information about the entire file system. Writing all file contents here would make it enormous, slowing down both queries and writes. Linux only stores each file's permissions and attributes in an inode. Each file occupies a separate inode record, which is typically 128 bytes in size. The recorded information includes:
File access permissions (read, write, execute);
File owner and group (owner, group);
File size (size);
Creation or content modification time (Ctime);
Last access time (Atime);
Modification time (Mtime);
Special permissions (SUID, SGID, SBIT);
Physical data address (point).
The actual content of the file is stored in blocks (typically 1KB, 2KB, or 4KB in size). The default size of an inode is only 128 bytes, and recording one block consumes 4 bytes. When a file's inode is filled, the Linux system automatically allocates a block dedicated to storing information about other blocks, similar to how an inode works. By linking the contents of these blocks together, users can read the complete file content. For blocks storing file content, the following two common scenarios exist (using 4KB blocks as an example):
Case 1: A very small file (1KB) still occupies one block, potentially wasting 3KB.
Case 2: A large file (5KB) occupies two blocks (the remaining 1KB after 4KB also requires one block).
At this point, you might think Linux is wasteful. Why can't the last block's capacity be fully utilized? Actually, every system operates this way—it's just something we haven't noticed before. You can check any existing file on your computer to see whether its actual size matches the space it occupies, as shown in Figure 6-6.
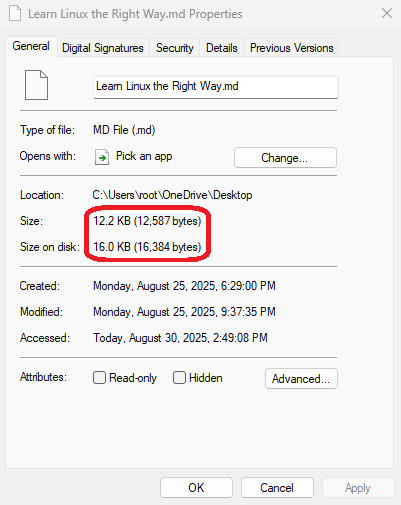
Figure 6-6 Actual File Size vs. Disk Space Used
Inodes and blocks work together to enable users to read and write file content. But this might sound too abstract. To better understand them, examine the relationship diagram in Figure 6-7.
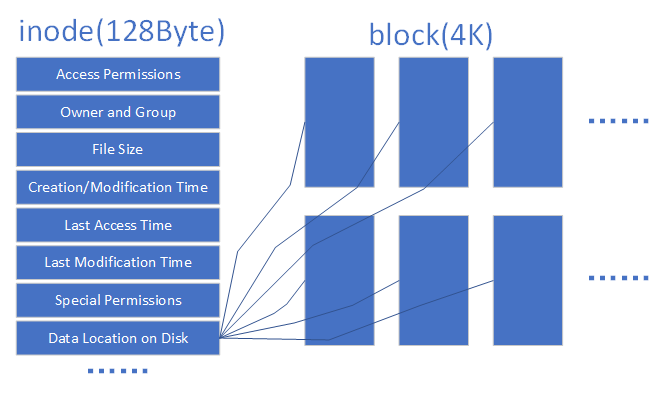
Figure 6-7 Schematic Diagram of the Relationship Between inodes and Blocks
Numerous file systems emerged during the evolution of computer systems. To shield users from underlying disk structures during file operations, the Linux kernel's software layer provides a Virtual File System (VFS) interface. This allows users to interact uniformly with this virtual layer when manipulating files. Figure 6-8 illustrates the VFS architecture. As shown, the actual file system hides its specific characteristics and details beneath the VFS. Consequently, users encounter a consistent experience where "file systems all seem the same," enabling them to freely use various commands to perform operations across any file system (e.g., copying files with the cp command).
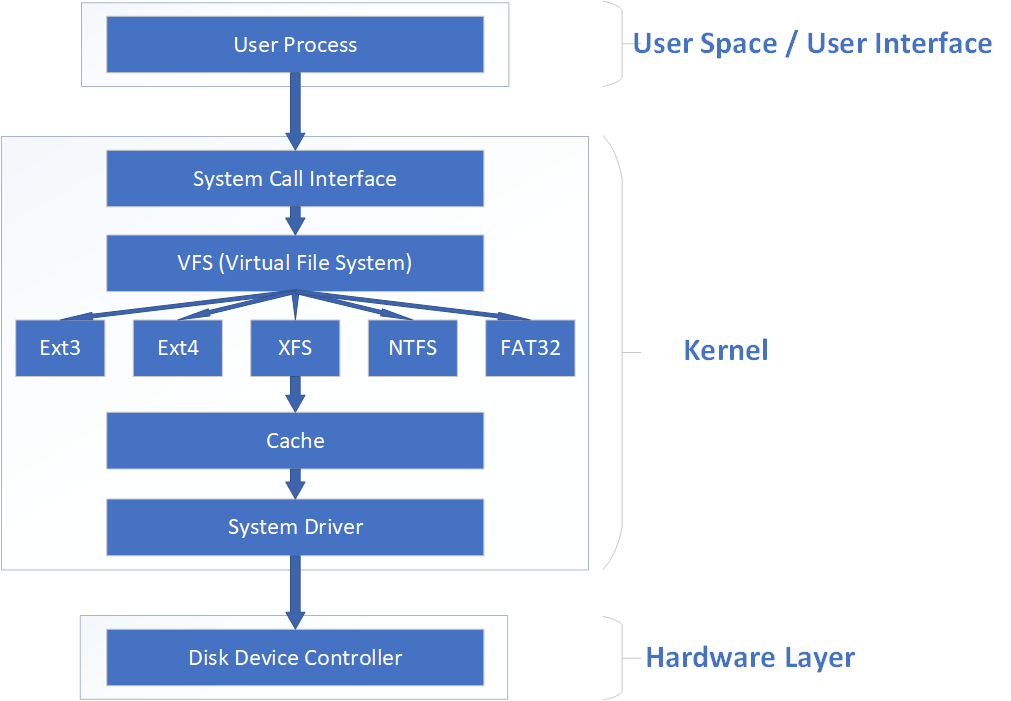
Figure 6-8 VFS Architecture Diagram
The VFS also functions somewhat like an interpreter. We needn't know the specifics of the other party; we simply tell the VFS what operation we wish to perform. It then automatically determines which commands the other party can understand, translates them, and passes them along. This way, users don't have to worry about these "minor details" and can focus solely on their own operations.
Tips:
There's a saying in the medical field: "When you start paying attention to a certain organ, it's likely because it's been acting up lately." Because VFS is so reliable and rarely causes issues, if we didn't explain its theory here, many students might go years without realizing they've been using it.
6.4 Mounting Hardware Devices
After getting used to Windows systems, we tend to take everything for granted. When we plug a USB drive into our computer, we rarely think about what Windows does behind the scenes to let us access its data. Next, we'll learn step by step how to mount and unmount storage devices in Linux, helping you better understand the principles and processes behind adding hardware in this system. As mentioned earlier, when you get a brand-new disk storage device, you must first partition it, then format it, and finally mount it for normal use. You've likely heard of "partitioning" and "formatting" before, but what exactly is "mounting"?
Professor Liu Chuan offers the simplest, most apt explanation: When users need to access data on a disk device or partition, they must first associate it with an existing directory file. This associative action is called "mounting."The following sections will guide readers step-by-step through using disk devices. However, given the complexity and importance of mounting-related theory, we've dedicated an additional subsection to explain it separately. This time, we hope you not only understand but also remember it.
The mount command is used to mount file systems, with the format mount [file system] [mount directory]. Available parameters and their functions are shown in Table 6-3. Mounting is the final step before using hardware devices. Simply use the mount command to associate a disk device or partition with a directory file, and then you can see the data from the hardware device within that directory.For newer Linux systems, specifying the filesystem type with the -t parameter is generally unnecessary, as Linux automatically detects it. The -a parameter in mount automatically checks the /etc/fstab file for any devices that may have been omitted from mounting and performs automatic mounting if found.
Table 6-3 Parameters and Functions in the mount Command
| Parameter | Function |
|---|---|
| -a | Mount all file systems defined in /etc/fstab |
| -t | Specifies the filesystem type |
For example, to mount the device /dev/sdb2 to the /backup directory, simply specify the device and mount directory parameters in the mount command. The system will automatically determine the file type to mount. The command is as follows:
root@linuxprobe:~# mount /dev/sdb2 /backup
If you need to mount a network storage device whose name may change frequently, using sdb becomes impractical. In such cases, it's recommended to use a UUID (Universally Unique Identifier) for mounting operations. A UUID is a string used to identify each individual disk, offering uniqueness and stability, making it particularly suitable for mounting network devices. So, how can you determine the UUID of an individual disk? The answer is to use the blkid command.
The blkid command displays device attribute information. Its full name is block device id, and its syntax is blkid [device name]. An example of using blkid to query a device's UUID is as follows:
root@linuxprobe:~# blkid
/dev/sdb1: UUID="1ff63c74-090c-4fa9-a3fb-cfb029572819" TYPE="xfs"
/dev/sdb2: UUID="53f01fa2-2a23-4979-8add-8fe0df5b8947" TYPE="ext4"
………………Partial output omitted………………
With the device's UUID value, you can mount the network device:
root@linuxprobe:~# mount UUID=53f01fa2-2a23-4979-8add-8fe0df5b8947 /backup
Although the filesystem becomes immediately accessible after executing the mount command as shown above, the mount will fail after a system reboot. This means you must manually mount it each time after booting.This is certainly not the desired outcome. To achieve a permanent, automatic association between hardware devices and directories, you must write the mount information into the /etc/fstab file using the specified format: "device_file mount_directory format_type permissions backup_option self_check_option" (refer to Table 6-4 for the meaning of each field). This file contains all the necessary information for mounting, and once configured, it will work indefinitely.
Table 6-4: Meaning of Each Field in the Specified Format for Mount Information
| Field | Meaning |
|---|---|
| Device File | Typically the device path + device name, or the UUID can be specified |
| Mount Point | Specifies the directory to mount to; must be created before mounting |
| File System Type | Specifies the file system format, e.g., Ext3, Ext4, XFS, SWAP, iso9660 (for optical discs) |
| Permissions | If set to defaults, default permissions are rw, suid, dev, exec, auto, nouser, async |
| Backup | If 1, performs disk backup using dump after boot; if 0, no backup |
| Self-Test | Set to 1 for automatic disk self-test after boot; 0 for no self-test |
To automatically mount the Ext4 filesystem device /dev/sdb2 to the /backup directory after boot, preserve default permissions, and skip the boot self-test, add the following entry to /etc/fstab. This ensures successful mounting after system restart.
root@linuxprobe:~# vim /etc/fstab
#
# /etc/fstab
# Created by anaconda on Wed Mar 12 19:35:26 2025
#
# Accessible filesystems, by reference, are maintained under '/dev/disk/'.
# See man pages fstab(5), findfs(8), mount(8) and/or blkid(8) for more info.
#
# After editing this file, run 'systemctl daemon-reload' to update systemd
# units generated from this file.
#
UUID=408f4a3d-a4d3-4a44-bb23-6988cdbd10bf /                  xfs     defaults        0 0
UUID=4cf8ecae-bcb6-4b1e-8001-968b33643a8a /boot              xfs     defaults        0 0
UUID=1FB8-9199                   /boot/efi        vfat    umask=0077,shortname=winnt 0 2
UUID=d936c726-45a7-4ca2-8932-c54f84a3d787 none               swap    defaults        0 0
/dev/sdb2                                 /backup            ext4    defaults        0 0
Since we'll need to create YUM/DNF software repositories from system images later, we'll mount the CD-ROM device to the /media/cdrom directory in advance. The file system format for the CD-ROM device is iso9660:
root@linuxprobe:~# vim /etc/fstab
#
# /etc/fstab
# Created by anaconda on Wed Mar 12 19:35:26 2025
#
# Accessible filesystems, by reference, are maintained under '/dev/disk/'.
# See man pages fstab(5), findfs(8), mount(8) and/or blkid(8) for more info.
#
# After editing this file, run 'systemctl daemon-reload' to update systemd
# units generated from this file.
#
UUID=408f4a3d-a4d3-4a44-bb23-6988cdbd10bf /                  xfs     defaults        0 0
UUID=4cf8ecae-bcb6-4b1e-8001-968b33643a8a /boot              xfs     defaults        0 0
UUID=1FB8-9199                   /boot/efi        vfat    umask=0077,shortname=winnt 0 2
UUID=d936c726-45a7-4ca2-8932-c54f84a3d787 none               swap    defaults        0 0
/dev/sdb2                                   /backup          ext4    defaults        0 0
/dev/cdrom                                  /media/cdrom   iso9660    defaults       0 0
Changes written to the /etc/fstab file do not take effect immediately. Use the mount -a command to automatically mount the devices:
root@linuxprobe:~# mount -a
The df command displays disk space usage on mounted volumes. Its full name is disk free, and the syntax is df -h. To view the current mounting status of devices in your system, we highly recommend using the df command. It not only lists
devices currently in use on the system, but also conveniently handles storage capacity "rounding" with the -h option. For example, it automatically rounds 10240K to 10M, greatly improving readability.
root@linuxprobe:~# df -h
Filesystem             Size  Used Avail Use% Mounted on
/dev/mapper/rhel-root   17G  3.7G   13G  23% /
devtmpfs               4.0M     0  4.0M   0% /dev
tmpfs                  1.9G   84K  1.9G   1% /dev/shm
efivarfs               256K   56K  196K  23% /sys/firmware/efi/efivars
tmpfs                  776M  9.7M  767M   2% /run
tmpfs                  1.0M     0  1.0M   0% /run/credentials/systemd-journald.service
/dev/sr0               6.5G  6.5G     0 100% /media/cdrom
/dev/sda2              960M  272M  689M  29% /boot
/dev/sda1              599M  8.3M  591M   2% /boot/efi
/dev/sdb2              480M   20M  460M   4% /backup
Oh, and speaking of network storage devices, it's recommended to add the _netdev parameter to the mount information in the fstab file. Adding this ensures the system attempts to mount the network storage device only after successfully connecting to the network, preventing prolonged boot times or failures (this will come in handy when learning iSCSI technology in Chapter 17).
root@linuxprobe:~# vim /etc/fstab
#
# /etc/fstab
# Created by anaconda on Wed Mar 12 19:35:26 2025
#
# Accessible filesystems, by reference, are maintained under '/dev/disk/'.
# See man pages fstab(5), findfs(8), mount(8) and/or blkid(8) for more info.
#
# After editing this file, run 'systemctl daemon-reload' to update systemd
# units generated from this file.
#
UUID=408f4a3d-a4d3-4a44-bb23-6988cdbd10bf /                 xfs     defaults         0 0
UUID=4cf8ecae-bcb6-4b1e-8001-968b33643a8a /boot             xfs     defaults         0 0
UUID=1FB8-9199                   /boot/efi        vfat    umask=0077,shortname=winnt 0 2
UUID=d936c726-45a7-4ca2-8932-c54f84a3d787 none              swap    defaults         0 0
/dev/sdb2                                  /backup          ext4    defaults,_netdev 0 0
/dev/cdrom                                 /media/cdrom   iso9660    defaults        0 0
Mounting a filesystem utilizes hardware resources, while unmounting signifies the release of hardware device resources. Since mounting associates a hardware device with a directory, unmounting simply requires specifying either the device file or the mount directory to be unlinked, typically without additional parameters.
The umount command is used to unmount devices or file systems. Its name comes from “unmount,” and its syntax is umount [device file | mount directory].
root@linuxprobe:~# umount /dev/sdb2
If you are currently in the directory where the device is mounted, the system will indicate that the device is busy. Simply exit to another directory and try again. Easy fix.
root@linuxprobe:~# cd /media/cdrom
root@linuxprobe:/media/cdrom# umount /dev/cdrom
umount: /media/cdrom: target is busy.
root@linuxprobe:/media/cdrom# cd ~
root@linuxprobe:~# umount /dev/cdrom
root@linuxprobe:~#
Tips:
Mounting a device is like two people registering for marriage at the civil affairs bureau—both parties must be present simultaneously. Once the information is recorded in the bureau's system, bigamy (remounting the same device) becomes impossible.
Finally, here's a handy trick for students. If your system has numerous disks and partitions, it's easy to lose track of their usage status or modifications over time. In such cases, use the lsblk command to display them in a tree-like structure.
The lsblk command displays information about block devices in the system, such as disks, partitions, and logical volumes. Its full name is list block devices. Simply type the command and press Enter to execute it.
root@linuxprobe:~# lsblk
NAME          MAJ:MIN RM  SIZE RO TYPE MOUNTPOINTS
sda             8:0    0   20G  0 disk
├─sda1          8:1    0  600M  0 part /boot/efi
├─sda2          8:2    0    1G  0 part /boot
└─sda3          8:3    0 18.4G  0 part
  ├─rhel-root 253:0    0 16.4G  0 lvm  /
  └─rhel-swap 253:1    0    2G  0 lvm  [SWAP]
sdb             8:16   0   20G  0 disk
├─sdb1          8:17   0    1G  0 part
└─sdb2          8:18   0  500M  0 part
sr0            11:0    1  6.5G  0 rom
6.5 Adding Disk Devices
Based on the theoretical knowledge about managing hardware devices discussed earlier, let's outline the steps for adding a disk device: First, simulate adding a new disk storage device within the virtual machine; then perform partitioning, formatting, and mounting operations; finally, verify the successful addition by checking the system's mount status and actually using the disk.
Since we don't need to purchase a physical disk specifically for this experiment—instead relying on hardware emulation through virtual machine software—this once again highlights the benefits of using virtualization tools. The specific steps are as follows.
First, shut down the virtual machine system. Wait a few minutes for it to automatically return to the virtual machine management main interface. Then click the "Edit Virtual Machine Settings" option. In the pop-up interface, click the "Add" button to add a new hardware device, as shown in Figure 6-9.
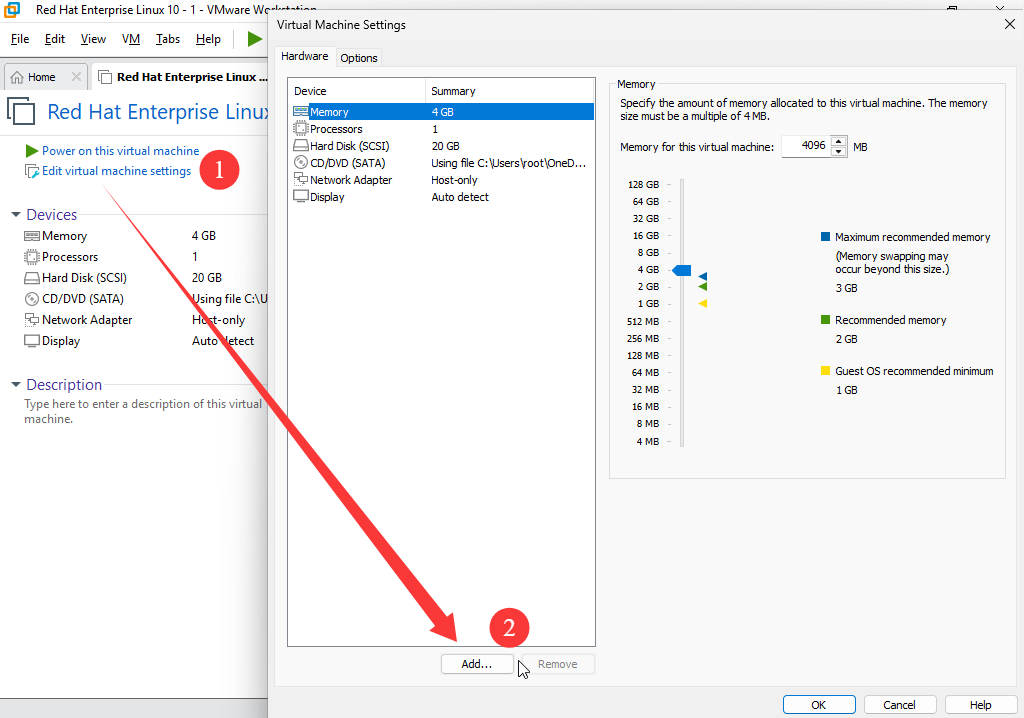
Figure 6-9 Adding a hardware device in the virtual machine system
Select "Disk" as the hardware type to add, then click the "Next" button, as shown in Figure 6-10. This step requires no further explanation.
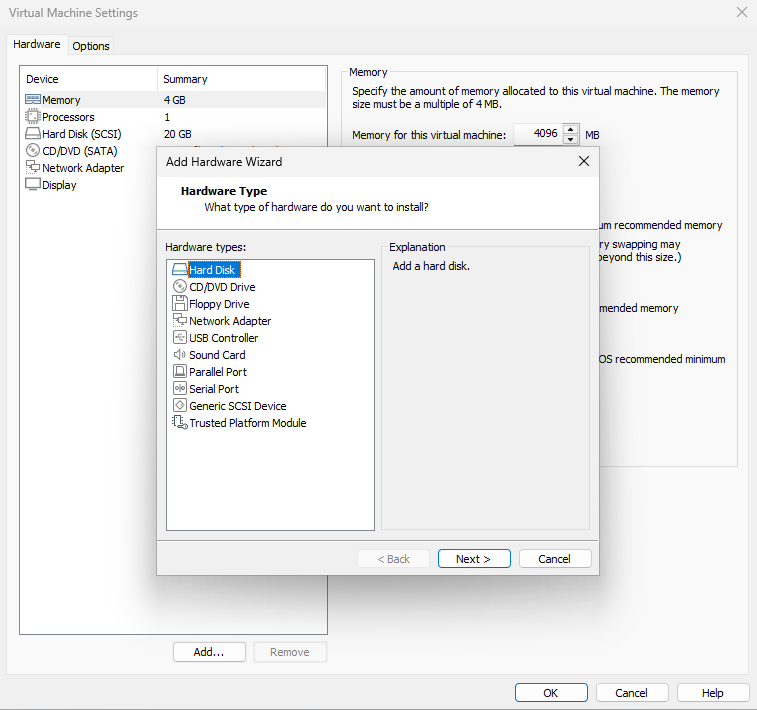
Figure 6-10 Selecting the hardware type to add
Select SATA as the virtual hard disk type and click the "Next" button, as shown in Figure 6-11. The device name within the virtual machine should subsequently appear as /dev/sdb.
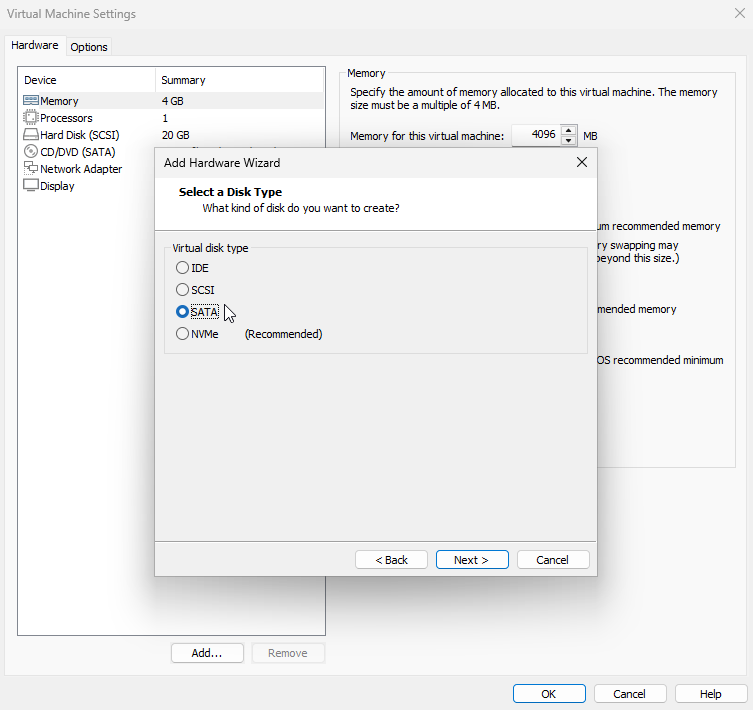
Figure 6-11 Selecting the Hard Disk Device Type
Select the "Create a new virtual disk" radio button (not other options), then click the "Next" button again, as shown in Figure 6-12.
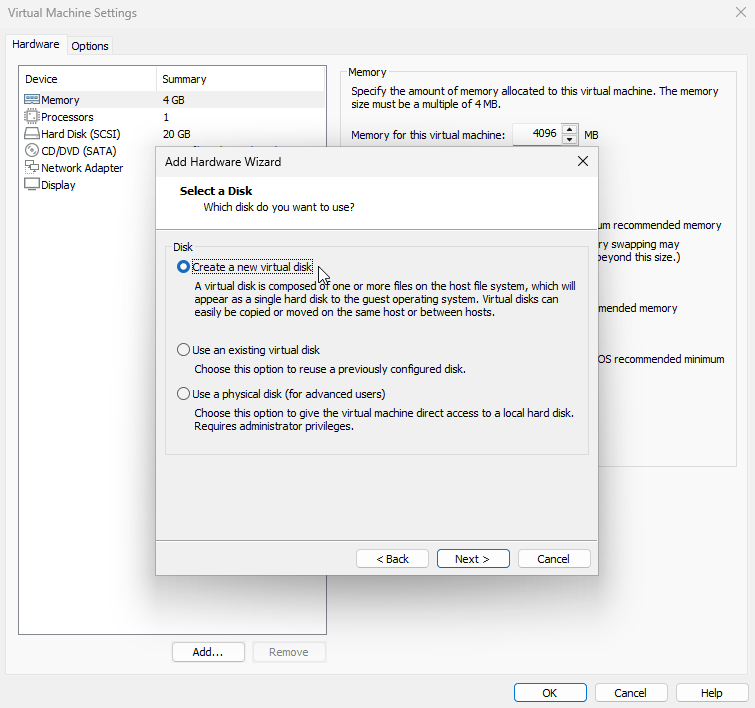
Figure 6-12 Selecting the "Create a new virtual disk" option
Set the "Maximum disk size" to the default 20GB. This value limits the maximum disk space the virtual machine can use, not the amount it will immediately fill, so the default 20GB is appropriate. Click the "Next" button, as shown in Figure 6-13.
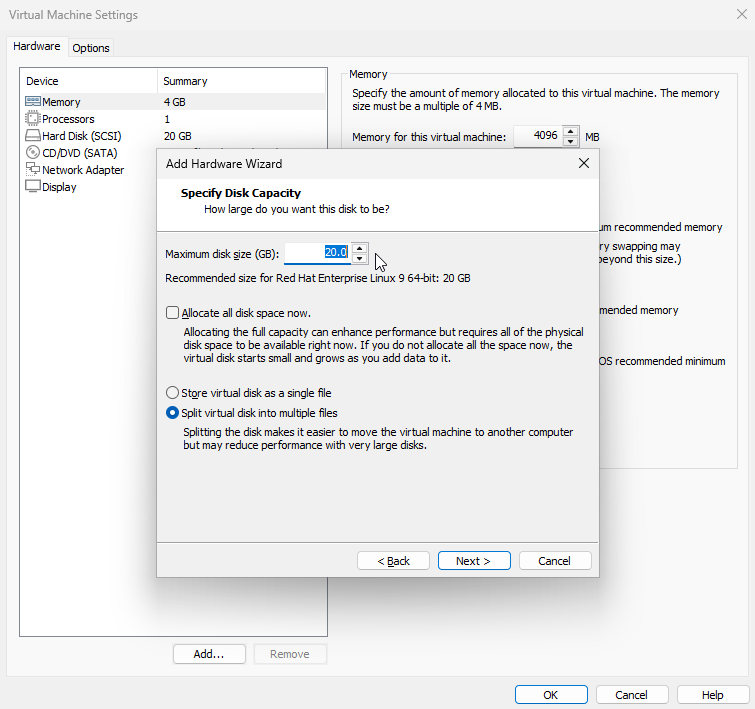
Figure 6-13 Setting the maximum disk space usage
Configure the disk file name and save location (the default settings are acceptable here; no modification is needed). Click the "Finish" button directly, as shown in Figure 6-14.
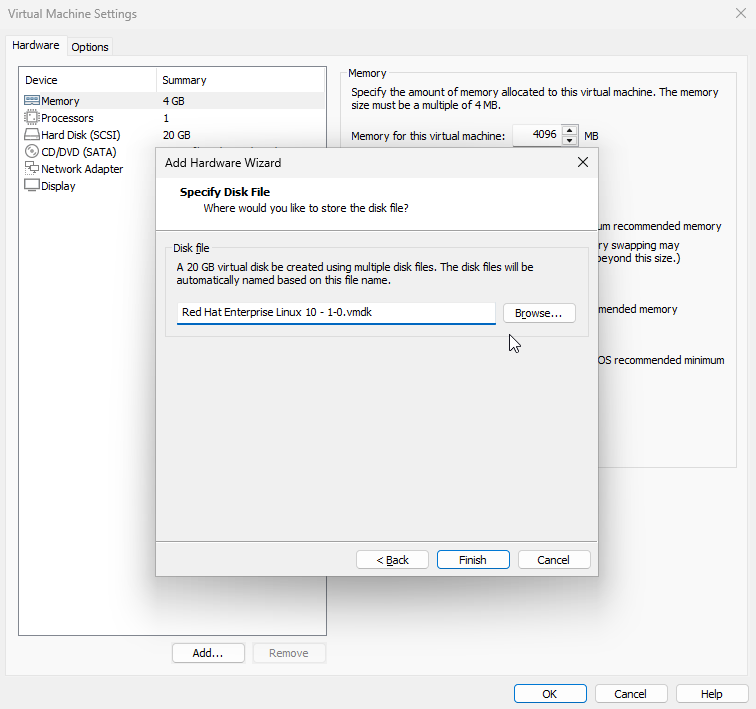
Figure 6-14 Setting the disk file name and save location
After adding the new disk, you can view the device information. No modifications are needed here; simply click the "OK" button to start the virtual machine, as shown in Figure 6-15.
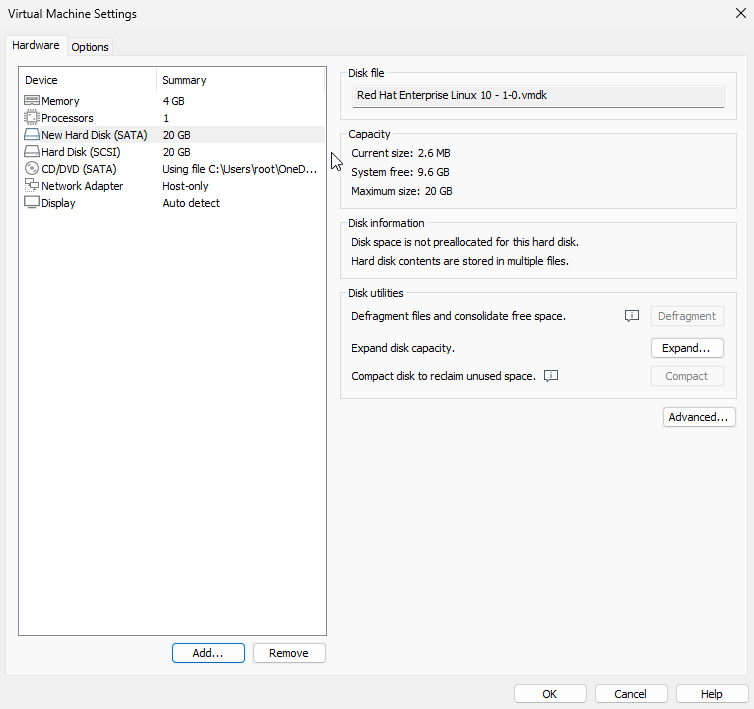
Figure 6-15 Viewing Virtual Machine Hardware Settings
After adding the disk device within the virtual machine, we should be able to see the corresponding disk device file. Following the udev naming rules explained earlier, the second recognized SATA device should be saved as /dev/sdb—this is the disk device file. However, before using this disk, partitioning is required. For example, we might create a 2GB partition for later operations.
The fdisk command is used to create, modify, and delete partition table information on a disk. Its full English name is "format diskette," and its syntax is "fdisk disk_name".
In Linux systems, the most commonly used method for managing disk devices is the fdisk command. It provides a "one-stop partitioning service" that combines functions like adding, deleting, and converting partitions. Unlike the previously introduced method of directly writing parameters after the command, this command uses an interactive question-and-answer format to receive parameters (see Table 6-5). This makes it particularly convenient for managing disk devices, allowing dynamic adjustments based on requirements.
Table 6-5 fdisk Command Parameters and Functions
| Parameter | Function |
|---|---|
| m | View all available parameters |
| n | Add a new partition |
| d | Delete a partition |
| l | List all available partition types |
| t | Change a partition type |
| p | View partition table information |
| w | Save and exit |
| q | Exit without saving |
First, use the fdisk command to manage the /dev/sdb disk device. After seeing the prompt, enter the p parameter to view existing partition information on the disk device, including disk capacity, number of sectors, etc.:
root@linuxprobe:~# fdisk /dev/sdb

Welcome to fdisk (util-linux 2.40.2).
Changes will remain in memory only, until you decide to write them.
Be careful before using the write command.

Device does not contain a recognized partition table.
Created a new DOS (MBR) disklabel with disk identifier 0x186f3f5e.

Command (m for help): p
Disk /dev/sdb: 20 GiB, 21474836480 bytes, 41943040 sectors
Disk model: VMware Virtual S
Units: sectors of 1 * 512 = 512 bytes
Sector size (logical/physical): 512 bytes / 512 bytes
I/O size (minimum/optimal): 512 bytes / 512 bytes
Disklabel type: dos
Disk identifier: 0x186f3f5e
Enter parameter n to attempt adding a new partition. The system will prompt the user to either continue with parameter p to create a primary partition or enter parameter e to create an extended partition. Here, enter parameter p to create a primary partition:
Command (m for help): n
Partition type
   p   primary (0 primary, 0 extended, 4 free)
   e   extended (container for logical partitions)
Select (default p): p
After confirming the creation of a primary partition, the system prompts the user to enter the primary partition number.As previously noted, primary partition numbers range from 1 to 4, so the default 1 can be entered here. Next, the system prompts for the starting sector position. This does not require modification; simply press Enter to retain the default setting. The system automatically calculates the earliest available free sector location. Finally, the system requests the ending sector position, which defines the partition's total size.There's no need to calculate the number of sectors. Simply enter +2G to create a 2GB disk partition.
Partition number (1-4, default 1): 1
First sector (2048-41943039, default 2048): # Press Enter here to accept the default
Last sector, +/-sectors or +/-size{K,M,G,T,P} (2048-41943039, default 41943039): +2G
Created a new partition 1 of type 'Linux' and of size 2 GiB.
Use the p parameter again to view partition information in the disk device. You will indeed see a primary partition named /dev/sdb1, with a starting sector position of 2048 and an ending sector position of 4196351. Do not close the window directly at this point. Instead, type the w parameter followed by Enter to ensure the partition information is successfully written.
Command (m for help): p
Disk /dev/sdb: 20 GiB, 21474836480 bytes, 41943040 sectors
Disk model: VMware Virtual S
Units: sectors of 1 * 512 = 512 bytes
Sector size (logical/physical): 512 bytes / 512 bytes
I/O size (minimum/optimal): 512 bytes / 512 bytes
Disklabel type: dos
Disk identifier: 0x186f3f5e

Device     Boot Start     End Sectors Size Id Type
/dev/sdb1        2048 4196351 4194304   2G 83 Linux

Command (m for help): w
The partition table has been altered.
Calling ioctl() to re-read partition table.
Syncing disks.
The Id value in the sixth field of the partition information is an encoding that identifies the partition's purpose, helping users quickly understand its function. It's generally unnecessary to modify this. Use the l parameter to view all disk encodings, then modify it during the SWAP operation in Section 6.6:
Command (m for help): l

00 Empty            27 Hidden NTFS Win  82 Linux swap / So  c1 DRDOS/sec (FAT-
01 FAT12            39 Plan 9           83 Linux            c4 DRDOS/sec (FAT-
02 XENIX root       3c PartitionMagic   84 OS/2 hidden or   c6 DRDOS/sec (FAT-
03 XENIX usr        40 Venix 80286      85 Linux extended   c7 Syrinx
04 FAT16 <32M       41 PPC PReP Boot    86 NTFS volume set  da Non-FS data
05 Extended         42 SFS              87 NTFS volume set  db CP/M / CTOS / .
06 FAT16            4d QNX4.x           88 Linux plaintext  de Dell Utility
07 HPFS/NTFS/exFAT  4e QNX4.x 2nd part  8e Linux LVM        df BootIt
08 AIX              4f QNX4.x 3rd part  93 Amoeba           e1 DOS access
09 AIX bootable     50 OnTrack DM       94 Amoeba BBT       e3 DOS R/O
0a OS/2 Boot Manag  51 OnTrack DM6 Aux  9f BSD/OS           e4 SpeedStor
0b W95 FAT32        52 CP/M             a0 IBM Thinkpad hi  ea Linux extended
0c W95 FAT32 (LBA)  53 OnTrack DM6 Aux  a5 FreeBSD          eb BeOS fs
0e W95 FAT16 (LBA)  54 OnTrackDM6       a6 OpenBSD          ee GPT
0f W95 Ext'd (LBA)  55 EZ-Drive         a7 NeXTSTEP         ef EFI (FAT-12/16/
10 OPUS             56 Golden Bow       a8 Darwin UFS       f0 Linux/PA-RISC b
11 Hidden FAT12     5c Priam Edisk      a9 NetBSD           f1 SpeedStor
12 Compaq diagnost  61 SpeedStor        ab Darwin boot      f4 SpeedStor
14 Hidden FAT16 <3  63 GNU HURD or Sys  af HFS / HFS+       f2 DOS secondary
16 Hidden FAT16     64 Novell Netware   b7 BSDI fs          f8 EBBR protective
17 Hidden HPFS/NTF  65 Novell Netware   b8 BSDI swap        fb VMware VMFS
18 AST SmartSleep   70 DiskSecure Mult  bb Boot Wizard hid  fc VMware VMKCORE
1b Hidden W95 FAT3  75 PC/IX            bc Acronis FAT32 L  fd Linux raid auto
1c Hidden W95 FAT3  80 Old Minix        be Solaris boot     fe LANstep
1e Hidden W95 FAT1  81 Minix / old Lin  bf Solaris          ff BBT
24 NEC DOS

Aliases:
   linux          - 83
   swap           - 82
   extended       - 05
   uefi           - EF
   raid           - FD
   lvm            - 8E
   linuxex        - 85
After completing the above steps, the Linux system will automatically abstract this disk's primary partition as the /dev/sdb1 device file. You can use the file command to view this file's attributes. However, in my teaching and work experience, I've found that sometimes the system fails to automatically synchronize partition information to the Linux kernel. This issue appears to be relatively common (though it shouldn't be considered a severe bug).In such cases, manually synchronize partition information to the kernel by running the partprobe command. It's generally recommended to execute this command twice consecutively for better results. If this command fails to resolve the issue, reboot the computer—this "last resort" always works and will definitely be effective.
root@linuxprobe:~# file /dev/sdb1
/dev/sdb1: cannot open `/dev/sdb1' (No such file or directory)
root@linuxprobe:~# partprobe
root@linuxprobe:~# partprobe
root@linuxprobe:~# file /dev/sdb1
/dev/sdb1: block special (8/17)
If the hardware storage device is not formatted, the Linux system cannot determine how to write data to it. Therefore, after partitioning the storage device, you must also perform a formatting operation. The command used for formatting in Linux is mkfs. This command is quite interesting because when you type mkfs in the shell terminal and then press the Tab key twice to complete the command, you will see the following effect:
root@linuxprobe:~# mkfs
mkfs         mkfs.exfat   mkfs.ext3    mkfs.fat     mkfs.msdos   mkfs.xfs
mkfs.cramfs  mkfs.ext2    mkfs.ext4    mkfs.minix   mkfs.vfat
This mkfs command invokes the corresponding file system formatting tool through different parameters to format various file systems. It's very simple to use—mkfs.filename. For example, to format a partition as XFS, the command should be mkfs.xfs /dev/sdb1.
root@linuxprobe:~# mkfs.xfs /dev/sdb1
meta-data=/dev/sdb1              isize=512    agcount=4, agsize=131072 blks
         =                       sectsz=512   attr=2, projid32bit=1
         =                       crc=1        finobt=1, sparse=1, rmapbt=1
         =                       reflink=1    bigtime=1 inobtcount=1 nrext64=1
data     =                       bsize=4096   blocks=524288, imaxpct=25
         =                       sunit=0      swidth=0 blks
naming   =version 2              bsize=4096   ascii-ci=0, ftype=1
log      =internal log           bsize=4096   blocks=16384, version=2
         =                       sectsz=512   sunit=0 blks, lazy-count=1
realtime =none                   extsz=4096   blocks=0, rtextents=0
The partitioning and formatting of the storage device is finally complete. Next, we proceed to mount and utilize the storage device. The associated steps are also straightforward: first, create a mount point directory for the device; then, use the mount command to associate the storage device with the mount point; finally, use the df -h command to view the mount status and disk usage information.
root@linuxprobe:~# mkdir /newFS
root@linuxprobe:~# mount /dev/sdb1 /newFS
root@linuxprobe:~# df -h
Filesystem             Size  Used Avail Use% Mounted on
/dev/mapper/rhel-root   17G  3.7G   13G  23% /
devtmpfs               4.0M     0  4.0M   0% /dev
tmpfs                  1.9G   84K  1.9G   1% /dev/shm
efivarfs               256K   56K  196K  23% /sys/firmware/efi/efivars
tmpfs                  776M  9.7M  767M   2% /run
tmpfs                  1.0M     0  1.0M   0% /run/credentials/systemd-journald.service
/dev/sda2              960M  272M  689M  29% /boot
/dev/sr0               6.5G  6.5G     0 100% /media/cdrom
/dev/sda1              599M  8.3M  591M   2% /boot/efi
tmpfs                  388M  120K  388M   1% /run/user/0
/dev/sdb1              2.0G   71M  1.9G   4% /newFS
Now that the storage devices are successfully mounted, we can attempt to write files to them via the mount point directories. Before writing files, let's first examine the du command used to check file data usage.The du command displays the disk space occupied by partitions or directories. Its full name is disk usage, and the syntax is du -sh directory_name. Simply put, this command shows how much disk space one or more files occupy.
When using Windows, we often encounter situations where "C drive space is insufficient, and after cleaning up junk files, it quickly fills up again." In Linux, you can use the du -sh /* command to view the space occupied by all top-level directories under the root directory. Within 1 second, you can identify which directory consumes the most space:
root@linuxprobe:~# du -sh /*
0		/afs
0		/bin
229M	/boot
84K		/dev
29M		/etc
12K		/home
0		/lib
0		/lib64
6.5G	/media
0		/mnt
0		/newFS
0		/opt
0		/proc
4.2M	/root
9.8M	/run
0		/sbin
0		/srv
0		/sys
20K	/tmp
3.2G	/usr
69M		/var
First, copy a batch of files from certain directories, then check the total space occupied by these files:
root@linuxprobe:~# cp -rf /etc/* /newFS
root@linuxprobe:~# ls /newFS
adjtime                  gshadow                   profile
aliases                  gshadow-                  profile.d
alsa                     gss                       protocols
alternatives             host.conf                 pulse
anacrontab               hostname                  qemu-ga
asound.conf              hosts                     ras
[... output omitted ...]
root@linuxprobe:~# du -sh /newFS
29M /newFS/
Attentive readers will recall that when explaining the mount command earlier, we mentioned that device files mounted using mount become invalid after the next system reboot.To make this mount permanent, the configuration must be written to a configuration file:
root@linuxprobe:~# vim /etc/fstab
#
# /etc/fstab
# Created by anaconda on Wed Mar 12 19:35:26 2025
#
# Accessible filesystems, by reference, are maintained under '/dev/disk/'.
# See man pages fstab(5), findfs(8), mount(8) and/or blkid(8) for more info.
#
# After editing this file, run 'systemctl daemon-reload' to update systemd
# units generated from this file.
#
UUID=408f4a3d-a4d3-4a44-bb23-6988cdbd10bf /             xfs     defaults        0 0
UUID=4cf8ecae-bcb6-4b1e-8001-968b33643a8a /boot         xfs     defaults        0 0
UUID=1FB8-9199          /boot/efi               vfat    umask=0077,shortname=winnt 0 2
UUID=d936c726-45a7-4ca2-8932-c54f84a3d787 none          swap    defaults        0 0
/dev/cdrom 				/media/cdrom 					iso9660 defaults 		0 0
/dev/sdb1  				/newFS       					xfs     defaults 		0 0
6.6 Adding a Swap Partition
A swap partition is a technique that allocates a designated space on disk to temporarily store data infrequently used in memory. This frees up physical memory for more active programs, addressing the issue of insufficient real physical memory.Simply put, it allows the disk to share the load with memory. Since the swap partition reads and writes data via disk devices, which are slower than physical memory, its resources are only utilized when actual physical memory is exhausted.
The process of creating a swap partition closely resembles the procedure for mounting and utilizing storage devices discussed earlier. Before partitioning the
/dev/sdb storage device, it is necessary to first outline recommendations for partitioning swap space: In production environments, it is generally advised that the swap partition size be 1.5 to 2 times the actual physical memory. To provide a more tangible sense of swap space changes, we will allocate a 5GB primary partition as swap space.
root@linuxprobe:~# fdisk /dev/sdb
Welcome to fdisk (util-linux 2.40.2).
Changes will remain in memory only, until you decide to write them.
Be careful before using the write command.

Command (m for help): n
Partition type
   p   primary (1 primary, 0 extended, 3 free)
   e   extended (container for logical partitions)
Select (default p): p
Partition number (2-4, default 2):
First sector (4196352-41943039, default 4196352):
Last sector, +/-sectors or +/-size{K,M,G,T,P} (4196352-41943039, default 41943039): +5G

Created a new partition 2 of type 'Linux' and of size 5 GiB.
After completing the above steps, we now have a new 5GB partition. Next, we'll modify the partition's identifier code. Here, we'll change it to 82 (Linux swap) for easier future identification:
Command (m for help): t
Partition number (1,2, default 2): 2
Hex code or alias (type L to list all): 82

Changed type of partition 'Linux' to 'Linux swap / Solaris'.

Command (m for help): p
Disk /dev/sdb: 20 GiB, 21474836480 bytes, 41943040 sectors
Disk model: VMware Virtual S
Units: sectors of 1 * 512 = 512 bytes
Sector size (logical/physical): 512 bytes / 512 bytes
I/O size (minimum/optimal): 512 bytes / 512 bytes
Disklabel type: dos
Disk identifier: 0x186f3f5e

Device     Boot   Start      End  Sectors Size Id Type
/dev/sdb1          2048  4196351  4194304   2G 83 Linux
/dev/sdb2       4196352 14682111 10485760   5G 82 Linux swap / Solaris
Done! Enter the w parameter to exit the partition table editor:
Command (m for help): w
The partition table has been altered.
Syncing disks.
Next, let's look at two simple commands related to swap partitions.
The mkswap command formats a new device as a swap partition. Its full name is make swap, and the syntax is mkswap device_name.
root@linuxprobe:~# mkswap /dev/sdb2
Setting up swapspace version 1, size = 5 GiB (5368705024 bytes)
no label, UUID=cd6c8f9d-0af2-4020-96bc-02509c118b5c
The swapon command activates the new swap partition device. Its full English name is "swap on," and the syntax is swapon device_name.
Use the swapon command to formally mount the prepared swap partition device into the system. You can use the free -m command to view the change in swap partition size (increased from 2047MB to 7167MB):
root@linuxprobe:~# free -m
               total        used        free      shared  buff/cache   available
Mem:            3879        1535        1563          14        1125        2344
Swap:           2047           0        2047
root@linuxprobe:~# swapon /dev/sdb2
root@linuxprobe:~# free -m
               total        used        free      shared  buff/cache   available
Mem:            3879        1540        1558          14        1126        2339
Swap:           7167           0        7167
To ensure the new swap partition remains active after reboot, add the relevant information to the configuration file in the following format and remember to save:
root@linuxprobe:~# vim /etc/fstab
#
# /etc/fstab
# Created by anaconda on Wed Mar 12 19:35:26 2025
#
# Accessible filesystems, by reference, are maintained under '/dev/disk/'.
# See man pages fstab(5), findfs(8), mount(8) and/or blkid(8) for more info.
#
# After editing this file, run 'systemctl daemon-reload' to update systemd
# units generated from this file.
#
UUID=408f4a3d-a4d3-4a44-bb23-6988cdbd10bf /             xfs     defaults        0 0
UUID=4cf8ecae-bcb6-4b1e-8001-968b33643a8a /boot         xfs     defaults        0 0
UUID=1FB8-9199          /boot/efi               vfat    umask=0077,shortname=winnt 0 2
UUID=d936c726-45a7-4ca2-8932-c54f84a3d787 none          swap    defaults        0 0
/dev/cdrom 				/media/cdrom 					iso9660 defaults 		0 0
/dev/sdb1  				/newFS       					xfs     defaults 		0 0
/dev/sdb2				swap							swap	defaults		0 0
6.7 Disk Quotas
As mentioned earlier, Linux was designed to enable multiple users to work simultaneously on their respective tasks, making it a multi-user, multi-tasking operating system. However, hardware resources are fixed and finite. If certain users continuously create files or store large video files on the Linux system, disk space will eventually fill up.To address this, root administrators can employ disk quota services to limit the maximum disk space or number of files a specific user or user group can utilize within designated directories. Once these thresholds are reached, further usage is prohibited. Quota technology enables disk capacity management by restricting available disk space or the maximum number of files a user can create. This technology also incorporates soft and hard limits.
Soft Limit: When the soft limit is reached, the user is notified but permitted to continue usage within the specified quota.
Hard Limit: When the hard limit is reached, the user is notified and operations are forcibly terminated.
The quota disk capacity allocation service package is pre-installed in RHEL 10 systems, but storage devices do not support quota technology by default. To enable quota support for the system's boot directory (/boot), manually edit the configuration file and reboot the system.
root@linuxprobe:~# vim /etc/fstab
#
# /etc/fstab
# Created by anaconda on Wed Mar 12 19:35:26 2025
#
# Accessible filesystems, by reference, are maintained under '/dev/disk/'.
# See man pages fstab(5), findfs(8), mount(8) and/or blkid(8) for more info.
#
# After editing this file, run 'systemctl daemon-reload' to update systemd
# units generated from this file.
#
UUID=408f4a3d-a4d3-4a44-bb23-6988cdbd10bf /             xfs     defaults        0 0
UUID=4cf8ecae-bcb6-4b1e-8001-968b33643a8a /boot         xfs     defaults,uquota 0 0
UUID=1FB8-9199          /boot/efi               vfat    umask=0077,shortname=winnt 0 2
UUID=d936c726-45a7-4ca2-8932-c54f84a3d787 none          swap    defaults        0 0
/dev/cdrom 				/media/cdrom 					iso9660 defaults 		0 0
/dev/sdb1  				/newFS       					xfs     defaults 		0 0
/dev/sdb2				swap							swap	defaults		0 0
root@linuxprobe:~# reboot
Tips:
In practice, VMware Workstation 17 Pro virtual machines sometimes incorrectly confuse two disks, causing the system to fail to boot after restart. You can resolve this by removing the mount entry for the /dev/sdb2 device from the /etc/fstab file, or by mounting using the UUID. After restarting, everything should function normally.
Additionally, readers familiar with early Linux systems or those with RHEL 5/6 experience should take special note. In older Linux systems, enabling disk quota support required the usrquota parameter, whereas RHEL 7 and later versions use the uquota parameter.
After rebooting, use the mount command to verify that the /boot directory now supports quota disk allocation:
root@linuxprobe:~# mount | grep boot
/dev/sda2 on /boot type xfs (rw,relatime,seclabel,attr2,inode64,logbufs=8,logbsize=32k,usrquota)
Next, create a user named tom to test the quota disk capacity allocation. Grant write permissions to other users for the /boot directory to ensure normal data writing:
root@linuxprobe:~# useradd tom
root@linuxprobe:~# chmod -R o+w /boot
The xfs_quota command manages disk quota settings for XFS-formatted devices. Its syntax is xfs_quota [options] quota mountpoint.
This command is specifically designed for managing disk quota on XFS file systems. The -c parameter sets the command to execute as an argument; the -x parameter enables expert mode, allowing administrators to configure more complex quota settings.
Next, use the xfs_quota command to set the disk quota for user tom on the /boot directory. Specific quota controls include: soft and hard limits for disk usage set to 3MB and 6MB respectively; soft and hard limits for the number of files created set to 3 and 6 respectively.
root@linuxprobe:~# xfs_quota -x -c 'limit bsoft=3m bhard=6m isoft=3 ihard=6 tom' /boot
root@linuxprobe:~# xfs_quota -x -c report /boot
User quota on /boot (/dev/sda2)
                               Blocks
User ID          Used       Soft       Hard    Warn/Grace
---------- --------------------------------------------------
root           225552          0          0     00 [--------]
tom                 0       3072       6144     00 [--------]
The parameters used above are divided into two sets: isoft/ihard and bsoft/bhard. Let's delve into these in more detail.As covered in Section 6.3, each file in a Linux system uses a dedicated inode to store its attributes. Since one file corresponds to one inode, isoft and ihard limit the total number of files by restricting the maximum number of inodes the system can use. bsoft and bhard represent the block size occupied by files, i.e., the total maximum capacity consumed by files.
Soft limits are flexible thresholds. Exceeding them only triggers logging of the operation without restricting user actions. Hard limits, however, enforce immediate restrictions. Once exceeded, the system prohibits further disk usage, preventing users from creating new files or consuming additional disk space.
After configuring these soft and hard limits, switch to a regular user account and attempt to create files of 5MB and 8MB in size. You will observe system restrictions when creating the 8MB file:
root@linuxprobe:~# su - tom
tom@linuxprobe:~$ cd /boot
tom@linuxprobe:/boot$ dd if=/dev/zero of=/boot/tom bs=5M count=1
1+0 records in
1+0 records out
5242880 bytes (5.2 MB, 5.0 MiB) copied, 0.00163334 s, 3.2 GB/s
tom@linuxprobe:/boot$ dd if=/dev/zero of=/boot/tom bs=8M count=1
dd: error writing '/boot/tom': Disk quota exceeded
1+0 records in
0+0 records out
4194304 bytes (4.2 MB, 4.0 MiB) copied, 0.00370067 s, 1.1 GB/s
After setting disk quota limits for users, the edquota command can be used to modify these limits as needed. The edquota command is primarily used to manage system disk quotas, with its full English name being "edit quota." Its syntax is "edquota [options] username." The -u option specifies the user for whom settings are to be adjusted, while the -g option specifies the user group.
Available parameters and their functions in the edquota command are shown in Table 6-6.
Table 6-6 Available Parameters and Functions in the edquota Command
| Parameter | Function |
|---|---|
| -u | Set quotas for a specific user |
| -g | Set quotas for a specific user group |
| -p | Copy existing rules to a new user or group |
| -t | Set the grace period for quotas |
The edquota command invokes the Vi or Vim editor for the root administrator to modify specific restriction details. Remember to save and exit using wq. Below, we increase the hard disk quota for user tom from 6MB to 8MB:
tom@linuxprobe:/boot$ exit
root@linuxprobe:~# edquota -u tom
Disk quotas for user tom (uid 1001):
  Filesystem                   blocks       soft       hard     inodes     soft     hard
  /dev/sda2                      4096       3072       8192          1        3        6
root@linuxprobe:~# su - tom
tom@linuxprobe:~$ cd /boot
tom@linuxprobe:/boot$ dd if=/dev/zero of=/boot/tom bs=8M count=1
1+0 records in
1+0 records out
8388608 bytes (8.4 MB, 8.0 MiB) copied, 0.00644861 s, 1.3 GB/s
tom@linuxprobe:/boot$ exit
6.8 Hard and Soft Links
After guiding everyone through all the disk management knowledge in this chapter, Instructor Liu Chuan can now confidently explain "shortcuts" in the Linux system.In Windows, a shortcut is a symbolic link pointing to the original file, allowing users to access it from different locations. If the original file is deleted or moved elsewhere, the shortcut becomes invalid. However, this seemingly simple concept operates differently in Linux.
Linux supports two distinct types of links: hard links and soft links.
Soft links (symbolic links): These contain only the name and path of the linked file, much like a label recording an address. When the original file is deleted or moved, the new link file becomes invalid and inaccessible. Soft links can be created for files or directories, and linking across file systems is also possible. In this respect, they share the same nature as Windows "shortcuts."The effect of accessing a soft link is illustrated in Figure 6-16.
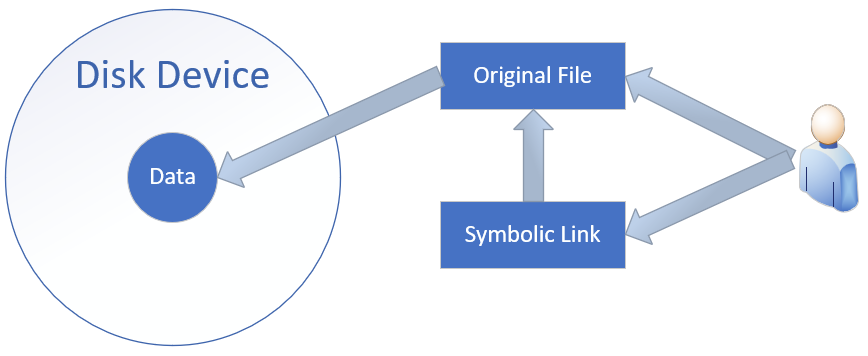
Figure 6-16 Schematic of Soft Link Mechanism
Hard links: These can be understood as "pointers to the original file's blocks." The system creates an inode information block identical to the original. Thus, a hard-linked file is completely identical to the original file, differing only in name. Each time a hard link is added, the file's inode count increases by 1; and a file is only completely deleted when its inode count reaches 0. In other words, since hard links are essentially pointers to the original file's blocks, they remain accessible even after the original file is deleted. Note that due to technical limitations, hard links cannot span directories across different partitions. User access to hard links is illustrated in Figure 6-17.
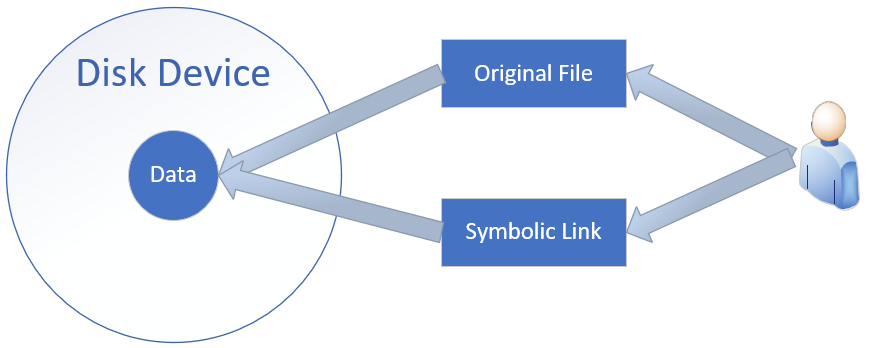
Figure 6-17 Schematic Diagram of Hard Link Mechanism
Tips:
Open the table of contents of this book and observe how the chapter titles correspond to page numbers. A link file acts as a label pointing to the location of actual content, enabling access to the corresponding data.
The ln command creates symbolic or hard links to files. Its full name is link, with the syntax ln [options] source_filename link_filename.
The available parameters and their functions for the ln command are shown in Table 6-7. Whether or not the -s parameter is added when using the ln command determines the creation of two distinct types of "shortcuts." Therefore, without a solid foundation of theoretical knowledge and practical experience, one may successfully complete experiments but never truly understand why they succeeded.
Table 6-7 Available Parameters and Functions of the ln Command
| Parameter | Function |
|---|---|
| -s | Create a "symbolic link" (default creates a hard link without -s) |
| -f | Force creation of a link to an existing file or directory |
| -i | Prompt for confirmation before overwriting |
| -v | Display the process of creating the link |
To better understand the differences between symbolic and hard links, let's first create a file and then create a symbolic link to it:
root@linuxprobe:~# echo "Welcome to linuxprobe.com" > old.txt
root@linuxprobe:~# ln -s old.txt new.txt
root@linuxprobe:~# cat old.txt
Welcome to linuxprobe.com
root@linuxprobe:~# cat new.txt
Welcome to linuxprobe.com
root@linuxprobe:~# ls -l old.txt
-rw-r--r--. 1 root root 26 Mar 16 23:16 old.txt
The original file is named old, and the new symbolic link is named new. After deleting the original file, the symbolic link immediately becomes unreadable:
root@linuxprobe:~# rm -f old.txt
root@linuxprobe:~# cat new.txt
cat: new.txt: No such file or directory
root@linuxprobe:~# rm -f new.txt
Next, create a hard link for the original file old. This effectively creates a pointer to the original file's disk storage location. As a result, the newly created hard link no longer depends on the original file's name or other information and will not become unreadable if the original file is deleted. You can also see that after creating the hard link file, the number of disk links for the original file increases to 2.
root@linuxprobe:~# echo "Welcome to linuxprobe.com" > old.txt
root@linuxprobe:~# ln old.txt new.txt
root@linuxprobe:~# cat old.txt
Welcome to linuxprobe.com
root@linuxprobe:~# cat new.txt
Welcome to linuxprobe.com
root@linuxprobe:~# ls -l old.txt
-rw-r--r--. 2 root root 26 Mar 16 23:18 old.txt
This is a fascinating phenomenon. Creating a hard link file actually changes the number in the second column of the file attributes to 2, which represents the number of inode information blocks for the file.Students should now be confident that even after deleting the original file, the new file remains readable. This is because a file is only truly deleted when its inode count is "reset to zero."
root@linuxprobe:~# rm -f old.txt
root@linuxprobe:~# cat new.txt
Welcome to linuxprobe.com
This concludes our introduction to fundamental disk management. To better meet practical production needs, we will now explore more advanced disk technologies, such as RAID—which combines multiple disks into an array—and LVM, enabling dynamic partition resizing. Let's dive into Chapter 7.
Review Questions
- What similarities and differences exist between files stored in the /home directory and those in the /root directory?
Answer: Both directories store user home directory data, but the /root directory specifically holds the home directory data for the root administrator.
- If a device's filename is /dev/sdb, can we confirm it's the device in the second slot on the motherboard?
Answer: Not necessarily, as device filenames are determined by the system's recognition sequence.
- If a disk requires 5 partitions, how many logical partitions are needed at minimum?
Answer: You can create 3 primary partitions + 1 extended partition, then divide the extended partition into 2 logical partitions, resulting in 5 total partitions.
- Is /dev/sda5 a primary partition or a logical partition?
Answer: It is a logical partition.
- Which service determines the names of devices in the /dev directory?
Answer: The udev device manager service.
- Describe the mounting operation in one sentence.
Answer: When a user needs to access data on a disk device or partition, they must first associate it with an existing directory file. This association process is called "mounting."
- When unmounting a file system, the system prompts "Device busy, operation failed." What does this typically indicate?
Answer: This indicates the directory is currently in use. Switch to another directory and try again, e.g., cd ~.
- When configuring the quota disk space allocation service, must the soft limit value be less than the hard limit value?
Answer: Not necessarily. The soft limit can be less than or equal to the hard limit.
- If the original file is renamed, can the previously created symbolic links still access the original file?
Answer: No.
- If the original file is deleted, can the hard link created earlier still access the original file?
Answer: Yes.