Chapter 13 · Providing Domain Name Resolution Services Using BIND
Chapter Overview
This chapter delves into the principles and significance of DNS name resolution services. It introduces the functions of forward and reverse lookups in domain name queries and demonstrates through experiments how to configure and operate both resolution modes on a DNS primary server. Readers will gain firsthand experience of the convenience and powerful capabilities of DNS domain name queries.
Additionally, it covers deploying DNS secondary servers and DNS caching servers to enhance user query experiences, and employs the chroot mechanism plugin to ensure BIND service reliability. The chapter also demonstrates configuring TSIG key encryption between primary and secondary servers to secure data transmission during iterative queries. Finally, this chapter provides hands-on guidance on DNS geolocation resolution technology, enabling users across different countries and regions to achieve optimal website access experiences.
After completing this chapter, you will gain a deeper understanding of the BIND service program and appreciate the vital role and significant impact of DNS domain name resolution services as a critical component of the internet infrastructure.
13.1 DNS Domain Name Resolution Service
Compared to numeric IP addresses, domain names are easier to understand and remember, making them the preferred method for accessing network resources. However, computers on the network can only identify each other based on IP addresses, and data transmission across the internet must also rely on external IP addresses.
To lower the barrier for users accessing network resources, the Domain Name System (DNS) was developed. This technology manages and resolves the correspondence between domain names and IP addresses. Simply put, DNS accepts either a user-entered domain name or IP address, then automatically locates the matching IP address or domain name—resolving a domain name to an IP address (forward resolution) or an IP address to a domain name (reverse resolution). This allows users to access desired websites simply by entering a domain name in their browser. Forward resolution is the most commonly used mode of DNS domain name resolution technology.
Given the immense size of the domain name-to-IP address database on the internet, DNS domain name resolution services employ a hierarchical structure resembling a directory tree to record the correspondence between domain names and IP addresses. This forms a distributed database system, as shown in Figure 13-1.
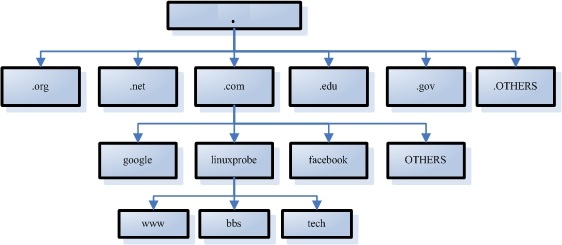
Figure 13-1 Directory Tree Hierarchy Used by DNS Domain Name Resolution Services
Domain name suffixes are generally categorized into international and domestic domains. While suffixes have strict definitions in principle, strict adherence is not always required in practical usage. The most common domain suffixes include .com (commercial organizations), .org (non-profit organizations), .gov (government agencies), .net (network service providers), .edu (educational institutions), .pub (public domain), and .cn (China's country code top-level domain).
The world's level of informatization continues to rise, with technologies like big data, cloud computing, the Internet of Things, and artificial intelligence constantly emerging. According to data from the International Telecommunication Union, by the end of 2024, the global internet user population had reached 5.5 billion, accounting for 68% of the world's population. These factors have led to a further surge in the number of domain names on the internet and an increase in their access frequency.Assuming each global internet user accesses only one website domain once per day, this would still generate 5.5 billion query requests. Such a massive volume of requests cannot be handled by a single server. As a critical component of internet infrastructure, DNS employs the following three types of servers within its system architecture to provide uninterrupted, stable, and fast domain name resolution services, ensuring the internet's smooth operation:
Primary Servers: Unique within a specific zone, responsible for maintaining the mapping between domain names and IP addresses within that zone.
Slave Servers: Obtain and maintain domain-to-IP mappings from primary servers to ensure service continuity during primary server outages.
Cache Servers: Query other DNS servers for domain-to-IP mappings, then store frequently queried domain information locally to accelerate repeated lookups.
Simply put, the primary server is the core server managing domain name-to-IP address mappings, while secondary servers assist it by being distributed across countries, provinces, or regions. This allows users to query domains from nearby servers, reducing load on the primary server. Cache servers are less common, typically deployed at enterprise intranet gateways to accelerate user domain query requests.
DNS employs a distributed data structure to store vast amounts of "zone data." When processing user-initiated domain queries, it utilizes two methods: recursive queries and iterative queries. A recursive query requires the DNS server to return an accurate result directly to the user upon receiving the request.If the DNS server does not locally store the corresponding information, it must query other servers and submit the returned query results to the user. An iterative query, however, means that when a DNS server receives a user-initiated request, it does not directly reply with the query result. Instead, it provides the address of another DNS server, and the user then submits the request to that DNS server. This process repeats sequentially until the query result is returned.
Thus, when a user initiates a domain name query request to a nearby DNS server (here using www.linuxprobe.com as an example), the query process is roughly as shown in Figure 13-2.
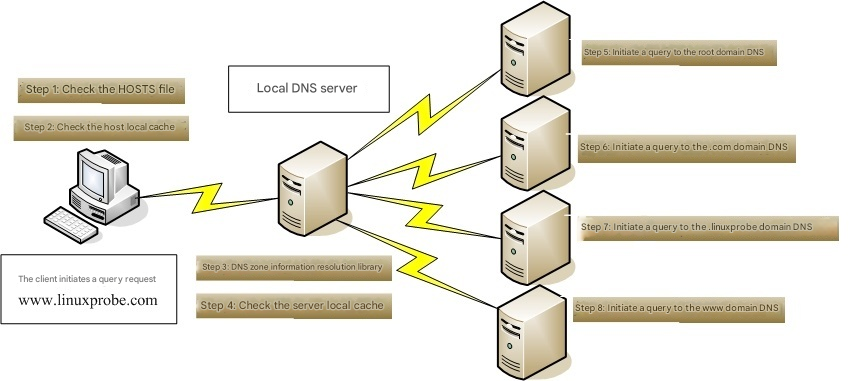
Figure 13-2 Process of Initiating a Domain Name Query Request to a DNS Server
When a user sends a domain name request to a network-designated DNS server, the local DNS server typically sends an iterative query request to its superior DNS server.If that DNS server lacks the requested information, it will further send iterative query requests to higher-level DNS servers until an accurate query result is obtained. Among these, the highest-level and most authoritative root DNS servers total 13 units, distributed worldwide. Their managing entities, specific geographic locations, and IP addresses are shown in Table 13-1.
Table 13-1 Specific Information for the 13 Root DNS Servers
| Name | Managing Organization | Geographic Location | IP Address |
|---|---|---|---|
| A | Verisign, Inc. | Virginia, USA | 198.41.0.4 |
| B | University of Southern California Information Sciences Institute | California, USA | 170.247.170.2 |
| C | Cogent Communications, Inc. | Virginia, USA | 192.33.4.12 |
| D | University of Maryland | Maryland, USA | 199.7.91.13 |
| E | National Aeronautics and Space Administration (NASA) | California, USA | 192.203.230.10 |
| F | Internet Systems Consortium (ISC) | California, USA | 192.5.5.241 |
| G | U.S. Department of Defense Network Information Center (NIC) | Virginia, USA | 192.112.36.4 |
| H | U.S. Army Research Laboratory | Maryland, USA | 198.97.190.53 |
| I | Netnod Company | Stockholm, Sweden | 192.36.148.17 |
| J | Verisign, Inc. | Virginia, USA | 192.58.128.30 |
| K | RIPE Network Coordination Centre | London, UK | 193.0.14.129 |
| L | Internet Corporation for Assigned Names and Numbers (ICANN) | Virginia, USA | 199.7.83.42 |
| M | WIDE Project | Tokyo, Japan | 202.12.27.33 |
Tips:
The 13 root servers mentioned here are not literally 13 individual servers. No single server could handle such massive request volumes alone; this is merely a convention within the technical community.According to the latest data, over 1,700 servers are actually used for root domain names. They are sorted from A to M and share 13 IP addresses to achieve load balancing and resist distributed denial-of-service (DDoS) attacks.
As the number of internet-connected devices grows, the original IPv4 protocol can no longer meet demand, leading to the global adoption of IPv6. The new address structure based on IPv6 provides an opportunity for adding new root servers. China's "National Engineering Research Center for Next Generation Internet" initiated the "Snowman Project" in 2013, collaborating with relevant operational institutions and experts from Japan and the United States. This project proposed a comprehensive, self-controlled IPv6 root server solution and technical framework targeting emerging applications. In November 2017, it announced the global deployment of 25 IPv6 root servers (including one in China, breaking the country's previous lack of root server presence).
13.2 Installing the BIND Service Program
BIND (Berkeley Internet Name Domain) is the world's most widely used, secure, reliable, and efficient domain name resolution service program.As a critical internet infrastructure service, the responsibility of DNS resolution is immense. Therefore, it is strongly recommended to install the chroot extension package when deploying BIND in production environments. This effectively restricts BIND to operate solely within its own configuration files, thereby ensuring overall server security.
root@linuxprobe:~# yum install bind-chroot
Updating Subscription Management repositories.
BaseOS                                          2.7 MB/s | 2.7 kB     00:00
AppStream                                       2.7 MB/s | 2.8 kB     00:00
Dependencies resolved.
================================================================================
 Package                Arch        Version                Repository      Size
================================================================================
Installing:
 bind-chroot            x86_64      32:9.18.21-5.el10      AppStream       25 k
Installing dependencies:
 bind                   x86_64      32:9.18.21-5.el10      AppStream      541 k
Installing weak dependencies:
 bind-dnssec-utils      x86_64      32:9.18.21-5.el10      AppStream      157 k
[... output omitted ...]
Installed:
  bind-32:9.18.21-5.el10.x86_64
  bind-chroot-32:9.18.21-5.el10.x86_64
  bind-dnssec-utils-32:9.18.21-5.el10.x86_64

Complete!
As seen in the code above, the main BIND program is 541KB, while the security plugin bind-chroot is only 25KB.
The configuration of the bind service program is indeed quite complex. To ensure users receive comprehensive DNS query services, it requires storing relevant domain name databases locally. If all domain name-to-IP address mappings were written into a single configuration file, the number of parameters could reach tens of millions. This would severely constrain program execution efficiency and complicate subsequent modifications and maintenance. Therefore, the BIND service program uses three key files to manage these configurations.
Main Configuration File (/etc/named.conf): This file contains only 59 lines. After removing comments and blank lines, only 30 lines of actual parameters remain. The main configuration file primarily defines the operational parameters for the BIND service program, including global settings, logging, access control, and more.
Zone Configuration File (/etc/named.rfc1912.zones): This file stores the locations where domain names and IP addresses are mapped, functioning similarly to a library catalog. Each zone configuration entry points to a specific zone data file. When viewing or modifying data, this entry directs users to the relevant file.
Data Configuration Directory (/var/named): This directory stores the actual data configuration files containing the real mappings between domain names and IP addresses.
On Linux systems, the BIND service runs as the daemon process named "named". First, locate the main configuration file for this service program in the /etc directory. Then, modify the addresses on lines 11 and 19 to any. This indicates that all IP addresses on the server can provide DNS domain name resolution services and that anyone can send DNS query requests to this server. Ensure these two modifications are accurate.
root@linuxprobe:~# vim /etc/named.conf
  1 //
  2 // named.conf
  3 //
  4 // Provided by Red Hat bind package to configure the ISC BIND named(8) DNS
  5 // server as a caching only nameserver (as a localhost DNS resolver only).
  6 //
  7 // See /usr/share/doc/bind*/sample/ for example named configuration files.
  8 //
  9
 10 options {
 11         listen-on port 53 { any; };
 12         listen-on-v6 port 53 { ::1; };
 13         directory       "/var/named";
 14         dump-file       "/var/named/data/cache_dump.db";
 15         statistics-file "/var/named/data/named_stats.txt";
 16         memstatistics-file "/var/named/data/named_mem_stats.txt";
 17         secroots-file   "/var/named/data/named.secroots";
 18         recursing-file  "/var/named/data/named.recursing";
 19         allow-query     { any; };
 20
 21         /*
 22          - If you are building an AUTHORITATIVE DNS server, do NOT enable re    cursion.
 23          - If you are building a RECURSIVE (caching) DNS server, you need to     enable
 24            recursion.
 25          - If your recursive DNS server has a public IP address, you MUST en    able access
 26            control to limit queries to your legitimate users. Failing to do     so will
 27            cause your server to become part of large scale DNS amplification
 28            attacks. Implementing BCP38 within your network would greatly
 29            reduce such attack surface
 30         */
 31         recursion yes;
 32
 33         dnssec-validation yes;
 34
 35         managed-keys-directory "/var/named/dynamic";
 36         geoip-directory "/usr/share/GeoIP";
 37
 38         pid-file "/run/named/named.pid";
 39         session-keyfile "/run/named/session.key";
 40
 41         /* https://fedoraproject.org/wiki/Changes/CryptoPolicy */
 42         include "/etc/crypto-policies/back-ends/bind.config";
 43 };
 44
 45 logging {
 46         channel default_debug {
 47                 file "data/named.run";
 48                 severity dynamic;
 49         };
 50 };
 51
 52 zone "." IN {
 53         type hint;
 54         file "named.ca";
 55 };
 56
 57 include "/etc/named.rfc1912.zones";
 58 include "/etc/named.root.key";
 59
As mentioned earlier, the zone configuration file for the BIND service (/etc/named.rfc1912.zones) stores the location where domain name-to-IP address mappings are kept. This file defines the location of files containing domain name resolution rules, service types, and other details, but does not contain the actual domain name-to-IP address mappings themselves. There are three service types: hint (root zone), master (primary zone), and slave (secondary zone). The commonly used master and slave refer to primary and secondary servers, respectively. Forward resolution parameters for converting domain names to IP addresses and reverse resolution parameters for converting IP addresses to domain names are shown in Figure 13-3 and Figure 13-4, respectively.
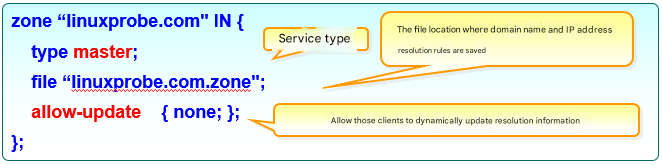
Figure 13-3 Forward Resolution Parameters
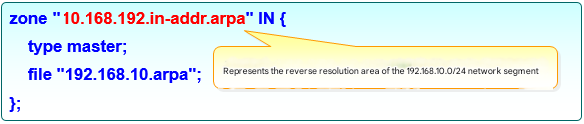
Figure 13-4 Reverse lookup parameters
The following experiments will modify the main configuration file, zone configuration file, and data configuration file of the BIND service program. If you encounter a BIND service startup failure during the experiments and suspect it is caused by incorrect parameters, you can execute the named-checkconf and named-checkzone commands to check for syntax or parameter errors in the main configuration file and data configuration file, respectively.
root@linuxprobe:~# named-checkconf /etc/named.conf
root@linuxprobe:~# named-checkzone localhost /var/named/named.localhost
zone localhost/IN: loaded serial 0
OK
13.2.1 Forward Resolution Experiment
In DNS domain name resolution services, forward resolution refers to finding the corresponding IP address based on a domain name (hostname). That is, when a user enters a domain name, the BIND service program automatically performs a lookup and returns the matched IP address to the user, as shown in Figure 13-5. This is also the most commonly used DNS operating mode.

Figure 13-5 Schematic Diagram of Forward Resolution Technology
Step 1: Edit the zone configuration file. This file already contains some default, non-essential resolution parameters for reference. Add the following parameters to the very bottom of the zone configuration file. Alternatively, you can clear all existing content in the file and retain only your own domain name resolution information.
root@linuxprobe:~# vim /etc/named.rfc1912.zones
zone "linuxprobe.com" IN {
        type master;
        file "linuxprobe.com.zone";
        allow-transfer {none;};
};
Tips:
Code indentation in the configuration file is solely for readability. The presence or absence of indentation has no effect on parameter functionality.
Step 2: Edit the data configuration file. Copy the forward resolution template file (named.localhost) from the /var/named directory. Then fill in the corresponding domain name and IP address data into the configuration file and save it. When copying, remember to add the -a parameter. This preserves the original file's owner, group, permissions, and other attributes, ensuring the BIND service can read the file content correctly.
root@linuxprobe:~# cd /var/named
root@linuxprobe:/var/named# ls -al named.localhost
-rw-r-----. 1 root named 152 Jun 24  2024 named.localhost
root@linuxprobe:/var/named# cp -a named.localhost linuxprobe.com.zone
After saving and exiting the file, remember to restart the named service to apply the new resolution data. Considering the numerous parameters in the forward resolution file and their relative importance, the author provides brief explanations after each parameter.
root@linuxprobe:/var/named# vim linuxprobe.com.zone
root@linuxprobe:/var/named# systemctl restart named
root@linuxprobe:/var/named# systemctl enable named
Created symlink '/etc/systemd/system/multi-user.target.wants/named.service' → '/usr/lib/systemd/system/named.service'.
| $TTL | 1D | #Survival period is 1 day | |||
|---|---|---|---|---|---|
| @ | IN SOA | linuxprobe.com. | root.linuxprobe.com. | ( | |
| #Authorization begins: | #DNS zone address | #Domain administrator email (without @ symbol) | |||
| 0;serial | #Update sequence number | ||||
| 1D;refresh | #Update time | ||||
| 1H;retry | #Retry delay | ||||
| 1W;expire | #Expiration time | ||||
| 3H );minimum | #Cache time for invalid resolution records | ||||
| NS | ns.linuxprobe.com. | #DNS Server Record | |||
| ns | IN A | 192.168.10.10 | #Address Record (ns.linuxprobe.com.) | ||
| www | IN A | 192.168.10.10 | #Address Record (www.linuxprobe.com.) |
In the resolution file, the A record type indicates that the domain name points to an IPv4 address, while AAAA indicates that the domain name points to an IPv6 address. Additionally, there are eight other record types, as shown in Table 13-2, for readers' future reference.
Table 13-2 Domain Name Resolution Record Types
| Record Type | Function |
|---|---|
| A | Points a domain name to an IPv4 address |
| CNAME | Points a domain name to another domain name |
| AAAA | Points a domain name to an IPv6 address |
| NS | Designates subdomains to be resolved by other DNS servers |
| MX | Points a domain name to a mail server address |
| SRV | Records servers providing specific services |
| TXT | Text content is typically 512 bytes, often used as SPF (Sender Policy Framework) records for anti-spam |
| CAA | Authorization and authentication of Certificate Authorities (CAs) |
| Explicit URL | Redirects the domain name to another address |
| Implicit URL | Similar to Explicit URL, but hides the actual destination address |
Step 3: Verify resolution results. To verify resolution outcomes, first modify the DNS address parameter in the Linux system's network interface to the local IP address (see Figure 13-6). This enables using the DNS query service provided by the local machine. The nslookup command detects whether DNS servers can resolve domain names to IP addresses, allowing more accurate verification of whether DNS servers are operational for users.
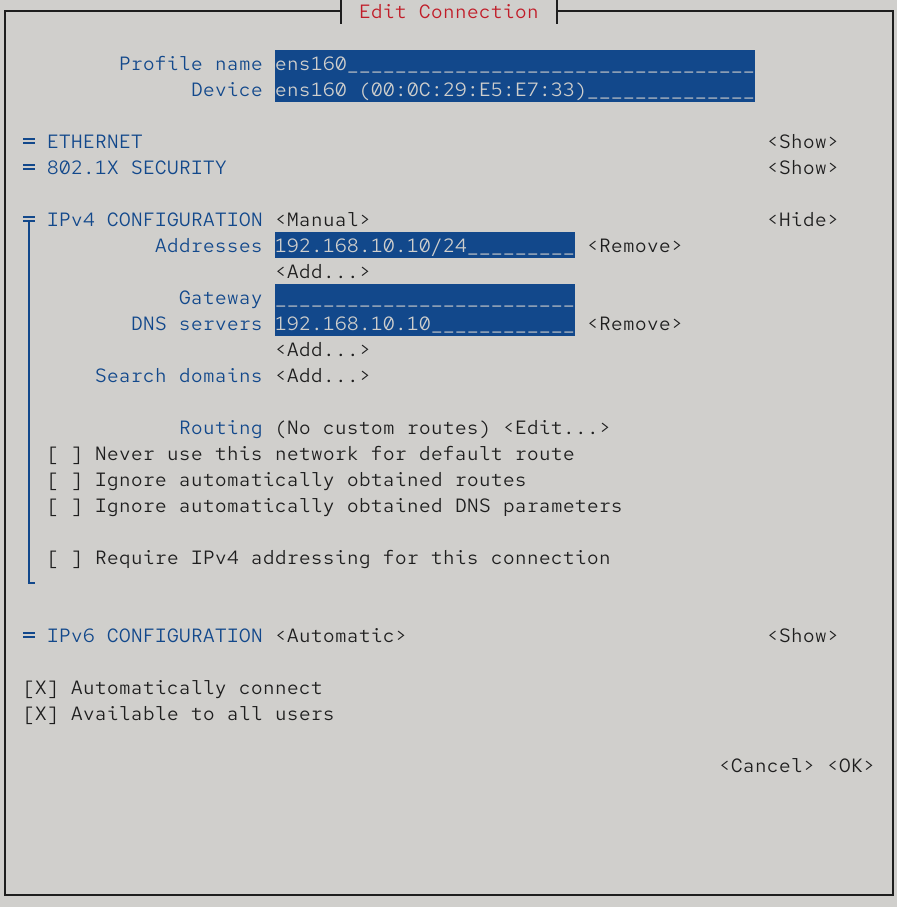
Figure 13-6 Configuring Network Interface DNS Parameters
root@linuxprobe:~# nmcli connection up ens160
Connection successfully activated (D-Bus active path: /org/freedesktop/NetworkManager/ActiveConnection/3)
root@linuxprobe:~# nslookup
> www.linuxprobe.com
Server:		192.168.10.10
Address:	192.168.10.10#53

Name:	www.linuxprobe.com
Address: 192.168.10.10
> ns.linuxprobe.com
Server:		192.168.10.10
Address:	192.168.10.10#53

Name:	ns.linuxprobe.com
Address: 192.168.10.10
If the resolved result is not 192.168.10.10, it is highly likely that the virtual machine has selected network mode and is being resolved by an internet DNS server.In this case, verify whether the server information matches Address: 192.168.10.10#53, indicating resolution via port 53 of the local server 192.168.10.10. If not, restart the network and try again.
13.2.2 Reverse Lookup Experiment
In DNS domain name resolution services, reverse lookup resolves user-submitted IP addresses into corresponding domain name information. It is typically used to block all domains bound to a specific IP address collectively, thereby intercepting spam sent from certain domains. It can also perform reverse lookup on an IP address to roughly estimate how many websites are running on it.When purchasing virtual hosting, this feature can be used to verify whether the provider has severe overselling issues. Figure 13-7 illustrates reverse lookup (reverse resolution) of domain name information associated with an IP address.

Figure 13-7 Schematic Diagram of Reverse Resolution Technology
Step 1: Edit the zone configuration file. When editing this file, ensure the format is correct and remember the name of the data configuration file defined here, as you will need to create a corresponding file with the same name in the /var/named directory shortly. Reverse resolution converts IP addresses into domain name format. Therefore, when defining the zone, reverse the IP address notation. For example, 192.168.10.0 becomes 10.168.192 (only the network portion of the IP address is required). Add the following parameters after the forward resolution parameters.
root@linuxprobe:~# vim /etc/named.rfc1912.zones
zone "linuxprobe.com" IN {
        type master;
        file "linuxprobe.com.zone";
        allow-transfer {none;};
};
zone "10.168.192.in-addr.arpa" IN {
        type master;
        file "192.168.10.arpa";
        allow-transfer {none;};
};
Step 2: Edit the data configuration file. First, copy the reverse lookup template file (named.loopback) from the /var/named directory. Then, fill in the following parameters into the file. Note that only the host portion of the IP address needs to be written, as shown in Figure 13-8.
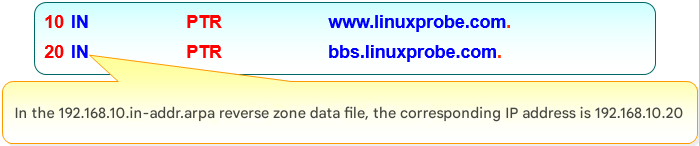
Figure 13-8 IP Address Parameter Specification in Reverse Lookup File
root@linuxprobe:~# cd /var/named
root@linuxprobe:/var/named# cp -a named.loopback 192.168.10.arpa
root@linuxprobe:/var/named# vim 192.168.10.arpa
root@linuxprobe:/var/named# systemctl restart named
| $TTL | 1D | |||
|---|---|---|---|---|
| @ | IN SOA | linuxprobe.com. | root.linuxprobe.com. | ( |
| 0;serial | ||||
| 1D;refresh | ||||
| 1H;retry | ||||
| 1W;expire | ||||
| 3H);minimum | ||||
| NS | ns.linuxprobe.com. | |||
| ns | A | 192.168.10.10 | ||
| 10 | PTR | ns.linuxprobe.com. | #PTR is a pointer record, used only for reverse lookup. | |
| 10 | PTR | www.linuxprobe.com. | ||
| 20 | PTR | bbs.linuxprobe.com. |
Step 3: Verify resolution results. In the previous forward resolution test, the DNS address parameter in the system network adapter was already modified to the local IP address. Therefore, you can directly use the nslookup command to verify the resolution results. Simply enter the IP address to query the corresponding domain name information.
root@linuxprobe:~# nslookup
> 192.168.10.10
10.10.168.192.in-addr.arpa	name = www.linuxprobe.com.
10.10.168.192.in-addr.arpa	name = ns.linuxprobe.com.
> 192.168.10.20
20.10.168.192.in-addr.arpa	name = bbs.linuxprobe.com.
> exit
13.3 Deploying a Secondary Server
As a critical internet infrastructure service, ensuring the reliable operation of DNS domain name resolution is paramount to delivering stable, fast, and uninterrupted domain name lookup services.In DNS resolution, secondary servers retrieve zone data files from primary servers, serving as backups for resolution records and load balancers. Deploying secondary servers thus reduces primary server load while improving query efficiency for users.
In this experiment, the operating systems and IP addresses used by the primary and secondary servers are shown in Table 13-3.
Table 13-3 Operating Systems and IP Addresses for Primary and Secondary Servers
| Hostname | Operating System | IP Address |
|---|---|---|
| Primary Server | RHEL 10 | 192.168.10.10 |
| Secondary Server | RHEL 10 | 192.168.10.20 |
Step 1: Enable update requests from the slave server in the master server's zone configuration file by modifying the allow-transfer parameter (host addresses permitted to update zone information), then restart the DNS service on the master server.
root@linuxprobe:~# vim /etc/named.rfc1912.zones
zone "linuxprobe.com" IN {
        type master;
        file "linuxprobe.com.zone";
        allow-transfer { 192.168.10.20;};
};
zone "10.168.192.in-addr.arpa" IN {
        type master;
        file "192.168.10.arpa";
        allow-transfer { 192.168.10.20;};
};
root@linuxprobe:~# systemctl restart named
Step 2: Configure firewall rules on the primary server to allow DNS protocol traffic to pass through smoothly.
root@linuxprobe:~# firewall-cmd --permanent --add-service=dns
success
root@linuxprobe:~# firewall-cmd --reload
success
Step 3: Install the bind-chroot package on the slave server (output omitted). Modify the configuration file to enable the slave server to provide DNS services externally, then test its network connectivity with the master server.
root@linuxprobe:~# dnf install bind-chroot
root@linuxprobe:~# vim /etc/named.conf
//
// named.conf
//
// Provided by Red Hat bind package to configure the ISC BIND named(8) DNS
// server as a caching only nameserver (as a localhost DNS resolver only).
//
// See /usr/share/doc/bind*/sample/ for example named configuration files.
//

options {
        listen-on port 53 { any; };
        listen-on-v6 port 53 { ::1; };
        directory       "/var/named";
        dump-file       "/var/named/data/cache_dump.db";
        statistics-file "/var/named/data/named_stats.txt";
        memstatistics-file "/var/named/data/named_mem_stats.txt";
        secroots-file   "/var/named/data/named.secroots";
        recursing-file  "/var/named/data/named.recursing";
        allow-query     { any; };
[... output omitted ...]
root@linuxprobe:~# ping -c 4 192.168.10.10
PING 192.168.10.10 (192.168.10.10) 56(84) bytes of data.
64 bytes from 192.168.10.10: icmp_seq=1 ttl=64 time=0.879 ms
64 bytes from 192.168.10.10: icmp_seq=2 ttl=64 time=0.479 ms
64 bytes from 192.168.10.10: icmp_seq=3 ttl=64 time=0.470 ms
64 bytes from 192.168.10.10: icmp_seq=4 ttl=64 time=0.421 ms

--- 192.168.10.10 ping statistics ---
4 packets transmitted, 4 received, 0% packet loss, time 3064ms
rtt min/avg/max/mdev = 0.421/0.562/0.879/0.184 ms
Step 4: Enter the primary server's IP address and the zone information to be captured in the slave server, then restart the service. Note that the service type should now be slave, not master. The masters parameter should be followed by the primary server's IP address, and the file parameter should specify the location where synchronized data configuration files will be saved. Synchronized files can be found in this directory later.
root@linuxprobe:~# vim /etc/named.rfc1912.zones
zone "linuxprobe.com" IN {
        type slave;
        masters { 192.168.10.10; };
        file "slaves/linuxprobe.com.zone";
};
zone "10.168.192.in-addr.arpa" IN {
        type slave;
        masters { 192.168.10.10; };
        file "slaves/192.168.10.arpa";
};
root@linuxprobe:~# systemctl restart named
root@linuxprobe:~# systemctl enable named
Created symlink '/etc/systemd/system/multi-user.target.wants/named.service' → '/usr/lib/systemd/system/named.service'.
Tips:
Themastersparameter here includes an extra 's' compared to the standardmasterservice type, indicating support for multiple primary servers. Please be careful not to omit it.
Step 5: Verify resolution results. After restarting the DNS service on the slave server, it typically automatically synchronizes the data configuration file from the master server. This file is placed by default in the directory defined by the zone configuration file.Next, modify the network parameters of the slave server to set the DNS address to 192.168.10.20 (steps omitted; see Figure 13-6). This enables the use of the DNS domain name resolution service provided by the slave server itself. Finally, you can successfully view the resolution results using the nslookup command.
root@linuxprobe:~# cd /var/named/slaves
root@linuxprobe:/var/named/slaves# ls
192.168.10.arpa  linuxprobe.com.zone
root@linuxprobe:/var/named/slaves# nslookup
> www.linuxprobe.com
Server:		192.168.10.20
Address:	192.168.10.20#53

Name:	www.linuxprobe.com
Address: 192.168.10.10
> 192.168.10.10
10.10.168.192.in-addr.arpa	name = ns.linuxprobe.com.
10.10.168.192.in-addr.arpa	name = www.linuxprobe.com.
> exit
If your resolved addresses differ from the above, it's likely because the server's network DNS address isn't pointing to your local machine at 192.168.10.20. Just modify it and you're good to go!
13.4 Secure Encrypted Transmission
As mentioned repeatedly earlier, domain name resolution services are an indispensable part of the internet infrastructure. Nearly all network applications rely on DNS to function properly. If DNS services fail, users cannot locate or use services like websites or email systems, even if those services themselves are operational.
The vast majority of DNS servers on the Internet (over 95%) are built using the BIND Domain Name System service. To provide secure resolution services, the BIND service program supports the TSIG (Transaction Signature) encryption mechanism (see RFC 2845).TSIG primarily employs cryptographic encoding to protect zone transfers. Specifically, the TSIG encryption mechanism ensures the security of domain zone information transmitted between DNS servers. The following experiment continues using the two servers listed in Table 13-2.
Continuing from the previous section. After configuring the BIND service program on the slave server and restarting it, you can now view the data configuration file obtained from the master server.
root@linuxprobe:~# ls -al /var/named/slaves/
total 8
drwxrwx---. 2 named named  56 Mar 26 13:42 .
drwxrwx--T. 6 root  named 141 Mar 26 13:41 ..
-rw-r--r--. 1 named named 409 Mar 26 13:42 192.168.10.arpa
-rw-r--r--. 1 named named 267 Mar 26 13:42 linuxprobe.com.zone
root@linuxprobe:~# rm -rf /var/named/slaves/*
Step 1: Generate keys on the primary server. The tsig-keygen command is used to generate secure DNS service keys. Its format is tsig-keygen [options] hostname. Common options and their functions are shown in Table 13-4.
Table 13-4 Common Parameters and Functions of the tsig-keygen Command
| Parameter | Function |
|---|---|
| -a | Specifies the encryption algorithm, including hmac-md5, hmac-sha1, hmac-sha256, hmac-sha512, etc. |
The following command uses the hmac-md5 algorithm to generate the encrypted key string:
root@linuxprobe:~# tsig-keygen -a hmac-md5 master-slave
key "master-slave" {
	algorithm hmac-md5;
	secret "FI4LX6fsycp0HJhK3bq8Iw==";
};
Step 2: Create the key verification file on the master server. Navigate to the directory where the BIND service stores configuration files. Write the generated key name, encryption algorithm, and encrypted private key string into the transfer.key file. For security, change the file's group ownership to named and set permissions to be more restrictive. Then create a hard link to this file pointing to the /etc directory.
root@linuxprobe:~# cd /var/named/chroot/etc/
root@linuxprobe:/var/named/chroot/etc# vim transfer.key
key "master-slave" {
	algorithm hmac-md5;
	secret "FI4LX6fsycp0HJhK3bq8Iw==";
};
root@linuxprobe:/var/named/chroot/etc# chown root:named transfer.key
root@linuxprobe:/var/named/chroot/etc# chmod 640 transfer.key
root@linuxprobe:/var/named/chroot/etc# ln transfer.key /etc/transfer.key
root@linuxprobe:/var/named/chroot/etc# cd ~
Step 3: Enable and load key authentication for the BIND service. First, load the key authentication file into the master server's main configuration file. Then configure settings to allow only DNS servers with master-slave key authentication to synchronize configuration files.
root@linuxprobe:~# vim /etc/named.conf
//
// named.conf
//
// Provided by Red Hat bind package to configure the ISC BIND named(8) DNS
// server as a caching only nameserver (as a localhost DNS resolver only).
//
// See /usr/share/doc/bind*/sample/ for example named configuration files.
//
include "/etc/transfer.key";
options {
        listen-on port 53 { any; };
        listen-on-v6 port 53 { ::1; };
        directory       "/var/named";
        dump-file       "/var/named/data/cache_dump.db";
        statistics-file "/var/named/data/named_stats.txt";
        memstatistics-file "/var/named/data/named_mem_stats.txt";
        secroots-file   "/var/named/data/named.secroots";
        recursing-file  "/var/named/data/named.recursing";
        allow-query     { any; };
        allow-transfer { key master-slave; };
[... output omitted ...]
root@linuxprobe:~# systemctl restart named
At this point, the TSIG key encrypted transmission feature for the DNS primary server has been fully configured.Next, clear all data configuration files from the DNS slave server's synchronization directory and restart the bind service program again. At this point, it will no longer automatically retrieve data configuration files as before.
root@linuxprobe:~# rm -rf /var/named/slaves/*
root@linuxprobe:~# systemctl restart named
root@linuxprobe:~# ls /var/named/slaves/
Step 4: Configure the slave server to support key authentication. Configuring the DNS slave server is similar to the master server. Both require creating a key authentication file in the BIND service configuration directory, setting appropriate permissions, and then creating a hard link to this file pointing to the /etc directory.
root@linuxprobe:~# cd /var/named/chroot/etc/
root@linuxprobe:/var/named/chroot/etc# vim transfer.key
key "master-slave" {
	algorithm hmac-md5;
	secret "FI4LX6fsycp0HJhK3bq8Iw==";
};
root@linuxprobe:/var/named/chroot/etc# chown root:named transfer.key
root@linuxprobe:/var/named/chroot/etc# chmod 640 transfer.key
root@linuxprobe:/var/named/chroot/etc# ln transfer.key /etc/transfer.key
root@linuxprobe:/var/named/chroot/etc# cd ~
Step 5: Enable and load key verification for the slave server. This step also involves loading the key verification file in the main configuration file, then specifying the primary server's IP address and key name in the designated format. Note that parameters like the key name should not be placed too early—around line 51 is appropriate. Otherwise, the BIND service may fail with an error due to incomplete loading of preset parameters:
root@linuxprobe:~# vim /etc/named.conf
  1 //
  2 // named.conf
  3 //
  4 // Provided by Red Hat bind package to configure the ISC BIND named(8) DNS
  5 // server as a caching only nameserver (as a localhost DNS resolver only).
  6 //
  7 // See /usr/share/doc/bind*/sample/ for example named configuration files.
  8 //
  9 include "/etc/transfer.key";
 10 options {
 11         listen-on port 53 { any; };
 12         listen-on-v6 port 53 { ::1; };
 13         directory       "/var/named";
 14         dump-file       "/var/named/data/cache_dump.db";
 15         statistics-file "/var/named/data/named_stats.txt";
 16         memstatistics-file "/var/named/data/named_mem_stats.txt";
 17         secroots-file   "/var/named/data/named.secroots";
 18         recursing-file  "/var/named/data/named.recursing";
 19         allow-query     { any; };
 20
 21         /*
 22          - If you are building an AUTHORITATIVE DNS server, do NOT enable recursion.
 23          - If you are building a RECURSIVE (caching) DNS server, you need to enable
 24            recursion.
 25          - If your recursive DNS server has a public IP address, you MUST enable access
 26            control to limit queries to your legitimate users. Failing to do so will
 27            cause your server to become part of large scale DNS amplification
 28            attacks. Implementing BCP38 within your network would greatly
 29            reduce such attack surface
 30         */
 31         recursion yes;
 32
 33         dnssec-validation yes;
 34
 35         managed-keys-directory "/var/named/dynamic";
 36         geoip-directory "/usr/share/GeoIP";
 37
 38         pid-file "/run/named/named.pid";
 39         session-keyfile "/run/named/session.key";
 40
 41         /* https://fedoraproject.org/wiki/Changes/CryptoPolicy */
 42         include "/etc/crypto-policies/back-ends/bind.config";
 43 };
 44
 45 logging {
 46         channel default_debug {
 47                 file "data/named.run";
 48                 severity dynamic;
 49         };
 50 };
 51 server 192.168.10.10
 52 {
 53         keys { master-slave; };
 54 };
 55 zone "." IN {
 56         type hint;
 57         file "named.ca";
 58 };
 59
 60 include "/etc/named.rfc1912.zones";
 61 include "/etc/named.root.key";
 62
Step 6: Synchronize DNS zone data on the slave server. Now that both servers' BIND services are configured and pointing to the same key verification files, restart the BIND service on the slave server. You'll see it successfully synchronizes the configuration files again.
root@linuxprobe:~# systemctl restart named
root@linuxprobe:~# ls /var/named/slaves
192.168.10.arpa  linuxprobe.com.zone
Step 7: Perform another resolution test. Functionality is confirmed. Note that this resolution is performed by the 192.168.10.20 slave server.
root@linuxprobe:~# nslookup www.linuxprobe.com
Server:		192.168.10.20
Address:	192.168.10.20#53

Name:	www.linuxprobe.com
Address: 192.168.10.10

root@linuxprobe:~# nslookup 192.168.10.10
10.10.168.192.in-addr.arpa	name = www.linuxprobe.com.
10.10.168.192.in-addr.arpa	name = ns.linuxprobe.com.
13.5 Deploying a Caching Server
A DNS caching server is a type of DNS server that does not maintain domain name data. Simply put, a caching server stores the resolution records of frequently used domain names and IP addresses locally on the host, thereby improving the efficiency of subsequent lookups. DNS cache servers are typically used within corporate intranets where users frequently access specific sites and demand high access speeds. However, their practical application remains limited. Additionally, whether a cache server can successfully resolve queries depends on the permission policies of the designated upstream DNS servers. Therefore, understanding this concept is sufficient for now.
Step 1: Configure the system's dual network interface parameters. As mentioned earlier, cache servers are primarily used within corporate intranets to reduce DNS query time for internal users. To simulate a more realistic network environment and enable external network queries, we need to add another network interface card to the cache server. Configure two Linux virtual machine systems according to the information shown in Table 13-5. Figure 13-9 illustrates the structural topology of the cache server experimental environment, where the number of clients is not limited to one.
Table 13-5 Parameters required for configuring Linux virtual machine systems
| Hostname | Operating System | IP Address |
|---|---|---|
| Cache Server | RHEL 10 | Network Interface (External): Configured based on physical device network parameters (specify IP address, gateway, etc. via DHCP or manually) Network Interface (Internal): 192.168.10.10 |
| Client | RHEL 10 | 192.168.10.20 |
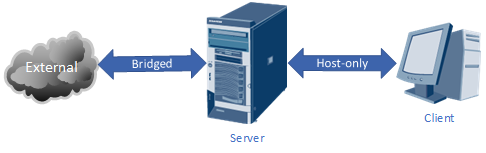
Figure 13-9 Cache Server Experimental Environment Topology
Step 2: You also need to set the newly added network adapter to "bridge mode" in the virtual machine software, as shown in Figure 13-10. Then configure it with the same network parameters as the physical device (users must configure this based on the actual network parameters of the physical device). Figure 13-11 shows the configuration for obtaining IP addresses and gateways via DHCP. The result after restarting the network service is shown in Figure 13-12.
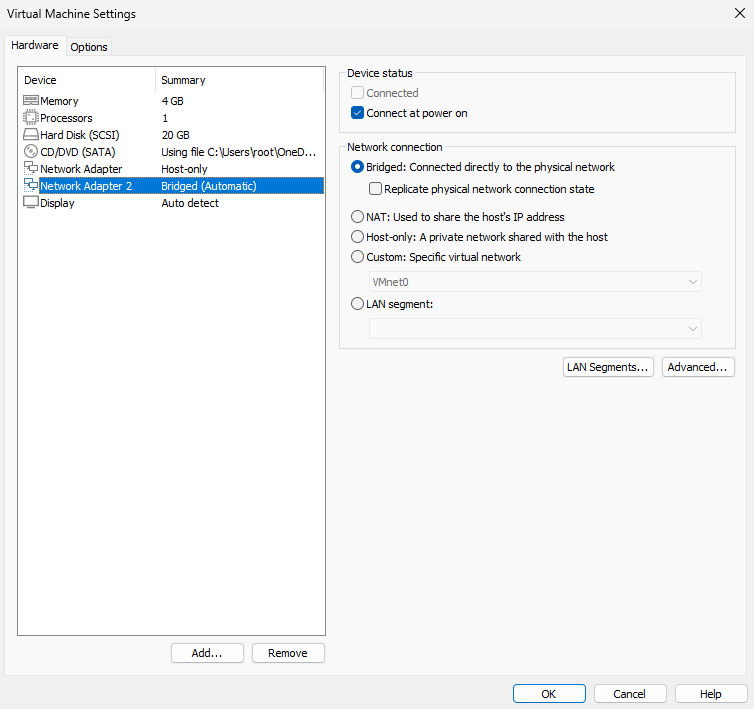
Figure 13-10 Adding a new bridged network adapter

Figure 13-11 Obtaining network parameters via DHCP
Tips:
Newly added network interface devices lack default configuration files; manually input the interface name and type. Additionally, ensure the new interface parameters take effect.root@linuxprobe:~# nmcli connection up ens192
Connection successfully activated (D-Bus active path: /org/freedesktop/NetworkManager/ActiveConnection/4)
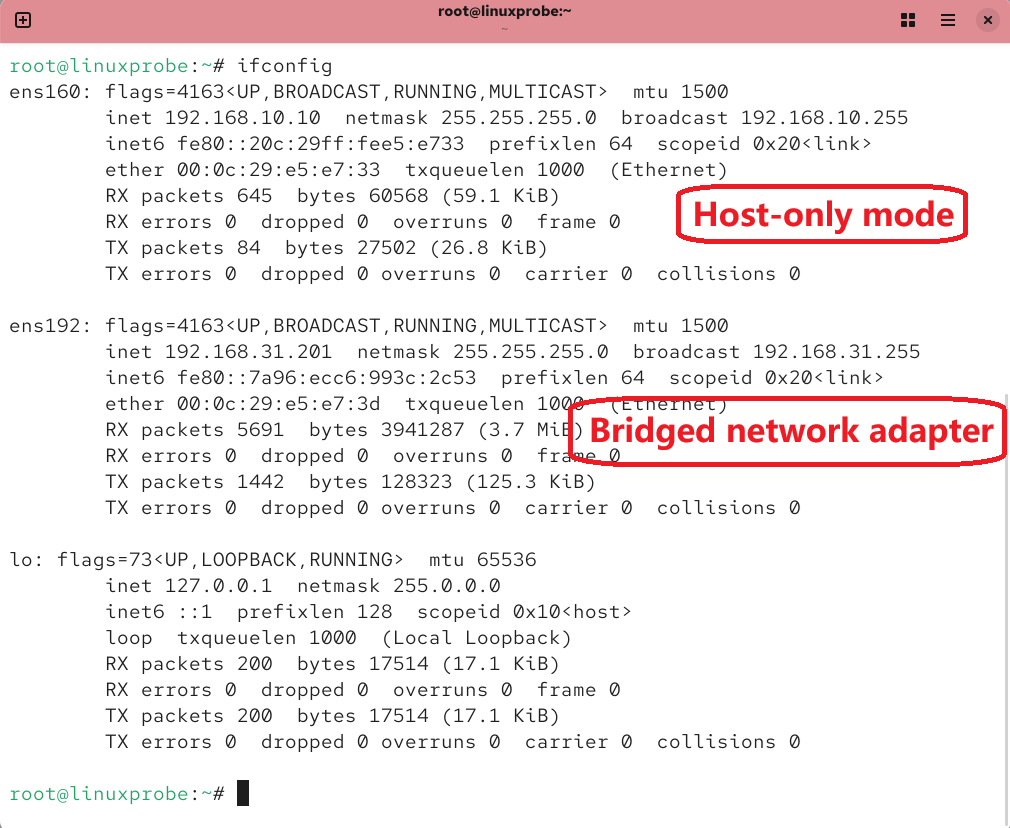
Figure 13-12 Viewing the network interface's operational status
Step 3: Add the cache forwarding parameter to the main configuration file of the bind service.Around line 20, add the parameter line "forwarders { upstream DNS server address; };". The upstream DNS server address is the server to which this caching server forwards queries and from which it obtains DNS answers. Considering query speed, stability, and security, Instructor Liu Chuan uses the address 210.73.64.1 here. If you also use this address, please test whether it is pingable beforehand to avoid DNS domain name resolution failures.
root@linuxprobe:~# vim /etc/named.conf
  1 //
  2 // named.conf
  3 //
  4 // Provided by Red Hat bind package to configure the ISC BIND named(8) DNS
  5 // server as a caching only nameserver (as a localhost DNS resolver only).
  6 //
  7 // See /usr/share/doc/bind*/sample/ for example named configuration files.
  8 //
  9
 10 options {
 11         listen-on port 53 { any; };
 12         listen-on-v6 port 53 { ::1; };
 13         directory       "/var/named";
 14         dump-file       "/var/named/data/cache_dump.db";
 15         statistics-file "/var/named/data/named_stats.txt";
 16         memstatistics-file "/var/named/data/named_mem_stats.txt";
 17         secroots-file   "/var/named/data/named.secroots";
 18         recursing-file  "/var/named/data/named.recursing";
 19         allow-query     { any; };
 20         forwarders 		{ 210.73.64.1; };
[... output omitted ...]
root@linuxprobe:~# systemctl restart named
Oh, and if you've also restored the virtual machine system to its initial state, remember to set up the firewall allow rules as well:
root@linuxprobe:~# firewall-cmd --permanent --add-service=dns
success
root@linuxprobe:~# firewall-cmd --reload
success
Step 4: Restart the DNS service and verify the results. Modify the client's DNS server address parameter to the DNS cache server's IP address 192.168.10.10, as shown in Figure 13-13. This allows the client to use the domain name query resolution service provided by the local DNS cache server.
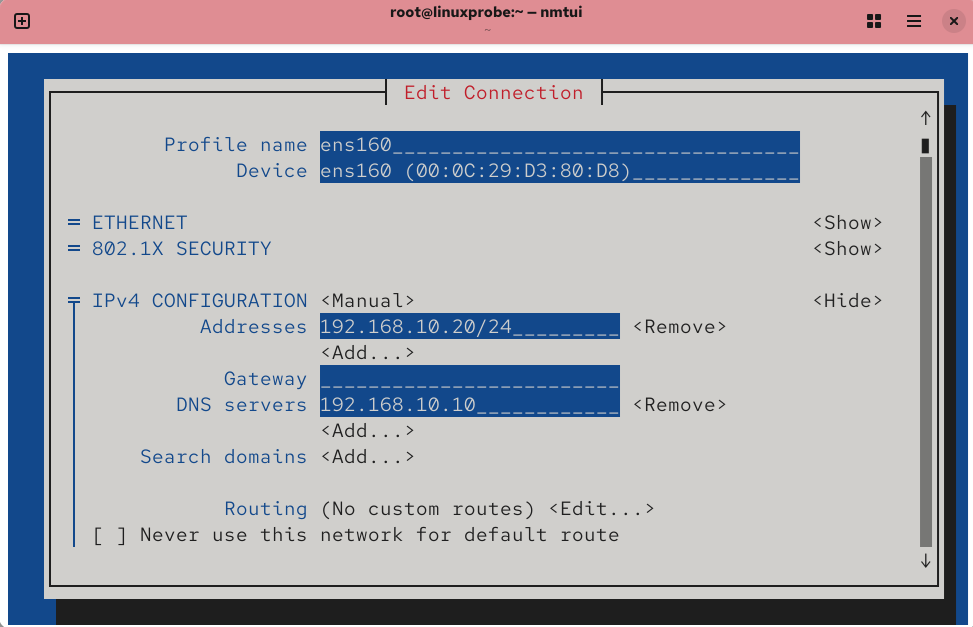
Figure 13-13 Configuring the DNS server address parameter on the client host
After properly configuring the client's network parameters, restart the network service. You can then use the nslookup command to verify the experimental results (if resolution fails, please check whether it is an issue with the selection of the upstream DNS server). The Server parameter provides the server address for the domain name resolution record, so you can see that the resolution content is provided by the local DNS cache server.
root@linuxprobe:~# nmcli connection up ens160
Connection successfully activated (D-Bus active path: /org/freedesktop/NetworkManager/ActiveConnection/3)
root@linuxprobe:~# nslookup
> www.linuxprobe.com
Server:		192.168.10.10
Address:	192.168.10.10#53

Non-authoritative answer:
Name:	www.linuxprobe.com
Address: 117.72.83.43
Finally, I'd like to share some insights from this experiment. The configuration for this caching DNS service consists of only one line, so there's no possibility of typos. If errors occur, there are typically two likely causes: the 210.73.64.1 server mentioned above may be unavailable—in which case you can switch to 8.8.8.8 or 114.114.114.114 and retry; or the local network settings aren't taking effect, requiring you to verify the server address in the output of the nslookup command.
13.6 Split-Horizon DNS (Split DNS Resolution)
Increasing numbers of overseas readers enjoy "Learn Linux the Right Way." If the book's companion website server remains hosted in a Beijing data center, overseas readers will inevitably experience slow access speeds. Conversely, hosting the server in an overseas data center would slow access for domestic readers.
To meet the needs of both domestic and international readers, multiple servers can be purchased and deployed globally. By utilizing the DNS service's split-hosting feature, readers in different geographic locations can access the same website URL and retrieve identical data from different servers. For example, assigning different IP addresses to the Beijing-based DNS server and the U.S.-based DNS server (see Table 13-6) will automatically route domestic readers to the Beijing server and overseas readers to the U.S. server, as illustrated in Figure 13-14.
Table 13-6 Operating Systems and IP Addresses for Different Servers
| Server Name | Operating System | IP Address |
|---|---|---|
| DNS Server | RHEL 10 | Beijing Network: 122.71.115.10 |
| U.S. Network: 106.185.25.10 | ||
| Beijing User | Windows 11 | 122.71.115.1 |
| Overseas User | Windows 11 | 106.185.25.1 |
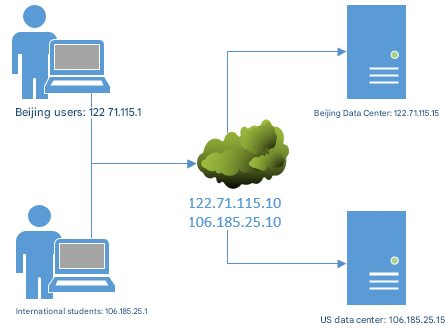
Figure 13-14 DNS Separation Resolution Technology
To resolve speed issues encountered by overseas readers accessing https://www.linuxprobe.com.linuxprobe.com. Instructor Liu Chuan has purchased and set up the corresponding web server in a U.S. data center. Next, we need to manually deploy a DNS server and implement split-resolving functionality. This will enable readers in different geographic regions to resolve different IP addresses when accessing the same domain name.
It is recommended that readers restore their virtual machines to their initial state and reinstall the BIND service program to avoid conflicts between multiple experiments.
Step 1: Modify the main configuration file of the BIND service program. Change the listening port on line 11 and the allowed query host on line 19 to any. Since the configured DNS split-horizon resolution functionality conflicts with the default DNS root zone configuration, remove the root zone information on lines 52–55.
root@linuxprobe:~# vim /etc/named.conf
[... output omitted ...]
 52 zone "." IN {
 53         type hint;
 54         file "named.ca";
 55 };
[... output omitted ...]
Step 2: Edit the zone configuration file. Clear all existing data in the zone configuration file, then enter parameters according to the following requirements.
First, use the acl parameter to define two variable names (china and america). When matching IP addresses later, simply write the variable name. This approach improves readability and simplifies maintenance. The key challenge here is understanding the role of the view parameter. Its function is to determine whether a user's IP address originates from China or the United States, then load the corresponding data configuration file (linuxprobe.com.china or linuxprobe.com.america). By assigning specific IP addresses to each data configuration file, this enables separate DNS resolution functionality.Consequently, when users in China access the linuxprobe.com domain, they will be directed to the corresponding server based on the IP addresses specified in the linuxprobe.com.china data configuration file.
root@linuxprobe:~# vim /etc/named.rfc1912.zones
acl "china"	  { 122.71.115.0/24; };
acl "america" { 106.185.25.0/24; };
view "china"{
        match-clients { "china"; };
        zone "linuxprobe.com" {
        type master;
        file "linuxprobe.com.china";
        };
};
view "america" {
        match-clients { "america"; };
        zone "linuxprobe.com" {
        type master;
        file "linuxprobe.com.america";
        };
};
Step 3: Create data configuration files. Generate two distinct zone data files using template files, naming them to correspond with the parameters in the zone configuration files above.
root@linuxprobe:~# cd /var/named
root@linuxprobe:/var/named# cp -a named.localhost linuxprobe.com.china
root@linuxprobe:/var/named# cp -a named.localhost linuxprobe.com.america
root@linuxprobe:/var/named# vim linuxprobe.com.china
| $TTL | 1D | #Survival period is 1 day | |||
|---|---|---|---|---|---|
| @ | IN SOA | linuxprobe.com. | root.linuxprobe.com. | ( | |
| #Authorization begins: | #DNS zone address | #Domain administrator email (omit @ symbol) | |||
| 0;serial | #Update sequence number | ||||
| 1D;refresh | #Update interval | ||||
| 1H;retry | #Retry delay | ||||
| 1W;expire | #Expiration time | ||||
| 3H);minimum | #Cache time for invalid resolution records | ||||
| NS | ns.linuxprobe.com. | #Name Server Records | |||
| ns | IN A | 122.71.115.10 | #Address Record (ns.linuxprobe.com.) | ||
| www | IN A | 122.71.115.10 | #Address Record (www.linuxprobe.com.) |
root@linuxprobe:/var/named# vim linuxprobe.com.america
| $TTL | 1D | #Time to Live is 1 day | |||
|---|---|---|---|---|---|
| @ | IN SOA | linuxprobe.com. | root.linuxprobe.com. | ( | |
| #Authorization begins: | #DNS zone address | #Domain administrator email (omit @ symbol) | |||
| 0;serial | #Update sequence number | ||||
| 1D;refresh | #Update interval | ||||
| 1H;retry | #Retry delay | ||||
| 1W;expire | #Expiration time | ||||
| 3H);minimum | #Cache time for invalid resolution records | ||||
| NS | ns.linuxprobe.com. | #Domain Name Server Record | |||
| ns | IN A | 106.185.25.10 | #Address Record (ns.linuxprobe.com.) | ||
| www | IN A | 106.185.25.10 | #Address Record (www.linuxprobe.com.) |
Note: The hosts 122.71.115.10 and 106.185.25.10 were not configured during the experiment phase and require manual setup by participants.If you prefer a simpler approach, you can directly resolve the domain name www.linuxprobe.com to the servers 122.71.115.10 and 106.185.25.10. This way, only one server needs to be prepared.
Step 4: Enable firewall allow policies.
root@linuxprobe:~# firewall-cmd --permanent --add-service=dns
success
root@linuxprobe:~# firewall-cmd --reload
success
Step 5: Restart the named service and verify the results. Set the IP address of the client (Windows or Linux system) to 122.71.115.1 and 106.185.25.1 respectively, and configure the DNS address to the two server IP addresses.This way, when attempting to resolve domain names using the nslookup command, the results will be clearly visible, as shown in Figures 13-15 and 13-16 respectively.

Figure 13-15 Simulated Domain Name Resolution for a Chinese User
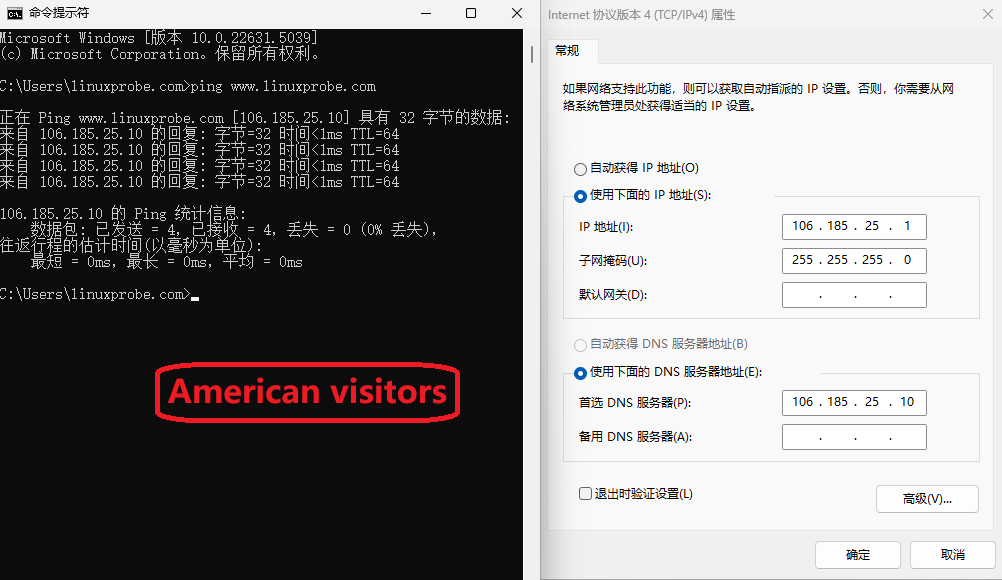
Figure 13-16 Simulated Domain Name Resolution for a U.S. User
Congratulations! You've completed another chapter. Take a break and continue learning.
Review Questions
- What are the three types of servers provided by DNS technology?
Answer: DNS primary servers, DNS secondary servers, and DNS caching servers.
- When transferring zone data files between DNS servers, is a recursive query or an iterative query used?
Answer: Iterative queries are used between DNS servers, while recursive queries are used between users and DNS servers.
- Why is installing the chroot plugin recommended when deploying DNS services using the BIND service program on Linux systems?
Answer: It effectively restricts the bind service program to operate only on its own configuration files, ensuring the security of the entire server.
- What are the functions of forward and reverse resolution in DNS services?
Answer: Forward resolution converts a specified domain name to an IP address, while reverse resolution converts an IP address to a domain name. Forward resolution is more commonly used.
- Can access to DNS resolution services be restricted for specific hosts? How?
Answer: Yes. Modify the allow-query parameter on line 19 of the main configuration file.
- What is the purpose of deploying DNS secondary servers?
Answer: Deploying a secondary server not only reduces the load on the primary server but also improves query efficiency for users.
- When transferring configuration files between users and DNS servers, can the TSIG encryption mechanism be used to prevent file tampering?
Answer: No. TSIG encryption safeguards the security of iterative queries between DNS servers.
- What is the purpose of deploying DNS cache servers?
Answer: DNS cache servers store frequently used domain name-to-IP address resolution records locally on the host, thereby improving efficiency for subsequent lookups. They are typically used within corporate intranets where users frequently access specific fixed sites and demand high access speeds for these websites. However, their practical application is not widespread.
- What is the purpose of DNS split-horizon resolution technology?
Answer: It enables users in different geographic regions to access the same data from different servers by visiting the same URL, thereby improving access efficiency.
- What is the principle behind DNS split-horizon resolution technology?
Answer: It directs requests to different configuration files based on the originating IP address range, thereby returning distinct domain name resolution results.