Chapter 03 · Pipes, Redirection, and Environment Variables
Chapter Overview
So far, we've covered over 50 commonly used Linux system commands. However, without the ability to flexibly combine these commands, it's difficult to truly enhance productivity. This chapter begins by explaining five modes of redirection related to file read/write operations: standard output overwriting redirection, standard output appending redirection, error output overwriting redirection, error output appending redirection, and input redirection. Through hands-on experiments, readers will gain practical understanding of each redirection mode's function and learn to address output information preservation challenges.
Additionally, this chapter delves into the pipe command symbol, helping readers master command chaining techniques to further enhance command output processing efficiency. Subsequently, by explaining wildcards and common escape characters in the Linux command line, it ensures your Linux commands carry precise meaning, laying the groundwork for learning Shell scripting in the next chapter.
Finally, this chapter dissects the internal workings of the Bash interpreter executing Linux commands, establishing a foundation for understanding the PATH variable and other critical environment variables within the Linux system.
3.1 Input and Output Redirection
Having covered nearly all fundamental and commonly used Linux commands in Chapter 2, the next task is to appropriately combine multiple Linux commands to work together efficiently for data processing. Achieving this requires understanding the principles of command input redirection and output redirection.
Simply put, input redirection involves feeding file content into a command, while output redirection redirects data intended for the screen to a specified file. The data flow is illustrated in Figure 3-1.In daily learning and work, output redirection is used more frequently than input redirection. Therefore, output redirection is further divided into two distinct techniques: standard output redirection and error output redirection, along with two modes: overwriting and appending. Sound mysterious? Instructor Liu Chuan will explain it step by step.
Standard Input Redirection (STDIN, file descriptor 0): By default, it reads from the keyboard, but can also read from other files or commands.
Standard Output Redirection (STDOUT, file descriptor 1): By default, it outputs to the screen.
Standard Error Redirection (STDERR, file descriptor 2): By default, it outputs to the screen.
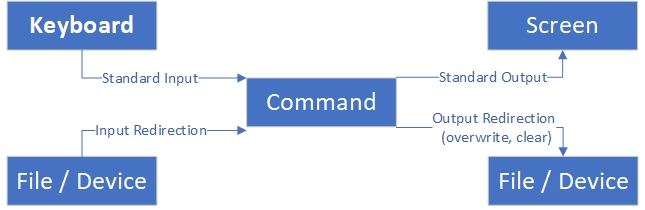
Figure 3-1: Input/Output Redirection Diagram
For example, when viewing the attributes of two files, we first create the first file while the second file does not exist. Therefore, although both file operations output information to the screen, the differences between these two operations are significant:
root@linuxprobe:~# touch linuxprobe
root@linuxprobe:~# ls -l linuxprobe
-rw-r--r--. 1 root root 0 May 19 10:31 linuxprobe
root@linuxprobe:~# ls -l xxxxxx
ls: cannot access 'xxxxxx': No such file or directory
In the example above, the file named linuxprobe actually exists. The output displays its permissions, owner, group, size, modification time, and other details—this is the standard output of the command. The second file named xxxxxx does not exist, so the error message displayed after executing ls is the command's error output.To redirect the data originally displayed on the screen to a file instead, we must treat these two types of output differently.
For input redirection, the symbols used and their functions are shown in Table 3-1.
Table 3-1: Symbols and Functions Used in Input Redirection
| Symbol | Function |
|---|---|
| Command < File | Treats file as command's standard input |
| Command << Delimiter | Reads from standard input until delimiter is encountered |
| Command < File 1 > File 2 | Treats File 1 as command's standard input and redirects standard output to File 2 |
For output redirection, the symbols used and their functions are shown in Table 3-2.
Table 3-2 Symbols Used in Output Redirection and Their Functions
| Symbol | Function |
|---|---|
| Command > File | Redirects standard output to a file (overwriting existing contents) |
| Command 2> File | Redirects error output to a file (overwriting existing contents) |
| Command >> File | Redirects standard output to a file (appending to existing contents) |
| Command 2>> File | Redirects error output to a file (appends to existing content) |
| Command >> File 2>&1 or Command &>> File | Writes both standard and error output to a file (appends to existing content) |
For standard output redirection, file descriptor 1 can be omitted. However, file descriptor 2 is required for error output redirection. Let's try a simple example. Redirect the output of the man poweroff command to the file readme.txt instead of displaying it on the screen, then display the contents of readme.txt. The specific commands are as follows:
root@linuxprobe:~# man poweroff > readme.txt
root@linuxprobe:~# cat readme.txt
POWEROFF(8)                        poweroff                        POWEROFF(8)
NAME
       poweroff, reboot, halt - Power off, reboot, or halt the machine
SYNOPSIS
       poweroff [OPTIONS...]

       reboot [OPTIONS...]

       halt [OPTIONS...]
DESCRIPTION
       poweroff, reboot, and halt may be used to power off, reboot, or halt
       the machine. All three commands take the same options.
[... output omitted ...]
Doesn't that feel convenient? Next, we'll explore the two modes of output redirection—overwriting and appending—to experience their distinct effects. First, use overwrite mode to write multiple lines to the readme.txt file (which already contains the man command information from the previous experiment). Note that when writing data to a file using overwrite mode, each operation overwrites the previous content. Consequently, only the last write operation will persist in the final file:
root@linuxprobe:~# echo "Welcome to LinuxProbe.Com" > readme.txt
root@linuxprobe:~# echo "Welcome to LinuxProbe.Com" > readme.txt
root@linuxprobe:~# echo "Welcome to LinuxProbe.Com" > readme.txt
root@linuxprobe:~# echo "Welcome to LinuxProbe.Com" > readme.txt
root@linuxprobe:~# echo "Welcome to LinuxProbe.Com" > readme.txt
root@linuxprobe:~# cat readme.txt
Welcome to LinuxProbe.Com
Next, append data to the readme.txt file using append mode. After executing the cat command, observe the following file contents:
root@linuxprobe:~# echo "Quality linux learning materials" >> readme.txt
root@linuxprobe:~# cat readme.txt
Welcome to LinuxProbe.Com
Quality linux learning materials
Although both utilize output redirection techniques, standard output and error output differ. For instance, when viewing information about a file in the current directory—using the linuxprobe file as an example—since this file actually exists, standard output can redirect the information intended for the screen into the file. However, error output redirection still displays the information on the screen.
root@linuxprobe:~# ls -l linuxprobe > /root/stderr.txt
root@linuxprobe:~# ls -l linuxprobe 2> /root/stderr.txt
-rw-r--r--. 1 root root 0 May 19 10:48 linuxprobe
How can we redirect command error messages to a file? This operation proves particularly useful and practical when executing automated shell scripts, as it logs all error messages encountered during script execution into a file for subsequent troubleshooting.
Let's demonstrate this using a non-existent file:
root@linuxprobe:~# ls -l xxxxxx > /root/stderr.txt
ls: cannot access 'xxxxxx': No such file or directory
root@linuxprobe:~# ls -l xxxxxx 2> /root/stderr.txt
root@linuxprobe:~# cat /root/stderr.txt
ls: cannot access 'xxxxxx': No such file or directory
Another common scenario is when we don't want to distinguish between standard output and error output, but instead append all command output to a file. This is where the &>> operator comes in:
root@linuxprobe:~# ls -l linuxprobe &>> result.txt
root@linuxprobe:~# ls -l xxxxxx &>> result.txt
root@linuxprobe:~# cat result.txt
-rw-r--r--. 1 root root 0 May 19 10:48 linuxprobe
ls: cannot access 'xxxxxx': No such file or directory
Input redirection is relatively less common and less likely to be encountered in practical work. Its purpose is to feed a file directly into a command. Next, we'll use input redirection to feed the result.txt file into the wc -l command to count the number of lines in the file:
root@linuxprobe:~# wc -l < result.txt
2
You may notice this output differs from Chapter 2—the filename is omitted.
root@linuxprobe:~# wc -l /etc/passwd
38 /etc/passwd
This is because the previous wc -l /etc/passwd followed the standard "command + argument + object" execution format, whereas wc -l < result.txt feeds the contents of result.txt into the command via the redirection operator. The file is not treated as an argument, so wc only processes the streamed data without the filename. Students can ponder this subtle difference.
3.2 Pipe Command Symbol
Attentive readers will recall encountering a symbol called the pipe symbol when learning the tr command in Section 2.6. Pressing the Shift key and backslash () simultaneously inputs the pipe symbol, which follows the execution format commandA | commandB. The function of the pipe symbol can be summarized as "redirecting the output intended for the screen by the preceding command as standard input to the subsequent command," as illustrated in Figure 3-2.

Figure 3-2 Schematic of the Pipe Symbol
In Section 2.6, when discussing the grep text search command, we identified all users restricted from logging into the system by matching the keyword /sbin/nologin. After learning the concepts in this section, you can easily combine the following two commands into one:
The command to find restricted users is
grep /sbin/nologin /etc/passwd;The command to count text lines is
wc -l.
Now, we need to pass the output of the grep text search command to the wc counting command. This means handing the list of user information that would normally be displayed on the screen to the wc command for further processing. To achieve this, simply place a pipe symbol between the two commands, as shown below:
root@linuxprobe:~# grep /sbin/nologin /etc/passwd | wc -l
33
This is incredibly convenient! The pipe symbol acts like a magic tool—we can apply it to various other commands. For instance, to view the file list and attributes in the /etc directory in paginated format (these details would otherwise flood the screen and be unreadable):
root@linuxprobe:~# ls -l /etc/ | more
total 1316
-rw-r--r--.  1 root                 root                     16 Mar  8 20:06 adjtime
-rw-r--r--.  1 root                 root                   1529 Nov 29  2023 aliases
drwxr-xr-x.  3 root                 root                     65 Mar  8 20:04 alsa
drwxr-xr-x.  2 root                 root                   4096 Mar  8 20:04 alternatives
-rw-r--r--.  1 root                 root                    541 Jun 24  2024 anacrontab
-rw-r--r--.  1 root                 root                     55 Jun 17  2024 asound.conf
-rw-r--r--.  1 root                 root                      1 Jun 24  2024 at.deny
drwxr-x---.  4 root                 root                    100 Mar  8 20:02 audit
--More--
When modifying user passwords, you typically need to enter the password twice for confirmation. This becomes a critical flaw when writing automated scripts. By combining the pipe symbol with the --stdin parameter of the passwd command, you can reset a password with a single command:
root@linuxprobe:~# echo "linuxprobe" | passwd --stdin root
When we learned the ps command in Chapter 2, running ps aux flooded the screen with information, making it hard to find useful details. Now, we'll cleverly combine ps, grep, and the pipe symbol to leverage their strengths. Below, we'll search only for process information related to bash:
root@linuxprobe:~# ps aux | grep bash
root        3272  0.1  0.1 230020  5552 pts/0    Ss   10:30   0:02 /usr/bin/bash
root        3953  0.0  0.0 227680  1948 pts/0    S+   10:58   0:00 grep --color=auto bash

Please don't mistakenly believe that the pipe symbol can only be used once within a command sequence. We can absolutely use it like this: commandA | commandB | commandC. To help readers better grasp the function of the pipe symbol, Instructor Liu Chuan often describes it as a "portal" during lectures. Most of us watched the Doraemon anime as children. Doraemon (often called Robot Cat) frequently pulled treasures from his pocket to amuse Nobita, often using the Anywhere Door gadget. In essence, the pipe symbol functions like a data-transfer Anywhere Door, boosting productivity and enabling previously unimaginable complex tasks.
Tips:
A classmate from Northeast China once offered a vivid analogy: Pipes function like an assembly line at a barbecue stall—one person slices meat, another skewers it, and a third grills it. Each step's output becomes the next step's input, just as pipes seamlessly feed one command's output to the next for processing, ultimately delivering the final result to the user.
For Linux beginners, the command combinations above might seem complex. Yet experienced system administrators might find them frustratingly limited, yearning to elevate these convenient commands to higher levels of sophistication and power.To express our gratitude for your support and recognition of this book, we are delighted to share these techniques. To simultaneously output pipeline results to both the screen and a file, combine them with the tee command.
The following command displays all bash-related process information on the system, outputting it both to the screen and to a file:
root@linuxprobe:~# ps aux | grep bash | tee result.txt
root        3272  0.1  0.1 230020  5552 pts/0    Ss   10:30   0:02 /usr/bin/bash
root        3961  0.0  0.0 227680  1884 pts/0    S+   10:58   0:00 grep --color=auto bash
root        3962  0.0  0.0 230020  3300 pts/0    D+   10:58   0:00 /usr/bin/bash
root@linuxprobe:~# cat result.txt
root        3272  0.1  0.1 230020  5552 pts/0    Ss   10:30   0:02 /usr/bin/bash
root        3961  0.0  0.0 227680  1884 pts/0    S+   10:58   0:00 grep --color=auto bash
root        3962  0.0  0.0 230020  3300 pts/0    D+   10:58   0:00 /usr/bin/bash
3.3 Command Line Wildcards
We've all experienced the awkward moment of forgetting a word when writing. As Linux system administrators, we sometimes face situations where "the filename is on the tip of our tongue but just won't come to mind." If you only remember the first few letters of a filename and want to list all files starting with those letters, how would you proceed? Similarly, suppose you want to batch-check the permission attributes of all disk files. One approach is as follows:
root@linuxprobe:~# ls -l /dev/sda
brw-rw----. 1 root disk 8, 0 May 19 10:22 /dev/sda
root@linuxprobe:~# ls -l /dev/sda1
brw-rw----. 1 root disk 8, 1 May 19 10:22 /dev/sda1
root@linuxprobe:~# ls -l /dev/sda2
brw-rw----. 1 root disk 8, 2 May 19 10:22 /dev/sda2
root@linuxprobe:~# ls -l /dev/sda3
brw-rw----. 1 root disk 8, 3 May 19 10:22 /dev/sda3
root@linuxprobe:~# ls -l /dev/sda4
ls: cannot access '/dev/sda4': No such file or directory
Fortunately, I only have four disk files and partitions. If there were hundreds, it would probably take a whole day to handle this. So this method is indeed very inefficient.
Although Chapter 6 covers Linux storage architecture and the Filesystem Hierarchy Standard (FHS), we can already discern some basic patterns. For instance, these disk device files all start with sda and reside in the /dev directory. This means even without knowing the partition number or exact number of partitions, wildcards can handle the task.
As the name suggests, wildcards are symbols for matching generic information. For example: - The asterisk (*) matches zero or more characters. - The question mark (?) matches a single character. - Square brackets containing numbers [0-9] match a single digit from 0 to 9. - Square brackets containing letters [abc] match any one of the three characters a, b, or c.The wildcards and their meanings in Linux systems are shown in Table 3-3.
Table 3-3 Wildcards and Their Meanings in Linux Systems
| Wildcard | Meaning |
|---|---|
| * | Zero or more arbitrary characters |
| ? | Single arbitrary character |
| [a-z] | Single lowercase letter |
| [A-Z] | Single uppercase letter |
| [a-zA-Z] | Single letter (any uppercase or lowercase letter) |
| [0-9] | Single digit |
| [[:alpha:]] | Any letter |
| [[:upper:]] | Any uppercase letter |
| [[:lower:]] | Any lowercase letter |
| [[:digit:]] | All digits |
| [[:alnum:]] | Any alphanumeric character |
| [[:punct:]] | Punctuation character |
As the saying goes, "Seeing is believing; practice makes perfect." Let's match all files in the /dev directory that start with sda:
root@linuxprobe:~# ls -l /dev/sda*
brw-rw----. 1 root disk 8, 0 May 19 10:22 /dev/sda
brw-rw----. 1 root disk 8, 1 May 19 10:22 /dev/sda1
brw-rw----. 1 root disk 8, 2 May 19 10:22 /dev/sda2
brw-rw----. 1 root disk 8, 3 May 19 10:22 /dev/sda3
If you only want to view information about files whose names start with "sda" followed immediately by any other character, you need to use a wildcard with a question mark:
root@linuxprobe:~# ls -l /dev/sda?
brw-rw----. 1 root disk 8, 1 May 19 10:22 /dev/sda1
brw-rw----. 1 root disk 8, 2 May 19 10:22 /dev/sda2
brw-rw----. 1 root disk 8, 3 May 19 10:22 /dev/sda3
Besides using [0-9] to match any single digit from 0 to 9, you can also use [135] to match only one of these three specific digits. If none of the digits 1, 2, or 3 are found, they won't be displayed:
root@linuxprobe:~# ls -l /dev/sda[0-9]
brw-rw----. 1 root disk 8, 1 May 19 10:22 /dev/sda1
brw-rw----. 1 root disk 8, 2 May 19 10:22 /dev/sda2
brw-rw----. 1 root disk 8, 3 May 19 10:22 /dev/sda3
root@linuxprobe:~# ls -l /dev/sda[135]
brw-rw----. 1 root disk 8, 1 May 19 10:22 /dev/sda1
brw-rw----. 1 root disk 8, 3 May 19 10:22 /dev/sda3
Wildcards don't necessarily have to be placed at the end; they can also be placed at the beginning. For example, use the following command to search for all configuration files ending with .conf in the /etc/ directory:
root@linuxprobe:~# ls -l /etc/*.conf
-rw-r--r--. 1 root root    55 Jun 17  2024 /etc/asound.conf
-rw-r--r--. 1 root root 30583 Jul  4  2024 /etc/brltty.conf
-rw-r--r--. 1 root root  1370 Dec  5  2023 /etc/chrony.conf
-rw-r--r--. 1 root root 28602 Jun 24  2024 /etc/dnsmasq.conf
-rw-r--r--. 1 root root   117 Aug 28  2024 /etc/dracut.conf
-rw-r--r--. 1 root root    20 Feb 25  2022 /etc/fprintd.conf
-rw-r--r--. 1 root root    38 Jun 24  2024 /etc/fuse.conf
[... output omitted ...]
Wildcards aren't just for searching files or substituting matched characters—they can also be combined with file creation commands to generate multiple files at once. However, when creating multiple files, you must use curly braces and separate fields with commas:
root@linuxprobe:~# touch {AA,BB,CC}.conf
root@linuxprobe:~# ls -l *.conf
-rw-r--r--. 1 root root 0 May 19 11:01 AA.conf
-rw-r--r--. 1 root root 0 May 19 11:01 BB.conf
-rw-r--r--. 1 root root 0 May 19 11:01 CC.conf
Using wildcards can also output specific information:
root@linuxprobe:~# echo file{1,2,3,4,5}
file1 file2 file3 file4 file5
Wildcards offer numerous possibilities—explore and experiment freely.
3.4 Common Escape Characters
To better interpret user input, the Shell interpreter provides an extensive set of escape characters for handling special data.Based on over a decade of work and training experience, Instructor Liu Chuan spent two weeks distilling the four most frequently used escape characters from dozens of options! This process prompted me to reflect deeply for a long time. I had previously believed that thicker books equated to more authoritative expertise, but now I realize this notion is entirely mistaken.
The four most frequently used escape characters are as follows:
Backslash (
\): Treats the next character literally, disabling its special meaning.Single quote (
'): Treats everything inside as literal text (no variable expansion).Double quote (
"): Allows variable expansion but protects spaces and most special characters.Backtick (```): Executes the command inside it and returns the result.
First, define a variable PRICE and assign it the value 5. Then output a string enclosed in double quotes along with variable information:
root@linuxprobe:~# PRICE=5
root@linuxprobe:~# echo "Price is $PRICE"
Price is 5
Next, we aim to output the string "Price is $5" (i.e., "The price is 5 dollars"). However, the dollar sign combines with the variable extraction symbol to form $$—which displays the current program's process ID. Consequently, the command output differs from our expectation:
root@linuxprobe:~# echo "Price is $$PRICE"
Price is 3272PRICE
Tips:
In Linux terminal, $$ displays the current process ID.
To ensure the first $ behaves as a dollar sign, you need to escape it using a backslash (). This escapes the variable placeholder, converting it into plain text and removing its special functionality:
root@linuxprobe:~# echo "Price is \$$PRICE"
Price is $5
If you only need the output value of a command, enclose the command in backticks to achieve the desired result. For example, combine backticks with the uname -a command, then use the echo command to view the Linux version and kernel information of this machine:
root@linuxprobe:~# echo `uname -a`
Linux linuxprobe.com 6.11.0-0.rc5.23.el10.x86_64 #1 SMP PREEMPT_DYNAMIC Mon Sep 23 04:19:12 EDT 2024 x86_64 GNU/Linux
The functionality of backslashes and backticks is quite distinctive, and students generally don't make mistakes with them. However, confusion often arises regarding when to use double quotes, as in most cases it seems like adding or omitting them yields the same result:
root@linuxprobe:~# echo AA BB CC
AA BB CC
root@linuxprobe:~# echo "AA BB CC"
AA BB CC
The difference between these two commands lies in the fact that the program cannot tell how many arguments the user intended in the first case. That's right—it's ambiguous by design. The echo command might treat "AA BB CC" as a single argument and output it directly to the screen, or it might output AA, BB, and CC separately. Even if you understand how echo processes arguments, this ambiguity persists when using other commands.
Here's a simple, no-frills tip—perhaps not rigorous, but absolutely straightforward: If your argument contains spaces, enclose it in double quotes. If it contains no spaces, skip the quotes.
3.5 Important Environment Variables
Variables are data types used by computer systems to store values that can change. In Linux, variable names are typically uppercase, while commands are lowercase—a convention-based standard. Environment variables define parameters for the system runtime environment, such as each user's home directory or email storage location. You can retrieve the value of a variable directly by its name.
Attentive readers may have noticed that both this section and the previous one are prefixed with adjectives—important and commonly used. The reason is self-evident: hundreds of environment variables must work together for a Linux system to function properly and serve users. It is unnecessary to study every single variable; instead, we should focus our limited energy on learning the most critical ones.
To better understand variables' role, consider this example. As previously mentioned, everything in Linux is a file—commands included. So what actually happens when a user executes a command? Simply put, command execution in Linux occurs in four steps.
Step 1: Determine whether the user entered the command using an absolute path or a relative path (e.g., /bin/ls). If it's an absolute path, execute it directly. Otherwise, proceed to Step 2 for further evaluation.
Step 2: The Linux system checks whether the entered command is an "alias command," meaning a custom command name replacing the original command name. When using the rm command to delete files, Linux always prompts the user to confirm deletion. This is actually the rm alias command—rm -i—specifically designed by the Linux system to prevent accidental file deletion.
root@linuxprobe:~# ls
anaconda-ks.cfg  Documents  Music     Public     Videos
Desktop          Downloads  Pictures  Templates
root@linuxprobe:~# rm -r Music
rm: remove directory 'Music'? y
You can create your own command aliases using the alias command, with the syntax alias alias_name=command. To remove an alias, use the unalias command with the syntax unalias alias_name.
Below, we'll remove the alias currently set for the rm command and then try deleting the file again:
root@linuxprobe:~# unalias rm
root@linuxprobe:~# rm -r Videos
root@linuxprobe:~#
Step 3: The Bash interpreter determines whether user input is an internal or external command. Internal commands reside within the interpreter and execute directly; external commands, entered by users most of the time, proceed to Step 4 for processing. Use type command_name to identify whether a command is internal or external.
root@linuxprobe:~# type echo
echo is a shell builtin
root@linuxprobe:~# type uptime
uptime is /usr/bin/uptime
Step 4: The system searches for the user-entered command file across multiple paths. The variable defining these paths is called PATH. Think of it simply as the "interpreter's little helper." Its role is to inform the Bash interpreter where the command to be executed might be located. The Bash interpreter then dutifully searches each of these locations sequentially. PATH is a variable composed of multiple path values separated by colons. Adding or removing paths from this variable affects how the Bash interpreter searches for Linux commands.
root@linuxprobe:~# echo $PATH
/root/.local/bin:/root/bin:/usr/local/bin:/usr/local/sbin:/usr/bin:/usr/sbin
root@linuxprobe:~# PATH=$PATH:/root/bin
root@linuxprobe:~# echo $PATH
/root/.local/bin:/root/bin:/usr/local/bin:/usr/local/sbin:/usr/bin:/usr/sbin:/root/bin
Here's a classic question: "Why is it a bad idea to add the current directory (.) to PATH?" The reason is that while adding the current directory (.) to the PATH variable is permitted—and can save users the trouble of typing full paths in some cases—it also introduces significant security risks. If a hacker places a trojan file with the same name as commands like ls or cd in a commonly used public directory like /tmp, and a user happens to execute these commands from that public directory, they could easily fall victim to an attack.
Therefore, as a cautious and experienced system administrator, always verify the PATH variable for suspicious directories before executing commands on a new Linux system. Additionally, did you notice how useful environment variables are from the previous PATH examples?We can use the env command to view all environment variables in a Linux system. Instructor Liu Chuan has carefully selected the 10 most critical environment variables for you, as shown in Table 3-4.
| Variable Name | Function |
|---|---|
| HOME | User's home directory (starting directory after login) |
| SHELL | Name of the user's current shell interpreter |
| HISTSIZE | Number of command history entries to retain |
| HISTFILESIZE | Maximum number of history entries to store in the history file |
| Path where mail is stored | |
| LANG | System language and locale name |
| RANDOM | Expands to a pseudo-random integer between 0 and 32767 |
| PS1 | Bash interpreter prompt |
| PATH | Paths defined for the interpreter to search for user commands |
| EDITOR | User's default text editor |
As a multi-user, multi-tasking operating system, Linux provides each user with an independent and suitable working environment. Consequently, the same variable may hold different values depending on the user identity. For example, use the following command to view the values of the HOME variable under different user identities (su is the command for switching user identities, which will be introduced in Chapter 5):
root@linuxprobe:~# echo $HOME
/root
root@linuxprobe:~# su - linuxprobe
linuxprobe@linuxprobe:~$ echo $HOME
/home/linuxprobe
linuxprobe@linuxprobe:~$ exit
Variables consist of a fixed name paired with a value set by the user or system. We can create custom variables to meet specific needs. For example, define a variable named WORKDIR to easily navigate to a deeply nested directory:
root@linuxprobe:~# mkdir /home/workdir
root@linuxprobe:~# WORKDIR=/home/workdir
root@linuxprobe:~# cd $WORKDIR
root@linuxprobe:/home/workdir# pwd
/home/workdir
root@linuxprobe:/home/workdir# cd ~
However, such variables are not global and have limited scope. By default, they cannot be used by other users:
root@linuxprobe:~# su linuxprobe
linuxprobe@linuxprobe:/root$ cd $WORKDIR
linuxprobe@linuxprobe:~$ echo $WORKDIR

linuxprobe@linuxprobe:~$ exit
If required for work, you can use the export command to elevate it to a global variable. This allows child processes (such as subshells or other programs started from this shell) to use it:
root@linuxprobe:~# export WORKDIR
root@linuxprobe:~# su linuxprobe
linuxprobe@linuxprobe:/root$ cd $WORKDIR
linuxprobe@linuxprobe:/home/workdir$ pwd
/home/workdir
linuxprobe@linuxprobe:/home/workdir$ exit
If you no longer need this variable, use the unset command to remove it from the current shell:
root@linuxprobe:~# unset WORKDIR
root@linuxprobe:~#
Tips:
Variables set directly in the terminal take effect immediately but are lost after a server reboot. To ensure permanent use, write the variable and its value into the .bashrc or .bash_profile file. What? Not sure how to edit files? Check out Chapter 4.
Review Questions
- What command appends the normal output of the ls command to the error.txt file?
Answer: ls >> error.txt (Note the difference between > and >>).
- If you want to redirect all output (both normal and error messages) to a file without distinguishing between them, what operator should you use?
Answer: Use the &> or &>> operator.
- Briefly describe the function of the pipe symbol.
Answer: It takes the output from the left (first) command and uses it as input for the right (second) command to further process the information.
- In Bash interpreter wildcards, how many characters does the asterisk (*) represent?
Answer: Zero or more.
- What is the purpose of the PATH variable?
Answer: It defines the paths where the interpreter searches for user commands to execute.
- What is the benefit of enclosing arguments in double quotes?
Answer: Double quotes are typically used to delimit the number of arguments to prevent ambiguity during program or command execution. Therefore, it is recommended to enclose arguments containing spaces in double quotes.
- What command converts a local variable named LINUX into a global variable?
Answer: export LINUX.
- How can I view all existing alias commands in the current system?
Answer: Use the alias command.
- How can I distinguish between internal and external commands in a Linux system?
Answer: Use the type command followed by the command name you want to check, e.g., type echo.
- Besides using the unset command, what other methods can be used to invalidate a newly created variable?
Answer: If the variable hasn't been written to a configuration file, restarting the terminal window or server will make the newly created variable invalid.