Chapter 10 · Deploying a Static Website Using Apache
Chapter Overview
This chapter begins by introducing web server software and its purposes. It then compares current mainstream web servers to help readers understand their respective advantages and characteristics. Next, through theoretical explanations and practical deployment of "global configuration parameters," "local configuration parameters," and "comment information" in the httpd service, readers will learn web server configuration methods and truly master the skills for configuring services on Linux systems.
This chapter also explains the role of SELinux services, its three operating modes, and policy management methods, ensuring readers master the configuration of SELinux domains and SELinux security contexts.Subsequently, this chapter guides readers through a series of practical deployment experiments based on the httpd service program. These include: basic httpd service deployment, enabling personal user homepages, implementing password-based encryption authentication, and deploying virtual host websites based on IP address, hostname (domain name), and port number.
10.1 Web Server
In 1970, ARPANET—the precursor to the Internet—took shape and began opening access to non-military sectors, with numerous universities and commercial institutions gradually connecting. Though ARPANET's scale at the time (only four interconnected hosts) was less mature than today's local area networks, it laid a solid foundation for the advancement of networking technology.
Most people likely first encountered the internet by visiting websites. The services we routinely access are Web network services, generally referring to services that allow users to access various resources on the Internet via a browser. As shown in Figure 10-1, Web network services are passive access service programs. They only respond after receiving requests from other hosts on the Internet. The Web server ultimately providing the service program transmits the requested content to the user via HTTP (Hypertext Transfer Protocol) or HTTPS (Hypertext Transfer Protocol Secure).
Current programs providing Web network services include IIS, Nginx, and Apache. Among these, IIS (Internet Information Services) is the default Web service program in Windows systems. It is a graphical website management tool that not only provides Web site services but also offers FTP, NTP, SMTP, and other services. However, IIS can only be used on Windows systems and is currently outside our learning scope.
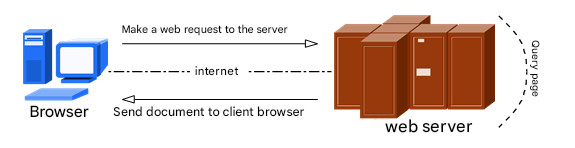
Figure 10-1 Communication Between Host and Web Server
On October 4, 2004, the web server Nginx emerged, initially developed for a prominent Russian portal site.As a lightweight web server software, Nginx rapidly captured the server market due to its stability and rich functionality. However, Nginx is most recognized for its low system resource consumption and strong concurrency capabilities, earning the favor of major domestic portals such as Sina, NetEase, and Tencent. This book will cover the Nginx service program in Chapter 20.
The Apache program is one of the web servers with the highest market share today. Its cross-platform compatibility and security are widely recognized, complemented by fast, reliable, and simple API extensions. Figure 10-2 shows the famous logo of the Apache Software Foundation. Its name originates from Native American languages, symbolizing "superior combat strategy and infinite patience."The Apache server can run on Linux, UNIX, and even Windows systems. It supports virtual hosting based on IP addresses, domain names, and port numbers, accommodates multiple authentication methods, integrates proxy server modules and Secure Sockets Layer (SSL), enables real-time monitoring of service status and custom log messages, and supports a wide array of modules.
As a longstanding web server, Apache not only commands a significant market share in web server software but is also the default web server for RHEL 10. It is a mandatory topic for both RHCSA and RHCE certification exams. Therefore, whether for practical application or Red Hat certification preparation, it is essential to thoroughly understand Apache's deployment and its extensive features.

Figure 10-2 The renowned logo of the Apache Software Foundation
Overall, Nginx, as a rising star, has earned the trust of numerous webmasters through its inherent strengths and continuous improvements. The online learning site accompanying this book, https://www.linuxprobe.com, is deployed using the Nginx server—it must be said that Nginx is truly impressive!
Let's revisit the software repository configuration process.
Step 1: Mount the system image to the /media/cdrom directory.
root@linuxprobe:~# mkdir -p /media/cdrom
root@linuxprobe:~# mount /dev/cdrom /media/cdrom
mount: /media/cdrom: WARNING: source write-protected, mounted read-only.
Step 2: Use the Vim text editor to create the software repository configuration file. Refer to Section 4.1.4 for the meaning of specific parameters in the following command.
root@linuxprobe:~# vim /etc/yum.repos.d/rhel10.repo
[BaseOS]
name=BaseOS
baseurl=file:///media/cdrom/BaseOS
enabled=1
gpgcheck=0
[AppStream]
name=AppStream
baseurl=file:///media/cdrom/AppStream
enabled=1
gpgcheck=0
Step 3: Proceed to install the Apache service. Note that when using the dnf command for installation, the package name for the Apache service is httpd. Use the -y parameter to install directly without requiring confirmation.
root@linuxprobe:~# dnf install httpd -y
Updating Subscription Management repositories.
Last metadata expiration check: 0:00:05 ago on Sun 23 Mar 2025 01:24:37 AM CST.
Dependencies resolved.
================================================================================
 Package                 Arch        Version               Repository      Size
================================================================================
Installing:
 httpd                   x86_64      2.4.62-4.el10         AppStream       54 k
Installing dependencies:
 apr                     x86_64      1.7.3-10.el10         AppStream      132 k
 apr-util                x86_64      1.6.3-20.el10         AppStream      101 k
 apr-util-lmdb           x86_64      1.6.3-20.el10         AppStream       17 k
 httpd-core              x86_64      2.4.62-4.el10         AppStream      1.5 M
 httpd-filesystem        noarch      2.4.62-4.el10         AppStream       17 k
 httpd-tools             x86_64      2.4.62-4.el10         AppStream       88 k
 redhat-logos-httpd      noarch      100.0-2.el10          AppStream       18 k
Installing weak dependencies:
 apr-util-openssl        x86_64      1.6.3-20.el10         AppStream       18 k
 mod_http2               x86_64      2.0.29-1.el10         AppStream      169 k
 mod_lua                 x86_64      2.4.62-4.el10         AppStream       61 k
[... output omitted ...]
Installed:
  apr-1.7.3-10.el10.x86_64                apr-util-1.6.3-20.el10.x86_64
  apr-util-lmdb-1.6.3-20.el10.x86_64      apr-util-openssl-1.6.3-20.el10.x86_64
  httpd-2.4.62-4.el10.x86_64              httpd-core-2.4.62-4.el10.x86_64
  httpd-filesystem-2.4.62-4.el10.noarch   httpd-tools-2.4.62-4.el10.x86_64
  mod_http2-2.0.29-1.el10.x86_64          mod_lua-2.4.62-4.el10.x86_64
  redhat-logos-httpd-100.0-2.el10.noarch

Complete!
Step 4: Enable the httpd service and add it to the startup items so it runs at system boot, continuously providing web services to users.
root@linuxprobe:~# systemctl start httpd
root@linuxprobe:~# systemctl enable httpd
Created symlink '/etc/systemd/system/multi-user.target.wants/httpd.service' → '/usr/lib/systemd/system/httpd.service'.
Step 5: Configure the firewall policy to allow HTTP requests to the localhost.
root@linuxprobe:~# firewall-cmd --permanent --add-service=http
success
root@linuxprobe:~# firewall-cmd --reload
success
Enter http://192.168.10.10 in the address bar of your physical machine's browser (using Google Chrome as an example) to view the default web service page, as shown in Figure 10-3.
If access fails, verify that the virtual machine's IP address is 192.168.10.10, the network adapter's connection mode is set to Host-only, and the physical machine's VMnet1 network interface is within the same subnet as the virtual machine's IP address (e.g., 192.168.10.1/255.255.255.0).If you've forgotten the procedure, refer back to Figures 8-16 and 8-17 to refresh your memory.
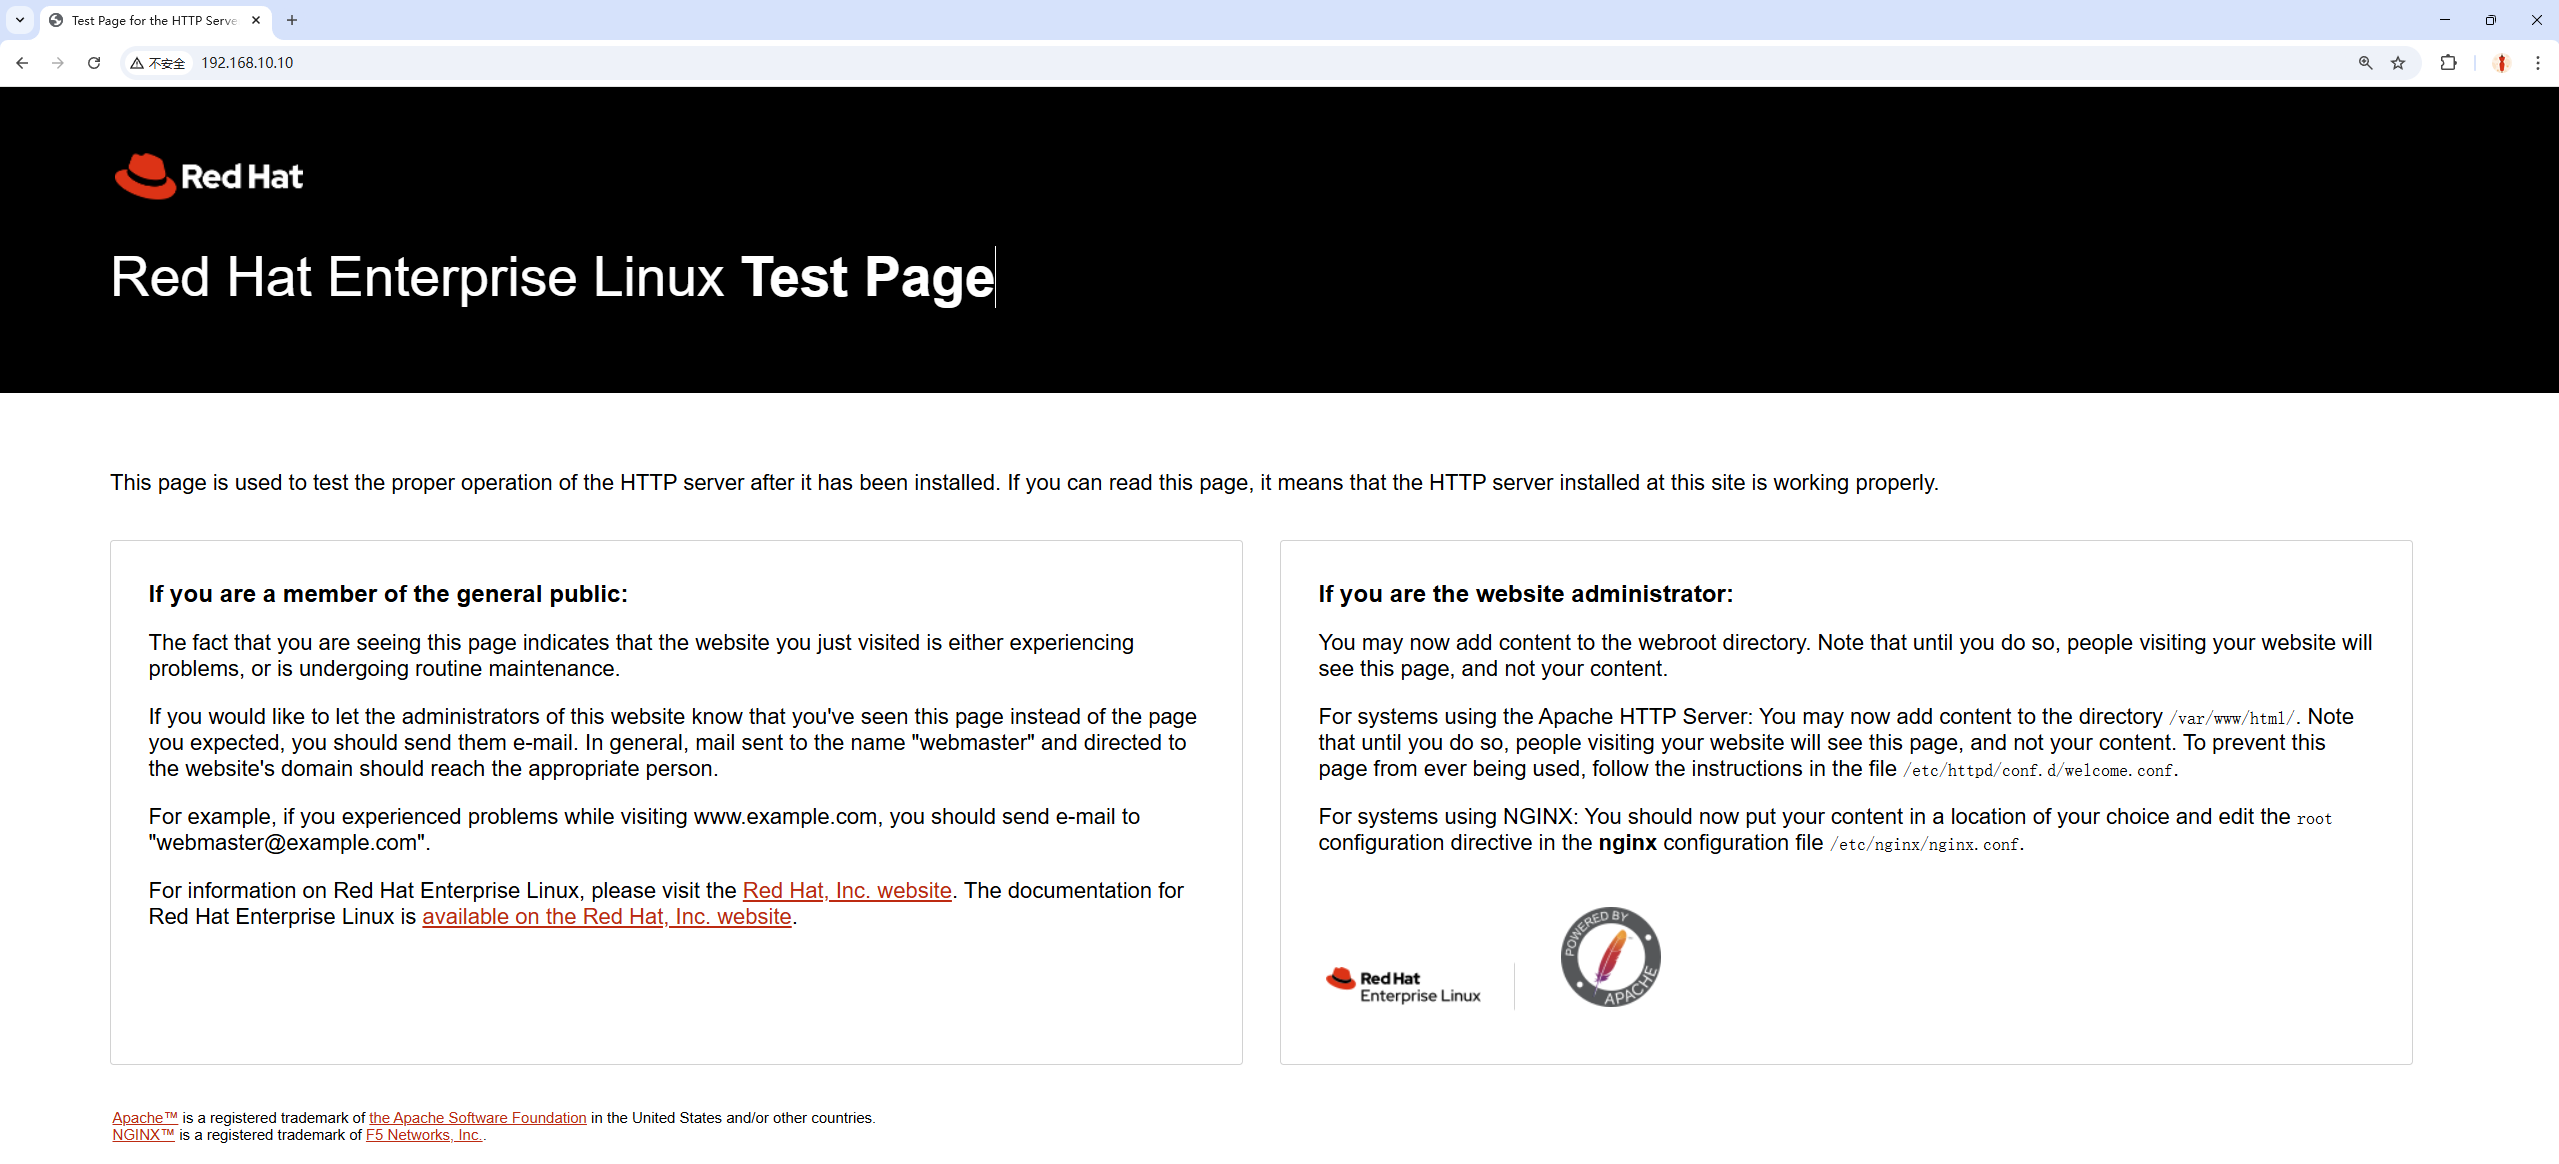
Figure 10-3 Default page of the httpd service program
Of course, you can also execute the firefox command in the command line to directly open the local Firefox browser, which is more convenient.
root@linuxprobe:~# firefox
10.2 Configuring Service File Parameters
It's important to note that the installation and operation knowledge of the httpd service program introduced earlier is merely the tip of the iceberg; we still have a long way to go. Configuring services in a Linux system essentially involves modifying the service's configuration files. Therefore, it's also necessary to know the locations and purposes of these configuration files. The names and functions of the main configuration files for the httpd service program are shown in Table 10-1.
Table 10-1 Names and Functions of the Main Configuration Files for the httpd Service Program
| File Name | Purpose |
|---|---|
| /etc/httpd | Service Directory |
| /etc/httpd/conf/httpd.conf | Main Configuration File |
| /var/www/html | Website Data Directory |
| /var/log/httpd/access_log | Access Log |
| /var/log/httpd/error_log | Error Log |
The main configuration file stores the most critical service parameters. It is typically located in a directory named after the software within the /etc directory, with the filename "service_name.conf"—for example, /etc/httpd/conf/httpd.conf. You'll memorize this once you become familiar with it.
Upon first opening the main configuration file for the httpd service, you might be startled—it has 358 lines! Wouldn't it take at least a week to read through?! Actually, it doesn't take that long, because in this configuration file, all lines starting with a hash symbol (#) are comment lines. Their purpose is to explain the functionality of the httpd service or describe a specific parameter. We don't need to study these line by line.
Within the main configuration file for the httpd service program, there are three types of parameters: comment lines, global configuration, and regional configuration, as shown in Figure 10-4.
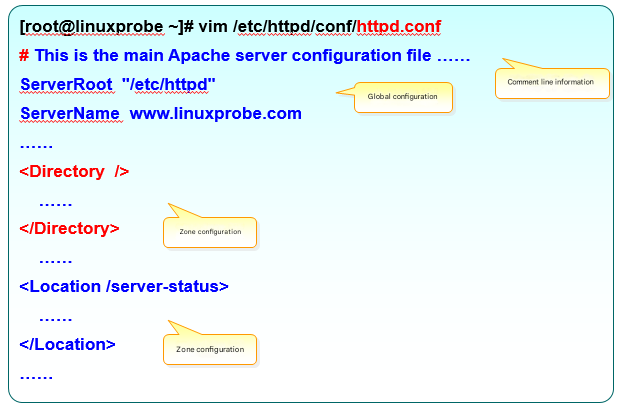
Figure 10-4 Parameter Structure of the Main httpd Configuration File
Readers encountered comment lines while studying Chapter 4, so this section primarily explains the difference between global configuration parameters and regional configuration parameters. As the name suggests, global configuration parameters apply universally to all sub-sites. This ensures normal access to sub-sites while significantly reducing the workload of repeatedly writing duplicate parameters.Regional configuration parameters, however, are set individually for each independent sub-site. This is akin to serving meals in a university cafeteria: the cafeteria staff first provides each student with a standard-sized bowl of rice (global configuration), then adds the specific dishes each student requests (regional configuration). The most commonly used parameters and their purposes in the main configuration file of the httpd service program are shown in Table 10-2.
Table 10-2 Most Common Parameters and Their Uses When Configuring the httpd Service Program
| Parameter | Purpose |
|---|---|
| ServerRoot | Service directory |
| ServerAdmin | Administrator email |
| User | User running the service |
| Group | User group running the service |
| ServerName | Website server domain name |
| DocumentRoot | Website data directory |
| Listen | IP address and port number to listen on |
| DirectoryIndex | Default index page |
| ErrorLog | Error log file |
| CustomLog | Access log file |
| Timeout | Web page timeout duration, default 300 seconds |
As shown in Table 10-2, the DocumentRoot parameter defines the storage path for website data, with a default value of /var/www/html (i.e., storing website data in this directory). Since the common default homepage name for websites is index.html, writing content to the /var/www/html/index.html file replaces the default homepage of the httpd service. This change takes effect immediately.
root@linuxprobe:~# echo "Welcome To LinuxProbe.Com" > /var/www/html/index.html
After executing the above operation, refresh the browser (or press F5) to observe the changed main page content, as shown in Figure 10-5.

Figure 10-5 Homepage content has been modified
After completing this experiment, aren't you feeling super confident?! By default, website data is stored in the /var/www/html directory. If you want to change the directory for saving website data to /home/wwwroot, how would you do it? Let's see below.
Step 1: Create the website data directory and generate the homepage file.
root@linuxprobe:~# mkdir /home/wwwroot
root@linuxprobe:~# echo "The New Web Directory" > /home/wwwroot/index.html
Step 2: Open the main configuration file for the httpd service. Modify the DocumentRoot parameter on line 124 (which defines the website data storage path) to /home/wwwroot. Additionally, update the paths following the Directory parameter on lines 129 and 136 (which define directory permissions) to /home/wwwroot. Save and exit the configuration file after making these changes.
root@linuxprobe:~# vim /etc/httpd/conf/httpd.conf
[... output omitted ...]
119 #
120 # DocumentRoot: The directory out of which you will serve your
121 # documents. By default, all requests are taken from this directory, but
122 # symbolic links and aliases may be used to point to other locations.
123 #
124 DocumentRoot "/home/wwwroot"
125
126 #
127 # Relax access to content within /var/www.
128 #
129 <Directory "/home/wwwroot">
130     AllowOverride None
131     # Allow open access:
132     Require all granted
133 </Directory>
134
135 # Further relax access to the default document root:
136 <Directory "/home/wwwroot">
[... output omitted ...]
Step 3: Restart the httpd service and verify the changes. After refreshing the page in the browser, the content appears as shown in Figure 10-6. Strange! Why am I getting an insufficient permissions warning?
root@linuxprobe:~# systemctl restart httpd

Figure 10-6 Web page displaying insufficient permissions
10.3 SELinux Security Subsystem

Figure 10-7 SELinux Logo
For example, imagine you download a photo editing app on your computer and are intently using it to enhance your photos. Meanwhile, the app is silently monitoring password entries in your browser in the background—something it clearly shouldn't be doing (even accessing image files on your computer would be understandable). The SELinux security subsystem is designed to prevent such scenarios. It monitors violations through multiple mechanisms: restricting service program functionality (SELinux domain constraints ensure services cannot overstep their boundaries); and limiting file resource access (SELinux security contexts ensure files are accessible only to their designated service programs).
Tips:
If standard permissions and firewalls are the "doors and windows," then SELinux is the "security fence" installed outside them, further fortifying the system's internal security.
Instructor Liu Chuan often describes SELinux domains and security contexts as a dual safeguard within Linux systems. Services can only access resources they are explicitly permitted to obtain. Thus, even if a hacker compromises the system, they cannot exploit internal services to perform unauthorized operations.Unfortunately, SELinux is complex and challenging to configure. Combined with many operations personnel's limited understanding of this technology, it often leads to SELinux being disabled immediately after Linux deployment. This is absolutely not a wise choice.
SELinux offers three configuration modes:
enforcing: Enforces security policy mode, intercepting unauthorized service requests.
permissive: Issues warnings but does not block unauthorized access attempts.
disabled: Neither warns nor blocks unauthorized actions.
All experiments in this book are conducted under enforcing mode. While disabling SELinux may reduce error rates, it is strongly discouraged in production environments. We recommend checking your system's default SELinux state defined in the main configuration file. If set to permissive or disabled, promptly change it to enforcing.
root@linuxprobe:~# cat /etc/selinux/config
# This file controls the state of SELinux on the system.
# SELINUX= can take one of these three values:
#     enforcing - SELinux security policy is enforced.
#     permissive - SELinux prints warnings instead of enforcing.
#     disabled - No SELinux policy is loaded.
# See also:
[... output omitted ...]
SELINUX=enforcing
# SELINUXTYPE= can take one of these three values:
#     targeted - Targeted processes are protected,
#     minimum - Modification of targeted policy. Only selected processes are protected.
#     mls - Multi Level Security protection.
SELINUXTYPE=targeted
The main configuration file for the SELinux service defines the default operational state of SELinux. This can be understood as the state after a system reboot, so changes do not take effect immediately. Use the getenforce command to obtain the current operational mode of the SELinux service:
root@linuxprobe:~# getenforce
Enforcing
To confirm that the result shown in Figure 10-6 is caused by SELinux, you can modify the current SELinux enforcement mode using the setenforce [0|1] command (0 disables, 1 enables). Note that this modification is temporary and will be lost after a system reboot:
root@linuxprobe:~# setenforce 0
root@linuxprobe:~# getenforce
Permissive
Refresh the page again. This time, the normal webpage content is displayed, as shown in Figure 10-8. This confirms the issue originated from the SELinux service.

Figure 10-8 Page content displayed as expected
Now, let's revisit the previous steps to identify where things went wrong.
The httpd service allows users to access website content, so SELinux would normally permit user requests to the site. However, we changed the default storage directory for website data to /home/wwwroot, which caused the problem.As discussed in Section 6.1, the /home directory stores home directory data for regular users. Now, the website service provided by httpd attempts to access data within regular users' home directories, which clearly violates SELinux's oversight principles. Restore SELinux to enforced security policy mode and examine whether the original website data storage directory and the current website data storage directory possess different SELinux security context values.
In the ls command, the -Z parameter displays the security context value of files, while the -d parameter indicates that the object is a directory.
root@linuxprobe:~# setenforce 1
root@linuxprobe:~# ls -Zd /var/www/html
system_u:object_r:httpd_sys_content_t:s0 /var/www/html
root@linuxprobe:~# ls -Zd /home/wwwroot
unconfined_u:object_r:user_home_dir_t:s0 /home/wwwroot
For the current situation, we only need to use the semanage command to modify the SELinux security context of the current website directory /home/wwwroot to match that of the original website directory.
The semanage command manages SELinux policies, standing for SELinux Management. Its syntax is semanage [options] [file].
The SELinux service significantly enhances Linux system security by tightly restricting user privileges. The semanage command not only sets file and directory policies like the traditional chcon command but also manages network ports and message interfaces (these new features will be covered later in this chapter). Table 10-3 lists several commonly used parameters and their functions when using the semanage command.
Table 10-3 Common Parameters and Functions in the semanage Command
| Parameter | Function |
|---|---|
| -l | List |
| -a | Add |
| -m | Modify |
| -d | Delete |
For example, to add a new SELinux security context to a website data directory, allowing the httpd service to access both the directory and its contents:
root@linuxprobe:~# semanage fcontext -a -t httpd_sys_content_t /home/wwwroot
root@linuxprobe:~# semanage fcontext -a -t httpd_sys_content_t /home/wwwroot/*
Note that after executing the above configuration, the website will not be immediately accessible. You must use the restorecon command to activate the newly set SELinux security context. When using restorecon, you can add the -Rv parameter to perform a recursive operation on the specified directory and display the SELinux security context modification process. Finally, refresh the page again to view the webpage content normally, as shown in Figure 10-9.
root@linuxprobe:~# restorecon -Rv /home/wwwroot/
Relabeled /home/wwwroot from unconfined_u:object_r:user_home_dir_t:s0 to unconfined_u:object_r:httpd_sys_content_t:s0
Relabeled /home/wwwroot/index.html from unconfined_u:object_r:user_home_t:s0 to unconfined_u:object_r:httpd_sys_content_t:s0

Figure 10-9 Normal webpage content display
What a rollercoaster ride! I initially thought that configuring the httpd service would be the final hurdle, only to repeatedly run into SELinux security context restrictions. Therefore, I strongly advise everyone to be meticulous and patient when configuring the httpd service. Once you successfully configure the httpd service, you'll find that SELinux isn't as daunting as it seems.
Tips:
For RHCSA, RHCE, or RHCA exams, you must reboot the machine before running the scoring script. Therefore, develop the habit of adding required services to the boot sequence in your daily work. Here, you'd need to runsystemctl enable httpd.
10.4 Personal Home Page Functionality
To create an independent website for each user on the system, the conventional approach involves deploying multiple sites using virtual web hosting. However, this task can become a nightmare for administrators (especially with large user populations). Additionally, when users self-manage their websites, they often encounter various permission restrictions, necessitating significant extra effort.In fact, the personal home page feature provided by the httpd service is perfectly capable of handling this task. This feature allows all users in the system to manage their personal websites within their home directories, and accessing them is very straightforward.
Step 1: By default, the personal home page feature is disabled in the httpd service program. To enable it, edit the configuration file below. First, add a hash symbol (#) before the UserDir disabled parameter on line 17 to instruct the httpd service program to activate the personal home page feature. Simultaneously, remove the hash symbol (#) before the UserDir public_html parameter on line 24 (the UserDir parameter specifies the directory name where website data is stored within the user's home directory, i.e., the public_html directory). Finally, remember to save the changes after modification.
root@linuxprobe:~# vim /etc/httpd/conf.d/userdir.conf
  1 #
  2 # UserDir: The name of the directory that is appended onto a user's home
  3 # directory if a ~user request is received.
  4 #
  5 # The path to the end user account 'public_html' directory must be
  6 # accessible to the webserver userid.  This usually means that ~userid
  7 # must have permissions of 711, ~userid/public_html must have permissions
  8 # of 755, and documents contained therein must be world-readable.
  9 # Otherwise, the client will only receive a "403 Forbidden" message.
 10 #
 11 <IfModule mod_userdir.c>
 12     #
 13     # UserDir is disabled by default since it can confirm the presence
 14     # of a username on the system (depending on home directory
 15     # permissions).
 16     #
 17     # UserDir disabled
 18
 19     #
 20     # To enable requests to /~user/ to serve the user's public_html
 21     # directory, remove the "UserDir disabled" line above, and uncomment
 22     # the following line instead:
 23     #
 24      UserDir public_html
 25 </IfModule>
 26
 27 #
 28 # Control access to UserDir directories.  The following is an example
 29 # for a site where these directories are restricted to read-only.
 30 #
 31 <Directory "/home/*/public_html">
 32     AllowOverride FileInfo AuthConfig Limit Indexes
 33     Options MultiViews Indexes SymLinksIfOwnerMatch IncludesNoExec
 34     Require method GET POST OPTIONS
 35 </Directory>
 36
Step 2: Create a directory within the user's home directory to store website data and the main page file. Additionally, change the home directory permissions to 755 to ensure others can read its contents.
root@linuxprobe:~# su - linuxprobe
linuxprobe@linuxprobe:~$ mkdir public_html
linuxprobe@linuxprobe:~$ echo "This is linuxprobe's website" > public_html/index.html
linuxprobe@linuxprobe:~$ chmod -R 755 /home/linuxprobe
Step 3: Restart the httpd service. Enter the URL in your browser's address bar in the format "URL/~username" (the tilde is required, and there should be no spaces between the URL, tilde, and username).In theory, the user's personal website should now be visible. Unexpectedly, the system displays an error page, as shown in Figure 10-10. This is undoubtedly caused by SELinux again.
linuxprobe@linuxprobe:~$ exit
logout
root@linuxprobe:~# systemctl restart httpd

Figure 10-10 Denying Access to User's Personal Website
Step 4: Consider the cause of this error. When the httpd service provides personal user homepages, the user's website data directory should reside within their home directory. Therefore, modifying the SELinux security context of the home directory shouldn't be necessary. However, we previously discussed the concept of SELinux domains. SELinux domains ensure services cannot perform unauthorized actions, restricting them to providing services to users within their designated boundaries.Was this newly enabled personal user homepage feature in the httpd service actually permitted by default in the SELinux domain?
Next, use the getsebool command to query and filter all HTTP-related security policies. Here, off indicates a prohibited state, while on indicates an allowed state.
root@linuxprobe:~# getsebool -a | grep http
httpd_anon_write --> off
httpd_builtin_scripting --> on
httpd_can_check_spam --> off
httpd_can_connect_ftp --> off
httpd_can_connect_ldap --> off
httpd_can_connect_mythtv --> off
httpd_can_connect_zabbix --> off
httpd_can_manage_courier_spool --> off
httpd_can_network_connect --> off
httpd_can_network_connect_cobbler --> off
httpd_can_network_connect_db --> off
httpd_can_network_memcache --> off
httpd_can_network_redis --> off
httpd_can_network_relay --> off
httpd_can_sendmail --> off
httpd_dbus_avahi --> off
httpd_dbus_sssd --> off
httpd_dontaudit_search_dirs --> off
httpd_enable_cgi --> on
httpd_enable_ftp_server --> off
httpd_enable_homedirs --> off
[... output omitted ...]
With so many SELinux domain security policy rules, it's unnecessary to understand each one individually. It's sufficient to roughly guess their purpose based on their names. For example, to enable personal home directory functionality for the httpd service, the relevant SELinux domain security policy should be httpd_enable_homedirs, right?Once you've roughly identified the relevant policy, you can use the setsebool command to modify the boolean values of individual SELinux policy rules. Remember to always append the -P parameter to the setsebool command to make the modified SELinux policy rules permanent and take effect immediately. After refreshing the webpage, the result is shown in Figure 10-11.
root@linuxprobe:~# setsebool -P httpd_enable_homedirs=on

Figure 10-11: Content from the personal user's home directory displayed normally
Sometimes, website owners do not want to display web content directly but only allow authenticated users to view it. In such cases, password protection can be added to the website.
Step 1: Generate the password database using the htpasswd command. The -c option indicates creating a new database. Subsequently, specify the file path for the password database and the username to be used for authentication (this user does not need to be an existing local account on the system).
root@linuxprobe:~# htpasswd -c /etc/httpd/passwd linuxprobe
New password: ********
Re-type new password: ********
Adding password for user linuxprobe
Here you enter the password you want to use for web authentication and then confirm it by typing it again.
Step 2: Continue editing the configuration file for personal user home directories. Modify the parameters on lines 31–37 to the following content. Lines prefixed with a hash symbol (#) are added comments and can be ignored. Save and exit the configuration file, then restart the httpd service for changes to take effect.
root@linuxprobe:~# vim /etc/httpd/conf.d/userdir.conf
[... output omitted ...]
 27 #
 28 # Control access to UserDir directories.  The following is an example
 29 # for a site where these directories are restricted to read-only.
 30 #
 31 \<Directory "/home/*/public_html"\>
 32     AllowOverride all
        #Path to the newly generated password authentication file
 33     authuserfile "/etc/httpd/passwd"
        #Prompt message displayed when users access the website
 34     authname "My private website"
        # Authentication method is password-based
 35     authtype basic
        # Username required for website access
 36     require user linuxprobe
 37 \</Directory\>
root@linuxprobe:~# systemctl restart httpd
After this, users must enter a username and password to access a specific user's personal website. Note that the credentials used for authentication are generated by the htpasswd command specifically for website login purposes—they are not the same as system account credentials. Do not confuse the two. The login interface is shown in Figures 10-12 and 10-13.
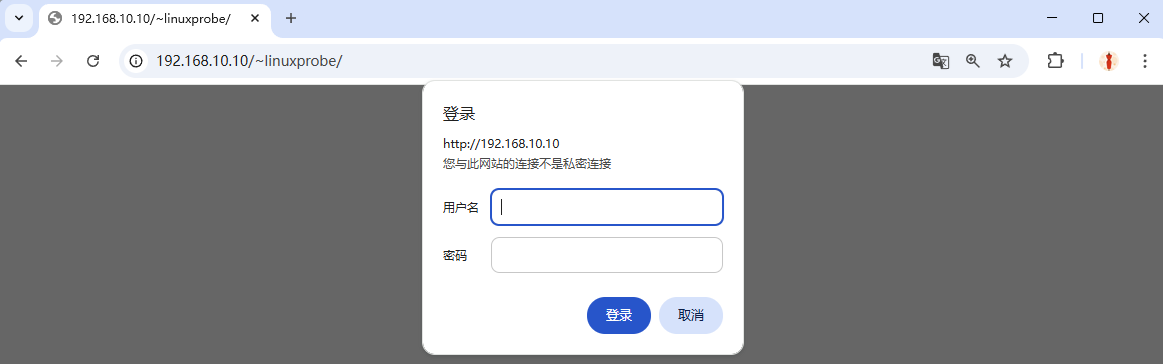
Figure 10-12 Account and password required for access
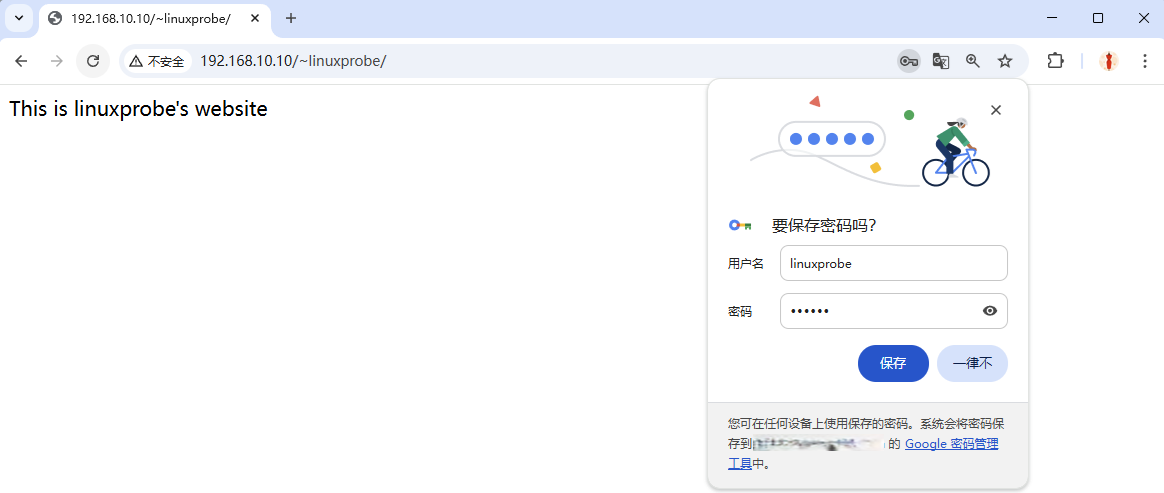
Figure 10-13 Password verification successful
10.5 Virtual Web Hosting Functionality
If each Linux server could only host one website, small-scale webmasters with low traffic would face exorbitant server rental costs, while hardware resources would be wasted. Before Virtual Private Servers (VPS) and cloud computing emerged, IDC providers enabled virtual hosting to maximize server utilization and lower entry barriers.
Virtual hosting allows a single physical server to be partitioned into multiple "virtual servers." However, this technology cannot achieve the hardware resource isolation of modern cloud hosting. Instead, these virtual servers share the physical server's hardware resources, with providers typically limiting only the disk space allocated to each. Due to various considerations (primarily affordability), many businesses and individual webmasters still deploy websites using virtual hosting.
Apache's virtual hosting feature enables a server to simultaneously serve multiple websites based on differing user requests—such as distinct IP addresses, hostnames, or port numbers. As shown in Figure 10-14, users requesting different resources receive distinct webpage content. If you haven't built a website before, this concept might seem unclear. Once we set up the experimental environment and observe the results, it will become evident.
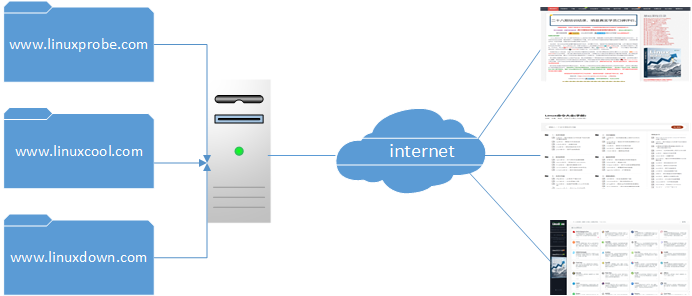
Figure 10-14 User Requesting Website Resources
As a reminder, please restore the virtual machine to its initial state before each experiment to prevent conflicts between experiments.
10.5.1 IP Address-Based
If a server has multiple IP addresses, and each IP address corresponds to a distinct website deployed on the server, users requesting different IP addresses will access resources from different websites. Furthermore, since each website has an independent IP address, this approach significantly benefits search engine optimization. Consequently, providing virtual hosting functionality in this manner is not only the most common practice but also highly favored by webmasters (especially grassroots webmasters).
Chapters 4 and 9 detail two methods for network configuration, which you may choose freely for experiments or work. For the current experiment, the required IP addresses are shown in Figure 10-15.After completing the configuration and restarting the network service, remember to verify network connectivity. Ensure all three IP addresses are accessible as shown in Figure 10-16 (this is crucial—thoroughly test before proceeding to the next step).

Figure 10-15 Configuring network parameters using the nmtui command
root@linuxprobe:~# nmcli connection up ens160
Connection successfully activated (D-Bus active path: /org/freedesktop/NetworkManager/ActiveConnection/3)
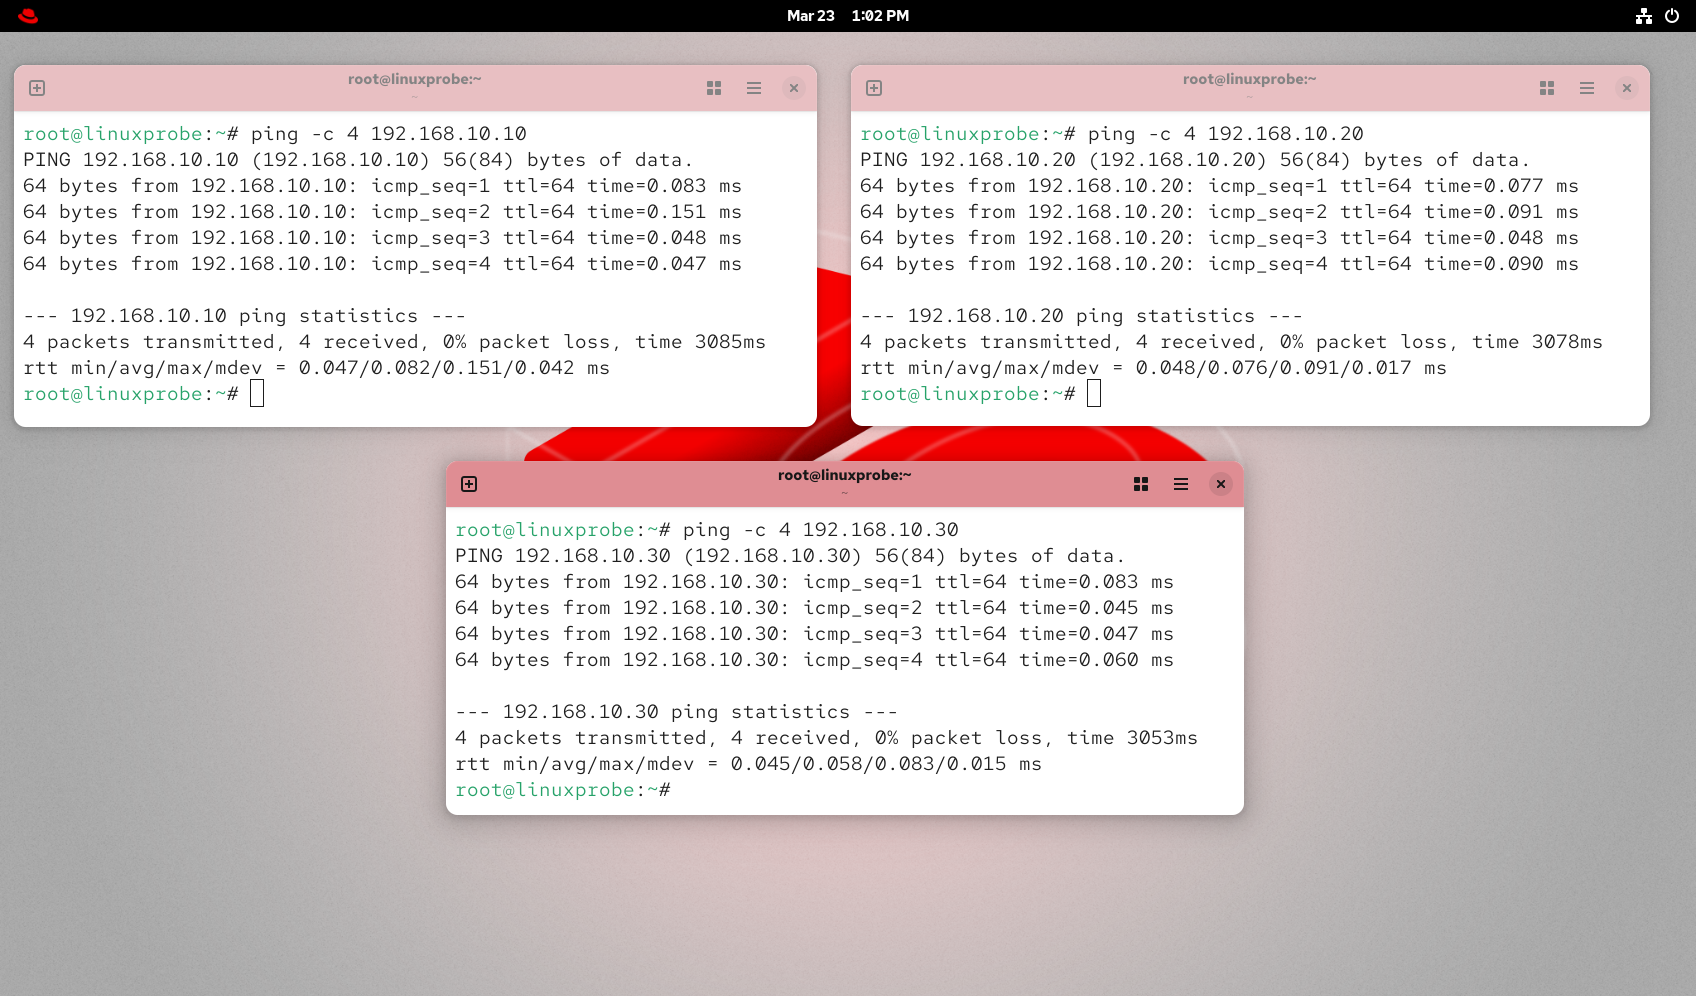
Figure 10-16 Verifying connectivity for all 3 IP addresses
Step 1: Create three directories in /home/wwwroot to store data for different websites, and place the homepage files for each site into their respective directories. Each homepage file should contain clearly distinguishable content for each website to facilitate visual verification later.
root@linuxprobe:~# mkdir -p /home/wwwroot/10
root@linuxprobe:~# mkdir -p /home/wwwroot/20
root@linuxprobe:~# mkdir -p /home/wwwroot/30
root@linuxprobe:~# echo "IP:192.168.10.10" > /home/wwwroot/10/index.html
root@linuxprobe:~# echo "IP:192.168.10.20" > /home/wwwroot/20/index.html
root@linuxprobe:~# echo "IP:192.168.10.30" > /home/wwwroot/30/index.html
Step 2: Starting from line 125 in the httpd service configuration file, append three IP-based virtual host parameters respectively. Save and exit. Remember to restart the httpd service for these configurations to take effect.
root@linuxprobe:~# vim /etc/httpd/conf/httpd.conf
[... output omitted ...]
125 <VirtualHost 192.168.10.10>
126         DocumentRoot /home/wwwroot/10
127         ServerName www.linuxprobe.com
128         <Directory /home/wwwroot/10>
129         AllowOverride None
130         Require all granted
131         </Directory>
132 </VirtualHost>

133 <VirtualHost 192.168.10.20>
134         DocumentRoot /home/wwwroot/20
135         ServerName www.linuxprobe.com
136         <Directory /home/wwwroot/20>
137         AllowOverride None
138         Require all granted
139         </Directory>
140 </VirtualHost>

141 <VirtualHost 192.168.10.30>
142         DocumentRoot /home/wwwroot/30
143         ServerName www.linuxprobe.com
144         <Directory /home/wwwroot/30>
145         AllowOverride None
146         Require all granted
147         </Directory>
148 </VirtualHost>
[... output omitted ...]
root@linuxprobe:~# systemctl restart httpd
Step 3: Accessing the website now displays the default httpd service page with "Insufficient privileges." You should immediately recognize this as SELinux at work. Since the SELinux security context for the current /home/wwwroot directory and its website data directories conflicts with the web service, the httpd service cannot access these directories.We need to manually set the correct SELinux security context for the new website data directory (refer to the previous experiment) and use the restorecon command to immediately activate the newly set SELinux security context. This will allow you to see the website's access results immediately, as shown in Figure 10-17.
root@linuxprobe:~# semanage fcontext -a -t httpd_sys_content_t /home/wwwroot
root@linuxprobe:~# semanage fcontext -a -t httpd_sys_content_t /home/wwwroot/10
root@linuxprobe:~# semanage fcontext -a -t httpd_sys_content_t /home/wwwroot/10/*
root@linuxprobe:~# semanage fcontext -a -t httpd_sys_content_t /home/wwwroot/20
root@linuxprobe:~# semanage fcontext -a -t httpd_sys_content_t /home/wwwroot/20/*
root@linuxprobe:~# semanage fcontext -a -t httpd_sys_content_t /home/wwwroot/30
root@linuxprobe:~# semanage fcontext -a -t httpd_sys_content_t /home/wwwroot/30/*
root@linuxprobe:~# restorecon -Rv /home/wwwroot
Relabeled /home/wwwroot from unconfined_u:object_r:user_home_dir_t:s0 to unconfined_u:object_r:httpd_sys_content_t:s0
Relabeled /home/wwwroot/10 from unconfined_u:object_r:user_home_t:s0 to unconfined_u:object_r:httpd_sys_content_t:s0
Relabeled /home/wwwroot/10/index.html from unconfined_u:object_r:user_home_t:s0 to unconfined_u:object_r:httpd_sys_content_t:s0
Relabeled /home/wwwroot/20 from unconfined_u:object_r:user_home_t:s0 to unconfined_u:object_r:httpd_sys_content_t:s0
Relabeled /home/wwwroot/20/index.html from unconfined_u:object_r:user_home_t:s0 to unconfined_u:object_r:httpd_sys_content_t:s0
Relabeled /home/wwwroot/30 from unconfined_u:object_r:user_home_t:s0 to unconfined_u:object_r:httpd_sys_content_t:s0
Relabeled /home/wwwroot/30/index.html from unconfined_u:object_r:user_home_t:s0 to unconfined_u:object_r:httpd_sys_content_t:s0
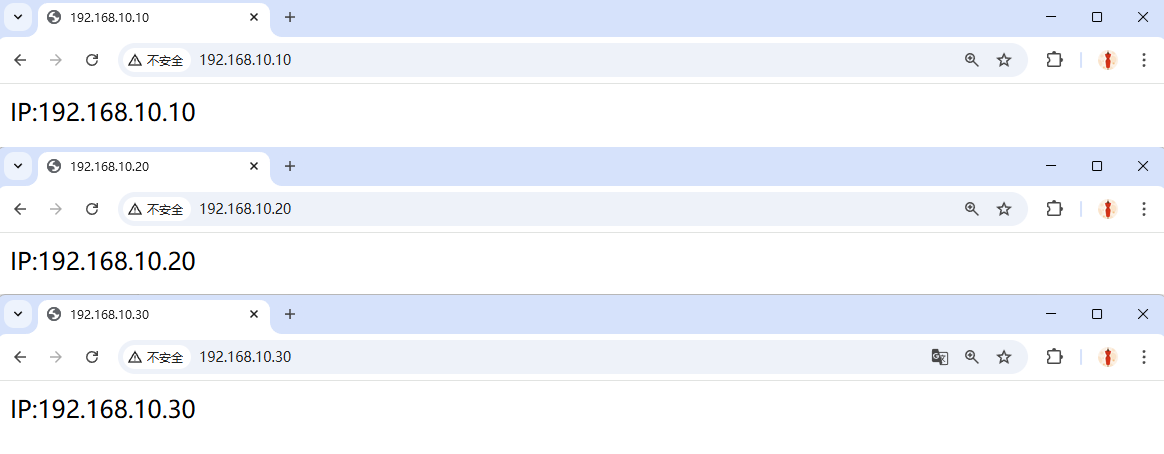
Figure 10-17 Accessing a Virtual Hosting-Based Website Using Different IP Addresses
10.5.2 Host-Based Domain Names
When the server cannot assign a dedicated IP address to each website, Apache can automatically identify the domain name requested by the user and serve different content based on the domain name. This configuration is simpler, requiring only one available IP address on the production server (using 192.168.10.10 as an example).Since DNS resolution service configuration has not yet been covered, the mapping between IP addresses and domain names must be defined manually. The /etc/hosts file in Linux systems is used to force a specific hostname to resolve to a designated IP address. Simply put, if this file is configured correctly, domain names can still resolve to specific IP addresses even if DNS information is absent from network parameters.
Step 1: Manually define the mapping between IP addresses and domain names in the configuration file. Changes take effect immediately after saving and exiting. You can verify successful resolution by pinging these domain names individually.
root@linuxprobe:~# vim /etc/hosts
# Loopback entries; do not change.
# For historical reasons, localhost precedes localhost.localdomain:
127.0.0.1   localhost localhost.localdomain localhost4 localhost4.localdomain4
::1         localhost localhost.localdomain localhost6 localhost6.localdomain6
192.168.10.10   www.linuxprobe.com www.linuxcool.com www.linuxdown.com
[... output omitted ...]
root@linuxprobe:~# ping -c 4 www.linuxprobe.com
PING www.linuxprobe.com (192.168.10.10) 56(84) bytes of data.
64 bytes from www.linuxprobe.com (192.168.10.10): icmp_seq=1 ttl=64 time=0.869 ms
64 bytes from www.linuxprobe.com (192.168.10.10): icmp_seq=2 ttl=64 time=0.141 ms
64 bytes from www.linuxprobe.com (192.168.10.10): icmp_seq=3 ttl=64 time=0.099 ms
64 bytes from www.linuxprobe.com (192.168.10.10): icmp_seq=4 ttl=64 time=0.048 ms
--- www.linuxprobe.com ping statistics ---
4 packets transmitted, 4 received, 0% packet loss, time 3043ms
rtt min/avg/max/mdev = 0.048/0.289/0.869/0.336 ms
root@linuxprobe:~#
Step 2: Create three separate directories within /home/wwwroot to store data for different websites. Place each website's homepage file into its corresponding directory. Ensure each homepage file contains clearly distinguishable content for each site to facilitate easier visual verification later.
root@linuxprobe:~# mkdir -p /home/wwwroot/linuxprobe
root@linuxprobe:~# mkdir -p /home/wwwroot/linuxcool
root@linuxprobe:~# mkdir -p /home/wwwroot/linuxdown
root@linuxprobe:~# echo "www.linuxprobe.com" > /home/wwwroot/linuxprobe/index.html
root@linuxprobe:~# echo "www.linuxcool.com" > /home/wwwroot/linuxcool/index.html
root@linuxprobe:~# echo "www.linuxdown.com" > /home/wwwroot/linuxdown/index.html
Step 3: Starting from line 125 in the httpd service configuration file, append three virtual host parameters based on hostnames. Save and exit. Remember to restart the httpd service for these changes to take effect.
root@linuxprobe:~# vim /etc/httpd/conf/httpd.conf
[... output omitted ...]
125 <VirtualHost 192.168.10.10>
126         Documentroot /home/wwwroot/linuxprobe
127         ServerName www.linuxprobe.com
128         <Directory /home/wwwroot/linuxprobe>
129         AllowOverride None
130         Require all granted
131         </Directory>
132 </VirtualHost>

133 <VirtualHost 192.168.10.10>
134         Documentroot /home/wwwroot/linuxcool
135         ServerName www.linuxcool.com
136         <Directory /home/wwwroot/linuxcool>
137         AllowOverride None
138         Require all granted
139         </Directory>
140 </VirtualHost>

141 <VirtualHost 192.168.10.10>
142         Documentroot /home/wwwroot/linuxdown
143         ServerName www.linuxdown.com
144         <Directory /home/wwwroot/linuxdown>
145         AllowOverride None
146         Require all granted
147         </Directory>
148 </VirtualHost>
[... output omitted ...]
root@linuxprobe:~# systemctl restart httpd
Step 4: Since the current website data directory remains in /home/wwwroot, it is essential to correctly configure the SELinux security context for the website data directory files to align with the website service functionality. Finally, remember to use the restorecon command to immediately activate the newly configured SELinux security context. This allows immediate access to the website built on the virtual host, as shown in Figure 10-18.
root@linuxprobe:~# semanage fcontext -a -t httpd_sys_content_t /home/wwwroot
root@linuxprobe:~# semanage fcontext -a -t httpd_sys_content_t /home/wwwroot/linuxprobe
root@linuxprobe:~# semanage fcontext -a -t httpd_sys_content_t /home/wwwroot/linuxprobe/*
root@linuxprobe:~# semanage fcontext -a -t httpd_sys_content_t /home/wwwroot/linuxcool
root@linuxprobe:~# semanage fcontext -a -t httpd_sys_content_t /home/wwwroot/linuxcool/*
root@linuxprobe:~# semanage fcontext -a -t httpd_sys_content_t /home/wwwroot/linuxdown
root@linuxprobe:~# semanage fcontext -a -t httpd_sys_content_t /home/wwwroot/linuxdown/*
root@linuxprobe:~# restorecon -Rv /home/wwwroot
Relabeled /home/wwwroot from unconfined_u:object_r:user_home_dir_t:s0 to unconfined_u:object_r:httpd_sys_content_t:s0
Relabeled /home/wwwroot/linuxprobe from unconfined_u:object_r:user_home_t:s0 to unconfined_u:object_r:httpd_sys_content_t:s0
Relabeled /home/wwwroot/linuxprobe/index.html from unconfined_u:object_r:user_home_t:s0 to unconfined_u:object_r:httpd_sys_content_t:s0
Relabeled /home/wwwroot/linuxcool from unconfined_u:object_r:user_home_t:s0 to unconfined_u:object_r:httpd_sys_content_t:s0
Relabeled /home/wwwroot/linuxcool/index.html from unconfined_u:object_r:user_home_t:s0 to unconfined_u:object_r:httpd_sys_content_t:s0
Relabeled /home/wwwroot/linuxdown from unconfined_u:object_r:user_home_t:s0 to unconfined_u:object_r:httpd_sys_content_t:s0
Relabeled /home/wwwroot/linuxdown/index.html from unconfined_u:object_r:user_home_t:s0 to unconfined_u:object_r:httpd_sys_content_t:s0
We continue accessing the site from the physical machine (the physical machine's hosts file has been modified):
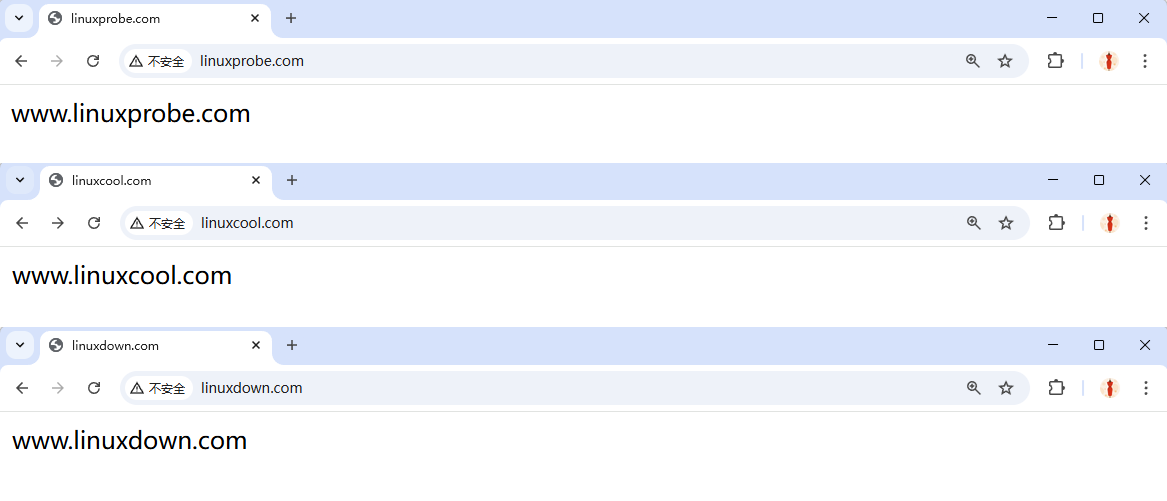
Figure 10-18 Accessing a Virtual Host-Based Website Using Different Domain Names
10.5.3 Port-Based Virtual Hosting
Port-based virtual hosting enables users to access website resources on the server by specifying a port number. Among Apache's virtual hosting configurations, port-based setup is the most complex.We must consider not only the configuration factors of the httpd service program but also the monitoring of newly opened ports by the SELinux service. Generally, using port numbers like 80, 443, or 8080 to provide website access services is reasonable. Using other port numbers may be restricted by the SELinux service.
In the following experiment, we must consider not only the restrictions imposed by the SELinux security context applied to directories but also the control exerted by the SELinux domain over the httpd service.
Step 1: Create three separate directories within /home/wwwroot to store data for different websites. Place the homepage files for each website into their respective directories. Each homepage file should contain clearly distinguishable content for each website to facilitate visual verification of results later.
root@linuxprobe:~# mkdir -p /home/wwwroot/6111
root@linuxprobe:~# mkdir -p /home/wwwroot/6222
root@linuxprobe:~# mkdir -p /home/wwwroot/6333
root@linuxprobe:~# echo "port:6111" > /home/wwwroot/6111/index.html
root@linuxprobe:~# echo "port:6222" > /home/wwwroot/6222/index.html
root@linuxprobe:~# echo "port:6333" > /home/wwwroot/6333/index.html
Step 2: Add parameters to listen on ports 6111, 6222, and 6333 respectively on lines 48–50 of the httpd service configuration file.
root@linuxprobe:~# vim /etc/httpd/conf/httpd.conf
[... output omitted ...]
 37 # Listen: Allows you to bind Apache to specific IP addresses and/or
 38 # ports, instead of the default. See also the <VirtualHost>
 39 # directive.
 40 #
 41 # Change this to Listen on a specific IP address, but note that if
 42 # httpd.service is enabled to run at boot time, the address may not be
 43 # available when the service starts.  See the httpd.service(8) man
 44 # page for more information.
 45 #
 46 #Listen 12.34.56.78:80
 47 Listen 80
 48 Listen 6111
 49 Listen 6222
 50 Listen 6333
[... output omitted ...]
Step 3: Starting from line 127 in the httpd service configuration file, append three port-based virtual host parameters. Save and exit. Remember to restart the httpd service for these changes to take effect.
root@linuxprobe:~# vim /etc/httpd/conf/httpd.conf
[... output omitted ...]
127 <VirtualHost 192.168.10.10:6111>
128         DocumentRoot /home/wwwroot/6111
129         ServerName www.linuxprobe.com
130         <Directory /home/wwwroot/6111>
131         AllowOverride None
132         Require all granted
133         </Directory>
134 </VirtualHost>

135 <VirtualHost 192.168.10.10:6222>
136         DocumentRoot /home/wwwroot/6222
137         ServerName www.linuxprobe.com
138         <Directory /home/wwwroot/6222>
139         AllowOverride None
140         Require all granted
141         </Directory>
142 </VirtualHost>

143 <VirtualHost 192.168.10.10:6333>
144         DocumentRoot /home/wwwroot/6333
145         ServerName www.linuxprobe.com
146         <Directory /home/wwwroot/6333>
147         AllowOverride None
148         Require all granted
149         </Directory>
150 </VirtualHost>
[... output omitted ...]
Step 4: Since we store website data in the /home/wwwroot directory, it is essential to correctly configure the SELinux security context for the website data directory files to align with the website service functionality.Finally, remember to use the restorecon command to immediately apply the newly configured SELinux security context.
root@linuxprobe:~# semanage fcontext -a -t httpd_sys_content_t /home/wwwroot
root@linuxprobe:~# semanage fcontext -a -t httpd_sys_content_t /home/wwwroot/6111
root@linuxprobe:~# semanage fcontext -a -t httpd_sys_content_t /home/wwwroot/6111/*
root@linuxprobe:~# semanage fcontext -a -t httpd_sys_content_t /home/wwwroot/6222
root@linuxprobe:~# semanage fcontext -a -t httpd_sys_content_t /home/wwwroot/6222/*
root@linuxprobe:~# semanage fcontext -a -t httpd_sys_content_t /home/wwwroot/6333
root@linuxprobe:~# semanage fcontext -a -t httpd_sys_content_t /home/wwwroot/6333/*
root@linuxprobe:~# restorecon -Rv /home/wwwroot/
Relabeled /home/wwwroot from unconfined_u:object_r:user_home_dir_t:s0 to unconfined_u:object_r:httpd_sys_content_t:s0
Relabeled /home/wwwroot/6111 from unconfined_u:object_r:user_home_t:s0 to unconfined_u:object_r:httpd_sys_content_t:s0
Relabeled /home/wwwroot/6111/index.html from unconfined_u:object_r:user_home_t:s0 to unconfined_u:object_r:httpd_sys_content_t:s0
Relabeled /home/wwwroot/6222 from unconfined_u:object_r:user_home_t:s0 to unconfined_u:object_r:httpd_sys_content_t:s0
Relabeled /home/wwwroot/6222/index.html from unconfined_u:object_r:user_home_t:s0 to unconfined_u:object_r:httpd_sys_content_t:s0
Relabeled /home/wwwroot/6333 from unconfined_u:object_r:user_home_t:s0 to unconfined_u:object_r:httpd_sys_content_t:s0
Relabeled /home/wwwroot/6333/index.html from unconfined_u:object_r:user_home_t:s0 to unconfined_u:object_r:httpd_sys_content_t:s0
root@linuxprobe:~# systemctl restart httpd
Job for httpd.service failed because the control process exited with error code.
See "systemctl status httpd.service" and "journalctl -xeu httpd.service" for details.
Damn it! After properly configuring the httpd service and SELinux security context and restarting the httpd service, an error message appeared.This is because the SELinux service detected that ports 6111, 6222, and 6333 were not originally resources required by the Apache service. However, they are now being listened to and used under the name of the httpd service. Therefore, SELinux will deny the Apache service from using these three ports. You can use the semanage command to query and filter out a list of all HTTP-related ports permitted by the SELinux service.
root@linuxprobe:~# semanage port -l | grep http
http_cache_port_t              tcp      8080, 8118, 8123, 10001-10010
http_cache_port_t              udp      3130
http_port_t                    tcp      80, 81, 443, 488, 8008, 8009, 8443, 9000
pegasus_http_port_t            tcp      5988
pegasus_https_port_t           tcp      5989
Step 5: The default SELinux allowed HTTP-related port numbers do not include 6111, 6222, and 6333. Therefore, these three port numbers must be manually added. This operation takes effect immediately and remains valid after system reboot.
root@linuxprobe:~# semanage port -a -t http_port_t -p tcp 6111
root@linuxprobe:~# semanage port -a -t http_port_t -p tcp 6222
root@linuxprobe:~# semanage port -a -t http_port_t -p tcp 6333
root@linuxprobe:~# semanage port -l | grep http
http_cache_port_t      tcp    8080, 8118, 8123, 10001-10010
http_cache_port_t      udp    3130
http_port_t            tcp    6333, 6222, 6111, 80, 81, 443, 488, 8008, 8009, 8443, 9000
pegasus_http_port_t    tcp    5988
pegasus_https_port_t   tcp    5989
Step 6: Enable the access control policy "Allow traffic on ports 6111, 6222, and 6333" on the firewall. After configuration, restart the httpd service. You should then be able to view the web content, as shown in Figure 10-19.
root@linuxprobe:~# firewall-cmd --permanent --add-port=6111/tcp
success
root@linuxprobe:~# firewall-cmd --permanent --add-port=6222/tcp
success
root@linuxprobe:~# firewall-cmd --permanent --add-port=6333/tcp
success
root@linuxprobe:~# firewall-cmd --reload
success
root@linuxprobe:~# systemctl restart httpd
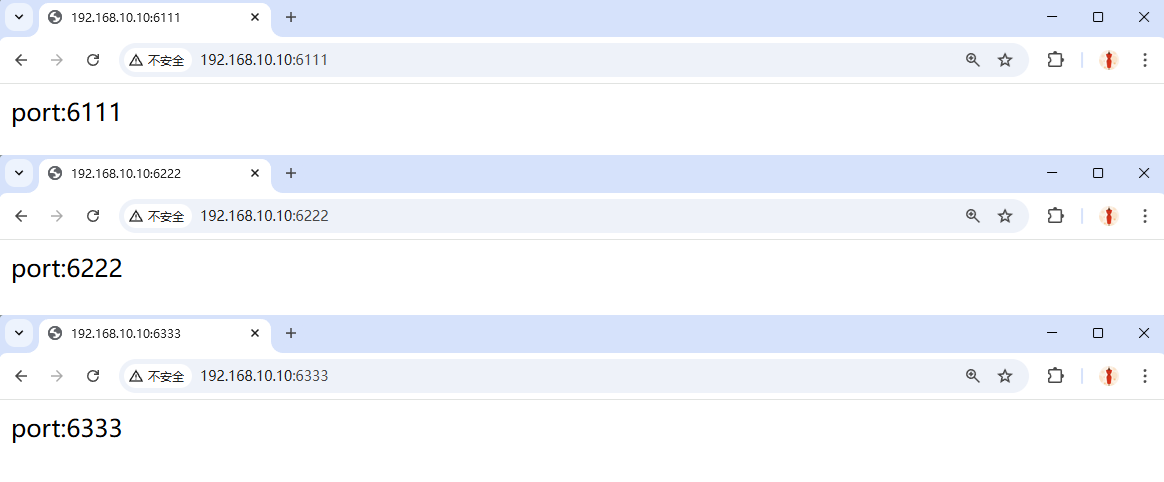
Figure 10-19 Accessing a Virtual Host-Based Website Using Different Port Numbers
10.6 Apache Access Control
Apache can control access to website resources based on information such as the source hostname, source IP address, or browser characteristics on the source host. It uses the Allow directive to permit a host to access website resources on the server, and the Deny directive to prohibit access.When permitting or denying access to resources, the Order directive defines the sequence in which Allow and Deny directives take effect. Matches are evaluated sequentially; if a rule matches, subsequent directives are ignored. For example, "Order Allow, Deny" means the source host is first checked against the Allow rules. If a match is found, the request is granted; otherwise, it is denied.
Step 1: First, create a new subdirectory within the website data directory on the server. Then, create a homepage file within this subdirectory containing the word "Successful".
root@linuxprobe:~# mkdir /var/www/html/server
root@linuxprobe:~# echo "Successful" > /var/www/html/server/index.html
Step 2: Open the httpd service configuration file and add the following rule after line 163 to restrict source host access.This rule allows hosts using the Firefox browser to access the homepage file on the server, while rejecting all other requests. Access using Firefox is shown in Figure 10-20, while access using other browsers is shown in Figure 10-21.
root@linuxprobe:~# vim /etc/httpd/conf/httpd.conf
[... output omitted ...]
163 <Directory "/var/www/html/server">
164         SetEnvIf User-Agent "Firefox" ff=1
165         Order allow,deny
166         Allow from env=ff
167 </Directory>
[... output omitted ...]
root@linuxprobe:~# systemctl restart httpd
root@linuxprobe:~# systemctl enable httpd
Created symlink '/etc/systemd/system/multi-user.target.wants/httpd.service' → '/usr/lib/systemd/system/httpd.service'.
In Apache httpd 2.4, these classic directives (Order / Allow / Deny) are provided by the mod_access_compat module for backward compatibility.

Figure 10-20 Firefox browser access successful
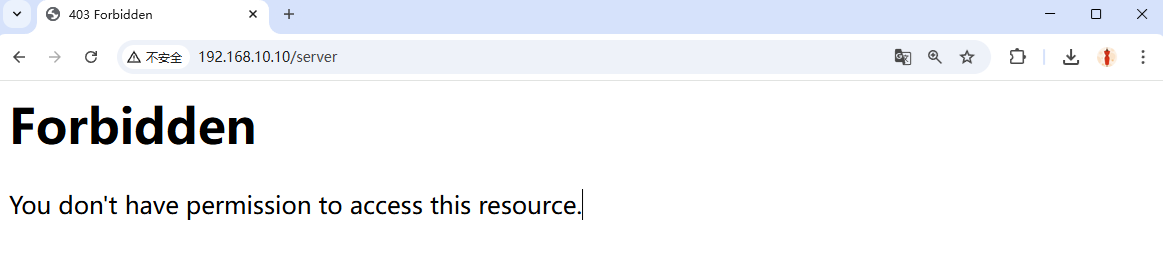
Figure 10-21 Other browsers access failed
In addition to matching browser characteristics of the source host, access control can also be implemented by matching the source host's IP address. For example, to restrict website access to only the host with IP address 192.168.10.20, add the following rule after line 163 in the httpd service configuration file.After restarting the httpd service, attempting to access the website's homepage from the local machine (i.e., the server with IP address 192.168.10.10) will result in an access denied prompt, as shown in Figure 10-22.
root@linuxprobe:~# vim /etc/httpd/conf/httpd.conf
[... output omitted ...]
161 <Directory "/var/www/html/server">
162     Order allow,deny
163     Allow from 192.168.10.20
164 </Directory>
[... output omitted ...]
root@linuxprobe:~# systemctl restart httpd
Figure 10-22 Access denied due to invalid IP address
Review Questions
- What is a web network service?
Answer: A service that allows users to access various resources on the internet via a browser.
- What is the primary advantage of the Apache service program compared to Nginx?
Answer: The Apache server offers cross-platform compatibility, enhanced security, and provides fast, reliable, and simple API extensions.
- If the httpd service cannot find the homepage file, will it display an error message?
Answer: No. When the httpd service cannot locate the website's home page file, it displays a default page to visitors.
- Briefly describe the roles of global configuration parameters, regional configuration parameters, and comment lines in the Apache main configuration file.
Answer: Global configuration parameters apply universally to all sub-sites; regional configuration parameters are set individually for each independent sub-site; comment lines typically provide explanations about the server's functionality or specific parameter lines.
- Briefly describe the function of the SELinux service.
Answer: It enforces constraints on service processes, ensuring they only access resources they are authorized to obtain.
- When using the
getenforcecommand to check the SELinux service mode, it shows the configuration mode aspermissive. Does this represent the enforcing mode?
Answer: No. Enforcing mode is "enforcing," while permissive mode only issues warnings without enforcing blocks.
- After modifying the SELinux security context applied to a file using the
semanagecommand, what additional command is required to make the changes take effect immediately?
Answer: You must also run the restorecon command to immediately activate the new SELinux security context parameters.
- How can I query and filter all SELinux domain policies related to HTTP?
Answer: You can achieve this using a pipe symbol by executing the command getsebool -a | grep http.
- What resources can the Apache server use to create virtual hosts for hosting websites?
Answer: Virtual hosts can be created based on IP addresses, hostnames (domain names), or port numbers.
- Compared to virtual hosts configured based on IP addresses or hostnames (domain names), what are the characteristics of virtual hosts configured using port numbers?
Answer: When configuring virtual hosts using port numbers, you must consider the SELinux domain's control policy for the port number used by the httpd service. Additionally, you must enable the port number to be listened on using the Listen parameter in the main configuration file of the httpd service.