Chapter 16 · Ansible Automation and Configuration Management
Chapter Overview
Ansible is an open-source operations automation tool that has gained significant attention in recent years, standing as a leader in the field of operations management. It greatly enhances the efficiency of operations personnel while reducing human errors, delivering twice the results with half the effort. Ansible includes thousands of feature-rich and practical modules, accompanied by detailed help documentation, allowing even beginners to get started quickly and feel right at home.
This chapter begins by introducing Ansible's origins, key terminology, and host configuration. It then delves into over ten commonly used Ansible modules—including ping, yum, firewalld, service, template, setup, lvol, lvg, copy, file, and debug—to meet daily operations needs.Next, through hands-on exercises, it details methods for loading roles from the system, fetching roles from external sources, and creating custom roles. This empowers readers to confidently manage and control task workflows in production environments. Additionally, carefully crafted playbook files demonstrate techniques for creating logical volume devices, rewriting files based on host conditions, and managing file attributes.Finally, the chapter concludes by using Ansible's vault functionality to encrypt variables and playbook files.
This chapter comprehensively covers the intricacies of Ansible usage, with content that builds upon itself seamlessly. Readers will find the learning experience thoroughly satisfying upon completing this chapter.
16.1 Ansible Introduction and Installation
Ansible stands as a prime example of simplicity and ease of use among current operations automation tools, serving as an indispensable assistant for operations personnel. It efficiently manages diverse resources and achieves comprehensive IT infrastructure automation through automated application deployment. With Ansible, we can effortlessly perform server initialization configurations, security baseline setups, system updates, and patch management.Compared to automation tools like Chef, Puppet, and SaltStack that use a client/server architecture, Ansible may not offer the best performance. However, its reliance on the SSH protocol eliminates the need for client installations. With just the account credentials of the target host, remote control is achieved directly via SSH. This grants Ansible a significant advantage in ease of use, making it a true "power tool" in the operations field.
In February 2012, programmer Michael DeHaan released the first version of Ansible. With extensive experience in configuration management and architecture design, DeHaan had previously developed the Cobbler automated system installation tool during his tenure at Red Hat. However, dissatisfied with the complexity and limitations of existing automation tools, he resolved to create a solution that combined the strengths of its predecessors.Ansible was born. Thanks to its exceptional ease of use and powerful capabilities, Ansible quickly gained widespread recognition in the operations community. Its GitHub star and fork counts far surpass those of SaltStack, clearly demonstrating its popularity. In 2015, Ansible was officially acquired by Red Hat (its logo changed to the one shown in Figure 16-1), unlocking immense potential for its future development.

Figure 16-1 Ansible Logo
Automated operations tools tangibly boost operational efficiency and minimize human error. Ansible itself lacks bulk deployment capabilities—it functions as a framework, with true mass deployment power residing in its executable modules. Ansible includes thousands of built-in modules installed alongside the core software. Specific functions are achieved by invoking designated modules.Ansible's extensive built-in modules cover nearly all requirements and are remarkably simple to use—a single command can impact thousands of hosts. For advanced functionality, Ansible can be extended through Python-based custom development.
Today, Ansible has been adopted and deployed by major tech companies including Amazon, Google, Microsoft, Cisco, HP, VMware, and Twitter (now X Corporation), demonstrating exceptional performance and flexibility in real-world applications. Red Hat has provided unwavering support for its own products. Effective August 1, 2020, the RHCE exam shifted its focus from configuring multiple services to specialized Ansible content.To successfully obtain RHCE certification today, thoroughly studying this chapter is essential.
Before formally introducing Ansible, let's familiarize ourselves with relevant specialized terminology to ensure a shared understanding, enabling us to dive straight into the subject matter during subsequent experiments. The Ansible-related specialized terms compiled here are shown in Table 16-1.
Table 16-1 Ansible Service Terminology Reference Table
| Term | English Term | Meaning |
|---|---|---|
| control node | control node | Host where Ansible service is installed, used to publish tasks, invoke modules, and perform bulk control over other hosts |
| managed node | Managed Node | Host managed by Ansible service, where module commands execute; also called managed host or client |
| inventory | Inventory | List of managed nodes, which can be IP addresses, hostnames, or domain names |
| module | Module | Function-specific code; Ansible includes thousands of default modules, with additional options available via Ansible Galaxy |
| task | Task | Operations to execute on Ansible clients |
| playbook | Playbook | A reusable list of tasks written in YAML; common operations stored in playbooks for direct execution later |
| role | Role | Structurally organizes playbooks; achieves sequences of functions by invoking roles |
Since controlled nodes do not require client installation and SSH is standard on Linux systems, remote control can be achieved directly via SSH. On the control node, there is no need to repeatedly start the service program each time; control can be executed by directly invoking modules using the ansible command.
RHEL 10 system images do not include the Ansible service program by default. Users must obtain it from the Extra Packages for Enterprise Linux (EPEL) extended package repository. EPEL, provided by Red Hat, is a high-quality software extension repository for creating, maintaining, and managing enterprise Linux distributions. It is compatible with multiple Red Hat-based enterprise systems like RHEL, CentOS, and Oracle Linux, serving to expand the default system repository packages.
The following steps prepare the system for deploying the Ansible service.
Step 1: In the "Virtual Machine Settings" interface, adjust the "Network Connection" option for the "Network Adapter" to "Bridged Mode" and set the system's network interface to Automatic (DHCP) mode, as shown in Figure 16-2 and Figure 16-3.
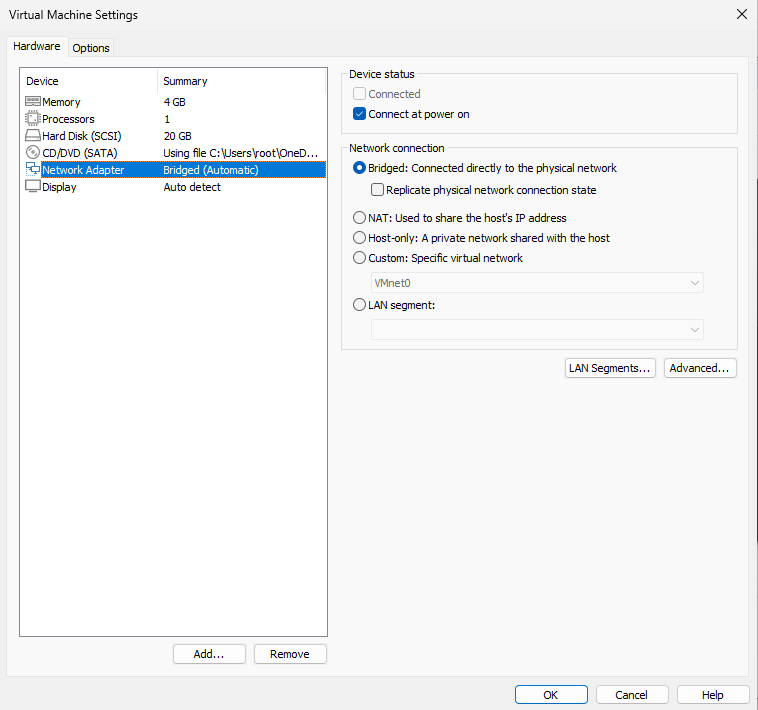
Figure 16-2 Setting "Network Connection" to "Bridged Mode"
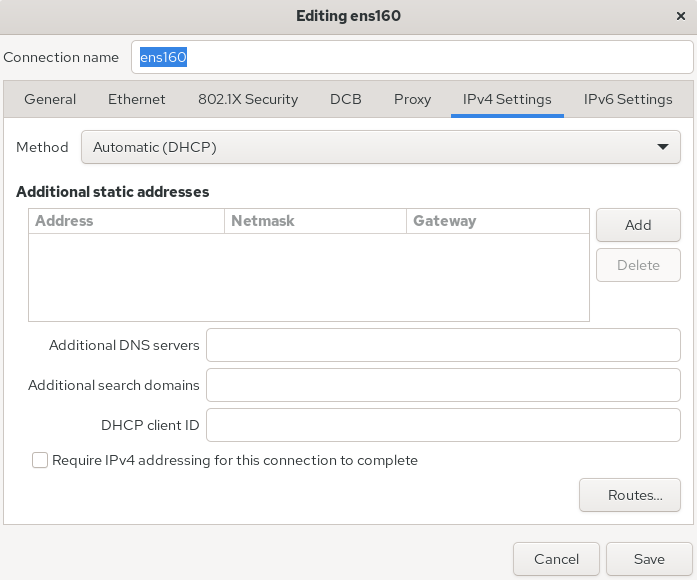
Figure 16-3 Setting the Network Adapter to Automatic (DHCP) Mode
In most cases, setting the virtual machine to bridge mode, ensuring the Linux system's network interface configuration matches the physical machine's, and then restarting network services will enable external network connectivity. For verification, you can test using the ping command.
root@linuxprobe:~# nmcli connection up ens160
Connection successfully activated (D-Bus active path: /org/freedesktop/NetworkManager/ActiveConnection/3)
root@linuxprobe:~# ping -c 4 www.linuxprobe.com
PING www.linuxprobe.com.w.kunlunno.com (124.95.157.160) 56(84) bytes of data.
64 bytes from www.linuxprobe.com (124.95.157.160): icmp_seq=1 ttl=53 time=17.1 ms
64 bytes from www.linuxprobe.com (124.95.157.160): icmp_seq=2 ttl=53 time=15.6 ms
64 bytes from www.linuxprobe.com (124.95.157.160): icmp_seq=3 ttl=53 time=16.8 ms
64 bytes from www.linuxprobe.com (124.95.157.160): icmp_seq=4 ttl=53 time=17.5 ms

--- www.linuxprobe.com.w.kunlunno.com ping statistics ---
4 packets transmitted, 4 received, 0% packet loss, time 10ms
rtt min/avg/max/mdev = 15.598/16.732/17.452/0.708 ms
Step 2: Append the EPEL extended package repository information below the existing software repository configuration.
root@linuxprobe:~# vim /etc/yum.repos.d/rhel10.repo
[BaseOS]
name=BaseOS
baseurl=file:///media/cdrom/BaseOS
enabled=1
gpgcheck=0

[AppStream]
name=AppStream
baseurl=file:///media/cdrom/AppStream
enabled=1
gpgcheck=0

[EPEL]
name=EPEL
baseurl=https://dl.fedoraproject.org/pub/epel/10/Everything/x86_64/
enabled=1
gpgcheck=0
Step 3: Install!
ansible-core is the package name for the Ansible service program, while the sshpass package enables remote management of controlled nodes from the server.
root@linuxprobe:~# dnf install ansible-core sshpass
Updating Subscription Management repositories.
BaseOS                                          2.7 MB/s | 2.7 kB     00:00
AppStream                                       2.7 MB/s | 2.8 kB     00:00
EPEL                                            1.3 MB/s | 3.8 MB     00:03
Dependencies resolved.
========================================================================================================
 Package                        Architecture     Version                      Repository           Size
========================================================================================================
Installing:
 ansible-core                   noarch           1:2.16.3-3.el10              AppStream           3.9 M
 sshpass                        x86_64           1.09-10.el10_1               EPEL                 27 k
Installing dependencies:
 python3-argcomplete            noarch           3.2.2-3.el10                 AppStream            90 k
 python3-cffi                   x86_64           1.16.0-5.el10                BaseOS              312 k
 python3-cryptography           x86_64           43.0.0-2.el10                BaseOS              1.4 M
 python3-jinja2                 noarch           3.1.4-2.el10                 AppStream           330 k
 python3-markupsafe             x86_64           2.1.3-5.el10                 AppStream            36 k
 python3-ply                    noarch           3.11-24.el10                 BaseOS              139 k
 python3-pycparser              noarch           2.20-15.el10                 BaseOS              162 k
 python3-resolvelib             noarch           1.0.1-5.el10                 AppStream            49 k
[... output omitted ...]
Installed:
  ansible-core-1:2.16.3-3.el10.noarch               python3-argcomplete-3.2.2-3.el10.noarch
  python3-cffi-1.16.0-5.el10.x86_64                 python3-cryptography-43.0.0-2.el10.x86_64
  python3-jinja2-3.1.4-2.el10.noarch                python3-markupsafe-2.1.3-5.el10.x86_64
  python3-ply-3.11-24.el10.noarch                   python3-pycparser-2.20-15.el10.noarch
  python3-resolvelib-1.0.1-5.el10.noarch            sshpass-1.09-10.el10_1.x86_64

Complete!
Since ansible-core only installs core modules by default, LVM-related modules such as lvg and lvol are provided by the community.general collection and need to be installed manually:
root@linuxprobe:~# ansible-galaxy collection install community.general
Starting galaxy collection install process
Process install dependency map
Starting collection install process
Downloading https://galaxy.ansible.com/api/v3/plugin/ansible/content/published/collections/artifacts/community-general-10.5.0.tar.gz to /root/.ansible/tmp/ansible-local-3064xaqti5li/tmpt0je0dr4/community-general-10.5.0-z14ni88o
Installing 'community.general:10.5.0' to '/root/.ansible/collections/ansible_collections/community/general'
community.general:10.5.0 was installed successfully
After installation, Ansible is ready to use immediately—no separate daemon needs to be started. Use the --version parameter to view the Ansible version and configuration details.
root@linuxprobe:~# ansible --version
ansible [core 2.16.3]
  config file = /etc/ansible/ansible.cfg
  configured module search path = ['/root/.ansible/plugins/modules', '/usr/share/ansible/plugins/modules']
  ansible python module location = /usr/lib/python3.12/site-packages/ansible
  ansible collection location = /root/.ansible/collections:/usr/share/ansible/collections
  executable location = /usr/bin/ansible
  python version = 3.12.5 (main, Aug 23 2024, 00:00:00) [GCC 14.2.1 20240801 (Red Hat 14.2.1-1)] (/usr/bin/python3)
  jinja version = 3.1.4
  libyaml = True
16.2 Setting Up Host Lists
When first using Ansible, you may encounter issues where modified parameters don't take effect. This is typically caused by the priority order of Ansible's main configuration files.Ansible's main configuration file is typically located in the /etc/ansible directory, but it has the lowest priority. If another main configuration file exists in the current directory or the user's home directory, Ansible will prioritize that file instead. When multiple main configuration files coexist, the specific priority order is shown in Table 16-2.
Table 16-2 Priority Order of Ansible Service Configuration Files
| Priority | File Location |
|---|---|
| High | ./ansible.cfg |
| Medium | ~/.ansible.cfg |
| Low | /etc/ansible/ansible.cfg |
Since the Ansible service is a management tool for implementing bulk automation control of hosts, the managed hosts are certainly not just one or two, but dozens, hundreds, or even thousands. In such production environments, the host inventory proves extremely useful.Users can pre-configure the IP addresses of managed hosts in the /etc/ansible/hosts file. This ensures that subsequent tasks executed via Ansible commands automatically include these hosts, eliminating the need to repeatedly input their addresses. For example, suppose five hosts need management, with their IP addresses and purposes as shown in Table 16-3.
Table 16-3 Managed Host Information
| Operating System | IP Address | Functionality |
|---|---|---|
| RHEL 10 | 192.168.10.20 | dev |
| RHEL 10 | 192.168.10.21 | test |
| RHEL 10 | 192.168.10.22 | prod |
| RHEL 10 | 192.168.10.23 | prod |
| RHEL 10 | 192.168.10.24 | balancers |
First, it should be noted that managed hosts default to RHEL 10. This is a recommended value to avoid ambiguity during lab setup preparation; other Linux systems may also be used. The host inventory file /etc/ansible/hosts contains extensive default comments. It is recommended to remove all comments and replace them with your lab information.
root@linuxprobe:~# vim /etc/ansible/hosts
192.168.10.20
192.168.10.21
192.168.10.22
192.168.10.23
192.168.10.24
To increase the experiment's complexity and cover common production environment requirements, we assigned specific functional roles to these five hosts: development (dev), testing (test), production (two instances: prod), and load balancers (balancers). Grouping hosts with labels simplifies management later.
root@linuxprobe:~# vim /etc/ansible/hosts
[dev]
192.168.10.20
[test]
192.168.10.21
[prod]
192.168.10.22
192.168.10.23
[balancers]
192.168.10.24
Changes to the inventory file take effect immediately. Typically, the ansible-inventory --graph command displays managed host information in a structured format. Grouping managed hosts makes this view highly readable.
root@linuxprobe:~# ansible-inventory --graph
@all:
  |--@ungrouped:
  |--@dev:
  |  |--192.168.10.20
  |--@test:
  |  |--192.168.10.21
  |--@prod:
  |  |--192.168.10.22
  |  |--192.168.10.23
  |--@balancers:
  |  |--192.168.10.24
Hold on! Don't rush into the next experiment just yet. As mentioned earlier, Ansible automates control via the SSH protocol—a prerequisite for proceeding. Chapter 9 covered how sshd requires users to accept the fingerprint of the remote host during initial connections. Prepare to enter the managed host's username and password. For instance, a typical first SSH remote connection looks like this:
root@linuxprobe:~# ssh 192.168.10.10
The authenticity of host '192.168.10.10 (192.168.10.10)' can't be established.
ED25519 key fingerprint is SHA256:0R7Kuk/yCTlJ+E4G9y9iX/A/hAklHkALm5ZUgnJ01cc.
This key is not known by any other names.
Are you sure you want to continue connecting (yes/no/[fingerprint])? yes
Warning: Permanently added '192.168.10.10' (ED25519) to the list of known hosts.
root@192.168.10.10's password: Enter the administrator password and press Enter.
[... output omitted ...]
Last login: Mon Mar 31 13:20:15 2025
root@linuxprobe:~#
As is well known, one benefit of automated operations is improved efficiency. However, repeatedly entering passwords for managed hosts during each operation can be cumbersome. Fortunately, the Ansible service provides a solution: utilizing variables as shown in Table 16-4.
Table 16-4 Summary of Common Ansible Variables
| Variable | Purpose |
|---|---|
| ansible_host | Target host address; defaults to the inventory hostname |
| ansible_port | SSH port used to connect to the target host |
| ansible_user | SSH username used when connecting to the target host |
| ansible_password | Password for ansible_user (or the private key passphrase) |
| ansible_shell_type | Remote shell type, for example sh or csh |
Users only need to fill in the corresponding variables and information in the host inventory file. When executing tasks, the account and password will be automatically matched without needing to re-enter them each time. Continue modifying the host inventory file:
root@linuxprobe:~# vim /etc/ansible/hosts
[dev]
192.168.10.20
[test]
192.168.10.21
[prod]
192.168.10.22
192.168.10.23
[balancers]
192.168.10.24
[all:vars]
ansible_user=root
ansible_password=redhat
One final step remains. Ansible's main configuration file defaults to commenting out all parameters. We can enable them individually as needed. Set line 221 to use the root administrator name for default playbook execution, and configure line 320 to skip fingerprint verification for SSH protocol by default, facilitating direct management of controlled nodes:
root@linuxprobe:~# cd /etc/ansible/
root@linuxprobe:/etc/ansible# ansible-config init --disabled > ansible.cfg
root@linuxprobe:/etc/ansible# vim /etc/ansible/ansible.cfg
219 # (string) Sets the login user for the target machines
220 # When blank it uses the connection plugin's default, normally the user currently executing Ansible.
221 remote_user=root
[... output omitted ...]
319 # (boolean) Set this to "False" if you want to avoid host key checking by the underlying tools Ansible uses to connect to the host
320 host_key_checking=False
No service restart is required. Once the above steps are fully completed, you can proceed with subsequent experiments. Since the Ansible server was previously configured in bridge and DHCP mode, please manually revert the network adapter to "Host-only mode" (see Figure 16-4) and assign the IP address 192.168.10.10/24.After making these changes, restart the network interface and perform ping operations between hosts. Ensuring network connectivity between hosts is fundamental for subsequent experiments.
root@linuxprobe:/etc/ansible# ifconfig
ens160: flags=4163<UP,BROADCAST,RUNNING,MULTICAST>  mtu 1500
        inet 192.168.10.10  netmask 255.255.255.0  broadcast 192.168.10.255
        inet6 fe80::20c:29ff:fee5:e733  prefixlen 64  scopeid 0x20<link>
        ether 00:0c:29:e5:e7:33  txqueuelen 1000  (Ethernet)
        RX packets 1132  bytes 107455 (104.9 KiB)
        RX errors 0  dropped 0  overruns 0  frame 0
        TX packets 152  bytes 18695 (18.2 KiB)
        TX errors 0  dropped 0 overruns 0  carrier 0  collisions 0
[... output omitted ...]
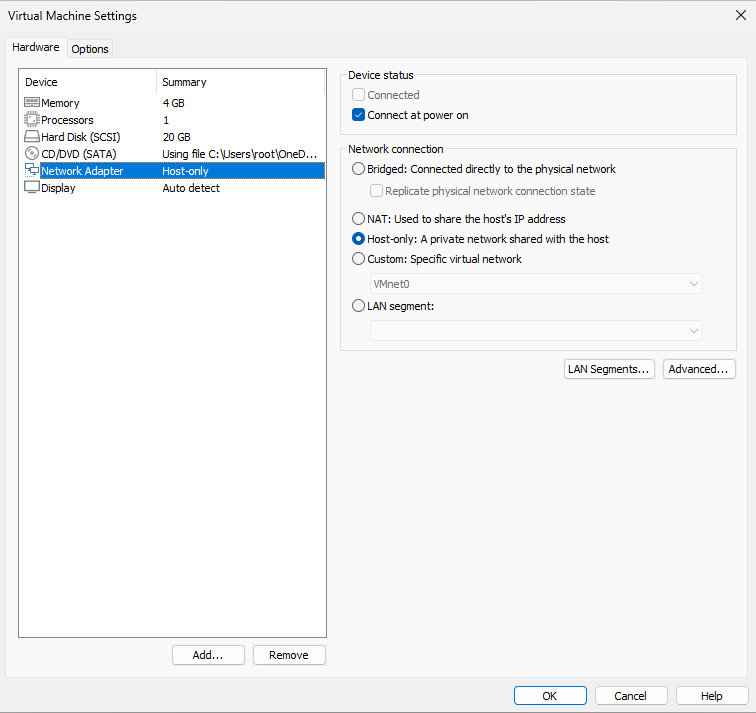
Figure 16-4 Changing the virtual machine network adapter back to "Host-only mode"
16.3 Running Temporary Commands
The power of Ansible lies in its ability to manage thousands of host nodes with a single command, and the ansible command is one of its most effective tools. As mentioned earlier, Ansible itself is merely a framework; the actual work is performed by modular functional code. Ansible has over 20 commonly used modules (see Table 16-5), which will be explained in detail in subsequent experiments throughout this book.
Occasionally, you may encounter modules not covered in the book. You can look them up using the command format "ansible-doc module_name" or use the ansible-doc -l command to list all available modules for selection. Press the q key to exit after browsing.
Table 16-5 Common Module Names and Functions in Ansible Services
| Module Name | Module Function |
|---|---|
| ping | Check network connectivity to managed hosts |
| yum | Install, update, and uninstall software packages |
| yum_repository | Manage host software repository configuration files |
| template | Copy template files to managed hosts |
| copy | Create, modify, and copy files |
| user | Create, modify, and delete users |
| group | Create, modify, and delete user groups |
| service | Start, stop, and view service status |
| get_url | Download files from the network |
| file | Set file permissions and create shortcuts |
| cron | Add, modify, and delete scheduled tasks |
| command | Directly execute user-specified commands |
| shell | Directly execute user-specified commands (supports special characters) |
| debug | Output debugging or error messages |
| mount | Mount disk device files |
| filesystem | Format disk device files |
| lineinfile | Modify file content using regular expressions |
| setup | Collect system and variable information on managed hosts |
| firewalld | Add, modify, and delete firewall policies |
| lvg | Manage physical volumes and volume groups on the host |
| lvol | Manage logical volumes on the host |
In the Ansible service, ansible is a command used to execute temporary tasks, meaning it terminates after execution (unlike playbook files, which can be re-executed). When using the ansible command, you must specify information about the managed hosts. If a host inventory file (/etc/ansible/hosts) has been configured, you can use the all parameter to refer to all managed hosts, or use host group names like dev or test to refer to specific groups of hosts.
The common syntax for the ansible command is ansible managed_host_node --m module_name [-a module_arguments]. Common arguments are listed in Table 16-6. Here, -a specifies arguments passed to the module. Only extremely simple modules require no additional arguments, so -m and -a are typically used together.
Table 16-6 Common Parameters for the ansible Command
| Parameter | Function |
|---|---|
| -k | Manually input SSH protocol password |
| -i | Specify host inventory file |
| -m | Specify module name to use |
| -M | Specifies the module path to use |
| -S | Uses the su command |
| -T | Sets the SSH protocol connection timeout |
| -a | Sets parameters passed to the module |
| --version | Displays version information |
| -h | Displays help information |
If you wish to implement a specific functionality but are unsure which module to use, or if you know the module name but are unclear about its exact purpose, it is recommended to use the ansible-doc command for reference. For example, to list all modules currently supported by the Ansible service:
root@linuxprobe:/etc/ansible# ansible-doc -l
ansible.builtin.add_host               Add a host (and alternatively a grou...
ansible.builtin.apt                    Manages apt-packages
ansible.builtin.apt_key                Add or remove an apt key
ansible.builtin.apt_repository         Add and remove APT repositories
ansible.builtin.assemble               Assemble configuration files from fr...
ansible.builtin.assert                 Asserts given expressions are true
ansible.builtin.async_status           Obtain status of asynchronous task
[... output omitted ...]
Generally, it's difficult to determine a module's function solely by its name. You'll either need to refer to the module's description or gain familiarity through practice and accumulation.For example, let's randomly examine a module's details. The ansible-doc command displays its purpose, available parameters, and usage examples:
root@linuxprobe:/etc/ansible# ansible-doc add_host
> ANSIBLE.BUILTIN.ADD_HOST    (/usr/lib/python3.12/site-packages/ansible/module>

        Use variables to create new hosts and groups in inventory for
        use in later plays of the same playbook. Takes variables so
        you can define the new hosts more fully. This module is also
        supported for Windows targets.
[... output omitted ...]
In Section 16.2, we successfully populated the managed hosts' IP addresses into the host inventory file. Next, let's test our skills by checking these hosts' network connectivity. The ping module performs simple network tests (similar to the common ping command). You can directly invoke the ping module for all hosts using the ansible command without additional parameters. A return value of SUCCESS indicates the host is currently online.
root@linuxprobe:/etc/ansible# ansible all -m ping
192.168.10.20 | SUCCESS => {
    "ansible_facts": {
        "discovered_interpreter_python": "/usr/bin/python3"
    },
    "changed": false,
    "ping": "pong"
}
192.168.10.21 | SUCCESS => {
    "ansible_facts": {
        "discovered_interpreter_python": "/usr/bin/python3"
    },
    "changed": false,
    "ping": "pong"
}
192.168.10.22 | SUCCESS => {
    "ansible_facts": {
        "discovered_interpreter_python": "/usr/bin/python3"
    },
    "changed": false,
    "ping": "pong"
}
192.168.10.23 | SUCCESS => {
    "ansible_facts": {
        "discovered_interpreter_python": "/usr/bin/python3"
    },
    "changed": false,
    "ping": "pong"
}
192.168.10.24 | SUCCESS => {
    "ansible_facts": {
        "discovered_interpreter_python": "/usr/bin/python3"
    },
    "changed": false,
    "ping": "pong"
}
Tips:
Since the output information for the 5 managed hosts is largely identical, to enhance readability for readers, subsequent output results in this chapter will default to showing only the output values from host 192.168.10.20. Identical output from other hosts will be omitted.
Pretty convenient, right?! You can check the online status of all hosts at once. Besides using the -m parameter to directly specify module names, you can also use the -a parameter to pass arguments to modules, enabling more advanced functionality to better meet current production needs.For instance, the yum_repository module manages software repositories on hosts, enabling the addition, modification, and deletion of repository configuration information. Its parameters are relatively complex. In such cases, it's advisable to first use the ansible-doc command to understand it. The EXAMPLES section below, in particular, provides examples of this module and is highly valuable for users.
root@linuxprobe:/etc/ansible# ansible-doc yum_repository
> ANSIBLE.BUILTIN.YUM_REPOSITORY    (/usr/lib/python3.12/site-packages/ansible/>

        Add or remove YUM repositories in RPM-based Linux
        distributions. If you wish to update an existing repository
        definition use [community.general.ini_file] instead.
[... output omitted ...]
EXAMPLES:
- name: Add repository
  ansible.builtin.yum_repository:
    name: epel
    description: EPEL YUM repo
    baseurl: https://download.fedoraproject.org/pub/epel/$releasever/$basearch/

- name: Add multiple repositories into the same file (1/2)
  ansible.builtin.yum_repository:
    name: epel
    description: EPEL YUM repo
    file: external_repos
    baseurl: https://download.fedoraproject.org/pub/epel/$releasever/$basearch/
    gpgcheck: no

- name: Add multiple repositories into the same file (2/2)
  ansible.builtin.yum_repository:
    name: rpmforge
    description: RPMforge YUM repo
    file: external_repos
    baseurl: http://apt.sw.be/redhat/el7/en/$basearch/rpmforge
    mirrorlist: http://mirrorlist.repoforge.org/el7/mirrors-rpmforge
    enabled: no
Fortunately, there aren't many parameters, and they're largely similar to the configuration files in the /etc/yum.repos.d directory we learned about earlier. Now, how do we add a new software repository like the one shown in Table 16-7 to all servers in the host inventory?
Table 16-7 New Software Repository Information
| Parameter | Value |
|---|---|
| Repository Name | EX294_BASE |
| Repository Description | EX294 base software |
| Repository Address | file:///media/cdrom/BaseOS |
| GPG Signature | Enabled |
| GPG Key File | file:///media/cdrom/RPM-GPG-KEY-redhat-release |
We can fill in the required values and parameters one by one, referencing the EXAMPLE instance segment. The standard format involves placing the overall parameter (enclosed in single quotes) after the -a option, while individual parameter field values are enclosed in double quotes. This is the most rigorous approach. If the word CHANGED appears after executing the following command, it indicates the modification was successful:
root@linuxprobe:/etc/ansible# ansible all -m yum_repository -a 'name="EX294_BASE" description="EX294 base software" baseurl="file:///media/cdrom/BaseOS" gpgcheck=yes enabled=1 gpgkey="file:///media/cdrom/RPM-GPG-KEY-redhat-release"'

192.168.10.20 | CHANGED => {
    "ansible_facts": {
        "discovered_interpreter_python": "/usr/bin/python3"
    },
    "changed": true,
    "repo": "EX294_BASE",
    "state": "present"
}
After the command completes successfully, you can verify the newly created repository configuration file on any machine in the host inventory. Although this experiment involves numerous parameters, it is not difficult.
root@linuxprobe:~# cat /etc/yum.repos.d/EX294_BASE.repo
[EX294_BASE]
baseurl = file:///media/cdrom/BaseOS
enabled = 1
gpgcheck = 1
gpgkey = file:///media/cdrom/RPM-GPG-KEY-redhat-release
name = EX294 base software
16.4 Practical Playbook Files
In many scenarios, executing a single command or invoking a specific module simply cannot meet the demands of complex tasks. Ansible enables users to write automated operations scripts in a shell-like scripting style tailored to their needs. These scripts are then executed automatically and repeatedly by the program, significantly boosting efficiency.
Ansible playbook files are written in YAML with strict formatting rules. Information is grouped by whitespace, so even a single misplaced space can cause errors. Exercise extreme caution when using them. YAML files must begin with three hyphens (---). Multiple grouped sections require consistent spacing to execute correctly and should be vertically aligned. The file extension is typically .yml. After execution, the playbook displays an output screen whose content varies based on the task performed. In this output: green indicates success, yellow signifies successful execution with modifications, and red denotes failure.
The script file structure comprises four sections: target, variable, task, and handler, each serving distinct purposes:
target: Defines the host scope for script execution.
variable: Defines variables required during script execution.
task: Defines the list of tasks to execute on remote hosts.
handler: Defines follow-up tasks to invoke after execution completes.
Ansible playbooks written in YAML are automatically executed top-down. Their format resembles the shell scripts introduced in Chapter 4 but enforces strict formatting rules. For example, create a playbook named packages.yml to automatically install database software on hosts in the dev, test, and prod groups, while updating software to the latest version on dev group hosts.
Installing and updating software requires the yum module. First, review the example in the help documentation:
root@linuxprobe:/etc/ansible# ansible-doc yum
> ANSIBLE.BUILTIN.YUM    (/usr/lib/python3.12/site-packages/ansible/modules/yum>

        Installs, upgrade, downgrades, removes, and lists packages and
        groups with the `yum' package manager. This module only works
        on Python 2. If you require Python 3 support see the
        [ansible.builtin.dnf] module.
[... output omitted ...]
EXAMPLES:

- name: Install the latest version of Apache
  ansible.builtin.yum:
    name: httpd
    state: latest
When configuring Ansible playbook files, the help information provided by the ansible-doc command is incredibly useful. Once you understand the usage and format of the yum module, you can start writing playbooks. When writing playbook files for the first time, make sure to pay close attention to the format. The module and play (action) formats must be aligned vertically; otherwise, you may encounter situations where "parameters are identical but the playbook fails to execute."
In summary, a correctly written playbook should look like this:
root@linuxprobe:/etc/ansible# vim packages.yml
---
- name: Install software packages
  hosts: dev,test,prod
  tasks:
          - name: one
            yum:
                    name: mariadb
                    state: latest
Here, the name field designates the name of this play (action). It informs users which step is being executed during runtime and helps administrators recall the purpose of this code segment during future reviews. You may freely name the name field with no restrictions. The hosts field specifies the hosts where this playbook will execute, with multiple host groups separated by commas. To perform operations on all hosts, use the all parameter.The tasks field defines the tasks to execute. Each task must have a distinct name field for naming, and the name field of each task must be strictly aligned with the module name. Parameters should be indented separately.
An incorrect script file looks like this:
root@linuxprobe:/etc/ansible# vim packages.yml
---
- name: Install software packages
  hosts: dev,test,prod
  tasks:
          - name: one
            yum:
            name: mariadb
            state: latest
You can see how strict YAML is about formatting.
When writing Ansible playbook files, the Vim editor included with RHEL 10 provides automatic indentation, which is very helpful. After confirming everything is correct, you can run the playbook using the ansible-playbook command.
root@linuxprobe:/etc/ansible# ansible-playbook packages.yml
PLAY [Installing Software Packages] **************************************************************

TASK [Gathering Facts] ********************************************************
ok: [192.168.10.20]
ok: [192.168.10.21]
ok: [192.168.10.22]
ok: [192.168.10.23]

TASK [one] ********************************************************************
changed: [192.168.10.20]
changed: [192.168.10.21]
changed: [192.168.10.22]
changed: [192.168.10.23]

PLAY RECAP ********************************************************************
192.168.10.20  : ok=2   changed=1  unreachable=0   failed=0   skipped=0   rescued=0   ignored=0
192.168.10.21  : ok=2   changed=1  unreachable=0   failed=0   skipped=0   rescued=0   ignored=0
192.168.10.22  : ok=2   changed=1  unreachable=0   failed=0   skipped=0   rescued=0   ignored=0
192.168.10.23  : ok=2   changed=1  unreachable=0   failed=0   skipped=0   rescued=0   ignored=0
After successful execution, focus on the output at the bottom. Here, ok and changed indicate successful execution and modification. If you encounter unreachable or failed values greater than 0, manually verify that the script ran correctly on all hosts and check for any installation failures.After successfully executing the packages.yml file, randomly switch to any host in the dev, test, or prod group and attempt to install the mariadb package again. You will receive a prompt indicating the service already exists. This confirms the previous operation was entirely successful!
root@linuxprobe:~# dnf install mariadb
Updating Subscription Management repositories.
Last metadata expiration check: 0:00:38 ago on Tue 01 Apr 2025 06:52:29 PM CST.
Package mariadb-3:10.11.9-3.el10.x86_64 is already installed.
Dependencies resolved.
Nothing to do.
Complete!
16.5 Creating and Using Roles
When writing Ansible playbooks, as content grows, code can become verbose, complex, difficult to maintain, and hard for other playbooks to flexibly call functions within. To address these issues, Ansible introduced the "role" feature starting with version 1.2, enabling hierarchical and structured organization of playbooks.Roles place variables, files, tasks, modules, and processors into separate directories, enabling easy loading and reuse. Simply put, roles modularize commonly used functionality for convenient invocation when needed.
Ansible's role functionality resembles encapsulation techniques in programming—it wraps specific functions so users can easily invoke them without needing to understand their internal workings.Consider how an average driver operates a car without needing to understand the intricate workings of the braking system—components like the master cylinder, wheel cylinders, vacuum booster, brake discs, drums, pads, or ABS pump. Simply pressing the brake pedal achieves stopping power. This exemplifies the benefit of technical encapsulation.
The advantage of roles lies in organizing scripts into concise, reusable abstract objects. This allows users to focus on high-level script design and coordinate key tasks, delving into details only when necessary. This structured organization significantly enhances script maintainability and scalability.
There are three primary methods for acquiring and utilizing roles: loading system-built-in roles, fetching roles from external environments, and creating custom roles. Through these approaches, users can flexibly leverage role functionality according to their needs, achieving efficient and streamlined automated operations management.
16.5.1 Loading System-Built-In Roles
When utilizing roles built into the RHEL system, no network connection is required. Users simply need to configure the software repository file, then install the rhel-system-roles package containing system roles. Afterward, these roles become available within the system and can be invoked via script files.
root@linuxprobe:/etc/ansible# dnf install rhel-system-roles
Updating Subscription Management repositories.
Last metadata expiration check: 0:27:07 ago on Tue 01 Apr 2025 06:27:45 PM CST.
Dependencies resolved.
================================================================================
 Package                Arch        Version                Repository      Size
================================================================================
Installing:
 rhel-system-roles      noarch      1.88.9-0.1.el10        AppStream      3.9 M
[... output omitted ...]
Installed:
  rhel-system-roles-1.88.9-0.1.el10.noarch

Complete!
After installation, use the ansible-galaxy list command to view the built-in roles available in the RHEL 10 system:
root@linuxprobe:/etc/ansible# ansible-galaxy list
# /usr/share/ansible/roles
- rhel-system-roles.network, (unknown version)
- rhel-system-roles.podman, (unknown version)
- rhel-system-roles.postfix, (unknown version)
- rhel-system-roles.postgresql, (unknown version)
- rhel-system-roles.rhc, (unknown version)
- rhel-system-roles.selinux, (unknown version)
- rhel-system-roles.snapshot, (unknown version)
- rhel-system-roles.ssh, (unknown version)
- rhel-system-roles.sshd, (unknown version)
- rhel-system-roles.storage, (unknown version)
- rhel-system-roles.sudo, (unknown version)
- rhel-system-roles.systemd, (unknown version)
- rhel-system-roles.timesync, (unknown version)
[... output omitted ...]
Never underestimate the utility of these roles bundled with the system image—they prove invaluable in daily operations. Their primary functions are outlined in Table 16-8.
Table 16-8 Roles Included with RHEL Systems
| Role Name | Function |
|---|---|
| rhel-system-roles.kdump | Configure KDUMP crash recovery service |
| rhel-system-roles.network | Configure network interfaces |
| rhel-system-roles.selinux | Configure SELinux policies and modes |
| rhel-system-roles.timesync | Configure Network Time Protocol |
| rhel-system-roles.postfix | Configure mail transfer service |
| rhel-system-roles.firewall | Configure firewall service |
| rhel-system-roles.tuned | Configure system tuning options |
Taking the rhel-system-roles.timesync role as an example, it configures the system time and NTP service to enable hosts to synchronize accurate time information. Playbook template files are stored in the /usr/share/doc/rhel-system-roles/ directory and can be copied for modification:
root@linuxprobe:/etc/ansible# cp /usr/share/doc/rhel-system-roles/timesync/example-single-pool-playbook.yml timesync.yml
NTP servers primarily synchronize computer clocks, providing high-precision time calibration services to help computers adjust their system clocks.In the copied playbook template file, remove any redundant code and enter the NTP server address into the hostname field of the timesync_ntp_servers variable. The parameter meanings for this variable are shown in Table 16-9. The timesync role will automatically configure the parameter information for the user later.
Table 16-9 Parameter Definitions for the timesync_ntp_servers Variable
| Parameter | Meaning |
|---|---|
| hostname | NTP server hostname |
| iburst | Enable fast synchronization |
root@linuxprobe:/etc/ansible# vim timesync.yml
---
- name: Example with single pool
  hosts: all
  vars:
    timesync_ntp_servers:
      - hostname: 2.pool.ntp.org
        pool: true
        iburst: true
  roles:
    - rhel-system-roles.timesync
16.5.2 Obtaining Roles from External Sources
Ansible Galaxy is an official community for Ansible (located at https://galaxy.ansible.com) dedicated to sharing roles and functional code. Users can freely share and download Ansible roles within this community. It is the premier choice for managing and utilizing roles.
On the Ansible Galaxy homepage shown in Figure 16-5, the left sidebar features five functional tabs: Search, Collections, Roles, Documentation, and Terms of Use.Clicking the Roles button takes you to the role search page. Searching for the nginx service here, for example, will display the official Nginx role information, as shown in Figure 16-6.
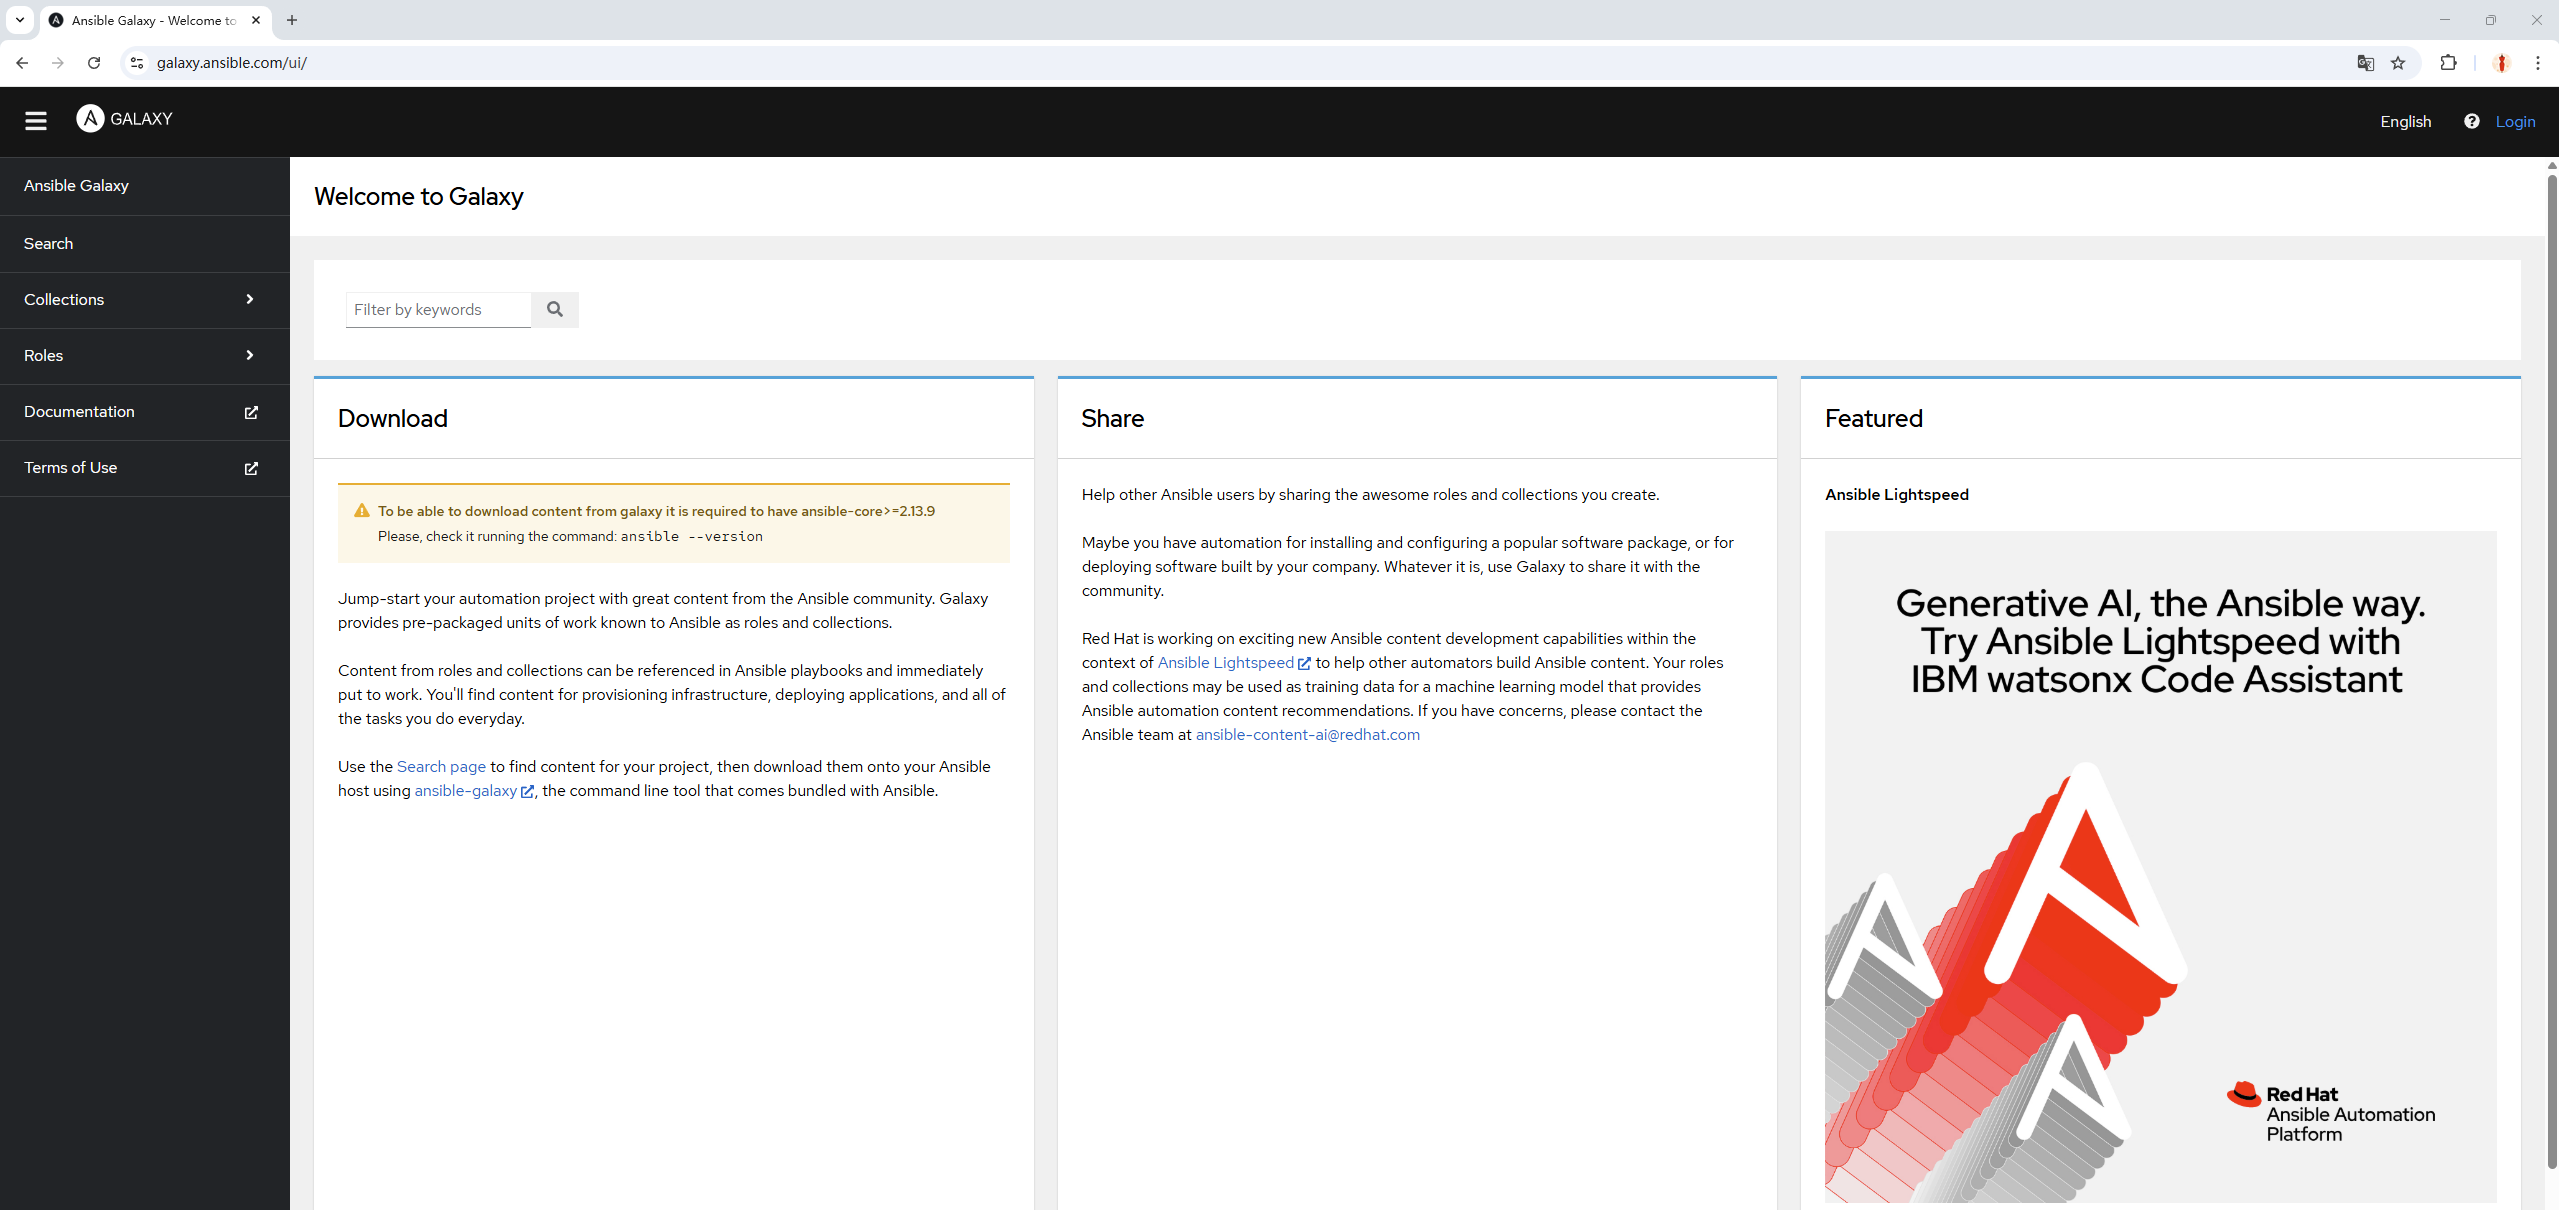
Figure 16-5 Ansible Galaxy Homepage
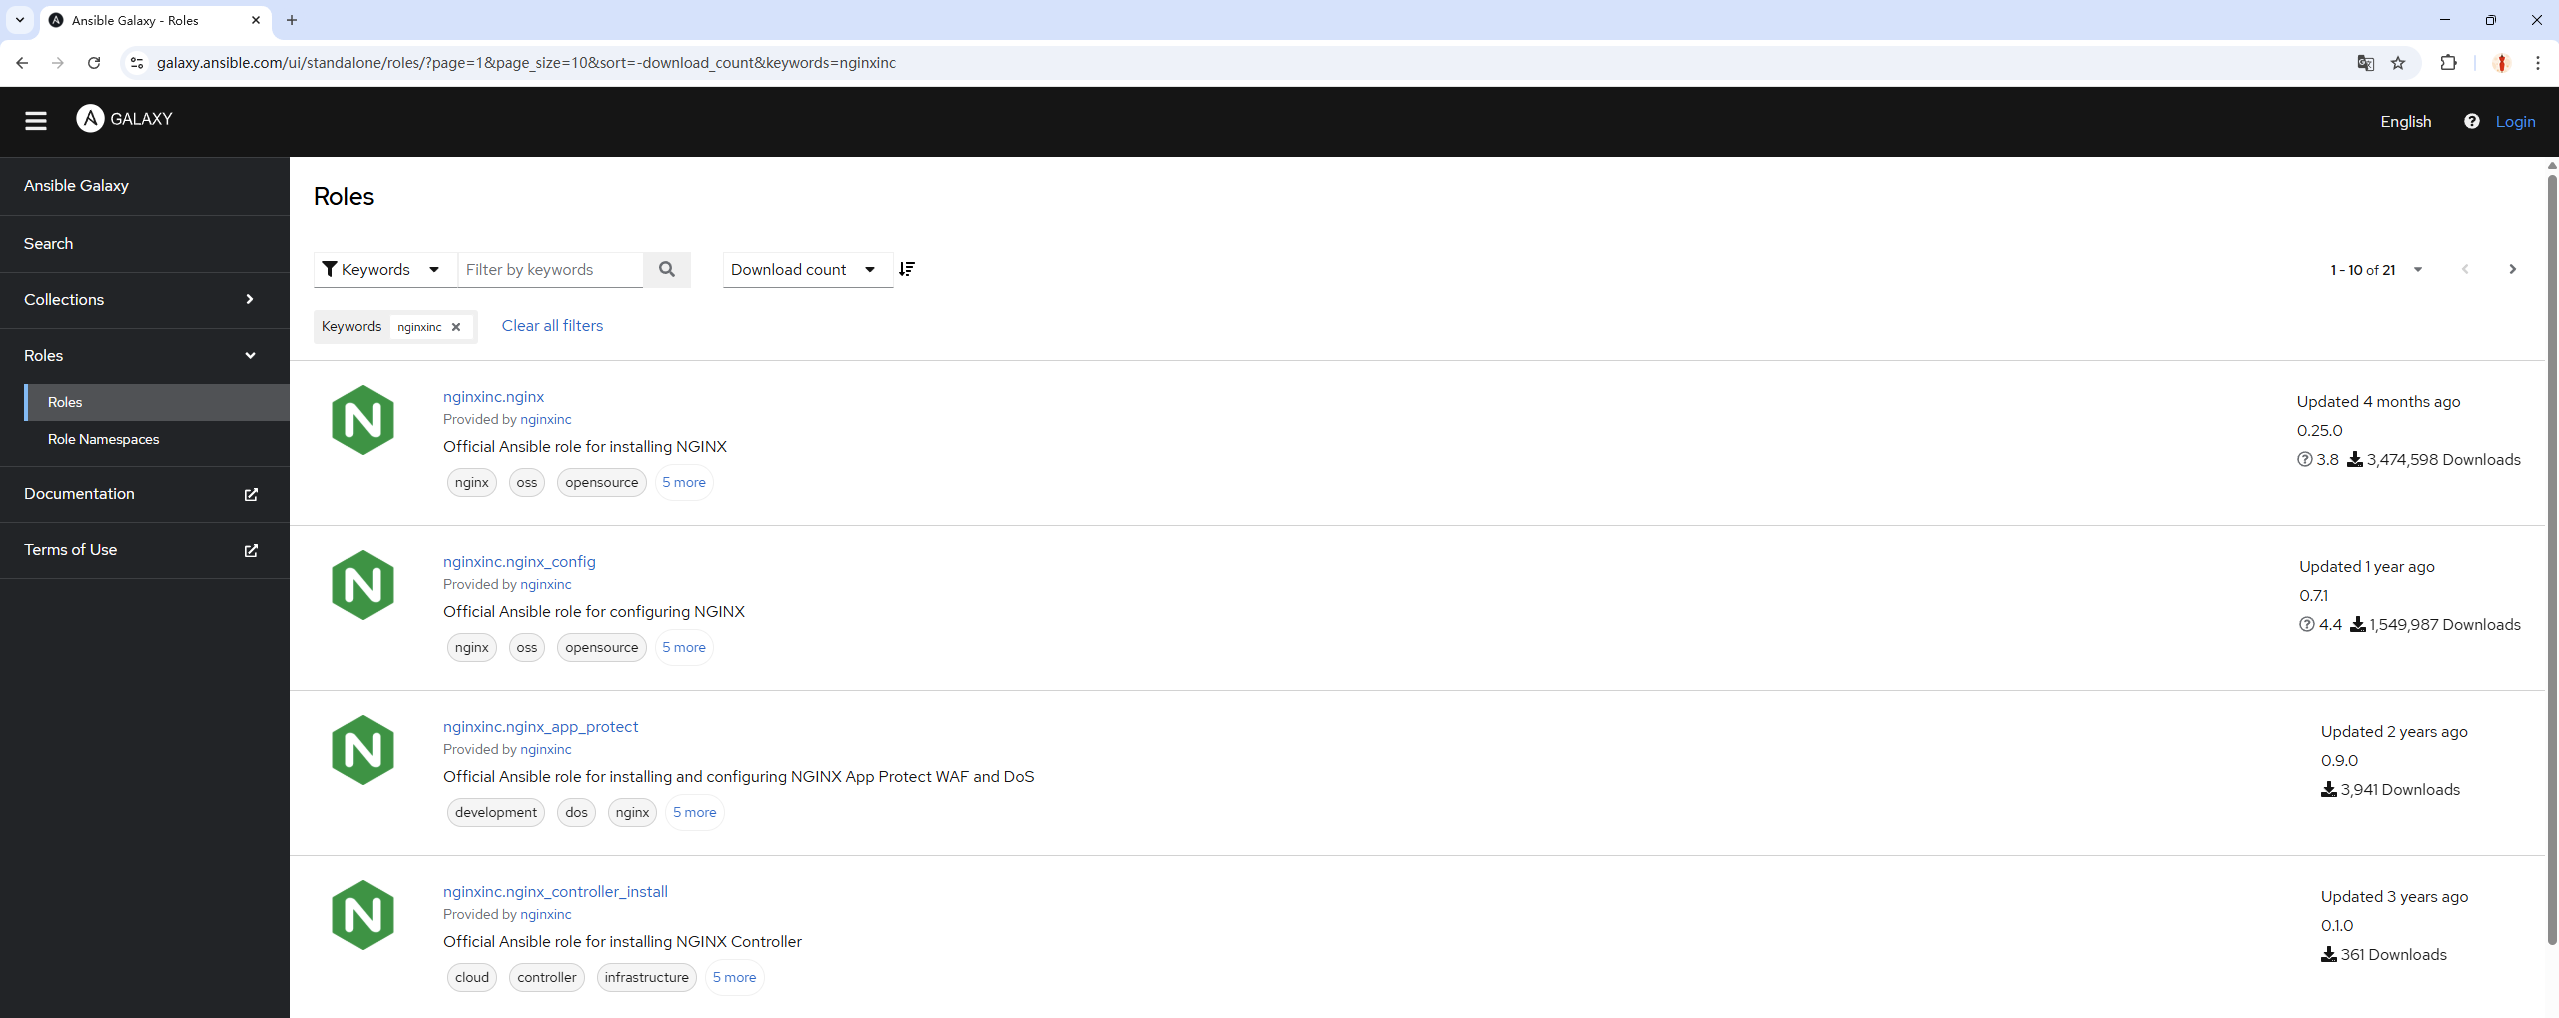
Figure 16-6: Nginx role information found in the search interface
Tips:
Ansible Galaxy homepage: https://galaxy.ansible.com
After clicking the nginxinc.nginx role to access its details page, you'll see information such as the software version, rating, and download count. The Installation field displays the corresponding installation method, as shown in Figure 16-7. Provided the virtual machine maintains a normal connection to the external network, you can install it by following the command prompts on this page.
To use this role, you can automatically retrieve it while the VM is connected to the internet using the command format: ansible-galaxy install role_name.

Figure 16-7 nginx role details page
root@linuxprobe:/etc/ansible# ansible-galaxy role install nginxinc.nginx
Starting galaxy role install process
- downloading role 'nginx', owned by nginxinc
- downloading role from https://github.com/nginxinc/ansible-role-nginx/archive/0.25.0.tar.gz
- extracting nginxinc.nginx to /etc/ansible/roles/nginxinc.nginx
- nginxinc.nginx (0.25.0) was installed successfully
After completion, check the system's existing roles again to find the nginx role information:
root@linuxprobe:/etc/ansible# ansible-galaxy list
# /etc/ansible/roles
- nginx-core, (unknown version)
# /usr/share/ansible/roles
- rhel-system-roles.network, (unknown version)
- rhel-system-roles.podman, (unknown version)
- rhel-system-roles.postfix, (unknown version)
- rhel-system-roles.postgresql, (unknown version)
- rhel-system-roles.rhc, (unknown version)
- rhel-system-roles.selinux, (unknown version)
- rhel-system-roles.snapshot, (unknown version)
- rhel-system-roles.ssh, (unknown version)
- rhel-system-roles.sshd, (unknown version)
- rhel-system-roles.storage, (unknown version)
- rhel-system-roles.sudo, (unknown version)
- rhel-system-roles.systemd, (unknown version)
- rhel-system-roles.timesync, (unknown version)
[... output omitted ...]
Two additional special cases exist:
Accessing the Ansible Galaxy website from within China may be unstable, resulting in inaccessibility or slow speeds;
Some authors upload their work to their own websites or platforms other than the official Ansible Galaxy site.
In these cases, you cannot directly install the role using ansible-galaxy install role_name. Instead, you must manually create a YAML file specifying the URL and role name, then load it using the -r parameter.
For example, Professor Liu Chuan uploaded a role package named nginx_core (a plugin for securing Nginx websites) to the companion website for this book. In this case, you would create a YAML configuration file as follows:
root@linuxprobe:/etc/ansible# vim nginx.yml
---
- src: https://www.linuxprobe.com/Software/ansible-role-nginx-0.25.0.tar.gz
  name: nginx-core
Then, load this file using the -r parameter with the ansible-galaxy command to view the new role information:
root@linuxprobe:/etc/ansible# ansible-galaxy role install -r nginx.yml
Starting galaxy role install process
- downloading role from https://www.linuxprobe.com/Software/ansible-role-nginx-0.25.0.tar.gz
- extracting nginx-core to /root/.ansible/roles/nginx-core
- nginx-core was installed successfully
root@linuxprobe:/etc/ansible# ansible-galaxy list
# /root/.ansible/roles
- nginx-core, (unknown version)
# /usr/share/ansible/roles
- rhel-system-roles.network, (unknown version)
- rhel-system-roles.podman, (unknown version)
- rhel-system-roles.postfix, (unknown version)
- rhel-system-roles.postgresql, (unknown version)
- rhel-system-roles.rhc, (unknown version)
- rhel-system-roles.selinux, (unknown version)
- rhel-system-roles.snapshot, (unknown version)
- rhel-system-roles.ssh, (unknown version)
- rhel-system-roles.sshd, (unknown version)
- rhel-system-roles.storage, (unknown version)
- rhel-system-roles.sudo, (unknown version)
- rhel-system-roles.systemd, (unknown version)
- rhel-system-roles.timesync, (unknown version)
[... output omitted ...]
16.5.3 Creating New Roles
Beyond utilizing pre-built system roles and those obtained from Ansible Galaxy, users can create customized roles tailored to production environments based on actual operational requirements. While such custom roles better align with practical needs, their development demands a higher level of difficulty, requiring solid Ansible knowledge and hands-on experience.
Next, we will create a new role named apache. This role will automatically install and configure the httpd web service, set firewall rules, and generate a unique index.html homepage file for each host. By invoking this role, users can enjoy a "one-stop" web deployment service, significantly simplifying operations and maintenance tasks.
In Ansible's main configuration file, line 224 defines the role storage path. If a newly created role is not placed within this specified directory, it cannot be discovered via the ansible-galaxy list command. Therefore, users must either manually specify the directory path for new roles or create roles after navigating into the /etc/ansible/roles directory.To avoid scattered role information and subsequent management difficulties, it is recommended to create roles within the default directory for unified management later.
root@linuxprobe:/etc/ansible# vim ansible.cfg
223 # (pathspec) Colon separated paths in which Ansible will search for Roles.
224 roles_path=/usr/share/ansible/roles:/etc/ansible/roles
Append the init parameter to the ansible-galaxy command to create a new role. Upon successful creation, a new directory will appear in the current directory:
root@linuxprobe:/etc/ansible# cd roles
root@linuxprobe:/etc/ansible/roles# ansible-galaxy init apache
- Role apache was created successfully
root@linuxprobe:/etc/ansible/roles# ls
apache
Here, apache serves both as the role name and the directory name for storing role information. Switch to this directory to examine its structure:
root@linuxprobe:/etc/ansible/roles# cd apache/
root@linuxprobe:/etc/ansible/roles/apache# ls
defaults  files  handlers  meta  README.md  tasks  templates  tests  vars
When creating a new role, the most critical step is to correctly understand the directory structure. Simply put, you must place the correct information in the correct directories to ensure the role functions as intended when invoked. The directory structure and meanings corresponding to role information are shown in Table 16-10.
Table 16-10 Directory Structure and Meaning for Role Information
| Directory Structure | Meaning |
|---|---|
| defaults | Contains default values for role variables (low priority) |
| files | Contains static files referenced when the role executes tasks |
| handlers | Contains the role's handler definitions |
| meta | Contains information such as the role's author, license, platform, and dependencies |
| tasks | Contains tasks executed by the role |
| templates | Contains Jinja2 templates used by role tasks |
| tests | Contains playback scripts for testing the role |
| vars | Contains default values for role variables (high priority) |
Next, we'll create a new role.
Step 1: Open the tasks/main.yml file used to define role tasks. This file does not require a list of host groups to execute on, as a separate playbook will be written later to invoke it. At this stage, clearly outline what the apache role should accomplish (tasks). After invoking the role, the YAML file will execute tasks sequentially from top to bottom.
Task 1: Install the httpd web service.
Task 2: Run the httpd web service and add it to the system startup.
Task 3: Configure the firewall to allow HTTP traffic.
Task 4: Generate distinct homepage files based on each host's variable values.
First, write the first task. Use the yum module to install the httpd web service program (note the format):
root@linuxprobe:/etc/ansible/roles/apache# vim tasks/main.yml
---
- name: one
  yum:
          name: httpd
          state: latest
Step 2: Use the service module to start the httpd web service and add it to the startup items, ensuring it remains available to users. Before using the module for the first time, review the help and examples with the ansible-doc command. Due to space constraints, only relevant content is shown here.
root@linuxprobe:/etc/ansible/roles/apache# ansible-doc service
> ANSIBLE.BUILTIN.SERVICE    (/usr/lib/python3.12/site-packages/ansible/modules/service.py)

        Controls services on remote hosts. Supported init systems include BSD init,
        OpenRC, SysV, Solaris SMF, systemd, upstart. This module acts as a proxy to
        the underlying service manager module. While all arguments will be passed
        to the underlying module, not all modules support the same arguments. This
        documentation only covers the minimum intersection of module arguments that
        all service manager modules support. This module is a proxy for multiple
        more specific service manager modules (such as [ansible.builtin.systemd]
        and [ansible.builtin.sysvinit]). This allows management of a heterogeneous
        environment of machines without creating a specific task for each service
        manager. The module to be executed is determined by the `use' option, which
        defaults to the service manager discovered by [ansible.builtin.setup].  If
        [ansible.builtin.setup] was not yet run, this module may run it. For
        Windows targets, use the [ansible.windows.win_service] module instead.
[... output omitted ...]
EXAMPLES:

- name: Start service httpd, if not started
  ansible.builtin.service:
    name: httpd
    state: started

- name: Stop service httpd, if started
  ansible.builtin.service:
    name: httpd
    state: stopped
Lucky us—the default EXAMPLES uses the httpd web service. From the output, we see that state: started starts the service, while enabled: yes adds it to startup. Let's continue writing:
root@linuxprobe:/etc/ansible/roles/apache# vim tasks/main.yml
---
- name: one
  yum:
          name: httpd
          state: latest
- name: two
  service:
          name: httpd
          state: started
          enabled: yes
Step 3: Configure firewall allow policies to enable normal access from other hosts. When configuring the firewall, the firewalld module is required. In RHEL 10 systems, the firewalld module belongs to the ansible.posix collection, which must be installed first:
root@linuxprobe:/etc/ansible/roles/apache# ansible-galaxy collection install ansible.posix
Starting galaxy collection install process
Process install dependency map
Starting collection install process
Downloading https://galaxy.ansible.com/api/v3/plugin/ansible/content/published/collections/artifacts/ansible-posix-2.0.0.tar.gz to /root/.ansible/tmp/ansible-local-3580_c2zd0z_/tmpfmch8wdd/ansible-posix-2.0.0-vf36mg2m
Installing 'ansible.posix:2.0.0' to '/root/.ansible/collections/ansible_collections/ansible/posix'
ansible.posix:2.0.0 was installed successfully
Then check the help example:
root@linuxprobe:/etc/ansible/roles/apache# ansible-doc firewalld
> ANSIBLE.POSIX.FIREWALLD    (/root/.ansible/collections/ansible_collections/ansible/posix/plugins/modu>

        This module allows for addition or deletion of services and ports (either
        TCP or UDP) in either running or permanent firewalld rules.
[... output omitted ...]
EXAMPLES:

- name: Permanently enable https service, also enable it immediately if possible
  ansible.posix.firewalld:
    service: https
    state: enabled
    permanent: true
    immediate: true
    offline: true

- name: Permit traffic in default zone for https service
  ansible.posix.firewalld:
    service: https
    permanent: true
    state: enabled
Based on the output, when configuring firewall policies in the firewalld module:
- Specify the protocol name using the
service: httpparameter - Enable the protocol using the
state: enabledparameter - Set permanent effect using the
permanent: yesparameter - Enable immediate effect using the
immediate: yesparameter Although there are more parameters, they are largely consistent with what was learned in Chapter 8, so there's no need for concern. Continue writing:
root@linuxprobe:/etc/ansible/roles/apache# vim tasks/main.yml
---
- name: one
  yum:
          name: httpd
          state: latest
- name: two
  service:
          name: httpd
          state: started
          enabled: yes
- name: three
  firewalld:
          service: http
          permanent: yes
          state: enabled
          immediate: yes
Step 4: Make each host display a different homepage file.When using Ansible's standard modules, we typically "look up examples and replicate them." To increase the challenge, let's introduce a new requirement: can we make the httpd web service display different content on each host? For example, showing the current server's hostname and IP address. This requires the template module and Jinja2 technology.
First, use the ansible-doc command to review the template module's usage. The EXAMPLES section is particularly helpful:
root@linuxprobe:/etc/ansible/roles/apache# ansible-doc template
> ANSIBLE.BUILTIN.TEMPLATE    (/usr/lib/python3.12/site-packages/ansible/modules/template.py)

        Templates are processed by the Jinja2 templating language
        <http://jinja.pocoo.org/docs/>. Documentation on the template formatting
        can be found in the Template Designer Documentation
        <http://jinja.pocoo.org/docs/templates/>. Additional variables listed below
        can be used in templates. `ansible_managed' (configurable via the
        `defaults' section of `ansible.cfg') contains a string which can be used to
        describe the template name, host, modification time of the template file
        and the owner uid. `template_host' contains the node name of the template's
        machine. `template_uid' is the numeric user id of the owner.
        `template_path' is the path of the template. `template_fullpath' is the
        absolute path of the template. `template_destpath' is the path of the
        template on the remote system (added in 2.8). `template_run_date' is the
        date that the template was rendered.
[... output omitted ...]
EXAMPLES:

- name: Template a file to /etc/file.conf
  ansible.builtin.template:
    src: /mytemplates/foo.j2
    dest: /etc/file.conf
    owner: bin
    group: wheel
    mode: '0644'
From the output of the template module, we can see that this module is used to copy file templates, enabling the replication of files from the Ansible server to managed hosts. The src parameter defines the local file path, while the dest parameter specifies the destination path on the managed host. The owner, group, and mode parameters can optionally configure file ownership and permissions.
Typically, we can perform direct file copying, resulting in a file on the managed host that is identical to the one on the Ansible server. However, if we want each client to generate different file information based on its own system configuration, we need to utilize Jinja2 technology. Jinja2 template files have the .j2 extension. Continuing the script:
root@linuxprobe:/etc/ansible/roles/apache# vim tasks/main.yml
---
- name: one
  yum:
          name: httpd
          state: latest
- name: two
  service:
          name: httpd
          state: started
          enabled: yes
- name: three
  firewalld:
          service: http
          permanent: yes
          state: enabled
          immediate: yes
- name: four
  template:
          src: index.html.j2
          dest: /var/www/html/index.html

Jinja2 is a widely used template engine in the Python language, inspired by Django's template engine.Jinja2 has evolved to offer more powerful syntax and functionality, enabling dynamic generation of different file content based on variables from the managed host. In simple terms, while standard file copying operations produce identical new and old files, Jinja2 does not write fixed content directly into files. Instead, it writes a series of variable names.
When using the template module for file replication, Ansible collects the corresponding values for these variables on the managed host and dynamically fills them into the template file. The final generated file is tailored to each host's specific configuration. This approach significantly enhances the flexibility and intelligence of automated operations, allowing a single template to adapt to diverse environments and requirements.
For instance, imagine making each website display "Welcome to [hostname] on [host address]"—replacing text with each host's unique name and IP address. This would be far more engaging. The challenge lies in locating where variable names and corresponding hostname/address values are stored. The setup module can be used for this inquiry.
root@linuxprobe:/etc/ansible/roles/apache# ansible-doc setup
> ANSIBLE.BUILTIN.SETUP    (/usr/lib/python3.12/site-packages/ansible/modules/setup.py)

        This module is automatically called by playbooks to gather useful variables
        about remote hosts that can be used in playbooks. It can also be executed
        directly by `/usr/bin/ansible' to check what variables are available to a
        host. Ansible provides many `facts' about the system, automatically. This
        module is also supported for Windows targets.
[... output omitted ...]
The setup module automatically collects variable information on managed hosts. Using the -a parameter with a filter command allows secondary filtering of collected data. The corresponding syntax is ansible all -m setup -a 'filter="keyword"', where the * symbol represents the wildcard discussed in Chapter 3 for keyword queries.For example, to search for hostnames across all hosts, use the wildcard to retrieve all variable values containing the keyword fqdn.
FQDN (Fully Qualified Domain Name) logically and precisely identifies a host's location. It serves as the complete representation of a hostname, offering greater rigor and accuracy than the hostname defined in the /etc/hostname file. The output confirms that the ansible_fqdn variable stores the hostname. Proceed to the next step:
root@linuxprobe:/etc/ansible/roles/apache# ansible all -m setup -a 'filter="*fqdn*"'
192.168.10.20 | SUCCESS => {
    "ansible_facts": {
        "ansible_fqdn": "linuxprobe.com",
        "discovered_interpreter_python": "/usr/bin/python3"
    },
    "changed": false
}
[... output omitted ...]
Variables specifying host addresses can be retrieved using the keyword ip. In the output below, the value within the ansible_all_ipv4_addresses variable is the information we seek. To output addresses in IPv6 format, use the ansible_all_ipv6_addresses variable.
root@linuxprobe:/etc/ansible/roles/apache# ansible all -m setup -a 'filter="*ip*"'
192.168.10.20 | SUCCESS => {
    "ansible_facts": {
        "ansible_all_ipv4_addresses": [
            "192.168.10.20"
        ],
        "ansible_all_ipv6_addresses": [
            "fe80::20c:29ff:fed3:80d8"
        ],
        "ansible_default_ipv4": {},
        "ansible_default_ipv6": {},
        "ansible_fips": false,
        "ansible_locally_reachable_ips": {
            "ipv4": [
                "127.0.0.0/8",
                "127.0.0.1",
                "192.168.10.20"
            ],
            "ipv6": [
                "::1",
                "fe80::20c:29ff:fed3:80d8"
            ]
        },
        "discovered_interpreter_python": "/usr/bin/python3"
    },
    "changed": false
}
[... output omitted ...]
After confirming the specific variable names corresponding to the hostname and IP address, create a new file in the templates directory of the role with the same name as the template module parameter above (index.html.j2). Jinja2 calls variable values by enclosing the variable name in double curly braces:
root@linuxprobe:/etc/ansible/roles/apache# vim templates/index.html.j2
Welcome to {{ ansible_fqdn }} on {{ ansible_all_ipv4_addresses }}
At this point, the task is essentially complete. The final step is to write a yaml file to invoke the apache role and execute it.
root@linuxprobe:/etc/ansible/roles/apache# cd ../../
root@linuxprobe:/etc/ansible# vim roles.yml
---
- name: Invoke Custom Role
  hosts: all
  roles:
          - apache
root@linuxprobe:~# ansible-playbook roles.yml
PLAY [Invoking Custom Role] **************************************************************************

TASK [Gathering Facts] **********************************************************************
ok: [192.168.10.20]
ok: [192.168.10.21]
ok: [192.168.10.22]
ok: [192.168.10.23]
ok: [192.168.10.24]

TASK [apache : one] *************************************************************************
changed: [192.168.10.20]
changed: [192.168.10.21]
changed: [192.168.10.22]
changed: [192.168.10.23]
changed: [192.168.10.24]

TASK [apache : two] *************************************************************************
changed: [192.168.10.20]
changed: [192.168.10.21]
changed: [192.168.10.22]
changed: [192.168.10.23]
changed: [192.168.10.24]

TASK [apache : three] ***********************************************************************
changed: [192.168.10.20]
changed: [192.168.10.21]
changed: [192.168.10.22]
changed: [192.168.10.23]
changed: [192.168.10.24]

TASK [apache : four] ***********************************************************************
changed: [192.168.10.20]
changed: [192.168.10.21]
changed: [192.168.10.22]
changed: [192.168.10.23]
changed: [192.168.10.24]

PLAY RECAP **********************************************************************************
192.168.10.20   : ok=5   changed=4  unreachable=0   failed=0   skipped=0   rescued=0   ignored=0
192.168.10.21   : ok=5   changed=4  unreachable=0   failed=0   skipped=0   rescued=0   ignored=0
192.168.10.22   : ok=5   changed=4  unreachable=0   failed=0   skipped=0   rescued=0   ignored=0
192.168.10.23   : ok=5   changed=4  unreachable=0   failed=0   skipped=0   rescued=0   ignored=0
192.168.10.24   : ok=4   changed=4  unreachable=0   failed=0   skipped=0   rescued=0   ignored=0
After execution, randomly enter the IP addresses of several hosts in your browser to access web pages containing the host FQDN and IP address, as shown in Figures 16-8 to 16-10.

Figure 16-8 Randomly accessing a host's website homepage

Figure 16-9 Randomly accessing a website homepage on a host

Figure 16-10 Randomly accessing a website homepage on a host
The experiment was quite successful!
16.6 Creating and Using Logical Volumes
Creating a script to batch-manage logical volume devices not only significantly improves disk device management efficiency but also avoids errors caused by manual creation.For example, suppose we want to create a logical volume named data on each managed host, sized at 150MB and belonging to the research volume group. If creation succeeds, we proceed to format it with the Ext4 filesystem; if creation fails, we output an error message to the user for troubleshooting.
In this scenario, Ansible scripts offer significant advantages over shell scripts for two primary reasons.
Ansible's modular design standardizes operations. As long as no errors occur during execution, it automatically assesses and acts based on the remote host's system version and configuration, eliminating concerns about commands failing due to system changes.
When executing playbook files, the Ansible service checks: if the file or device already exists, or if a specific action (play) has been executed, it will never repeat the operation. Using Shell scripts, however, could lead to repeated formatting of the device, resulting in data loss.
First, add a new disk device to each host in the prod group. Set the size to 20GB, the type to SCSI, and leave other options at their default values, as shown in Figures 16-11 to 16-13.
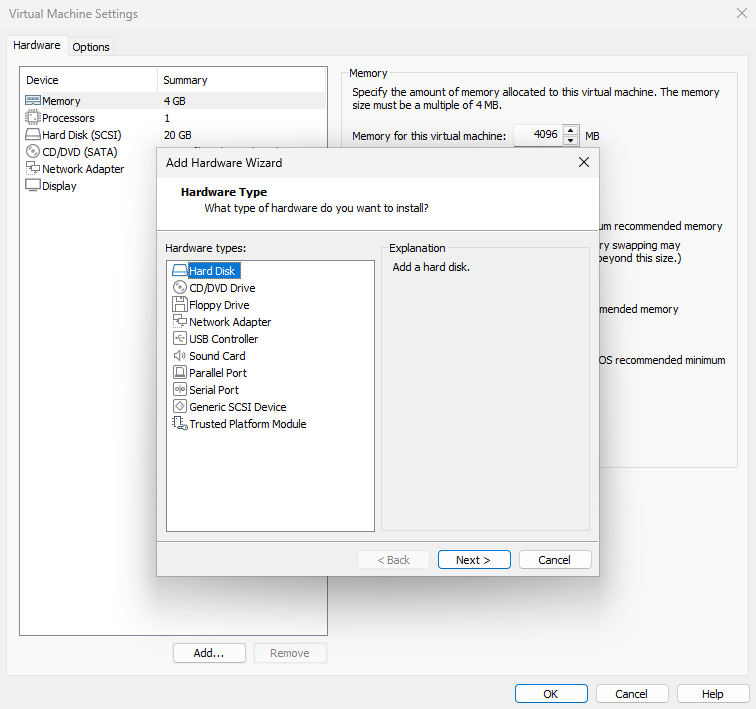
Figure 16-11 Adding a New Disk
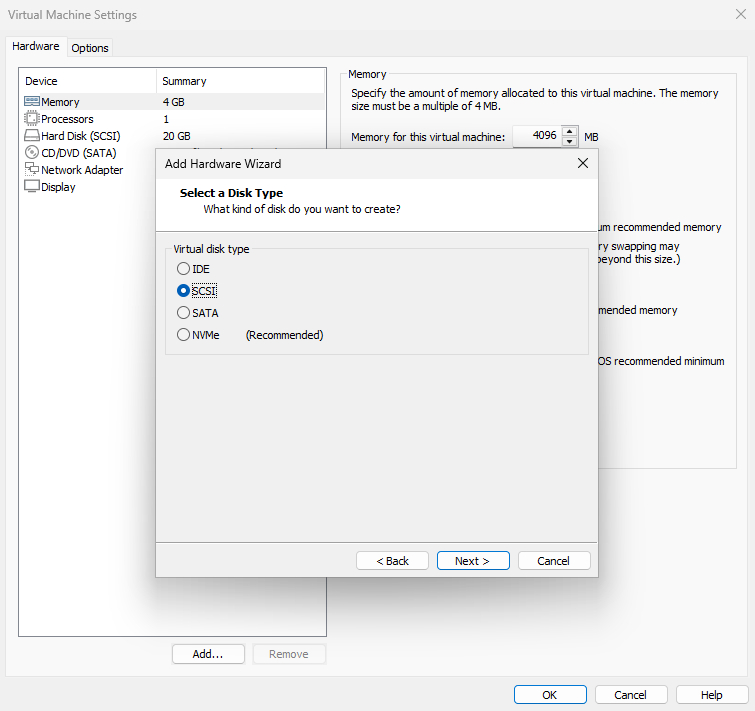
Figure 16-12 Selecting the disk type
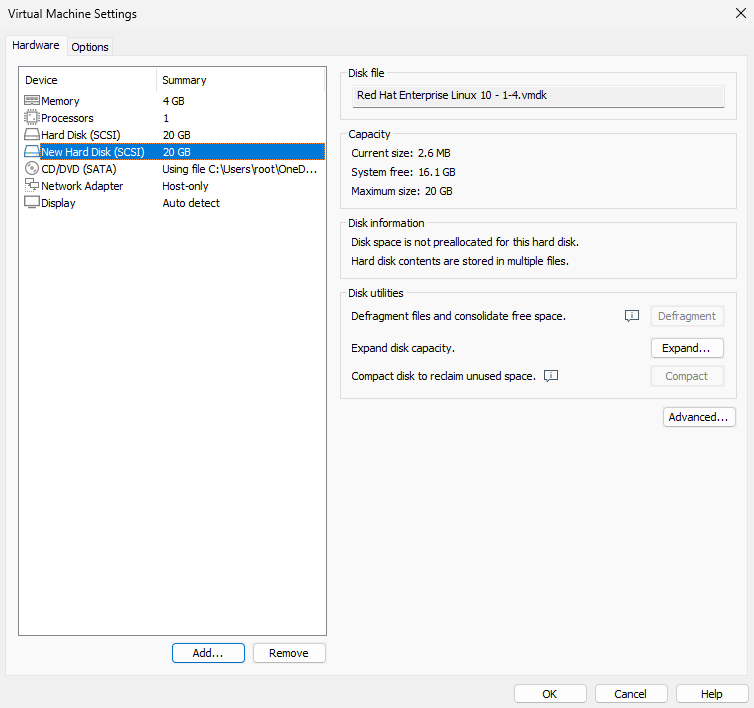
Figure 16-13 New disk added
Recalling the knowledge about logical volumes learned in Chapter 7, we should configure the playbook to sequentially create a physical volume (PV), volume group (VG), and logical volume (LV). First, use the lvg module to enable logical volume support on the device, then create a volume group named research. The help information for the lvg module is as follows:
root@linuxprobe:/etc/ansible# ansible-doc lvg
> COMMUNITY.GENERAL.LVG    (/root/.ansible/collections/ansible_collections/community/general/plugins/mo>

        This module creates, removes or resizes volume groups.
[... output omitted ...]
EXAMPLES:

- name: Create a volume group on top of /dev/sda1 with physical extent size = 32MB
  community.general.lvg:
    vg: vg.services
    pvs: /dev/sda1
    pesize: 32

- name: Create a volume group on top of /dev/sdb with physical extent size = 128KiB
  community.general.lvg:
    vg: vg.services
    pvs: /dev/sdb
    pesize: 128K
The output indicates that the lvg module for creating PVs and VGs has three required parameters.Specifically, the vg parameter defines the volume group name, pvs specifies the disk device name, and pesize determines the final volume group capacity (specified either by number of physical extents or capacity value). Thus, we first create a volume group named research with a size of 150MB, composed of the /dev/sdb device.
root@linuxprobe:/etc/ansible# vim lv.yml
---
- name: Creating and using logical volumes
  hosts: all
  tasks:
          - name: one
            lvg:
                    vg: research
                    pvs: /dev/sdb
                    pesize: 150M
Since the new disk device files were only added to the two hosts in the prod group earlier, the remaining three hosts will report creation failures when executing the above operation. This is expected behavior. Next, use the lvol module to create the logical volume device. As usual, first review the module's help information:
root@linuxprobe:/etc/ansible# ansible-doc lvol
> COMMUNITY.GENERAL.LVOL    (/root/.ansible/collections/ansible_collections/community/general/plugins/m>

        This module creates, removes or resizes logical volumes.
[... output omitted ...]
EXAMPLES:

- name: Create a logical volume of 512m
  community.general.lvol:
    vg: firefly
    lv: test
    size: 512

- name: Create a logical volume of 512m with disks /dev/sda and /dev/sdb
  community.general.lvol:
    vg: firefly
    lv: test
    size: 512
    pvs:
      - /dev/sda
      - /dev/sdb
The output confirms that lvol is the module for creating logical volume devices. The vg parameter specifies the volume group name, lv specifies the logical volume name, and size defines the final capacity of the logical volume device (no unit needed, defaults to MB). After filling in the parameters, create a 150MB logical volume device named data belonging to the research volume group:
root@linuxprobe:/etc/ansible# vim lv.yml
---
- name: Create and use logical volumes
  hosts: all
  tasks:
          - name: one
            lvg:
                    vg: research
                    pvs: /dev/sdb
                    pesize: 150M
          - name: two
            lvol:
                    vg: research
                    lv: data
                    size: 150M
This approach is still not optimal. If we could automatically format the created /dev/research/data logical volume device with the Ext4 filesystem, it would further reduce the workload for operations administrators. The filesystem module can be used to format the device's filesystem. Its help information is as follows:
root@linuxprobe:/etc/ansible# ansible-doc filesystem
> COMMUNITY.GENERAL.FILESYSTEM    (/root/.ansible/collections/ansible_collections/community/general/plu>

        This module creates a filesystem.
[... output omitted ...]
EXAMPLES:

- name: Create a ext2 filesystem on /dev/sdb1
  community.general.filesystem:
    fstype: ext2
    dev: /dev/sdb1
The filesystem module's parameters are remarkably concise. The fstype parameter specifies the filesystem format, while dev designates the device file path to format. Continuing the script:
root@linuxprobe:/etc/ansible# vim lv.yml
---
- name: Create and use logical volumes
  hosts: all
  tasks:
          - name: one
            lvg:
                    vg: research
                    pvs: /dev/sdb
                    pesize: 150M
          - name: two
            lvol:
                    vg: research
                    lv: data
                    size: 150M
          - name: three
            filesystem:
                    fstype: ext4
                    dev: /dev/research/data
Executing these tasks sequentially will automatically create the logical volume device. Wait, there's still an unresolved issue. Currently, only hosts in the prod group have added the new disk device file. Other hosts cannot complete the operation smoothly according to the defined modules. This is where we need to use conditional statements similar to the if statements learned in Chapter 4—if it fails..., then....
First, use the block operator to group the three module commands into a single unit (effectively evaluating the results of all three modules collectively). Then employ the rescue operator for error handling—the rescue modules will only be invoked if any module within the block fails. The msg parameter in the debug module outputs a warning message to the screen if any module in the block encounters an error.The completed script appears as follows:
root@linuxprobe:/etc/ansible# vim lv.yml
---
- name: Create and use logical volumes
  hosts: all
  tasks:
          - block:
                  - name: one
                    lvg:
                            vg: research
                            pvs: /dev/sdb
                            pesize: 150M
                  - name: two
                    lvol:
                            vg: research
                            lv: data
                            size: 150M
                  - name: three
                    filesystem:
                            fstype: ext4
                            dev: /dev/research/data
            rescue:
                    - debug:
                            msg: "Could not create logical volume of that size"
YAML imposes strict formatting requirements. Since rescue is rescue functionality for modules within a block, the rescue and block operators must be precisely aligned. Even a single misplaced space will cause the playbook to fail. After verifying accuracy, execute the lv.yml playbook to review the results:
root@linuxprobe:/etc/ansible# ansible-playbook lv.yml

PLAY [Creating and using logical volumes] *********************************************************

TASK [Gathering Facts] *********************************************************
ok: [192.168.10.20]
ok: [192.168.10.21]
ok: [192.168.10.22]
ok: [192.168.10.23]
ok: [192.168.10.24]

TASK [one] *********************************************************************
fatal: [192.168.10.20]: FAILED! => {"changed": false, "msg": "Device /dev/sdb not found."}
fatal: [192.168.10.21]: FAILED! => {"changed": false, "msg": "Device /dev/sdb not found."}
changed: [192.168.10.22]
changed: [192.168.10.23]
fatal: [192.168.10.24]: FAILED! => {"changed": false, "msg": "Device /dev/sdb not found."}

TASK [two] *********************************************************************
changed: [192.168.10.22]
changed: [192.168.10.23]

TASK [three] *********************************************************************
changed: [192.168.10.22]
changed: [192.168.10.23]

TASK [debug] *******************************************************************
ok: [192.168.10.20] => {
    "msg": "Could not create logical volume of that size"
}
ok: [192.168.10.21] => {
    "msg": "Could not create logical volume of that size"
}
ok: [192.168.10.24] => {
    "msg": "Could not create logical volume of that size"
}

PLAY RECAP *********************************************************************
192.168.10.20  : ok=2  changed=0  unreachable=0  failed=0  skipped=0  rescued=1  ignored=0
192.168.10.21  : ok=2  changed=0  unreachable=0  failed=0  skipped=0  rescued=1  ignored=0
192.168.10.22  : ok=4  changed=3  unreachable=0  failed=0  skipped=0  rescued=0  ignored=0
192.168.10.23  : ok=4  changed=3  unreachable=0  failed=0  skipped=0  rescued=0  ignored=0
192.168.10.24  : ok=2  changed=0  unreachable=0  failed=0  skipped=0  rescued=1  ignored=0
The PLAY RECAP log after script execution clearly shows that only the two hosts in the prod group—192.168.10.22 and 192.168.10.23—executed successfully. The remaining three hosts triggered the rescue function. Log in to any host in the prod group and locate the newly created logical volume device information:
root@linuxprobe:/etc/ansible# lvdisplay
  --- Logical volume ---
  LV Path                /dev/research/data
  LV Name                data
  VG Name                research
  LV UUID                jI3PoD-az0v-oTRZ-w8Ve-FI08-LvDk-2oISvZ
  LV Write Access        read/write
  LV Creation host, time linuxprobe.com, 2025-04-03 20:28:41 +0800
  LV Status              available
  # open                 0
  LV Size                150.00 MiB
  Current LE             1
  Segments               1
  Allocation             inherit
  Read ahead sectors     auto
  - currently set to     8192
  Block device           253:2
[... output omitted ...]
16.7 Determining Host Group Names
In the script experiment above, we can generate unique website homepage files for different hosts based on their distinct variable information. However, we cannot perform targeted operations on a specific host group.In fact, each client contains a variable named inventory_hostname, which defines the host group name for each machine in the Ansible service. This corresponds to the grouping information in the /etc/ansible/hosts file, such as dev, test, prod, or balancers.
inventory_hostname is a magic variable within the Ansible service. This means it cannot be directly queried using the setup module. Commands like ansible all -m setup -a 'filter="keyword"' will fail when attempting to access it. Magic variables are collected during the Gathering Facts phase when executing playbook files. They cannot be viewed through direct queries and can only be referenced within playbook files.
After obtaining the variable name storing the host group name, we proceed to the practical implementation. The requirements are as follows:
If the host belongs to the dev group, modify the content of /etc/issue to Development;
If the host belongs to the test group, modify the content of /etc/issue to Test;
If the host belongs to the prod group, modify the content of /etc/issue to Production.
Referring to Table 16-5, which lists common Ansible module names and their functions, we see that the copy module primarily creates, modifies, and copies files—making it the most suitable for our current task. Let's first check the help documentation for the copy module:
root@linuxprobe:/etc/ansible# ansible-doc copy
> ANSIBLE.BUILTIN.COPY    (/usr/lib/python3.12/site-packages/ansible/modules/copy.py)

        The [ansible.builtin.copy] module copies a file or a directory structure
        from the local or remote machine to a location on the remote machine. File
        system meta-information (permissions, ownership, etc.) may be set, even
        when the file or directory already exists on the target system. Some meta-
        information may be copied on request. Get meta-information with the
        [ansible.builtin.stat] module. Set meta-information with the
        [ansible.builtin.file] module. Use the [ansible.builtin.fetch] module to
        copy files from remote locations to the local box. If you need variable
        interpolation in copied files, use the [ansible.builtin.template] module.
        Using a variable with the `content' parameter produces unpredictable
        results. For Windows targets, use the [ansible.windows.win_copy] module
        instead.
[... output omitted ...]
EXAMPLES:
- name: Copy file with owner and permissions
  ansible.builtin.copy:
    src: /srv/myfiles/foo.conf
    dest: /etc/foo.conf
    owner: foo
    group: foo
    mode: '0644'

- name: Copy file with owner and permission, using symbolic representation
  ansible.builtin.copy:
    src: /srv/myfiles/foo.conf
    dest: /etc/foo.conf
    owner: foo
    group: foo
    mode: u=rw,g=r,o=r
The output lists two examples for managing file content. The first is for file copying, while the second defines content via the content parameter and specifies the new file name with the dest parameter. Clearly, the second approach better suits the current experimental scenario. The playbook file is written as follows:
root@linuxprobe:/etc/ansible# vim issue.yml
---
- name: Modify file content
  hosts: all
  tasks:
          - name: one
            copy:
                    content: 'Development'
                    dest: /etc/issue
          - name: two
            copy:
                    content: 'Test'
                    dest: /etc/issue
          - name: three
            copy:
                    content: 'Production'
                    dest: /etc/issue
However, executing in this order would modify the /etc/issue file on each host three times, ultimately freezing the content at 'Production'. This approach clearly lacks something.We should evaluate based on the values in the inventory_hostname variable. If the host belongs to the dev group, execute the first action; if it belongs to the test group, execute the second action; if it belongs to the prod group, execute the third action. Therefore, we need to perform three checks.
The when clause is the conditional syntax. We place it below each action to ensure execution only occurs when conditions are met:
root@linuxprobe:/etc/ansible# vim issue.yml
---
- name: Modify file content
  hosts: all
  tasks:
          - name: one
            copy:
                    content: 'Development'
                    dest: /etc/issue
            when: "inventory_hostname in groups.dev"
          - name: two
            copy:
                    content: 'Test'
                    dest: /etc/issue
            when: "inventory_hostname in groups.test"
          - name: three
            copy:
                    content: 'Production'
                    dest: /etc/issue
            when: "inventory_hostname in groups.prod"
Execute the playbook file. During the process, you can clearly observe that hosts not in the specified host groups are skipped due to the when syntax:
root@linuxprobe:/etc/ansible# ansible-playbook issue.yml

PLAY [Modifying file content] ************************************************************************

TASK [Gathering Facts] ********************************************************************
ok: [192.168.10.20]
ok: [192.168.10.21]
ok: [192.168.10.22]
ok: [192.168.10.23]
ok: [192.168.10.24]

TASK [one] ********************************************************************************
changed: [192.168.10.20]
skipping: [192.168.10.21]
skipping: [192.168.10.22]
skipping: [192.168.10.23]
skipping: [192.168.10.24]

TASK [two] ********************************************************************************
skipping: [192.168.10.20]
changed: [192.168.10.21]
skipping: [192.168.10.23]
skipping: [192.168.10.24]
skipping: [192.168.10.25]

TASK [three] ******************************************************************************
skipping: [192.168.10.20]
skipping: [192.168.10.21]
changed: [192.168.10.22]
changed: [192.168.10.23]
skipping: [192.168.10.24]

PLAY RECAP ********************************************************************************
192.168.10.20   : ok=2  changed=1  unreachable=0  failed=0  skipped=2  rescued=0  ignored=0
192.168.10.21   : ok=2  changed=1  unreachable=0  failed=0  skipped=2  rescued=0  ignored=0
192.168.10.22   : ok=2  changed=1  unreachable=0  failed=0  skipped=2  rescued=0  ignored=0
192.168.10.23   : ok=2  changed=1  unreachable=0  failed=0  skipped=2  rescued=0  ignored=0
192.168.10.24   : ok=1  changed=0  unreachable=0  failed=0  skipped=3  rescued=0  ignored=0
Log in to the dev group host 192.168.10.20 and view the file content:
root@linuxprobe:~# cat /etc/issue
Development
Log in to the test group host 192.168.10.21 and view the file content:
root@linuxprobe:~# cat /etc/issue
Test
Log in to the 192.168.10.22/23 host in the prod group and view the file contents:
root@linuxprobe:~# cat /etc/issue
Production
16.8 Managing File Attributes
The purpose of learning scripting is to meet daily operational needs. By writing repetitive tasks into scripts and executing them in batches, we enhance operational efficiency. Skills like creating files, managing permissions, and setting shortcuts are almost daily necessities. Especially when learning about general permissions, special permissions, and hidden permissions in Chapter 5, errors often occur due to command formatting issues. How can we remember so many commands?
Ansible consolidates common file management functions into the file module, eliminating the need to search across multiple modules. First, review the module's help documentation:
root@linuxprobe:/etc/ansible# ansible-doc file
> ANSIBLE.BUILTIN.FILE    (/usr/lib/python3.12/site-packages/ansible/modules/file.py)

        Set attributes of files, directories, or symlinks and their targets.
        Alternatively, remove files, symlinks or directories. Many other modules
        support the same options as the [ansible.builtin.file] module - including
        [ansible.builtin.copy], [ansible.builtin.template], and
        [ansible.builtin.assemble]. For Windows targets, use the
        [ansible.windows.win_file] module instead.
[... output omitted ...]
EXAMPLES:

- name: Change file ownership, group and permissions
  ansible.builtin.file:
    path: /etc/foo.conf
    owner: foo
    group: foo
    mode: '0644'

- name: Give insecure permissions to an existing file
  ansible.builtin.file:
    path: /work
    owner: root
    group: root
    mode: '1777'

- name: Create a symbolic link
  ansible.builtin.file:
    src: /file/to/link/to
    dest: /path/to/symlink
    owner: foo
    group: foo
    state: link
Through the output examples above, you should now understand the basic parameters of the file module. The path parameter defines the file path, owner defines the file owner, group defines the file's group ownership, mode defines the file permissions, src defines the source file path, dest defines the destination file path, and state defines the file type.
As seen, the file module essentially incorporates all file permission management functions covered in Chapter 5. Now let's tackle the following experiment:
Create a new directory named /linuxprobe with root as both owner and group;
Grant the owner and group full control over the file, while others have only read and execute permissions;
Enable the SGID (Set Group ID) special permission;
Implement this only on hosts belonging to the dev host group.
The second requirement is an arithmetic problem: convert the permission descriptions into numerical notation—read as 4, write as 2, execute as 1. Calculate the answer silently first. Previously, when writing script files, the hosts parameter always corresponded to all hosts. This time, it must be modified to apply only to members of the dev host group. Proceed with caution. Write the module code as follows:
root@linuxprobe:/etc/ansible# vim chmod.yml
---
- name: Manage file attributes
  hosts: dev
  tasks:
          - name: one
            file:
                    path: /linuxprobe
                    state: directory
                    owner: root
                    group: root
                    mode: '2775'
Oops, I made the task too easy. This didn't fully showcase the power of the file module. Let's add a requirement: create a shortcut file named /linuxcool pointing to the newly created /linuxprobe directory. This way, users will see identical content when accessing either directory. When setting up shortcuts with the file module, you don't need to create the target file separately—Ansible handles it for you.
root@linuxprobe:/etc/ansible# vim chmod.yml
---
- name: Manage file attributes
  hosts: dev
  tasks:
          - name: one
            file:
                    path: /linuxprobe
                    state: directory
                    owner: root
                    group: root
                    mode: '2775'
          - name: two
            file:
                    src: /linuxprobe
                    dest: /linuxcool
                    state: link
The playbook execution process is as follows:
root@linuxprobe:/etc/ansible# ansible-playbook chmod.yml

PLAY [Manage file attributes] ***************************************************************

TASK [Gathering Facts] ***********************************************************
ok: [192.168.10.20]
ok: [192.168.10.21]
ok: [192.168.10.22]
ok: [192.168.10.23]
ok: [192.168.10.24]

TASK [one] ***********************************************************************
changed: [192.168.10.20]
skipping: [192.168.10.21]
skipping: [192.168.10.22]
skipping: [192.168.10.23]
skipping: [192.168.10.24]

TASK [two] ***********************************************************************
changed: [192.168.10.20]
skipping: [192.168.10.21]
skipping: [192.168.10.22]
skipping: [192.168.10.23]
skipping: [192.168.10.24]

PLAY RECAP ***********************************************************************
192.168.10.20   : ok=3  changed=2  unreachable=0  failed=0  skipped=0  rescued=0  ignored=0
192.168.10.22   : ok=1  changed=0  unreachable=0  failed=0  skipped=3  rescued=0  ignored=0
192.168.10.22   : ok=1  changed=0  unreachable=0  failed=0  skipped=3  rescued=0  ignored=0
192.168.10.22   : ok=1  changed=0  unreachable=0  failed=0  skipped=3  rescued=0  ignored=0
192.168.10.22   : ok=1  changed=0  unreachable=0  failed=0  skipped=3  rescued=0  ignored=0
On the host in the dev group, both the /linuxprobe directory and the /linuxcool shortcut have been successfully created:
root@linuxprobe:~# ls -ld /linuxprobe
drwxrwsr-x. 2 root root 6 Apr  3 20:35 /linuxprobe
root@linuxprobe:~# ls -ld /linuxcool
lrwxrwxrwx. 1 root root 11 Apr  3 20:35 /linuxcool -> /linuxprobe
16.9 Managing Password Vault Files
Since the release of Ansible 1.5, vault has emerged as a new feature for operations personnel. It not only encrypts sensitive information like passwords and playbooks but also encrypts variable names and values, ensuring data remains inaccessible to unauthorized readers.The ansible-vault command enables operations such as creating (create), encrypting (encrypt), decrypting (decrypt), rekeying passwords (rekey), and viewing (view) content.
Let's explore vault's usage through an example.
Step 1: Create a configuration file named locker.yml containing two variable values.
root@linuxprobe:/etc/ansible# vim locker.yml
---
pw_developer: Imadev
pw_manager: Imamgr
Step 2: Encrypt the file using the ansible-vault command. Since entering the password each time is cumbersome, create a separate text file to store the password value for automatic retrieval by ansible-vault. To ensure data security, set the file permissions to 600 after creation, restricting access to administrators only.
root@linuxprobe:/etc/ansible# vim /root/secret.txt
whenyouwishuponastar
root@linuxprobe:/etc/ansible# chmod 600 /root/secret.txt
In the main Ansible service configuration file, specify the path to the text file containing the password value after the vault_password_file parameter on line 278, preparing for its use:
root@linuxprobe:/etc/ansible# vim /etc/ansible/ansible.cfg
137
138 # If set, configures the path to the Vault password file as an alternative to
139 # specifying --vault-password-file on the command line.
140 vault_password_file = /root/secret.txt
141
Step 3: After setting the password file path, the Ansible service will automatically load it. Users no longer need to repeatedly enter the password each time they encrypt or decrypt. For example, to encrypt the newly created locker.yml file, simply use the encrypt parameter.
root@linuxprobe:/etc/ansible# ansible-vault encrypt locker.yml
Encryption successful
The file will be encrypted using AES-256, meaning the key has 2^256 possible combinations. Viewing the encrypted content reveals:
root@linuxprobe:/etc/ansible# cat locker.yml
$ANSIBLE_VAULT;1.1;AES256
38666539353062343930633135306633613736386366633665353464343964613838356135616137
3538616139303438316636613564313266353833336337640a313963316664303431383132386362
30326430643234653336363130393238633266386636333666633932613937326135373766656539
3637386562646539610a333761333039323565353761353636623762623435616163333031376333
36316334386562326337363730353463323462316131383064333234626561366338356261383333
3235626134393832323436386232646562396133666435386361
What if you no longer wish to use the original password? You can manually change the password using the rekey parameter. This should be combined with the --ask-vault-pass parameter for modification. Otherwise, the Ansible service will reject the new password change request because it cannot receive the old password entered by the user:
root@linuxprobe:/etc/ansible# ansible-vault rekey --ask-vault-pass locker.yml
Vault password: Enter the old password
New Vault password: Enter the new password
Confirm New Vault password: Re-enter the new password
Rekey successful
Step 4: How do you view and modify the contents of an encrypted file? For files already encrypted, use the edit parameter with the ansible-vault command to make changes. After editing, use the view parameter to see the updated content.By default, the ansible-vault command uses the Vim editor for editing encrypted files. After making changes, remember to execute wq to save and exit.
root@linuxprobe:/etc/ansible# ansible-vault edit locker.yml
---
pw_developer: Imadev
pw_manager: Imamgr
pw_production: Imaprod
Finally, use the view parameter to display the latest content:
root@linuxprobe:/etc/ansible# ansible-vault view locker.yml
Vault password: Enter password and press Enter to confirm
---
pw_developer: Imadev
pw_manager: Imamgr
pw_production: Imaprod
Review Questions
- The software repositories are already set up, but the dnf command fails to install the Ansible service. What could be the reason?
Answer: The default BaseOS and AppStream repositories in RHEL 10 do not include the Ansible service package. You need to configure the EPEL repository for installation.
- When both /etc/ansible/ansible.cfg and ~/.ansible.cfg exist as primary configuration files, which takes precedence?
Answer: The main configuration file in the home directory has higher priority.
- Which Ansible module can be used to start a service, and which module can be used to mount a disk device file?
Answer: Use the service module to start services and the mount module to mount disk device files.
- What command can we use to look up help information about a module's functionality?
Answer: Use the ansible-doc command.
- How many ways are there to obtain Ansible roles?
Answer: There are three methods: loading system-built-in roles, obtaining roles from external sources, and creating roles yourself.
- When executing a playbook, I see "changed" displayed in yellow. What does this mean?
Answer: It indicates the playbook executed successfully and made changes.
- What is the difference between Jinja2 and the copy module?
A: The copy module performs a 1:1 copy, where the source and destination files are identical. Jinja2, however, replaces variable names in the source file with the actual variable values on the managed host.
- How can I ensure script content applies to all controlled hosts in the host list?
Answer: Use the hosts: all parameter in the script file to ensure all hosts in the host list file execute the corresponding operations.
- If you only remember part of a variable's name and want to search for related information using keywords, what command should you execute?
Answer: Execute the command ansible all -m setup-a 'filter="keyword"'.
- When encrypting with the
ansible-vaultcommand, what is the default encryption method?
Answer: AES-256.