Chapter 10 · Deploying Static Websites with Apache
Chapter Overview
In this chapter I first explain what a web service is and what it’s used for, then compare today’s mainstream web servers so you understand their strengths and characteristics. Next, I walk through Apache httpd’s “global directives,” “per‑site (section) directives,” and “comments,” and show you how to configure them correctly in real deployments so you truly master the way services are configured on Linux.
I also cover what SELinux does, its three operating modes, and how to manage its policies, so that you can configure SELinux domains and file security contexts with confidence. After that, I guide you through several practical labs that use Apache httpd: the basic deployment, per‑user home pages, password authentication, and virtual hosts built by IP address, by hostname (domain), and by port.
10.1 Web server software
In 1970, ARPANET—the forerunner of the modern internet—had already taken shape and began opening to non‑military institutions. Although it connected only four hosts back then (smaller than many of today’s LANs), it laid a solid foundation for the progress of networking technology.
Most of us first touched the internet by visiting a website. A “web service” lets users access resources through a browser. As shown in Figure 10‑1, a web server is a passive service: it only responds after receiving requests from other hosts. The server returns the requested content using HTTP (Hypertext Transfer Protocol) or HTTPS (HTTP Secure).
On today’s Linux servers, the most common web service programs are IIS, Nginx, and Apache. IIS (Internet Information Services) is Windows’ default web server. It’s a graphical management tool that can provide not only web sites but also FTP, NNTP, SMTP, and more. IIS, however, runs only on Windows, so it’s out of scope for this book.
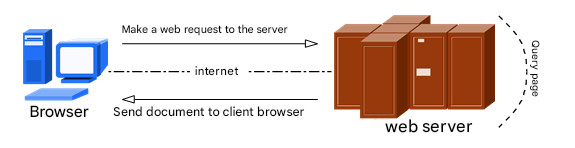
Figure 10-1 Communication between a host and a web server
On October 4, 2004, Nginx debuted for a major Russian portal. As a lightweight web server, it quickly gained market share due to its stability and rich features. Its low resource usage and high concurrency are particularly admired, which is why many Chinese portals—Sina, NetEase, Tencent—favor it. I’ll cover Nginx in Chapter 20.
Apache is one of the most widely deployed web servers. It’s cross‑platform and secure, and exposes a fast, reliable, simple API for extensions. Figure 10‑2 shows the famous Apache Software Foundation logo. The name derives from a Native American word that suggests “superior tactics and great patience.” Apache runs on Linux, UNIX, and even Windows. It supports virtual hosts by IP, hostname, and port; multiple authentication methods; proxy modules; SSL/TLS; real‑time status; customizable logs; and a very rich module ecosystem.
Beyond its market share, Apache is the default web server on RHEL 10 and a required topic for the RHCSA and RHCE exams. From both a practical and certification perspective, it’s worth learning to deploy Apache and its features in depth.

Figure 10-2 Apache Software Foundation logo
Overall, Nginx—as a later challenger—has earned a huge number of fans on its merits. Our book’s companion site, https://www.linuxprobe.com, is deployed with Nginx. It’s excellent!
Let’s quickly review how to set up local repositories.
Step 1: Mount the installation ISO at /media/cdrom.
root@linuxprobe:~# mkdir -p /media/cdrom
root@linuxprobe:~# mount /dev/cdrom /media/cdrom
mount: /media/cdrom: WARNING: source write-protected, mounted read-only.
Step 2: Create the repository file (see §4.1.4 for option meanings).
root@linuxprobe:~# vim /etc/yum.repos.d/rhel10.repo
[BaseOS]
name=BaseOS
baseurl=file:///media/cdrom/BaseOS
enabled=1
gpgcheck=0
[AppStream]
name=AppStream
baseurl=file:///media/cdrom/AppStream
enabled=1
gpgcheck=0
Step 3: Install Apache. The package name is httpd. Use -y to skip prompts.
root@linuxprobe:~# dnf install httpd -y
Updating Subscription Management repositories.
Last metadata expiration check: 0:00:05 ago on Sun 23 Mar 2025 01:24:37 AM CST.
Dependencies resolved.
================================================================================
 Package                 Arch        Version               Repository      Size
================================================================================
Installing:
 httpd                   x86_64      2.4.62-4.el10         AppStream       54 k
Installing dependencies:
 apr                     x86_64      1.7.3-10.el10         AppStream      132 k
 apr-util                x86_64      1.6.3-20.el10         AppStream      101 k
 apr-util-lmdb           x86_64      1.6.3-20.el10         AppStream       17 k
 httpd-core              x86_64      2.4.62-4.el10         AppStream      1.5 M
 httpd-filesystem        noarch      2.4.62-4.el10         AppStream       17 k
 httpd-tools             x86_64      2.4.62-4.el10         AppStream       88 k
 redhat-logos-httpd      noarch      100.0-2.el10          AppStream       18 k
Installing weak dependencies:
 apr-util-openssl        x86_64      1.6.3-20.el10         AppStream       18 k
 mod_http2               x86_64      2.0.29-1.el10         AppStream      169 k
 mod_lua                 x86_64      2.4.62-4.el10         AppStream       61 k
Installed:
  apr-1.7.3-10.el10.x86_64                apr-util-1.6.3-20.el10.x86_64
  apr-util-lmdb-1.6.3-20.el10.x86_64      apr-util-openssl-1.6.3-20.el10.x86_64
  httpd-2.4.62-4.el10.x86_64              httpd-core-2.4.62-4.el10.x86_64
  httpd-filesystem-2.4.62-4.el10.noarch   httpd-tools-2.4.62-4.el10.x86_64
  mod_http2-2.0.29-1.el10.x86_64          mod_lua-2.4.62-4.el10.x86_64
  redhat-logos-httpd-100.0-2.el10.noarch

Complete!
Step 4: Start httpd and enable it at boot so it continues to serve content.
root@linuxprobe:~# systemctl start httpd
root@linuxprobe:~# systemctl enable httpd
Created symlink '/etc/systemd/system/multi-user.target.wants/httpd.service' → '/usr/lib/systemd/system/httpd.service'.
Step 5: Open HTTP in the firewall.
root@linuxprobe:~# firewall-cmd --permanent --add-service=http
success
root@linuxprobe:~# firewall-cmd --reload
success
From the host machine’s browser (e.g., Google Chrome), visit http://192.168.10.10 and you’ll see Apache’s default page (Figure 10‑3).
If it fails, check that the VM’s IP is 192.168.10.10, its adapter is in host‑only mode, and your host’s VMnet1 is in the same subnet (e.g., 192.168.10.1/255.255.255.0). If you’ve forgotten how, review Figures 8‑16 and 8‑17.
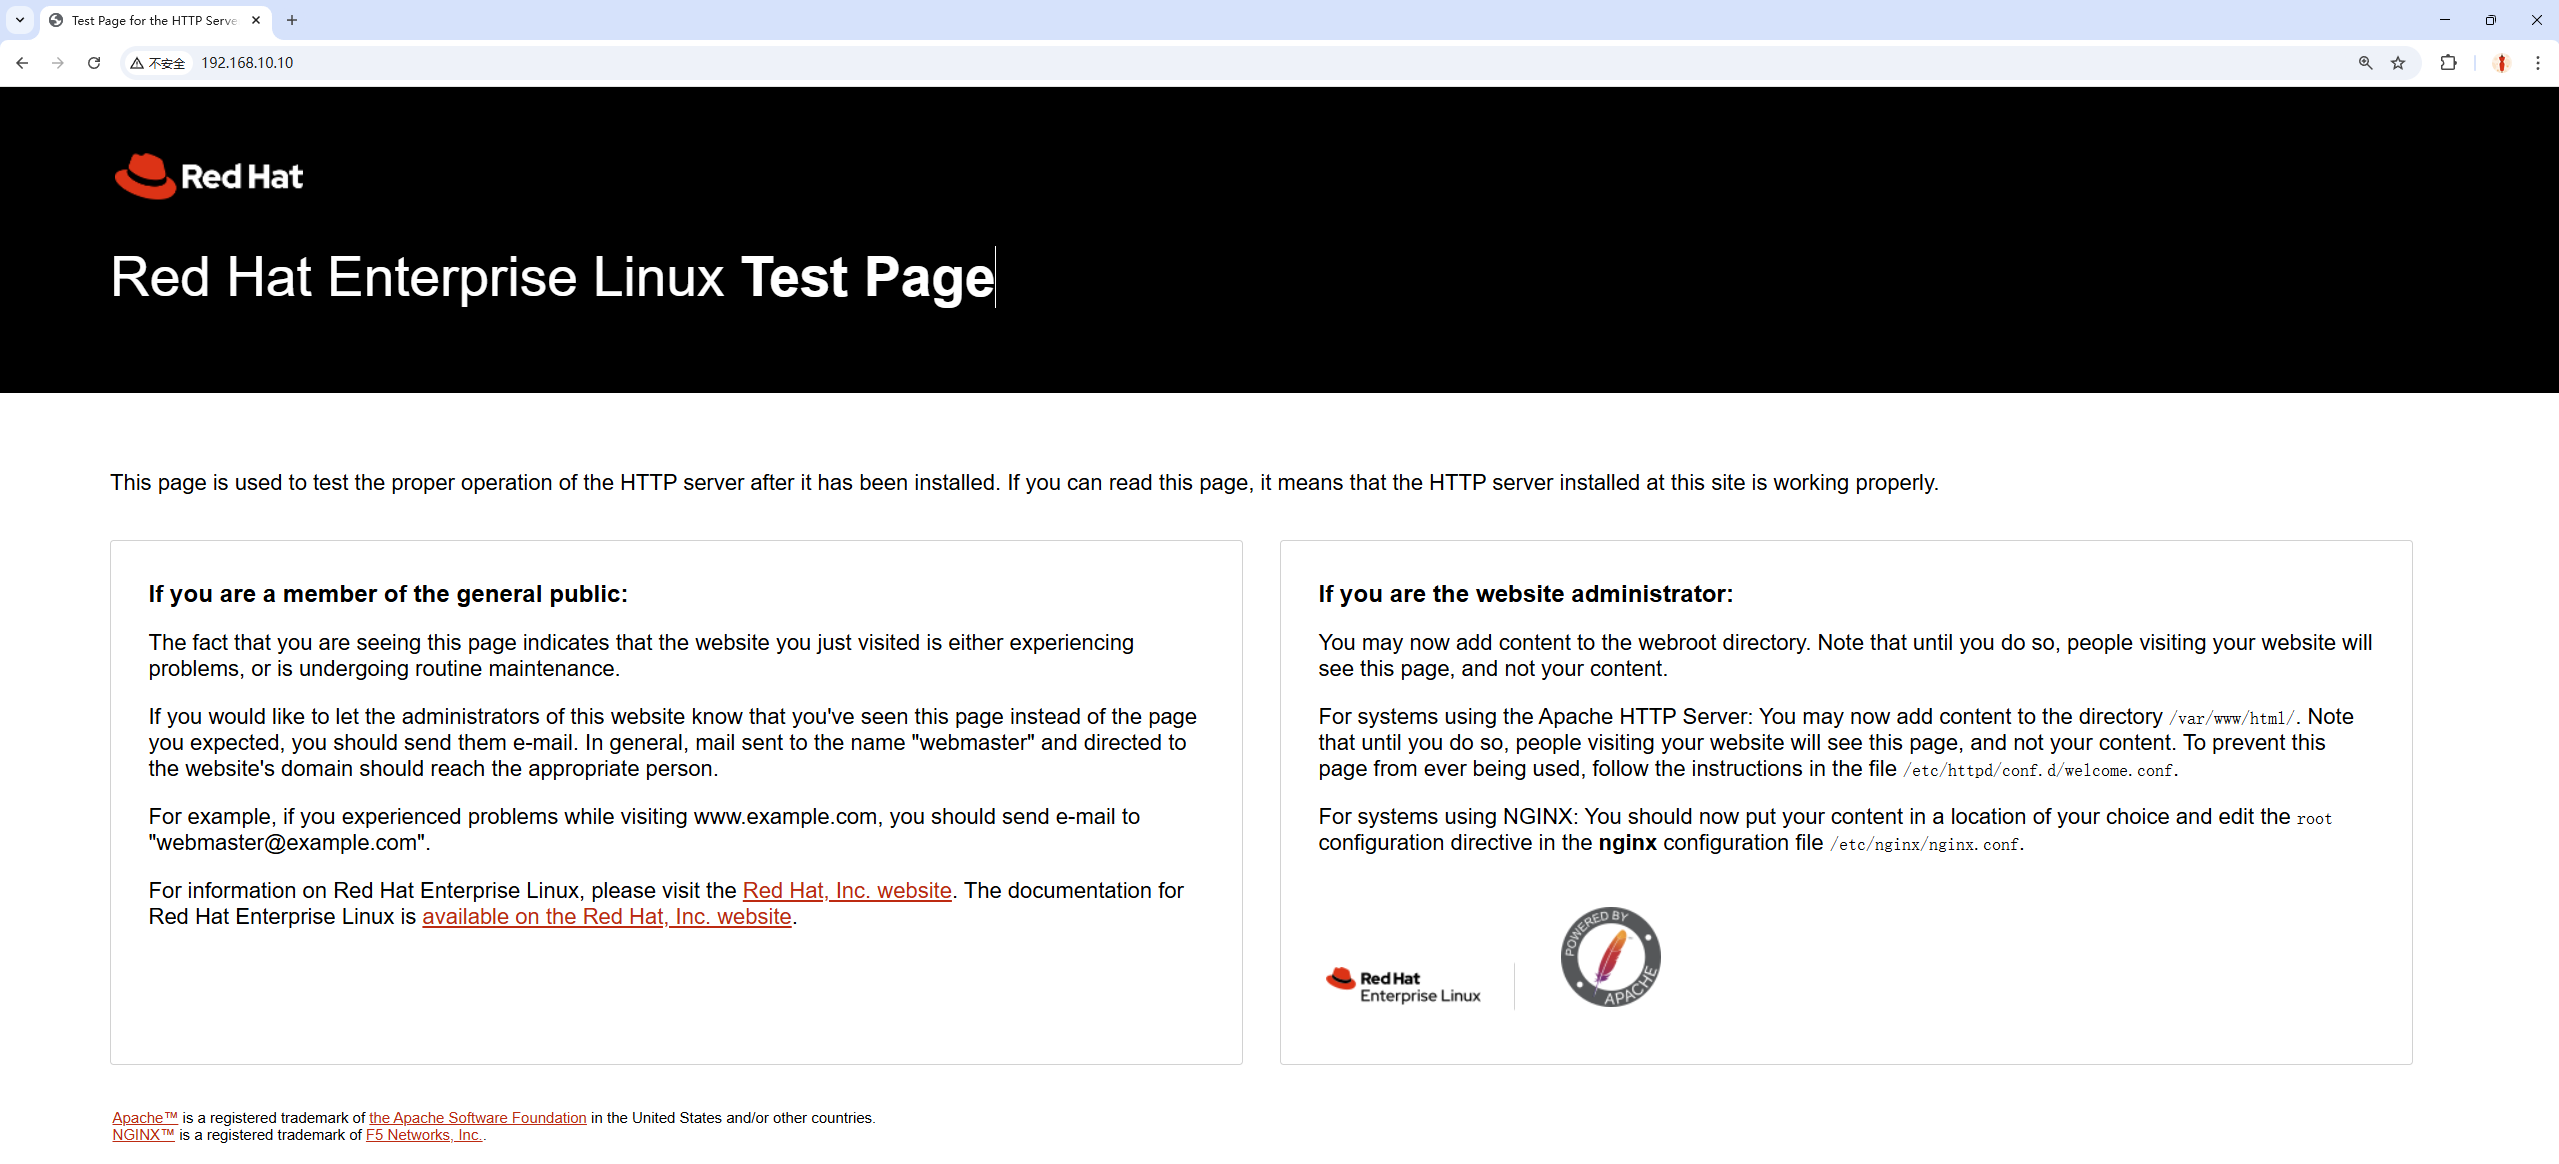
Figure 10-3 Default httpd welcome page
Or, from the terminal, launch Firefox directly:
root@linuxprobe:~# firefox
10.2 Configuring service files and parameters
Installing and starting httpd is only the beginning. On Linux, configuring a service means editing its configuration files. Know where they are and what they do. Table 10‑1 lists the most important ones.
Table 10‑1 Main httpd files and their roles
| File/Path | Role |
|---|---|
| /etc/httpd | Service directory |
| /etc/httpd/conf/httpd.conf | Main configuration |
| /var/www/html | Document root |
| /var/log/httpd/access_log | Access log |
| /var/log/httpd/error_log | Error log |
The main config can be long (358 lines in my lab), but don’t panic—lines starting with # are comments meant to explain behavior or options.
Inside the file you’ll find three kinds of content (Figure 10‑4): comments, global directives, and per‑site directives. Global directives apply to all virtual hosts and prevent duplication. Per‑site directives configure each individual sub‑site—like a cafeteria giving everyone a standard bowl of rice (global), then adding each student’s custom dishes (per‑site). Table 10‑2 shows the most common directives.
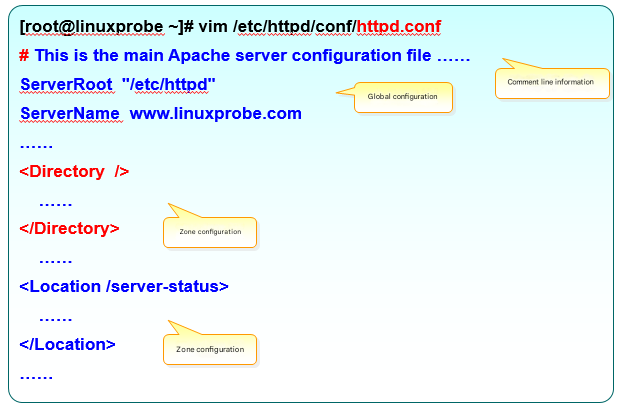
Figure 10-4 Structure of the main Apache config
Table 10‑2 Common httpd directives
| Directive | Purpose |
|---|---|
| ServerRoot | Service directory |
| ServerAdmin | Admin email |
| User | User the service runs as |
| Group | Group the service runs as |
| ServerName | Server’s hostname |
| DocumentRoot | Document root |
| Listen | IP/port to listen on |
| DirectoryIndex | Default index page |
| ErrorLog | Error log |
| CustomLog | Access log |
| Timeout | Request timeout (default 300s) |
By default, DocumentRoot is /var/www/html, and most sites use index.html as the home page. Replace the default page like this:
root@linuxprobe:~# echo "Welcome To LinuxProbe.Com" > /var/www/html/index.html
Refresh the browser to see the change (Figure 10‑5).

Figure 10-5 The home page has been replaced
If you want to change the document root to /home/wwwroot, follow these steps.
Step 1: Create the directory and an index page.
root@linuxprobe:~# mkdir /home/wwwroot
root@linuxprobe:~# echo "The New Web Directory" > /home/wwwroot/index.html
Step 2: Edit the main config—set DocumentRoot and both <Directory> blocks to /home/wwwroot. Save and exit.
root@linuxprobe:~# vim /etc/httpd/conf/httpd.conf
119 #
120 # DocumentRoot: The directory out of which you will serve your
121 # documents. By default, all requests are taken from this directory, but
122 # symbolic links and aliases may be used to point to other locations.
123 #
124 DocumentRoot "/home/wwwroot"
125
126 #
127 # Relax access to content within /var/www.
128 #
129 <Directory "/home/wwwroot">
130     AllowOverride None
131     # Allow open access:
132     Require all granted
133 </Directory>
134
135 # Further relax access to the default document root:
136 <Directory "/home/wwwroot">
Step 3: Restart httpd and refresh the page. You’ll see “permission denied” (Figure 10‑6).
root@linuxprobe:~# systemctl restart httpd

Figure 10-6 Permission denied
10.3 The SELinux security subsystem

Figure 10-7 SELinux logo
Imagine you download a photo app and, while you’re beautifying pictures, it silently listens for passwords you type into your browser. That’s out of bounds. SELinux prevents this class of behavior: domain restrictions keep services from doing things they shouldn’t; file security contexts restrict which files a service can access.
Tips:
If UNIX permissions and the firewall are “doors and windows,” SELinux is the protective fence outside—an extra layer of safety.
I often describe SELinux domains plus file contexts as a “double lock.” Services can only access what they’re supposed to, so even if an attacker gains a foothold they can’t easily abuse a service to overreach. Sadly, SELinux is seen as complex and is often disabled. That’s not wise.
SELinux has three modes:
enforcing: apply the policy and block disallowed actions.
permissive: warn on violations, but don’t block.
disabled: no policy loaded; no checks performed.
All labs in this book use enforcing mode. Check your default in the main config; if it’s permissive or disabled, switch to enforcing:
root@linuxprobe:~# cat /etc/selinux/config
# This file controls the state of SELinux on the system.
# SELINUX= can take one of these three values:
#     enforcing - SELinux security policy is enforced.
#     permissive - SELinux prints warnings instead of enforcing.
#     disabled - No SELinux policy is loaded.
# See also:
SELINUX=enforcing
# SELINUXTYPE= can take one of these three values:
#     targeted - Targeted processes are protected,
#     minimum - Modification of targeted policy. Only selected processes are protected.
#     mls - Multi Level Security protection.
SELINUXTYPE=targeted
That file sets the post‑reboot default. To see the current mode:
root@linuxprobe:~# getenforce
Enforcing
To confirm that SELinux caused the earlier “permission denied,” temporarily switch to permissive (effective immediately until reboot):
root@linuxprobe:~# setenforce 0
root@linuxprobe:~# getenforce
Permissive
Refresh the page—you should now see the site (Figure 10‑8).

Figure 10-8 Expected content after switching to permissive
What went wrong? Apache is allowed to serve web content, but only from locations labeled for web content. We moved the document root to /home/wwwroot, and /home is for user homes. That violates policy.
Switch back to enforcing and compare labels. -Z prints SELinux contexts; -d treats the target as a directory.
root@linuxprobe:~# setenforce 1
root@linuxprobe:~# ls -Zd /var/www/html
system_u:object_r:httpd_sys_content_t:s0 /var/www/html
root@linuxprobe:~# ls -Zd /home/wwwroot
unconfined_u:object_r:user_home_dir_t:s0 /home/wwwroot
An SELinux context contains user, role, type, and level. Here the type is key: httpd_sys_content_t marks web content; user_home_dir_t marks home directories.
Use semanage to set appropriate file contexts, then apply with restorecon:
root@linuxprobe:~# semanage fcontext -a -t httpd_sys_content_t /home/wwwroot
root@linuxprobe:~# semanage fcontext -a -t httpd_sys_content_t /home/wwwroot/*
root@linuxprobe:~# restorecon -Rv /home/wwwroot/
Relabeled /home/wwwroot from unconfined_u:object_r:user_home_dir_t:s0 to unconfined_u:object_r:httpd_sys_content_t:s0
Relabeled /home/wwwroot/index.html from unconfined_u:object_r:user_home_t:s0 to unconfined_u:object_r:httpd_sys_content_t:s0
Refresh: the page renders normally again (Figure 10‑9).

Figure 10-9 Normal content after fixing labels
Tips:
RHCSA/RHCE/RHCA exams usually require a reboot before grading. Make a habit of enabling services at boot—for example,systemctl enable httpdhere.
10.4 User home pages
If you need a separate site for every user, building lots of vhosts is tedious and permission‑heavy to manage. Apache’s UserDir feature lets each user manage a personal site under their home directory.
Step 1: By default, UserDir is disabled. Edit the following file: comment out UserDir disabled, and uncomment UserDir public_html. Save the file.
root@linuxprobe:~# vim /etc/httpd/conf.d/userdir.conf
  1 #
  2 # UserDir: The name of the directory that is appended onto a user's home
  3 # directory if a ~user request is received.
  4 #
  5 # The path to the end user account 'public_html' directory must be
  6 # accessible to the webserver userid.  This usually means that ~userid
  7 # must have permissions of 711, ~userid/public_html must have permissions
  8 # of 755, and documents contained therein must be world-readable.
  9 # Otherwise, the client will only receive a "403 Forbidden" message.
 10 #
 11 <IfModule mod_userdir.c>
 12     #
 13     # UserDir is disabled by default since it can confirm the presence
 14     # of a username on the system (depending on home directory
 15     # permissions).
 16     #
 17     # UserDir disabled
 18
 19     #
 20     # To enable requests to /~user/ to serve the user's public_html
 21     # directory, remove the "UserDir disabled" line above, and uncomment
 22     # the following line instead:
 23     #
 24      UserDir public_html
 25 </IfModule>
 26
 27 #
 28 # Control access to UserDir directories.  The following is an example
 29 # for a site where these directories are restricted to read-only.
 30 #
 31 <Directory "/home/*/public_html">
 32     AllowOverride FileInfo AuthConfig Limit Indexes
 33     Options MultiViews Indexes SymLinksIfOwnerMatch IncludesNoExec
 34     Require method GET POST OPTIONS
 35 </Directory>
Step 2: Create the directory and an index page in the user’s home, and make it world‑readable:
root@linuxprobe:~# su - linuxprobe
linuxprobe@linuxprobe:~$ mkdir public_html
linuxprobe@linuxprobe:~$ echo "This is linuxprobe's website" > public_html/index.html
linuxprobe@linuxprobe:~$ chmod -R 755 /home/linuxprobe
Step 3: Restart httpd and browse to /~username. You’ll see a denied page (Figure 10‑10)—that’s SELinux again.
linuxprobe@linuxprobe:~$ exit
logout
root@linuxprobe:~# systemctl restart httpd

Figure 10-10 Access to the user site is forbidden
Check relevant SELinux booleans; off means disabled, on means enabled. Enable httpd_enable_homedirs and make it persistent:
root@linuxprobe:~# getsebool -a | grep http
httpd_anon_write --> off
httpd_builtin_scripting --> on
httpd_can_check_spam --> off
httpd_can_connect_ftp --> off
httpd_can_connect_ldap --> off
httpd_can_connect_mythtv --> off
httpd_can_connect_zabbix --> off
httpd_can_manage_courier_spool --> off
httpd_can_network_connect --> off
httpd_can_network_connect_cobbler --> off
httpd_can_network_connect_db --> off
httpd_can_network_memcache --> off
httpd_can_network_redis --> off
httpd_can_network_relay --> off
httpd_can_sendmail --> off
httpd_dbus_avahi --> off
httpd_dbus_sssd --> off
httpd_dontaudit_search_dirs --> off
httpd_enable_cgi --> on
httpd_enable_ftp_server --> off
httpd_enable_homedirs --> off

root@linuxprobe:~# setsebool -P httpd_enable_homedirs=on
Now the user site loads (Figure 10‑11).

Figure 10-11 UserDir content loads after enabling the SELinux boolean
To restrict access to authenticated visitors, add basic authentication.
Step 1: Create the password database with htpasswd. -c creates the file the first time; the username is for web login only (it need not be a system user).
root@linuxprobe:~# htpasswd -c /etc/httpd/passwd linuxprobe
New password: Enter the password for web authentication here.
Re-type new password: Enter it again for confirmation.
Adding password for user linuxprobe
Step 2: Protect the UserDir directory and restart httpd:
root@linuxprobe:~# vim /etc/httpd/conf.d/userdir.conf
 31 <Directory "/home/*/public_html">
 32 AllowOverride all
 #Path to save the newly generated password verification file
 33 authuserfile "/etc/httpd/passwd"
 #Prompt message when the user accesses the website
 34 authname "My private website"
 #Authentication method is password mode
 35 authtype basic
 #User name required for verification when accessing the website
 36 require user linuxprobe
 37 </Directory>
root@linuxprobe:~# systemctl restart httpd
Now, visitors must enter the username and password to access a user’s site (Figures 10‑12 and 10‑13).
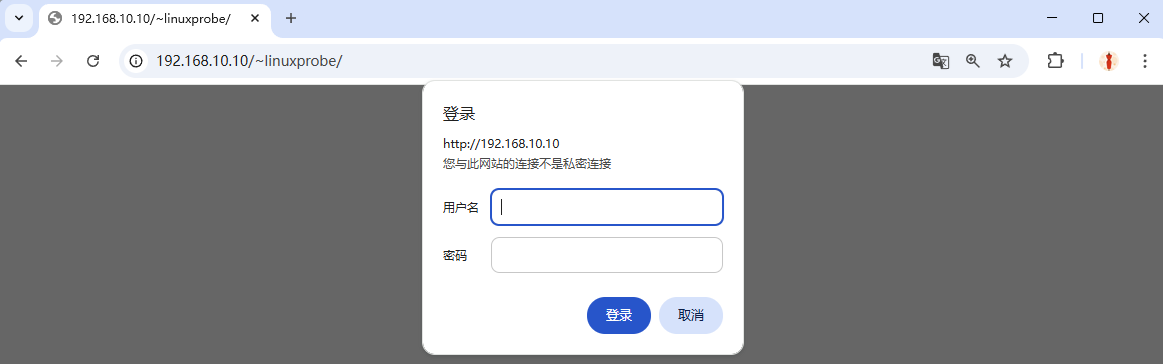
Figure 10-12 Authentication required
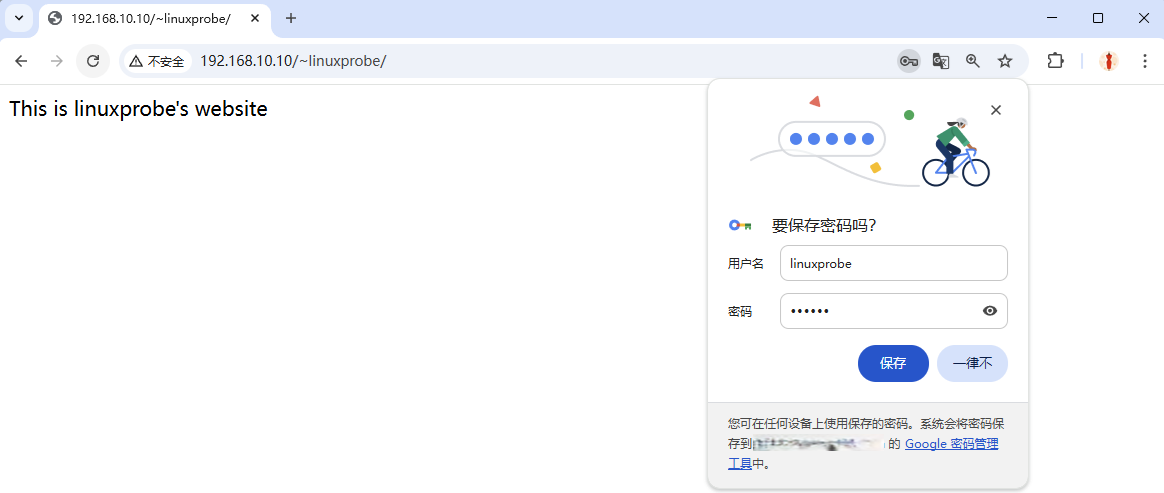
Figure 10-13 Authentication succeeds
10.5 Virtual hosts
If each server could run only one website, small sites would be forced to pay for dedicated servers—wasteful and expensive. Before VPS and cloud computing, hosting providers introduced “virtual hosts” to improve utilization and lower costs.
With Apache’s virtual hosts, one server can serve multiple sites based on the requested IP, hostname, or port (Figure 10‑14).
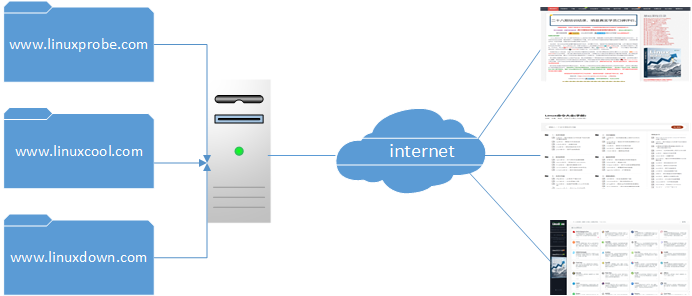
Figure 10-14 Routing requests to different sites
Before each lab, revert the VM to a clean baseline so experiments don’t conflict.
10.5.1 By IP address
If your server has multiple IP addresses—one per site—then visiting different IPs returns different sites. Dedicated IPs can also help SEO, so this method is common and popular among site owners.
Configure the IPs (see Chapters 4 and 9), restart networking, and verify all three are reachable (Figures 10‑15 and 10‑16).

Figure 10-15 Configure IPs with nmtui
root@linuxprobe:~# nmcli connection up ens160
Connection successfully activated (D-Bus active path: /org/freedesktop/NetworkManager/ActiveConnection/3)
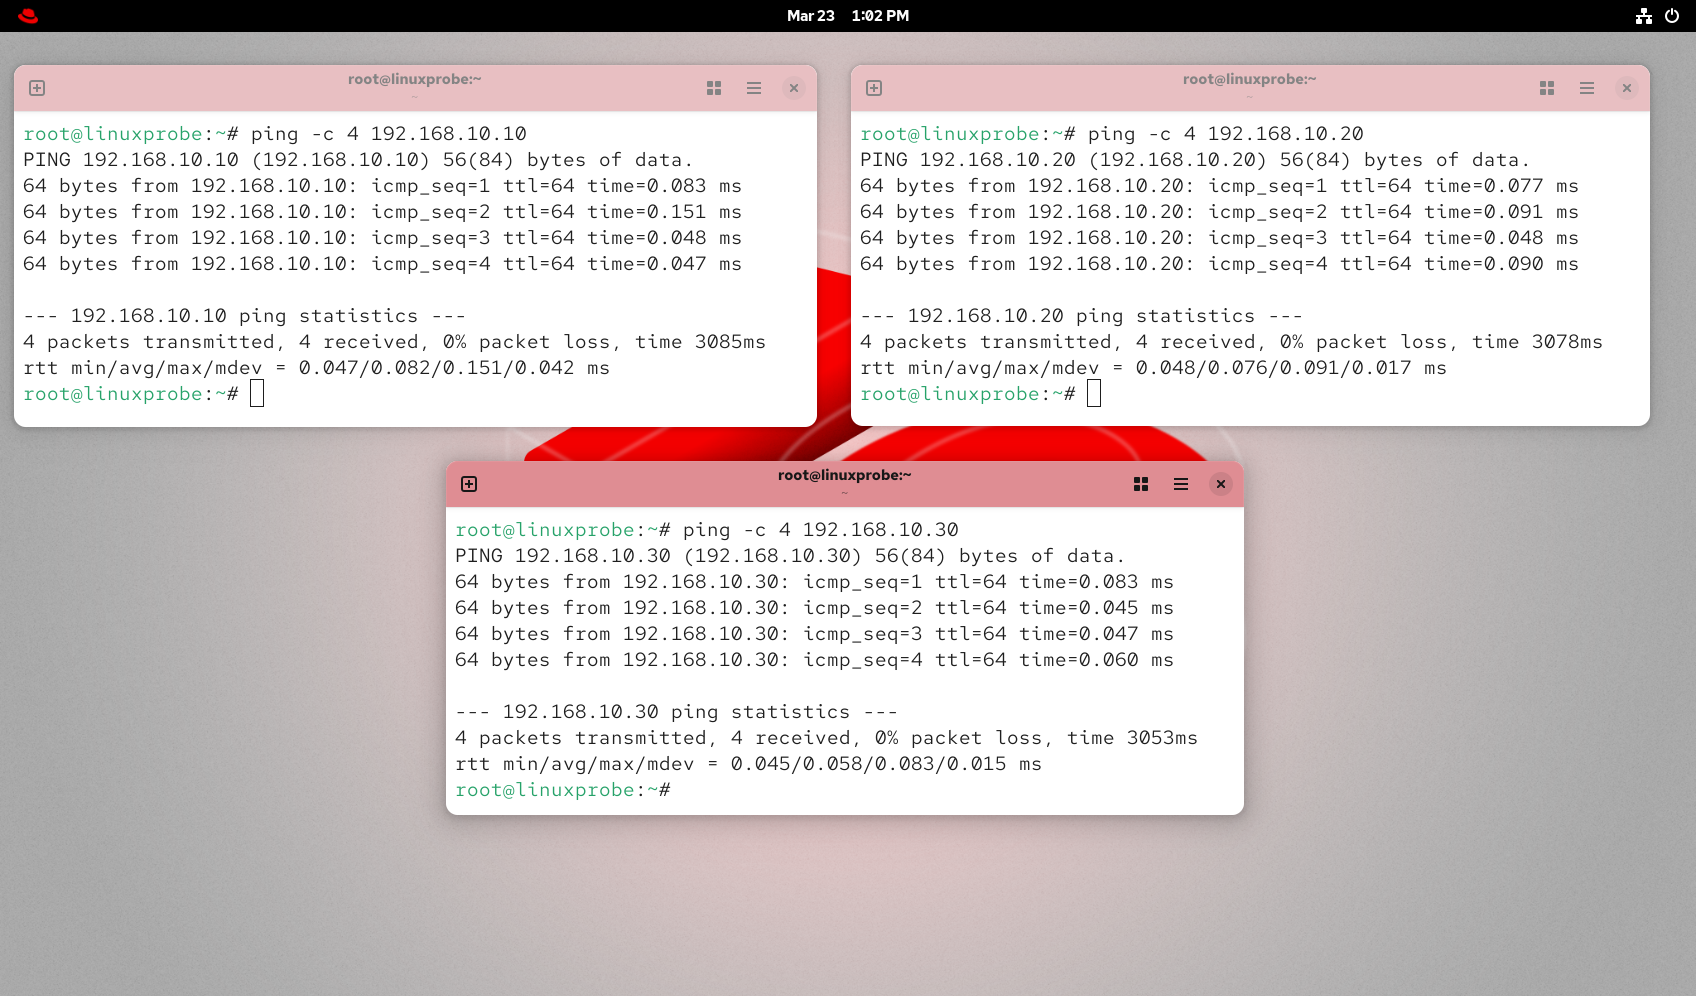
Figure 10-16 Test connectivity for all three IPs
Step 1: Create three document roots and distinct index pages:
root@linuxprobe:~# mkdir -p /home/wwwroot/10
root@linuxprobe:~# mkdir -p /home/wwwroot/20
root@linuxprobe:~# mkdir -p /home/wwwroot/30
root@linuxprobe:~# echo "IP:192.168.10.10" > /home/wwwroot/10/index.html
root@linuxprobe:~# echo "IP:192.168.10.20" > /home/wwwroot/20/index.html
root@linuxprobe:~# echo "IP:192.168.10.30" > /home/wwwroot/30/index.html
Step 2: Append three IP‑based vhosts and restart httpd:
root@linuxprobe:~# vim /etc/httpd/conf/httpd.conf
125 <VirtualHost 192.168.10.10>
126         DocumentRoot /home/wwwroot/10
127         ServerName www.linuxprobe.com
128         <Directory /home/wwwroot/10>
129         AllowOverride None
130         Require all granted
131         </Directory>
132 </VirtualHost>

133 <VirtualHost 192.168.10.20>
134         DocumentRoot /home/wwwroot/20
135         ServerName www.linuxprobe.com
136         <Directory /home/wwwroot/20>
137         AllowOverride None
138         Require all granted
139         </Directory>
140 </VirtualHost>

141 <VirtualHost 192.168.10.30>
142         DocumentRoot /home/wwwroot/30
143         ServerName www.linuxprobe.com
144         <Directory /home/wwwroot/30>
145         AllowOverride None
146         Require all granted
147         </Directory>
148 </VirtualHost>
root@linuxprobe:~# systemctl restart httpd
Step 3: If you see “permission denied,” fix SELinux labels on the new directories and apply them:
root@linuxprobe:~# semanage fcontext -a -t httpd_sys_content_t /home/wwwroot
root@linuxprobe:~# semanage fcontext -a -t httpd_sys_content_t /home/wwwroot/10
root@linuxprobe:~# semanage fcontext -a -t httpd_sys_content_t /home/wwwroot/10/*
root@linuxprobe:~# semanage fcontext -a -t httpd_sys_content_t /home/wwwroot/20
root@linuxprobe:~# semanage fcontext -a -t httpd_sys_content_t /home/wwwroot/20/*
root@linuxprobe:~# semanage fcontext -a -t httpd_sys_content_t /home/wwwroot/30
root@linuxprobe:~# semanage fcontext -a -t httpd_sys_content_t /home/wwwroot/30/*
root@linuxprobe:~# restorecon -Rv /home/wwwroot
Relabeled /home/wwwroot from unconfined_u:object_r:user_home_dir_t:s0 to unconfined_u:object_r:httpd_sys_content_t:s0
Relabeled /home/wwwroot/10 from unconfined_u:object_r:user_home_t:s0 to unconfined_u:object_r:httpd_sys_content_t:s0
Relabeled /home/wwwroot/10/index.html from unconfined_u:object_r:user_home_t:s0 to unconfined_u:object_r:httpd_sys_content_t:s0
Relabeled /home/wwwroot/20 from unconfined_u:object_r:user_home_t:s0 to unconfined_u:object_r:httpd_sys_content_t:s0
Relabeled /home/wwwroot/20/index.html from unconfined_u:object_r:user_home_t:s0 to unconfined_u:object_r:httpd_sys_content_t:s0
Relabeled /home/wwwroot/30 from unconfined_u:object_r:user_home_t:s0 to unconfined_u:object_r:httpd_sys_content_t:s0
Relabeled /home/wwwroot/30/index.html from unconfined_u:object_r:user_home_t:s0 to unconfined_u:object_r:httpd_sys_content_t:s0
Each IP now serves its own content (Figure 10‑17).
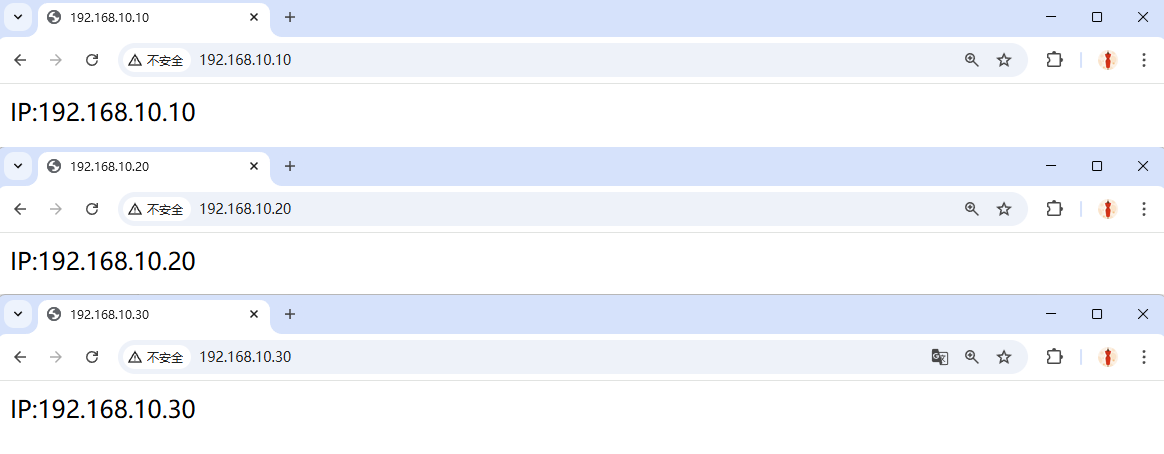
Figure 10-17 IP‑based virtual hosts
10.5.2 By hostname
When you can’t give each site its own IP, name‑based vhosts are simpler. The server needs only one IP (192.168.10.10). Because we don’t have DNS here, use /etc/hosts for testing.
Step 1: Add hostnames and verify resolution with ping:
root@linuxprobe:~# vim /etc/hosts
# Loopback entries; do not change.
# For historical reasons, localhost precedes localhost.localdomain:
127.0.0.1   localhost localhost.localdomain localhost4 localhost4.localdomain4
::1         localhost localhost.localdomain localhost6 localhost6.localdomain6
192.168.10.10   www.linuxprobe.com www.linuxcool.com www.linuxdown.com
root@linuxprobe:~# ping -c 4 www.linuxprobe.com
PING www.linuxprobe.com (192.168.10.10) 56(84) bytes of data.
64 bytes from www.linuxprobe.com (192.168.10.10): icmp_seq=1 ttl=64 time=0.869 ms
64 bytes from www.linuxprobe.com (192.168.10.10): icmp_seq=2 ttl=64 time=0.141 ms
64 bytes from www.linuxprobe.com (192.168.10.10): icmp_seq=3 ttl=64 time=0.099 ms
64 bytes from www.linuxprobe.com (192.168.10.10): icmp_seq=4 ttl=64 time=0.048 ms
--- www.linuxprobe.com ping statistics ---
4 packets transmitted, 4 received, 0% packet loss, time 3043ms
rtt min/avg/max/mdev = 0.048/0.289/0.869/0.336 ms
root@linuxprobe:~#
Step 2: Create three document roots and index pages:
root@linuxprobe:~# mkdir -p /home/wwwroot/linuxprobe
root@linuxprobe:~# mkdir -p /home/wwwroot/linuxcool
root@linuxprobe:~# mkdir -p /home/wwwroot/linuxdown
root@linuxprobe:~# echo "www.linuxprobe.com" > /home/wwwroot/linuxprobe/index.html
root@linuxprobe:~# echo "www.linuxcool.com" > /home/wwwroot/linuxcool/index.html
root@linuxprobe:~# echo "www.linuxdown.com" > /home/wwwroot/linuxdown/index.html
Step 3: Append the hostname‑based vhosts and restart httpd:
root@linuxprobe:~# vim /etc/httpd/conf/httpd.conf
151 <VirtualHost *:80>
152     ServerName www.linuxprobe.com
153     DocumentRoot /home/wwwroot/linuxprobe
154     <Directory /home/wwwroot/linuxprobe>
155     AllowOverride None
156     Require all granted
157     </Directory>
158 </VirtualHost>

159 <VirtualHost *:80>
160     ServerName www.linuxcool.com
161     DocumentRoot /home/wwwroot/linuxcool
162     <Directory /home/wwwroot/linuxcool>
163     AllowOverride None
164     Require all granted
165     </Directory>
166 </VirtualHost>

167 <VirtualHost *:80>
168     ServerName www.linuxdown.com
169     DocumentRoot /home/wwwroot/linuxdown
170     <Directory /home/wwwroot/linuxdown>
171     AllowOverride None
172     Require all granted
173     </Directory>
174 </VirtualHost>
root@linuxprobe:~# systemctl restart httpd
Step 4: Fix SELinux labels for the new directories, then apply them:
root@linuxprobe:~# semanage fcontext -a -t httpd_sys_content_t /home/wwwroot
root@linuxprobe:~# semanage fcontext -a -t httpd_sys_content_t /home/wwwroot/linuxprobe
root@linuxprobe:~# semanage fcontext -a -t httpd_sys_content_t /home/wwwroot/linuxprobe/*
root@linuxprobe:~# semanage fcontext -a -t httpd_sys_content_t /home/wwwroot/linuxcool
root@linuxprobe:~# semanage fcontext -a -t httpd_sys_content_t /home/wwwroot/linuxcool/*
root@linuxprobe:~# semanage fcontext -a -t httpd_sys_content_t /home/wwwroot/linuxdown
root@linuxprobe:~# semanage fcontext -a -t httpd_sys_content_t /home/wwwroot/linuxdown/*
root@linuxprobe:~# restorecon -Rv /home/wwwroot/
Relabeled /home/wwwroot from unconfined_u:object_r:user_home_dir_t:s0 to unconfined_u:object_r:httpd_sys_content_t:s0
Relabeled /home/wwwroot/linuxprobe from unconfined_u:object_r:user_home_t:s0 to unconfined_u:object_r:httpd_sys_content_t:s0
Relabeled /home/wwwroot/linuxprobe/index.html from unconfined_u:object_r:user_home_t:s0 to unconfined_u:object_r:httpd_sys_content_t:s0
Relabeled /home/wwwroot/linuxcool from unconfined_u:object_r:user_home_t:s0 to unconfined_u:object_r:httpd_sys_content_t:s0
Relabeled /home/wwwroot/linuxcool/index.html from unconfined_u:object_r:user_home_t:s0 to unconfined_u:object_r:httpd_sys_content_t:s0
Relabeled /home/wwwroot/linuxdown from unconfined_u:object_r:user_home_t:s0 to unconfined_u:object_r:httpd_sys_content_t:s0
Relabeled /home/wwwroot/linuxdown/index.html from unconfined_u:object_r:user_home_t:s0 to unconfined_u:object_r:httpd_sys_content_t:s0
Now each hostname serves its own content (Figure 10‑18).
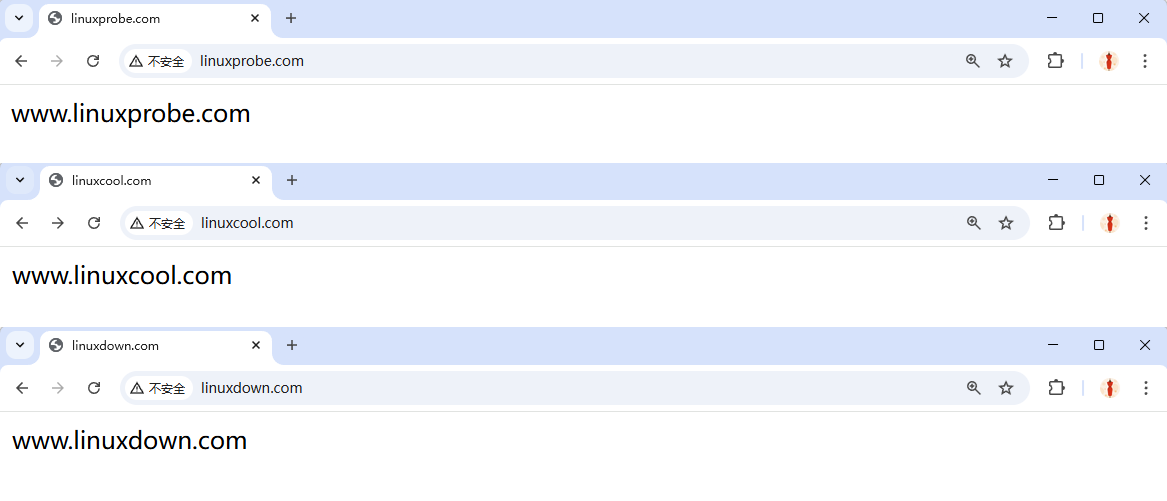
Figure 10-18 Name‑based virtual hosts
10.5.3 By port
Port‑based vhosts route requests to different sites based on the TCP port. This is the trickiest form, because you must consider Apache’s configuration, SELinux’s port policy, and the firewall. Ports such as 80/443/8080 are permitted by policy; other ports are blocked unless you extend it.
Step 1: Create three document roots and index pages that identify each port:
root@linuxprobe:~# mkdir -p /home/wwwroot/6111
root@linuxprobe:~# mkdir -p /home/wwwroot/6222
root@linuxprobe:~# mkdir -p /home/wwwroot/6333
root@linuxprobe:~# echo "port:6111" > /home/wwwroot/6111/index.html
root@linuxprobe:~# echo "port:6222" > /home/wwwroot/6222/index.html
root@linuxprobe:~# echo "port:6333" > /home/wwwroot/6333/index.html
Step 2: Add Listen directives for the three ports:
root@linuxprobe:~# vim /etc/httpd/conf/httpd.conf
 46 #Listen 12.34.56.78:80
 47 Listen 80
 48 Listen 6111
 49 Listen 6222
 50 Listen 6333
Step 3: Append the port‑based vhost sections and restart httpd:
root@linuxprobe:~# vim /etc/httpd/conf/httpd.conf
127 <VirtualHost 192.168.10.10:6111>
128         DocumentRoot /home/wwwroot/6111
129         ServerName www.linuxprobe.com
130         <Directory /home/wwwroot/6111>
131         AllowOverride None
132         Require all granted
133         </Directory>
134 </VirtualHost>

135 <VirtualHost 192.168.10.10:6222>
136         DocumentRoot /home/wwwroot/6222
137         ServerName www.linuxprobe.com
138         <Directory /home/wwwroot/6222>
139         AllowOverride None
140         Require all granted
141         </Directory>
142 </VirtualHost>

143 <VirtualHost 192.168.10.10:6333>
144         DocumentRoot /home/wwwroot/6333
145         ServerName www.linuxprobe.com
146         <Directory /home/wwwroot/6333>
147         AllowOverride None
148         Require all granted
149         </Directory>
150 </VirtualHost>
Step 4: Because we’re serving content from /home/wwwroot, set the SELinux labels appropriately and apply them:
root@linuxprobe:~# semanage fcontext -a -t httpd_sys_content_t /home/wwwroot
root@linuxprobe:~# semanage fcontext -a -t httpd_sys_content_t /home/wwwroot/6111
root@linuxprobe:~# semanage fcontext -a -t httpd_sys_content_t /home/wwwroot/6111/*
root@linuxprobe:~# semanage fcontext -a -t httpd_sys_content_t /home/wwwroot/6222
root@linuxprobe:~# semanage fcontext -a -t httpd_sys_content_t /home/wwwroot/6222/*
root@linuxprobe:~# semanage fcontext -a -t httpd_sys_content_t /home/wwwroot/6333
root@linuxprobe:~# semanage fcontext -a -t httpd_sys_content_t /home/wwwroot/6333/*
root@linuxprobe:~# restorecon -Rv /home/wwwroot/
Relabeled /home/wwwroot from unconfined_u:object_r:user_home_dir_t:s0 to unconfined_u:object_r:httpd_sys_content_t:s0
Relabeled /home/wwwroot/6111 from unconfined_u:object_r:user_home_t:s0 to unconfined_u:object_r:httpd_sys_content_t:s0
Relabeled /home/wwwroot/6111/index.html from unconfined_u:object_r:user_home_t:s0 to unconfined_u:object_r:httpd_sys_content_t:s0
Relabeled /home/wwwroot/6222 from unconfined_u:object_r:user_home_t:s0 to unconfined_u:object_r:httpd_sys_content_t:s0
Relabeled /home/wwwroot/6222/index.html from unconfined_u:object_r:user_home_t:s0 to unconfined_u:object_r:httpd_sys_content_t:s0
Relabeled /home/wwwroot/6333 from unconfined_u:object_r:user_home_t:s0 to unconfined_u:object_r:httpd_sys_content_t:s0
Relabeled /home/wwwroot/6333/index.html from unconfined_u:object_r:user_home_t:s0 to unconfined_u:object_r:httpd_sys_content_t:s0
root@linuxprobe:~# systemctl restart httpd
Job for httpd.service failed because the control process exited with error code.
See "systemctl status httpd.service" and "journalctl -xeu httpd.service" for details.
Why the failure? SELinux permits only certain HTTP ports by default. List the allowed ones:
root@linuxprobe:~# semanage port -l | grep http
http_cache_port_t              tcp      8080, 8118, 8123, 10001-10010
http_cache_port_t              udp      3130
http_port_t                    tcp      80, 81, 443, 488, 8008, 8009, 8443, 9000
pegasus_http_port_t            tcp      5988
pegasus_https_port_t           tcp      5989
Step 5: Add our three ports to http_port_t so Apache is allowed to listen on them (this persists across reboots):
root@linuxprobe:~# semanage port -a -t http_port_t -p tcp 6111
root@linuxprobe:~# semanage port -a -t http_port_t -p tcp 6222
root@linuxprobe:~# semanage port -a -t http_port_t -p tcp 6333
root@linuxprobe:~# semanage port -l | grep http
http_cache_port_t      tcp    8080, 8118, 8123, 10001-10010
http_cache_port_t      udp    3130
http_port_t            tcp    6333, 6222, 6111, 80, 81, 443, 488, 8008, 8009, 8443, 9000
pegasus_http_port_t    tcp    5988
pegasus_https_port_t   tcp    5989
Step 6: Open the ports in the firewall, reload, and restart httpd:
root@linuxprobe:~# firewall-cmd --permanent --add-port=6111/tcp
success
root@linuxprobe:~# firewall-cmd --permanent --add-port=6222/tcp
success
root@linuxprobe:~# firewall-cmd --permanent --add-port=6333/tcp
success
root@linuxprobe:~# firewall-cmd --reload
success
root@linuxprobe:~# systemctl restart httpd
Now each port serves its own site (Figure 10‑19).
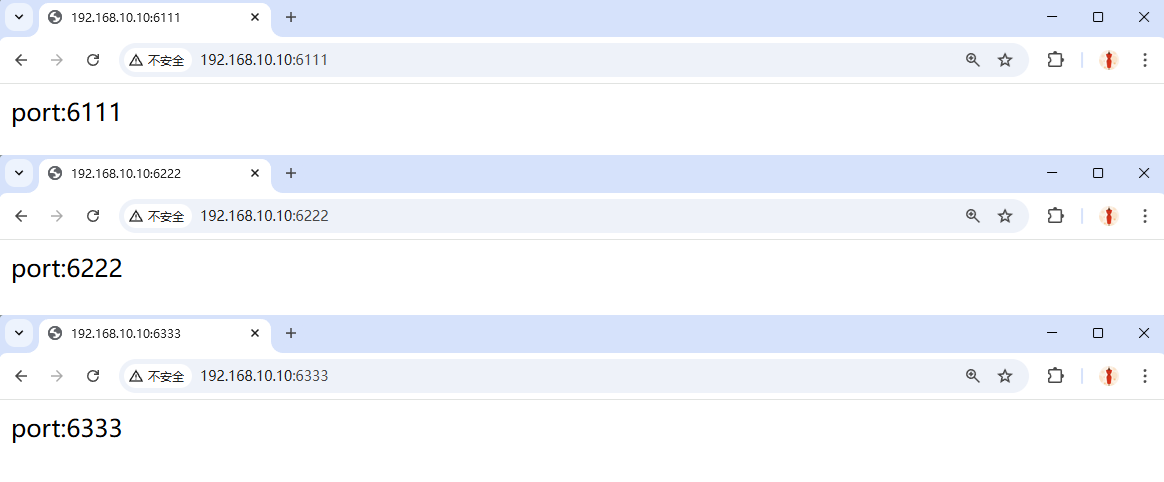
Figure 10-19 Port‑based virtual hosts
10.6 Access control in Apache
Apache can restrict access based on source hostname or IP, or even on the browser’s User‑Agent. Use Allow to permit, Deny to block, and Order to define the evaluation order. With Order allow,deny, Apache first checks the allow rules; if they match, the request is allowed, otherwise it’s denied by default.
Step 1: Create a subdirectory and an index page that contains the word Successful:
root@linuxprobe:~# mkdir /var/www/html/server
root@linuxprobe:~# echo "Successful" > /var/www/html/server/index.html
Step 2: Restrict by browser. The rules below allow only Firefox to load the page; all other requests are denied. Restart httpd and test—Firefox succeeds (Figure 10‑20); other browsers are rejected (Figure 10‑21).
root@linuxprobe:~# vim /etc/httpd/conf/httpd.conf
163 <Directory "/var/www/html/server">
164         SetEnvIf User-Agent "Firefox" ff=1
165         Order allow,deny
166         Allow from env=ff
167 </Directory>
root@linuxprobe:~# systemctl restart httpd
root@linuxprobe:~# systemctl enable httpd
Created symlink '/etc/systemd/system/multi-user.target.wants/httpd.service' → '/usr/lib/systemd/system/httpd.service'.

Figure 10-20 Firefox is allowed
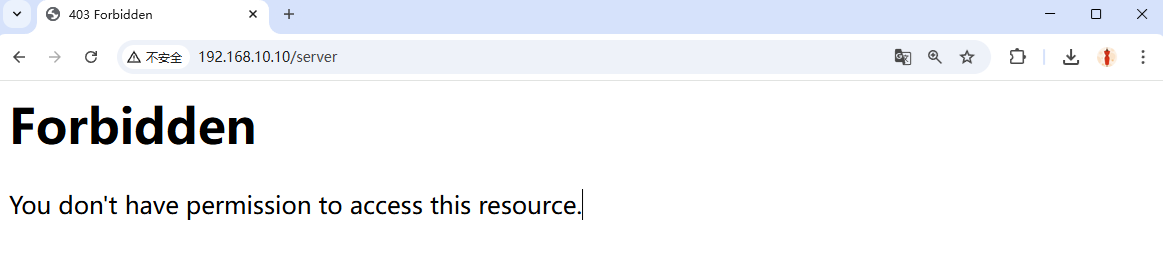
Figure 10-21 Other browsers are denied
You can also control access by source IP. The rules below allow only 192.168.10.20. After restarting httpd, requests from the server itself (192.168.10.10) are denied (Figure 10‑22).
root@linuxprobe:~# vim /etc/httpd/conf/httpd.conf
161 <Directory "/var/www/html/server">
162     Order allow,deny
163     Allow from 192.168.10.20
164 </Directory>
root@linuxprobe:~# systemctl restart httpd
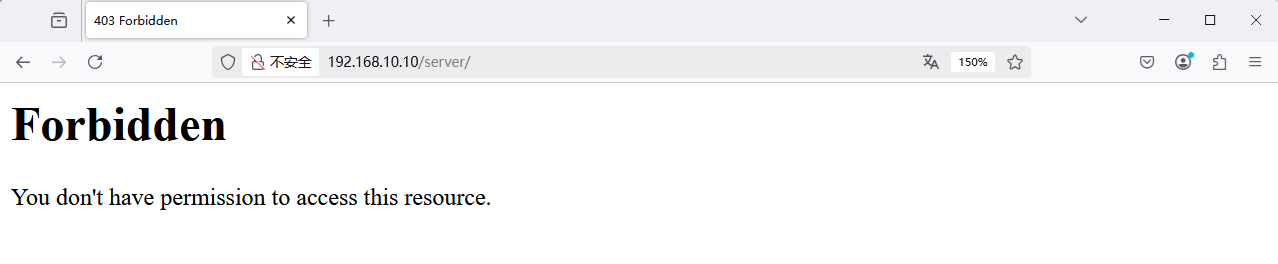
Figure 10-22 Access denied by IP
Review Questions
-
What is a web service?
Answer: A service that lets users access internet resources via a browser. -
Compared to Nginx, what’s Apache’s biggest advantage?
Answer: Cross‑platform support, strong security model, and a fast, reliable, simple extension API. -
If no custom index page exists, what will Apache show?
Answer: A default welcome page. -
Summarize the roles of global directives, per‑site directives, and comments in
httpd.conf.
Answer: Global directives apply to all virtual hosts; per‑site directives configure each site; comments explain options and features. -
What does SELinux do?
Answer: It confines services to the resources and actions appropriate to their roles. -
You run
getenforceand seePermissive. Is that enforcing mode?
Answer: No. Enforcing isEnforcing;Permissiveonly warns about violations. -
After setting file contexts with
semanage fcontext, what command applies them immediately?
Answer:restorecon(often with-Rv). -
How do you list HTTP‑related SELinux booleans?
Answer:getsebool -a | grep http. -
On what bases can Apache build virtual hosts?
Answer: IP address, hostname (domain), or port number. -
Compared with IP‑ or name‑based vhosts, what’s special about port‑based vhosts?
Answer: You must ensure Apache listens on the ports, allow them in SELinux policy (semanage port), and open them in the firewall.