Chapter 08 · Using Firewall to Safeguard Network Security
Chapter Overview
Protecting data security is the most important task after ensuring data availability. As the protective barrier between the public internet and the internal network, the firewall plays a pivotal role in data security.
In this chapter, we will use the firewall-cmd and firewall-config tools to configure dozens of firewall policies designed around real-world operational needs. After working through these exercises, you will not only be able to filter incoming requests and allow or deny traffic based on service names, but also monitor system status easily with Cockpit to ensure the Linux system’s network security is rock-solid.
8.1 Firewall Management Tools
Compared with an enterprise’s internal network, the external public internet is far more hostile and rife with threats. A firewall (see Figure 8-1), whether implemented in software or hardware, serves as the protective barrier between the internet and the enterprise intranet. Its primary purpose is to filter traffic that traverses the firewall according to defined policies—much like a security door installed at home to protect your family and property. Firewall policies can be customized based on a flow’s source and destination addresses, port numbers, protocols, and applications. The firewall then monitors inbound and outbound traffic against the predefined policy rules: if there is a match, it applies the corresponding action; if no rule matches, the firewall usually drops the traffic by default. In this way, only legitimate traffic can flow between the enterprise intranet and the outside world.
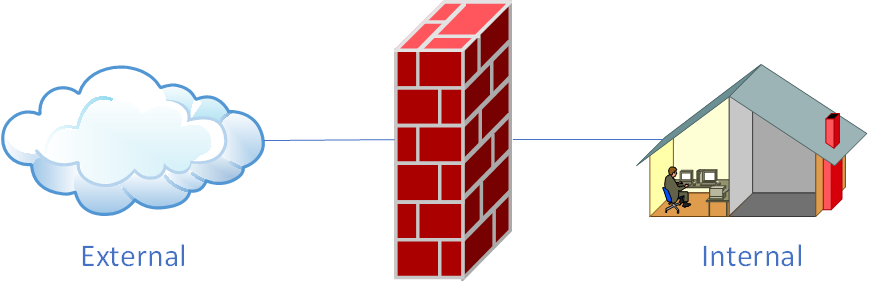
Figure 8-1 The firewall as a protective barrier between the public internet and the internal network
Starting with RHEL 10, the firewalld firewall officially replaces iptables. For readers who learned Linux earlier or are familiar with RHEL, discovering that iptables knowledge no longer applies on the new system—and that firewalld needs to be learned from scratch—can feel frustrating. In practice, iptables and firewalld are not the “firewall” itself; they are firewall management tools (services) that define the policy. The iptables service hands configured policies to the kernel’s netfilter framework, whereas firewalld hands its configured policies to the kernel’s nftables packet-filtering framework. In other words, Linux provides multiple firewall management tools to make policy administration flexible; you only need to configure one of them properly.
Although these tools each have strengths and weaknesses, the way you think about firewall policies is consistent across them. You don’t need to master everything in this chapter; learning any one of these tools thoroughly is sufficient for day-to-day work.
8.2 iptables
On older Linux systems, the default firewall management service is iptables. Even though firewalld has been in use for years, many organizations still run iptables in production for various reasons. Given iptables’ tenacity in current environments—and to help you feel confident if an interviewer asks about it—this book still covers the technology in detail. As mentioned, the configuration mindset is shared among tools: mastering iptables will also give you a useful reference point for learning other firewall managers.
The iptables firewall reads configured policy rules from top to bottom. When it finds a matching entry, it immediately stops evaluating and performs the specified action (allow or deny). If no rule matches after evaluating them all, the default policy is applied. Typically, a firewall’s ruleset uses two broad approaches: “allow” and “deny.” If the default policy is deny, you must add explicit allow rules—otherwise nothing gets in. If the default policy is allow, you must add deny rules—otherwise everything gets in and the firewall loses its protective effect.
In iptables terminology, each policy entry for handling or filtering traffic is called a rule. Multiple rules compose a chain, and chains are categorized by where packets are processed:
Process before routing (PREROUTING)
Handle inbound packets (INPUT)
Handle outbound packets (OUTPUT)
Handle forwarded packets (FORWARD)
Process after routing (POSTROUTING)
Generally, traffic sent from the intranet to the internet is more controlled and benign, so the chain used most often is INPUT, which focuses on making it harder for attackers on the internet to breach the intranet.
Consider two rules set by the property manager in your residential community: “no peddlers allowed” and “all vehicles must register at the gate.” Clearly, these rules apply at the main gate (where all traffic must pass), not at each household’s front door. According to the firewall’s top‑down matching order, several situations may occur. If the visitor is a peddler, they’re immediately turned away—no need to register the vehicle. If a visitor arrives by car, rule 1 (“no peddlers”) doesn’t match, so rule 2 applies (“register the vehicle”). If a resident returns home, neither rule matches and the default allow policy applies.
Rules alone don’t ensure safety: security must also decide what action to take on matching traffic—allow, deny, log, ignore. In iptables terminology these are: ACCEPT (allow), REJECT (deny and send a reply), LOG (record event), and DROP (silently discard). “Allow” and “log” are self‑explanatory. The key difference between REJECT and DROP is that DROP discards traffic without responding; REJECT denies and sends back a message indicating “received but rejected,” making it clear to the sender that the traffic was blocked.
Here’s an example to make the difference more intuitive. Suppose you’re watching TV and someone knocks. If you see salespeople through the peephole, you might open the door just enough to say “no thanks” and close it (REJECT). But if you see a creditor with a dozen henchmen, you might refuse to open the door and remain silent, pretending nobody’s home (DROP).
If a Linux system’s firewall action is set to REJECT, the sender sees a response like “destination host unreachable”:
root@linuxprobe:~# ping -c 4 192.168.10.10
PING 192.168.10.10 (192.168.10.10) 56(84) bytes of data.
From 192.168.10.10 icmp_seq=1 Destination Host Unreachable
From 192.168.10.10 icmp_seq=2 Destination Host Unreachable
From 192.168.10.10 icmp_seq=3 Destination Host Unreachable
From 192.168.10.10 icmp_seq=4 Destination Host Unreachable

--- 192.168.10.10 ping statistics ---
4 packets transmitted, 0 received, +4 errors, 100% packet loss, time 3099ms
pipe 4
If the action is DROP, the sender sees a timeout and cannot tell whether traffic was blocked or the host is offline:
root@linuxprobe:~# ping -c 4 192.168.10.10
PING 192.168.10.10 (192.168.10.10) 56(84) bytes of data.

--- 192.168.10.10 ping statistics ---
4 packets transmitted, 0 received, 100% packet loss, time 3000ms
Per the OSI 7‑layer model, iptables operates at Layers 2/3/4, so it can match on source and destination addresses, transport protocols, and service types; once a match occurs, the preconfigured action is applied. Remember: the firewall evaluates rules from top to bottom, so put stricter, higher‑priority rules earlier to avoid errors. Table 8‑1 summarizes common iptables parameters and their meanings. There’s no need to memorize them—refer back as needed.
Because this book targets Red Hat RHEL 10, which no longer ships the legacy iptables manager, use an older RHEL version when you want to practice iptables commands hands‑on.
Table 8‑1 Common iptables parameters and their meanings
| Parameter | Meaning |
|---|---|
| -P | Set the default policy |
| -F | Flush a chain |
| -L | List a chain |
| -A | Append a new rule to the end of a chain |
| -I num | Insert a new rule at the head of a chain |
| -D num | Delete the specified rule |
| -s | Match source address (IP/MASK); add ! to exclude the given IP |
| -d | Match destination address |
| -i ifname | Match packets arriving on the given interface |
| -o ifname | Match packets leaving via the given interface |
| -p | Match protocol, e.g., TCP, UDP, ICMP |
| --dport num | Match destination port |
| --sport num | Match source port |
8.3 firewalld
RHEL 10’s default firewall manager is firewalld, which offers both a CLI and a GUI.
Compared to traditional tools, firewalld supports dynamic updates and introduces the concept of zones—predefined sets of rule templates. You can choose a zone that fits the current scenario and switch policies quickly. For example, suppose you use a laptop at the office, a café, and at home. In terms of security from high to low: home, office, café. We want the following: allow all services at home; allow only file‑sharing in the office; allow only web browsing at the café. In the past, you’d constantly edit rules. Now, you simply preconfigure zones and click to switch, greatly improving policy application efficiency. Common zones in firewalld (the default is public) and their rules are shown in Table 8‑2.
Table 8‑2 Common firewalld zones and their default policies
| Zone | Default policy |
|---|---|
| trusted | Allow all packets |
| home | Deny inbound unless related to outbound; allow traffic related to ssh, mdns, ipp-client, samba-client, dhcpv6-client |
| internal | Same as home |
| work | Deny inbound unless related to outbound; allow traffic related to ssh, ipp-client, dhcpv6-client |
| public | Deny inbound unless related to outbound; allow traffic related to ssh, dhcpv6-client |
| external | Deny inbound unless related to outbound; allow traffic related to ssh |
| dmz | Deny inbound unless related to outbound; allow traffic related to ssh |
| block | Deny inbound unless related to outbound |
| drop | Drop inbound unless related to outbound |
8.3.1 Terminal Management Tool
As noted in Chapter 2, the command‑line terminal is an extremely efficient way to work. firewall-cmd is firewalld’s CLI. Its options are generally provided in long form. Don’t be intimidated: RHEL 10 supports option completion for some commands, including this one (nice!). In other words, beyond completing command names and filenames with Tab, you can also complete the long options listed in Table 8‑3 with Tab. That’s great.
Table 8‑3 firewall-cmd parameters and their meanings
| Parameter | Meaning |
|---|---|
| --get-zones | List all available zones |
| --get-services | List all predefined services |
| --get-active-zones | Show active zones and their associated interfaces |
| --get-default-zone | Show the default zone |
| --set-default-zone=<zone> | Set the default zone and make it permanent |
| --add-source= | Direct traffic from a given IP or subnet into a specified zone |
| --remove-source= | Remove a source IP/subnet from a zone |
| --add-interface=<ifname> | Direct all traffic from a given interface into a specified zone |
| --change-interface=<ifname> | Associate a given interface with a specified zone |
| --list-services | List services allowed in the current zone |
| --list-ports | List ports allowed in the current zone |
| --list-all | Show all settings, resources, ports, and services for the current zone |
| --list-all-zones | Show all settings, resources, ports, and services for all zones |
| --add-service=<service> | Allow the specified service in the default zone |
| --remove-service=<service> | Disallow the specified service in the default zone |
| --add-port=<port or proto> | Allow the specified port in the default zone |
| --remove-port=<port or proto> | Disallow the specified port in the default zone |
| --query-service=<service> | Query whether the specified service is allowed |
| --query-port=<port or proto> | Query whether the specified port is allowed |
| --add-rich-rule='<rule>' | Add a rich (advanced) rule |
| --remove-rich-rule='<rule>' | Delete a rich rule |
| --reload | Reload configuration so “permanent” rules take effect immediately, overwriting current runtime |
| --panic-on | Enable panic mode (deny all traffic) |
| --panic-off | Disable panic mode (restore normal traffic handling) |
| --permanent | Make a rule permanent (persists across reboots) |
As with other firewall tools on Linux, rules configured via firewalld default to Runtime mode (effective immediately, lost on reboot). If you want rules to persist, use Permanent mode by adding --permanent to firewall-cmd—those rules survive reboots.
However, permanent rules are “unforgiving” in that they don’t take effect until after a reboot. To apply them right away, run firewall-cmd --reload.
Tips:
Runtime: takes effect immediately, lost after reboot.
Permanent: does not take effect immediately, persists across reboots (requires reload or reboot).
The following labs are straightforward, but pay careful attention to whether you’re working in Runtime or Permanent mode. If you ignore this detail, your changes may not produce the expected outcome even if the commands are “correct.”
Experiment 1: Check which zone firewalld is currently using.
This step is crucial. Before configuring rules, you must see which zone is active; otherwise, your rules may not take effect immediately.
root@linuxprobe:~# firewall-cmd --get-default-zone
public
Experiment 2: Query which zone a given interface is bound to.
Servers in production commonly have multiple network interfaces. For example, a gateway server typically has two: one facing the public internet and one facing the intranet. The policies for those interfaces certainly differ. Bind different zones to different interfaces according to where their traffic originates to achieve flexible control.
root@linuxprobe:~# firewall-cmd --get-zone-of-interface=ens160
public
Experiment 3: Change the interface’s zone to external and make it persist after reboot.
Use --change-interface with the correct interface name (confirm with ifconfig if unsure). After setting it, query the zone again to verify the change.
root@linuxprobe:~# firewall-cmd --permanent --zone=external --change-interface=ens160
The interface is under control of NetworkManager, setting zone to 'external'.
success
root@linuxprobe:~# firewall-cmd --permanent --get-zone-of-interface=ens160
external
Experiment 4: Set the default zone to public.
The default zone applies globally to all interfaces and has a lower priority than explicit per‑interface settings. In the output below, the default is public, but interface ens160 is external, so the interface’s zone takes precedence.
Think of the default zone as a general policy. A cafeteria provides disposable utensils for everyone, but environmentalists bring their own. If you bring your own utensils, use those; otherwise, use the cafeteria’s set.
root@linuxprobe:~# firewall-cmd --set-default-zone=public
Warning: ZONE_ALREADY_SET: public
success
root@linuxprobe:~# firewall-cmd --get-default-zone
public
root@linuxprobe:~# firewall-cmd --get-zone-of-interface=ens160
external
Experiment 5: Enable and disable firewalld’s panic mode.
Need to block every network connection in one second? The knee‑jerk answer is “pull the cable!”—which works, physically. But what if you’re in Beijing and the server is far away? Panic mode is your friend. --panic-on immediately severs all connections; --panic-off restores them. Be careful: panic mode cuts everything, so think twice before pressing Enter while managing a remote server.
root@linuxprobe:~# firewall-cmd --panic-on
success
root@linuxprobe:~# firewall-cmd --panic-off
success
Experiment 6: Query whether SSH and HTTPS traffic is allowed.
You can omit --zone and let firewall-cmd query the default zone, which reduces typing. But if the default zone differs from an interface’s bound zone, conflicts can arise—so it’s best practice to include --zone explicitly.
root@linuxprobe:~# firewall-cmd --query-service=ssh
yes
root@linuxprobe:~# firewall-cmd --query-service=https
no
Experiment 7: Permanently allow HTTPS traffic and make it take effect immediately.
By default, modifications are Runtime (apply now, lost on reboot), which you should generally avoid in work and exams. With --permanent, changes do not apply immediately; they take effect after a reload or reboot. After adding an allow rule for HTTPS, querying the current (runtime) policy still shows “no”:
root@linuxprobe:~# firewall-cmd --permanent --add-service=https
success
root@linuxprobe:~# firewall-cmd --query-service=https
no
If you don’t want to reboot, run --reload:
root@linuxprobe:~# firewall-cmd --reload
success
root@linuxprobe:~# firewall-cmd --query-service=https
yes
Experiment 8: Permanently disallow HTTP traffic and make it take effect immediately.
If HTTP isn’t allowed by default, you’ll see a “Warning: NOT_ENABLED: http” message—it doesn’t affect the outcome.
root@linuxprobe:~# firewall-cmd --permanent --remove-service=http
Warning: NOT_ENABLED: http
success
root@linuxprobe:~# firewall-cmd --reload
success
Experiment 9: Allow access to ports 8080 and 8081 (TCP) for the current runtime only.
Since this is runtime‑only, there’s no need for --permanent. After success, use --list-ports to view all port‑based rules.
root@linuxprobe:~# firewall-cmd --add-port=8080-8081/tcp
success
root@linuxprobe:~# firewall-cmd --list-ports
8080-8081/tcp
Experiment 10: Forward traffic originally sent to local port 888 to port 22, both now and permanently.
SSH (Chapter 9) is a remote‑control protocol that uses TCP/22. If you want users to reach SSH via a different port, use port forwarding. With port forwarding, a new port automatically forwards requests to the service’s original port, letting users connect through the new entry point.
Here’s an analogy. Xiao Qiang works at an electronics factory and fancies Xiao Hua on assembly line #3 but is too shy to confess. He writes a love letter and gives it to the gatekeeper, Grandpa Zhang, asking him to pass it on. Delivery changes from “Xiao Qiang → Xiao Hua” to “Xiao Qiang → Grandpa Zhang → Xiao Hua,” yet the letter still gets delivered.
The firewall-cmd syntax for port forwarding is a bit long; here’s the template:
firewall-cmd --permanent --zone=<zone> --add-forward-port=port=<source-port>:proto=<protocol>:toport=<target-port>:toaddr=<target-IP-address>
The target IP is usually the server’s local address:
root@linuxprobe:~# firewall-cmd --permanent --add-forward-port=port=888:proto=tcp:toport=22:toaddr=192.168.10.10
success
root@linuxprobe:~# firewall-cmd --reload
success
On the client, try connecting to port 888 on 192.168.10.10; it works:
[root@client A ~]# ssh -p 888 192.168.10.10
The authenticity of host '[192.168.10.10]:888 ([192.168.10.10]:888)' can't be established.
ED25519 key fingerprint is SHA256:0R7Kuk/yCTlJ+E4G9y9iX/A/hAklHkALm5ZUgnJ01cc.
This key is not known by any other names.
Are you sure you want to continue connecting (yes/no/[fingerprint])? yes
Warning: Permanently added '[192.168.10.10]:888' (ED25519) to the list of known hosts.
root@192.168.10.10's password: Enter the remote root administrator's password here
Last login: Thu Mar 20 11:36:54 2025 from 192.168.10.20
Experiment 11: Configure a rich rule.
A rich rule is an advanced, fine‑grained firewall policy. It can match on services, ports, source and destination addresses, and more; rich rules also have the highest priority. For example, configure a rich rule in firewalld that rejects all access from the 192.168.10.0/24 subnet to the local SSH service (port 22):
root@linuxprobe:~# firewall-cmd --permanent --add-rich-rule="rule family="ipv4" source address="192.168.10.0/24" service name="ssh" reject"
success
root@linuxprobe:~# firewall-cmd --reload
success
On the client, an attempt to SSH to 192.168.10.10 is rejected:
[root@client A ~]# ssh 192.168.10.10
ssh: connect to host 192.168.10.10 port 22: Connection refused
Tips:
“A man” vs. “a tall man with big eyes and a dimple on the right cheek”—the latter is more precise, reduces false matches, and should be matched first.
8.3.2 Graphical Management Tool
Across many Linux distributions, few GUI tools are satisfying enough to recommend—but firewall-config is one of them. It’s the GUI companion to firewalld and can accomplish nearly everything you can do on the command line. Frankly, even without strong command‑line skills, you can configure RHEL 10’s firewall policies well using this tool. By default, firewall-config isn’t installed, so we’ll use dnf to install it—which in turn requires a properly configured software repository.
First, set the VM’s “CD/DVD (SATA)” to “Use ISO image file” and select the downloaded system image (see Figure 8‑2).
Companion software resources for this book can be downloaded here: https://www.linuxprobe.com/tools
Red Hat Enterprise Linux (RHEL) 10 — required OS:
Produced by Red Hat, the global leader in open‑source software and enterprise services, RHEL is a remarkably stable and capable Linux distribution.
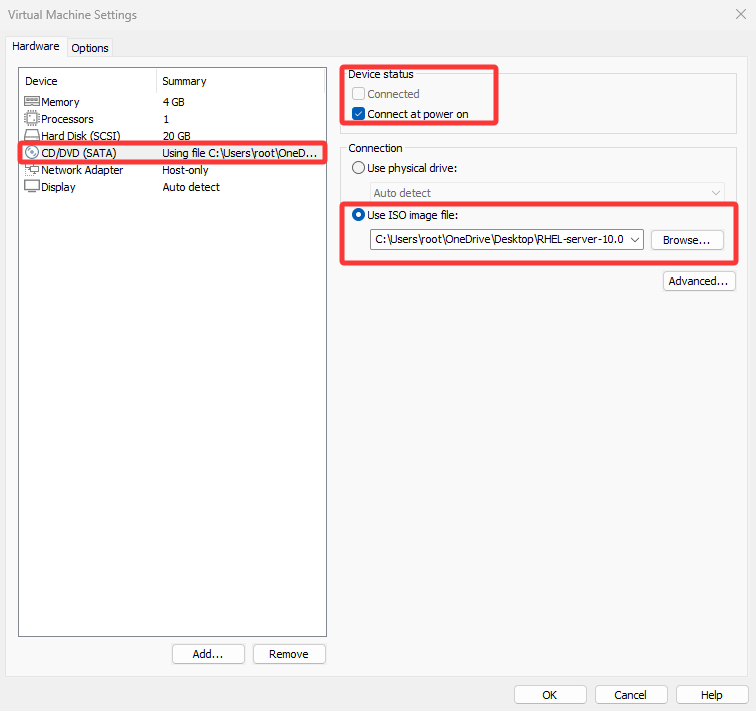
Figure 8-2 Point the VM’s optical drive device to the ISO image
Tips:
The downloaded system image is a file ending in .iso. Select it—no need to extract it.
Mount the ISO image from the optical device to /media/cdrom:
root@linuxprobe:~# mkdir -p /media/cdrom
root@linuxprobe:~# mount /dev/cdrom /media/cdrom
mount: /media/cdrom: WARNING: source write-protected, mounted read-only.
To ensure the repository remains available, it’s more rigorous to write the mount information into /etc/fstab so it persists:
root@linuxprobe:~# vim /etc/fstab
#
# /etc/fstab
# Created by anaconda on Wed Mar 12 19:35:26 2025
#
# Accessible filesystems, by reference, are maintained under '/dev/disk/'.
# See man pages fstab(5), findfs(8), mount(8) and/or blkid(8) for more info.
#
# After editing this file, run 'systemctl daemon-reload' to update systemd
# units generated from this file.
#
UUID=408f4a3d-a4d3-4a44-bb23-6988cdbd10bf /                  xfs     defaults        0 0
UUID=4cf8ecae-bcb6-4b1e-8001-968b33643a8a /boot              xfs     defaults        0 0
UUID=1FB8-9199          /boot/efi               vfat    umask=0077,shortname=winnt	 0 2
UUID=d936c726-45a7-4ca2-8932-c54f84a3d787 none               swap    defaults        0 0
/dev/cdrom 								  /media/cdrom		iso9660	 defaults 		 0 0
Finally, use the Vim text editor to create the repository configuration file. Unlike earlier releases, RHEL 10 requires two repositories ([BaseOS] and [AppStream])—both are mandatory. See Section 4.1.4 for an explanation of the parameters used below.
root@linuxprobe:~# vim /etc/yum.repos.d/rhel10.repo
[BaseOS]
name=BaseOS
baseurl=file:///media/cdrom/BaseOS
enabled=1
gpgcheck=0
[AppStream]
name=AppStream
baseurl=file:///media/cdrom/AppStream
enabled=1
gpgcheck=0
With the repository correctly configured, you can install software with yum or dnf. Aside from their names, the usage is identical; feel free to substitute yum for dnf. Install the GUI:
root@linuxprobe:~# dnf install firewall-config
Updating Subscription Management repositories.
BaseOS                                          2.7 MB/s | 2.7 kB     00:00
AppStream                                       2.7 MB/s | 2.8 kB     00:00
Dependencies resolved.
================================================================================
 Package              Arch        Version                  Repository      Size
================================================================================
Installing:
 firewall-config      noarch      2.2.1-1.el10             AppStream       90 k
Installing dependencies:
 dbus-x11             x86_64      1:1.14.10-4.el10         AppStream       26 k

Transaction Summary
================================================================================
Install  2 Packages

Total size: 116 k
Installed size: 1.0 M
Is this ok [y/N]: y
Downloading Packages:
Running transaction check
Transaction check succeeded.
Running transaction test
Transaction test succeeded.
Running transaction
  Preparing        :                                                        1/1
  Installing       : dbus-x11-1:1.14.10-4.el10.x86_64                       1/2
  Installing       : firewall-config-2.2.1-1.el10.noarch                    2/2
  Running scriptlet: firewall-config-2.2.1-1.el10.noarch                    2/2
Installed products updated.

Installed:
  dbus-x11-1:1.14.10-4.el10.x86_64      firewall-config-2.2.1-1.el10.noarch

Complete!
After installation, the firewall-config GUI looks like Figure 8‑3. Its features are as follows:
- Choose between Runtime and Permanent configuration modes.
- List of selectable zone policy sets.
- List of common system services.
- Source address allow/deny lists.
- The zone currently in use.
- Manage services within the selected zone.
- Manage ports within the selected zone.
- Set allowed protocols.
- Set allowed ports.
- Enable or disable SNAT (source network address translation).
- Configure port‑forwarding policies.
- Control traffic for ICMP requests.
- Manage rich rules.
- Services in the selected zone (check a box to allow related traffic).
- The running status of firewall-config.
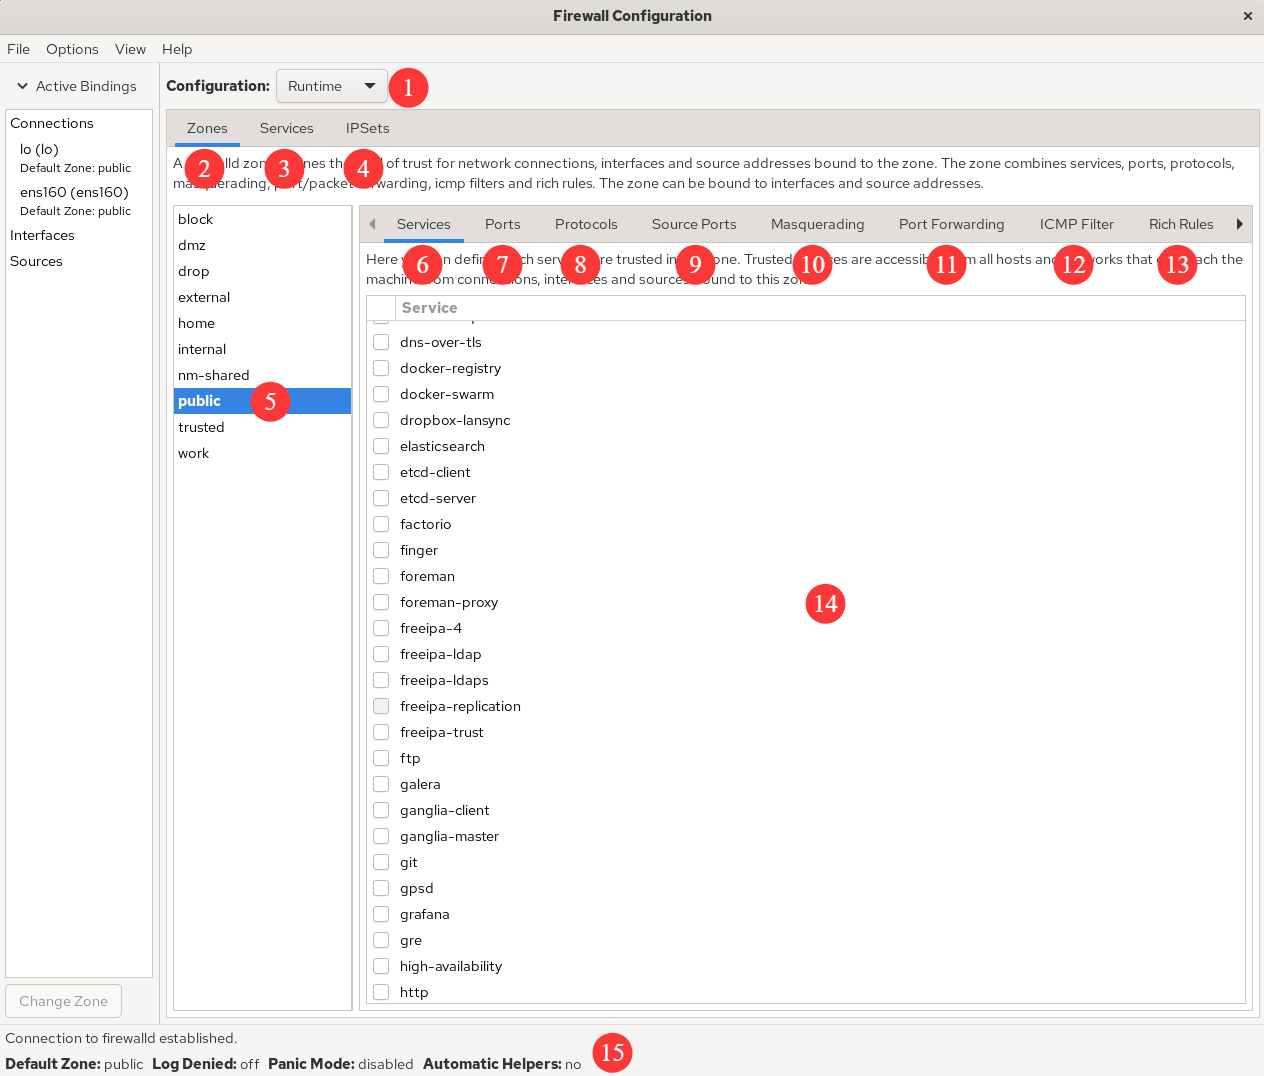
Figure 8-3 The firewall-config GUI
In addition to the features listed in Figure 8‑3, there’s an Interfaces tab to bind interfaces to zones and a Sources tab to bind IP addresses to zones. One more reminder: firewall-config saves changes automatically—no need for a second confirmation.
Let’s practice.
First, allow http traffic in the current zone for runtime only, as shown in Figure 8‑4.
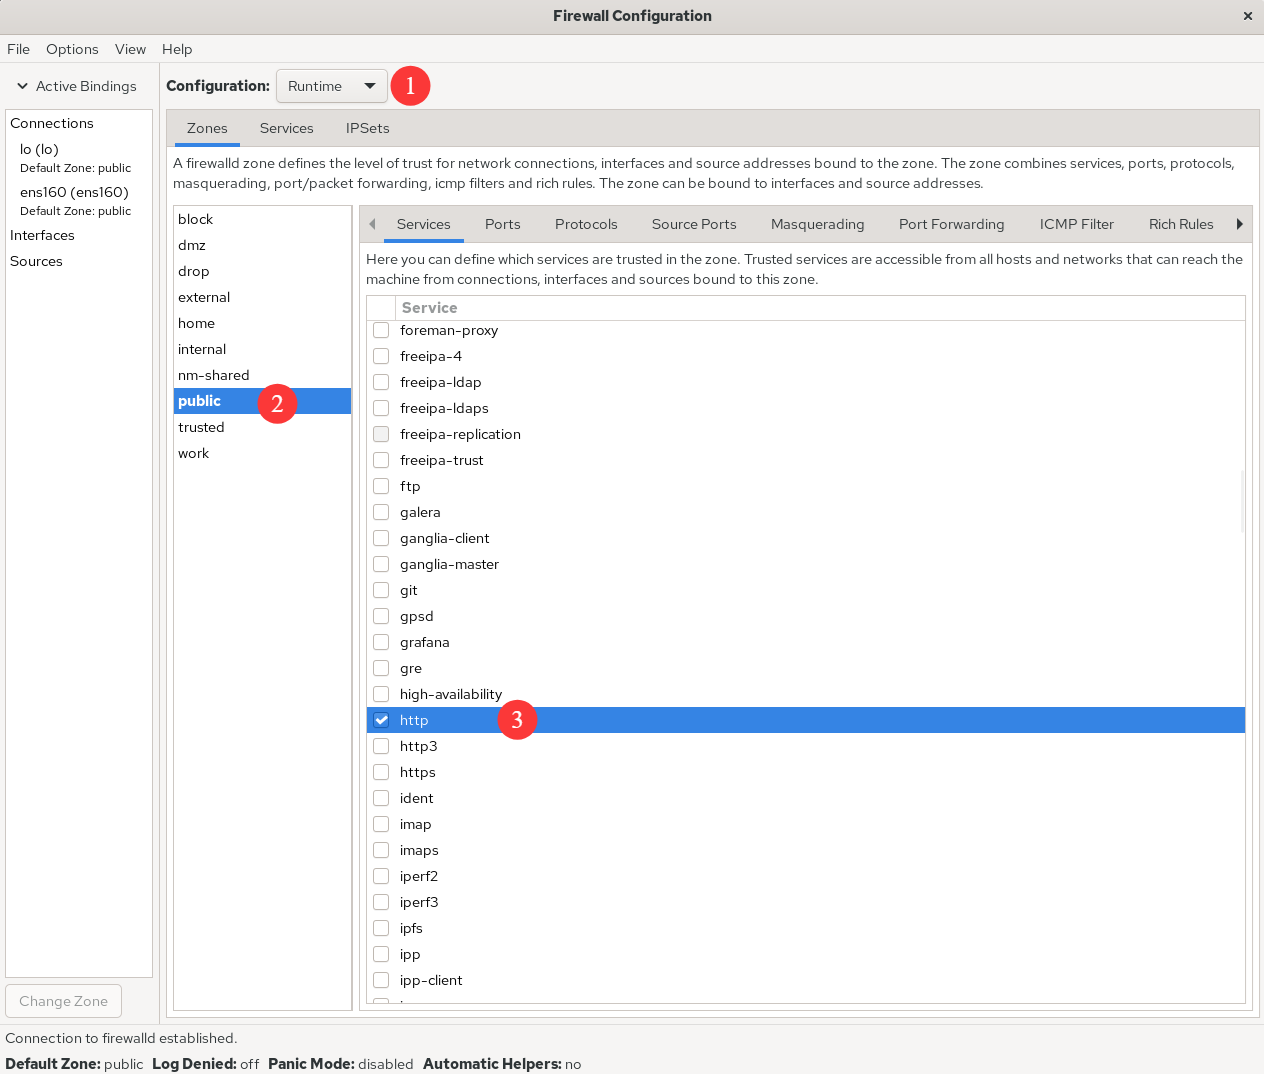
Figure 8-4 Allow traffic for the http service
Next, add a rule to allow TCP ports 8080–8088 and set it to Permanent so it persists across reboots. After configuring the rule as shown in Figure 8‑5, choose Options → Reload Firewalld (Figure 8‑6) to make it take effect immediately. This mirrors --reload on the command line.
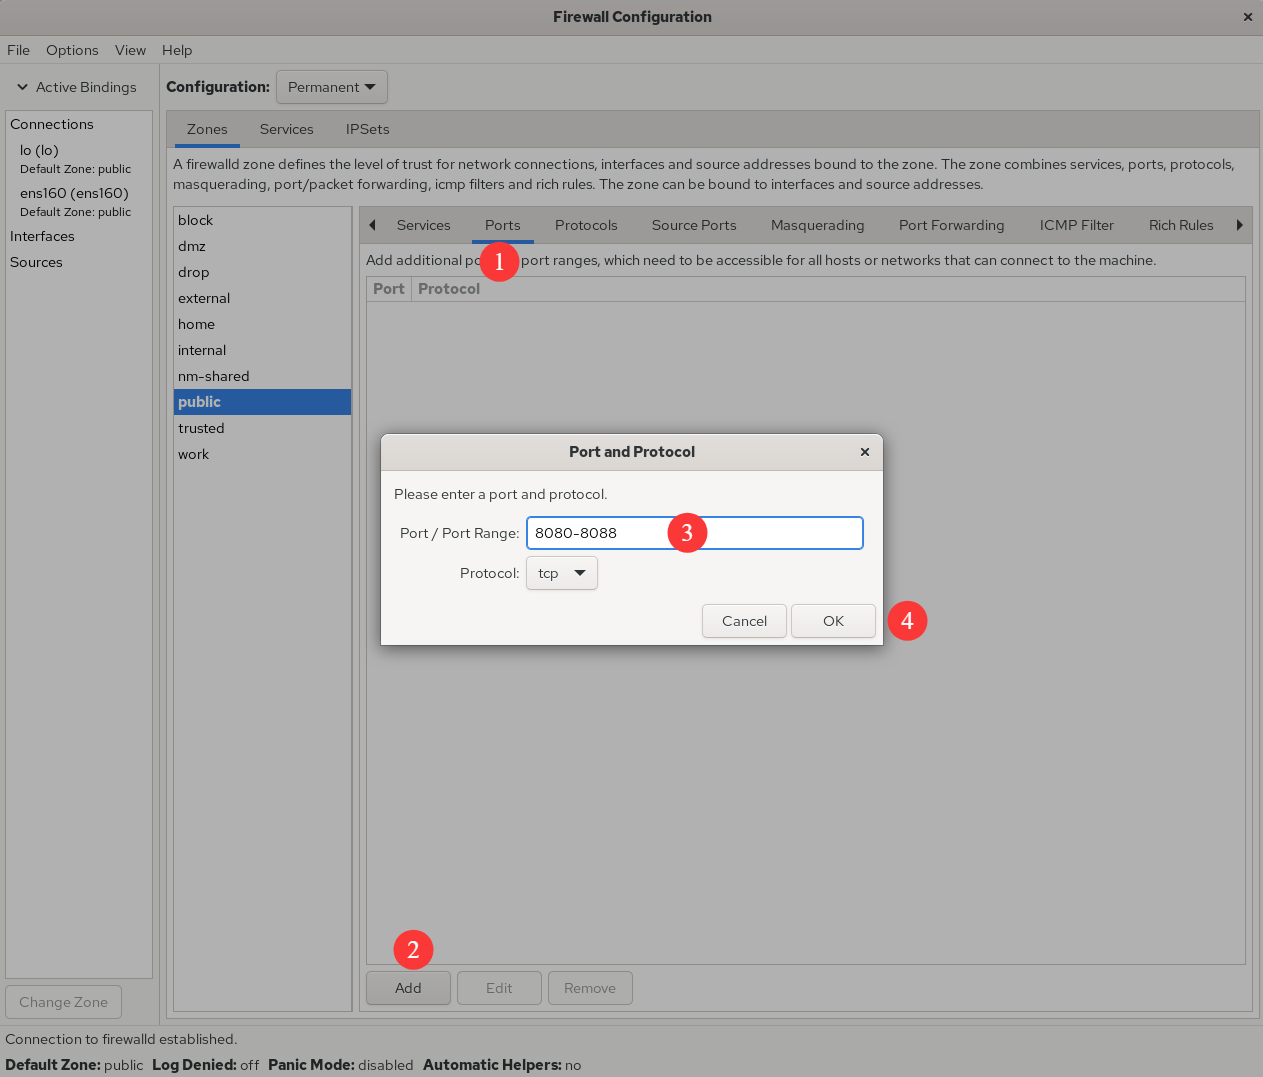
Figure 8-5 Allow traffic to ports 8080–8088 (TCP)
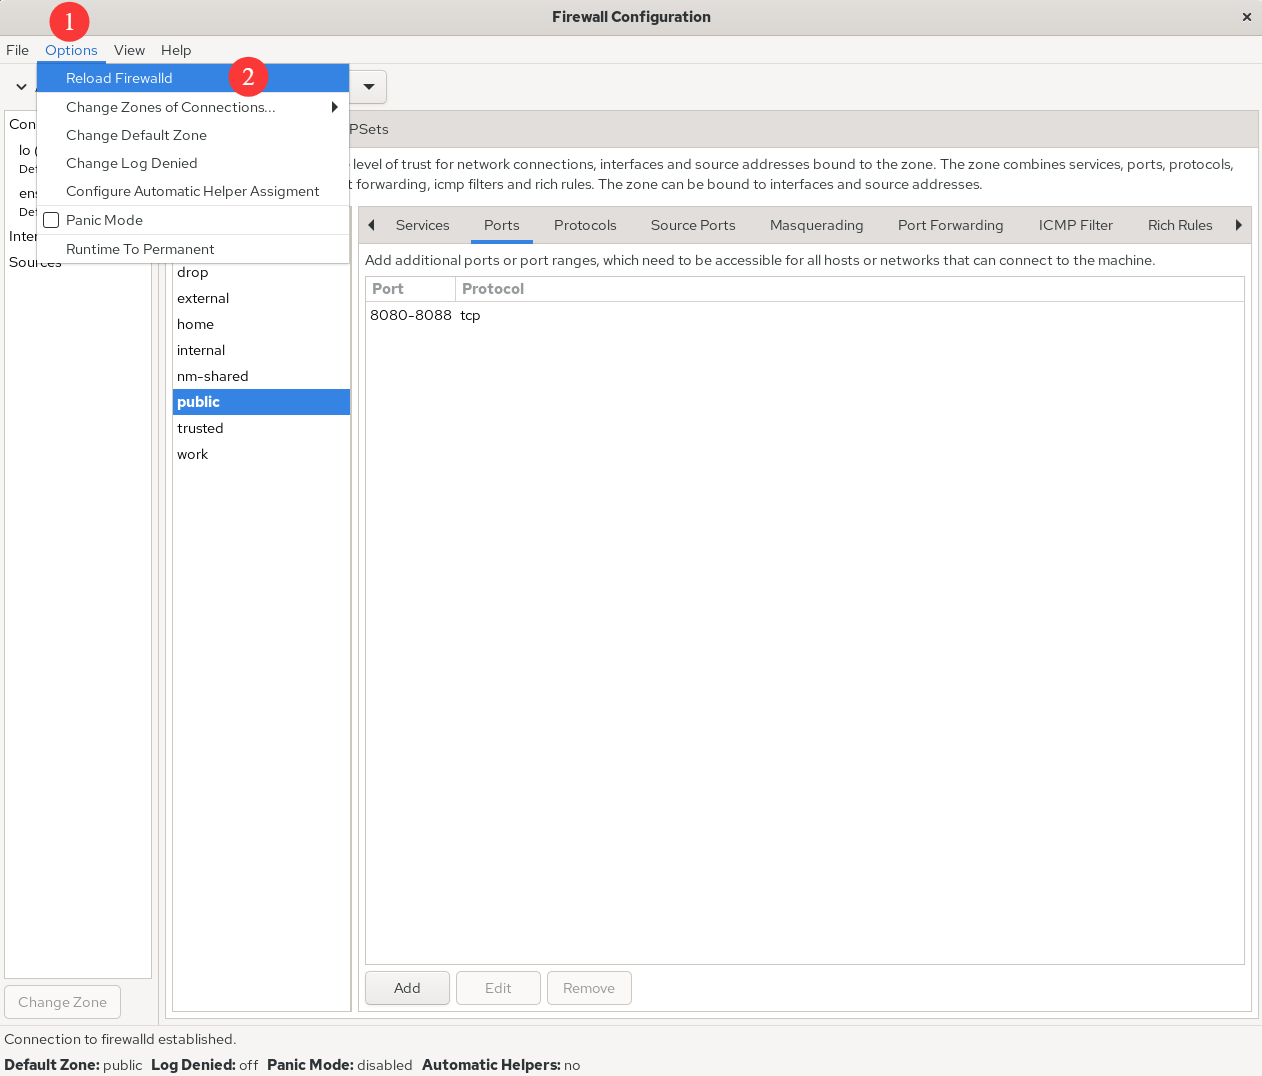
Figure 8-6 Apply rules immediately by reloading firewalld
Earlier, we mentioned SNAT (Source Network Address Translation). SNAT mitigates IPv4 address scarcity by allowing many hosts on a private network to access the internet via a single public IP. You use SNAT every day, often without realizing it—for example, when you browse this book’s companion site www.linuxprobe.com through your home router (gateway).
Compare the two scenarios in Figure 8‑7 (without SNAT) and Figure 8‑8 (with SNAT). In the LAN without SNAT, multiple PCs exist, but when the gateway lacks SNAT, a website on the internet cannot route response packets to a private IP, and the PC won’t receive them. In the LAN with SNAT, the website sends responses back to the gateway’s public IP, which then forwards them to the correct PC.
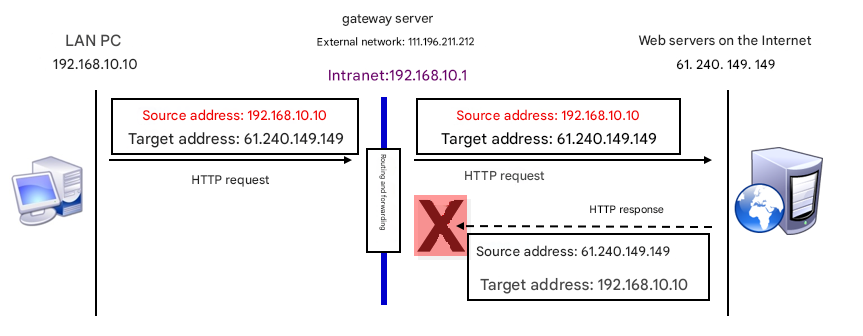
Figure 8-7 A network without SNAT
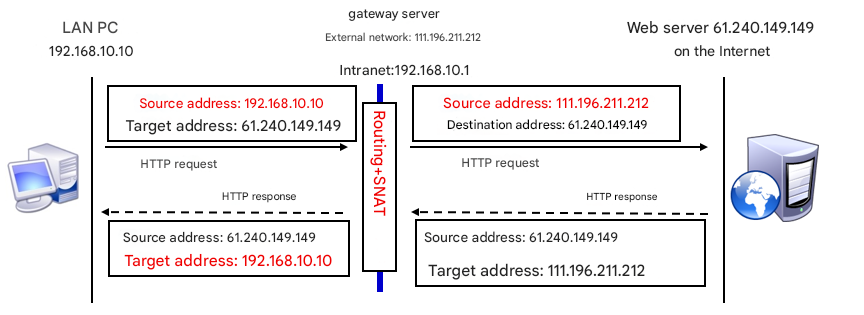
Figure 8-8 A network using SNAT
Implementing SNAT with iptables can be tedious, but in firewall-config it’s a breeze. Configure it as in Figure 8‑9 and check Masquerade zone to enable SNAT automatically.
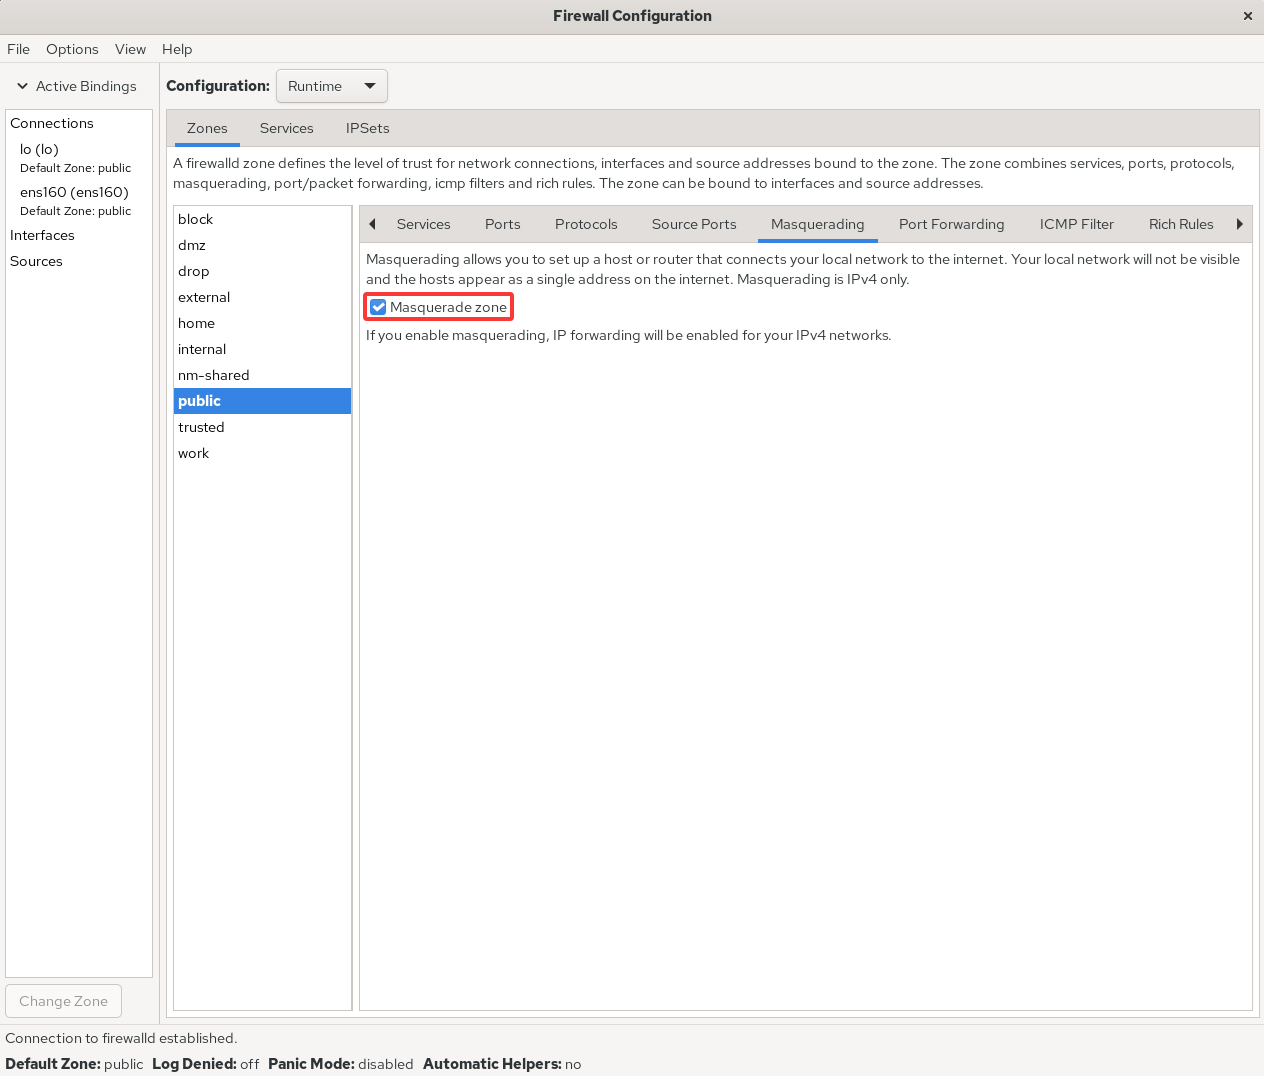
Figure 8-9 Enable SNAT in the firewall
To show the GUI approach for tasks we handled with firewall-cmd, here’s the same port‑forwarding example: forward local port 888 to port 22, with both runtime and permanent effect (Figures 8‑10 and 8‑11).
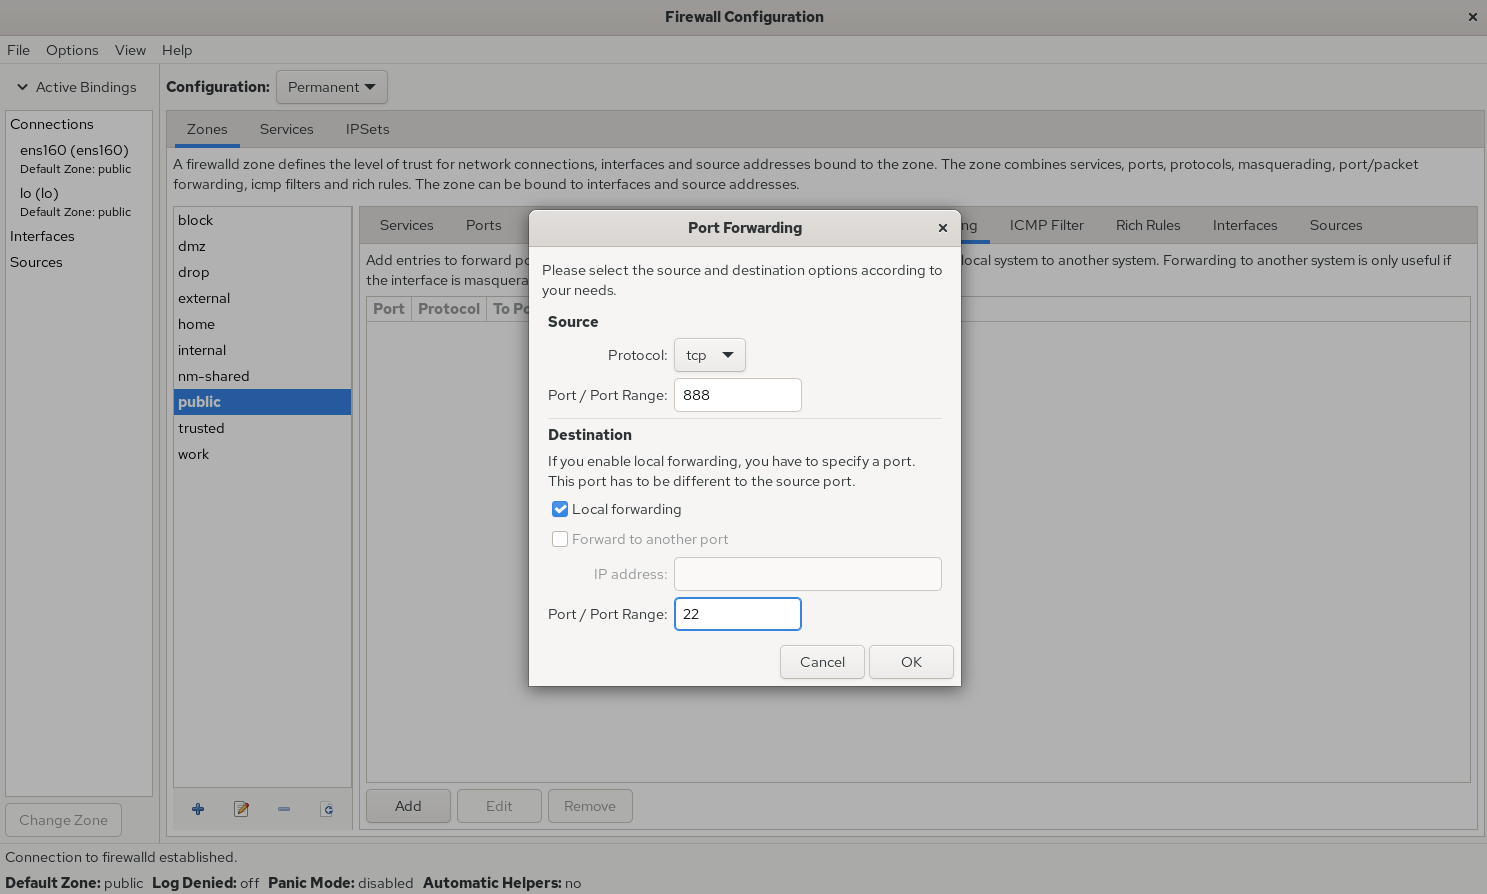
Figure 8-10 Configure local port forwarding
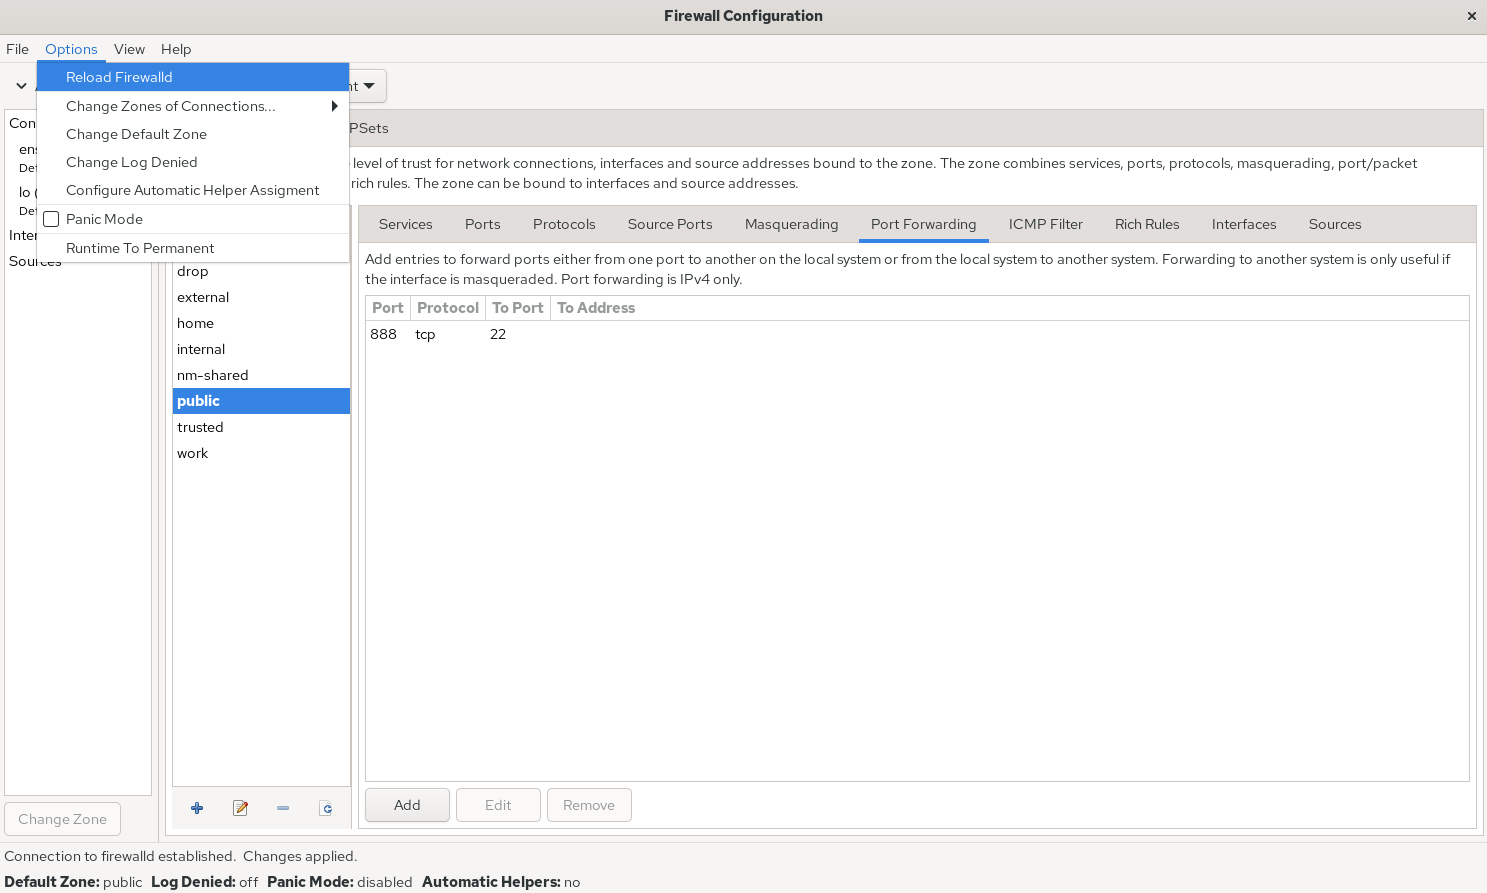
Figure 8-11 Apply firewall rules immediately
Configuring rich rules on the command line can be tiring; the GUI makes it much easier. For example, define what action the firewall should take when host 192.168.10.20 accesses local port 1234, as shown in Figure 8‑12. The Element section can match on service name, port, protocol, and more. The inverted checkbox next to Source and Destination flips the match—select it to target everything except the entered address. Log records events to the log file; after choosing a log Level, entries are recorded accordingly for later analysis.
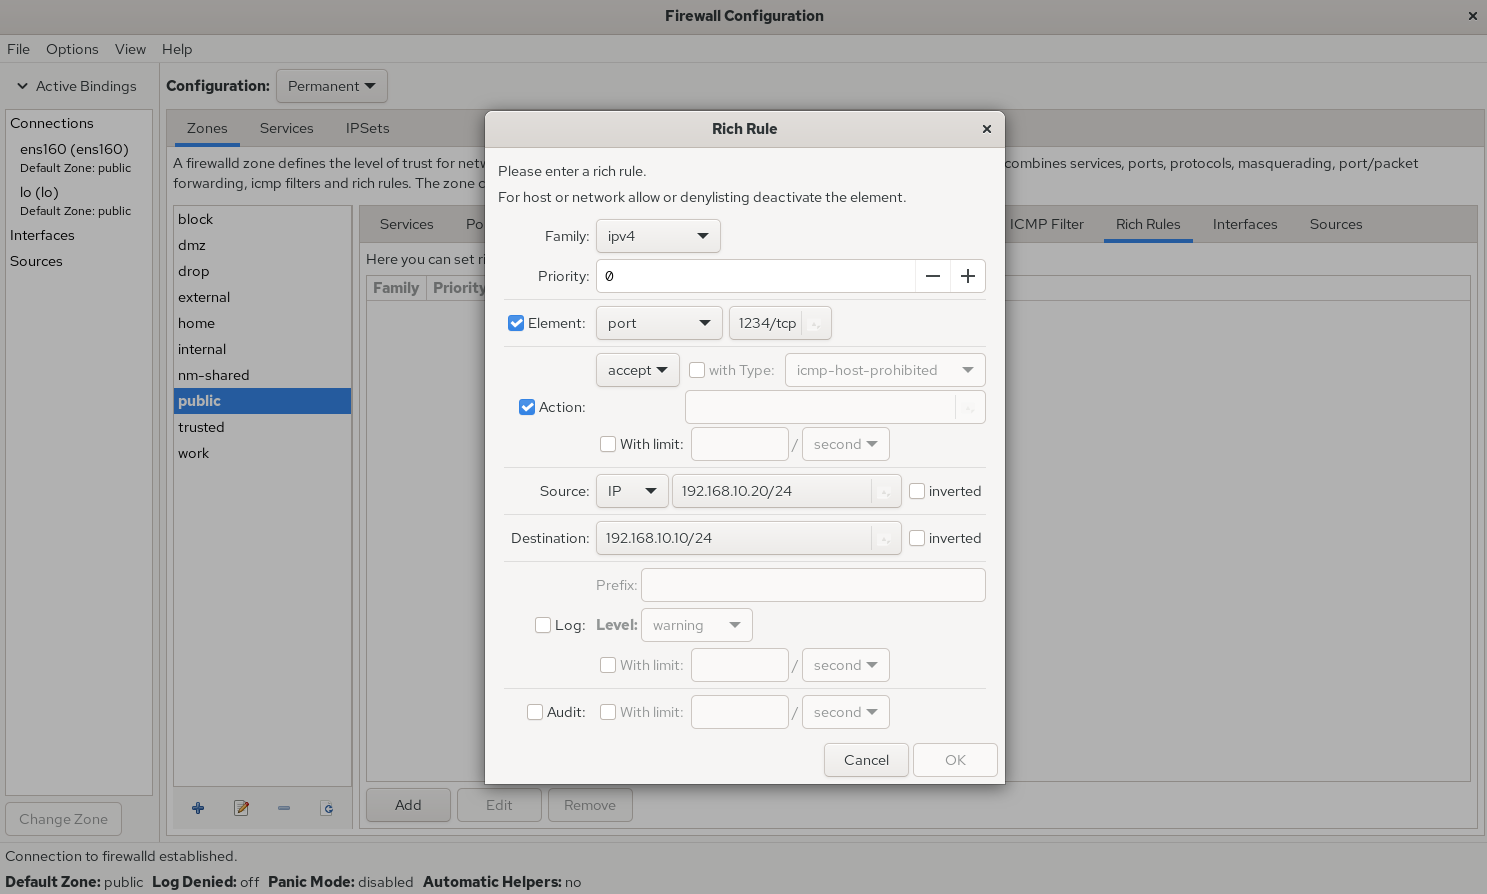
Figure 8-12 Configure a rich rule
If a production server has multiple interfaces providing services (quite common), the zone policies for the intranet‑facing interfaces will differ from those for the internet‑facing ones. Bind interfaces to firewall zones (Figures 8‑13 and 8‑14) so that traffic from different interfaces is governed by the appropriate policy—monitoring becomes more targeted and effective.
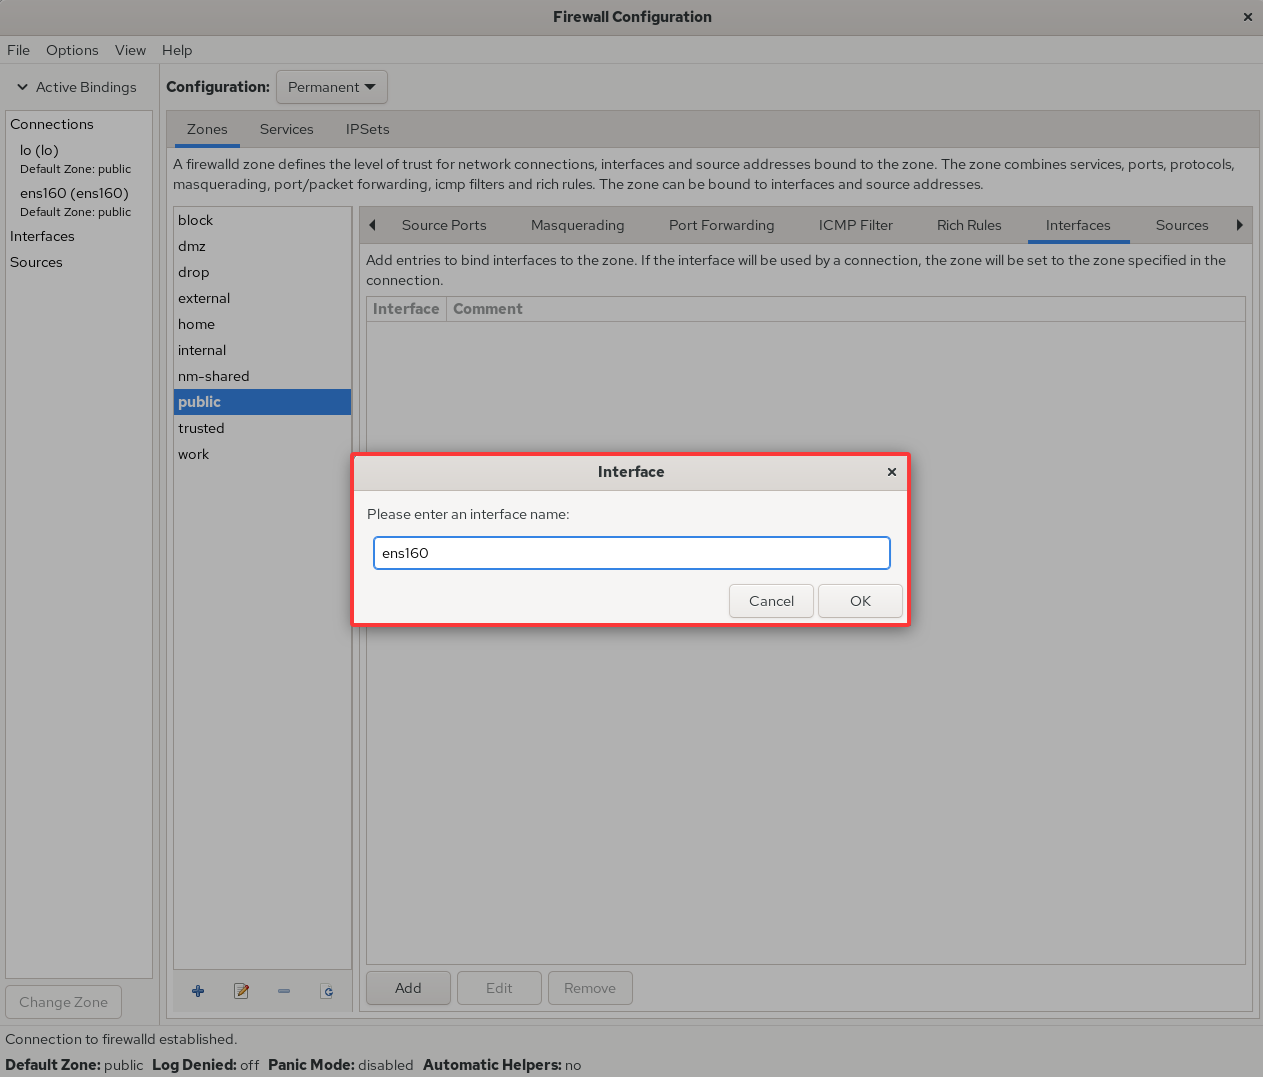
Figure 8-13 Bind an interface to a firewall zone
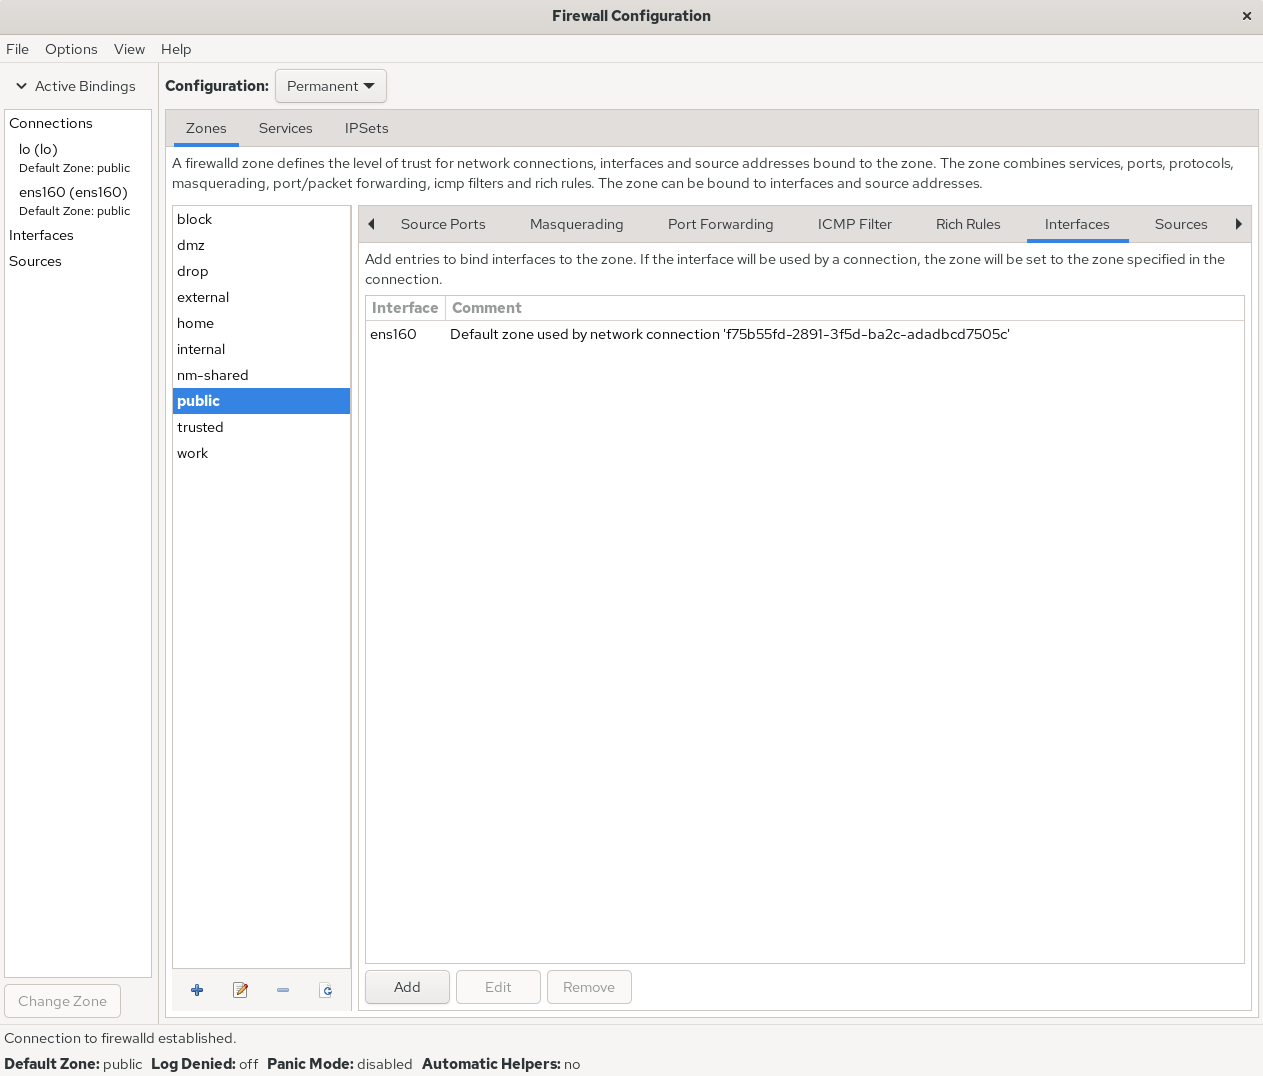
Figure 8-14 Interface–zone binding complete
To close, firewall-config is genuinely useful. Many previously long, complex commands are replaced by clear GUI controls, and rule setup is straightforward—more than sufficient for daily operations. The guiding principle bears repeating: as long as you can achieve the required functionality, feel free to use whichever tool you prefer.
8.4 Access Control Lists for Services
TCP Wrappers was a service access-control facility enabled by default on RHEL 5/6. It could allow or deny requests to local services based on the source host’s address and the target service on the local machine. In RHEL 10 it has been officially replaced by firewalld. In other words, Linux historically exposed two “layers” of firewalling: the first is the TCP/IP–level packet filter discussed earlier; TCP Wrappers, by contrast, controls whether specific services on Linux are allowed to accept requests. In that sense it protects the system at a higher layer.
TCP Wrappers’ policy is defined by two control-list files. You can edit the allow list to permit requests to a service, or edit the deny list to block them. Changes take effect immediately. The system first checks the allow-list file (/etc/hosts.allow). If a matching allow rule is found, the request is permitted. If no match is found, it checks the deny-list file (/etc/hosts.deny). If a matching deny rule is found, the request is refused. If neither file matches, the request is permitted by default.
Because RHEL 10 no longer supports the TCP Wrappers facility, the following demonstration uses an older release. The control-list syntax is simple; Table 8‑4 shows common client address match patterns.
Table 8-4 Common client address match patterns in TCP Wrappers control-list files
| Client match pattern | Example | Clients matched by the example |
|---|---|---|
| Single host | 192.168.10.10 | The host with IP address 192.168.10.10 |
| Specific subnet | 192.168.10. | All hosts in the 192.168.10.0/24 network |
| Specific subnet | 192.168.10.0/255.255.255.0 | All hosts in the 192.168.10.0/24 network |
| Specific DNS suffix | .linuxprobe.com | All hosts whose DNS suffix is .linuxprobe.com |
| Specific host name | www.linuxprobe.com | The host named www.linuxprobe.com |
| All clients | ALL | Matches every host |
When configuring TCP Wrappers, follow two principles:
When writing deny rules, specify the service name, not the protocol name.
It’s recommended to write deny rules first, then allow rules, so you can observe the effects clearly.
Now create a deny-list rule that blocks all access to the local sshd service (no need to remove comments already present in /etc/hosts.deny):
root@linuxprobe:~# vim /etc/hosts.deny
#
# hosts.deny This file contains access rules which are used to
# deny connections to network services that either use
# the tcp_wrappers library or that have been
# started through a tcp_wrappers-enabled xinetd.
#
# The rules in this file can also be set up in
# /etc/hosts.allow with a 'deny' option instead.
#
# See 'man 5 hosts_options' and 'man 5 hosts_access'
# for information on rule syntax.
# See 'man tcpd' for information on tcp_wrappers
sshd:*
root@linuxprobe:~# ssh 192.168.10.10
ssh_exchange_identification: read: Connection reset by peer
Next, add an allow-list rule that permits all traffic from the 192.168.10.0/24 subnet to the local sshd service. You’ll see the server immediately allows SSH connections—very straightforward:
root@linuxprobe:~# vim /etc/hosts.allow
#
# hosts.allow This file contains access rules which are used to
# allow or deny connections to network services that
# either use the tcp_wrappers library or that have been
# started through a tcp_wrappers-enabled xinetd.
#
# See 'man 5 hosts_options' and 'man 5 hosts_access'
# for information on rule syntax.
# See 'man tcpd' for information on tcp_wrappers
sshd:192.168.10.

root@linuxprobe:~# ssh 192.168.10.10
The authenticity of host '192.168.10.10 (192.168.10.10)' can't be established.
ECDSA key fingerprint is 70:3b:5d:37:96:7b:2e:a5:28:0d:7e:dc:47:6a:fe:5c.
Are you sure you want to continue connecting (yes/no)? yes
Warning: Permanently added '192.168.10.10' (ECDSA) to the list of known hosts.
root@192.168.10.10's password: Enter the root administrator password here
Last login: Wed May  4 07:56:29 2025
root@linuxprobe:~#
8.5 Cockpit Web Console
First, cockpit is an English word meaning “the control seat or compartment of an airplane, ship, or race car” (see Figure 8‑15)—a name that hints at its rich, centralized capabilities. Second, Cockpit is a web-based graphical management console that’s friendly to users; even beginners can get productive quickly. It’s also naturally cross‑platform and has been widely adopted for managing servers, containers, and virtual machines. Finally, Red Hat treats Cockpit as a first‑class tool, shipping it by default on RHEL 10 and CentOS Stream; Fedora includes it as well.

Figure 8-15 Cockpit schematic
Cockpit is already installed by default. Verify with dnf:
root@linuxprobe:~# dnf install cockpit
Updating Subscription Management repositories.
BaseOS                                          2.7 MB/s | 2.7 kB     00:00
AppStream                                       2.7 MB/s | 2.8 kB     00:00
Package cockpit-323-1.el10.x86_64 is already installed.
Dependencies resolved.
Nothing to do.
Complete!
The service isn’t started automatically; enable it and configure it to start at boot:
root@linuxprobe:~# systemctl start cockpit
root@linuxprobe:~# systemctl enable cockpit.socket
On the host (your physical machine), open Network & Internet → Advanced network settings, locate the VMnet1 adapter, and click Edit. Configure an IP address from the same subnet as the guest VM so the two can communicate (Figures 8‑16 and 8‑17).
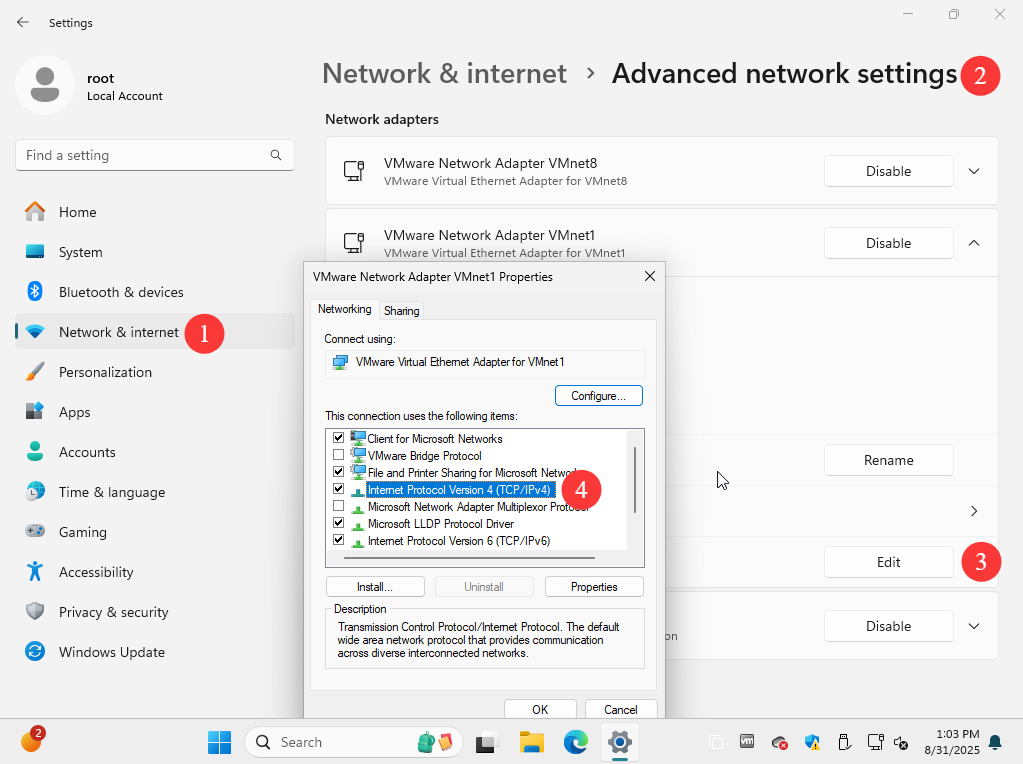
Figure 8-16 Enter the advanced network settings view
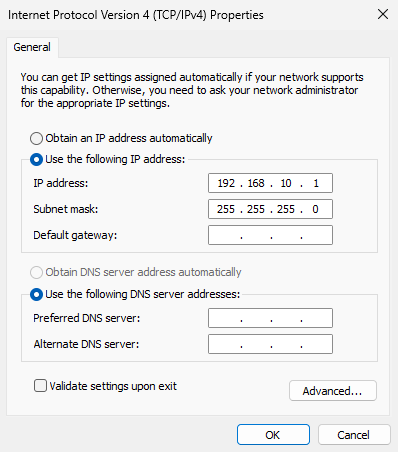
Figure 8-17 Configure the adapter’s IP address
In your browser, visit VM-IP:9090 to access Cockpit. Because Cockpit uses HTTPS with a locally issued certificate, you’ll need to trust the certificate before proceeding (Figure 8‑18).
If you haven’t configured the Linux network interface yet using the method in Chapter 4, don’t worry—Chapter 9 shows a graphical configuration approach you can try later.
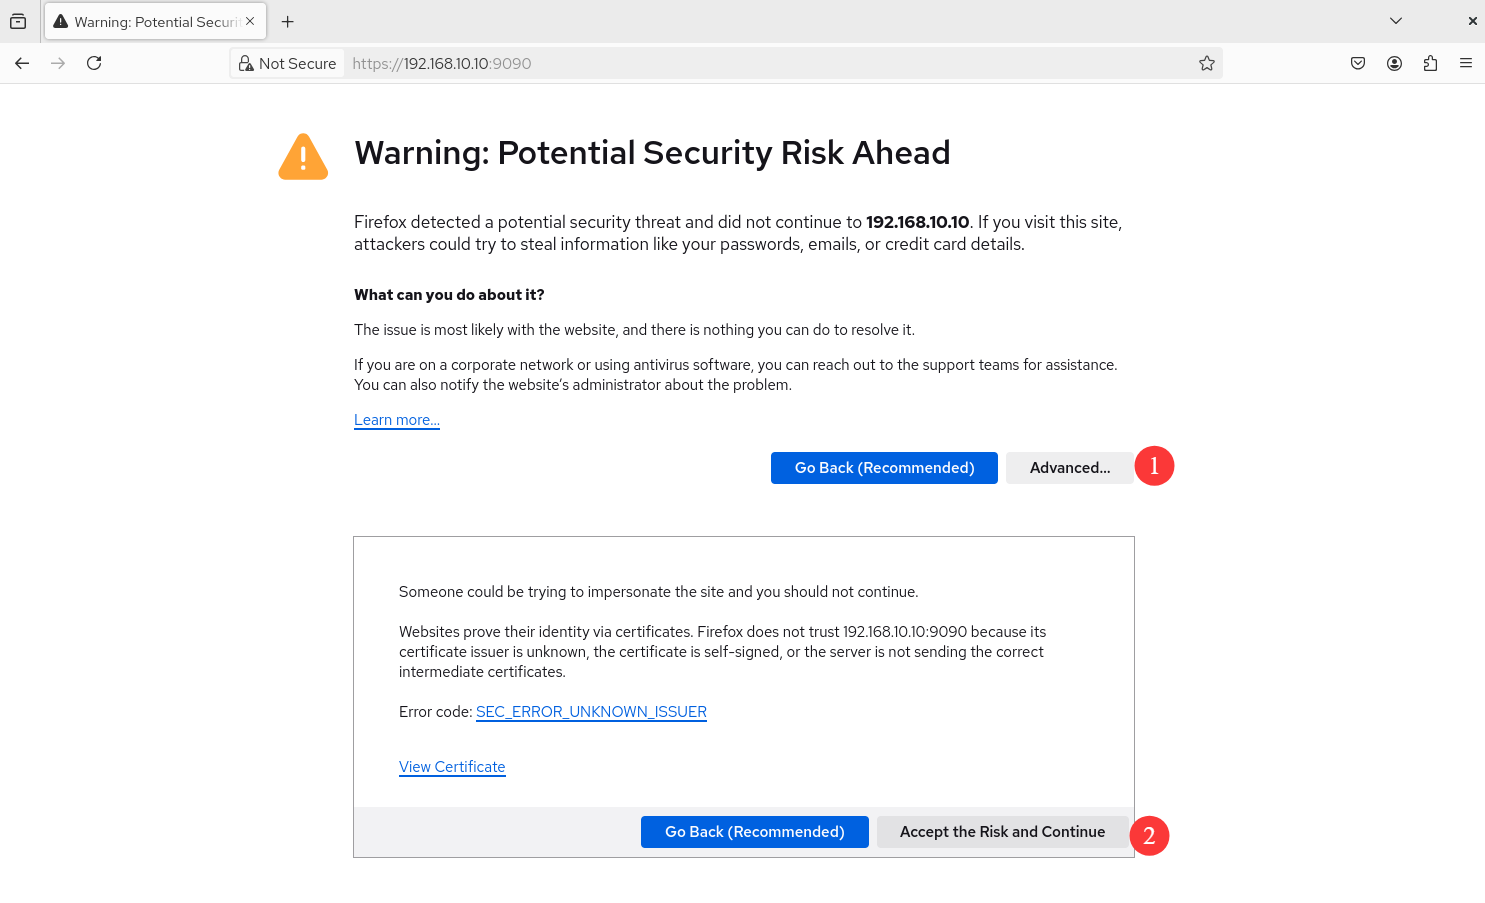
Figure 8-18 Proceed to the site
At the login page, enter the root administrator account and password, then click Log in (Figure 8‑19).
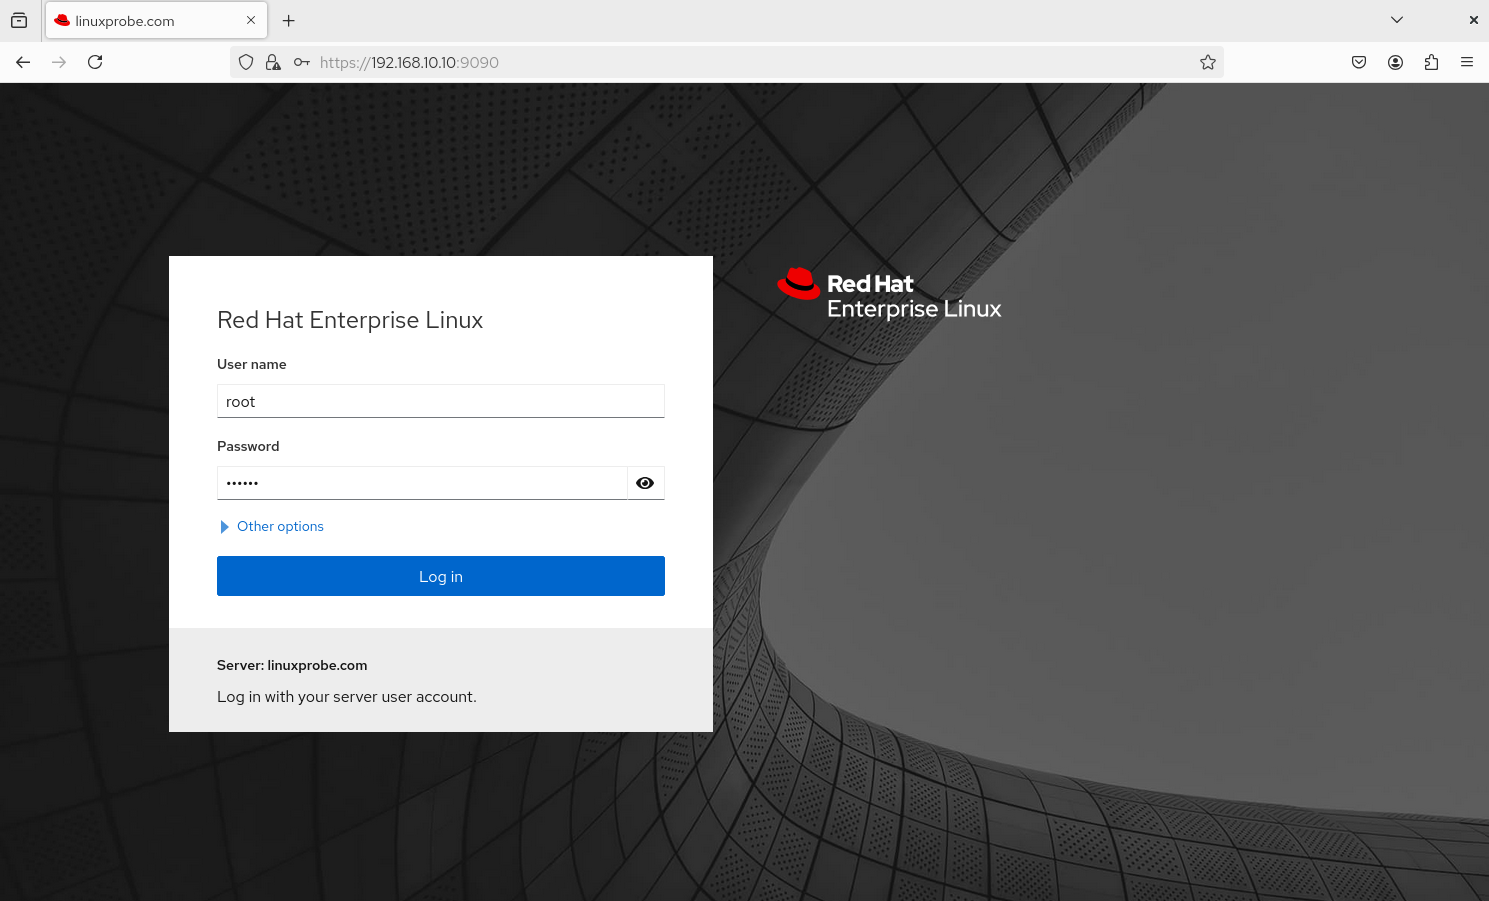
Figure 8-19 Enter the root account and password
If you see Permission denied (Figure 8‑20), don’t panic. For security, RHEL 10 disallows remote logins by root by default. Remember in Chapter 1 where we allowed root over SSH (Figure 1‑40)? Similarly, to log in to Cockpit, remove root from the following file:
root@linuxprobe:~# vim /etc/cockpit/disallowed-users
List of users which are not allowed to login to Cockpit
root
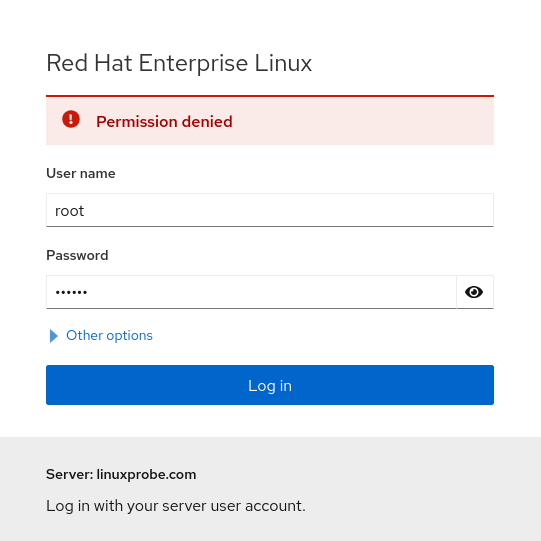
Figure 8-20 Permission denied
No need to restart services; click Log in again.
Once inside Cockpit’s web UI, you’ll find a lot to explore. Cockpit provides fourteen modules: Overview, Logs, Storage, Networking, Podman Containers, User Accounts, Services, Subscriptions, Kernel Dump, Software Updates, Applications, Diagnostic Reports, Terminal, SELinux. Here’s a quick tour.
1. Overview
The default landing page shows system architecture, version, hostname, and time. Click View metrics and history for real‑time CPU, memory, disk, and network usage. It’s like a web‑based “Windows Task Manager” and very handy (Figure 8‑21).
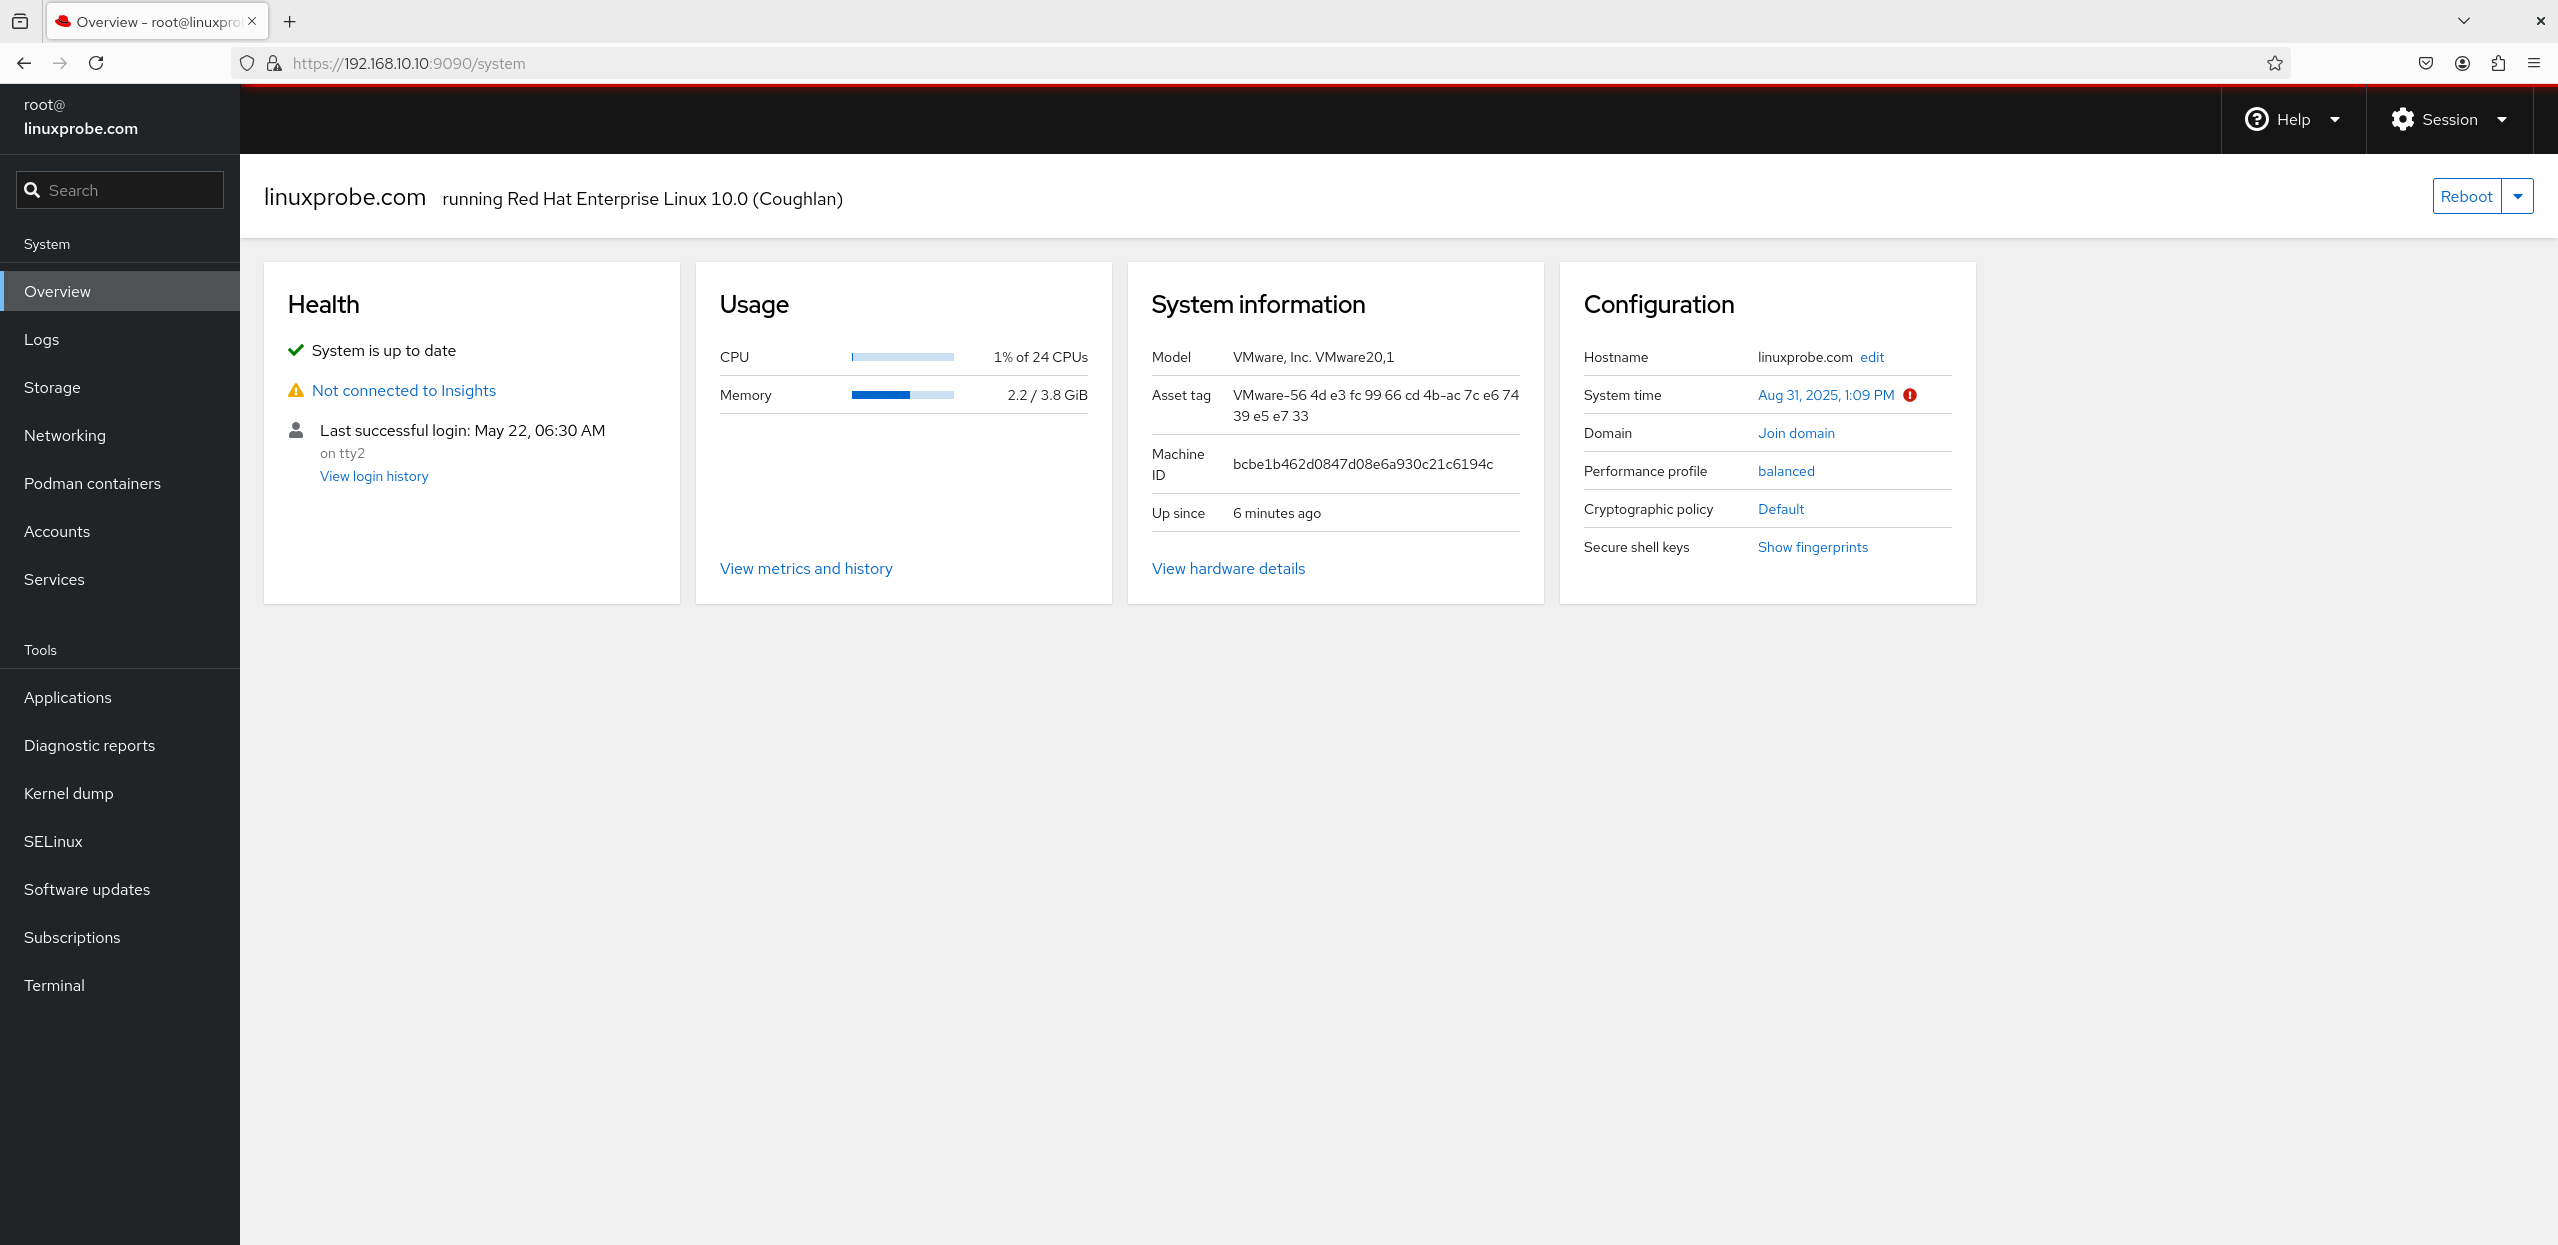
Figure 8-21 System status view
2. Logs
This module aggregates all system logs. If it looks sparse, check the two filters—Time and Priority—in Figure 8‑22. With these you can quickly pinpoint what you need, rather than sifting through a monolithic /var/log/messages file.
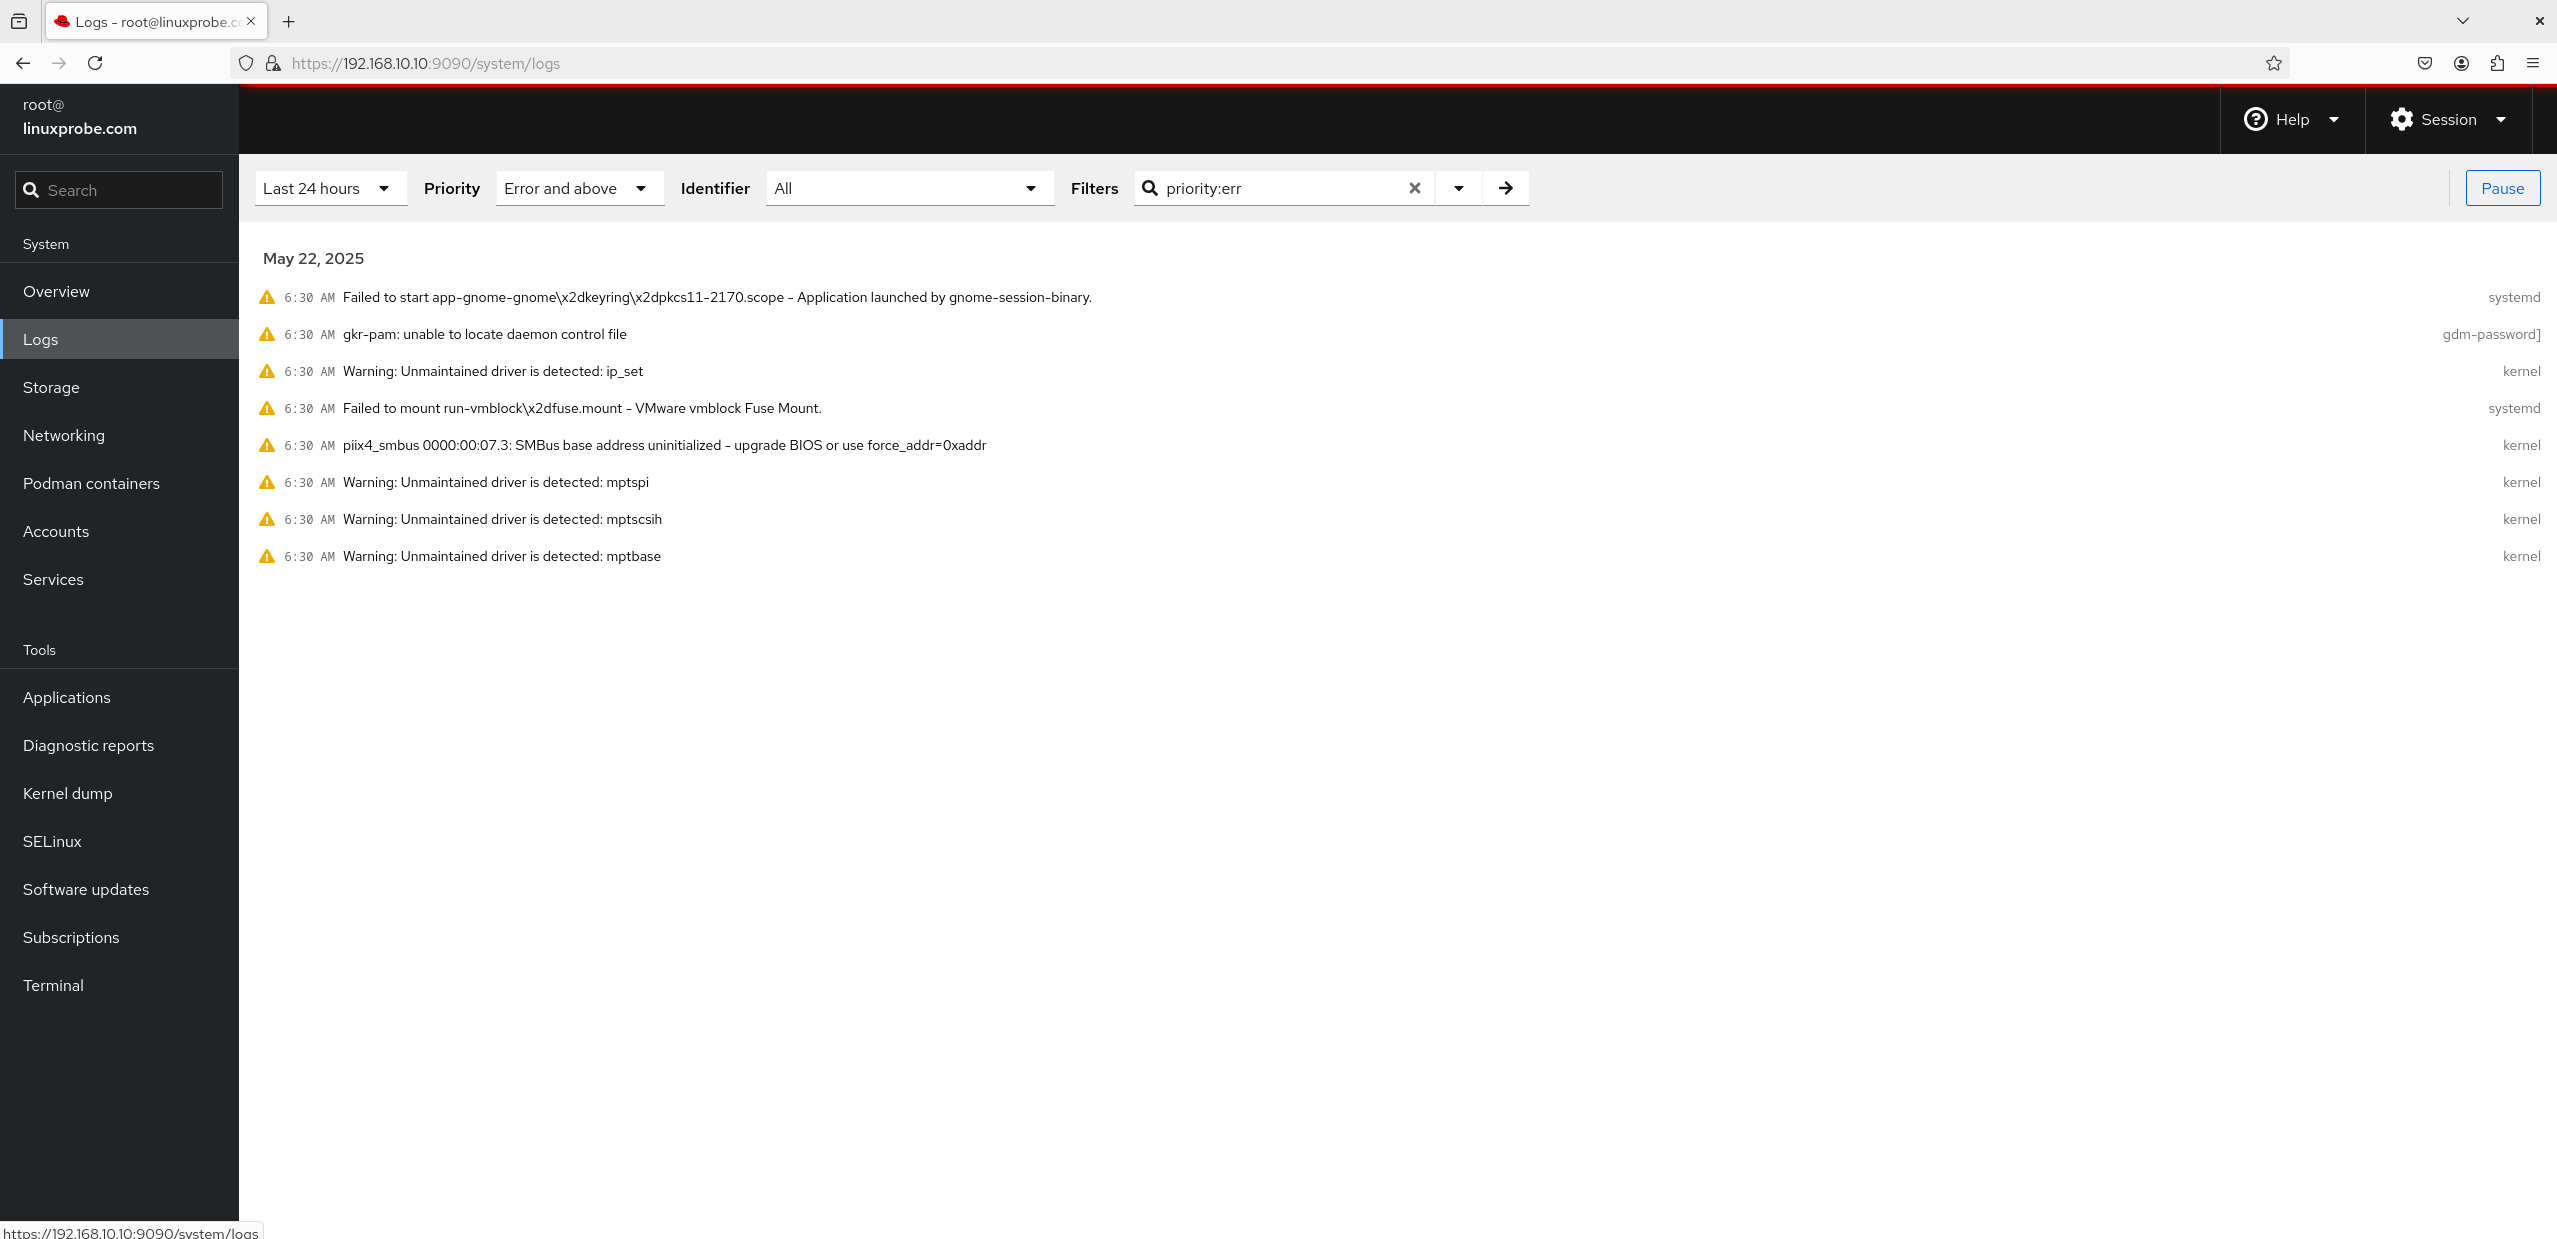
Figure 8-22 Logs view
3. Storage
A perennial favorite. Beyond showing disk I/O load, it lets you create RAID, LVM, VDO, and iSCSI storage using the mouse (Figure 8‑23). Yes, you read that right—RAID and LVM with clicks. Nice!
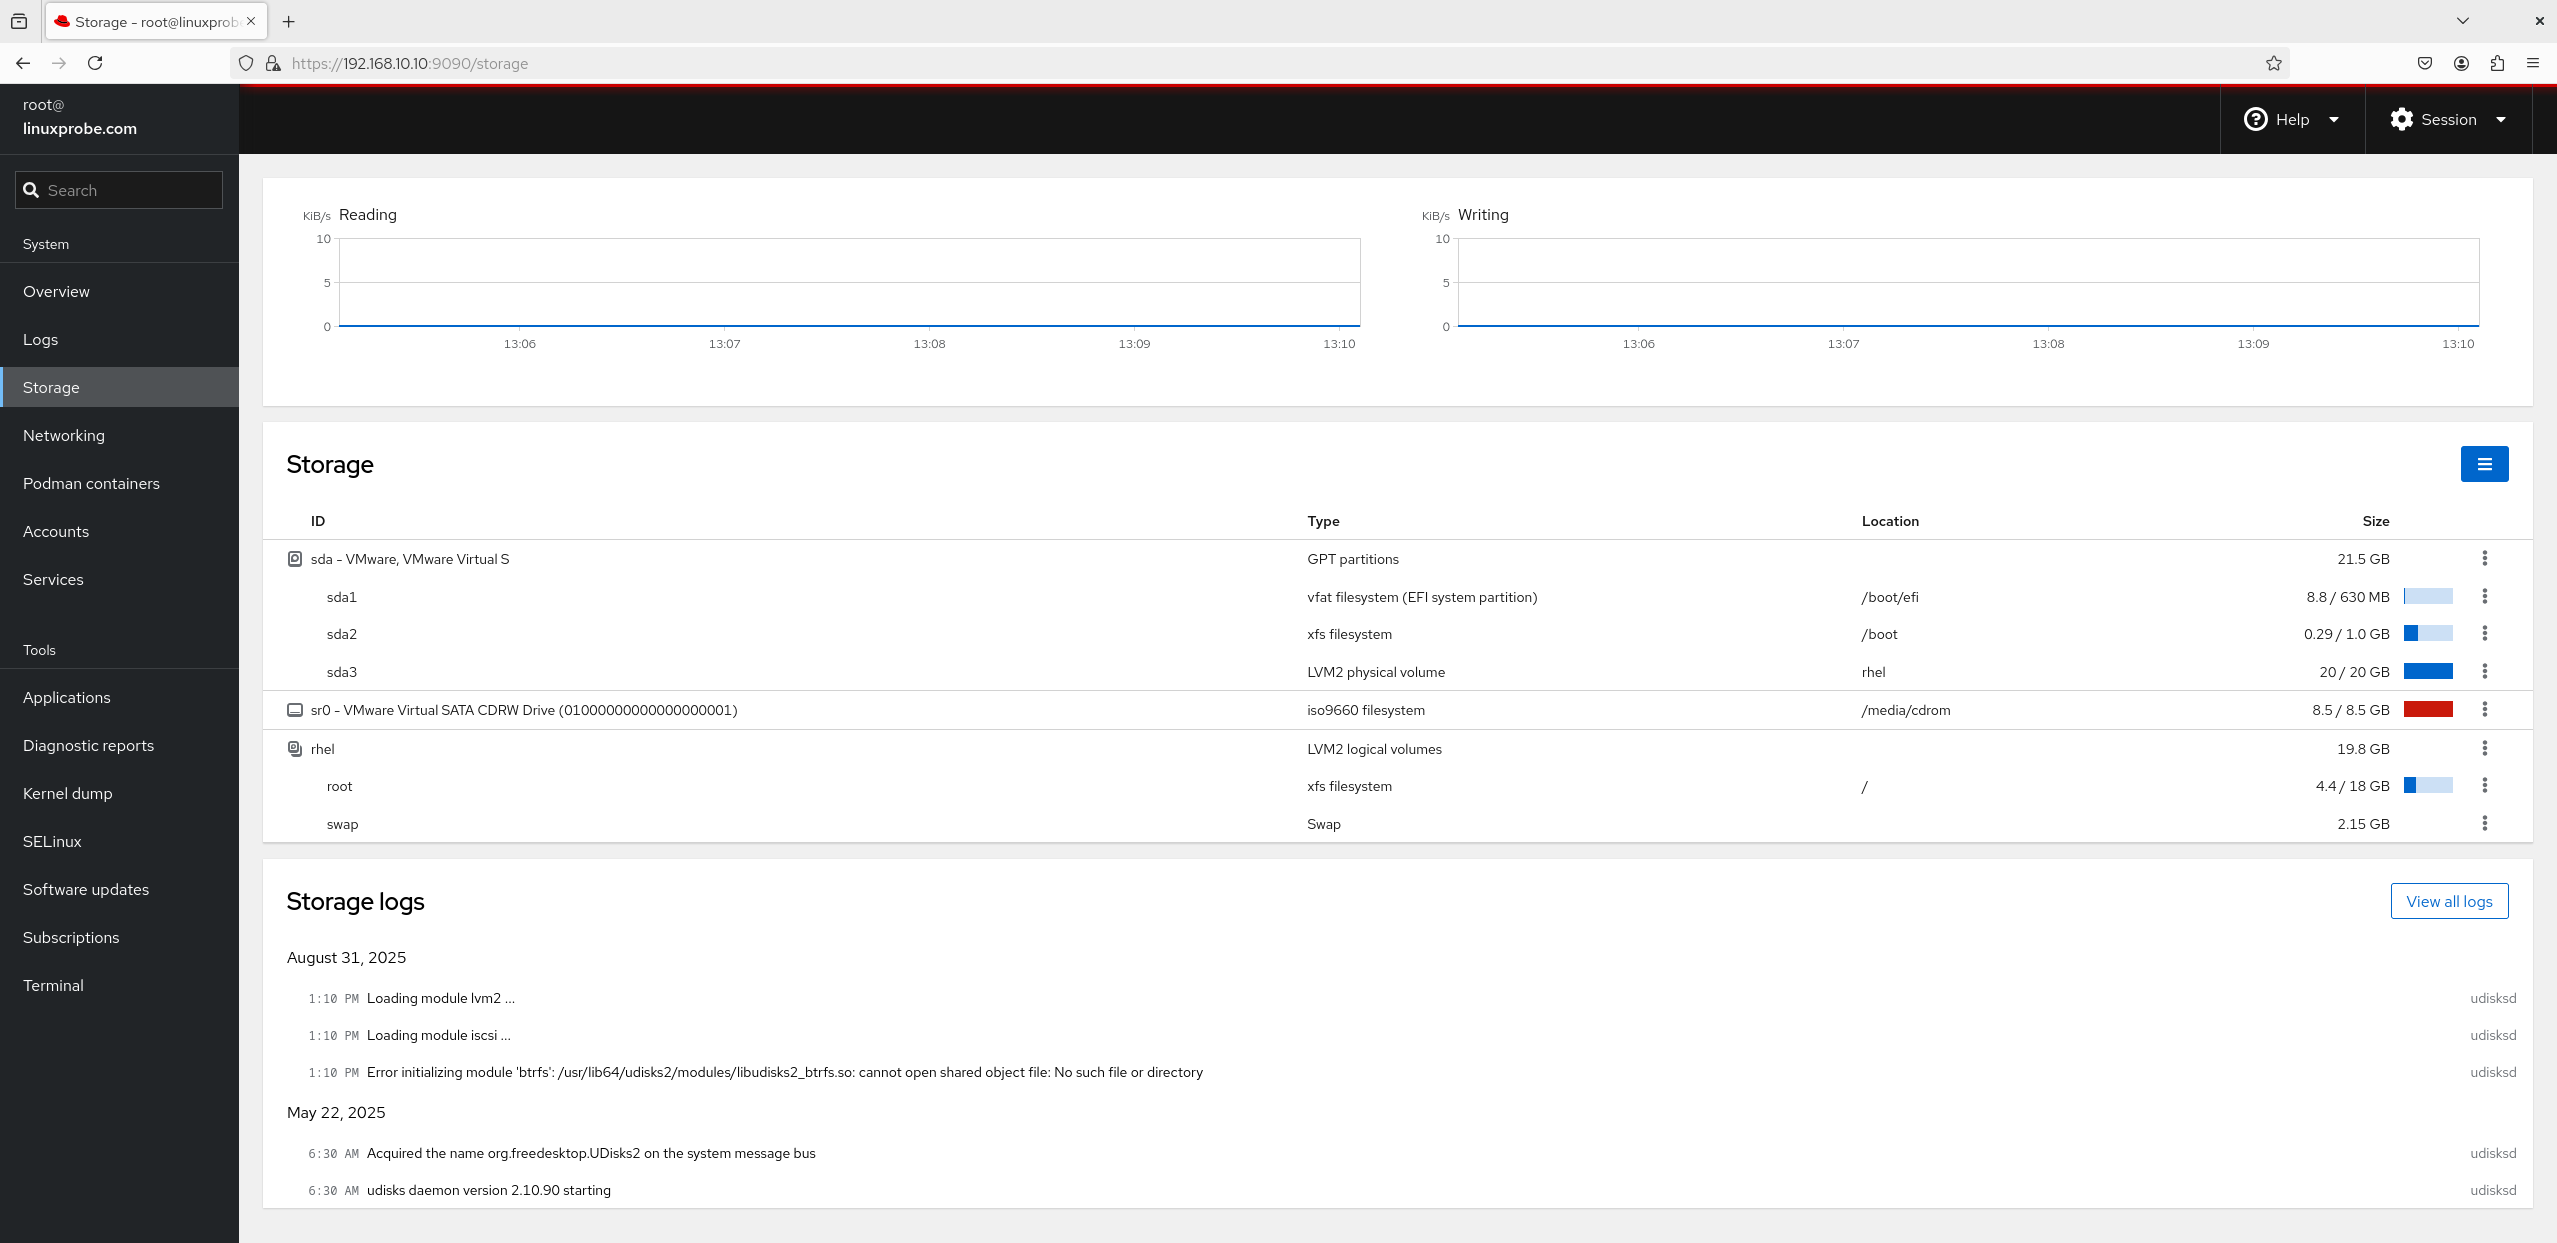
Figure 8-23 Storage view
4. Networking
Naturally you can watch transmit/receive stats in real time. As shown in Figure 8‑24, you can configure bonding and team links, create bridges, and add VLANs. Related logs appear at the bottom.
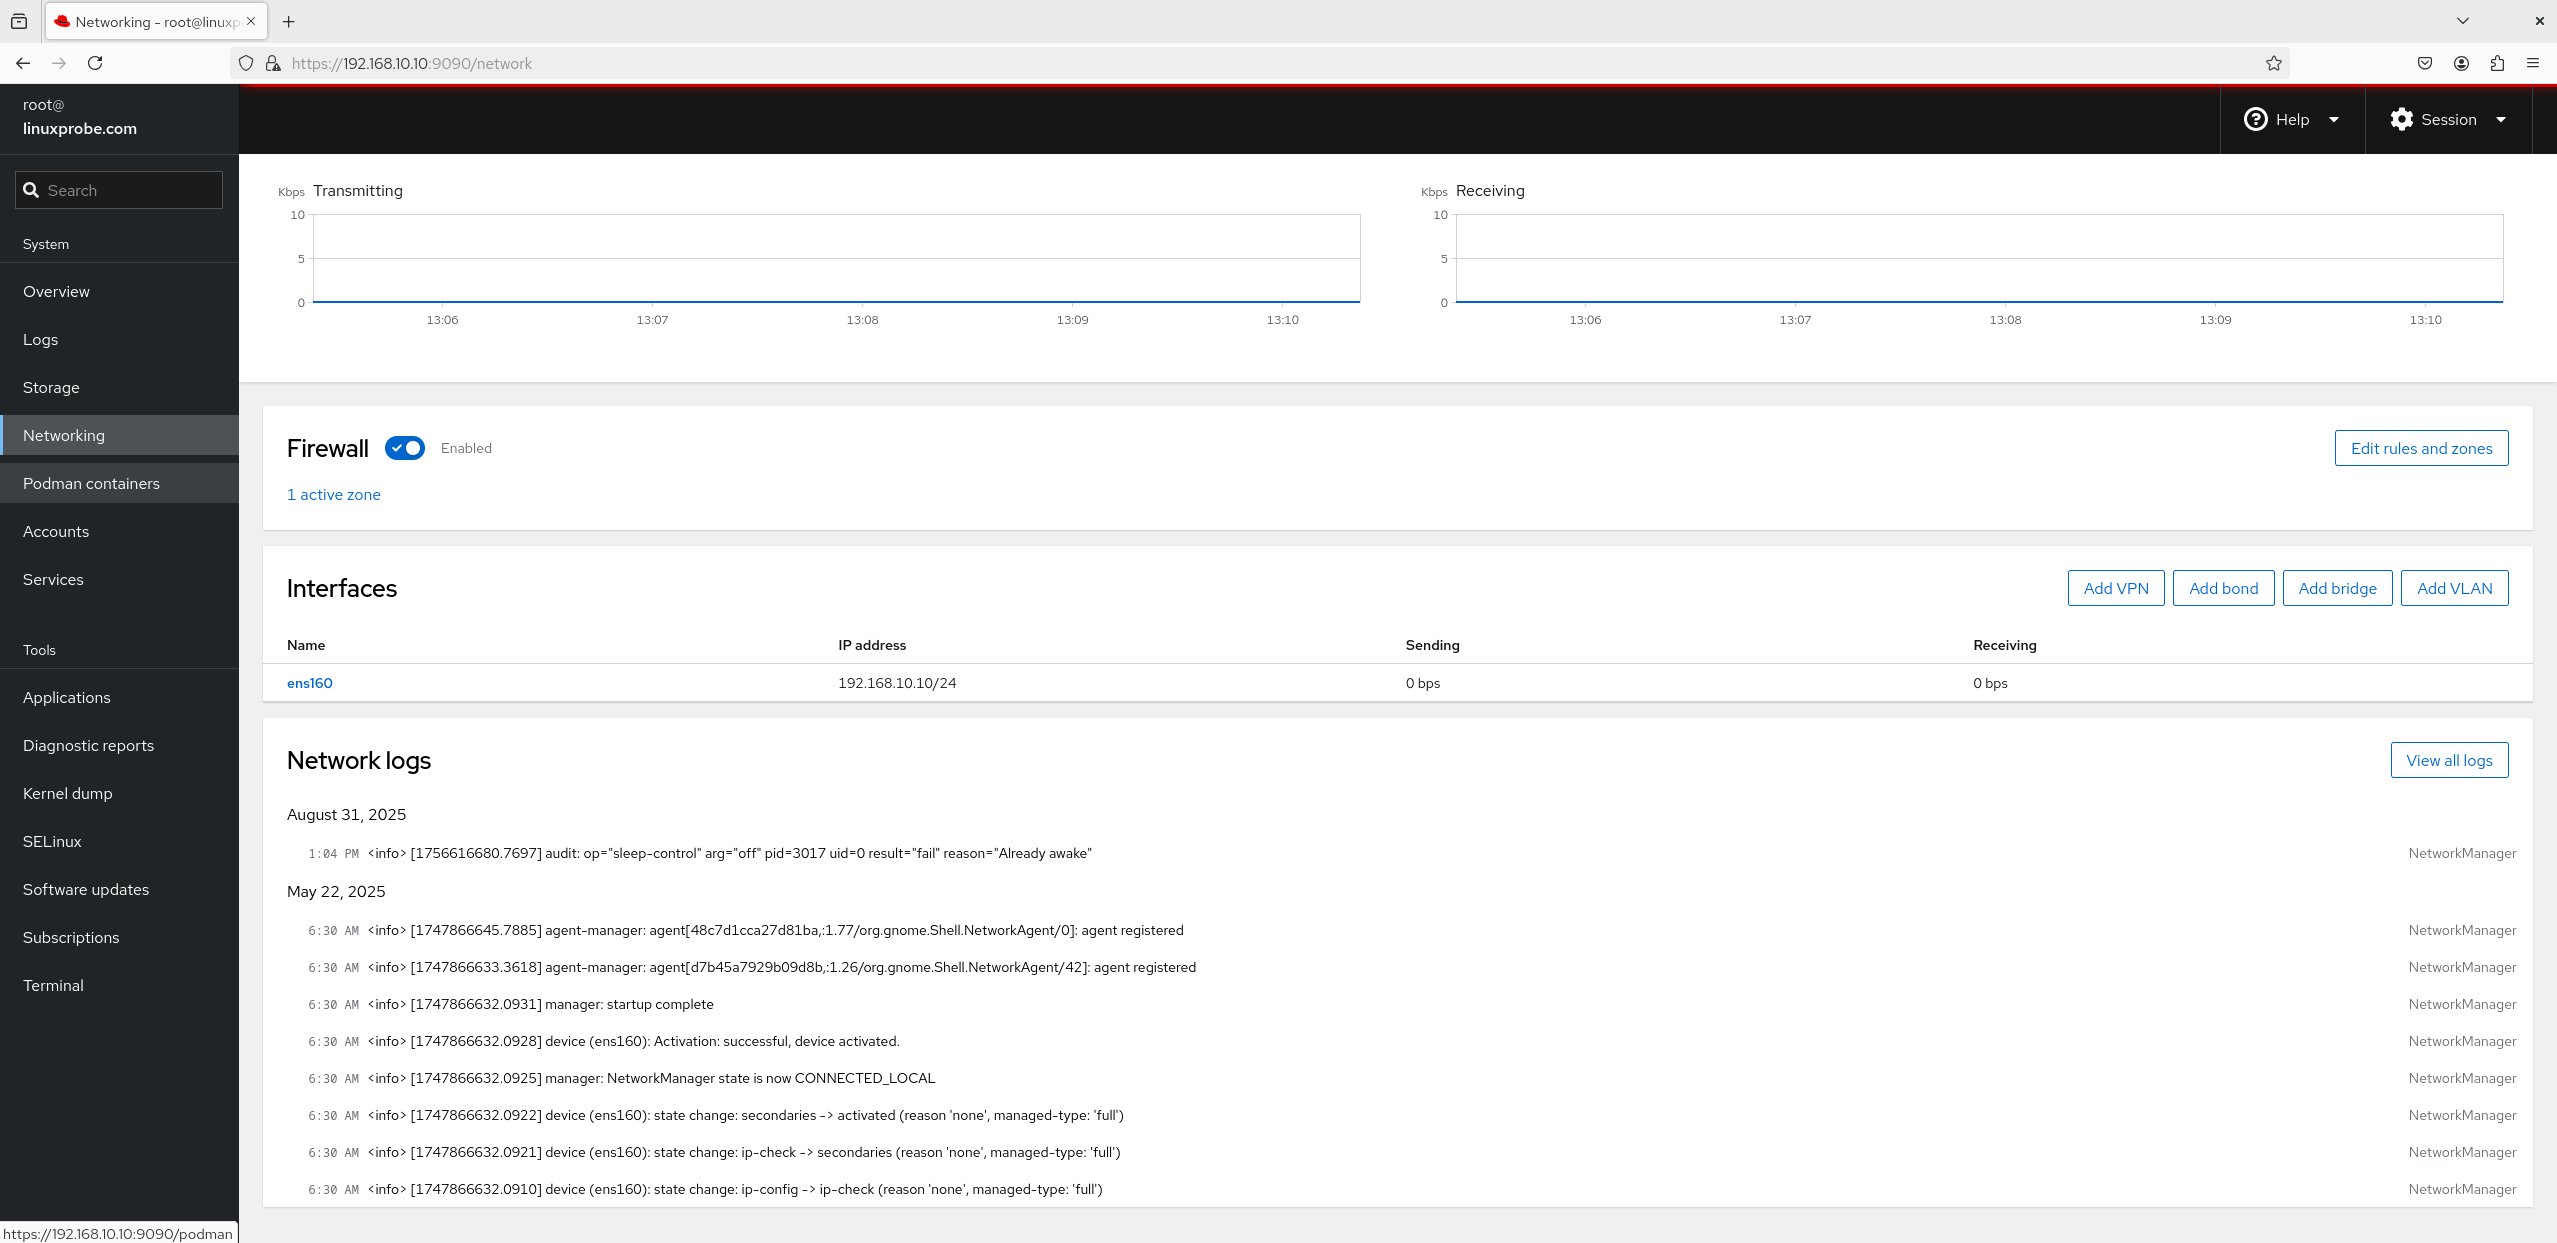
Figure 8-24 Networking view
5. Podman Containers
Podman is installed by default on RHEL 10 but not started—click Start podman to run it. Image and container management can also be done from the GUI (Figures 8‑25 and 8‑26).
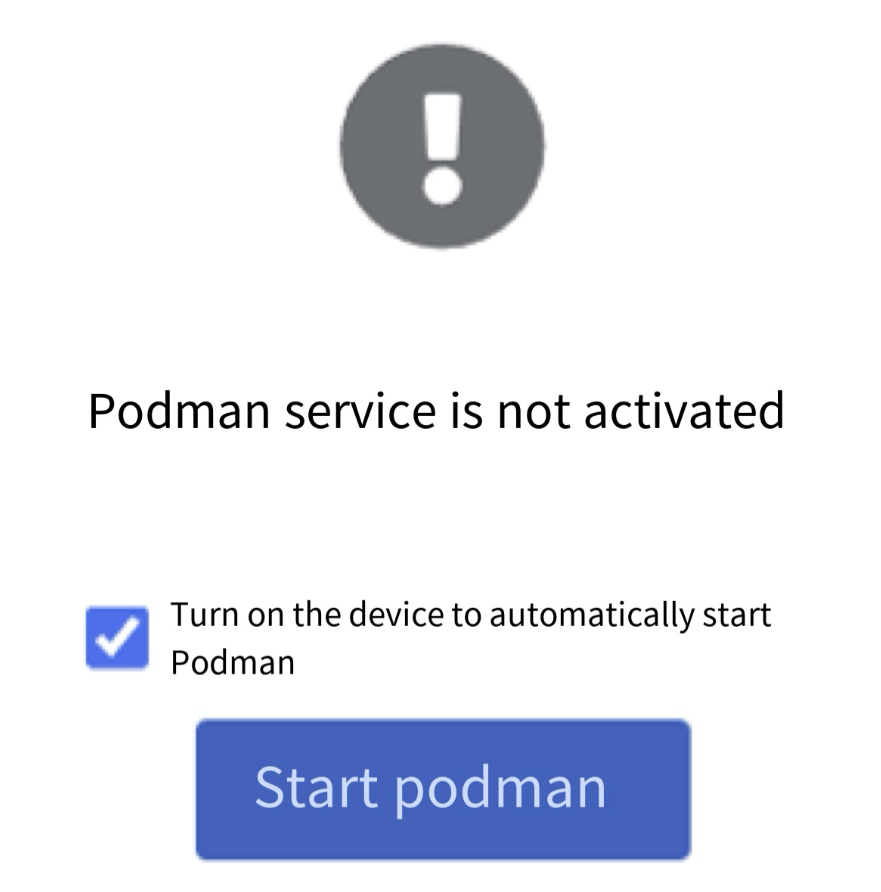
Figure 8-25 Podman service view
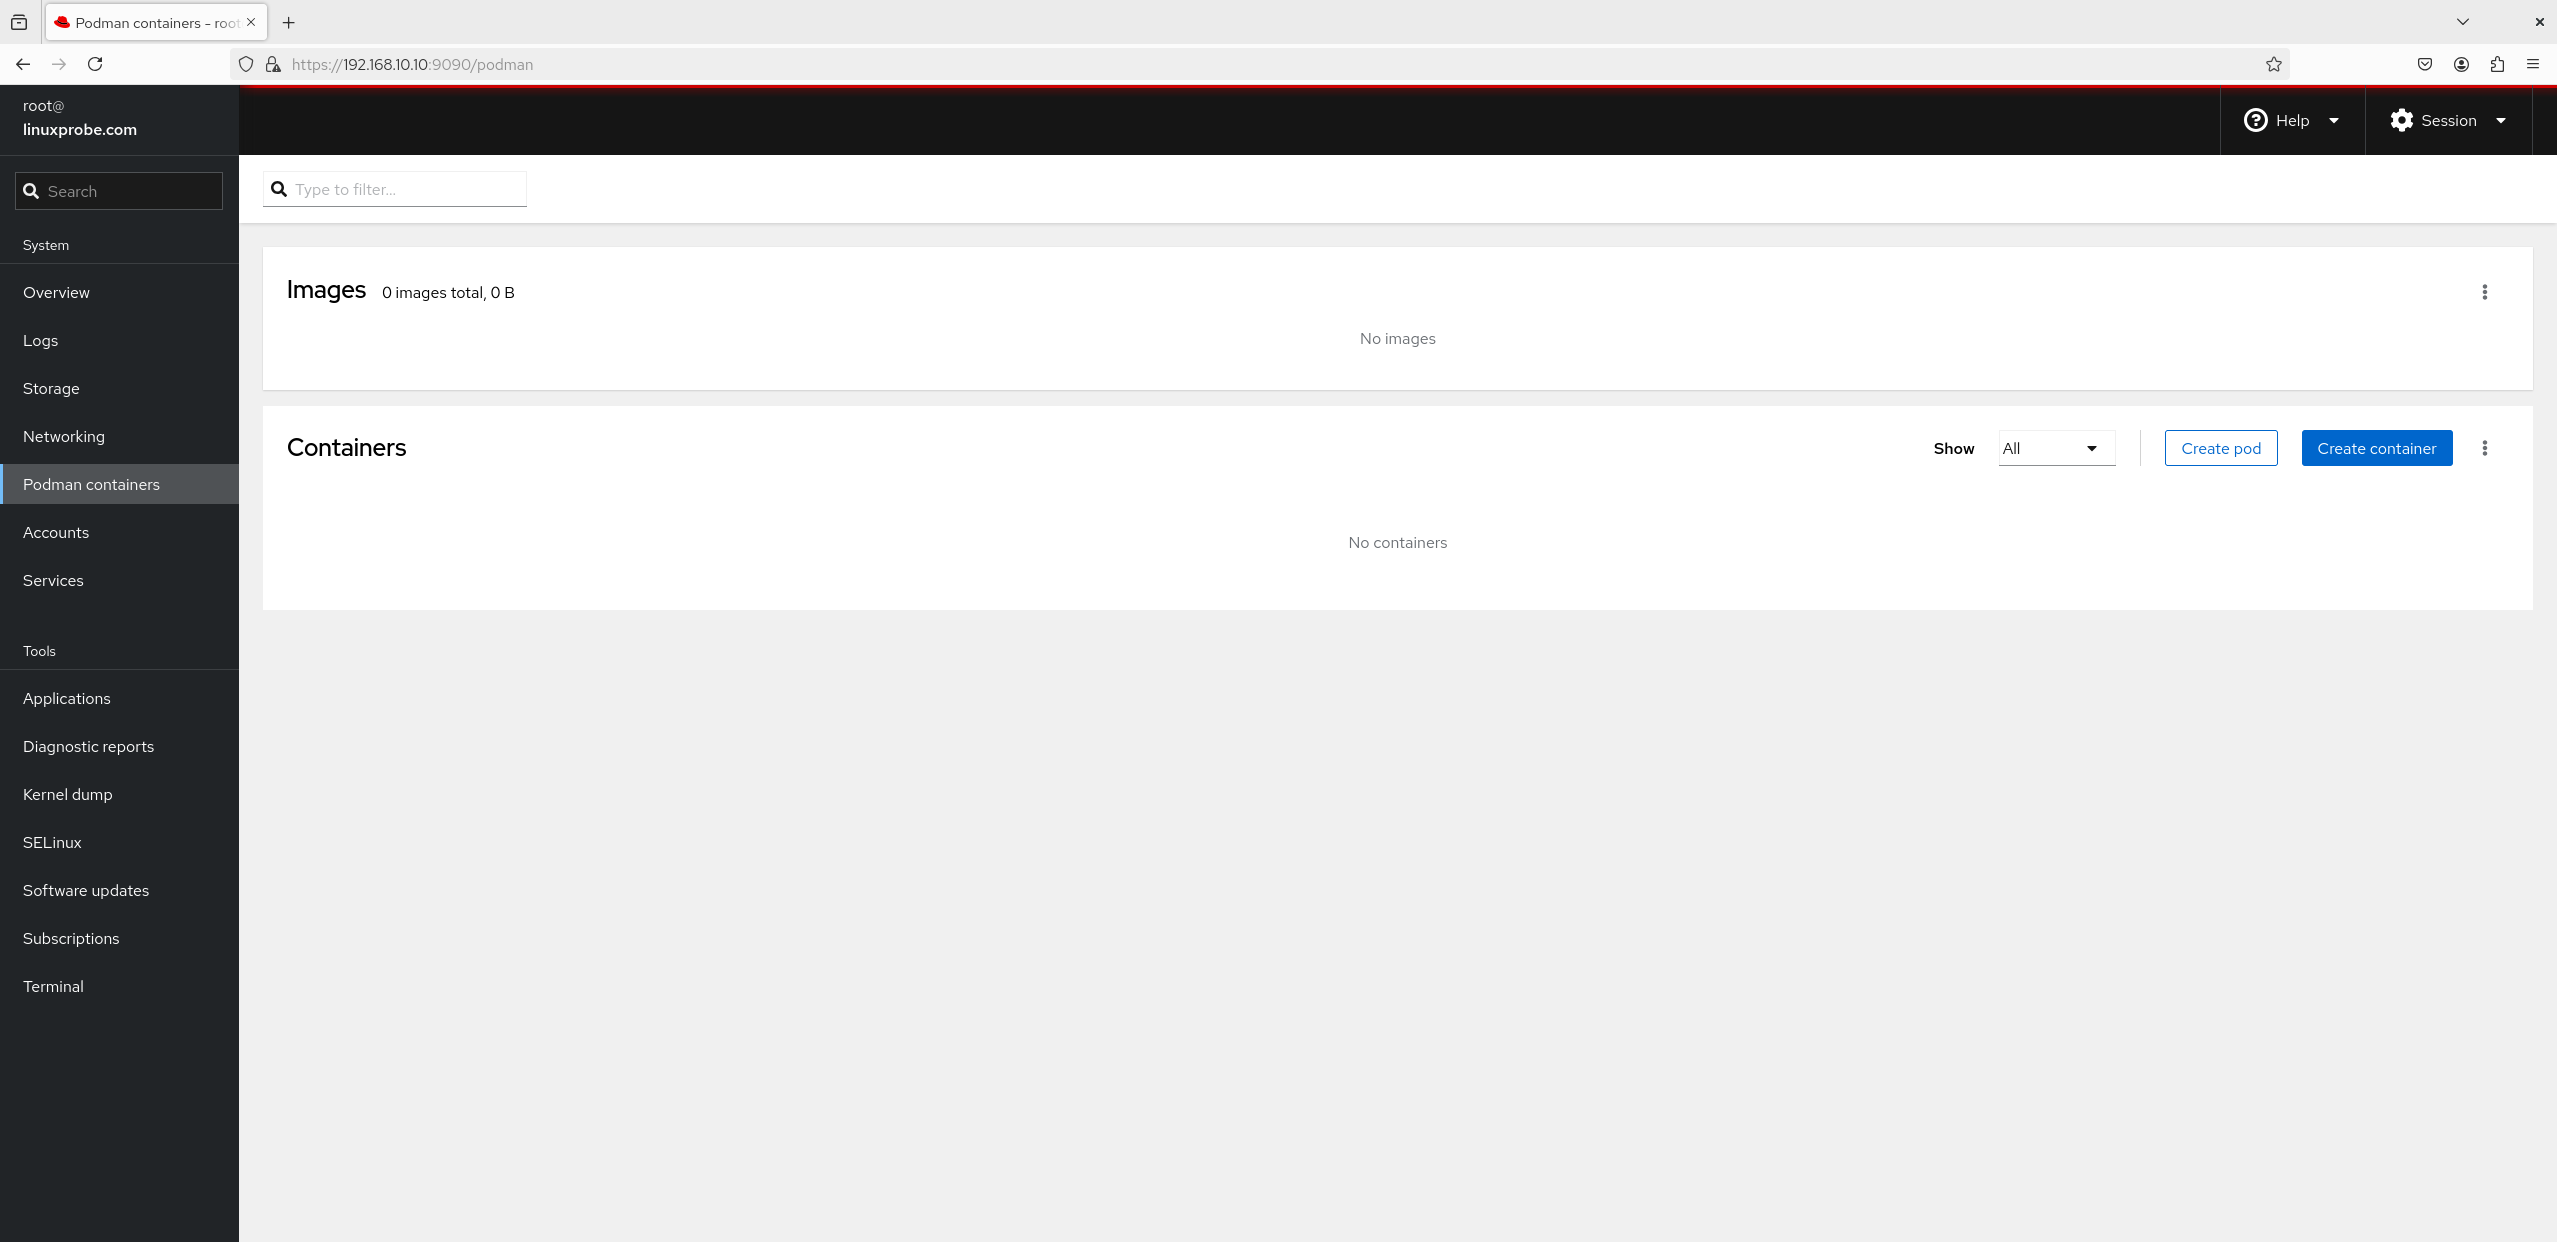
Figure 8-26 Manage images and containers
6. User Accounts
Don’t underestimate this one. While the main list looks simple (Figure 8‑27), click into a user and you’ll find a rich set of controls (Figure 8‑28): rename, set privileges, lock/unlock, change password, and create SSH keys.
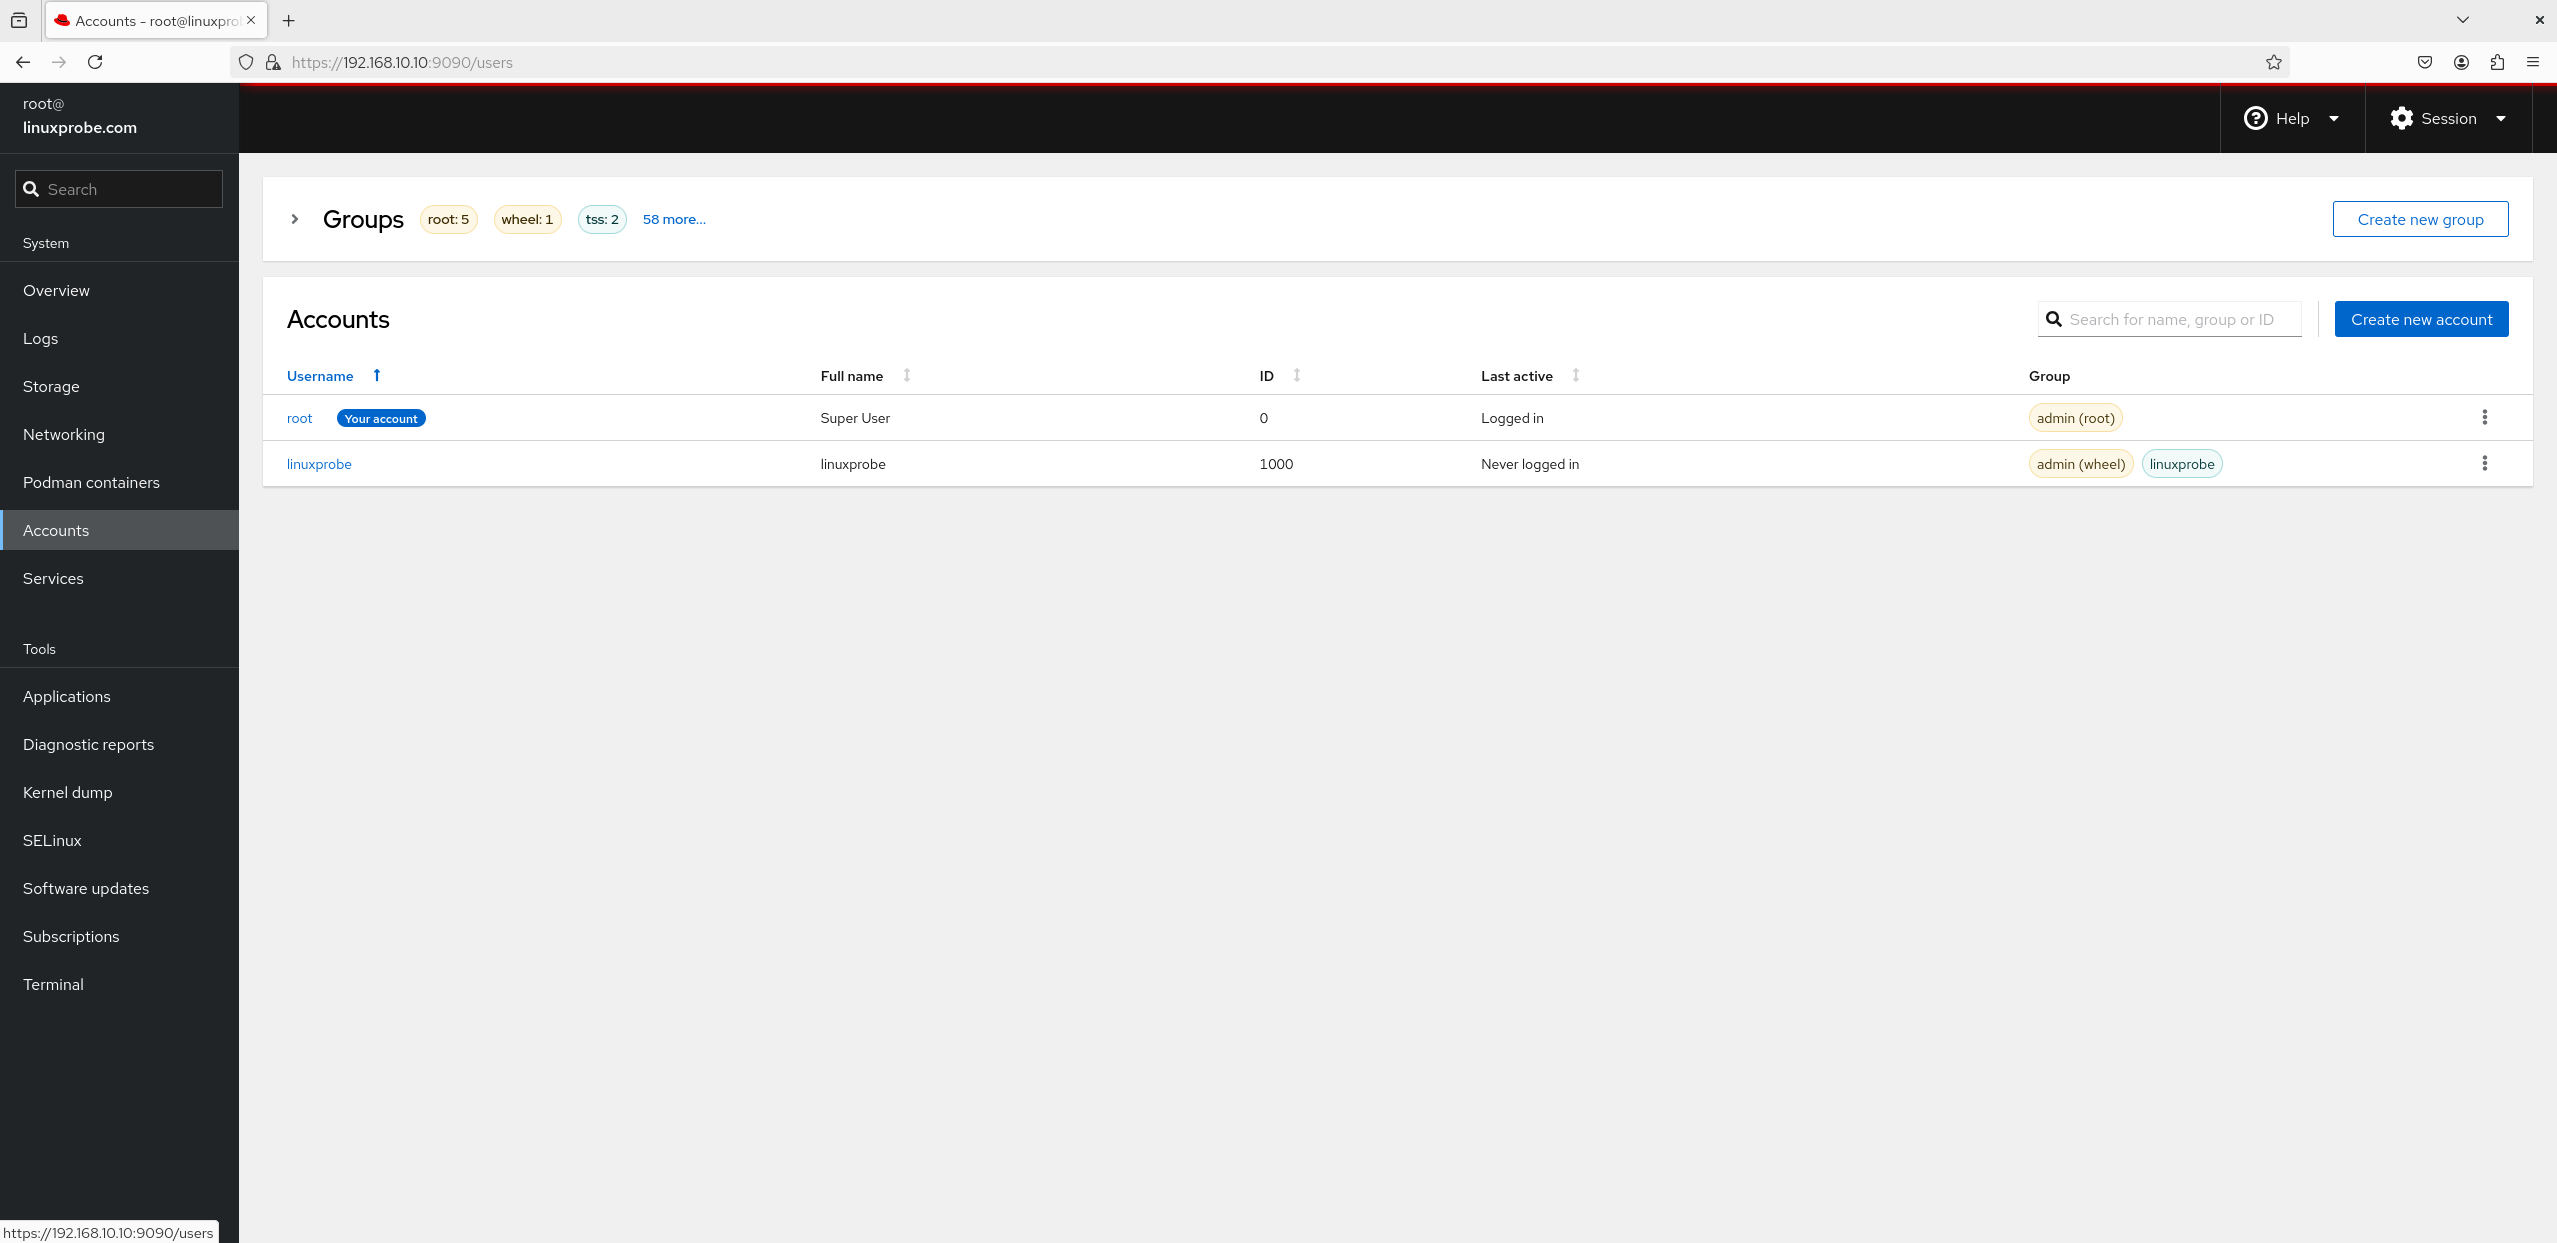
Figure 8-27 Accounts view
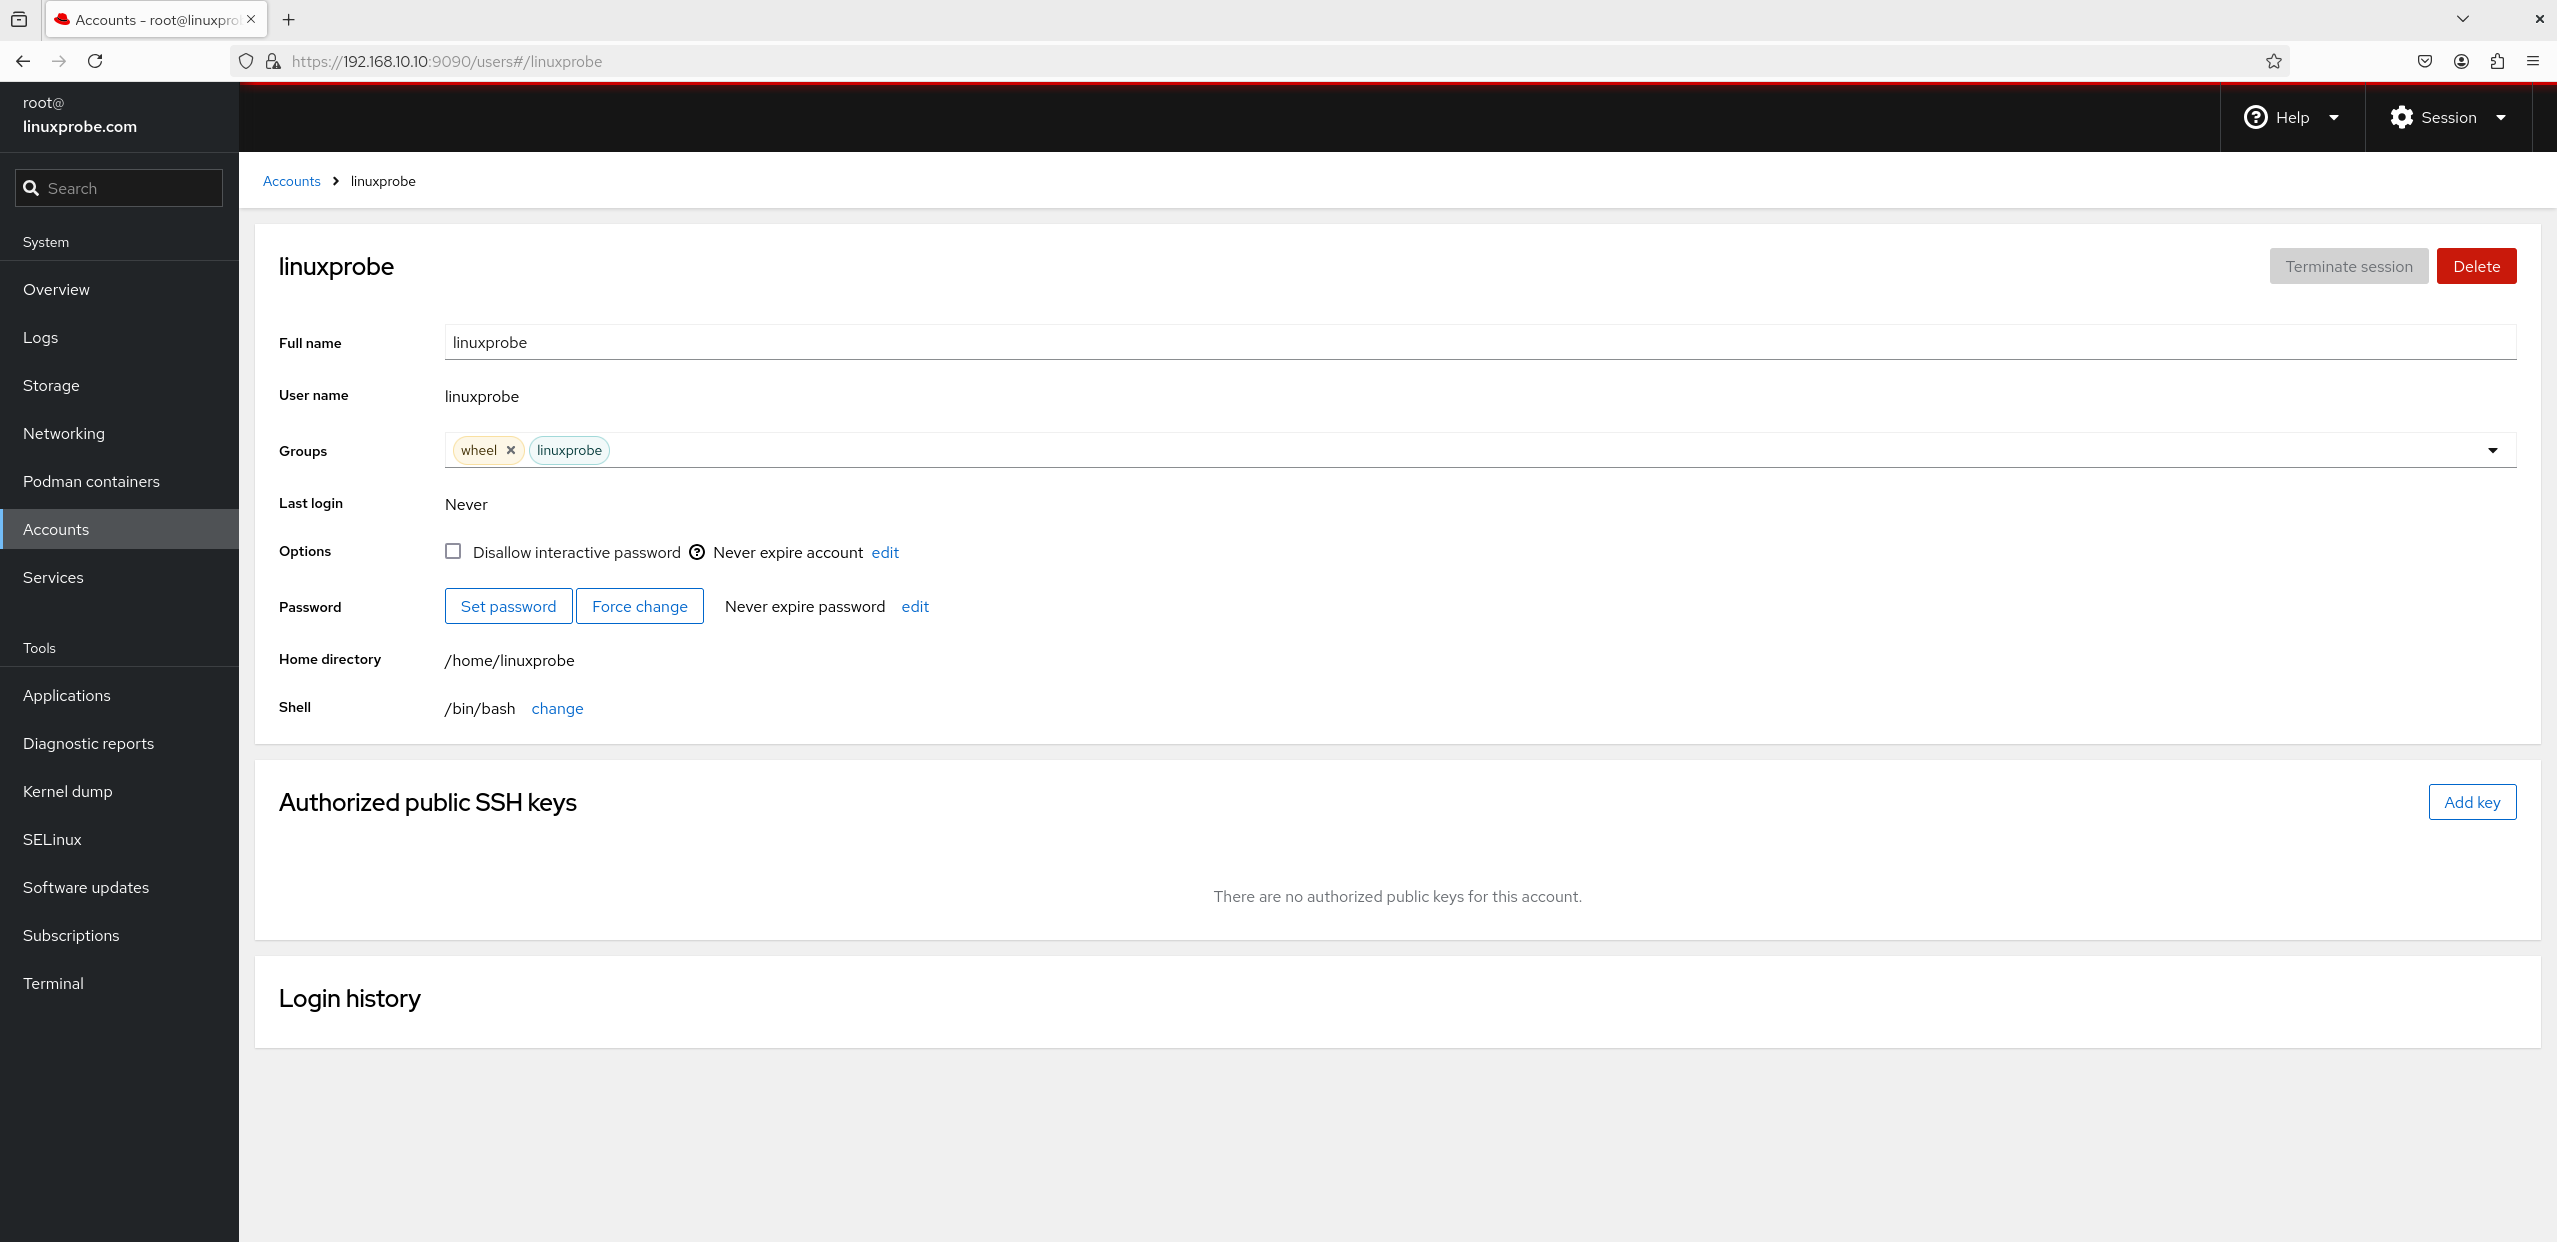
Figure 8-28 Account management view
7. Services
View installed services and their status (Figure 8‑29). Clicking a service opens its management page (Figure 8‑30), where you can start/stop it and enable it to start at boot so it remains available after a restart.
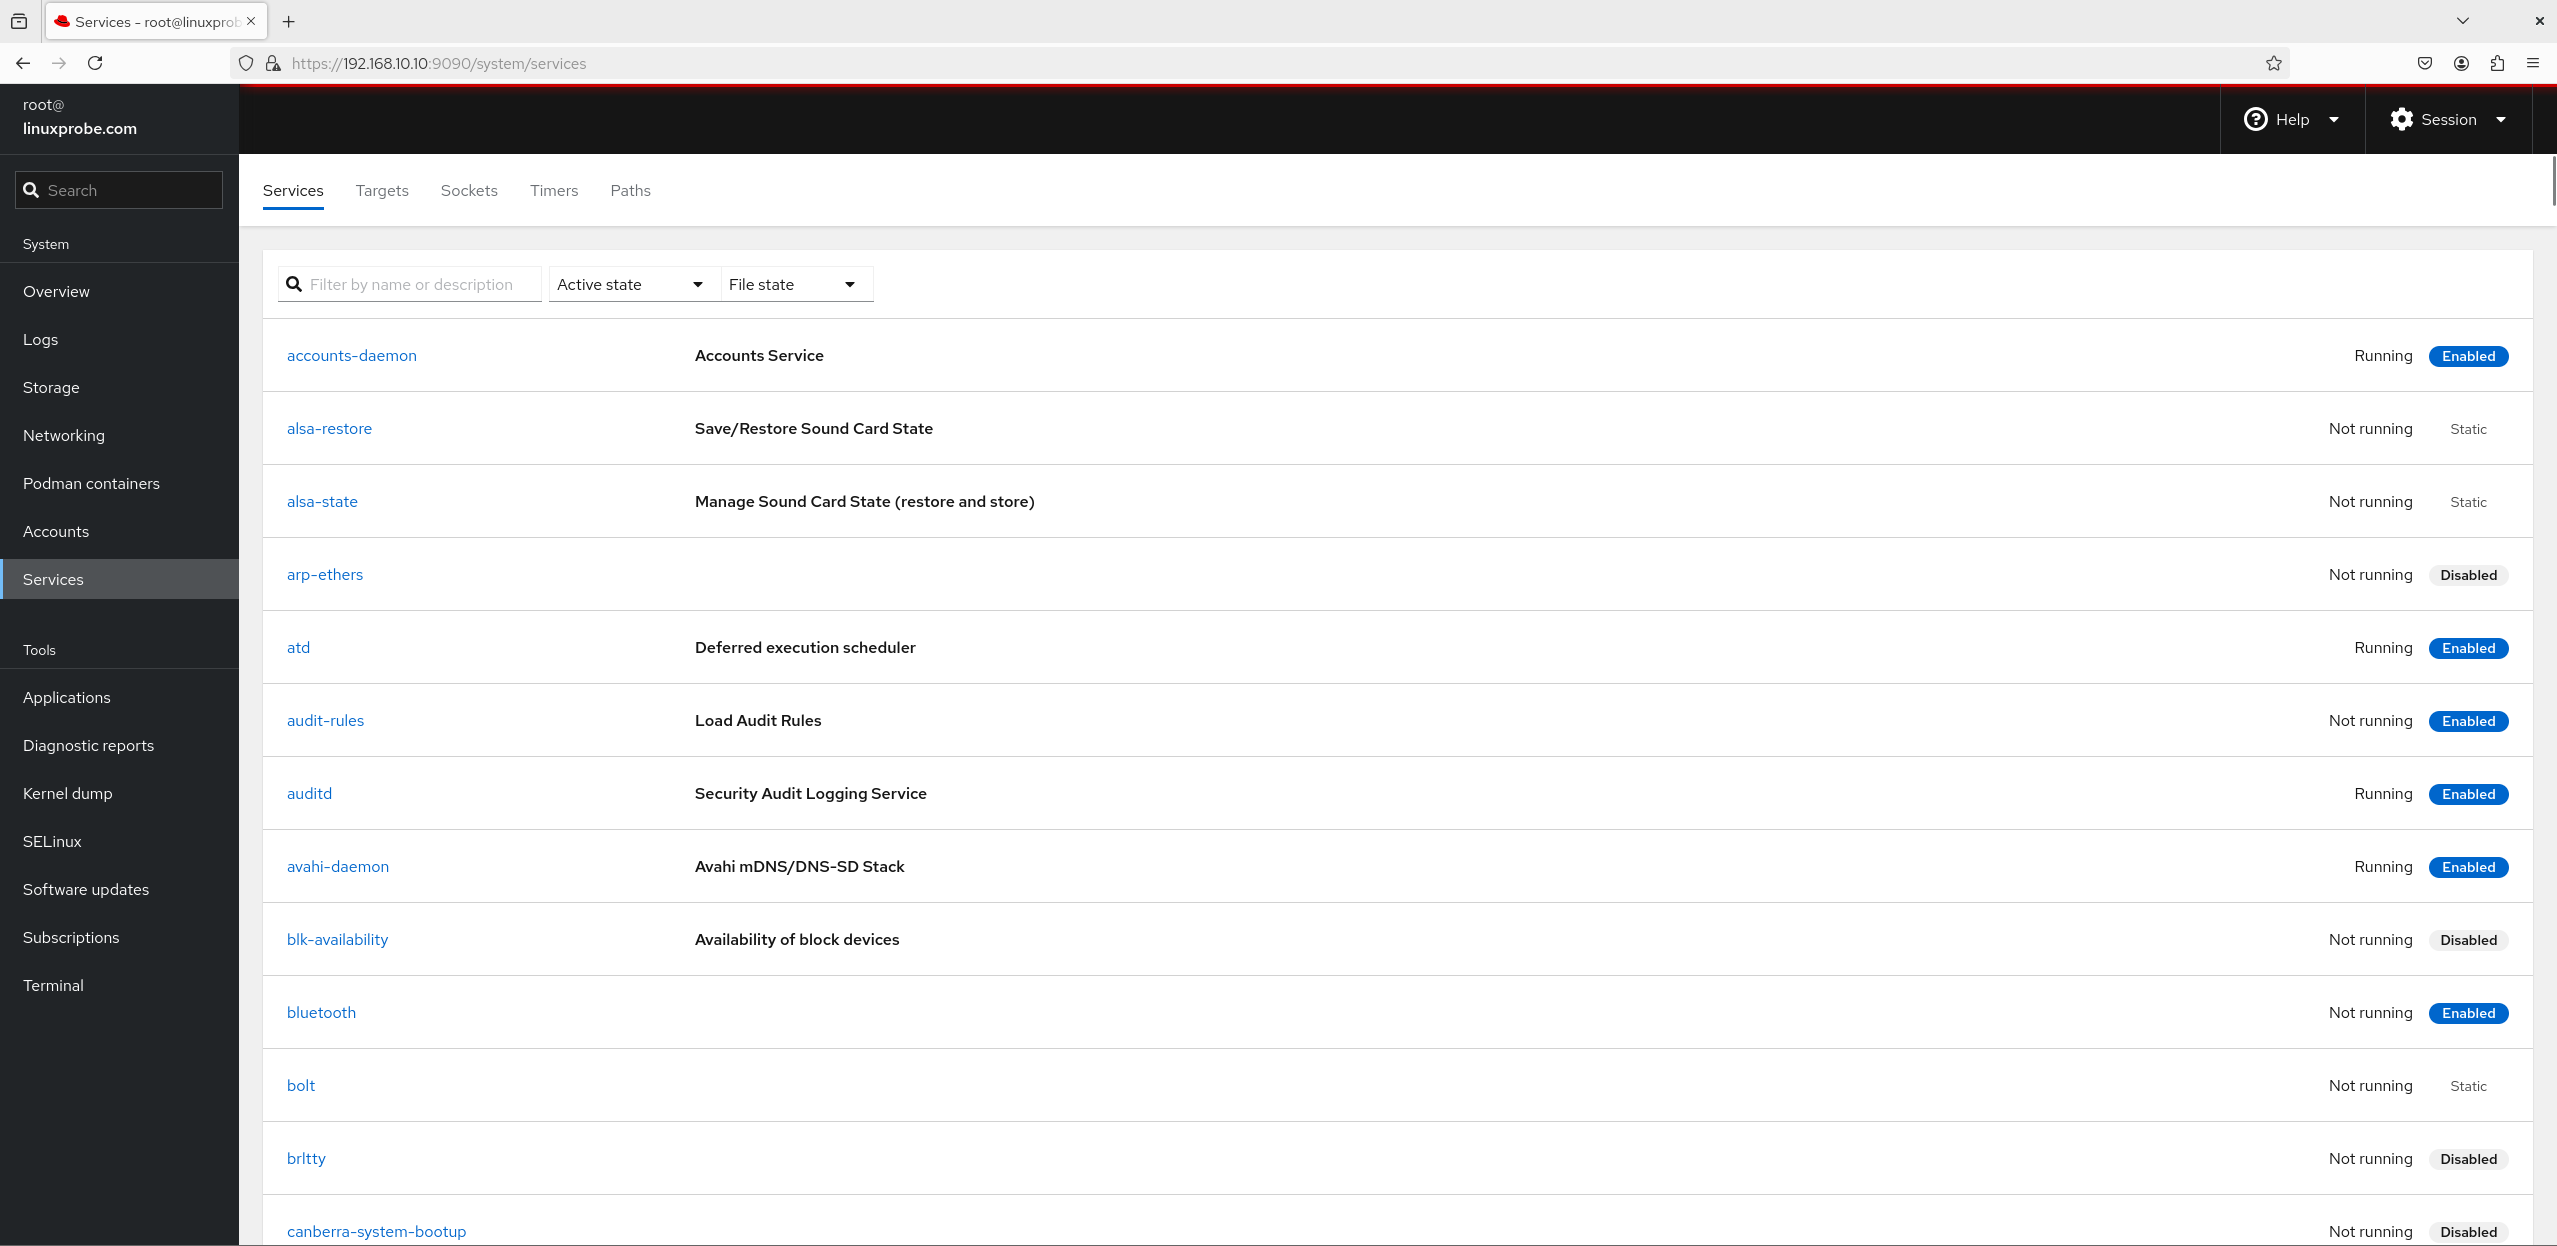
Figure 8-29 Services view

Figure 8-30 Service management view
8. Subscriptions
Shown in Figure 8‑31—essentially a reminder from Red Hat that enterprise subscriptions are paid offerings. Individual users needn’t buy these; our exercises are unaffected.
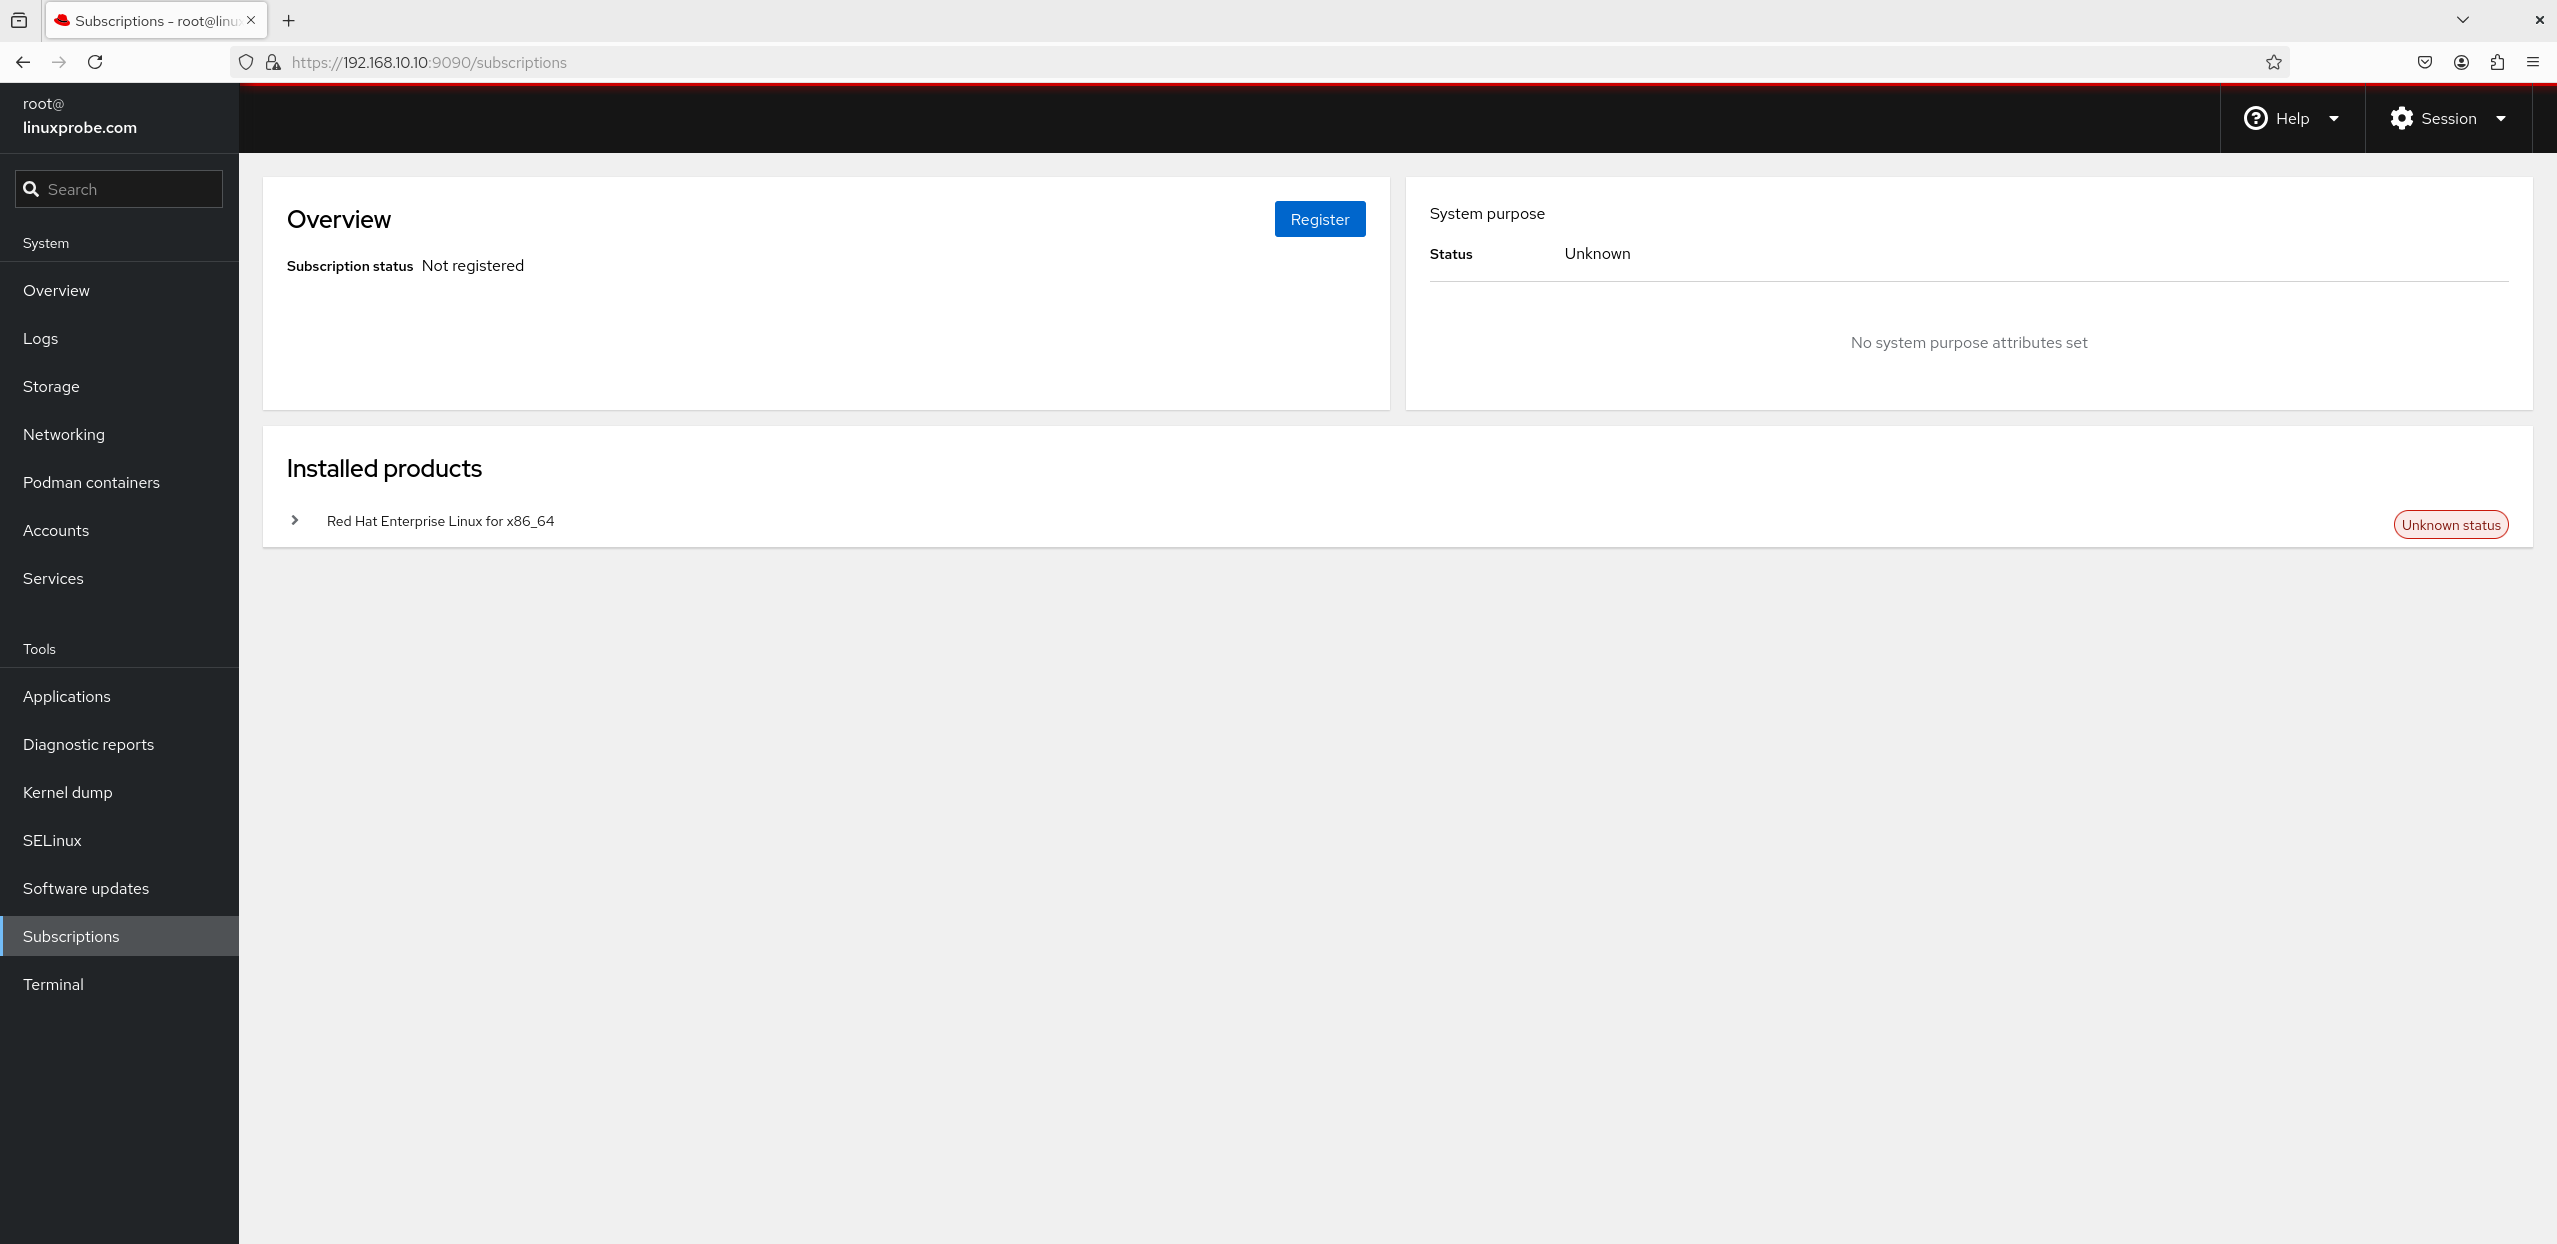
Figure 8-31 Subscription view
9. Kernel Dump
Kernel dumps collect kernel state when the system crashes, deadlocks, or halts. When that happens, the kdump service writes a core file for later analysis. If you didn’t enable it during installation, you can turn it on here when needed (Figure 8‑32).

Figure 8-32 Kernel troubleshooting view
10. Software Updates
Figure 8‑33 shows the Software Updates module. Here it refers to updates related to Red Hat subscription services rather than general package updates. With a subscription you can download the latest and stable versions of subscribed components here.
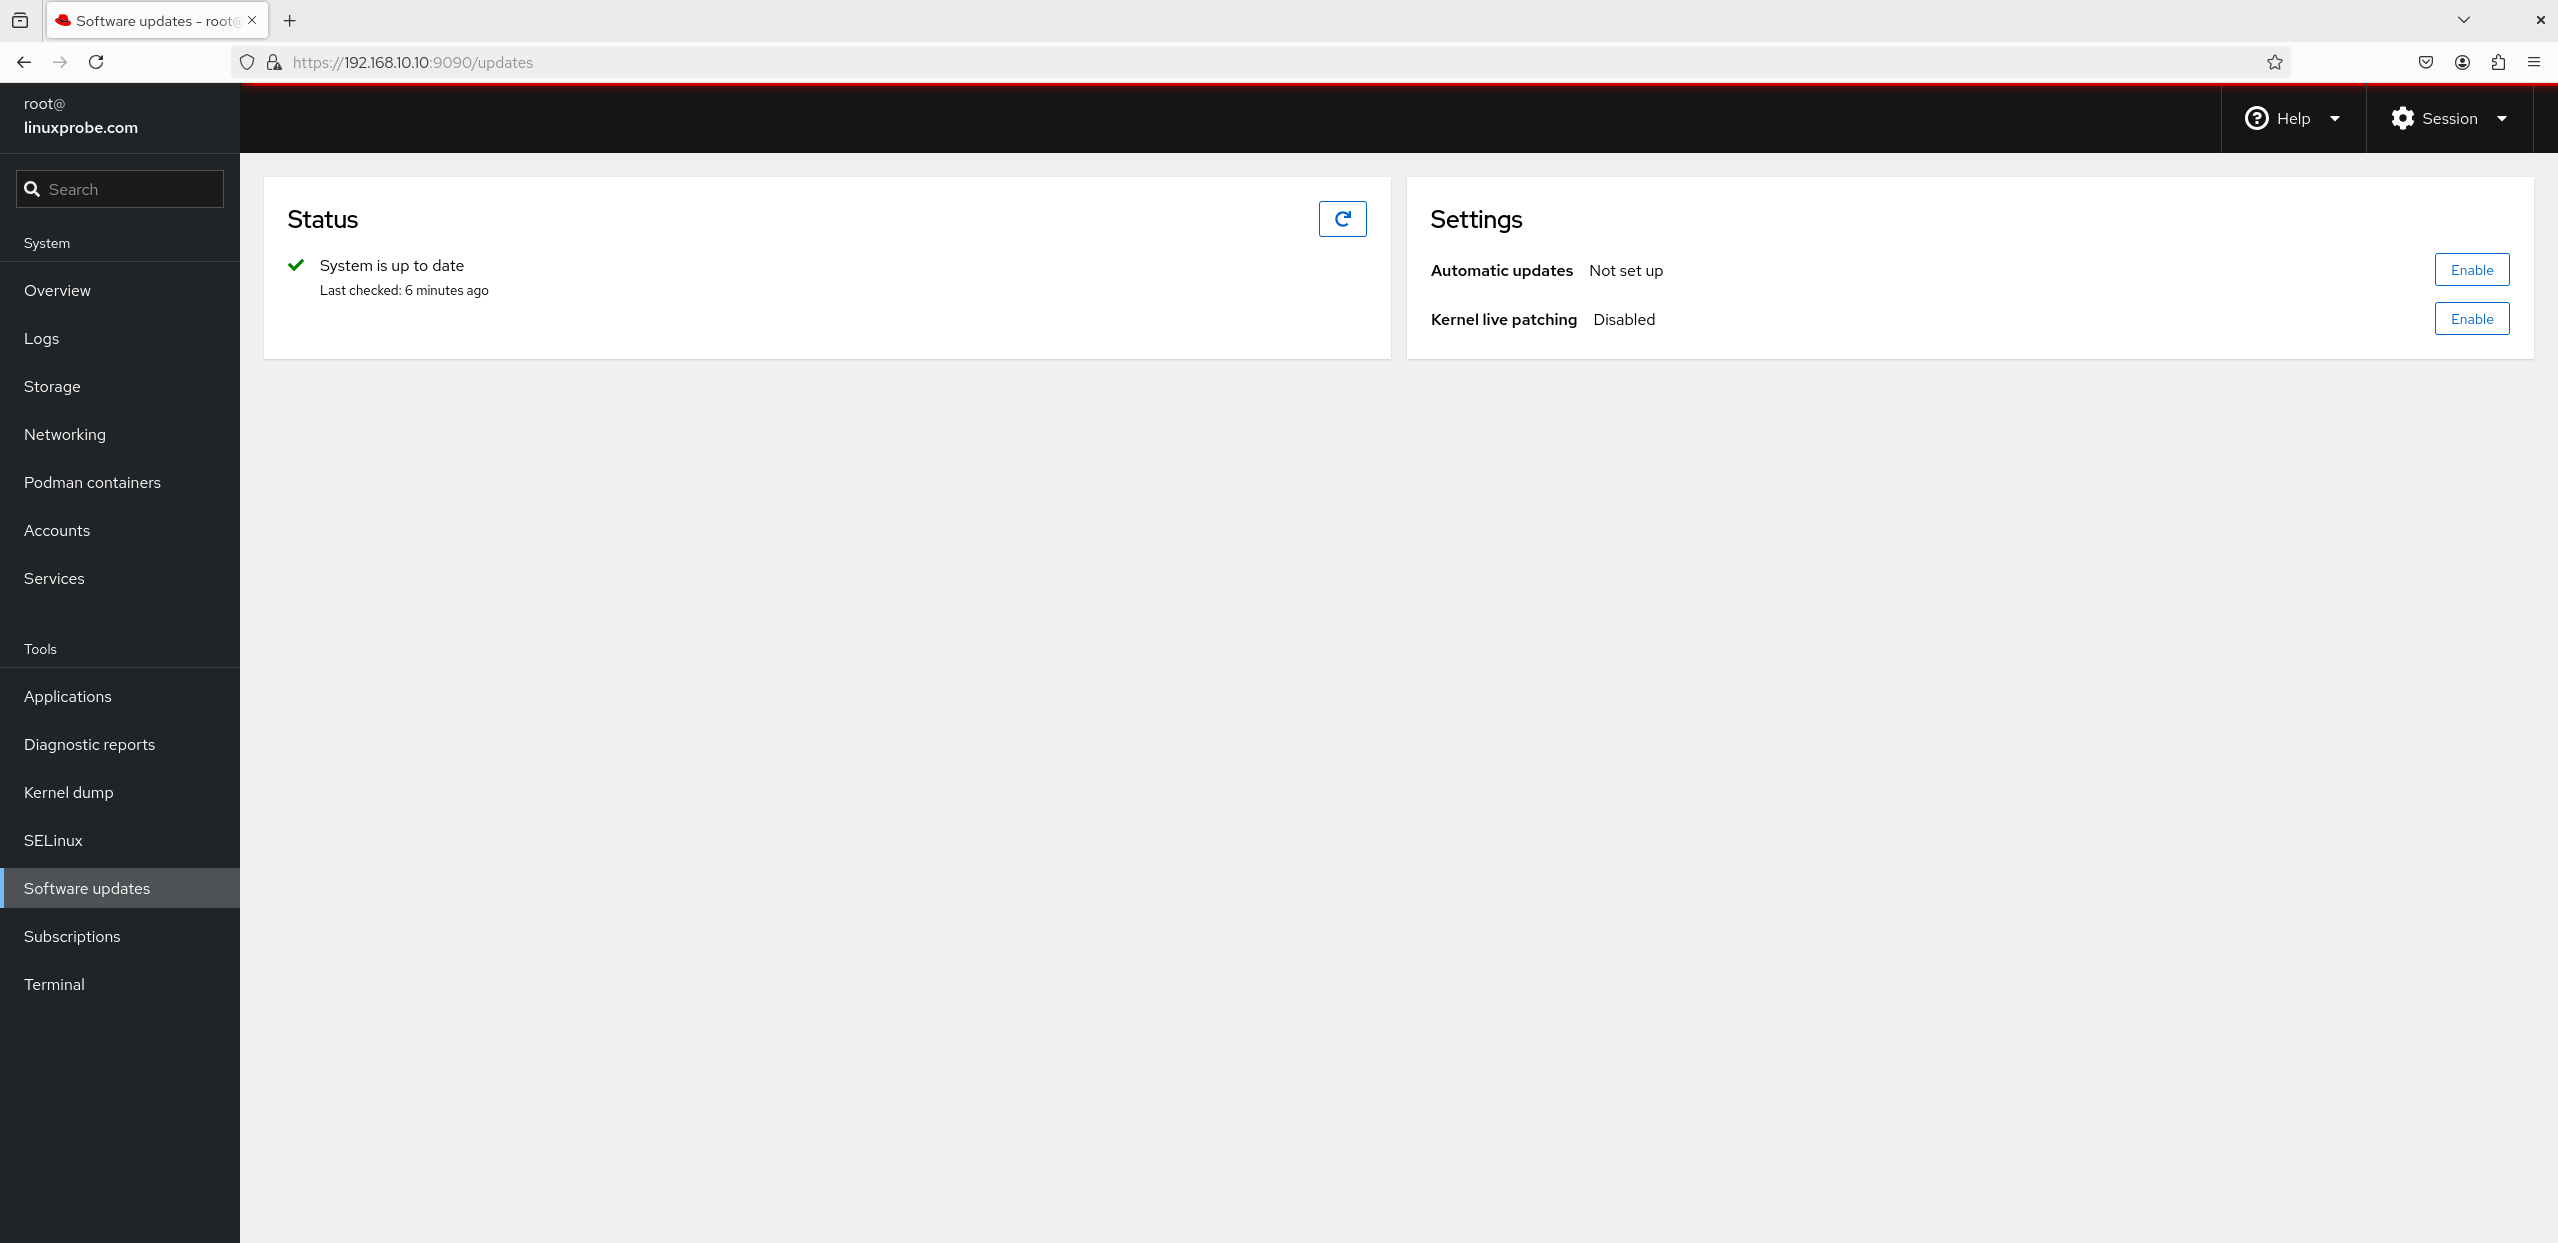
Figure 8-33 Updates view
11. Applications
Software installed via Cockpit or using Red Hat subscription sources appears here (Figure 8‑34).
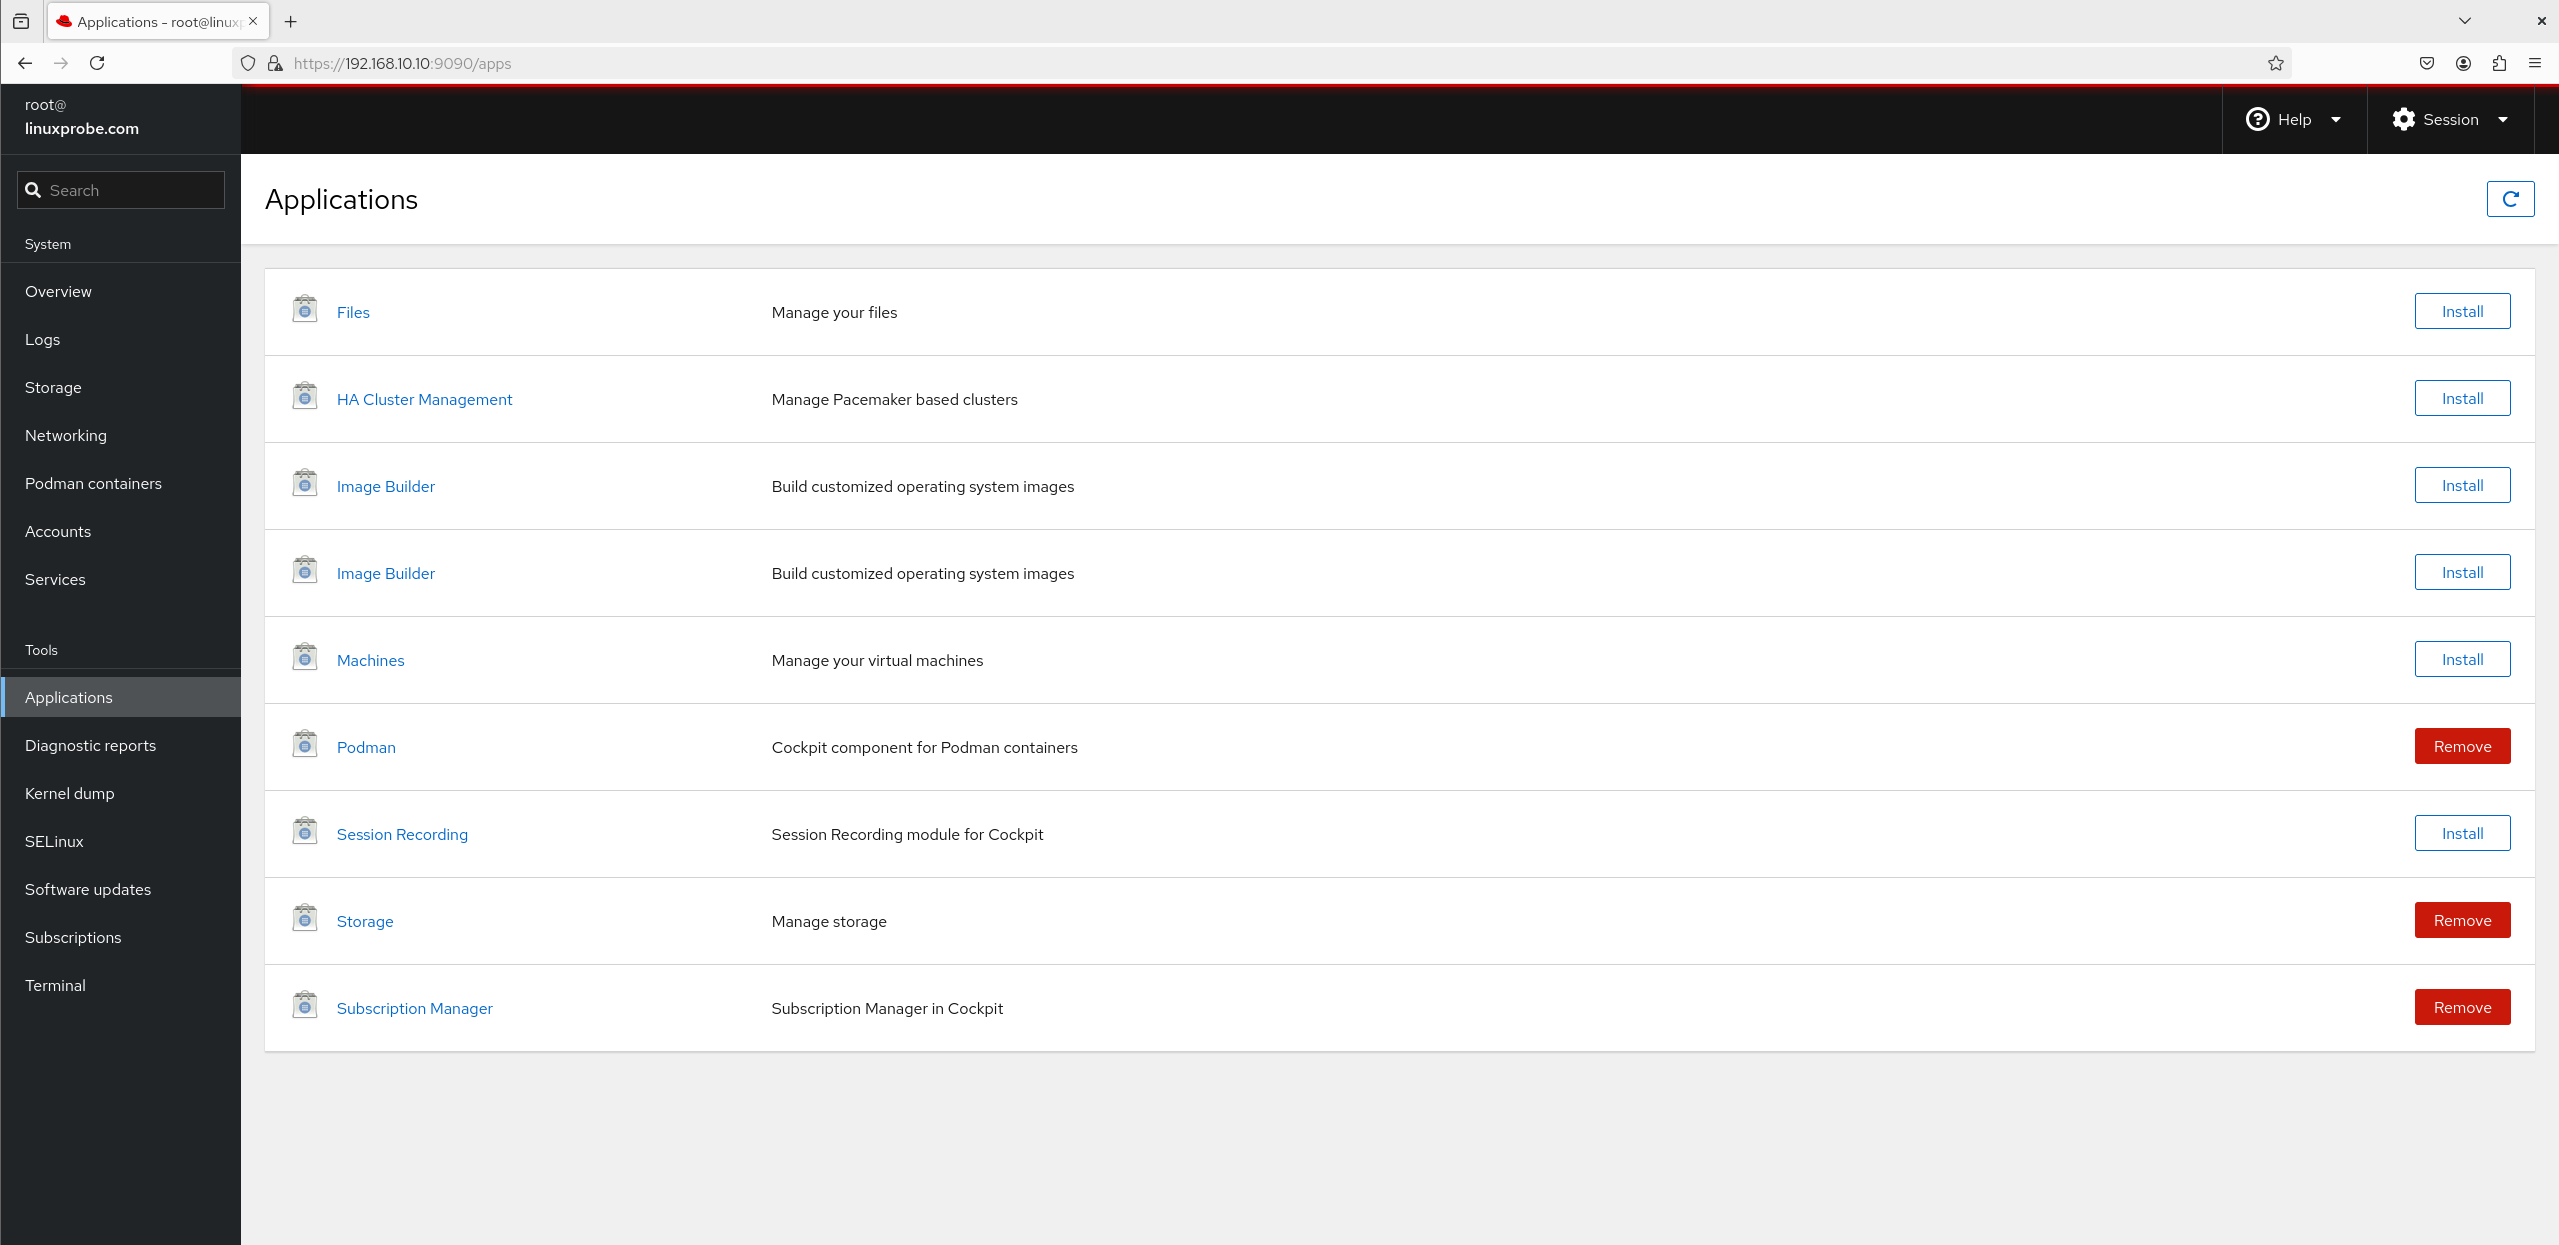
Figure 8-34 Applications view
12. Diagnostic Reports
This module helps collect/analyze system information to locate problems (Figure 8‑35). Click Run report and, after about two minutes, you’ll see a page like Figure 8‑36. Honestly, it’s basically a web button for the sosreport command.
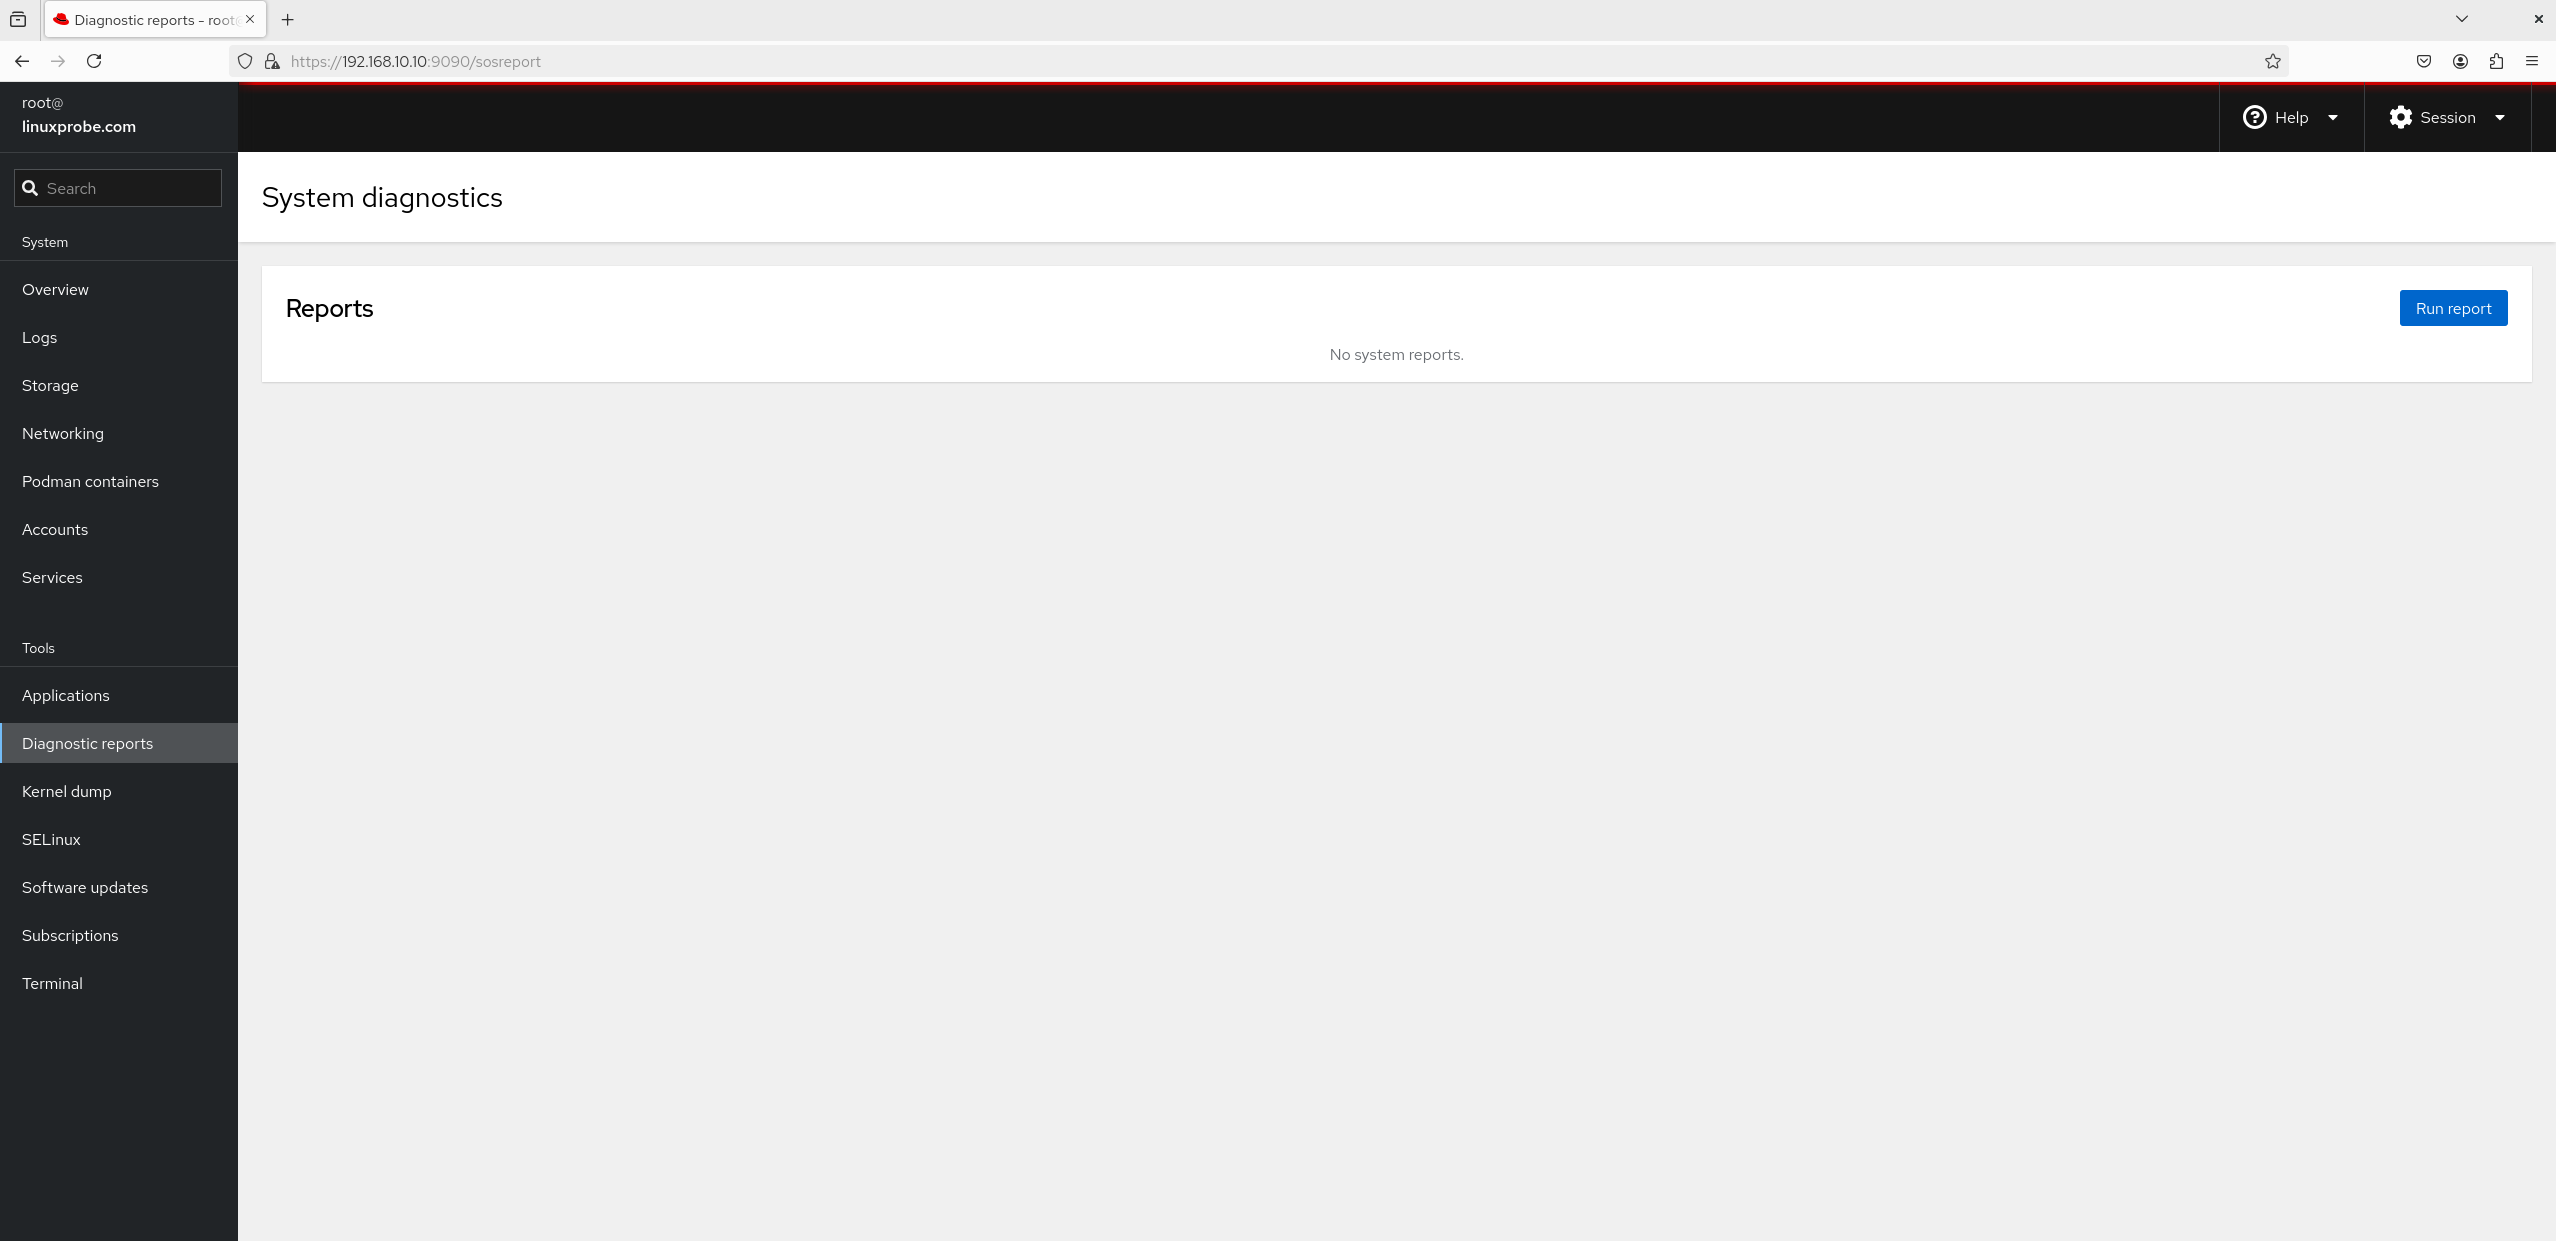
Figure 8-35 Report analysis view
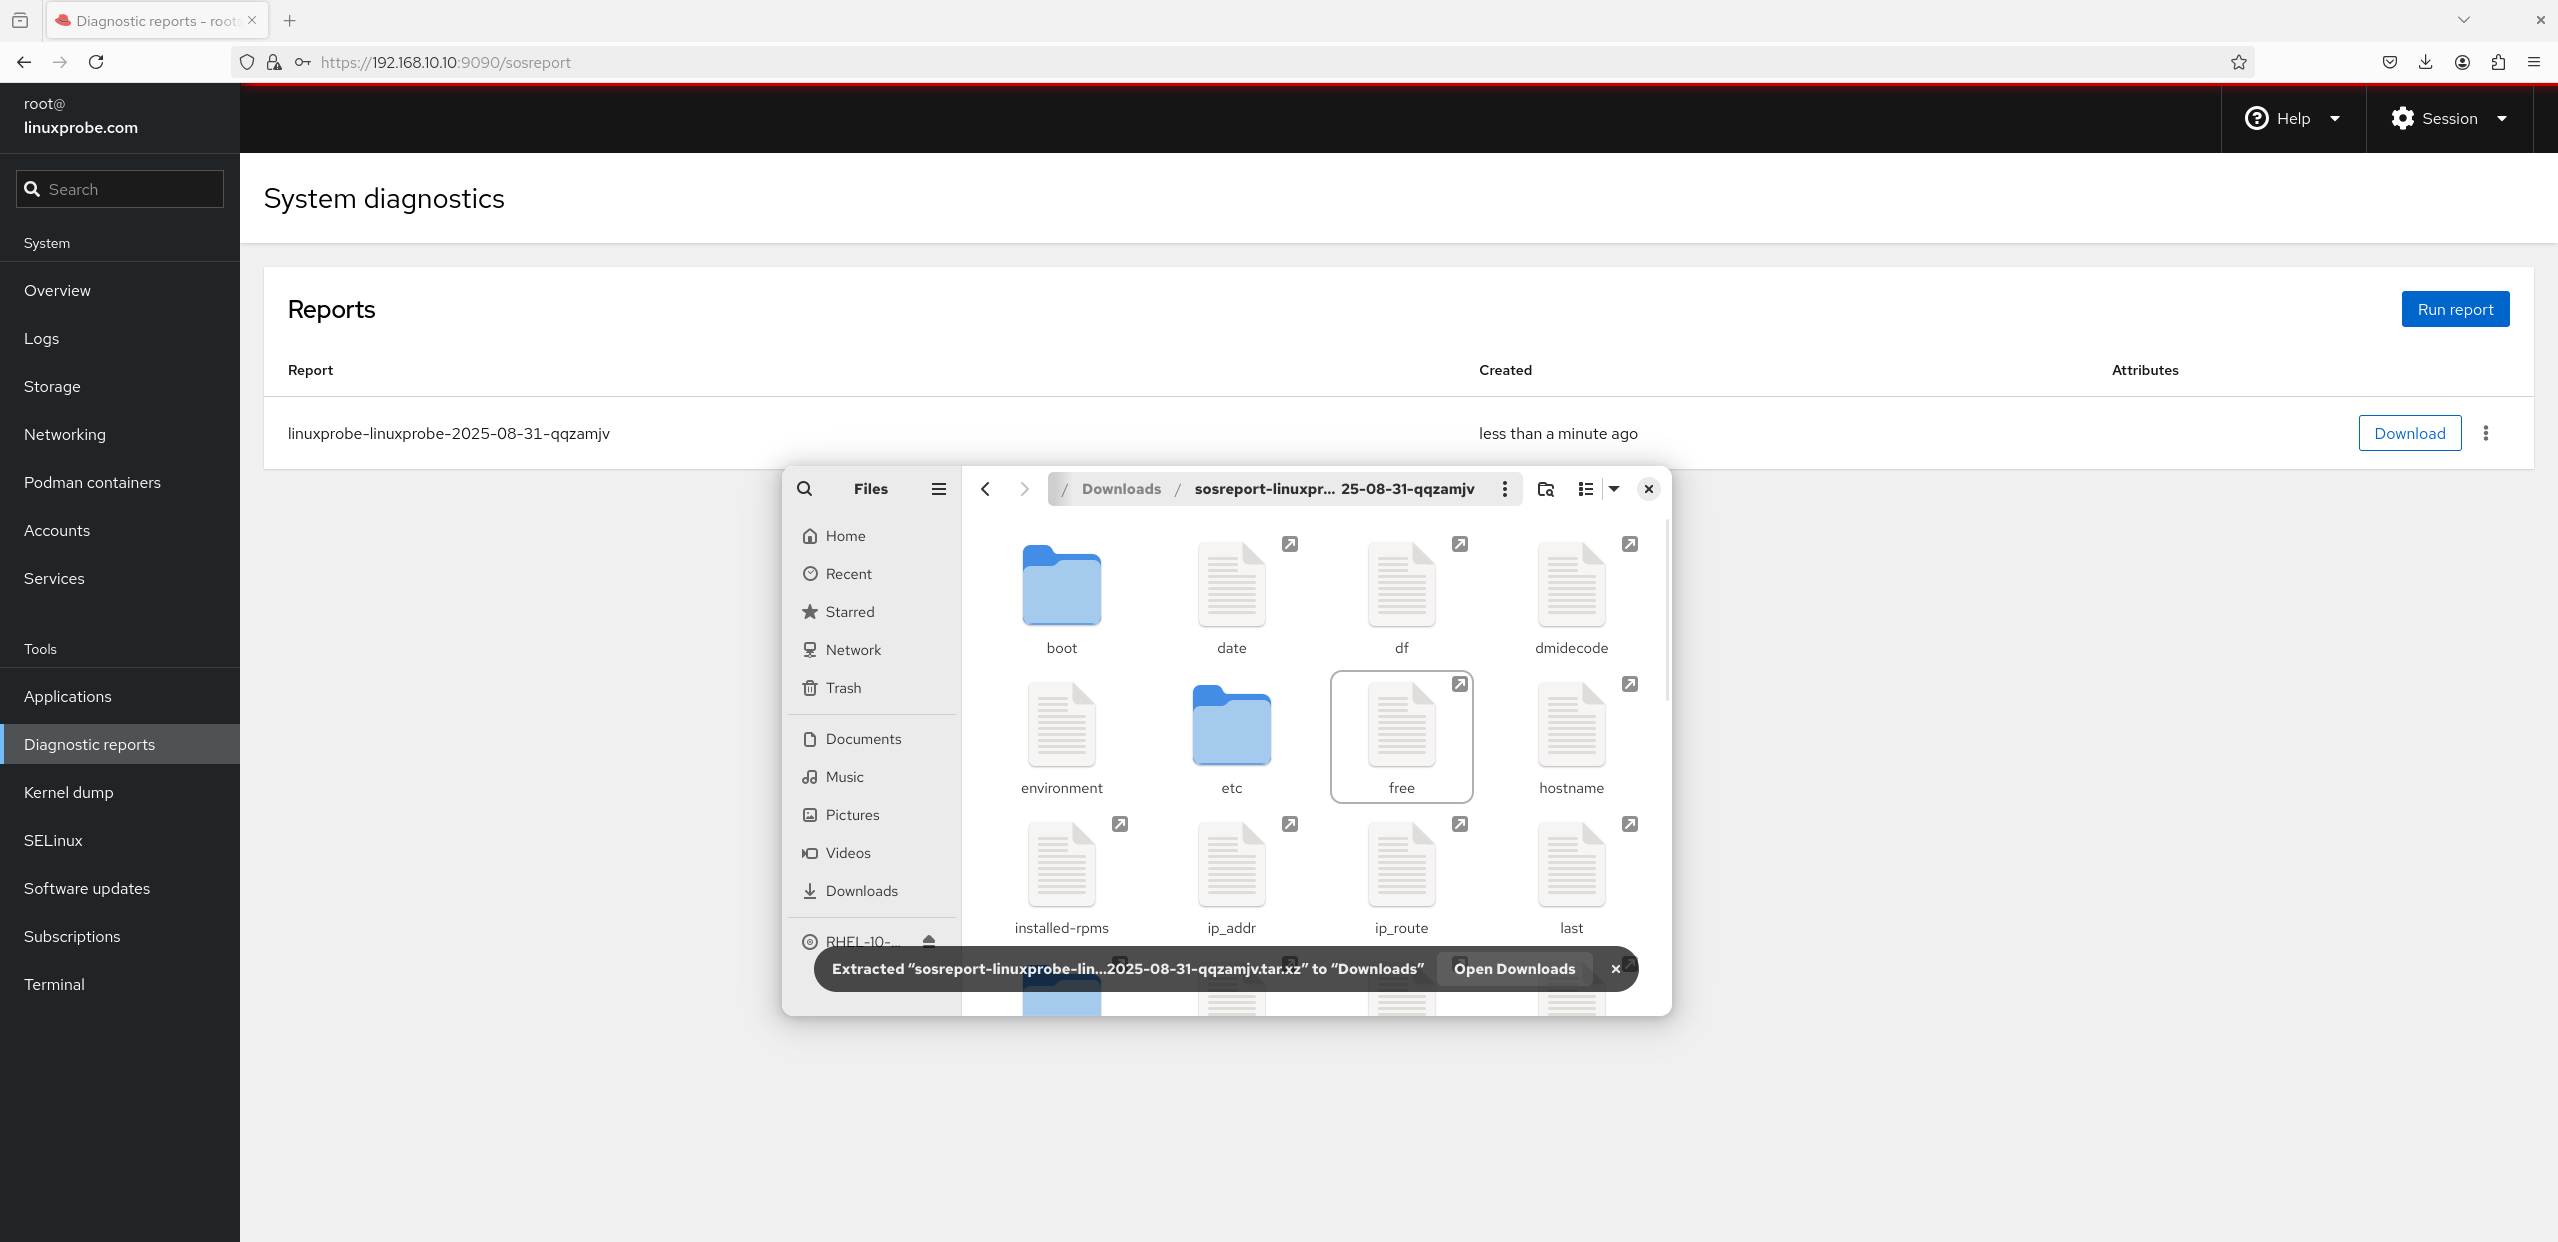
Figure 8-36 Report generated
13. Terminal
Cockpit provides an in‑browser shell (Figure 8‑37), which admins love for quick remote management.
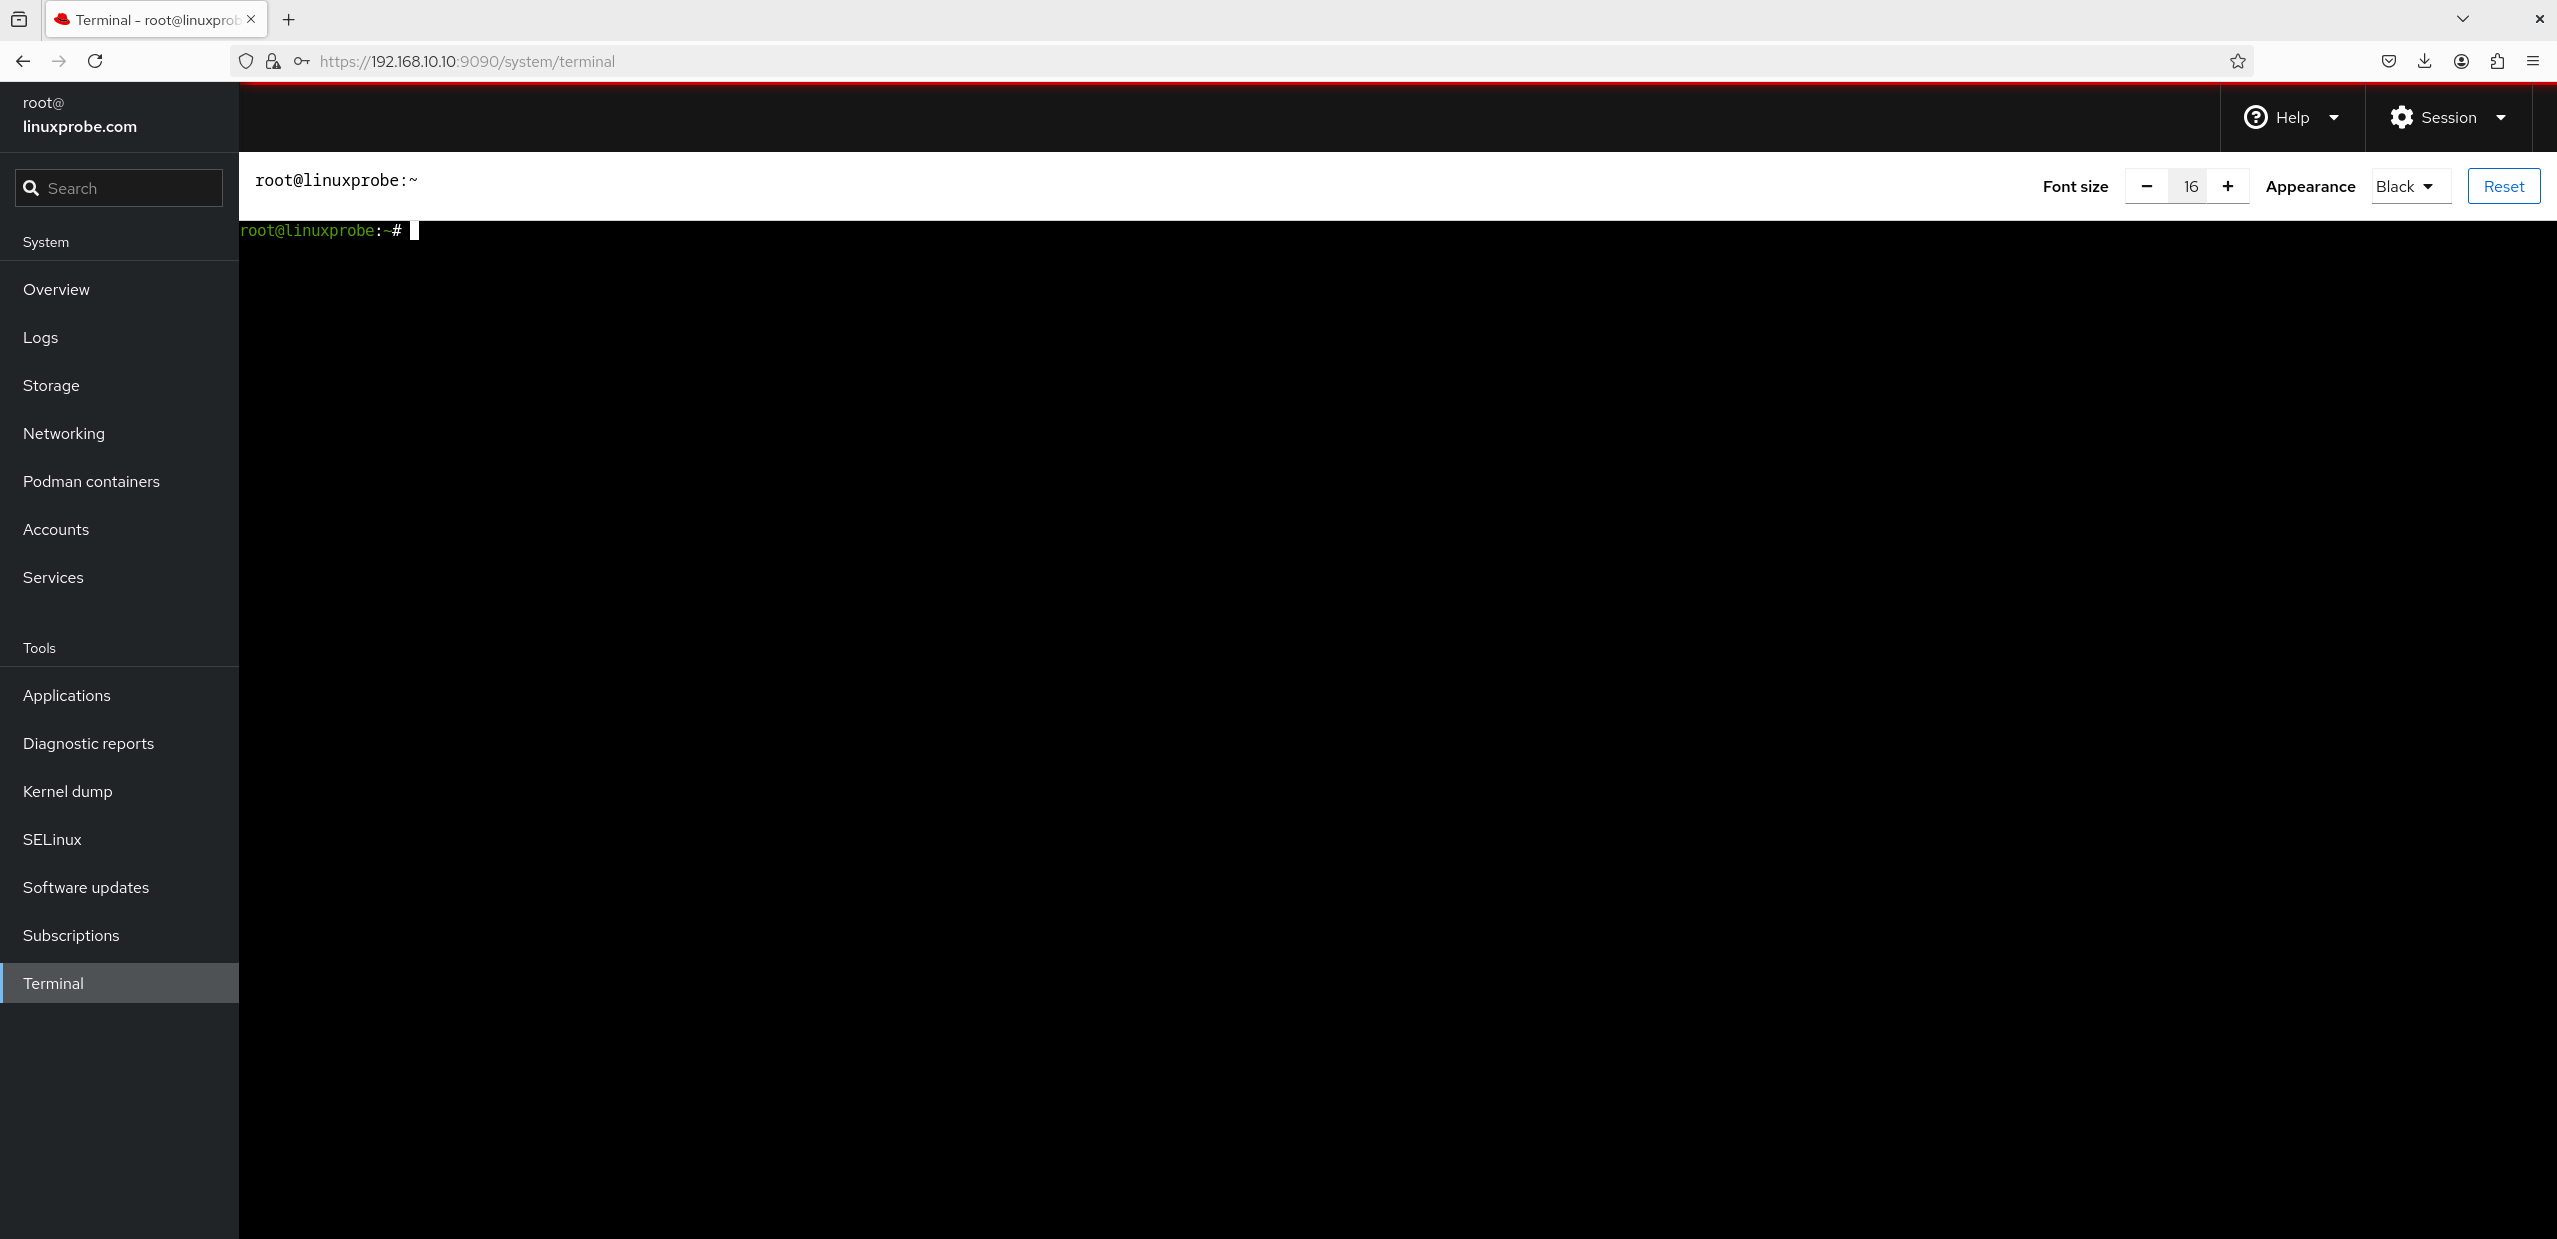
Figure 8-37 Terminal view
14. SELinux
Figure 8‑38 shows the SELinux controls and alerts. Chapter 10 covers SELinux in detail, so we’ll skip it here.
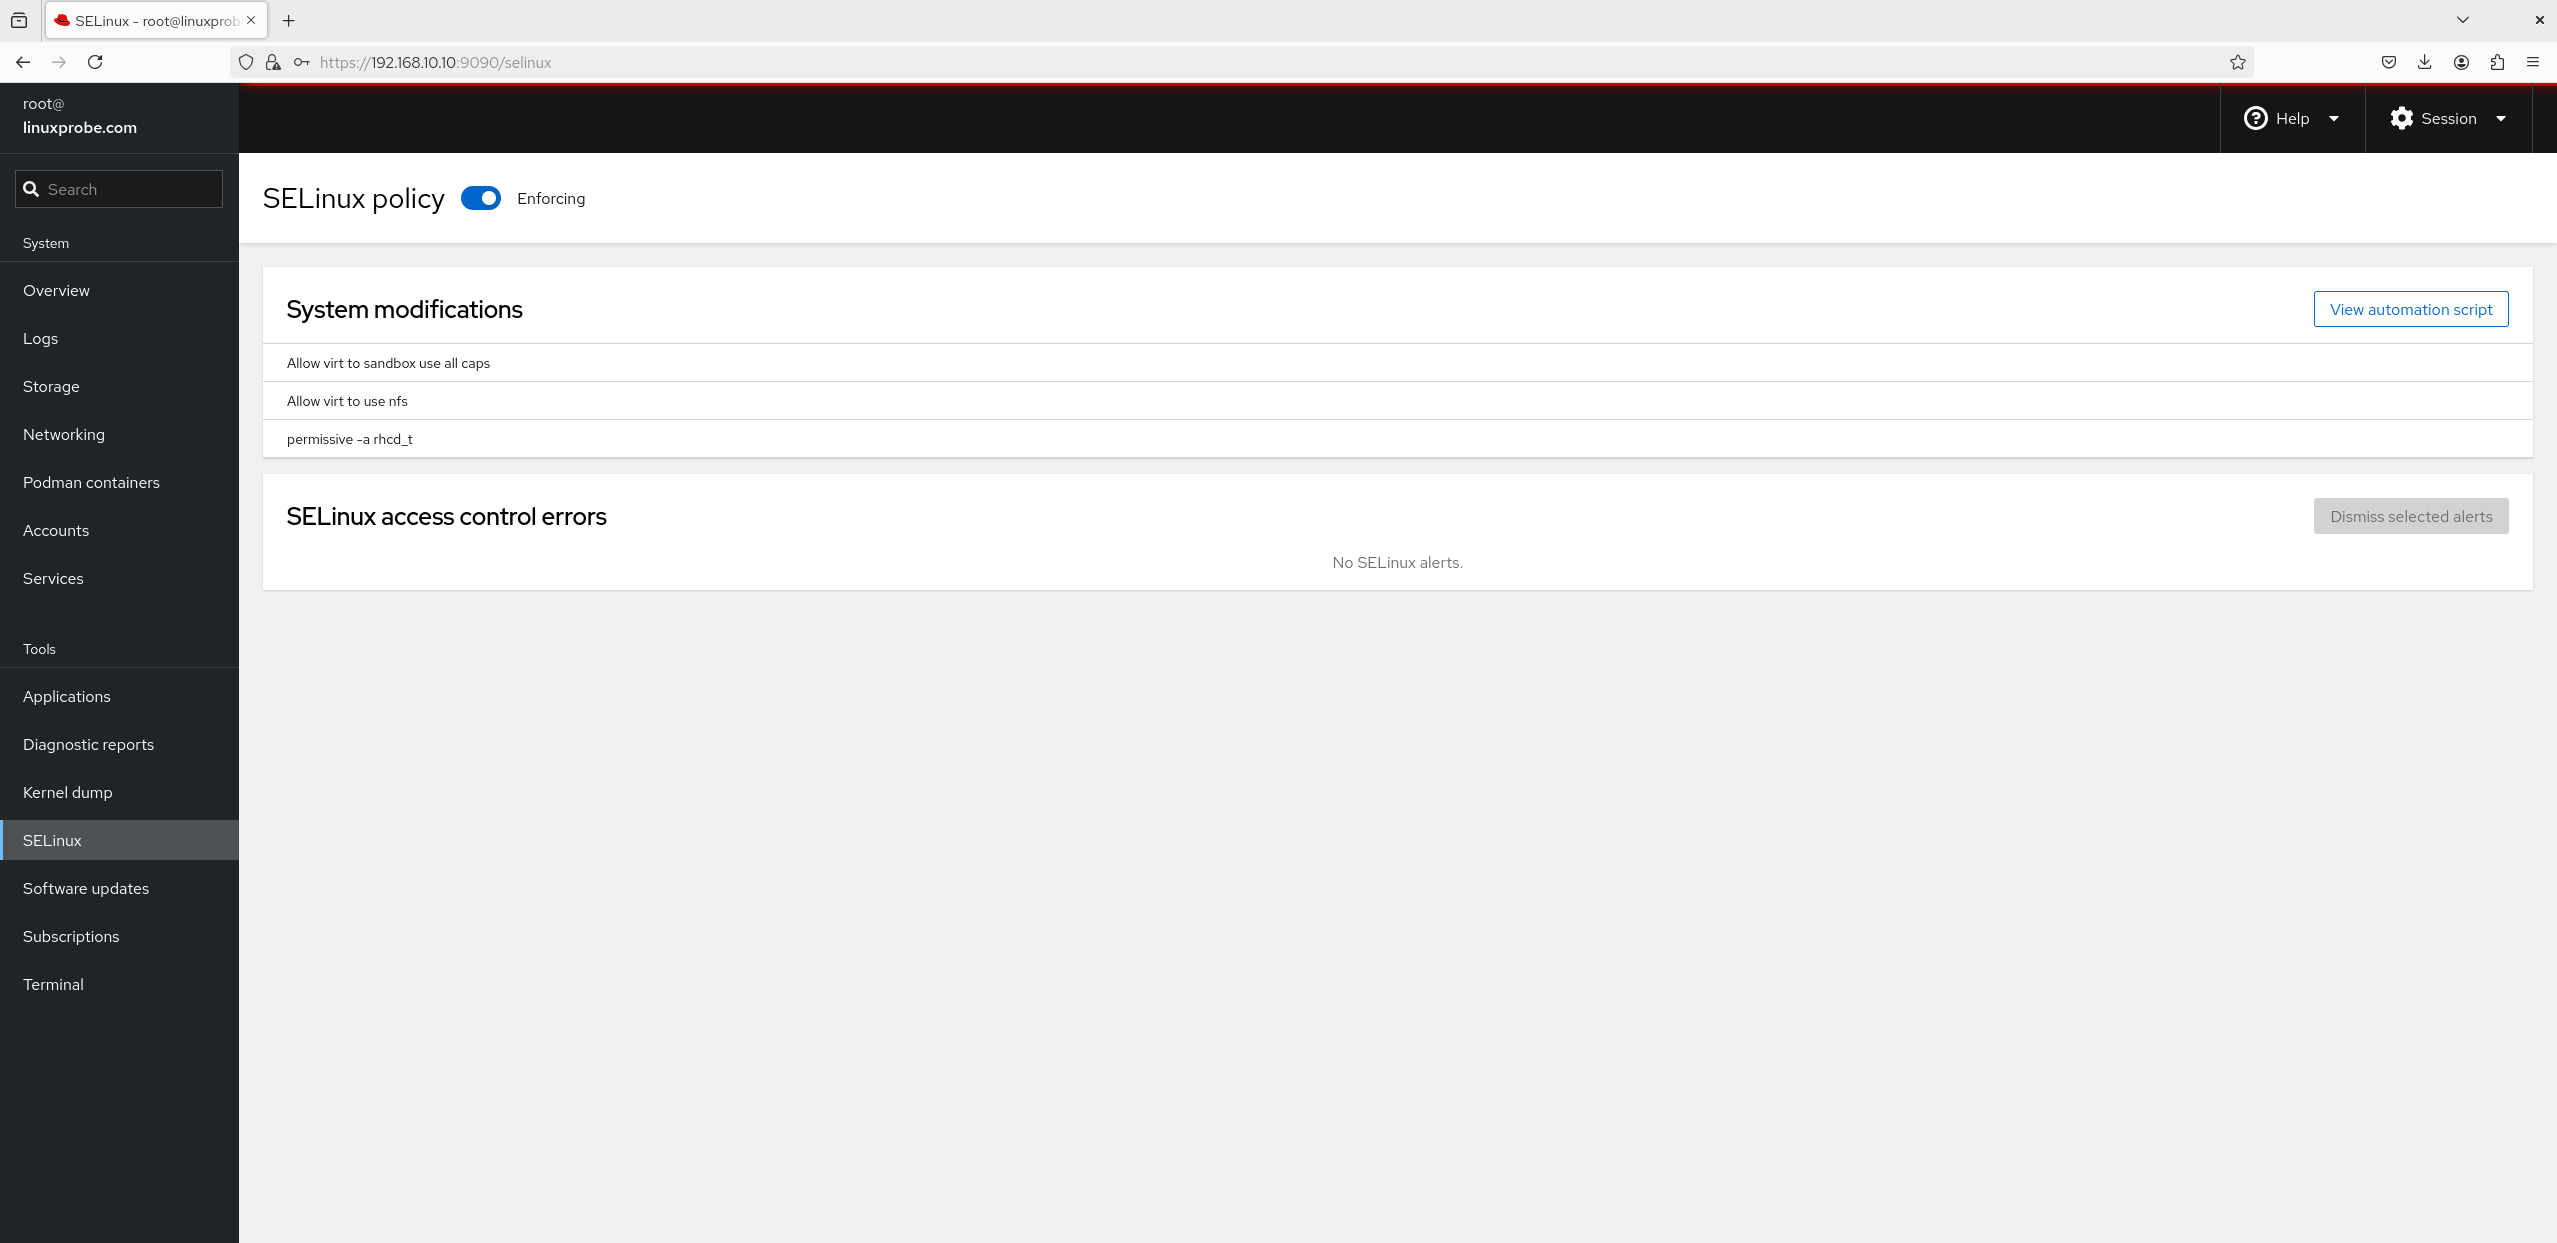
Figure 8-38 SELinux management view
At this point you should be comfortable managing firewalls. There are many tools; pick any one that meets your needs. Before configuring services later in the book, remember to verify both networking and firewall state to avoid the “service is correct but unreachable” situation that can derail lab results.
Take a short break—we’ll tackle the next chapter soon!
Review Questions
-
On RHEL 10, has iptables been completely replaced by firewalld?
Answer: Yes. It’s fully replaced; theiptablescommand is not available. -
Briefly explain the difference between the DROP and REJECT actions.
Answer: DROP silently discards packets; REJECT refuses the request and sends a rejection message back to the sender. -
How do you set the default policy of the iptables INPUT chain to DROP?
Answer: Runiptables -P INPUT DROP. -
Write an iptables rule that blocks SSH (port 22) access from the 192.168.10.0/24 subnet.
Answer:iptables -I INPUT -s 192.168.10.0/24 -p tcp --dport 22 -j REJECT. -
What’s the purpose of zones in firewalld?
Answer: Zones encapsulate rule sets tailored to different scenarios, enabling rapid switching among large sets of firewall policies. -
How do you set the default firewalld zone to
dmz?
Answer: Runfirewall-cmd --set-default-zone=dmz. -
How do you make permanently configured firewalld rules take effect immediately?
Answer: Runfirewall-cmd --reload. -
What problem does SNAT solve?
Answer: SNAT allows many private hosts to access the internet via a single public IP, mitigating IPv4 address scarcity. -
In what order does TCP Wrappers evaluate its allow/deny files?
Answer: It checks /etc/hosts.allow first, then /etc/hosts.deny; if neither matches, the request is allowed by default. -
How do you use Cockpit by default?
Answer: Cockpit listens on port 9090 by default; access it via a web browser athttps://<host>:9090.