Chapter 07 · Using RAID and LVM Disk Array Technologies
Chapter Overview
After learning how to partition, format, and mount disk devices in Chapter 6, this chapter dives into the characteristics of common RAID (Redundant Array of Independent Disks) configurations. By actually deploying solutions such as RAID 10 and RAID 5 with a hot spare, we’ll show—hands on—how powerful RAID can be to satisfy production demands for both disk I/O throughput and data redundancy. In addition, because storage resources often need to be adjusted dynamically, we’ll also cover deploying LVM (Logical Volume Manager), including expansion, reduction, snapshots, as well as unmounting and deletion. By the end of this chapter, you should be able to use RAID and LVM flexibly in enterprise production environments to meet advanced storage management needs.
7.1 RAID
For a long stretch of time, CPU performance kept rising rapidly. In 2024, Intel released the Core i9‑14900KS, bringing consumer desktops up to 24 cores and 32 threads with big‑core turbo frequencies up to 6.2 GHz. Earlier, AMD launched the Threadripper 7980X, making 64‑core/128‑thread “monsters” feasible on consumer systems. Meanwhile, disk performance has improved far more slowly and has increasingly become the bottleneck of overall system performance. Because disks handle sustained, frequent, and heavy I/O operations, they also fail more often than other components—raising the risk of data loss accordingly.
Among the components in a computer, disks are particularly prone to failure. Because they hold your data, you can’t treat them like a CPU, memory, power supply, or even a motherboard—parts you can simply swap when something goes wrong. In production environments, you must plan ahead and implement redundancy and off‑site backups.
The concept of RAID was first proposed and defined in 1988 at the University of California, Berkeley. RAID combines multiple disks into a larger, more reliable array, splits data into segments, and distributes those segments across different physical disks. This improves aggregate performance through parallel reads and writes and achieves redundancy by spreading data across disks according to different fault‑tolerance strategies.
Every technology has trade‑offs. RAID provides excellent redundancy, but it also increases cost. It’s like keeping two physical copies of the same phone book so you don’t lose your contacts: you double the materials and the price. RAID exists to improve reliability, availability, and performance. In modern enterprises, the redundancy mechanisms and the increase in throughput are often worth more than the raw storage itself. In other words, RAID both reduces the probability of data loss due to disk failure and increases read/write speeds, which is why it’s widely deployed by operators and medium‑to‑large organizations.
Cost and technical constraints mean you must balance reliability and performance for different needs and choose an appropriate plan. There are at least a dozen RAID levels in practice; here we’ll focus on the four most common: RAID 0, RAID 1, RAID 5, and RAID 10. Table 7‑1 compares these four (with n representing the total number of disks).
Table 7‑1 Comparison of RAID 0, 1, 5, and 10
| RAID level | Minimum disks | Usable capacity | Read/Write performance | Data safety | Characteristics |
|---|---|---|---|---|---|
| 0 | 2 | n | n | Low | Maximizes capacity and speed; failure of any single disk corrupts the entire array |
| 1 | 2 | n/2 | n | High | Maximizes safety; as long as one disk in the mirror set is healthy, data remains intact |
| 5 | 3 | n‑1 | n‑1 | Medium | Balances capacity, performance, and safety under cost constraints; tolerates one failed disk with no data loss |
| 10 | 4 | n/2 | n/2 | High | Combines RAID 1 and RAID 0 to deliver both performance and safety; tolerates up to half the disks failing (so long as failures are not within the same mirror pair) without data loss |
1. RAID 0
RAID 0 stripes data across at least two physical disks, combining them (via hardware or software) into a single large volume and writing data sequentially across the members. In ideal conditions this multiplies throughput, but failure of any one disk corrupts the entire array. In plain terms, RAID 0 boosts throughput but provides no redundancy or error correction. As shown in Figure 7‑1, data is split and written across disks A and B, improving both read and write speeds.
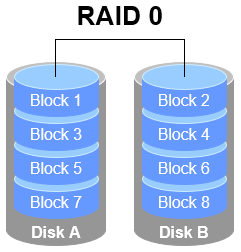
Figure 7‑1 RAID 0 schematic
2. RAID 1
While RAID 0 improves throughput, it stripes data across disks with no redundancy. If any disk fails, the array’s data is lost. If your production environment prioritizes data safety over write performance, RAID 1 is appropriate.
In Figure 7‑2, RAID 1 binds two or more disks and writes identical data to each (you can think of it as mirroring). If one disk fails, the system automatically continues operating using the surviving mirror copy.
Because of disk switching and write duplication, RAID 1 writes can be slightly slower than RAID 0. However, reads can be faster because the OS can read from multiple members in parallel; in theory, peak read throughput scales with the number of disks. Reliability is high: as long as at least one member remains healthy, your data is safe.
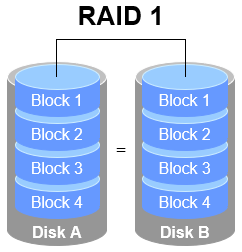
Figure 7‑2 RAID 1 schematic
Although RAID 1 emphasizes safety, writing the same data to multiple disks lowers utilization. In Figure 7‑2, only 50% of the raw capacity is usable. With three mirrors, usable capacity drops to roughly 33%, and so on. Writing to multiple members also increases system overhead.
Is there a RAID level that balances performance, safety, and cost? Strictly speaking, you can’t dramatically increase safety without either adding disks or sacrificing effective capacity. The upcoming RAID 5 scheme is often said to balance all three, but in reality it’s a compromise among them.
3. RAID 5
As shown in Figure 7‑3, RAID 5 distributes parity information across the disks. Parity is not stored on a dedicated disk but is spread across all members other than the one holding the corresponding data stripe. The benefit is that failure of any single disk is not catastrophic. In the figure, the Parity segments hold parity information. RAID 5 does not store a second copy of the actual data; instead, when a disk fails, it reconstructs the missing data using parity. In this way, RAID 5 compromises among performance, safety, and cost.
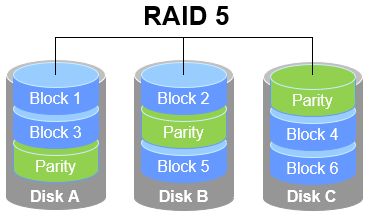
Figure 7‑3 RAID 5 schematic
RAID 5 requires at least three disks and uses disk striping. Compared with RAID 1, it stores parity rather than complete replicas, so repeated writes to a file need only update the associated parity, improving efficiency and reducing storage cost.
4. RAID 10
RAID 5 makes some trade‑offs to save on disk cost, but many enterprises value data above hardware savings, so RAID 10 is common in production.
As the name implies, RAID 10 is a combination of RAID 1 and RAID 0. As shown in Figure 7‑4, it requires at least four disks. First, create two RAID 1 mirror sets to ensure data safety; then stripe (RAID 0) across those mirrors to increase throughput. In theory, as long as both disks in the same mirror don’t fail simultaneously, up to 50% of the disks can fail without data loss. Because RAID 10 inherits RAID 0’s high performance and RAID 1’s safety—and typically outperforms RAID 5 when cost is not the primary concern—it has become widely used.
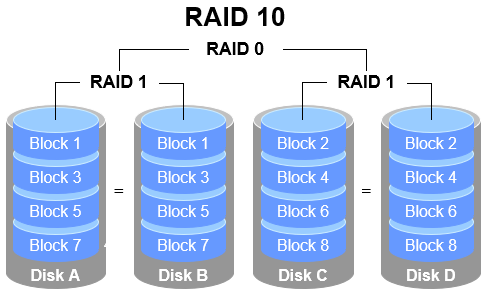
Figure 7‑4 RAID 10 schematic
Tips:
Because RAID 10 consists of RAID 1 plus RAID 0, the proper pronunciation is “RAID one‑zero,” not “RAID ten.”
Looking closely at Figure 7‑4, RAID 10 first mirrors pairs (RAID 1) and then stripes across those mirrors (RAID 0), treating the mirrors as single logical disks. RAID 01 does the reverse: it first creates two RAID 0 sets, then mirrors those sets with RAID 1.
The difference matters. In RAID 10, the failure of any single disk does not threaten data safety; the array keeps running. In RAID 01, failure of any one disk immediately breaks a RAID 0 set at the lowest level and can cause serious risk. As a result, RAID 10 is far more common, and many motherboards don’t even support RAID 01.
7.1.1 Deploying a RAID Array
With the disk‑management basics from Chapter 6, deploying RAID and LVM becomes much easier. Start by adding four disks in your VM to build a RAID 10 array, as shown in Figure 7‑5. We won’t repeat the VM steps here. Use SCSI or SATA virtual disks; 20 GB each is fine.
These are virtual disks—you don’t need to buy extra hardware. Be sure to power off the VM before adding disks, or the guest OS might not detect them due to hardware‑layout changes.

Figure 7‑5 Adding four disks
In production, servers usually have hardware RAID controllers. There’s no need to buy a server just to practice, though—you can create and manage software RAID on Linux with the mdadm command. The concepts and procedures are the same as in production.
mdadm (short for “multiple devices admin”) creates, adjusts, monitors, and manages RAID devices. Syntax: mdadm <options> <device>.
Table 7‑2 lists common mdadm options.
Table 7‑2 Common mdadm options and their meanings
| Option | Meaning |
|---|---|
| -a | Auto‑detect device names |
| -n | Specify number of member devices |
| -l | Specify RAID level |
| -C | Create a new array |
| -v | Verbose creation output |
| -f | Mark a device as failed (simulate failure) |
| -r | Remove a device |
| -Q | Show summary information |
| -D | Show detailed information |
| -S | Stop an array |
Next, use mdadm to create a RAID 10 array named /dev/md0.
In Chapter 6, we noted that udev names storage devices in a straightforward way. The second SCSI disk is typically /dev/sdb, and so on. Building a RAID array from individual disks is like organizing students into a class—you wouldn’t call the class /dev/sdbcde. That might show the members at a glance, but it’s hard to read, and what if your array has 10, 50, or 100 disks?
In VMware Workstation 17, the system disk may occasionally be mis‑identified after a reboot, scrambling device names. Confirm that /dev/sdb, /dev/sdc, /dev/sdd, and /dev/sde are the newly added disks (use the command below). If /dev/sda is not the primary system disk, reboot the VM.
root@linuxprobe:~# ls -l /dev/sd*
brw-rw----. 1 root disk 8,  0 Mar 17 21:15 /dev/sda
brw-rw----. 1 root disk 8,  1 Mar 17 21:15 /dev/sda1
brw-rw----. 1 root disk 8,  2 Mar 17 21:15 /dev/sda2
brw-rw----. 1 root disk 8,  3 Mar 17 21:15 /dev/sda3
brw-rw----. 1 root disk 8, 16 Mar 17 21:15 /dev/sdb
brw-rw----. 1 root disk 8, 32 Mar 17 21:15 /dev/sdc
brw-rw----. 1 root disk 8, 48 Mar 17 21:15 /dev/sdd
brw-rw----. 1 root disk 8, 64 Mar 17 21:15 /dev/sde
Now for the options: -C creates a new array; -v prints progress; we name the array /dev/md0; -n 4 uses four disks; -l 10 sets RAID level 10; then we list the four devices.
root@linuxprobe:~# mdadm -Cv /dev/md0 -n 4 -l 10 /dev/sdb /dev/sdc /dev/sdd /dev/sde
mdadm: layout defaults to n2
mdadm: layout defaults to n2
mdadm: chunk size defaults to 512K
mdadm: size set to 20954112K
mdadm: Defaulting to version 1.2 metadata
mdadm: array /dev/md0 started.
Initialization takes about a minute; use -D to watch details. You can also use -Q for a quick summary:
root@linuxprobe:~# mdadm -Q /dev/md0
/dev/md0: 39.97GiB raid10 4 devices, 0 spares. Use mdadm --detail for more detail.
You might wonder why an array built from four 20 GB disks shows only 39.97 GiB of capacity.
That’s RAID 10’s design: each pair is mirrored, so every piece of data is stored twice. Usable capacity is 50%, with the other 50% providing redundancy. Thus, from 80 GB raw, you get roughly 40 GB usable.
After a couple of minutes, format the array as Ext4:
root@linuxprobe:~# mkfs.ext4 /dev/md0
mke2fs 1.47.1 (20-May-2024)
Creating filesystem with 10477056 4k blocks and 2621440 inodes
Filesystem UUID: 3bec5133-ecb1-4102-a10e-5c22208a76a1
Superblock backups stored on blocks:
	32768, 98304, 163840, 229376, 294912, 819200, 884736, 1605632, 2654208,
	4096000, 7962624

Allocating group tables: done
Writing inode tables: done
Creating journal (65536 blocks): done
Writing superblocks and filesystem accounting information: done
Create a mount point and mount the device:
root@linuxprobe:~# mkdir /RAID
root@linuxprobe:~# mount /dev/md0 /RAID
root@linuxprobe:~# df -h
Filesystem             Size  Used Avail Use% Mounted on
/dev/mapper/rhel-root   17G  3.7G   13G  23% /
devtmpfs               4.0M     0  4.0M   0% /dev
tmpfs                  1.9G   84K  1.9G   1% /dev/shm
efivarfs               256K   56K  196K  23% /sys/firmware/efi/efivars
tmpfs                  776M  9.7M  767M   2% /run
tmpfs                  1.0M     0  1.0M   0% /run/credentials/systemd-journald.service
/dev/sr0               6.5G  6.5G     0 100% /media/cdrom
/dev/sda2              960M  272M  689M  29% /boot
/dev/sda1              599M  8.3M  591M   2% /boot/efi
tmpfs                  388M  128K  388M   1% /run/user/0
/dev/md0                40G   24K   38G   1% /RAID
Check /dev/md0 for details to confirm the RAID level, array size, and total devices:
root@linuxprobe:~# mdadm -D /dev/md0
/dev/md0:
           Version : 1.2
     Creation Time : Mon Mar 17 21:56:00 2025
        Raid Level : raid10
        Array Size : 41908224 (39.97 GiB 42.91 GB)
     Used Dev Size : 20954112 (19.98 GiB 21.46 GB)
      Raid Devices : 4
     Total Devices : 4
       Persistence : Superblock is persistent

       Update Time : Mon Mar 17 22:02:18 2025
             State : clean
    Active Devices : 4
   Working Devices : 4
    Failed Devices : 0
     Spare Devices : 0

            Layout : near=2
        Chunk Size : 512K

Consistency Policy : resync

              Name : linuxprobe.com:0  (local to host linuxprobe.com)
              UUID : 568d1322:33f4dd42:78d1f692:5ded8f34
            Events : 17

    Number   Major   Minor   RaidDevice State
       0       8       16        0      active sync set-A   /dev/sdb
       1       8       32        1      active sync set-B   /dev/sdc
       2       8       48        2      active sync set-A   /dev/sdd
       3       8       64        3      active sync set-B   /dev/sde
To ensure the array survives reboots, add it to /etc/fstab so it mounts automatically:
root@linuxprobe:~# echo "/dev/md0 /RAID ext4 defaults 0 0" >> /etc/fstab
root@linuxprobe:~# cat /etc/fstab
#
# /etc/fstab
# Created by anaconda on Wed Mar 12 19:35:26 2025
#
# Accessible filesystems, by reference, are maintained under '/dev/disk/'.
# See man pages fstab(5), findfs(8), mount(8) and/or blkid(8) for more info.
#
# After editing this file, run 'systemctl daemon-reload' to update systemd
# units generated from this file.
#
UUID=408f4a3d-a4d3-4a44-bb23-6988cdbd10bf /                       xfs     defaults        0 0
UUID=4cf8ecae-bcb6-4b1e-8001-968b33643a8a /boot                   xfs     defaults        0 0
UUID=1FB8-9199         			 		  /boot/efi               vfat    umask=0077,shortname=winnt 0 2
UUID=d936c726-45a7-4ca2-8932-c54f84a3d787 none                    swap    defaults        0 0
/dev/cdrom 								  /media/cdrom 			  iso9660 defaults 		  0 0
/dev/md0 								  /RAID 				  ext4 	  defaults 		  0 0
7.1.2 Simulating Failure and Repair
We deploy RAID 10 primarily for higher I/O throughput and safety. In a VM, the performance boost may not be obvious, so let’s focus on failure handling so you’ll be calm and effective when an array degrades in production.
After confirming that a physical disk has failed and can no longer be used, mark it as failed with mdadm and then check the array’s status—you’ll see it has degraded:
root@linuxprobe:~# mdadm /dev/md0 -f /dev/sdb
mdadm: set /dev/sdb faulty in /dev/md0
root@linuxprobe:~# mdadm -D /dev/md0
/dev/md0:
           Version : 1.2
     Creation Time : Mon Mar 17 21:56:00 2025
        Raid Level : raid10
        Array Size : 41908224 (39.97 GiB 42.91 GB)
     Used Dev Size : 20954112 (19.98 GiB 21.46 GB)
      Raid Devices : 4
     Total Devices : 4
       Persistence : Superblock is persistent

       Update Time : Mon Mar 17 22:15:25 2025
             State : clean, degraded
    Active Devices : 3
   Working Devices : 3
    Failed Devices : 1
     Spare Devices : 0

            Layout : near=2
        Chunk Size : 512K

Consistency Policy : resync

              Name : linuxprobe.com:0  (local to host linuxprobe.com)
              UUID : 568d1322:33f4dd42:78d1f692:5ded8f34
            Events : 19

    Number   Major   Minor   RaidDevice State
       -       0        0        0      removed
       1       8       32        1      active sync set-B   /dev/sdc
       2       8       48        2      active sync set-A   /dev/sdd
       3       8       64        3      active sync set-B   /dev/sde

       0       8       16        -      faulty   /dev/sdb
The -f option simulates a failure. To fully detach the failed member, remove it:
root@linuxprobe:~# mdadm /dev/md0 -r /dev/sdb
mdadm: hot removed /dev/sdb from /dev/md0
In RAID 10, a failed disk within a mirror pair doesn’t stop the array. When the replacement disk arrives, add it back with mdadm—the array will rebuild automatically. During this time, you can still create and delete files under /RAID. In our VM, we’ll reboot to simulate swapping in a new disk, then add it to the array.
After adding the replacement, use -a to attach it and -D to monitor rebuild progress (shown as a percentage):
root@linuxprobe:~# mdadm /dev/md0 -a /dev/sdb
mdadm: added /dev/sdb
root@linuxprobe:~# mdadm -D /dev/md0
/dev/md0:
           Version : 1.2
     Creation Time : Mon Mar 17 21:56:00 2025
        Raid Level : raid10
        Array Size : 41908224 (39.97 GiB 42.91 GB)
     Used Dev Size : 20954112 (19.98 GiB 21.46 GB)
      Raid Devices : 4
     Total Devices : 4
       Persistence : Superblock is persistent

       Update Time : Mon Mar 17 22:16:27 2025
             State : clean, degraded, recovering
    Active Devices : 3
   Working Devices : 4
    Failed Devices : 0
     Spare Devices : 1

            Layout : near=2
        Chunk Size : 512K

Consistency Policy : resync

    Rebuild Status : 29% complete

              Name : linuxprobe.com:0  (local to host linuxprobe.com)
              UUID : 568d1322:33f4dd42:78d1f692:5ded8f34
            Events : 26

    Number   Major   Minor   RaidDevice State
       4       8       16        0      spare rebuilding   /dev/sdb
       1       8       32        1      active sync set-B   /dev/sdc
       2       8       48        2      active sync set-A   /dev/sdd
       3       8       64        3      active sync set-B   /dev/sde
You might ask: “Our controller has 30+ disks. Even if I know /dev/sdb failed, how do I know which physical drive to pull?” In practice, a failed drive’s status LED will change (often to solid red or flashing amber), as shown in Figure 7‑6.
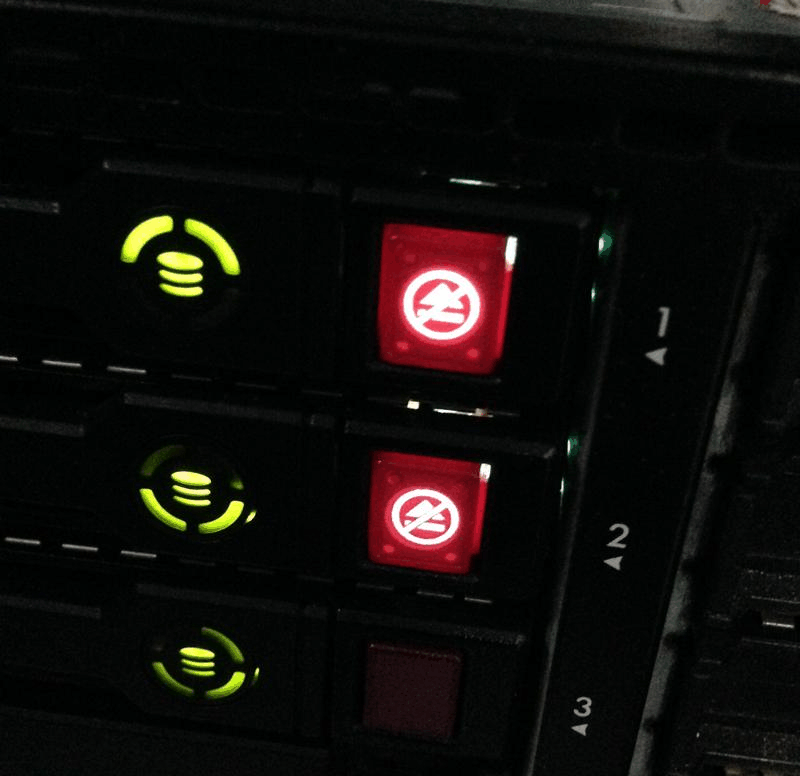
Figure 7‑6 Drive status LEDs
7.1.3 Arrays with a Hot Spare
In RAID 10, up to half the disks can fail without data loss—provided failures don’t occur within the same mirror pair. An edge case remains: if a mirror loses one disk and the other fails before you replace it, the array will lose data. This dual failure within a single mirror is rare, but it does happen.
What can we do? Use a hot spare. Keep an extra disk of sufficient size idle; if a member fails, the hot spare is immediately promoted and the array begins rebuilding. It’s a simple and effective safeguard.
To keep the experiments isolated, revert your VM to the initial snapshot. This time we’ll deploy RAID 5 to illustrate the hot‑spare workflow. RAID 5 needs at least three disks plus one hot spare, so add four virtual disks as shown in Figure 7‑7.
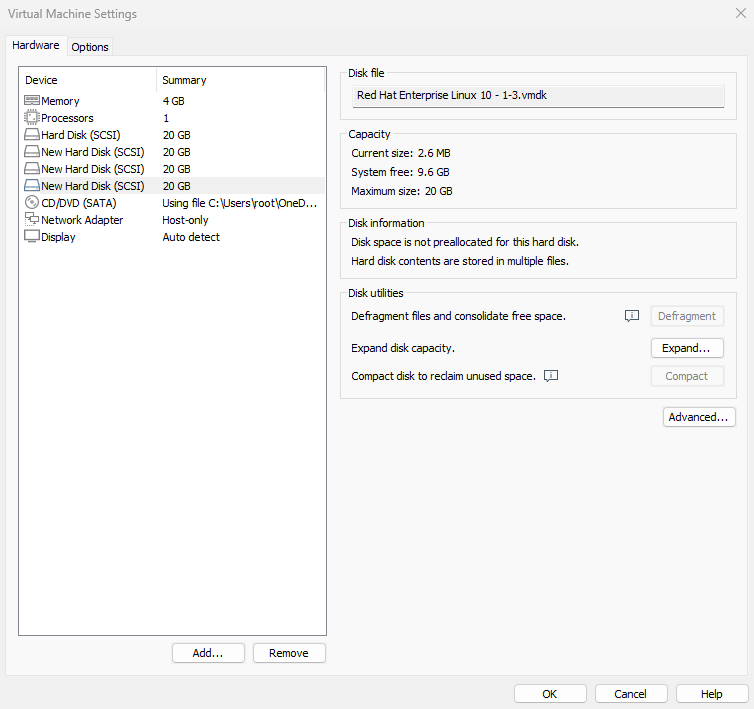
Figure 7‑7 After resetting the VM, add four disks again
Create a RAID 5 array with a hot spare. Here, -n 3 sets the number of active members, -l 5 sets the level, and -x 1 allocates one hot spare. Inspecting /dev/md0 shows the spare “waiting in the wings.”
root@linuxprobe:~# mdadm -Cv /dev/md0 -n 3 -l 5 -x 1 /dev/sdb /dev/sdc /dev/sdd /dev/sde
mdadm: layout defaults to left-symmetric
mdadm: chunk size defaults to 512K
mdadm: size set to 20954112K
mdadm: Defaulting to version 1.2 metadata
mdadm: array /dev/md0 started.
root@linuxprobe:~# mdadm -D /dev/md0
/dev/md0:
           Version : 1.2
     Creation Time : Mon Mar 17 22:22:57 2025
        Raid Level : raid5
        Array Size : 41908224 (39.97 GiB 42.91 GB)
     Used Dev Size : 20954112 (19.98 GiB 21.46 GB)
      Raid Devices : 3
     Total Devices : 4
       Persistence : Superblock is persistent

       Update Time : Mon Mar 17 22:24:43 2025
             State : clean
    Active Devices : 3
   Working Devices : 4
    Failed Devices : 0
     Spare Devices : 1

            Layout : left-symmetric
        Chunk Size : 512K

Consistency Policy : resync

              Name : linuxprobe.com:0  (local to host linuxprobe.com)
              UUID : ae39f666:bae02cb8:45ba71d7:51223d5d
            Events : 18

    Number   Major   Minor   RaidDevice State
       0       8       16        0      active sync   /dev/sdb
       1       8       32        1      active sync   /dev/sdc
       4       8       48        2      active sync   /dev/sdd

       3       8       64        -      spare   /dev/sde
Format the RAID 5 array as Ext4 and mount it:
root@linuxprobe:~# mkfs.ext4 /dev/md0
mke2fs 1.47.1 (20-May-2024)
Creating filesystem with 10477056 4k blocks and 2621440 inodes
Filesystem UUID: 9c111651-c594-4458-96ec-364d27d28ec9
Superblock backups stored on blocks:
	32768, 98304, 163840, 229376, 294912, 819200, 884736, 1605632, 2654208,
	4096000, 7962624

Allocating group tables: done
Writing inode tables: done
Creating journal (65536 blocks): done
Writing superblocks and filesystem accounting information: done
root@linuxprobe:~# mkdir /RAID
root@linuxprobe:~# echo "/dev/md0 /RAID ext4 defaults 0 0" >> /etc/fstab
On RHEL 10, after editing /etc/fstab, you can’t immediately rely on mount -a. First, reload systemd units, then mount:
root@linuxprobe:~# systemctl daemon-reload
root@linuxprobe:~# mount -a
With three 20 GB disks in a RAID 5 array, usable capacity is (n − 1) × disk size = (3 − 1) × 20 GB = 40 GB. The hot spare isn’t counted—it “sleeps” until needed.
root@linuxprobe:~# df -h
Filesystem             Size  Used Avail Use% Mounted on
/dev/mapper/rhel-root   17G  3.7G   13G  23% /
devtmpfs               4.0M     0  4.0M   0% /dev
tmpfs                  1.9G   84K  1.9G   1% /dev/shm
efivarfs               256K   56K  196K  23% /sys/firmware/efi/efivars
tmpfs                  776M  9.7M  767M   2% /run
tmpfs                  1.0M     0  1.0M   0% /run/credentials/systemd-journald.service
/dev/sda2              960M  272M  689M  29% /boot
/dev/sr0               6.5G  6.5G     0 100% /media/cdrom
/dev/sda1              599M  8.3M  591M   2% /boot/efi
tmpfs                  388M  124K  388M   1% /run/user/0
/dev/md0                40G   24K   38G   1% /RAID
Now for the fun part: mark /dev/sdb as failed and quickly check /dev/md0. You’ll see the spare promoted automatically and the rebuild starting. Hot spares significantly enhance reliability beyond the basic fault tolerance of RAID.
root@linuxprobe:~# mdadm /dev/md0 -f /dev/sdb
mdadm: set /dev/sdb faulty in /dev/md0
root@linuxprobe:~# mdadm -D /dev/md0
/dev/md0:
           Version : 1.2
     Creation Time : Mon Mar 17 22:22:57 2025
        Raid Level : raid5
        Array Size : 41908224 (39.97 GiB 42.91 GB)
     Used Dev Size : 20954112 (19.98 GiB 21.46 GB)
      Raid Devices : 3
     Total Devices : 4
       Persistence : Superblock is persistent

       Update Time : Mon Mar 17 22:32:18 2025
             State : clean
    Active Devices : 3
   Working Devices : 3
    Failed Devices : 1
     Spare Devices : 0

            Layout : left-symmetric
        Chunk Size : 512K

Consistency Policy : resync

              Name : linuxprobe.com:0  (local to host linuxprobe.com)
              UUID : ae39f666:bae02cb8:45ba71d7:51223d5d
            Events : 37

    Number   Major   Minor   RaidDevice State
       3       8       64        0      active sync   /dev/sde
       1       8       32        1      active sync   /dev/sdc
       4       8       48        2      active sync   /dev/sdd

       0       8       16        -      faulty   /dev/sdb
Feel free to experiment by copying files to /RAID—they’ll remain safe. To add another hot spare later, use -a again.
7.1.4 Deleting a RAID Array
In production, arrays are rarely decommissioned, but it’s important to know how. We’ll demonstrate removal using the slightly more complex RAID 5 + hot spare scenario from above.
First, unmount and stop the array:
root@linuxprobe:~# umount /dev/md0
umount: /dev/md0: not mounted.
root@linuxprobe:~# mdadm -S /dev/md0
mdadm: stopped /dev/md0
Because each member still contains metadata, a malicious actor could attempt to reassemble the array and recover data. To be safe, zero the superblocks (and thus metadata) on each former member:
root@linuxprobe:~# mdadm --zero-superblock /dev/sdb
root@linuxprobe:~# mdadm --zero-superblock /dev/sdc
root@linuxprobe:~# mdadm --zero-superblock /dev/sdd
root@linuxprobe:~# mdadm --zero-superblock /dev/sde
At this point, /dev/md0 no longer exists:
root@linuxprobe:~# mdadm -D /dev/md0
mdadm: cannot open /dev/md0: No such file or directory
root@linuxprobe:~# ls -l /dev/md0
ls: cannot access '/dev/md0': No such file or directory
Finally, remove the corresponding entry from /etc/fstab, and you’re done:
root@linuxprobe:~# cat /etc/fstab
#
# /etc/fstab
# Created by anaconda on Wed Mar 12 19:35:26 2025
#
# Accessible filesystems, by reference, are maintained under '/dev/disk/'.
# See man pages fstab(5), findfs(8), mount(8) and/or blkid(8) for more info.
#
# After editing this file, run 'systemctl daemon-reload' to update systemd
# units generated from this file.
#
UUID=408f4a3d-a4d3-4a44-bb23-6988cdbd10bf /                     xfs     defaults        0 0
UUID=4cf8ecae-bcb6-4b1e-8001-968b33643a8a /boot                 xfs     defaults        0 0
UUID=1FB8-9199         			 		  /boot/efi             vfat    umask=0077,shortname=winnt 0 2
UUID=d936c726-45a7-4ca2-8932-c54f84a3d787 none                  swap    defaults        0 0
/dev/cdrom 								  /media/cdrom 			iso9660 defaults 		  0 0
7.2 LVM
The disk management techniques covered earlier do improve disk I/O and protect data, but once a disk has been partitioned—or deployed into a RAID array—changing partition sizes is no longer easy. In other words, when you need to adjust partition sizes as real‑world requirements evolve, you quickly run into the limits of disk “flexibility.” That’s when another widely used storage‑resource management technology comes in: the Logical Volume Manager (LVM). LVM allows you to adjust storage resources dynamically.
LVM is a Linux mechanism for managing disk partitions. It is theory‑heavy and was originally designed to address the pain point that classic disk partitions are hard to resize after they’re created. In theory, you could force a traditional partition to grow or shrink, but that carries a risk of data loss. LVM inserts a logical layer between the partition and the filesystem. It provides an abstract volume group that can merge multiple disks into a pool. With this in place, you don’t need to worry about the underlying architecture or layout of the physical disks; you can flexibly resize partitions. The LVM architecture is shown in Figure 7‑8.
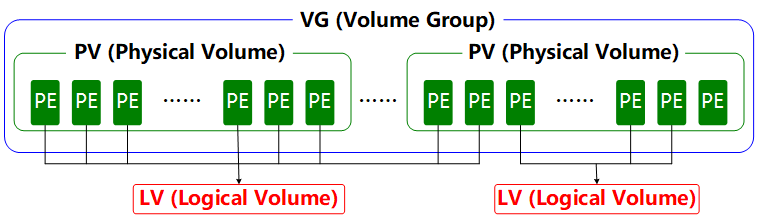
Figure 7-8 LVM architecture
To make this easier to grasp, consider a foodie’s analogy. Xiao Ming’s family wants to steam buns, but they don’t have enough flour. Mom borrows some flour from three neighbors—Old Wang, Old Li, and Old Zhang. First, she kneads all the flour (physical volumes, PVs) into one big dough ball (a volume group, VG), and then divides that dough into individual buns (logical volumes, LVs). Each bun’s weight must be a multiple of a scoop of flour—the basic unit known as a physical extent (PE).
In everyday use, if the volume group (VG) is running low on free space, you can add new physical volumes (PVs) to it at any time and keep expanding. To further clarify, Figure 7‑9 shows a simple flow diagram for how you work with LVM.
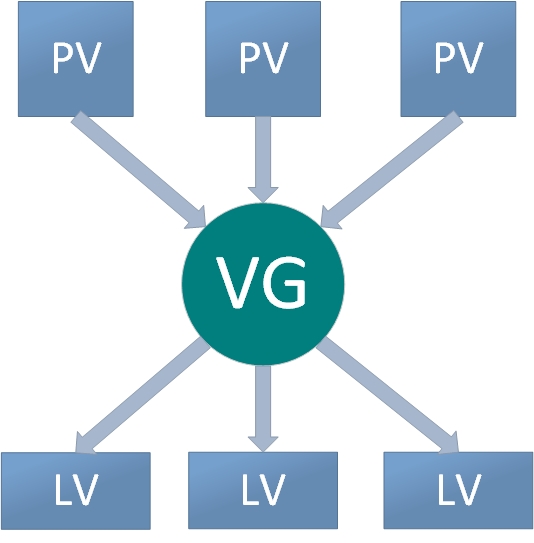
Figure 7-9 LVM workflow
Physical volumes are at the bottom of LVM; they can be physical disks, disk partitions, or RAID arrays. Volume groups are built on top of physical volumes, can contain multiple PVs, and can accept additional PVs after creation. Logical volumes are carved from the free space in a VG and can be expanded or reduced after creation. That’s the core idea of LVM.
7.2.1 Deploying LVM
In production, it’s hard to size every partition perfectly at the very beginning, so running out of space is common. For example, as business grows, the database directory that stores transaction records keeps increasing; as you analyze and log user behavior, the log directory grows as well—both squeeze the original partitions. You may also want to shrink a large partition to reclaim space for other uses.
We can solve these problems by deploying LVM. During deployment you configure physical volumes, a volume group, and logical volumes in turn. Table 7‑3 lists the common commands used.
Table 7‑3 Common LVM deployment commands
| Function/Command | Physical Volume Management | Volume Group Management | Logical Volume Management |
|---|---|---|---|
| Scan | pvscan | vgscan | lvscan |
| Create | pvcreate | vgcreate | lvcreate |
| Display | pvdisplay | vgdisplay | lvdisplay |
| Delete | pvremove | vgremove | lvremove |
| Extend | vgextend | lvextend | |
| Reduce | vgreduce | lvreduce |
To keep experiments from interfering with each other, restore your VM to its initial state and add two new disks, as shown in Figure 7‑10. Then boot the system.
Figure 7-10 Adding two new virtual disks
We’re adding two disks to better demonstrate LVM’s core idea: you don’t need to care about the characteristics of the underlying disks. First we’ll initialize the two new disks as physical volumes—think of this as enabling LVM support on those devices, or adding them into the hardware resource pool that LVM can manage. Next, we merge the two disks into a volume group with a user‑defined name. Then, based on need, we carve out a logical volume of about 150 MB from the combined volume group, format it as Ext4, and mount it for use. The steps are as follows.
Step 1: Enable LVM on the two new disks.
root@linuxprobe:~# pvcreate /dev/sdb /dev/sdc
  Physical volume "/dev/sdb" successfully created.
  Physical volume "/dev/sdc" successfully created.
Step 2: Add both disks to a volume group named storage, then view the group’s status.
root@linuxprobe:~# vgcreate storage /dev/sdb /dev/sdc
  Volume group "storage" successfully created
root@linuxprobe:~# vgdisplay
  --- Volume group ---
  VG Name               storage
  System ID
  Format                lvm2
  Metadata Areas        2
  Metadata Sequence No  1
  VG Access             read/write
  VG Status             resizable
  MAX LV                0
  Cur LV                0
  Open LV               0
  Max PV                0
  Cur PV                2
  Act PV                2
  VG Size               39.99 GiB
  PE Size               4.00 MiB
  Total PE              10238
  Alloc PE / Size       0 / 0
  Free  PE / Size       10238 / 39.99 GiB
  VG UUID               M9xB4b-sydm-G6tZ-K00e-RO45-iqL2-4bRlw1
………………output truncated………………
Step 3: Create a logical volume of about 150 MB.
Be mindful of the sizing units: there are two ways to specify size. You can use capacity units with -L, for example -L 150M to create a 150‑MB LV. Or you can specify a number of extents with -l. The default size of a single extent is 4 MB. For example, -l 37 yields an LV of 37 × 4 MB = 148 MB.
root@linuxprobe:~# lvcreate -n vo -l 37 storage
  Logical volume "vo" created.
root@linuxprobe:~# lvdisplay
  --- Logical volume ---
  LV Path                /dev/storage/vo
  LV Name                vo
  VG Name                storage
  LV UUID                9Tuv9a-FjmN-Cbye-CqC6-709V-zJMh-MQ9iIr
  LV Write Access        read/write
  LV Creation host, time linuxprobe.com, 2025-03-18 01:15:48 +0800
  LV Status              available
  # open                 0
  LV Size                148.00 MiB
  Current LE             37
  Segments               1
  Allocation             inherit
  Read ahead sectors     auto
  - currently set to     8192
  Block device           253:2
………………output truncated………………
Step 4: Format the new LV and mount it.
Linux stores LVM logical‑volume device nodes under the /dev directory (they are essentially symlinks). It also creates a directory named after the volume group and places the LV device mapper nodes inside (i.e., /dev/<VG>/<LV>).
root@linuxprobe:~# mkfs.ext4 /dev/storage/vo
mke2fs 1.47.1 (20-May-2024)
Creating filesystem with 151552 1k blocks and 37848 inodes
Filesystem UUID: c5b6efaf-0b25-4ad2-81ac-afb8bc0c99a9
Superblock backups stored on blocks:
	8193, 24577, 40961, 57345, 73729

Allocating group tables: done
Writing inode tables: done
Creating journal (4096 blocks): done
Writing superblocks and filesystem accounting information: done

root@linuxprobe:~# mkdir /linuxprobe
root@linuxprobe:~# mount /dev/storage/vo /linuxprobe
By the way, if you’re using LVM, we don’t recommend the XFS filesystem. XFS can expand itself with the xfs_growfs command. It’s not as flexible as LVM, but often “good enough.” In our testing, some servers showed poor compatibility between XFS and LVM.
Step 5: Check the mount status and write the configuration so the mount persists.
root@linuxprobe:~# df -h
Filesystem              Size  Used Avail Use% Mounted on
/dev/mapper/rhel-root    17G  3.7G   13G  23% /
devtmpfs                4.0M     0  4.0M   0% /dev
tmpfs                   1.9G   84K  1.9G   1% /dev/shm
efivarfs                256K   56K  196K  23% /sys/firmware/efi/efivars
tmpfs                   776M  9.7M  767M   2% /run
tmpfs                   1.0M     0  1.0M   0% /run/credentials/systemd-journald.service
/dev/sda2               960M  272M  689M  29% /boot
/dev/sr0                6.5G  6.5G     0 100% /media/cdrom
/dev/sda1               599M  8.3M  591M   2% /boot/efi
tmpfs                   388M  124K  388M   1% /run/user/0
/dev/mapper/storage-vo  134M   14K  123M   1% /linuxprobe
root@linuxprobe:~# echo "/dev/storage/vo /linuxprobe ext4 defaults 0 0" >> /etc/fstab
root@linuxprobe:~# cat /etc/fstab
#
# /etc/fstab
# Created by anaconda on Wed Mar 12 19:35:26 2025
#
# Accessible filesystems, by reference, are maintained under '/dev/disk/'.
# See man pages fstab(5), findfs(8), mount(8) and/or blkid(8) for more info.
#
# After editing this file, run 'systemctl daemon-reload' to update systemd
# units generated from this file.
#
UUID=408f4a3d-a4d3-4a44-bb23-6988cdbd10bf /                       xfs     defaults        0 0
UUID=4cf8ecae-bcb6-4b1e-8001-968b33643a8a /boot                   xfs     defaults        0 0
UUID=1FB8-9199          /boot/efi                      vfat    umask=0077,shortname=winnt 0 2
UUID=d936c726-45a7-4ca2-8932-c54f84a3d787 none                    swap    defaults        0 0
/dev/cdrom 								  /media/cdrom 			iso9660   defaults		  0 0
/dev/storage/vo 						  /linuxprobe 			  ext4    defaults 		  0 0
Tips:
Sharp‑eyed readers may notice a small discrepancy: we said 148 MB just now, so why does the display show only 140 MB? That’s because hardware vendors label capacity using decimal units (1 GB = 1000 MB, 1 MB = 1000 KB, 1 KB = 1000 B), while computers calculate storage using binary units (1 GB = 1024 MB, 1 MB = 1024 KB, 1 KB = 1024 B). A “shrinkage” of about 3% is normal.
7.2.2 Expanding a Logical Volume
In the previous experiment, the volume group was composed of two disks. When you use storage through LVM, you don’t perceive the underlying layout—nor do you need to care how many disks are underneath. As long as the VG has free space, the LV can keep growing. Before expanding, unmount the LV.
root@linuxprobe:~# umount /linuxprobe
Step 1: Expand the LV vo from its previous size to 290 MB.
root@linuxprobe:~# lvextend -L 290M /dev/storage/vo
  Rounding size to boundary between physical extents: 292.00 MiB.
  Size of logical volume storage/vo changed from 148.00 MiB (37 extents) to 292.00 MiB (73 extents).
  Logical volume storage/vo successfully resized.
Step 2: Check the filesystem for consistency to confirm that directories and file contents are intact. Normally, if there are no errors, you’re fine.
root@linuxprobe:~# e2fsck -f /dev/storage/vo
e2fsck 1.47.1 (20-May-2024)
Pass 1: Checking inodes, blocks, and sizes
Pass 2: Checking directory structure
Pass 3: Checking directory connectivity
Pass 4: Checking reference counts
Pass 5: Checking group summary information
/dev/storage/vo: 11/37848 files (0.0% non-contiguous), 15165/151552 blocks
Step 3: Resize the filesystem so the kernel sees the new capacity. We expanded the LV, but the kernel hasn’t yet learned about the new size, so we need to sync it manually.
root@linuxprobe:~# resize2fs /dev/storage/vo
resize2fs 1.47.1 (20-May-2024)
Resizing the filesystem on /dev/storage/vo to 299008 (1k) blocks.
The filesystem on /dev/storage/vo is now 299008 (1k) blocks long.
Step 4: Remount and verify.
root@linuxprobe:~# systemctl daemon-reload
root@linuxprobe:~# mount -a
root@linuxprobe:~# df -h
Filesystem              Size  Used Avail Use% Mounted on
/dev/mapper/rhel-root    17G  3.7G   13G  23% /
devtmpfs                4.0M     0  4.0M   0% /dev
tmpfs                   1.9G   84K  1.9G   1% /dev/shm
efivarfs                256K   56K  196K  23% /sys/firmware/efi/efivars
tmpfs                   776M  9.7M  767M   2% /run
tmpfs                   1.0M     0  1.0M   0% /run/credentials/systemd-journald.service
/dev/sda2               960M  272M  689M  29% /boot
/dev/sr0                6.5G  6.5G     0 100% /media/cdrom
/dev/sda1               599M  8.3M  591M   2% /boot/efi
tmpfs                   388M  124K  388M   1% /run/user/0
/dev/mapper/storage-vo  268M   14K  250M   1% /linuxprobe
7.2.3 Shrinking a Logical Volume
Compared with expansion, shrinking an LV carries a higher risk of data loss. In production, always back up data first. Linux also requires a filesystem check before shrinking an LVM LV (again, to protect data). And before shrinking, unmount the filesystem.
root@linuxprobe:~# umount /linuxprobe
Step 1: Check the filesystem for consistency.
root@linuxprobe:~# e2fsck -f /dev/storage/vo
e2fsck 1.47.1 (20-May-2024)
Pass 1: Checking inodes, blocks, and sizes
Pass 2: Checking directory structure
Pass 3: Checking directory connectivity
Pass 4: Checking reference counts
Pass 5: Checking group summary information
/dev/storage/vo: 11/73704 files (0.0% non-contiguous), 24683/299008 blocks
Step 2: Tell the kernel to reduce vo to 120 MB.
root@linuxprobe:~# resize2fs /dev/storage/vo 120M
resize2fs 1.47.1 (20-May-2024)
Resizing the filesystem on /dev/storage/vo to 122880 (1k) blocks.
The filesystem on /dev/storage/vo is now 122880 (1k) blocks long.
You may ask: why is shrinking different from expansion? Why do we first tell the kernel we want the filesystem to be 120 MB, and then perform the actual LV shrink? Think of a middle‑schooler named Xiao Qiang who wants a tattoo but fears parental backlash. He first tells his mom, “I got a tattoo.” If she’s calm about it, he can go ahead. If she strongly objects, he laughs it off—“Just kidding!”—and avoids a beating.
Shrinking works similarly: you first “announce” your intended size change to the kernel. If resize2fs returns without errors, you proceed with the actual shrink.
Step 3: Change the LV size to 120 MB.
root@linuxprobe:~# lvreduce -L 120M /dev/storage/vo
  File system ext4 found on storage/vo.
  File system size (120.00 MiB) is equal to the requested size (120.00 MiB).
  File system reduce is not needed, skipping.
  Size of logical volume storage/vo changed from 292.00 MiB (73 extents) to 120.00 MiB (30 extents).
  Logical volume storage/vo successfully resized.
When you run lvreduce, the final size must exactly match what you “announced” earlier. If you negotiated 120 MB, you can’t be off by even 1 MB, 1 KB, or 1 B. It’s like promising mom a tiny cat tattoo and coming home with a tiger—you’re still getting punished (and the shrink will fail).
Step 4: Remount and check the status.
root@linuxprobe:~# mount -a
root@linuxprobe:~# df -h
Filesystem              Size  Used Avail Use% Mounted on
/dev/mapper/rhel-root    17G  3.7G   13G  23% /
devtmpfs                4.0M     0  4.0M   0% /dev
tmpfs                   1.9G   84K  1.9G   1% /dev/shm
efivarfs                256K   56K  196K  23% /sys/firmware/efi/efivars
tmpfs                   776M  9.7M  767M   2% /run
tmpfs                   1.0M     0  1.0M   0% /run/credentials/systemd-journald.service
/dev/sda2               960M  272M  689M  29% /boot
/dev/sr0                6.5G  6.5G     0 100% /media/cdrom
/dev/sda1               599M  8.3M  591M   2% /boot/efi
tmpfs                   388M  124K  388M   1% /run/user/0
/dev/mapper/storage-vo  108M   14K   99M   1% /linuxprobe
7.2.4 Logical Volume Snapshots
LVM also supports snapshots, similar to a VM’s restore points. For example, you can take a snapshot of an LV; if you later discover that data was modified incorrectly, you can roll back from the snapshot. LVM snapshots have two characteristics:
The snapshot must be the same size as the original LV.
A snapshot can be used once only; after the merge/restore operation, it is automatically deleted.
Before operating, check that the VG has sufficient free space:
root@linuxprobe:~# vgdisplay
  --- Volume group ---
  VG Name               storage
  System ID
  Format                lvm2
  Metadata Areas        2
  Metadata Sequence No  4
  VG Access             read/write
  VG Status             resizable
  MAX LV                0
  Cur LV                1
  Open LV               1
  Max PV                0
  Cur PV                2
  Act PV                2
  VG Size               39.99 GiB
  PE Size               4.00 MiB
  Total PE              10238
  Alloc PE / Size       30 / 120.00 MiB
  Free  PE / Size       10208 / <39.88 GiB
  VG UUID               M9xB4b-sydm-G6tZ-K00e-RO45-iqL2-4bRlw1
………………output truncated………………
From this, you can see the VG has 120 MB allocated and ~39.88 GB free. Next, write a file via the mount point:
root@linuxprobe:~# echo "Welcome to Linuxprobe.com" > /linuxprobe/readme.txt
root@linuxprobe:~# ls -l /linuxprobe
total 13
drwx------. 2 root root 12288 Mar 18 01:16 lost+found
-rw-r--r--. 1 root root    26 Mar 18 01:43 readme.txt
Step 1: Create a snapshot with -s and specify its size with -L—it must match the size of the LV you’re snapshotting. Also specify which LV to snapshot; the subsequent restore targets that LV.
root@linuxprobe:~# lvcreate -L 120M -s -n SNAP /dev/storage/vo
 Logical volume "SNAP" created.
root@linuxprobe:~# lvdisplay
  --- Logical volume ---
  LV Path                /dev/storage/SNAP
  LV Name                SNAP
  VG Name                storage
  LV UUID                XsCyvN-NiXP-M6tD-CfXk-TCQU-PSbQ-eYHaV2
  LV Write Access        read/write
  LV Creation host, time linuxprobe.com, 2025-03-18 01:43:57 +0800
  LV snapshot status     active destination for vo
  LV Status              available
  # open                 0
  LV Size                120.00 MiB
  Current LE             30
  COW-table size         120.00 MiB
  COW-table LE           30
  Allocated to snapshot  0.01%
  Snapshot chunk size    4.00 KiB
  Segments               1
  Allocation             inherit
  Read ahead sectors     auto
  - currently set to     256
  Block device           253:5
………………output truncated………………
Step 2: Create a 100‑MB junk file under the mount point and then check the snapshot’s status—the allocation percentage will have jumped.
root@linuxprobe:~# dd if=/dev/zero of=/linuxprobe/files count=1 bs=100M
1+0 records in
1+0 records out
104857600 bytes (105 MB, 100 MiB) copied, 0.461243 s, 227 MB/s
root@linuxprobe:~# lvdisplay
  --- Logical volume ---
  LV Path                /dev/storage/SNAP
  LV Name                SNAP
  VG Name                storage
  LV UUID                XsCyvN-NiXP-M6tD-CfXk-TCQU-PSbQ-eYHaV2
  LV Write Access        read/write
  LV Creation host, time linuxprobe.com, 2025-03-18 01:43:57 +0800
  LV snapshot status     active destination for vo
  LV Status              available
  # open                 0
  LV Size                120.00 MiB
  Current LE             30
  COW-table size         120.00 MiB
  COW-table LE           30
  Allocated to snapshot  67.28%
  Snapshot chunk size    4.00 KiB
  Segments               1
  Allocation             inherit
  Read ahead sectors     auto
  - currently set to     256
  Block device           253:5
………………output truncated………………
Step 3: To test the snapshot, we’ll restore from it. Before merging, unmount the LV.
The lvconvert command manages snapshots. Syntax: lvconvert [options] <snapshot-name>. In older RHEL/CentOS 5, you had to write the full form --mergesnapshot. From RHEL 6 through RHEL 10, you can simply use --merge; the system infers the device type.
root@linuxprobe:~# umount /linuxprobe
root@linuxprobe:~# lvconvert --merge /dev/storage/SNAP
  Merging of volume storage/SNAP started.
  storage/vo: Merged: 100.00%
Step 4: The snapshot is automatically deleted, and the 100‑MB junk file created after the snapshot is gone.
root@linuxprobe:~# mount -a
root@linuxprobe:~# cd /linuxprobe
root@linuxprobe:/linuxprobe# ls
lost+found  readme.txt
root@linuxprobe:/linuxprobe# cat readme.txt
Welcome to Linuxprobe.com
7.2.5 Removing LVM
When you want to redeploy LVM or no longer need it, remove it cleanly. Back up important data first. Then delete the logical volumes, the volume group, and the physical volumes—in that order.
Step 1: Unmount the LV and remove the persistent mount entry from the configuration file.
root@linuxprobe:/linuxprobe# cd ~
root@linuxprobe:~# umount /linuxprobe
root@linuxprobe:~# vim /etc/fstab
#
# /etc/fstab
# Created by anaconda on Tue Jul 21 05:03:40 2020
#
# Accessible filesystems, by reference, are maintained under '/dev/disk/'.
# See man pages fstab(5), findfs(8), mount(8) and/or blkid(8) for more info.
#
# After editing this file, run 'systemctl daemon-reload' to update systemd
# units generated from this file.
#
/dev/mapper/rhel-root                       /                       xfs      defaults        0 0
UUID=2db66eb4-d9c1-4522-8fab-ac074cd3ea0b   /boot                   xfs      defaults        0 0
/dev/mapper/rhel-swap                       swap                    swap     defaults        0 0
/dev/cdrom                                  /media/cdrom            iso9660  defaults        0 0
Step 2: Remove the LV. Confirm with y.
root@linuxprobe:~# lvremove /dev/storage/vo
Do you really want to remove active logical volume storage/vo? [y/n]: y
  Logical volume "vo" successfully removed.
Step 3: Remove the VG—just the group’s name is needed (no device path).
root@linuxprobe:~# vgremove storage
  Volume group "storage" successfully removed
Step 4: Remove the PV labels.
root@linuxprobe:~# pvremove /dev/sdb /dev/sdc
  Labels on physical volume "/dev/sdb" successfully wiped.
  Labels on physical volume "/dev/sdc" successfully wiped.
After these steps, lvdisplay, vgdisplay, and pvdisplay will show no LVM objects (assuming the preceding steps were executed correctly). Clean and tidy!
Review Questions
-
What problem does RAID primarily solve?
A: RAID is designed to increase storage I/O throughput and provide data redundancy. -
Which is safer, RAID 0 or RAID 5?
A: RAID 5. RAID 0 has no data redundancy. -
Suppose you deploy RAID 10 with four disks plus one spare. How many disks can fail simultaneously at most?
A: Up to three of the five disks can fail at the same time. -
Is “RAID 0 plus a hot spare” a viable plan?
A: Absolutely not. In RAID 0, failure of any single disk causes total data loss with no recovery path. -
Which is at the very bottom layer of LVM: the physical volume or the volume group?
A: The physical volume is at the bottom; volume groups are built from PVs. -
How do expansion and shrink differ for LVM logical volumes?
A: Both require unmounting first. For expansion, you extend the LV and then check the filesystem; for shrink, you check the filesystem first, then shrink. -
How many times can an LVM snapshot be used?
A: Once. After it’s merged/restored, it is deleted automatically. -
What is the correct order for removing LVM?
A: Remove the LVs, then the VG, then the PVs. -
LVM can be composed of multiple disks. Does it provide redundancy?
A: No. If any underlying disk fails, data can be lost. -
Can RAID and LVM be used together?
A: Yes, if needed. Create RAID first, then build LVM on top of it.