Chapter 13 · Using BIND to Provide DNS Name Resolution
Chapter Overview
In this chapter I take you deep into the principles and importance of the DNS name service. I explain forward and reverse lookups, and I walk through hands-on labs to configure both modes on a DNS primary server so you can feel the convenience and power of DNS in practice.
I also show how I deploy a DNS secondary server and a DNS caching server to improve lookup performance for users, and how I use the chroot jail plugin to improve the reliability of the bind service. In addition, I demonstrate configuring TSIG key encryption between the primary and secondary to secure data during iterative queries. Finally, I implement split-horizon DNS so users in different countries and regions can enjoy the best website experience.
After finishing this chapter, you’ll have a much deeper understanding of the bind service program and of DNS’s essential role as a core piece of internet infrastructure.
13.1 DNS Name Service
Compared with numeric IP addresses, domain names are easier for me to understand and remember, so I typically prefer to access network resources by name. Computers on a network, however, recognize each other by IP address, and data on the internet must be transmitted using public IP addresses.
To lower the barrier for accessing resources, the Domain Name System (DNS) was created. DNS manages and resolves the mapping between domain names and IP addresses. In short, DNS accepts a domain name or an IP address from me and automatically looks up the corresponding counterpart—resolving a name to an IP address (forward lookup) or an IP to a name (reverse lookup). That way, I can simply enter a domain in my browser and it opens the site I want. Forward lookups are by far the most commonly used mode.
Because the domain/IP mapping database across the internet is huge, DNS organizes this information in a hierarchical tree structure, forming a distributed database system, as shown in Figure 13-1.
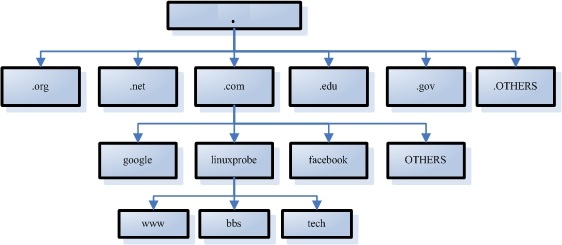
Figure 13-1 Hierarchical tree structure used by the DNS name service
Domain suffixes generally include international and country-code TLDs. In principle, suffixes are strictly defined, but in practice I don’t have to follow them rigidly. The most common suffixes include .com (commercial organizations), .org (non-profits), .gov (government), .net (network providers), .edu (education), .pub (public), and .cn (China’s ccTLD), among others.
As digitalization accelerates worldwide, with big data, cloud computing, IoT, and AI continuing to emerge, the number of domain names has exploded and query frequency has surged. According to the International Telecommunication Union, by the end of 2024 there were 5.5 billion internet users—68% of the global population. If each person made just one domain query per day, that would still be 5.5 billion queries—far more than any single server could handle. To provide uninterrupted, stable, and fast lookups that keep the internet running, DNS employs three types of servers:
Primary server: Unique within a zone; maintains the authoritative mappings between names and IPs.
Secondary server: Retrieves and maintains copies of the mappings from the primary to guard against outages.
Caching server: Obtains answers from other DNS servers and caches frequently requested records locally to speed up repeated lookups.
In short, the primary manages the authoritative mappings; secondaries act as helpers distributed across countries, provinces, or regions so users can query nearby, reducing load on the primary. Caching servers are less common; I typically deploy them at an enterprise gateway to accelerate users’ queries.
DNS stores massive “zone data” in a distributed structure and supports recursive and iterative query modes when handling requests. In a recursive query, upon receiving a client’s request, the DNS server must return an exact answer. If it doesn’t have the data locally, it queries other servers and returns the final result. In an iterative query, the server doesn’t return the answer directly but instead refers the client to another DNS server. The client then repeats the request step by step until it gets an answer.
For example, if I query a nearby DNS server for www.linuxprobe.com, the approximate flow looks like Figure 13-2.
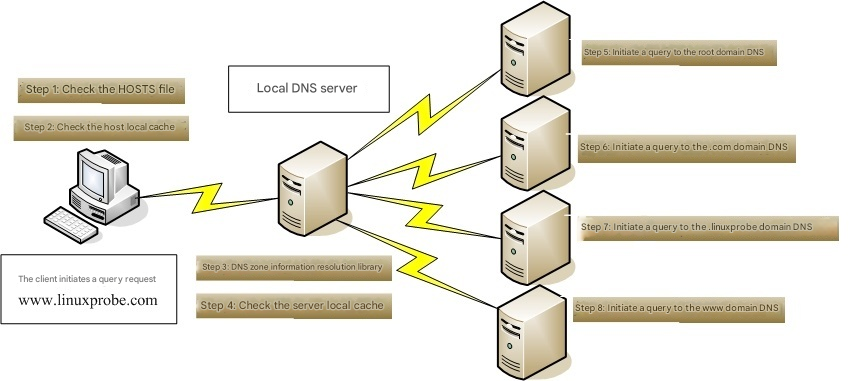
Figure 13-2 Flow of a DNS query submitted to a DNS server
When I submit a domain request to the configured DNS server, my local DNS server typically sends iterative queries to its upstream. If that DNS server lacks the needed data, it continues referring the request upward until an accurate result is returned. At the top are the authoritative root DNS servers—traditionally referred to as “the 13 root servers”—distributed worldwide. Their operators, locations, and IP addresses are shown in Table 13-1.
Table 13-1 Operators, locations, and IPs of the “13” root DNS servers
| Name | Operator | Location | IP Address |
|---|---|---|---|
| A | Verisign | Virginia, USA | 198.41.0.4 |
| B | USC Information Sciences Institute | California, USA | 170.247.170.2 |
| C | Cogent Communications | Virginia, USA | 192.33.4.12 |
| D | University of Maryland | Maryland, USA | 199.7.91.13 |
| E | NASA | California, USA | 192.203.230.10 |
| F | Internet Systems Consortium (ISC) | California, USA | 192.5.5.241 |
| G | U.S. DoD Network Information Center (NIC) | Virginia, USA | 192.112.36.4 |
| H | U.S. Army Research Lab | Maryland, USA | 198.97.190.53 |
| I | Netnod | Stockholm, Sweden | 192.36.148.17 |
| J | Verisign | Virginia, USA | 192.58.128.30 |
| K | RIPE NCC | London, UK | 193.0.14.129 |
| L | ICANN | Virginia, USA | 199.7.83.42 |
| M | WIDE Project | Tokyo, Japan | 202.12.27.33 |
Tips:
The “13 root servers” is only a conventional label—no single machine can handle such a load. As of the latest data, there are actually more than 1,700 anycast root instances. They’re labeled A through M and share 13 IP addresses to balance load and defend against DDoS attacks.
With more devices coming online, IPv4 can’t meet demand, so IPv6 is being adopted globally. Its expanded address space enables additional root infrastructure. In 2013, China’s Next-Generation Internet National Engineering Center, together with partners in Japan and the United States, launched the Snowman Project to design an IPv6-based, independently controlled root service. In November 2017 the project announced 25 IPv6 root deployments worldwide (including one in China), ending the historical absence of a root instance in China.
13.2 Installing the BIND Service
BIND (Berkeley Internet Name Domain) is the most widely used, secure, and efficient DNS software worldwide. Because DNS is critical infrastructure, in production I recommend installing the chroot (jail) extension to confine the service so it can only operate on its own configuration files, improving overall server security.
root@linuxprobe:~# yum install bind-chroot
Updating Subscription Management repositories.
BaseOS                                          2.7 MB/s | 2.7 kB     00:00
AppStream                                       2.7 MB/s | 2.8 kB     00:00
Dependencies resolved.
================================================================================
 Package                Arch        Version                Repository      Size
================================================================================
Installing:
 bind-chroot            x86_64      32:9.18.21-5.el10      AppStream       25 k
Installing dependencies:
 bind                   x86_64      32:9.18.21-5.el10      AppStream      541 k
Installing weak dependencies:
 bind-dnssec-utils      x86_64      32:9.18.21-5.el10      AppStream      157 k
Installed:
  bind-32:9.18.21-5.el10.x86_64
  bind-chroot-32:9.18.21-5.el10.x86_64
  bind-dnssec-utils-32:9.18.21-5.el10.x86_64

Complete!
As you can see, the main bind package is about 541 KB, while the bind-chroot security plugin is only 25 KB.
BIND’s configuration is indeed complex. To ensure users receive complete DNS answers, I must store relevant zone data locally. Writing all name/IP pairs into a single file would amount to tens of millions of entries—terrible for performance and maintenance. Instead, BIND uses three key locations:
Main configuration file (
/etc/named.conf): Only 59 lines, with about 30 effective parameters after removing comments and blanks. I define global options here: service behavior, logging, access control, and so on.
Zone configuration file (/etc/named.rfc1912.zones): Points to where zone data lives—like a book’s table of contents. Each zone entry references a specific data file.
Data directory (/var/named): Stores the actual zone data files mapping names to IPs.
On Linux the service is called named. First I open the main configuration under /etc and change line 11 and line 19 to any so the server both listens on all addresses and allows queries from anywhere. Get these two lines exactly right.
root@linuxprobe:~# vim /etc/named.conf
  1 //
  2 // named.conf
  3 //
  4 // Provided by Red Hat bind package to configure the ISC BIND named(8) DNS
  5 // server as a caching only nameserver (as a localhost DNS resolver only).
  6 //
  7 // See /usr/share/doc/bind*/sample/ for example named configuration files.
  8 //
  9
 10 options {
 11         listen-on port 53 { any; };
 12         listen-on-v6 port 53 { ::1; };
 13         directory       "/var/named";
 14         dump-file       "/var/named/data/cache_dump.db";
 15         statistics-file "/var/named/data/named_stats.txt";
 16         memstatistics-file "/var/named/data/named_mem_stats.txt";
 17         secroots-file   "/var/named/data/named.secroots";
 18         recursing-file  "/var/named/data/named.recursing";
 19         allow-query     { any; };
 20
 21         /*
 22          - If you are building an AUTHORITATIVE DNS server, do NOT enable re    cursion.
 23          - If you are building a RECURSIVE (caching) DNS server, you need to     enable
 24            recursion.
 25          - If your recursive DNS server has a public IP address, you MUST en    able access
 26            control to limit queries to your legitimate users. Failing to do     so will
 27            cause your server to become part of large scale DNS amplification
 28            attacks. Implementing BCP38 within your network would greatly
 29            reduce such attack surface
 30         */
 31         recursion yes;
 32
 33         dnssec-validation yes;
 34
 35         managed-keys-directory "/var/named/dynamic";
 36         geoip-directory "/usr/share/GeoIP";
 37
 38         pid-file "/run/named/named.pid";
 39         session-keyfile "/run/named/session.key";
 40
 41         /* https://fedoraproproject.org/wiki/Changes/CryptoPolicy */
 42         include "/etc/crypto-policies/back-ends/bind.config";
 43 };
 44
 45 logging {
 46         channel default_debug {
 47                 file "data/named.run";
 48                 severity dynamic;
 49         };
 50 };
 51
 52 zone "." IN {
 53         type hint;
 54         file "named.ca";
 55 };
 56
 57 include "/etc/named.rfc1912.zones";
 58 include "/etc/named.root.key";
 59
As noted, the zone configuration file (/etc/named.rfc1912.zones) records where the data files live and the service role, not the records themselves. Roles include hint (root), master (primary), and slave (secondary). Figures 13-3 and 13-4 show forward and reverse parameters.
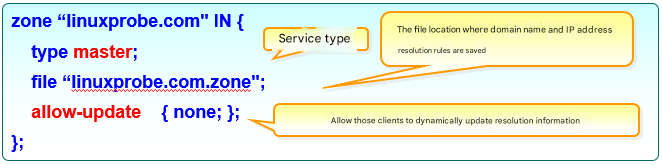
Figure 13-3 Forward lookup parameters
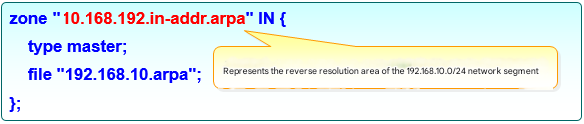
Figure 13-4 Reverse lookup parameters
In the following labs I edit the main config, the zone config, and the zone data files. If bind fails to start and I suspect a typo, I can validate the main config and zone files with:
root@linuxprobe:~# named-checkconf /etc/named.conf
root@linuxprobe:~# named-checkzone localhost /var/named/named.localhost
zone localhost/IN: loaded serial 0
OK
13.2.1 Forward Lookup Lab
In DNS, a forward lookup maps a hostname to an IP address (Figure 13-5). When a user enters a domain, the bind service looks it up and returns the matching IP.

Figure 13-5 Forward lookup diagram
Step 1: Edit the zone configuration file. The file includes sample entries for reference. I append the following at the end (or clear the sample content and keep only my zone):
root@linuxprobe:~# vim /etc/named.rfc1912.zones
zone "linuxprobe.com" IN {
        type master;
        file "linuxprobe.com.zone";
        allow-transfer {none;};
};
Tips:
Indentation is only for readability; it doesn’t affect behavior.
Step 2: Edit the data file. From /var/named, I copy the forward-zone template (named.localhost) and fill in the records, preserving ownership and permissions with -a so bind can read it.
root@linuxprobe:~# cd /var/named
root@linuxprobe:/var/named# ls -al named.localhost
-rw-r-----. 1 root named 152 Jun 24  2024 named.localhost
root@linuxprobe:/var/named# cp -a named.localhost linuxprobe.com.zone
After saving the file, I restart named so the new data takes effect. Because the forward file’s parameters matter, I’ve added brief notes after each item.
root@linuxprobe:/var/named# vim linuxprobe.com.zone
root@linuxprobe:/var/named# systemctl restart named
root@linuxprobe:/var/named# systemctl enable named
Created symlink '/etc/systemd/system/multi-user.target.wants/named.service' → '/usr/lib/systemd/system/named.service'.
| $TTL | 1D | # time-to-live is 1 day | |||
|---|---|---|---|---|---|
| @ | IN SOA | linuxprobe.com. | root.linuxprobe.com. | ( | |
| # start of authority: | # DNS zone address | # admin email (do not use @) | |||
| 0;serial | # serial number | ||||
| 1D;refresh | # refresh | ||||
| 1H;retry | # retry | ||||
| 1W;expire | # expire | ||||
| 3H );minimum | # negative-cache TTL | ||||
| NS | ns.linuxprobe.com. | # name server record | |||
| ns | IN A | 192.168.10.10 | # address record (ns.linuxprobe.com.) | ||
| www | IN A | 192.168.10.10 | # address record (www.linuxprobe.com.) |
In this zone file, record type A maps a name to an IPv4 address, and AAAA maps to IPv6. Additional common types appear in Table 13-2 for reference.
Table 13-2 DNS record types
| Record type | Purpose |
|---|---|
| A | Map a name to an IPv4 address |
| CNAME | Map a name to another domain name |
| AAAA | Map a name to an IPv6 address |
| NS | Delegate a subdomain to other DNS servers |
| MX | Point the domain to its mail server |
| SRV | Advertise a specific service’s target |
| TXT | Free-form text (often used for SPF records) |
| CAA | Authorize which CAs may issue certificates |
| Visible URL | Redirect a domain to another address (target visible) |
| Masked URL | Redirect while hiding the true target address |
Step 3: Verify the results. To test, I first set my NIC’s DNS to the local server’s IP (Figure 13-6) so queries go to my own DNS. Then I use nslookup to check whether the server returns the expected records.
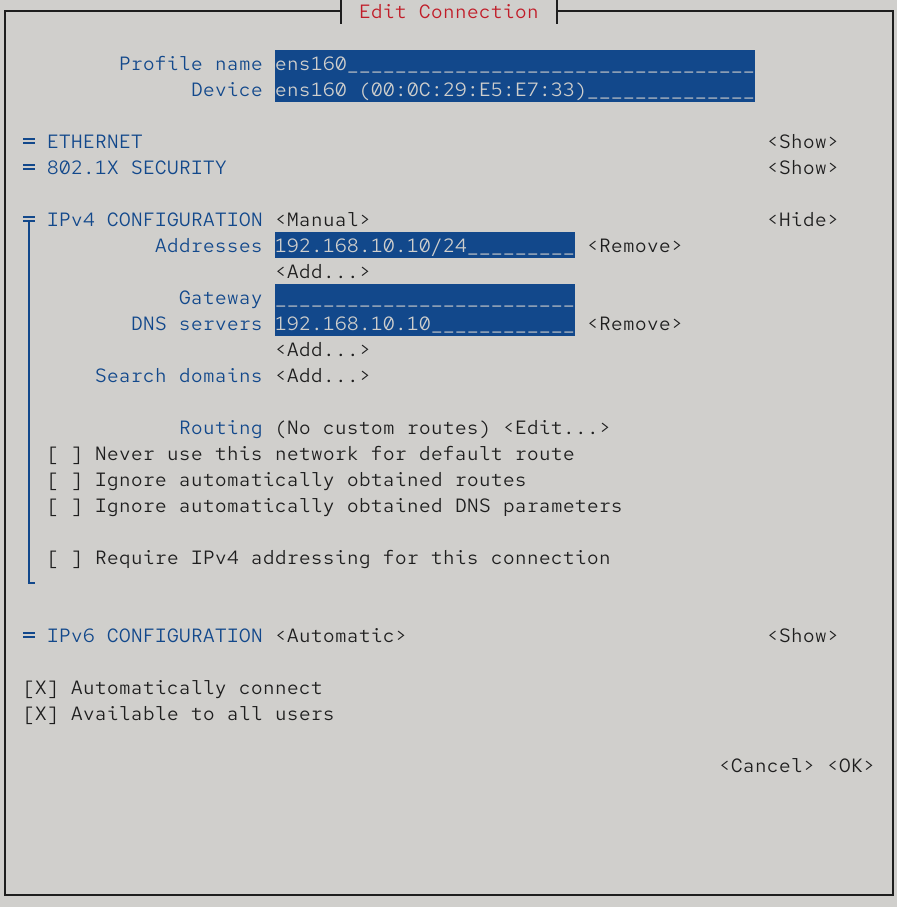
Figure 13-6 Configuring the NIC’s DNS parameter
root@linuxprobe:~# nmcli connection up ens160
Connection successfully activated (D-Bus active path: /org/freedesktop/NetworkManager/ActiveConnection/3)
root@linuxprobe:~# nslookup
> www.linuxprobe.com
Server:		192.168.10.10
Address:	192.168.10.10#53

Name:	www.linuxprobe.com
Address: 192.168.10.10
> ns.linuxprobe.com
Server:		192.168.10.10
Address:	192.168.10.10#53

Name:	ns.linuxprobe.com
Address: 192.168.10.10
If you don’t get 192.168.10.10, your VM may be using an external DNS. Confirm the server shows Address: 192.168.10.10#53; if not, restart networking and retry.
13.2.2 Reverse Lookup Lab
In DNS, a reverse lookup maps an IP address to its corresponding name(s). I often use it to block every domain hosted on a given IP (e.g., to filter spam) or to estimate how many sites share a host. Figure 13-7 shows how I infer name information from an IP (reverse mapping).

Figure 13-7 Reverse lookup diagram
Step 1: Edit the zone configuration file. Besides getting the format right, I must remember the data filename because I’ll create it under /var/named. Since reverse mapping converts an IP to a name, the zone name reverses the network portion of the subnet. For example, 192.168.10.0 becomes 10.168.192. I append the following after the forward-zone entry:
root@linuxprobe:~# vim /etc/named.rfc1912.zones
zone "linuxprobe.com" IN {
        type master;
        file "linuxprobe.com.zone";
        allow-transfer {none;};
};
zone "10.168.192.in-addr.arpa" IN {
        type master;
        file "192.168.10.arpa";
        allow-transfer {none;};
};
Step 2: Edit the data file. I copy the reverse template (named.loopback) into place and fill in PTR records, writing only the host octet on the left (Figure 13-8).
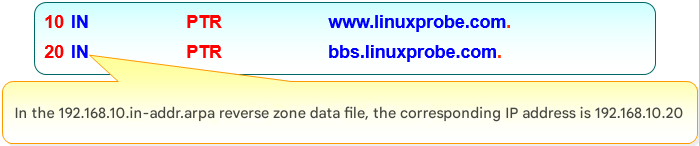
Figure 13-8 Host-octet convention in reverse zone files
root@linuxprobe:~# cd /var/named
root@linuxprobe:/var/named# cp -a named.loopback 192.168.10.arpa
root@linuxprobe:/var/named# vim 192.168.10.arpa
root@linuxprobe:/var/named# systemctl restart named
| $TTL | 1D | ||||
|---|---|---|---|---|---|
| @ | IN SOA | linuxprobe.com. | root.linuxprobe.com. | ( | |
| 0;serial | |||||
| 1D;refresh | |||||
| 1H;retry | |||||
| 1W;expire | |||||
| 3H);minimum | |||||
| NS | ns.linuxprobe.com. | ||||
| ns | A | 192.168.10.10 | |||
| 10 | PTR | ns.linuxprobe.com. | # PTR is a pointer record used in reverse zones only. | ||
| 10 | PTR | www.linuxprobe.com. | |||
| 20 | PTR | bbs.linuxprobe.com. |
Step 3: Verify the results. Since I already set my NIC DNS to the local server earlier, I can go straight to nslookup and enter IP addresses to see their names.
root@linuxprobe:~# nslookup
> 192.168.10.10
10.10.168.192.in-addr.arpa	name = www.linuxprobe.com.
10.10.168.192.in-addr.arpa	name = ns.linuxprobe.com.
> 192.168.10.20
20.10.168.192.in-addr.arpa	name = bbs.linuxprobe.com.
> exit
13.3 Deploying a Secondary Server
As a critical internet service, DNS must remain reliable—stable, fast, and continuous. A secondary can fetch zone data from the primary to provide redundancy and load sharing. Deploying a secondary lessens the primary’s load and improves user latency.
In this lab the primary and secondary use the OS and IPs shown in Table 13-3.
Table 13-3 OS and IP information for the primary and secondary
| Hostname | OS | IP Address |
|---|---|---|
| Primary | RHEL 10 | 192.168.10.10 |
| Secondary | RHEL 10 | 192.168.10.20 |
Step 1: Permit transfers from the secondary on the primary’s zone config, then restart named.
root@linuxprobe:~# vim /etc/named.rfc1912.zones
zone "linuxprobe.com" IN {
        type master;
        file "linuxprobe.com.zone";
        allow-transfer { 192.168.10.20;};
};
zone "10.168.192.in-addr.arpa" IN {
        type master;
        file "192.168.10.arpa";
        allow-transfer { 192.168.10.20;};
};
root@linuxprobe:~# systemctl restart named
Step 2: Open the firewall on the primary so DNS traffic passes.
root@linuxprobe:~# firewall-cmd --permanent --add-service=dns
success
root@linuxprobe:~# firewall-cmd --reload
success
Step 3: Prepare the secondary. Install bind-chroot, adjust config so it listens and allows queries, and confirm network reachability.
root@linuxprobe:~# dnf install bind-chroot
root@linuxprobe:~# vim /etc/named.conf
//
// named.conf
//
// Provided by Red Hat bind package to configure the ISC BIND named(8) DNS
// server as a caching only nameserver (as a localhost DNS resolver only).
//
// See /usr/share/doc/bind*/sample/ for example named configuration files.
//

options {
        listen-on port 53 { any; };
        listen-on-v6 port 53 { ::1; };
        directory       "/var/named";
        dump-file       "/var/named/data/cache_dump.db";
        statistics-file "/var/named/data/named_stats.txt";
        memstatistics-file "/var/named/data/named_mem_stats.txt";
        secroots-file   "/var/named/data/named.secroots";
        recursing-file  "/var/named/data/named.recursing";
        allow-query     { any; };
root@linuxprobe:~# ping -c 4 192.168.10.10
PING 192.168.10.10 (192.168.10.10) 56(84) bytes of data.
64 bytes from 192.168.10.10: icmp_seq=1 ttl=64 time=0.879 ms
64 bytes from 192.168.10.10: icmp_seq=2 ttl=64 time=0.479 ms
64 bytes from 192.168.10.10: icmp_seq=3 ttl=64 time=0.470 ms
64 bytes from 192.168.10.10: icmp_seq=4 ttl=64 time=0.421 ms

--- 192.168.10.10 ping statistics ---
4 packets transmitted, 4 received, 0% packet loss, time 3064ms
rtt min/avg/max/mdev = 0.421/0.562/0.879/0.184 ms
Step 4: Define slave zones on the secondary pointing to the primary’s IP. Note the masters directive and that the synchronized files are saved under the given paths.
root@linuxprobe:~# vim /etc/named.rfc1912.zones
zone "linuxprobe.com" IN {
        type slave;
        masters { 192.168.10.10; };
        file "slaves/linuxprobe.com.zone";
};
zone "10.168.192.in-addr.arpa" IN {
        type slave;
        masters { 192.168.10.10; };
        file "slaves/192.168.10.arpa";
};
root@linuxprobe:~# systemctl restart named
root@linuxprobe:~# systemctl enable named
Created symlink '/etc/systemd/system/multi-user.target.wants/named.service' → '/usr/lib/systemd/system/named.service'.
Tips:
mastershas an extra “s” compared withmaster, because it can list multiple primaries—don’t omit it.
Step 5: Verify. After restart the secondary should automatically synchronize zone files from the primary into the configured directory. Then I set the secondary’s NIC DNS to 192.168.10.20 (Figure 13-6) so I can test using its own resolver. nslookup shows the expected results:
root@linuxprobe:~# cd /var/named/slaves
root@linuxprobe:/var/named/slaves# cd /var/named/slaves
root@linuxprobe:/var/named/slaves# ls
192.168.10.arpa  linuxprobe.com.zone
root@linuxprobe:/var/named/slaves# nslookup
> www.linuxprobe.com
Server:		192.168.10.20
Address:	192.168.10.20#53

Name:	www.linuxprobe.com
Address: 192.168.10.10
> 192.168.10.10
10.10.168.192.in-addr.arpa	name = ns.linuxprobe.com.
10.10.168.192.in-addr.arpa	name = www.linuxprobe.com.
> exit
If your answers differ, the secondary’s NIC DNS may not be pointing to 192.168.10.20. Fix that and you’re set.
13.4 Securing Encrypted Transfers
As I’ve emphasized, DNS is indispensable: nearly all network applications depend on it. If DNS fails, users can’t locate otherwise healthy web or email services.
Most internet DNS servers (over 95%) run on BIND, and to provide secure transfers, bind supports TSIG (Transaction SIGnature; see RFC 2845). TSIG uses cryptography to protect zone transfers—it secures the exchange of zone data between DNS servers. I continue using the two servers from Table 13-3.
Picking up where we left off: after configuring and restarting bind on the secondary, I can see files pulled from the primary.
root@linuxprobe:~# ls -al /var/named/slaves/
total 8
drwxrwx---. 2 named named  56 Mar 26 13:42 .
drwxrwx--T. 6 root  named 141 Mar 26 13:41 ..
-rw-r--r--. 1 named named 409 Mar 26 13:42 192.168.10.arpa
-rw-r--r--. 1 named named 267 Mar 26 13:42 linuxprobe.com.zone
root@linuxprobe:~# rm -rf /var/named/slaves/*
Step 1: Generate a key on the primary. tsig-keygen creates secure DNS keys. Common options are shown in Table 13-4.
Table 13-4 Common tsig-keygen options and purposes
| Option | Purpose |
|---|---|
| -a | Specify the HMAC algorithm: hmac-md5, hmac-sha1, hmac-sha256, hmac-sha512, etc. |
Using hmac-md5 to generate a key:
root@linuxprobe:~# tsig-keygen -a hmac-md5 master-slave
key "master-slave" {
	algorithm hmac-md5;
	secret "FI4LX6fsycp0HJhK3bq8Iw==";
};
Step 2: Create the key file on the primary. Under BIND’s config tree, I write the key name, algorithm, and secret into transfer.key, tighten permissions, and hard-link it into /etc.
root@linuxprobe:~# cd /var/named/chroot/etc/
root@linuxprobe:/var/named/chroot/etc# vim transfer.key
key "master-slave" {
	algorithm hmac-md5;
	secret "FI4LX6fsycp0HJhK3bq8Iw==";
};
root@linuxprobe:/var/named/chroot/etc# chown root:named transfer.key
root@linuxprobe:/var/named/chroot/etc# chmod 640 transfer.key
root@linuxprobe:/var/named/chroot/etc# ln transfer.key /etc/transfer.key
root@linuxprobe:/var/named/chroot/etc# cd ~
Step 3: Load the key and restrict transfers in the primary’s main config.
root@linuxprobe:~# vim /etc/named.conf
//
// named.conf
//
// Provided by Red Hat bind package to configure the ISC BIND named(8) DNS
// server as a caching only nameserver (as a localhost DNS resolver only).
//
// See /usr/share/doc/bind*/sample/ for example named configuration files.
//
include "/etc/transfer.key";
options {
        listen-on port 53 { any; };
        listen-on-v6 port 53 { ::1; };
        directory       "/var/named";
        dump-file       "/var/named/data/cache_dump.db";
        statistics-file "/var/named/data/named_stats.txt";
        memstatistics-file "/var/named/data/named_mem_stats.txt";
        secroots-file   "/var/named/data/named.secroots";
        recursing-file  "/var/named/data/named.recursing";
        allow-query     { any; };
        allow-transfer { key master-slave; };
root@linuxprobe:~# systemctl restart named
At this point the primary’s TSIG-protected transfers are configured. Next I clear the secondary’s synchronized files and restart bind; zone files will no longer appear because the transfer is blocked.
root@linuxprobe:~# rm -rf /var/named/slaves/*
root@linuxprobe:~# systemctl restart named
root@linuxprobe:~# ls /var/named/slaves/
Step 4: Configure the secondary with the same key, permissions, and link.
root@linuxprobe:~# cd /var/named/chroot/etc/
root@linuxprobe:/var/named/chroot/etc# vim transfer.key
key "master-slave" {
	algorithm hmac-md5;
	secret "FI4LX6fsycp0HJhK3bq8Iw==";
};
root@linuxprobe:/var/named/chroot/etc# chown root:named transfer.key
root@linuxprobe:/var/named/chroot/etc# chmod 640 transfer.key
root@linuxprobe:/var/named/chroot/etc# ln transfer.key /etc/transfer.key
root@linuxprobe:/var/named/chroot/etc# cd ~
Step 5: Load the key and reference it for the primary’s address on the secondary. Place the server block after logging (around line 51 by default) so it loads after the base options; otherwise bind may error before all defaults are loaded.
root@linuxprobe:~# vim /etc/named.conf
  1 //
  2 // named.conf
  3 //
  4 // Provided by Red Hat bind package to configure the ISC BIND named(8) DNS
  5 // server as a caching only nameserver (as a localhost DNS resolver only).
  6 //
  7 // See /usr/share/doc/bind*/sample/ for example named configuration files.
  8 //
  9 include "/etc/transfer.key";
 10 options {
 11         listen-on port 53 { any; };
 12         listen-on-v6 port 53 { ::1; };
 13         directory       "/var/named";
 14         dump-file       "/var/named/data/cache_dump.db";
 15         statistics-file "/var/named/data/named_stats.txt";
 16         memstatistics-file "/var/named/data/named_mem_stats.txt";
 17         secroots-file   "/var/named/data/named.secroots";
 18         recursing-file  "/var/named/data/named.recursing";
 19         allow-query     { any; };
 20
 21         /*
 22          - If you are building an AUTHORITATIVE DNS server, do NOT enable recursion.
 23          - If you are building a RECURSIVE (caching) DNS server, you need to enable
 24            recursion.
 25          - If your recursive DNS server has a public IP address, you MUST enable access
 26            control to limit queries to your legitimate users. Failing to do so will
 27            cause your server to become part of large scale DNS amplification
 28            attacks. Implementing BCP38 within your network would greatly
 29            reduce such attack surface
 30         */
 31         recursion yes;
 32
 33         dnssec-validation yes;
 34
 35         managed-keys-directory "/var/named/dynamic";
 36         geoip-directory "/usr/share/GeoIP";
 37
 38         pid-file "/run/named/named.pid";
 39         session-keyfile "/run/named/session.key";
 40
 41         /* https://fedoraproject.org/wiki/Changes/CryptoPolicy */
 42         include "/etc/crypto-policies/back-ends/bind.config";
 43 };
 44
 45 logging {
 46         channel default_debug {
 47                 file "data/named.run";
 48                 severity dynamic;
 49         };
 50 };
 51 server 192.168.10.10
 52 {
 53         keys { master-slave; };
 54 };
 55 zone "." IN {
 56         type hint;
 57         file "named.ca";
 58 };
 59
 60 include "/etc/named.rfc1912.zones";
 61 include "/etc/named.root.key";
 62
Step 6: Synchronize again. After restart the secondary resumes syncing zone data.
root@linuxprobe:~# systemctl restart named
root@linuxprobe:~# ls /var/named/slaves
192.168.10.arpa  linuxprobe.com.zone
Step 7: Re-test lookups. Note that the Server line indicates the secondary (192.168.10.20).
root@linuxprobe:~# nslookup www.linuxprobe.com
Server:		192.168.10.20
Address:	192.168.10.20#53

Name:	www.linuxprobe.com
Address: 192.168.10.10

root@linuxprobe:~# nslookup 192.168.10.10
10.10.168.192.in-addr.arpa	name = www.linuxprobe.com.
10.10.168.192.in-addr.arpa	name = ns.linuxprobe.com.
13.5 Deploying a Caching Server
A caching DNS server does not maintain zone data itself. Instead, it stores frequently used name/IP answers locally to speed up subsequent lookups. I generally use caching on enterprise LAN gateways where the same sites are visited repeatedly and throughput matters; usage in practice is less common, and whether it succeeds depends on the upstream DNS server’s policy—so for now, basic understanding is enough.
Step 1: Configure two NICs. Because caching is often used on an internal LAN to reduce user lookup time, I add a second NIC for the caching server to more closely mirror reality and enable external queries. I configure two Linux VMs as in Table 13-5. The topology is shown in Figure 13-9; the client isn’t limited to a single host.
Table 13-5 Parameters for configuring the Linux VMs
| Hostname | OS | IP Address |
|---|---|---|
| Caching server | RHEL 10 | External NIC: set per your physical network (via DHCP or manually specify IP/gateway) · Internal NIC: 192.168.10.10 |
| Client | RHEL 10 | 192.168.10.20 |
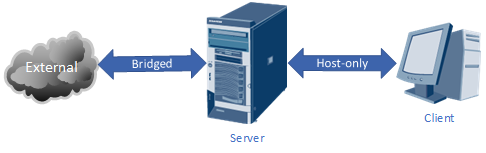
Figure 13-9 Topology for the caching server lab
Step 2: In the hypervisor, set the new NIC to Bridged (Figure 13-10), then match the physical network parameters (Figure 13-11). After restarting networking, the status appears as in Figure 13-12.
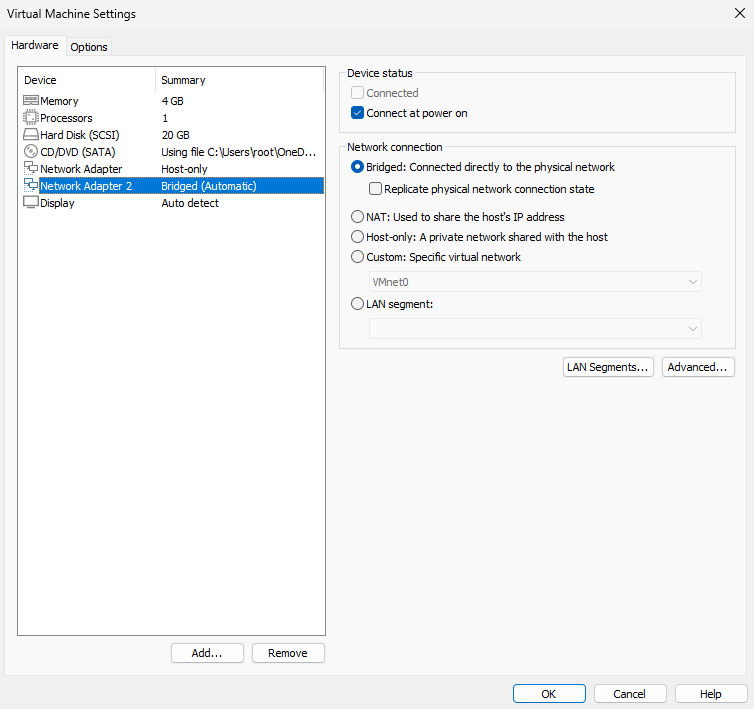
Figure 13-10 Adding a bridged NIC

Figure 13-11 Obtaining IP/gateway via DHCP
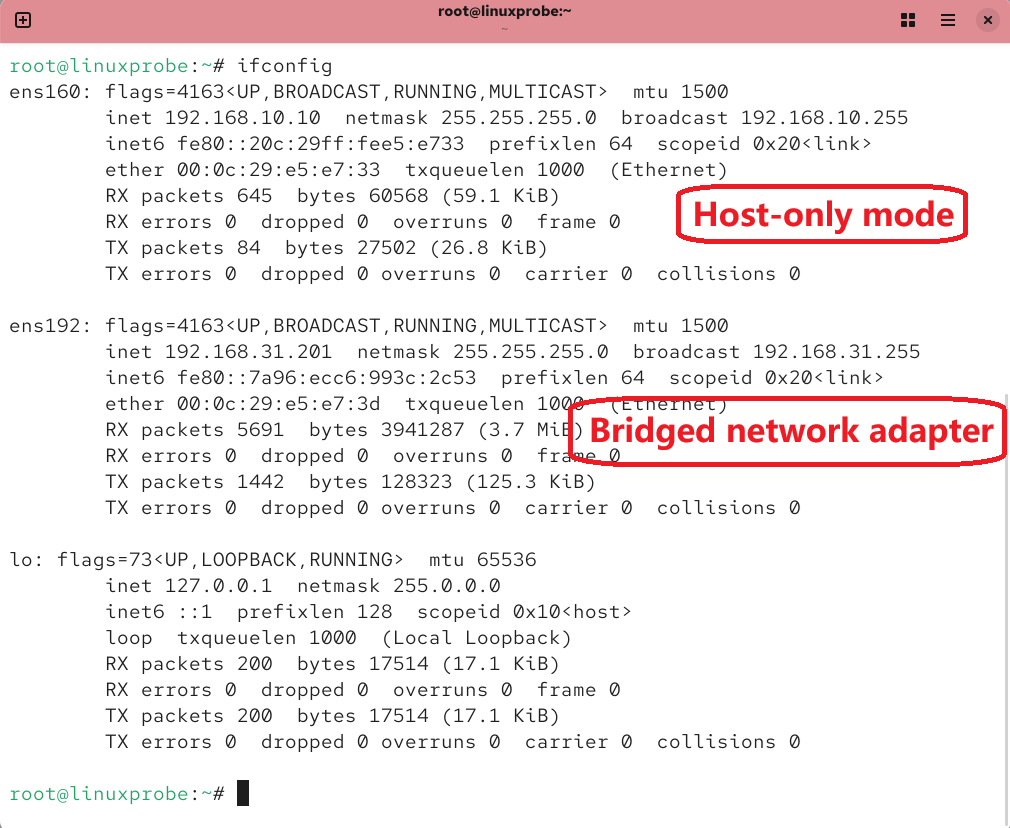
Figure 13-12 Network status after restart
Tips:
A newly added NIC typically has no config file—enter the name/type yourself. And don’t forget to bring it up:root@linuxprobe:~# nmcli connection up ens192
Connection successfully activated (D-Bus active path: /org/freedesktop/NetworkManager/ActiveConnection/4)
Now I add a single forwarder line so unknown queries go to an upstream resolver (change the IP to a reachable one on your network), restart named, and—if I reverted to a clean snapshot—reopen the firewall:
root@linuxprobe:~# vim /etc/named.conf
  1 //
  2 // named.conf
  3 //
  4 // Provided by Red Hat bind package to configure the ISC BIND named(8) DNS
  5 // server as a caching only nameserver (as a localhost DNS resolver only).
  6 //
  7 // See /usr/share/doc/bind*/sample/ for example named configuration files.
  8 //
  9
 10 options {
 11         listen-on port 53 { any; };
 12         listen-on-v6 port 53 { ::1; };
 13         directory       "/var/named";
 14         dump-file       "/var/named/data/cache_dump.db";
 15         statistics-file "/var/named/data/named_stats.txt";
 16         memstatistics-file "/var/named/data/named_mem_stats.txt";
 17         secroots-file   "/var/named/data/named.secroots";
 18         recursing-file  "/var/named/data/named.recursing";
 19         allow-query     { any; };
 20         forwarders 		{ 210.73.64.1; };
root@linuxprobe:~# systemctl restart named
If I had also reverted the VM to an initial snapshot, I reapply the firewall allow rule:
root@linuxprobe:~# firewall-cmd --permanent --add-service=dns
success
root@linuxprobe:~# firewall-cmd --reload
success
Step 3: Point the client’s DNS to 192.168.10.10 (Figure 13-13), bring up the connection, and test with nslookup.
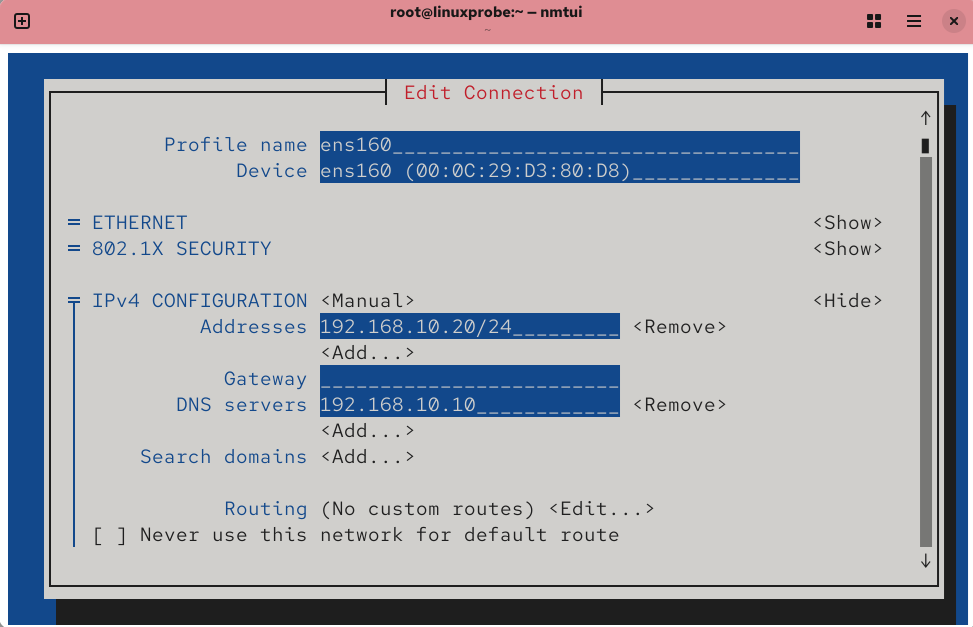
Figure 13-13 Setting the client’s DNS server address
root@linuxprobe:~# nmcli connection up ens160
Connection successfully activated (D-Bus active path: /org/freedesktop/NetworkManager/ActiveConnection/3)
root@linuxprobe:~# nslookup
> www.linuxprobe.com
Server:		192.168.10.10
Address:	192.168.10.10#53

Non-authoritative answer:
Name:	www.linuxprobe.com
Address: 117.72.83.43
Finally, a couple of troubleshooting notes from experience: because the caching server’s configuration adds only one line, typos are unlikely. If lookups fail, the usual culprits are (1) the chosen upstream resolver (e.g., 210.73.64.1) is unavailable—try 8.8.8.8 or 114.114.114.114—or (2) the client’s DNS setting didn’t take effect. Check the Server line in nslookup to confirm the resolver address.
13.6 Split-Horizon DNS
As overseas readership of Learn Linux the Right Way grows, hosting the companion website only in a Beijing data center would slow access for readers abroad; conversely, hosting it only overseas slows access within China.
To serve both domestic and overseas readers well, I can deploy multiple servers in different regions and enable split-horizon DNS so readers at the same URL receive the same content from the best-located server. For instance, I assign different public IPs to a DNS server in Beijing and one in the United States (Table 13-6). Readers in China are directed to Beijing; overseas readers are directed to the U.S., as in Figure 13-14.
Table 13-6 Operating systems and IP addresses of different servers
| Server | OS | IP Address |
|---|---|---|
| DNS server | RHEL 10 | Beijing network: 122.71.115.10 · U.S. network: 106.185.25.10 |
| Beijing client | Windows 11 | 122.71.115.1 |
| Overseas client | Windows 11 | 106.185.25.1 |
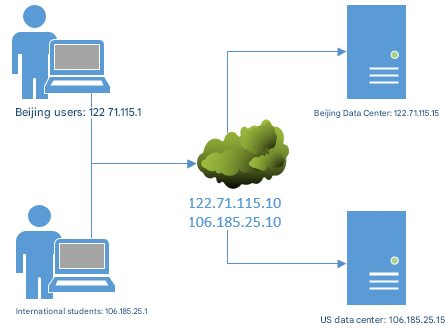
Figure 13-14 Split-horizon DNS directing users by geography
To improve access speed for overseas visitors to www.linuxprobe.com, I’ve already purchased and set up a web server in a U.S. data center. Next I manually deploy the DNS server and implement split-horizon DNS so readers in different regions get different IP addresses when resolving the same domain name.
Recommendation: Revert the VM to its initial state and reinstall
bindto avoid conflicts between experiments.
Step 1: Edit the bind main configuration. Change the listen and allow-query addresses to any (lines 11 and 19). Because split-horizon DNS conflicts with the root hint configuration, delete lines 52–55 for the root zone.
root@linuxprobe:~# vim /etc/named.conf
 52 zone "." IN {
 53         type hint;
 54         file "named.ca";
 55 };
Step 2: Edit the zone configuration file. Clear the existing contents and add the parameters below.
First I define two ACL variables (china and america) so later I can match client IPs by name—this is easier to read and maintain. The key is the view directive: it evaluates whether the client IP belongs to China or the U.S. and then loads a different zone data file (linuxprobe.com.china or linuxprobe.com.america). With the appropriate IPs in those files, split-horizon DNS is achieved. When a user in China queries linuxprobe.com, the resolver uses the records from linuxprobe.com.china.
root@linuxprobe:~# vim /etc/named.rfc1912.zones
acl "china"	  { 122.71.115.0/24; };
acl "america" { 106.185.25.0/24; };
view "china"{
        match-clients { "china"; };
        zone "linuxprobe.com" {
        type master;
        file "linuxprobe.com.china";
        };
};
view "america" {
        match-clients { "america"; };
        zone "linuxprobe.com" {
        type master;
        file "linuxprobe.com.america";
        };
};
Step 3: Create the data files. Using the template, I create two differently named zone data files whose names match the zone config above.
root@linuxprobe:~# cd /var/named
root@linuxprobe:/var/named# cp -a named.localhost linuxprobe.com.china
root@linuxprobe:/var/named# cp -a named.localhost linuxprobe.com.america
root@linuxprobe:/var/named# vim linuxprobe.com.china
| $TTL | 1D | # time-to-live is 1 day | |||
|---|---|---|---|---|---|
| @ | IN SOA | linuxprobe.com. | root.linuxprobe.com. | ( | |
| # start of authority: | # DNS zone address | # admin email (do not use @) | |||
| 0;serial | # serial number | ||||
| 1D;refresh | # refresh | ||||
| 1H;retry | # retry | ||||
| 1W;expire | # expire | ||||
| 3H);minimum | # negative-cache TTL | ||||
| NS | ns.linuxprobe.com. | # name server record | |||
| ns | IN A | 122.71.115.10 | # address record (ns.linuxprobe.com.) | ||
| www | IN A | 122.71.115.10 | # address record (www.linuxprobe.com.) |
root@linuxprobe:/var/named# vim linuxprobe.com.america
| $TTL | 1D | # time-to-live is 1 day | |||
|---|---|---|---|---|---|
| @ | IN SOA | linuxprobe.com. | root.linuxprobe.com. | ( | |
| # start of authority: | # DNS zone address | # admin email (do not use @) | |||
| 0;serial | # serial number | ||||
| 1D;refresh | # refresh | ||||
| 1H;retry | # retry | ||||
| 1W;expire | # expire | ||||
| 3H);minimum | # negative-cache TTL | ||||
| NS | ns.linuxprobe.com. | # name server record | |||
| ns | IN A | 106.185.25.10 | # address record (ns.linuxprobe.com.) | ||
| www | IN A | 106.185.25.10 | # address record (www.linuxprobe.com.) |
Here 122.71.115.10 and 106.185.25.10 are not configured in the lab itself—you need to provision them. To simplify, you could point www.linuxprobe.com to both 122.71.115.10 and 106.185.25.10 and prepare only one server.
Step 4: Allow the firewall rule.
root@linuxprobe:~# firewall-cmd --permanent --add-service=dns
success
root@linuxprobe:~# firewall-cmd --reload
success
Step 5: Restart named and verify. On the client (Windows or Linux), set the IP to 122.71.115.1 and 106.185.25.1 respectively, and set the DNS server to the DNS server’s two IP addresses. When using nslookup, you can clearly see the results (Figures 13-15 and 13-16).

Figure 13-15 Simulating a China-based user’s DNS lookup
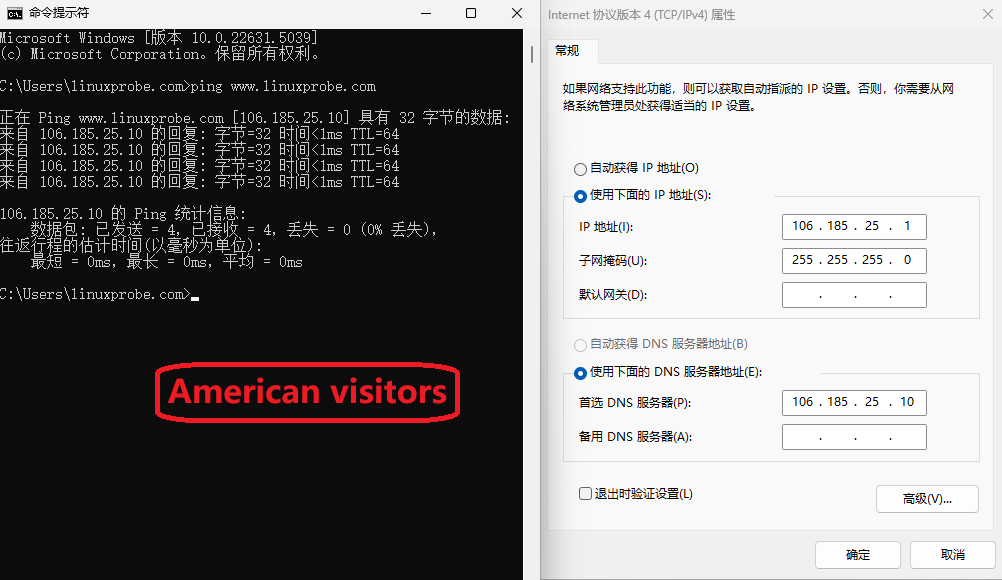
Figure 13-16 Simulating a U.S.-based user’s DNS lookup
Congratulations! You’ve finished another chapter—take a short break before moving on.
Review Questions
-
What are the three types of DNS servers?
A: DNS primary server, DNS secondary server, and DNS caching server. -
When DNS servers transfer zone data files between each other, do they use recursive or iterative queries?
A: Between DNS servers it’s iterative; between users and DNS servers it’s recursive. -
Why do I recommend installing the
chrootplugin when deploying DNS withbindon Linux?
A: It confinesbindso it can only operate on its own configuration files, thereby improving overall server security. -
What are the purposes of forward and reverse lookups in DNS?
A: Forward lookup converts a specified domain name into an IP address; reverse lookup converts an IP address into a domain name. Forward lookups are more commonly used. -
Can I restrict which hosts may use my DNS resolver? How?
A: Yes. Modify line 19’sallow-querydirective in the main config to limit clients. -
What is the role of deploying a DNS secondary server?
A: It reduces load on the primary and improves users’ query performance. -
Can I use TSIG encryption to ensure the integrity of data files when users transfer configuration files to the DNS server?
A: No. TSIG secures DNS server–to–DNS server zone transfers during iterative exchanges, not user uploads. -
What is the purpose of a DNS caching server?
A: It stores frequently accessed name/IP mappings locally to speed up subsequent queries. It’s commonly used on enterprise LAN gateways for sites that are repeatedly accessed and where speed matters, though it’s less common in practice. -
What does split-horizon DNS do?
A: It lets users in different geographic regions get the same content from different servers by returning region-specific IPs for the same domain. -
What is the principle behind split-horizon DNS?
A: Based on the client’s source IP ranges, different views load different zone data files and return different DNS answers.