Chapter 12 · File Sharing with Samba and NFS
Chapter Overview
In this chapter, I first compare two ways to exchange resources—file transfer and file sharing—and then introduce the theory behind the Samba service. I explain where the SMB protocol came from and how the Samba project was created and evolved. After that, I deploy a file‑sharing service step by step, walk through the meaning of key parameters, and finally access the shared resources from both Windows and Linux so that I fully master the configuration method.
I also show how to configure the Network File System (NFS) service to simplify file sharing between Linux systems. By deploying NFS, I mount and use resources across multiple Linux hosts. When managing many mounts, the autofs service not only meets mounting needs but also improves utilization of server hardware and network bandwidth by mounting on demand.
By the end of this chapter, I will have a clear grasp of how file sharing works between Linux systems, and between Linux and Windows, and I will be able to configure these services with confidence.
12.1 Samba file‑sharing service
In the previous chapter, the FTP service made transfers between hosts convenient, but FTP’s essence is transfer, not sharing. If I want clients to edit files directly on the server, FTP is awkward.
In 1987, Microsoft and Intel defined the SMB (Server Message Block) protocol to share files, printers, and other resources on a LAN, which made sharing across hosts much easier. In 1991, while still in college, Andrew Tridgell implemented SMB on Linux so that Linux and Windows could share files. He first named it SMBServer. When he attempted to trademark the name, the office rejected it as “SMB is meaningless.” Flipping through a dictionary, he saw the name of a Latin dance—Samba—which conveniently contains “SMB,” and that’s how the project got its name (its logo appears in Figure 12‑1). Today, the Samba service is a common and excellent choice for file sharing between Linux and Windows.

Figure 12-1 Samba service logo
Like other services we’ve configured, I install Samba from the repositories (the service and the package share the same name). I also install samba-client for testing:
root@linuxprobe:~# dnf install samba samba-client
Updating Subscription Management repositories.
BaseOS                                          2.7 MB/s | 2.7 kB     00:00
AppStream                                       2.7 MB/s | 2.8 kB     00:00
Dependencies resolved.
================================================================================
 Package                    Arch       Version              Repository     Size
================================================================================
Installing:
 samba                      x86_64     4.20.2-104.el10      BaseOS        991 k
 samba-client               x86_64     4.20.2-104.el10      AppStream     757 k
Installing dependencies:
 libnetapi                  x86_64     4.20.2-104.el10      BaseOS        151 k
 samba-common-tools         x86_64     4.20.2-104.el10      BaseOS        485 k
 samba-dcerpc               x86_64     4.20.2-104.el10      BaseOS        727 k
 samba-ldb-ldap-modules     x86_64     4.20.2-104.el10      BaseOS         34 k
 samba-libs                 x86_64     4.20.2-104.el10      BaseOS        135 k

Installed:
  libnetapi-4.20.2-104.el10.x86_64
  samba-4.20.2-104.el10.x86_64
  samba-client-4.20.2-104.el10.x86_64
  samba-common-tools-4.20.2-104.el10.x86_64
  samba-dcerpc-4.20.2-104.el10.x86_64
  samba-ldb-ldap-modules-4.20.2-104.el10.x86_64
  samba-libs-4.20.2-104.el10.x86_64

Complete!
After installation I open the main Samba configuration file. Fortunately there aren’t many parameters—only 44 lines. Lines 24–29 share each user’s home directory. Although convenient in some scenarios, this default is risky; I recommend deleting it. Lines 31–36 share local printers via SMB to make them available on the LAN; since I don’t have printers here, I delete those too. Lines 38–44 are also for printer drivers and can likewise be removed.
root@linuxprobe:~# vim /etc/samba/smb.conf
  1 # See smb.conf.example for a more detailed config file or
  2 # read the smb.conf manpage.
  3 # Run 'testparm' to verify the config is correct after
  4 # you modified it.
  5 #
  6 # Note:
  7 # SMB1 is disabled by default. This means clients without support for SMB2 o    r
  8 # SMB3 are no longer able to connect to smbd (by default).
  9
 10 [global]
 11         workgroup = SAMBA
 12         security = user
 13
 14         passdb backend = tdbsam
 15
 16         printing = cups
 17         printcap name = cups
 18         load printers = yes
 19         cups options = raw
 20
 21         # Install samba-usershares package for support
 22         include = /etc/samba/usershares.conf
 23
 24 [homes]
 25         comment = Home Directories
 26         valid users = %S, %D%w%S
 27         browseable = No
 28         read only = No
 29         inherit acls = Yes
 30
 31 [printers]
 32         comment = All Printers
 33         path = /var/tmp
 34         printable = Yes
 35         create mask = 0600
 36         browseable = No
 37
 38 [print$]
 39         comment = Printer Drivers
 40         path = /var/lib/samba/drivers
 41         write list = @printadmin root
 42         force group = @printadmin
 43         create mask = 0664
 44         directory mask = 0775
After pruning, only nine effective lines remain. Among those I can safely delete CUPS‑related directives (lines 5–8) since they serve only printing. The intermediate result looks like this:
root@linuxprobe:~# cat /etc/samba/smb.conf
  1 [global]
  2         workgroup = SAMBA
  3         security = user
  4         passdb backend = tdbsam
  5         printing = cups
  6         printcap name = cups
  7         load printers = yes
  8         cups options = raw
  9         include = /etc/samba/usershares.conf
The final minimal configuration is:
root@linuxprobe:~# cat /etc/samba/smb.conf
  1 [global]
  2         workgroup = SAMBA
  3         security = user
  4         passdb backend = tdbsam
  5         include = /etc/samba/usershares.conf
Tips:
Removing unused directives is standard practice. By turning off non‑essential features, I let the service “travel light,” push hardware resources where they matter, and improve performance. It also makes the file easier to read—finding one parameter in under ten lines is far quicker than scanning dozens. As long as I understand what each directive does, I can trim with confidence.
In the configuration above, the security directive controls the authentication method when users log in to Samba. There are four modes:
share — No password verification. Similar to vsftpd’s anonymous mode: convenient but insecure.
user — Require username and password before accessing shares. This is the default and most common.
domain — Authenticate via a domain controller to restrict the source domain of users.
server — Delegate password checks to a specific host (centralized account management; rarely used).
On older RHEL/CentOS versions, Samba used PAM to consult local accounts. In 5/6 it moved to smbpasswd for a standalone account set. Since RHEL 7, authentication uses the tdbsam database. tdbsam stores Samba’s own accounts and passwords, and I manage them with pdbedit—independent from the system account database. I’ll demonstrate this shortly.
12.1.1 Configure a share
Samba’s main configuration file resembles Apache’s, with global parameters that apply to the entire service and per‑share parameters for individual resources. Creating a share is straightforward—add the directives in Table 12‑1 to the main file and restart the service.
Table 12‑1 Parameters for defining a Samba share and their purposes
| Directive | Purpose |
|---|---|
| [database] | Share name is database |
| comment = Do not arbitrarily modify the database file | Warns users not to modify the database casually |
| path = /home/database | Share the directory /home/database |
| public = no | Do not expose to everyone |
| writable = yes | Allow write operations |
Step 1: Create account information for accessing the share. On RHEL 10, Samba uses user authentication by default so that only trusted accounts with passwords can access resources. This requires an account database. Samba also expects a corresponding system account so that file ownership and permissions behave correctly; otherwise permissions become confused when files are created.
The pdbedit command manages Samba’s account database; the format is pdbedit [options] user. Use -a the first time you add an account; you don’t need -a for later password changes or deletions. Table 12‑2 lists useful options.
Table 12‑2 Options for pdbedit and their purposes
| Option | Purpose |
|---|---|
| -a username | Add a Samba account |
| -x username | Delete a Samba account |
| -L | List accounts |
| -Lv | List accounts with details |
root@linuxprobe:~# id linuxprobe
uid=1000(linuxprobe) gid=1000(linuxprobe) groups=1000(linuxprobe),10(wheel)
root@linuxprobe:~# pdbedit -a -u linuxprobe
new password: Enter the password of the account in the Samba service database here
retype new password: Enter your password again to confirm
Unix username:        linuxprobe
NT username:
Account Flags:        [U          ]
User SID:             S-1-5-21-1663959641-2503989833-3304495206-1000
Primary Group SID:    S-1-5-21-1663959641-2503989833-3304495206-513
Full Name:            linuxprobe
Home Directory:       \LINUXPROBE\linuxprobe
HomeDir Drive:
Logon Script:
Profile Path:         \LINUXPROBE\linuxprobe\profile
Domain:               LINUXPROBE
Account desc:
Workstations:
Munged dial:
Logon time:           0
Logoff time:          Wed, 06 Feb 2036 23:06:39 CST
Kickoff time:         Wed, 06 Feb 2036 23:06:39 CST
Password last set:    Tue, 25 Mar 2025 21:48:33 CST
Password can change:  Tue, 25 Mar 2025 21:48:33 CST
Password must change: never
Last bad password   : 0
Bad password count  : 0
Logon hours         : FFFFFFFFFFFFFFFFFFFFFFFFFFFFFFFFFFFFFFFFFF
Step 2: Create the directory that will be shared. I consider UNIX permissions and the SELinux context. Because /home holds normal users’ home directories, I also need the correct SELinux type. The manual states that the proper type is samba_share_t. After setting the mapping, I run restorecon so the new context takes effect immediately.
root@linuxprobe:~# mkdir /home/database
root@linuxprobe:~# chown -Rf linuxprobe:linuxprobe /home/database
root@linuxprobe:~# semanage fcontext -a -t samba_share_t /home/database
root@linuxprobe:~# restorecon -Rv /home/database
Relabeled /home/database from unconfined_u:object_r:user_home_dir_t:s0 to unconfined_u:object_r:samba_share_t:s0
Step 3: Adjust SELinux booleans so Samba may serve content from users’ home directories. I list Samba‑related booleans and enable the correct one:
root@linuxprobe:~# getsebool -a | grep samba
samba_create_home_dirs --> off
samba_domain_controller --> off
samba_enable_home_dirs --> off
samba_export_all_ro --> off
samba_export_all_rw --> off
samba_load_libgfapi --> off
samba_portmapper --> off
samba_run_unconfined --> off
samba_share_fusefs --> off
samba_share_nfs --> off
sanlock_use_samba --> off
tmpreaper_use_samba --> off
use_samba_home_dirs --> off
virt_use_samba --> off
root@linuxprobe:~# setsebool -P samba_enable_home_dirs on
Step 4: Add the share definition to /etc/samba/smb.conf following Table 12‑1:
root@linuxprobe:~# vim /etc/samba/smb.conf
[global]
        workgroup = SAMBA
        security = user
        passdb backend = tdbsam
        include = /etc/samba/usershares.conf
[database]
        comment = Do not arbitrarily modify the database file
        path = /home/database
        public = no
        writable = yes
Step 5: The configuration is now complete. The service name on Linux is smb, so I restart it and enable it at boot to keep serving after reboots:
root@linuxprobe:~# systemctl restart smb
root@linuxprobe:~# systemctl enable smb
Created symlink '/etc/systemd/system/multi-user.target.wants/smb.service' → '/usr/lib/systemd/system/smb.service'.
To avoid firewall interference, I allow the Samba service in firewalld:
root@linuxprobe:~# firewall-cmd --permanent --add-service=samba
success
root@linuxprobe:~# firewall-cmd --reload
success
Step 6: I can check whether the service started with systemctl status smb. To see which directories Samba is sharing, I use smbclient. The -U option specifies the username; -L lists shares:
root@linuxprobe:~# smbclient -U linuxprobe -L 192.168.10.10
Password for [SAMBA\linuxprobe]: Enter the password of the account in the Samba service database here
	Sharename       Type      Comment
	---------       ----      -------
	database        Disk      Do not arbitrarily modify the database file
	IPC$            IPC       IPC Service (Samba 4.20.2)
SMB1 disabled -- no workgroup available
12.1.2 Mount from Windows
Whether the Samba service runs on Windows or on Linux, the Windows access steps are the same. Here I assume the server is Linux and I access it from Windows. I configure IP addresses according to Table 12‑3.
Table 12‑3 Operating systems and IP addresses
| Hostname | Operating system | IP address |
|---|---|---|
| Samba server | RHEL 10 | 192.168.10.10 |
| Linux client | RHEL 10 | 192.168.10.20 |
| Windows client | Windows 11 | 192.168.10.30 |
To access the share in Windows, I press Start, type two backslashes plus the server’s IP address, and press Enter, as in Figure 12‑2.
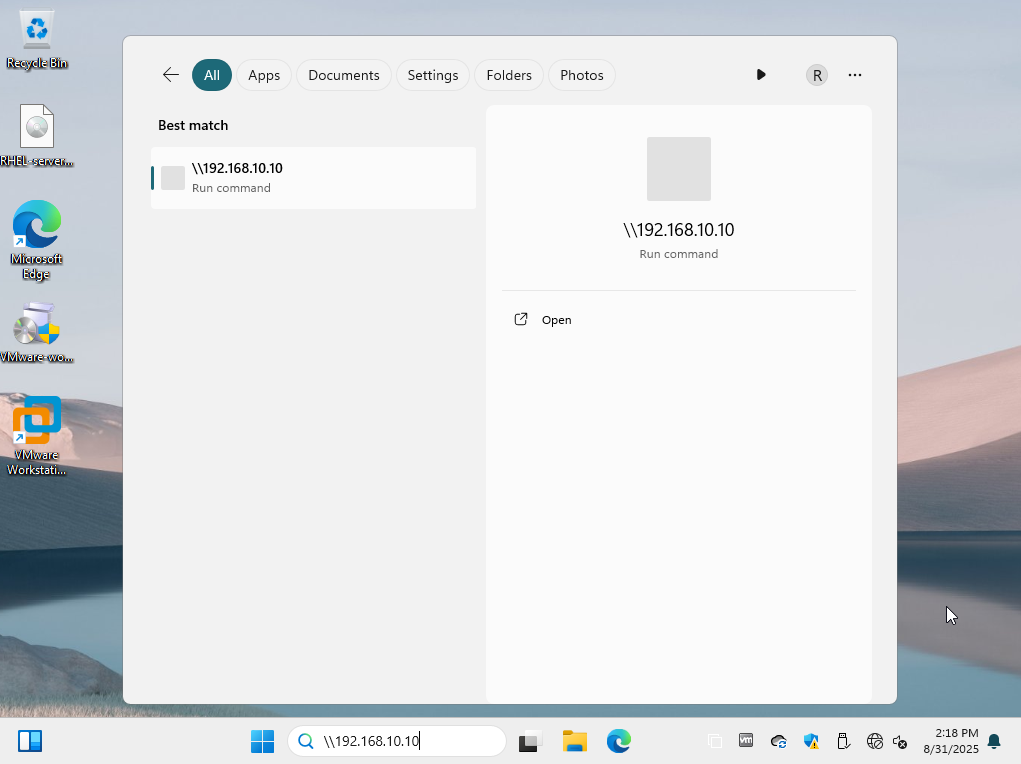
Figure 12-2 Accessing shared resources in Windows
I first try logging in with the system password of the linuxprobe account, and I get the error shown in Figure 12‑3. This confirms that on RHEL 10, Samba uses an independent account database. Even if there is a system user named linuxprobe, it is not the same as the Samba account. They live in different databases with separate passwords and must be distinguished in practice.
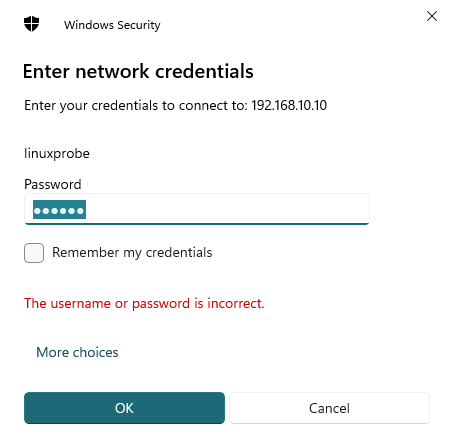
Figure 12-3 Error while accessing the Samba share
After entering the linuxprobe username and the password set with pdbedit in the Samba database, I can log in to the share (Figure 12‑4) and then view, write, rename, and delete files.
Because of Windows credential caching, I might still see errors on the second login even with correct credentials. If that happens, I simply reboot the Windows client and try again (if errors persist, I re‑check the steps above).
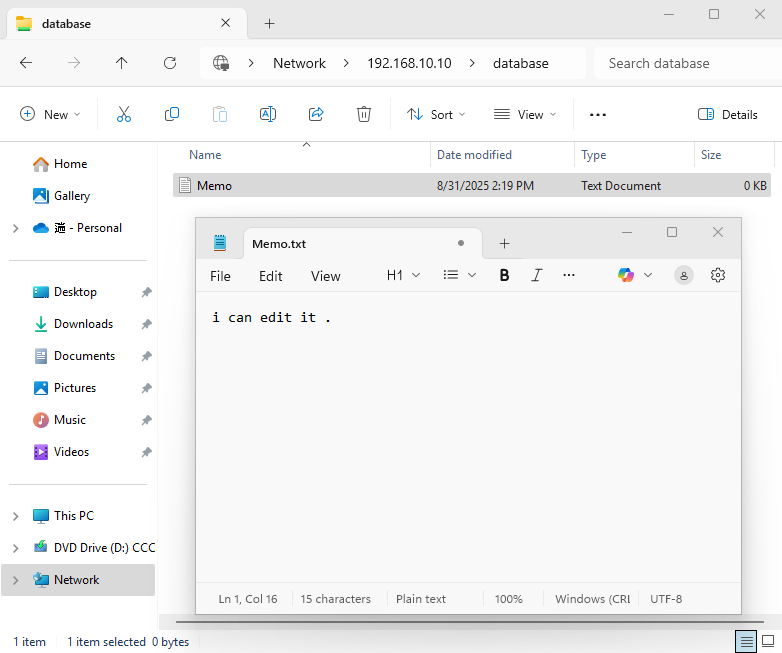
Figure 12-4 Successfully accessing the Samba share
12.1.3 Mount from Linux
It’s easy to assume Samba exists only to share between Linux and Windows, but it also works great between Linux hosts. I configure IP addressing as in Table 12‑4, then install the package cifs-utils on the Linux client.
Table 12‑4 Operating systems and IP addresses
| Hostname | Operating system | IP address |
|---|---|---|
| Samba server | RHEL 10 | 192.168.10.10 |
| Linux client | RHEL 10 | 192.168.10.20 |
| Windows client | Windows 11 | 192.168.10.30 |
root@linuxprobe:~# dnf install cifs-utils
Updating Subscription Management repositories.
Last metadata expiration check: 0:17:57 ago on Tue 25 Mar 2025 09:45:22 PM CST.
Dependencies resolved.
================================================================================
 Package            Architecture   Version                 Repository      Size
================================================================================
Installing:
 cifs-utils         x86_64         7.0-5.el10              BaseOS         100 k
Installing dependencies:
 keyutils           x86_64         1.6.3-4.el10            BaseOS          80 k

Installed:
  cifs-utils-7.0-5.el10.x86_64           keyutils-1.6.3-4.el10.x86_64

Complete!
After installing the package, on the Linux client I create a mount point for the Samba share. I often name it the same as the share for convenience. In the mount command, -t specifies the protocol type, -o provides username and password, and then I append the server IP, share name, and local mount directory. Note that the share name after the server IP is the section name [database] from smb.conf, not the server’s local path. They may be the same string, but they are conceptually different.
root@linuxprobe:~# mkdir /database
root@linuxprobe:~# mount -t cifs -o username=linuxprobe,password=redhat //192.168.10.10/database /database
root@linuxprobe:~# df -h
Filesystem                Size  Used Avail Use% Mounted on
/dev/mapper/rhel-root      17G  3.8G   13G  23% /
devtmpfs                  4.0M     0  4.0M   0% /dev
tmpfs                     1.9G   84K  1.9G   1% /dev/shm
efivarfs                  256K   56K  196K  23% /sys/firmware/efi/efivars
tmpfs                     776M  9.7M  767M   2% /run
tmpfs                     1.0M     0  1.0M   0% /run/credentials/systemd-journald.service
/dev/sda2                 960M  272M  689M  29% /boot
/dev/sr0                  6.5G  6.5G     0 100% /media/cdrom
/dev/sda1                 599M  8.3M  591M   2% /boot/efi
tmpfs                     388M  124K  388M   1% /run/user/0
//192.168.10.10/database   17G  3.7G   13G  23% /database
If I don’t want to mount it manually after each reboot, I can place credentials in a file (username, password, domain) and let /etc/fstab and the system load it automatically. For safety I restrict the file to root only:
root@linuxprobe:~# vim auth.smb
username=linuxprobe
password=redhat
domain=SAMBA
root@linuxprobe:~# chmod 600 auth.smb
I then add the mount to /etc/fstab so it persists across reboots:
root@linuxprobe:~# vim /etc/fstab
#
# /etc/fstab
# Created by anaconda on Wed Mar 12 20:08:04 2025
#
# Accessible filesystems, by reference, are maintained under '/dev/disk/'.
# See man pages fstab(5), findfs(8), mount(8) and/or blkid(8) for more info.
#
# After editing this file, run 'systemctl daemon-reload' to update systemd
# units generated from this file.
#
UUID=016bb74f-bfa8-4d80-aa6d-d5693c39a844 /                xfs     defaults         0 0
UUID=c34124dd-c66e-4cbe-ba04-528666d30dc0 /boot            xfs     defaults         0 0
UUID=9A1A-B195          /boot/efi               vfat    umask=0077,shortname=winnt  0 2
UUID=299dacfd-f999-48d8-bca4-e5274ac600a8 none             swap    defaults         0 0
/dev/cdrom 								  /media/cdrom     iso9660 defaults 	    0 0
//192.168.10.10/database          /database     cifs    credentials=/root/auth.smb  0 0
root@linuxprobe:~# systemctl daemon-reload
root@linuxprobe:~# mount -a
The Linux client has mounted the Samba share successfully. Inside /database I can see files left by the Windows client (for example Memo.txt), read and write them, and save changes:
root@linuxprobe:~# cat /database/Memo.txt
i can edit it .
12.2 NFS
If Samba feels complicated and all the hosts are Linux, I strongly recommend using NFS (Network File System) for file sharing. NFS allows a client to mount a remote directory from a Linux server so that it can read and write it over TCP/IP just like local data.
Because configuring NFS on RHEL 10 is so simple, I jokingly call it Need For Speed in class.
Step 1: Install the required packages.
root@linuxprobe:~# dnf install nfs-utils
Updating Subscription Management repositories.
BaseOS                                          2.7 MB/s | 2.7 kB     00:00
AppStream                                       2.7 MB/s | 2.8 kB     00:00
Dependencies resolved.
================================================================================
 Package              Architecture Version                   Repository    Size
================================================================================
Installing:
 nfs-utils            x86_64       1:2.7.1-1.el10            BaseOS       481 k
Installing dependencies:
 gssproxy             x86_64       0.9.2-7.el10              BaseOS       122 k
 keyutils             x86_64       1.6.3-4.el10              BaseOS        80 k
 libev                x86_64       4.33-12.el10              BaseOS        56 k
 libnfsidmap          x86_64       1:2.7.1-1.el10            BaseOS        67 k
 libverto-libev       x86_64       0.3.2-9.el10              BaseOS        15 k
 rpcbind              x86_64       1.2.7-2.el10              BaseOS        62 k
 sssd-nfs-idmap       x86_64       2.10.0~beta2-3.el10       BaseOS        34 k

Installed:
  gssproxy-0.9.2-7.el10.x86_64        keyutils-1.6.3-4.el10.x86_64
  libev-4.33-12.el10.x86_64           libnfsidmap-1:2.7.1-1.el10.x86_64
  libverto-libev-0.3.2-9.el10.x86_64  nfs-utils-1:2.7.1-1.el10.x86_64
  rpcbind-1.2.7-2.el10.x86_64         sssd-nfs-idmap-2.10.0~beta2-3.el10.x86_64

Complete!
Step 2: To test the configuration, I use two Linux hosts (one server, one client) and assign IP addresses according to Table 12‑5.
Table 12‑5 Two Linux hosts and their IP addresses
| Hostname | Operating system | IP address |
|---|---|---|
| NFS server | RHEL 10 | 192.168.10.10 |
| NFS client | RHEL 10 | 192.168.10.20 |
I also open the firewall so that default policies don’t block NFS:
root@linuxprobe:~# firewall-cmd --permanent --add-service=nfs
success
root@linuxprobe:~# firewall-cmd --permanent --add-service=rpc-bind
success
root@linuxprobe:~# firewall-cmd --permanent --add-service=mountd
success
root@linuxprobe:~# firewall-cmd --reload
success
Step 3: On the NFS server I create the export directory and grant permissive permissions so others can write:
root@linuxprobe:~# mkdir /nfsfile
root@linuxprobe:~# chmod -R 777 /nfsfile
root@linuxprobe:~# echo "welcome to linuxprobe.com" > /nfsfile/readme
Step 4: The NFS configuration file is /etc/exports, which is empty by default. I define exports with the format:
<exported directory> <allowed clients>(<permissions>)
For example, to share /nfsfile with the host 192.168.10.20, allowing read/write, writing data to disk before returning (for safety), and mapping the client’s root to the server’s anonymous user, I write the following using the options in Table 12‑6.
Table 12‑6 Options for the NFS exports file
| Option | Purpose |
|---|---|
| ro | Read‑only |
| rw | Read/write |
| root_squash | Map the client’s root to the server’s anonymous user |
| no_root_squash | Map the client’s root to the server’s root (not recommended) |
| all_squash | Map all client users to the anonymous user |
| sync | Write to memory and disk before replying (safer) |
| async | Write to memory first, then to disk (faster but may lose data) |
Note that there is no space between the client address and the parentheses:
root@linuxprobe:~# vim /etc/exports
/nfsfile 192.168.10.20(rw,sync,root_squash)
Using wildcards in client addresses gives flexibility. There are three common patterns: * allows any host; 192.168.10.* allows the 192.168.10.0/24 network; 192.168.10.20 allows only one host.
Step 5: Start and enable the services. Before using NFS, the RPC service must advertise the server’s IP and ports to clients, so I also restart and enable rpcbind, and then enable nfs-server:
root@linuxprobe:~# systemctl restart rpcbind
root@linuxprobe:~# systemctl enable rpcbind
root@linuxprobe:~# systemctl restart nfs-server
root@linuxprobe:~# systemctl enable nfs-server
Created symlink '/etc/systemd/system/multi-user.target.wants/nfs-server.service' → '/usr/lib/systemd/system/nfs-server.service'.
On the client, the showmount command queries the server’s exports. Table 12‑7 lists useful options and their meanings.
Table 12‑7 Options for showmount
| Option | Purpose |
|---|---|
| -e | Show the server’s export list |
| -a | Show all clients that have mounted and their mount points |
| -v | Show the version |
I install the client tools and then query the server:
root@linuxprobe:~# dnf install showmount
Updating Subscription Management repositories.
BaseOS                                          2.7 MB/s | 2.7 kB     00:00
AppStream                                       2.7 MB/s | 2.8 kB     00:00
Dependencies resolved.
================================================================================
 Package              Architecture Version                   Repository    Size
================================================================================
Installing:
 nfs-utils            x86_64       1:2.7.1-1.el10            BaseOS       481 k
Installing dependencies:
 gssproxy             x86_64       0.9.2-7.el10              BaseOS       122 k
 keyutils             x86_64       1.6.3-4.el10              BaseOS        80 k
 libev                x86_64       4.33-12.el10              BaseOS        56 k
 libnfsidmap          x86_64       1:2.7.1-1.el10            BaseOS        67 k
 libverto-libev       x86_64       0.3.2-9.el10              BaseOS        15 k
 rpcbind              x86_64       1.2.7-2.el10              BaseOS        62 k
 sssd-nfs-idmap       x86_64       2.10.0~beta2-3.el10       BaseOS        34 k

Installed:
  gssproxy-0.9.2-7.el10.x86_64        keyutils-1.6.3-4.el10.x86_64
  libev-4.33-12.el10.x86_64           libnfsidmap-1:2.7.1-1.el10.x86_64
  libverto-libev-0.3.2-9.el10.x86_64  nfs-utils-1:2.7.1-1.el10.x86_64
  rpcbind-1.2.7-2.el10.x86_64         sssd-nfs-idmap-2.10.0~beta2-3.el10.x86_64

Complete!
Then I view the server’s export list:
root@linuxprobe:~# showmount -e 192.168.10.10
Export list for 192.168.10.10:
/nfsfile 192.168.10.20
Finally, on the NFS client I create a mount point and mount the export. I use -t nfs and specify the server IP with the exported path, followed by the local directory:
root@linuxprobe:~# mkdir /nfsfile
root@linuxprobe:~# mount -t nfs 192.168.10.10:/nfsfile /nfsfile
root@linuxprobe:~# df -h
Filesystem              Size  Used Avail Use% Mounted on
/dev/mapper/rhel-root    17G  3.8G   13G  23% /
devtmpfs                4.0M     0  4.0M   0% /dev
tmpfs                   1.9G   84K  1.9G   1% /dev/shm
efivarfs                256K   56K  196K  23% /sys/firmware/efi/efivars
tmpfs                   776M  9.7M  767M   2% /run
tmpfs                   1.0M     0  1.0M   0% /run/credentials/systemd-journald.service
/dev/sda2               960M  272M  689M  29% /boot
/dev/sr0                6.5G  6.5G     0 100% /media/cdrom
/dev/sda1               599M  8.3M  591M   2% /boot/efi
tmpfs                   388M  124K  388M   1% /run/user/0
192.168.10.10:/nfsfile   17G  3.7G   13G  23% /nfsfile
After mounting I can read the file created earlier:
root@linuxprobe:~# cat /nfsfile/readme
welcome to linuxprobe.com
To keep the NFS mount active after reboots, I write it into /etc/fstab:
#
# /etc/fstab
# Created by anaconda on Wed Mar 12 20:08:04 2025
#
# Accessible filesystems, by reference, are maintained under '/dev/disk/'.
# See man pages fstab(5), findfs(8), mount(8) and/or blkid(8) for more info.
#
# After editing this file, run 'systemctl daemon-reload' to update systemd
# units generated from this file.
#
UUID=016bb74f-bfa8-4d80-aa6d-d5693c39a844 /             xfs     defaults        0 0
UUID=c34124dd-c66e-4cbe-ba04-528666d30dc0 /boot         xfs     defaults        0 0
UUID=9A1A-B195          /boot/efi            vfat    umask=0077,shortname=winnt 0 2
UUID=299dacfd-f999-48d8-bca4-e5274ac600a8 none          swap    defaults        0 0
/dev/cdrom 							/media/cdrom 	   iso9660  defaults 		0 0
192.168.10.10:/nfsfile                    /nfsfile      nfs     defaults        0 0
12.3 autofs automatic mounts
Both Samba and NFS mounts can be added to /etc/fstab so that the system mounts them during boot. That’s convenient, but if there are many remote resources, it can waste network bandwidth and server hardware resources. If a mount remains unused for long periods, it still consumes resources. I could mount by hand every time with mount, but that’s tedious.
The autofs automatic mount service solves this problem. Unlike the one‑shot mount command, autofs runs as a daemon. When it detects access to an as‑yet unmounted file system, it mounts it automatically. In other words, entries in /etc/fstab mount at boot, while autofs mounts on demand, saving resources.
First I install autofs:
root@linuxprobe:~# dnf install autofs
Updating Subscription Management repositories.
Last metadata expiration check: 0:12:01 ago on Tue 25 Mar 2025 11:37:58 PM CST.
Dependencies resolved.
================================================================================
 Package             Architecture Version                    Repository    Size
================================================================================
Installing:
 autofs              x86_64       1:5.1.9-10.el10            BaseOS       395 k
Installing dependencies:
 libsss_autofs       x86_64       2.10.0~beta2-3.el10        BaseOS        36 k

Installed:
  autofs-1:5.1.9-10.el10.x86_64     libsss_autofs-2.10.0~beta2-3.el10.x86_64

Complete!
On production servers I often manage many mounts. If I put everything into the master file, it becomes bloated and slow to scan. Instead, in /etc/auto.master I map a parent mount directory to a per‑mount map file using the format “mount‑point per‑map”. The parent directory is the parent of the device’s mount point. For example, CD‑ROMs usually mount at /media/cdrom, so the parent is /media. I reference a custom map file whose name is arbitrary (I use /etc/iso.misc; I recommend using the suffix .misc). The parameters appear on line 7 below.
root@linuxprobe:~# vim /etc/auto.master
  1 #
  2 # Sample auto.master file
  3 # This is a 'master' automounter map and it has the following format:
  4 # mount-point [map-type[,format]:]map [options]
  5 # For details of the format look at auto.master(5).
  6 #
  7 /media  /etc/iso.misc
  8 /misc   /etc/auto.misc
  9 #
 10 # NOTE: mounts done from a hosts map will be mounted with the
 11 #       "nosuid" and "nodev" options unless the "suid" and "dev"
 12 #       options are explicitly given.
 13 #
 14 /net    -hosts
 15 #
 16 # Include /etc/auto.master.d/*.autofs
 17 # To add an extra map using this mechanism you will need to add
 18 # two configuration items - one /etc/auto.master.d/extra.autofs file
 19 # (using the same line format as the auto.master file)
 20 # and a separate mount map (e.g. /etc/auto.extra or an auto.extra NIS map)
 21 # that is referred to by the extra.autofs file.
 22 #
 23 +dir:/etc/auto.master.d
 24 #
 25 # If you have fedfs set up and the related binaries, either
 26 # built as part of autofs or installed from another package,
 27 # uncomment this line to use the fedfs program map to access
 28 # your fedfs mounts.
 29 #/nfs4  /usr/sbin/fedfs-map-nfs4 nobind
 30 #
 31 # Include central master map if it can be found using
 32 # nsswitch sources.
 33 #
 34 # Note that if there are entries for /net or /misc (as
 35 # above) in the included master map any keys that are the
 36 # same will not be seen as the first read key seen takes
 37 # precedence.
 38 #
 39 +auto.master
In the per‑mount map I use the format “key -fstype=<type>,<options> :device”. To mount the CD‑ROM at /media/iso, I set iso as the key, -fstype=iso9660,ro,nosuid,nodev as options, and /dev/cdrom as the device. I then start and enable autofs:
root@linuxprobe:~# vim /etc/iso.misc
iso   -fstype=iso9660,ro,nosuid,nodev :/dev/cdrom
root@linuxprobe:~# systemctl start autofs
root@linuxprobe:~# systemctl enable autofs
Created symlink '/etc/systemd/system/multi-user.target.wants/autofs.service' → '/usr/lib/systemd/system/autofs.service'.
Next comes a neat trick. I first confirm the CD‑ROM isn’t mounted and there is no iso subdirectory under /media:
root@linuxprobe:~# umount /dev/cdrom
root@linuxprobe:~# df -h
Filesystem             Size  Used Avail Use% Mounted on
/dev/mapper/rhel-root   17G  3.8G   13G  23% /
devtmpfs               4.0M     0  4.0M   0% /dev
tmpfs                  1.9G   84K  1.9G   1% /dev/shm
efivarfs               256K   56K  196K  23% /sys/firmware/efi/efivars
tmpfs                  776M  9.7M  767M   2% /run
tmpfs                  1.0M     0  1.0M   0% /run/credentials/systemd-journald.service
/dev/sda2              960M  272M  689M  29% /boot
/dev/sda1              599M  8.3M  591M   2% /boot/efi
tmpfs                  388M  128K  388M   1% /run/user/0
root@linuxprobe:~# cd /media
root@linuxprobe:/media# ls
root@linuxprobe:/media#
However, the moment I cd into /media/iso, the device is mounted automatically and I can view the disc contents:
root@linuxprobe:/media# cd iso
root@linuxprobe:/media/iso# ls
AppStream  EFI               GPL         RPM-GPG-KEY-redhat-beta
BaseOS     EULA              images      RPM-GPG-KEY-redhat-release
boot       extra_files.json  media.repo
root@linuxprobe:/media/iso# df -h
Filesystem             Size  Used Avail Use% Mounted on
/dev/mapper/rhel-root   17G  3.8G   13G  23% /
devtmpfs               4.0M     0  4.0M   0% /dev
tmpfs                  1.9G   84K  1.9G   1% /dev/shm
efivarfs               256K   56K  196K  23% /sys/firmware/efi/efivars
tmpfs                  776M  9.7M  767M   2% /run
tmpfs                  1.0M     0  1.0M   0% /run/credentials/systemd-journald.service
/dev/sda2              960M  272M  689M  29% /boot
/dev/sr0               6.5G  6.5G     0 100% /media/iso
/dev/sda1              599M  8.3M  591M   2% /boot/efi
tmpfs                  388M  128K  388M   1% /run/user/0
Tips:
Why is the device now /dev/sr0? It’s simply the device behind the /dev/cdrom symlink.root@linuxprobe:~# ls -l /dev/cdrom
lrwxrwxrwx. 1 root root 3 Mar 13 04:06 /dev/cdrom -> sr0
Nice! While I’m at it, I also try autofs with NFS.
First I unmount the manually mounted NFS directory. The master map already includes /misc /etc/auto.misc, and auto.misc exists by default, so there’s nothing to create here.
root@linuxprobe:~# umount /nfsfile
root@linuxprobe:~# vim /etc/auto.master
#
# Sample auto.master file
# This is a 'master' automounter map and it has the following format:
# mount-point [map-type[,format]:]map [options]
# For details of the format look at auto.master(5).
#
/media  /etc/iso.misc
/misc   /etc/auto.misc
I now add an entry to /etc/auto.misc that describes the local mount path and the NFS export on the server:
root@linuxprobe:~# vim /etc/auto.misc
#
# This is an automounter map and it has the following format
# key [ -mount-options-separated-by-comma ] location
# Details may be found in the autofs(5) manpage
nfsfile         192.168.10.10:/nfsfile
cd              -fstype=iso9660,ro,nosuid,nodev :/dev/cdrom

# the following entries are samples to pique your imagination
#linux          -ro,soft                ftp.example.org:/pub/linux
#boot           -
I restart autofs and then access the path; the export mounts automatically when I enter the directory:
root@linuxprobe:~# systemctl restart autofs
root@linuxprobe:~# cd /misc/nfsfile
root@linuxprobe:/misc/nfsfile# df -h
Filesystem              Size  Used Avail Use% Mounted on
192.168.10.10:/nfsfile   17G  3.7G   13G  23% /misc/nfsfile
Review Questions
-
Can I use NFS to share files between Linux and Windows?
Answer: No. Use Samba for Linux–Windows sharing; NFS is primarily for Linux–Linux. -
Which command manages Samba’s independent user database?
Answer: pdbedit. -
How do I access a Samba share from Windows?
Answer: In Run or File Explorer, enter a UNC path such as\\192.168.10.10. -
How do I mount a Samba share on Linux?
Answer: Create a credentials file and a mount point, add an entry to /etc/fstab, then runmount -a(or mount manually withmount -t cifs …). -
What package installs the NFS server utilities on RHEL?
Answer: nfs-utils. -
In NFS exports, which option maps all client users to the server’s anonymous user?
Answer: all_squash. -
Which command lists exports on an NFS server?
Answer: showmount (for example,showmount -e <server>). -
What does autofs do?
Answer: It mounts file systems on demand when accessed and unmounts them when idle, conserving resources. -
Where is the autofs master map?
Answer: /etc/auto.master. -
In /etc/exports, what’s the format for defining an export?
Answer:<exported directory> <client or network>(options).