Chapter 01 · Deploy a Linux System from Scratch
Chapter Overview
This chapter begins with installing virtual machine software, providing a complete demonstration of installing and deploying RHEL 10 on a VMware virtual machine. It meticulously documents each configuration step (making errors nearly impossible), ensuring you can build your own Linux system from scratch.
It also thoroughly explains installation methods like source packages, RPM, YUM, and DNF along with their differences, covers common installation commands and their formats, and delves into the features and operational techniques of the systemd init system in RHEL 10—equipping you to start using it immediately after learning.
Finally, first-time readers or those without prior Linux experience should carefully review all tips in this chapter to avoid experimental errors due to operational details.
1.1 Preparing Your Tools
As the saying goes, "A craftsman who wants to do his work well must first sharpen his tools." Before diving into this book's content, you'll need a Linux system. Rest assured, you don't need to purchase a new computer just for practice. The following sections will explain how to use virtual machine software to simulate a complete hardware platform, meeting all experimental requirements in this book. Virtual machine software allows users to run multiple operating systems simultaneously on a single physical machine—both cost-effective and convenient.
Generally speaking, current mainstream hardware configurations are more than sufficient for virtual machine operations. Based on over a decade of operational and teaching experience, Instructor Liu Chuan strongly advises against deploying Linux systems on physical machines during the learning phase—regardless of budget constraints. The learning process inevitably involves daily experimentation with your system. Data loss or system reinstallation resulting from these experiments can be extremely frustrating and waste valuable time.Systems installed via virtual machine software not only simulate hardware resources and isolate experimental environments from physical machine files to ensure data security, but also offer a more impressive feature: when operational errors or misconfigurations cause system abnormalities, they can rapidly restore the system to a snapshot state before the error—taking only about 5 to 10 seconds. This is far more efficient than reinstalling a system on a physical machine (which takes at least 20 minutes).
In recent years, while teaching, I've consistently observed students using wildly varied lab environments—CentOS Stream, Debian, older RHEL versions, and more. This makes troubleshooting issues exceptionally difficult each time. Although RHEL knowledge is largely transferable across most Linux distributions, beginners lack troubleshooting skills. In such cases, maintaining consistent lab environments is crucial.It's like enrolling in a Japanese sushi-making class: if the instructor uses a professional yanagiba knife while students insist on ordinary kitchen knives, the sushi will inevitably end up mangled. Smart learners should adopt the same tools and environment as their instructors. This allows them to quickly eliminate external variables when problems arise, pinpointing and resolving issues faster. Once their technical foundation is solid, they'll naturally gain the freedom to choose tools and environments in production settings.
Tips:
Software resources for this book can be downloaded via https://www.linuxzone.net/tools .
VMware Workstation 17—Virtual Machine Software (Required):This powerful desktop virtualization software enables users to run multiple distinct operating systems simultaneously on a single physical machine.
Red Hat Enterprise Linux (RHEL) 10—Red Hat Operating System (Required): Developed by Red Hat, Inc., a global leader in open-source software and enterprise services, this is an exceptionally stable and robust Linux system.
Come to think of it, it's quite frustrating. I actually intended to learn Linux back in middle school, but internet access wasn't convenient then. Installing the system required buying CDs, and at that time, installing Linux needed at least 6 CD-ROMs (each with a capacity of about 700MB).I bit the bullet, bought them, and tried installing it several times, but it kept throwing errors. Unable to figure out why, I had to give up. Then, right before Chinese New Year in 2015, while cleaning my room, I stumbled upon those CDs again. This time, I finally discovered why the installation failed back then—the fifth disc was scratched, preventing certain dependency packages from installing correctly.I could have started using Linux years earlier, but this delay was both frustrating and embarrassing. So let me strongly remind everyone: "After gathering all your tools, always verify their integrity. Don't repeat my mistake."
1.2 Installing and Configuring VMware Virtual Machine
VMware Workstation is a powerful desktop virtualization software that allows users to run multiple different operating systems simultaneously on a single physical machine. Each virtual system has its own independent disk partition and data configuration, so there's absolutely no risk of affecting the original data on your physical machine.Additionally, virtual machines created with VMware Workstation (referred to as VMware VMs) support convenient features like live snapshots, virtual networking, drag-and-drop file transfers, and network installations. Users can also connect multiple VMs into a dedicated local area network, making them incredibly convenient to use.
Regarding hardware requirements, Linux systems do not demand high-end configurations, and virtual machines can easily meet its needs. Ready to get started?
First, download the VMware Workstation 17 virtual machine installation package mentioned above to your computer. Double-click the software package with your mouse. After approximately 1–3 seconds, you will see the initial interface shown in Figure 1-1.
Figure 1-1 Initial Installation Wizard Interface
In the subsequent virtual machine installation wizard interface, click the "Next" button as shown in Figure 1-2.
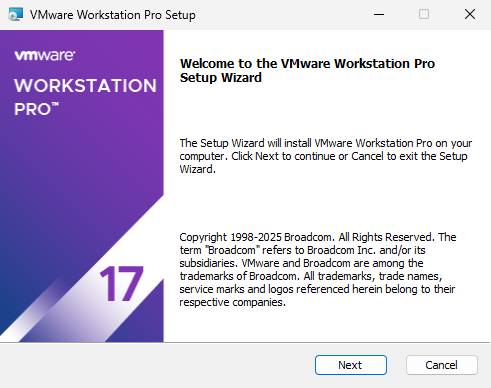
Figure 1-2 Installation Wizard Interface
On the End User License Agreement screen, select the "I accept the terms of the license agreement" checkbox, then click the "Next" button as shown in Figure 1-3.
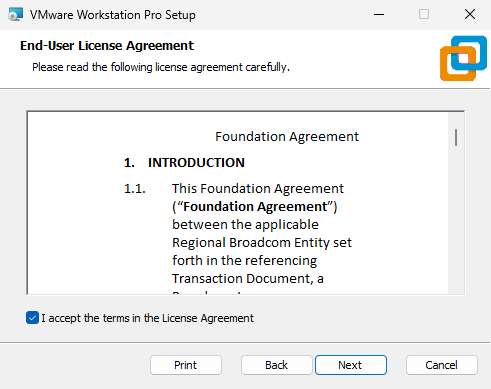
Figure 1-3 Accepting License Terms
When installing the virtual machine software, it is generally unnecessary to modify the installation path. If you are concerned about insufficient space on the C: drive, you may consider changing the installation path to another location. Then select the "Add VMware Workstation console tools to the system PATH" checkbox. This allows you to invoke VMware command-line tools directly from the command prompt without specifying the full path. Click the "Next" button, as shown in Figure 1-4.
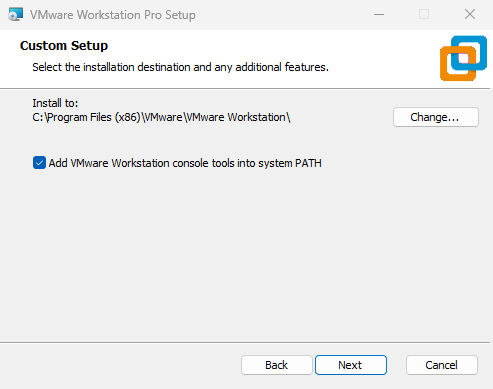
Figure 1-4 Specifying the installation path for the virtual machine software
Select the "Check for product updates at startup" and "Join the VMware Customer Experience Improvement Program" checkboxes as appropriate for your situation, then click the "Next" button, as shown in Figure 1-5.
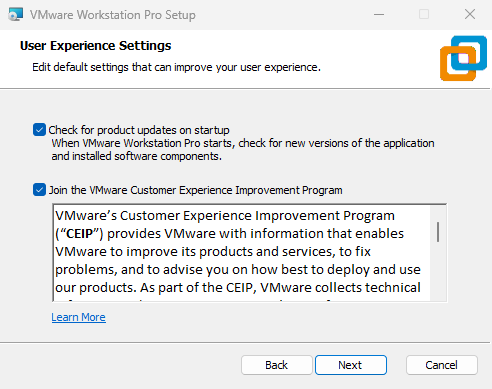
Figure 1-5 User Experience Settings
To facilitate easier access to the virtual machine software icon later, it is recommended to select the "Desktop" and "Start Menu Programs folder" checkboxes. Then click the "Next" button, as shown in Figure 1-6.
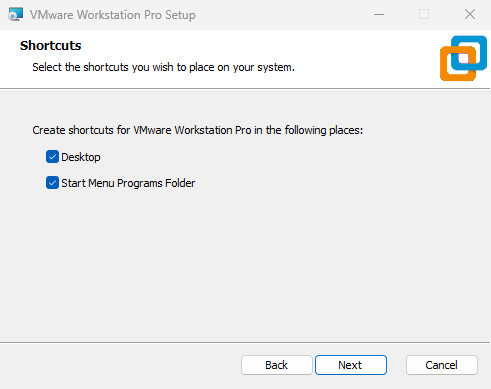
Figure 1-6 Creating Shortcuts
Once everything is ready, click the "Install" button, as shown in Figure 1-7.
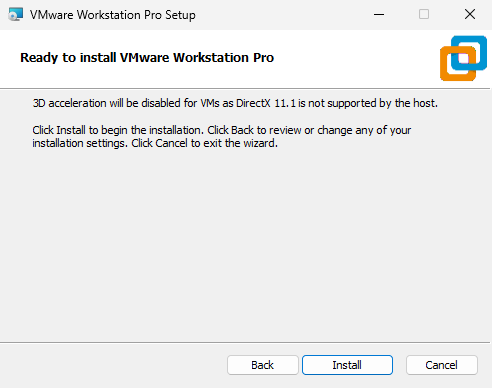
Figure 1-7 Preparing to Install the Virtual Machine
The installation process begins. At this point, simply wait patiently for the virtual machine software installation to complete, as shown in Figure 1-8 (the entire process takes approximately 3–5 minutes).
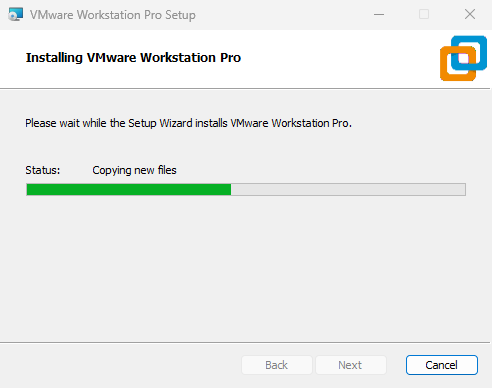
Figure 1-8 Waiting for Installation to Complete
After the virtual machine software installation completes, click the "Finish" button again to conclude the entire installation process, as shown in Figure 1-9.
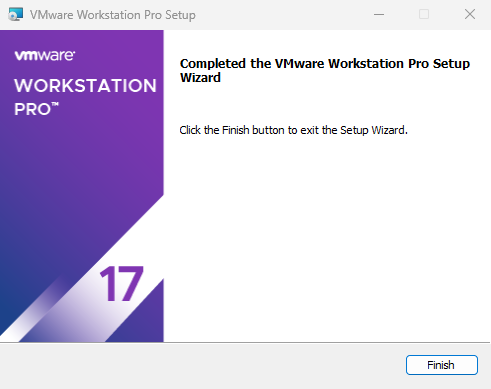
Figure 1-9 Installation Wizard Completion Screen
Double-click the virtual machine shortcut icon generated on the desktop. In the interface that appears, as shown in Figure 1-10, select "I will be using VMware Workstation 17 for personal use" and then click the "Continue" button.
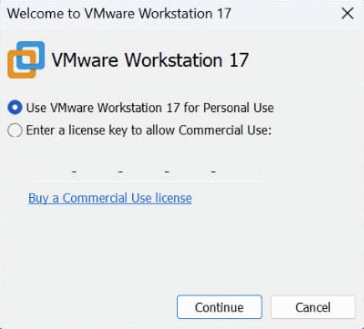
Figure 1-10 License Key Verification Interface
When the "Welcome to VMware Workstation 17" interface appears, click the "Finish" button without hesitation, as shown in Figure 1-11.
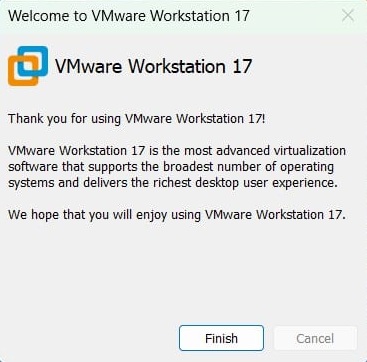
Figure 1-11 Virtual Machine Software Welcome Interface
Double-click the shortcut icon on the desktop again. You will now see the virtual machine software management interface, as shown in Figure 1-12.
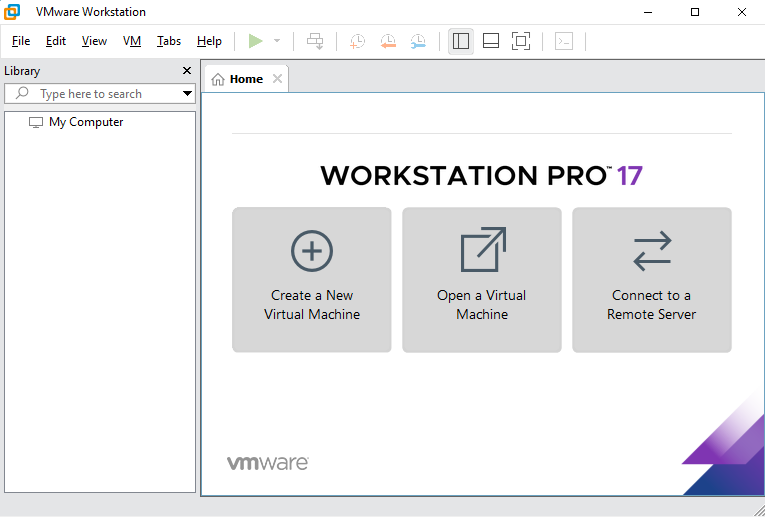
Figure 1-12 Virtual machine software management interface
Note that after installing the virtual machine software, you cannot immediately install the Linux system. An important step remains—configuring hardware information.Configuring hardware information is akin to setting up a hardware cage for the Linux system, defining its maximum disk and memory capacity, number of CPU cores, system image location, network mode, and other hardware parameters. Imagine assembling a physical computer: only after simulating all hardware resources within the virtual machine (i.e., completing the assembly) can you formally begin the Linux installation process.
The power of VMware Workstation lies not only in its ability to access real physical device resources but also in its capability to simulate multiple disks or network adapters. Even using five or six disks poses no concern (see Chapter 7 for details)—we can create them in an instant, fully meeting your learning environment needs. Therefore, we reiterate: there is absolutely no need to purchase a new computer.
In the management interface shown in Figure 1-12, click the "Create a New Virtual Machine" button. In the "New Virtual Machine Wizard" that appears, select the "Custom (Advanced)" radio button, then click "Next," as shown in Figure 1-13 (this allows us to gain a deeper understanding of the new system).
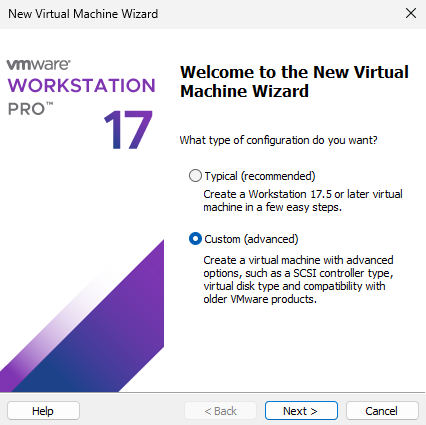
Figure 1-13 New Virtual Machine Wizard
Since this is a fresh installation, compatibility concerns are unnecessary. Simply select "Workstation 17.5 or later" from the "Hardware Compatibility" dropdown list and click "Next," as shown in Figure 1-14.
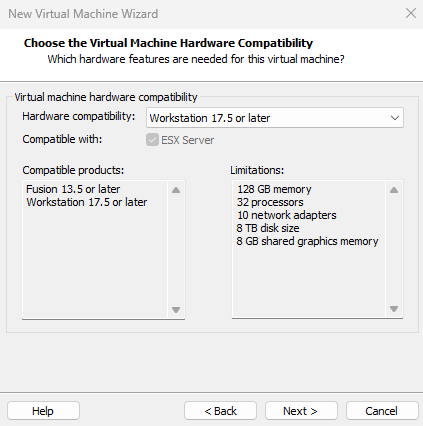
Figure 1-14 Setting Hardware Compatibility
Proceed to the interface shown in Figure 1-15. Select the "Install the operating system later" radio button, then click the "Next" button.
Over the past few years of teaching, I've encountered many uncooperative students. Despite being instructed to select "Install the operating system later," they insist on choosing "Install from an image file" and select the downloaded RHEL 10 system image. This causes the virtual machine to deploy the most minimal Linux system via the default installation policy without prompting for configuration details, resulting in a final system significantly different from the lab environment.

Figure 1-15 Configuring the System Installation Source
At the time of writing, RHEL 10 had just been officially released (May 20, 2025), and VMware virtual machine software did not yet offer a corresponding system option for this version. Therefore, as shown in Figure 1-16, select Linux as the guest operating system type, choose "Red Hat Enterprise Linux 9 64-bit" as the version, and finally click the "Next" button.This selection serves solely as a system type identifier and will not affect subsequent experimental procedures, execution processes, or results. It is primarily intended to facilitate the classification and management of different systems within the software.
Tips:
If you notice that the latest VMware virtual machine software now includes a "Red Hat Enterprise Linux 10 64-bit" option while reading this book, select this RHEL 10 version instead.
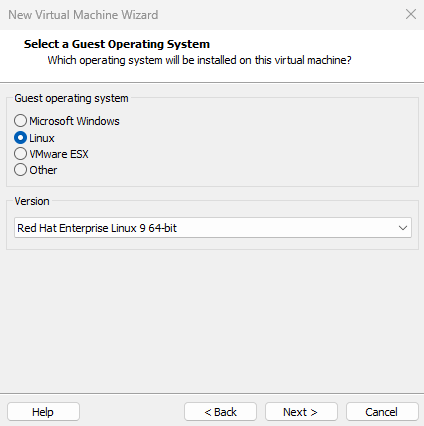
Figure 1-16 Selecting the Operating System Version
Fill in the "Virtual Machine Name" field with a name of your choice. Select a large disk partition for the "Location" field, ensuring at least 20GB of free space. Then click the "Next" button, as shown in Figure 1-17.

Figure 1-17 Naming the Virtual Machine and Setting the Installation Path
Configure the "Number of processors" and "Number of cores per processor" based on your computer's specifications. You can search online for your CPU model information or open the "Task Manager" in Windows, navigate to the "Performance" tab, and find the number of logical processors in the lower-right corner—this indicates your CPU core count.If the above methods are ineffective, temporarily set both processor and core counts to 1 (see Figure 1-18). You can modify these settings later without affecting the experiment. Once configured, click the "Next" button.
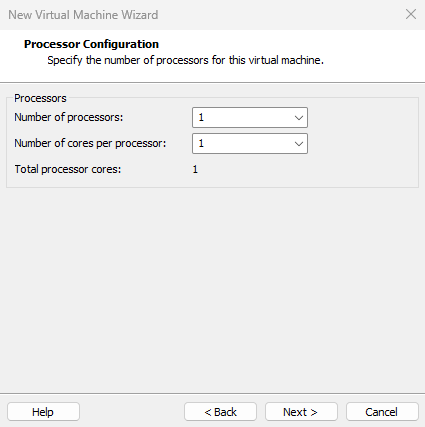
Figure 1-18 Configuring CPU Processor Information
Set the memory allocation for the virtual machine. If the host machine has less than 8GB of RAM, allocate 2GB to the virtual machine. If the host machine has more than 8GB of RAM (whether 16GB or larger), allocate 4GB to the virtual machine, as shown in Figure 1-19. Allocating excessive memory to the virtual machine does not directly impact the experiment results, and exceeding 4GB may result in wasted resources.
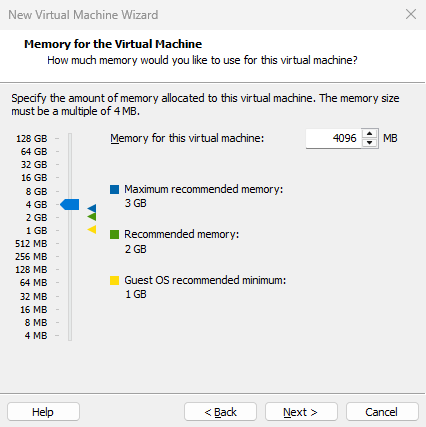
Figure 1-19 Setting Memory Allocation
VMware Workstation virtual machine software offers users three selectable network modes: "Use Bridged Networking," "Use Network Address Translation (NAT)," and "Use Host-Only Networking."
Bridged Networking: Acts as a bridge between the physical machine's network adapter and the virtual machine's network adapter, enabling access to the external network through the physical host's network adapter.
Network Address Translation (NAT): Enables the VMware virtual machine's network services to function as a router, allowing hosts simulated by the virtual machine software to access the external network through the physical host; the corresponding network adapter name on the physical machine is VMnet8.
Host-only Networking: Allows the virtual machine's system to communicate only with the physical host, without external network access. The corresponding network adapter name on the physical machine is VMnet1.
Since the virtual machine system does not currently need internet connectivity, set the network connection type to "Host-only network" and click the "Next" button, as shown in Figure 1-20.
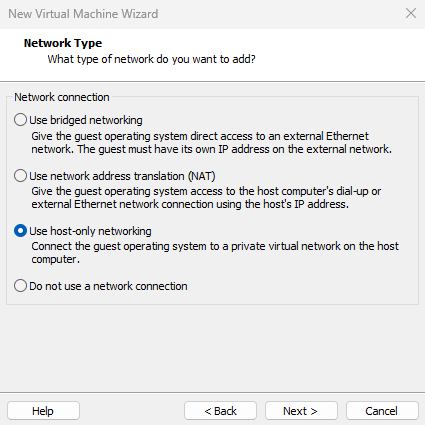
Figure 1-20: Configuring Network Type
Figure 1-21 shows the selection of the SCSI controller type. Here, we use the "LSI Logic (recommended)" value and then click the "Next" button.
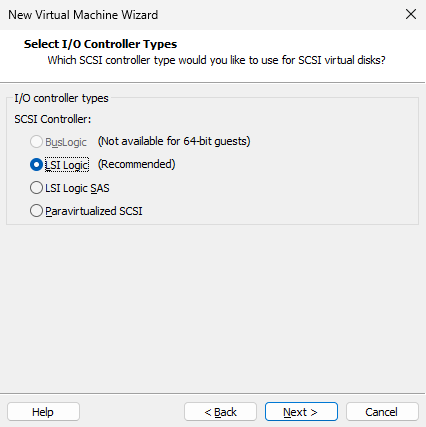
Figure 1-21 Setting the I/O controller type
Next, configure the disk type for the newly installed system. Here, we select the SCSI type, which is more commonly used in practice, and then click the "Next" button, as shown in Figure 1-22. Please try to align with Instructor Liu Chuan's approach here. If you selected IDE or NVMe disk types, the disk name in Chapter 6's experiments will not be /dev/sda.
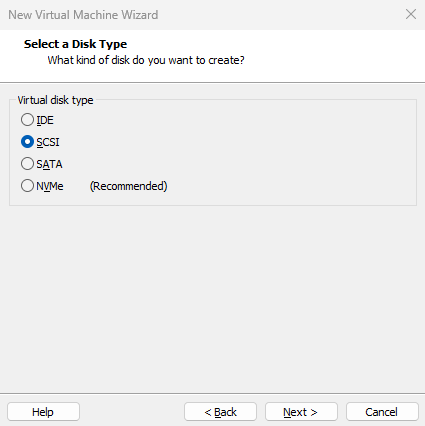
Figure 1-22: Setting Virtual Disk Type
Since this is a fresh system installation with no existing data to recover, directly select the "Create a new virtual disk" radio button and click the "Next" button, as shown in Figure 1-23.
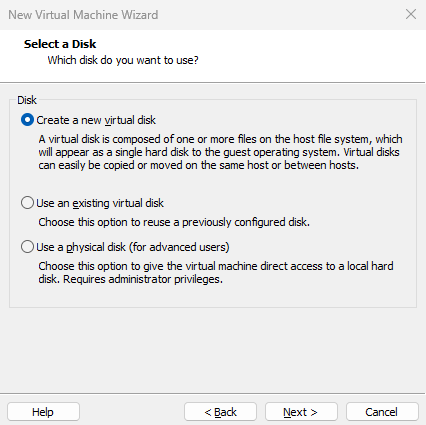
Figure 1-23 Creating a new virtual disk
Set the virtual machine's "Maximum disk size" to 20.0GB (default value). This defines the maximum disk capacity the system can utilize, not the amount of space immediately occupied. To enhance disk performance, select the "Allocate all disk space immediately" checkbox.Additionally, if you won't frequently move this virtual machine later, select the "Store virtual disk as a single file" radio button for better performance. Then click the "Next" button, as shown in Figure 1-24.
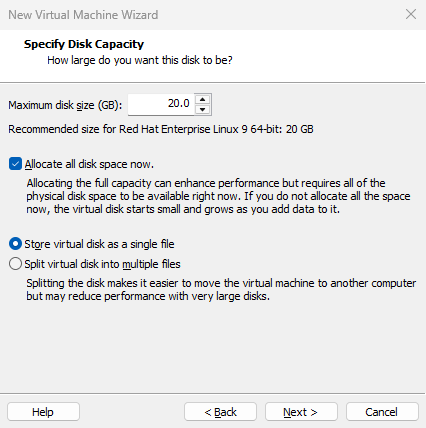
Figure 1-24 Setting Maximum Disk Capacity
Specify the disk file name. Leave it unchanged here and click the "Next" button directly, as shown in Figure 1-25.
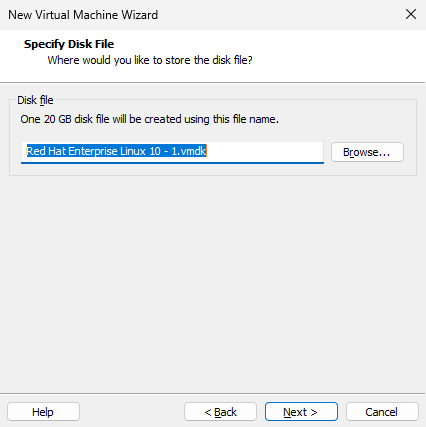
Figure 1-25 Specifying the disk file name
After the basic hardware configuration for the virtual machine is complete, the installation wizard prompts for confirmation. Since several settings require further modification, click the "Customize Hardware" button, as shown in Figure 1-26.
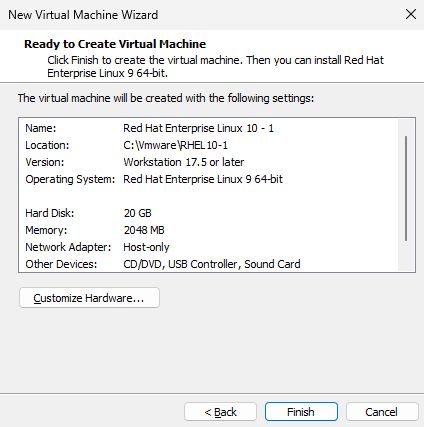
Figure 1-26 Configuration Overview
Click the "New CD/DVD (SATA)" option. In the "Use ISO image file" dropdown list on the right, locate and select the previously downloaded RHEL 10 system image file (i.e., the file ending with .iso). Do not extract it; simply select the file directly, as shown in Figure 1-27.
Tips:
This book does not include physical discs. The system image file refers to the software package downloaded from the book's companion website.
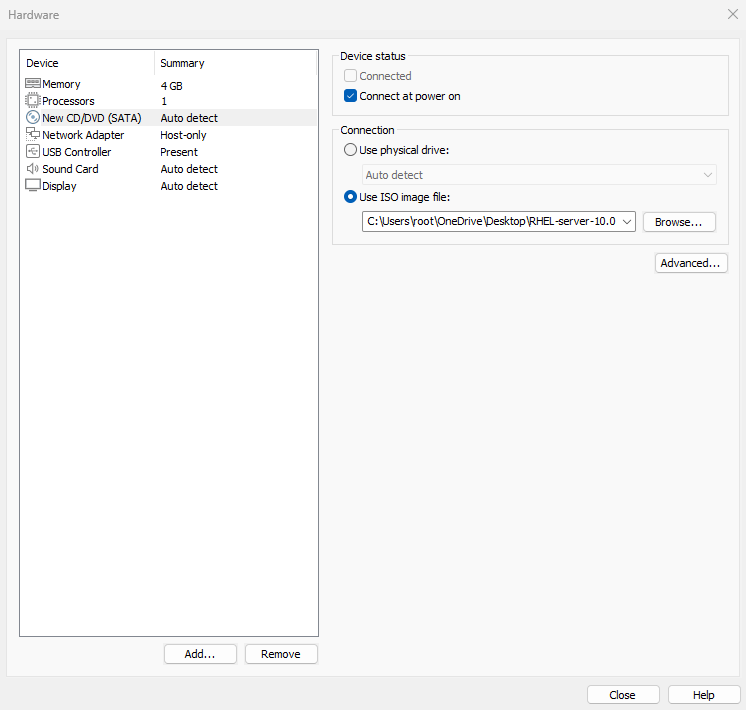
Figure 1-27: Selecting the RHEL 10 System Image File Path
While you're at it, remove the USB controller and sound card devices. Removing the sound card prevents the beeper from emitting alerts when you make input errors, ensuring your focus remains undisturbed during experiments. Then click the "Confirm" button. The final virtual machine configuration is shown in Figure 1-28.
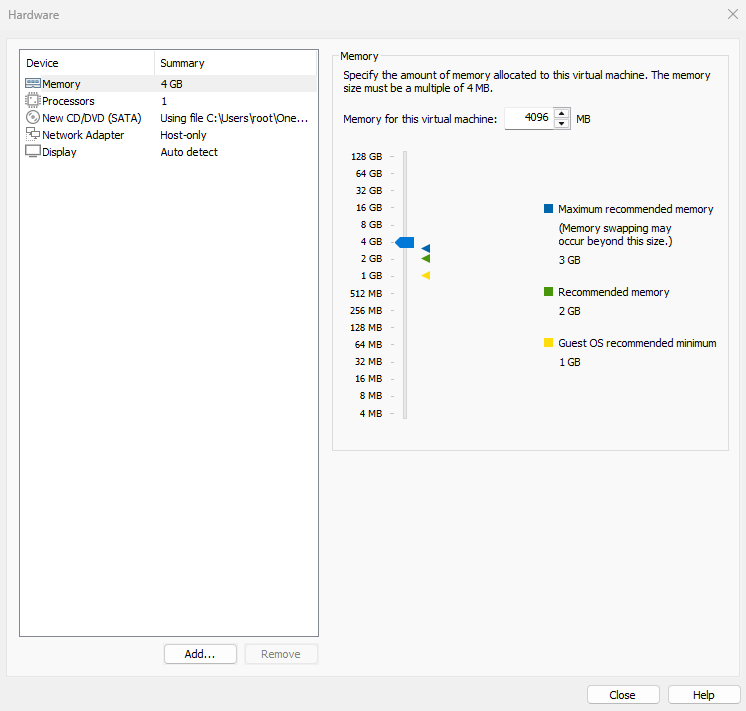
Figure 1-28 Final virtual machine configuration
Return to the configuration confirmation screen shown in Figure 1-26 and click the "Finish" button. The new system hardware will then initialize, which takes approximately 1 minute.
When you see the interface shown in Figure 1-29, it indicates the virtual machine has been successfully configured. Take a short break, and then get ready to embark on your journey into the Linux system.
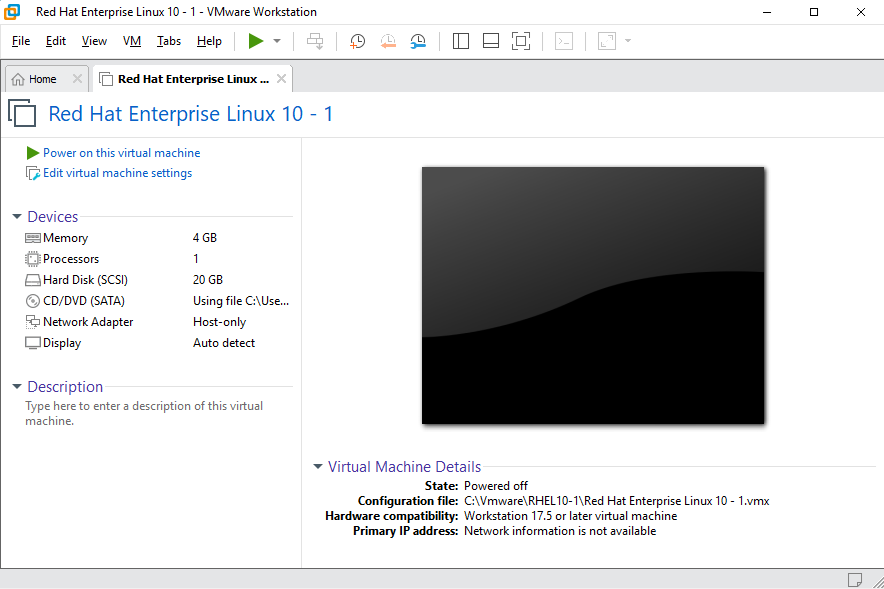
Figure 1-29 Virtual machine configuration success interface
1.3 Installing Your Linux System
When installing RHEL 10, ensure your computer's CPU supports VT (Virtualization Technology). This technology enables a single computer to partition multiple independent resource zones, allowing each zone to simulate a system as needed. Essentially, it manages and redistributes computer resources through an intermediate layer to maximize system resource utilization.
There's an easy way to check if your CPU supports VT: if your computer wasn't purchased five or six years ago, or if it cost at least $300, it very likely supports VT. In most cases, VT support is enabled by default on the CPU. Manual activation in the physical machine's BIOS is only required if system installation fails (typically accessed by repeatedly pressing F2, F12, or Del during startup to enter BIOS settings), as shown in Figure 1-30.
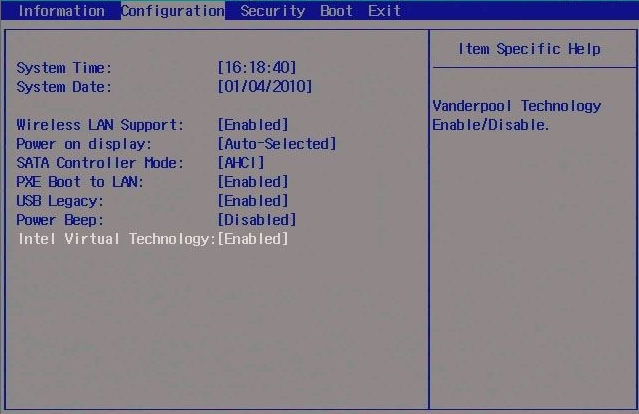
Figure 1-30: Enabling virtualization in the physical machine's BIOS settings
After clicking the "Power On This Virtual Machine" button in the virtual machine management interface, the RHEL 10 system installation screen will appear within seconds, as shown in Figure 1-31.In this interface, "Test this media & install Red Hat Enterprise Linux 10.0" verifies the integrity of the image file (or disc) before installation, while "Troubleshooting" launches rescue mode. Use the arrow keys to select "Install Red Hat Enterprise Linux 10.0," then press Enter to proceed directly with the Linux installation.
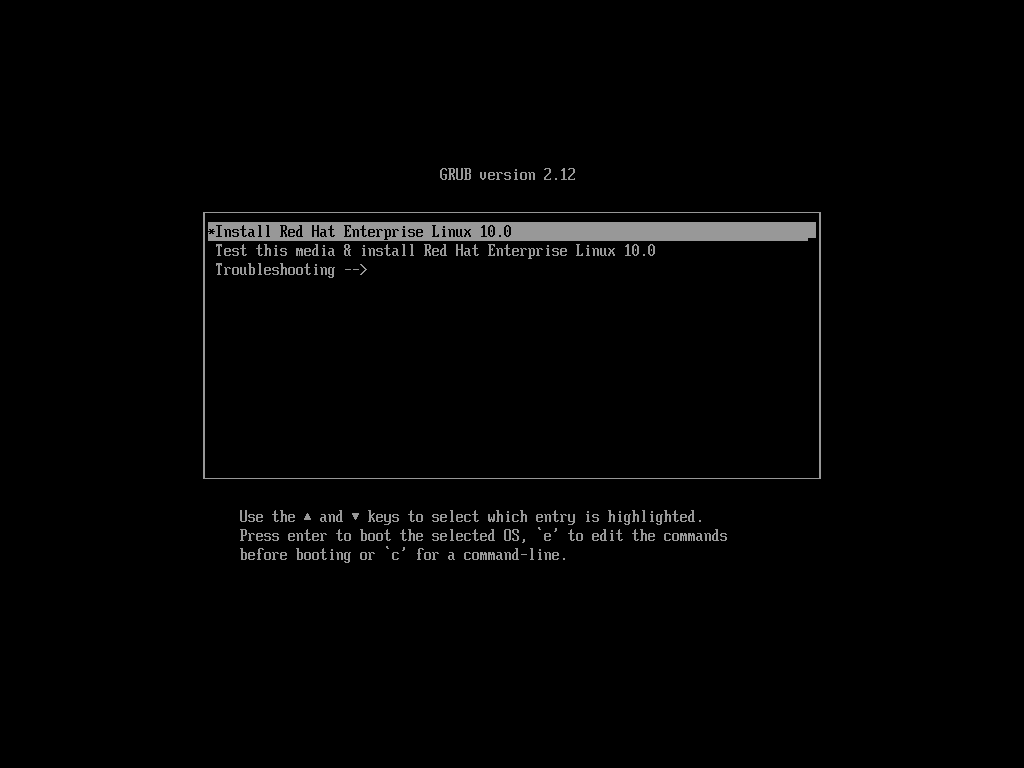
Figure 1-31 RHEL 10 System Installation Interface
Pressing Enter will begin loading the installation image, which takes 20–30 seconds. Please wait patiently, as shown in Figure 1-32.
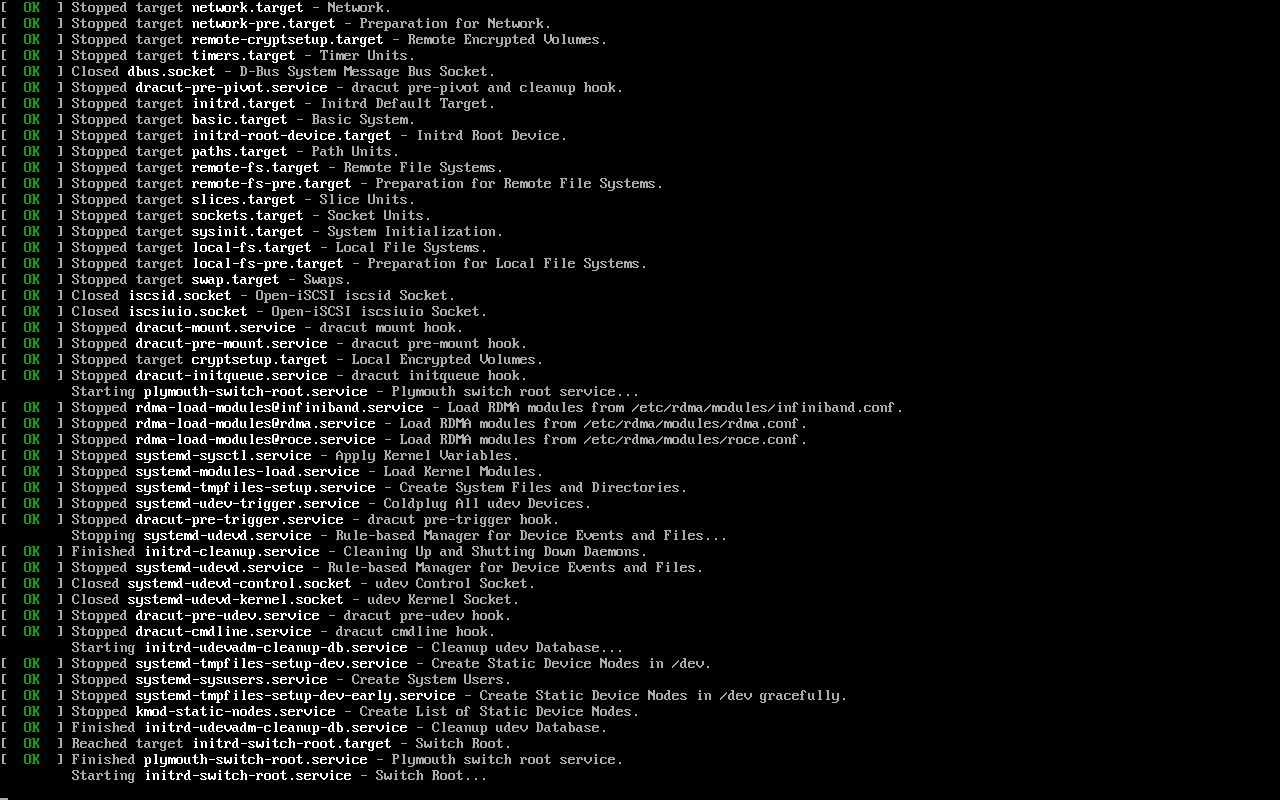
Figure 1-32 Initialization screen of the installation wizard
After selecting the system installation language, click the Continue button, as shown in Figure 1-33.
Readers need not worry about English proficiency, as commands in Linux systems carry specific functional meanings rather than relying on the literal definitions of English words. ... Thus, even highly proficient English speakers without Linux knowledge must relearn these commands upon encountering them. Moreover, setting the system language to English is also a good way to practice your reading skills—learning Linux and English together without even realizing it. If you prefer to use a different language, you can select it in this step (Figure 1-33).
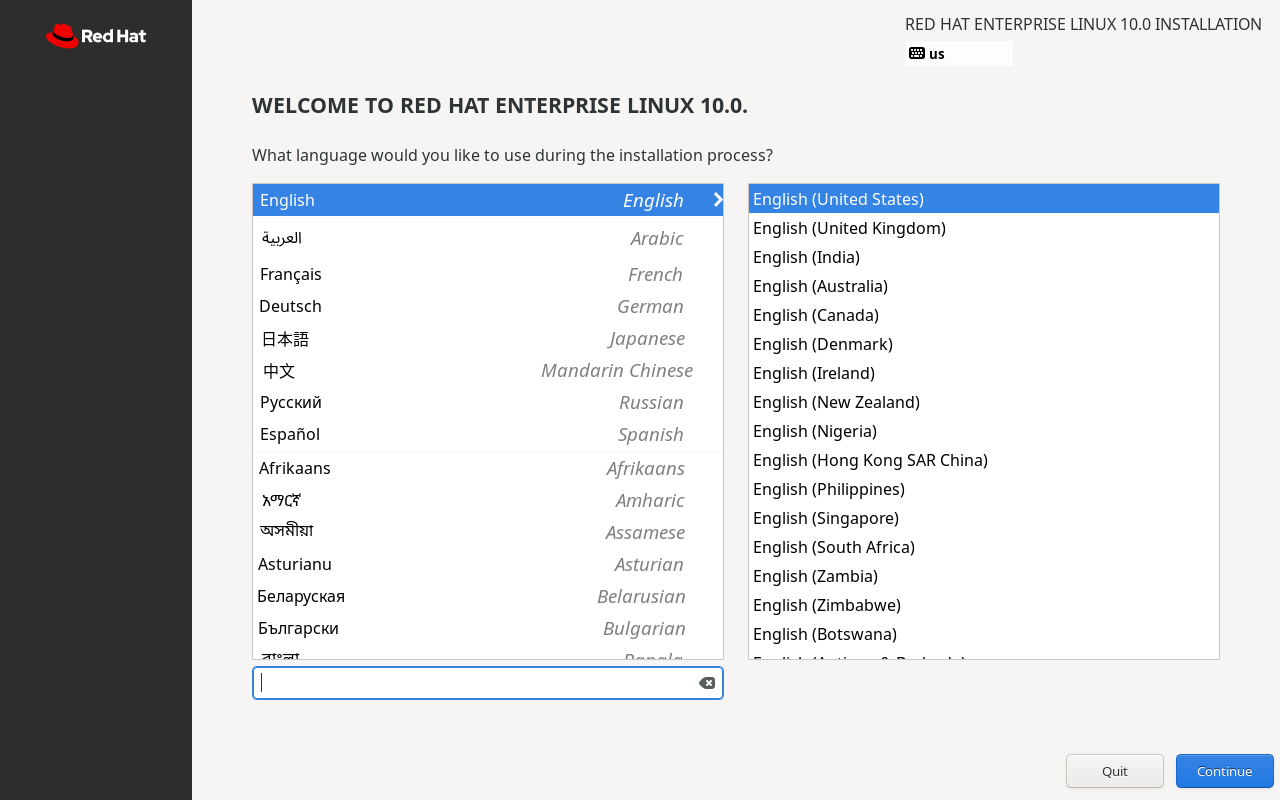
Figure 1-33 Selecting the system installation language
The INSTALLATION SUMMARY interface compiles all necessary information for Linux system installation, as shown in Figure 1-34. It includes the following sections: Keyboard, Language Support, Time & Date, Connect to Red Hat, Installation Source, Software Selection, Installation Destination, KDUMP, Network & Host Name, Root Account, and User Creation.
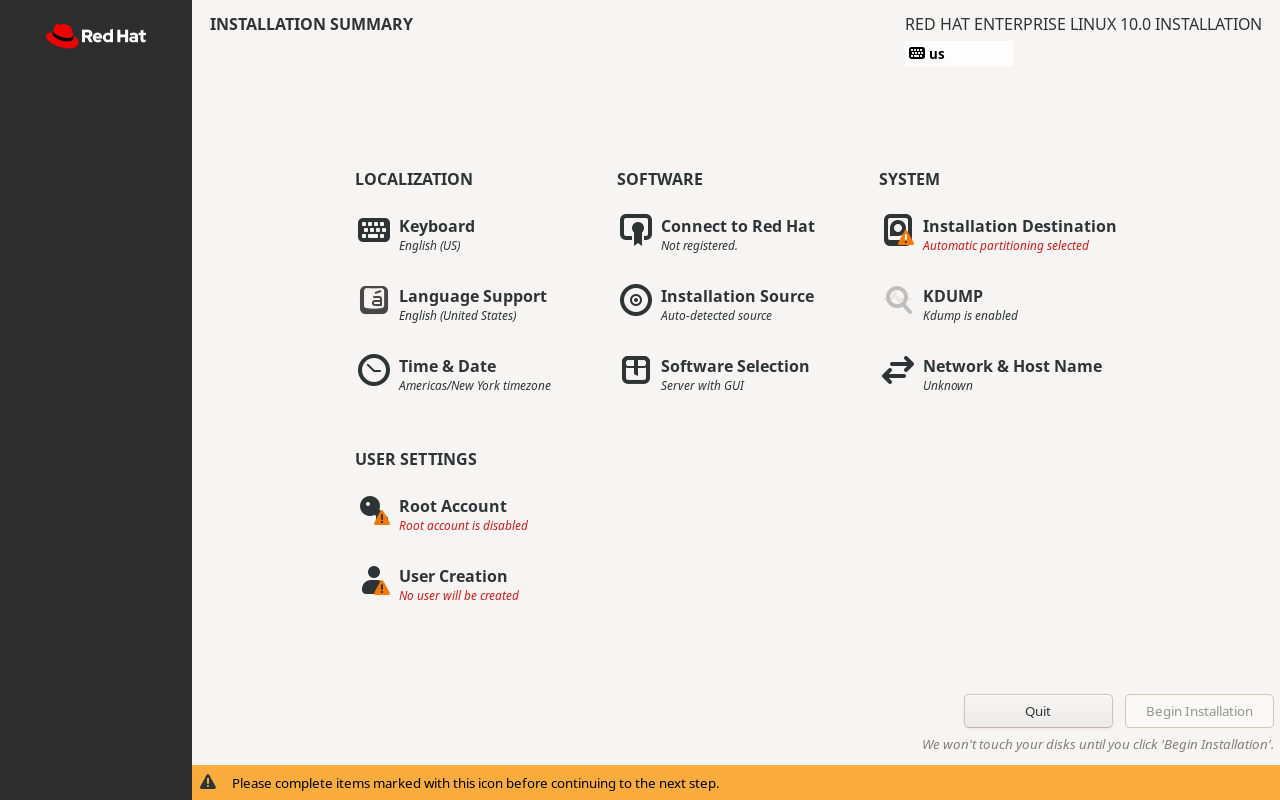
Figure 1-34 Installation Summary Interface
Stay calm, everyone. Although there are many options here, not all require manual configuration. Keyboard and Language Support refer to keyboard layout and language support respectively. Both are set to English by default and need no modification (unless you wish to switch to a Chinese interface).
First, click the Time & Date button to set the system time zone and time. In this book, we use Asia as the Region and Shanghai as the City as an example. On your own system, select the region and city that match your actual location.
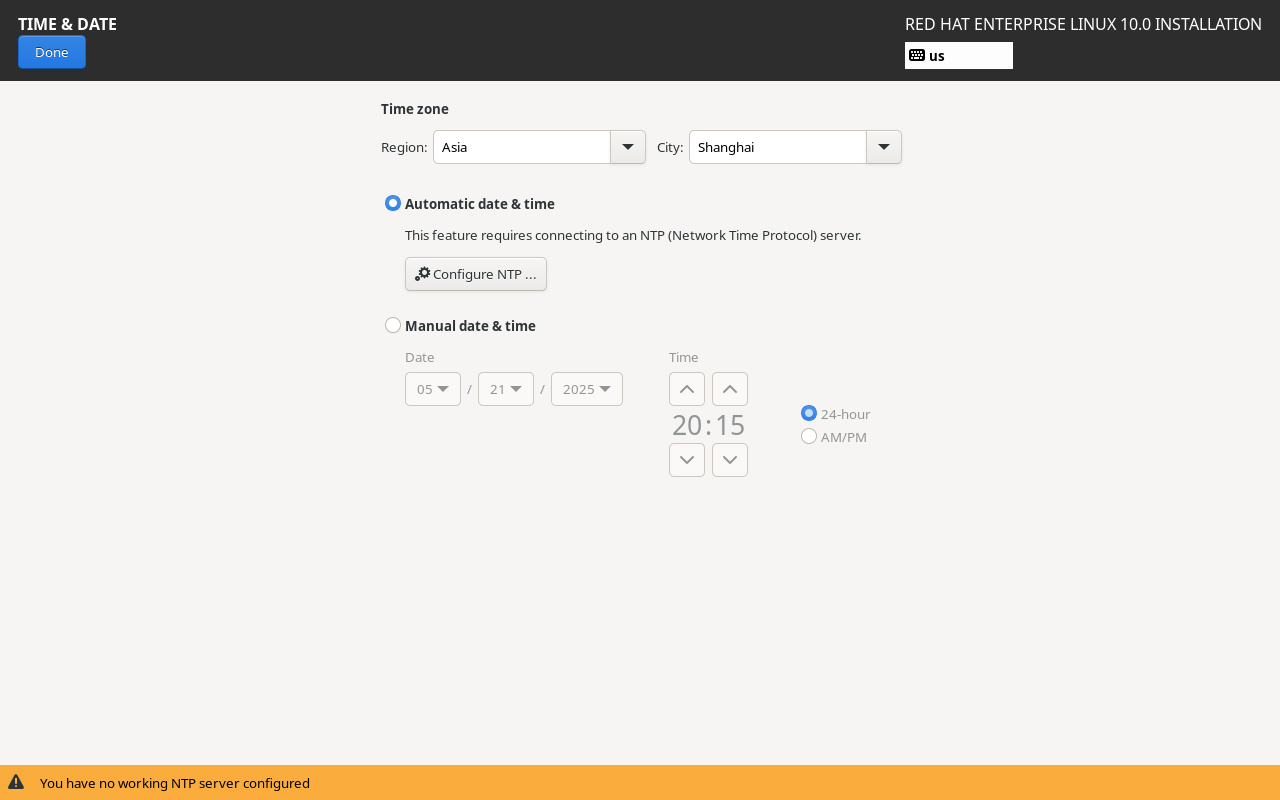
Figure 1-35 Setting the System Time Zone
After returning to the installation summary screen, the first option on the right, Installation Destination, specifies which disk to install the system on. At this stage, it only requires confirmation without any changes. Click the Done button in the upper-left corner, as shown in Figure 1-36.
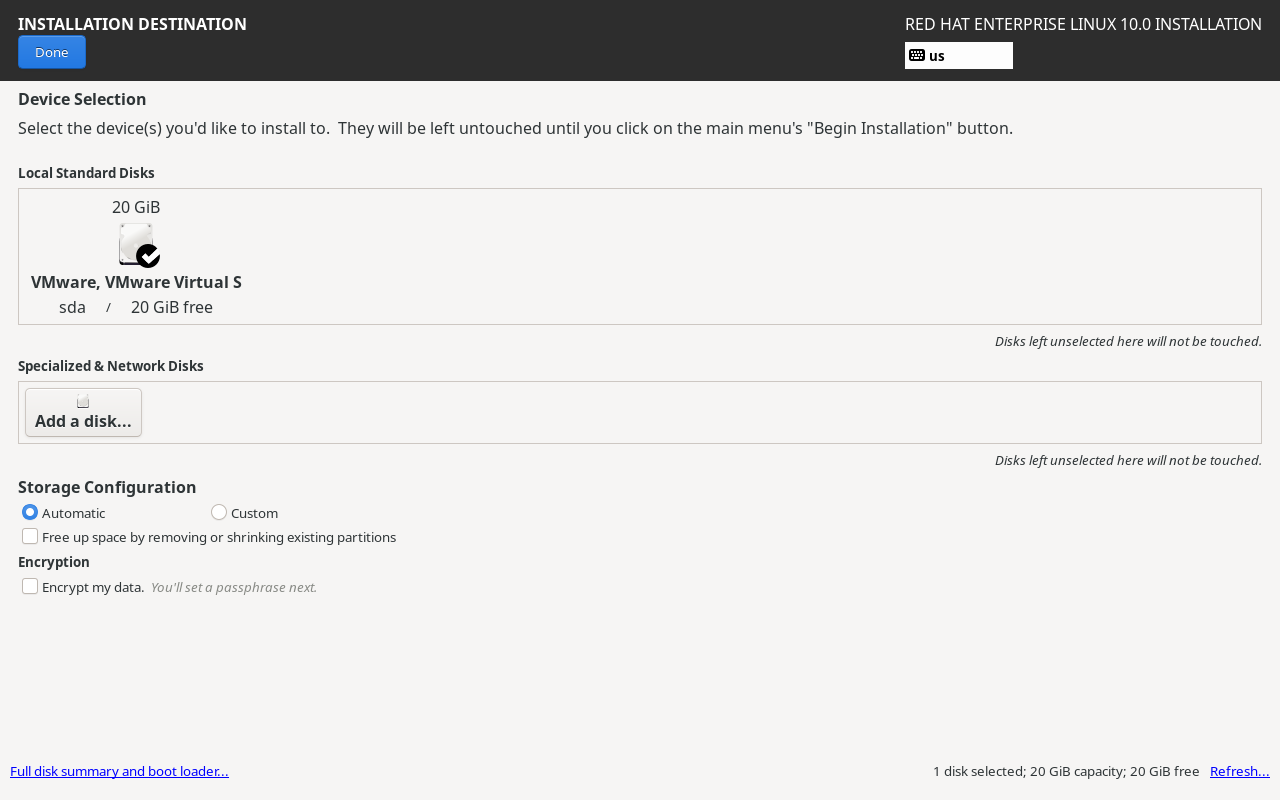
Figure 1-36: Setting the System Installation Device
Readers might wonder: "Why don't we cover manual partitioning methods like other Linux books?" The reason is simple: Linux systems define distinct functions for different directories based on the FHS (Filesystem Hierarchy Standard), which will be detailed in Chapter 6.Based on Liu Chuan's teaching experience over recent years, even if we provided step-by-step instructions now, most readers would merely click through without truly grasping the underlying principles. This approach may not yield optimal results. Moreover, in subsequent experiments, manual partitioning offers no significant advantages over automatic partitioning. Therefore, readers need not worry about missing out—the book's content structure is scientifically designed.
Next, proceed to the KDUMP service configuration interface. The KDUMP service collects system kernel crash data. However, since we do not plan to debug kernel parameters in the near term, it is recommended to deselect the Enable kdump checkbox. This saves approximately 160MB of physical memory. Then click the Done button in the upper-left corner, as shown in Figure 1-37.
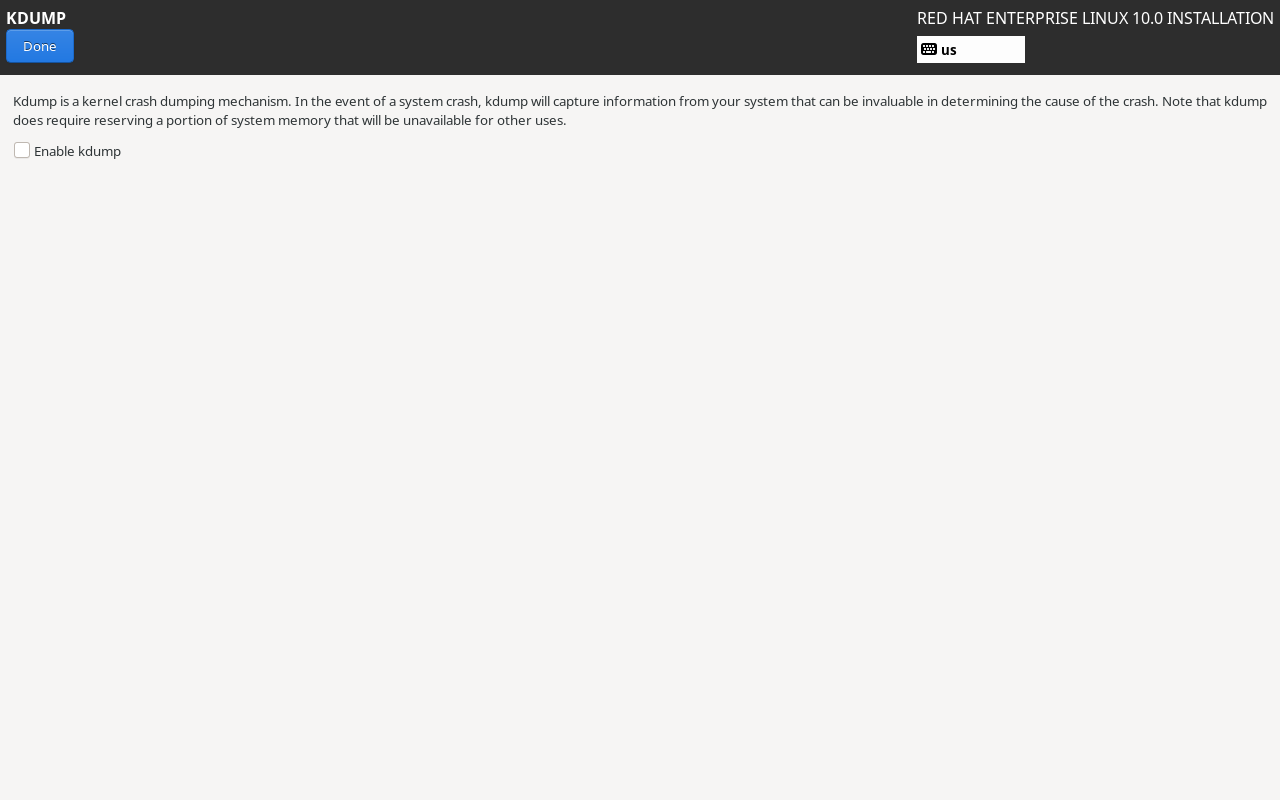
Figure 1-37 Disabling KDUMP Service
Next, proceed to the Network & Host Name configuration interface.First, click the toggle button in the upper-right corner to set it to the Connected state. Then, in the lower-left corner, change the Host Name to linuxprobe.com and click the Apply button on the right to confirm. This ensures subsequent command prompts have a consistent prefix, preventing learning ambiguities. Finally, click the Done button in the upper-left corner, as shown in Figure 1-38.
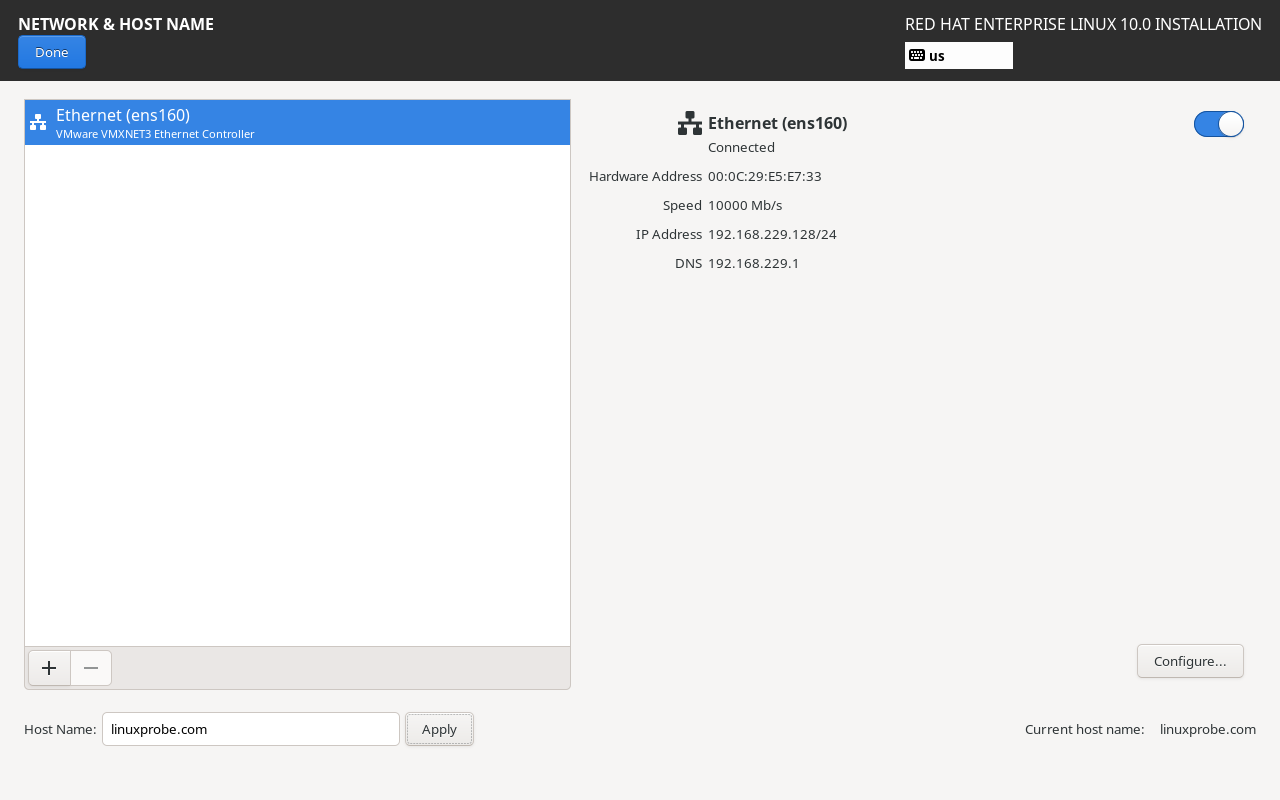
Figure 1-38 Configuring Network Information
Within the Software Selection interface of the RHEL 10 system, users can customize the base system environment according to their requirements.For instance, if you intend to use the Linux system as a base server, file server, web server, or workstation, additional foundational software packages will be installed during the system setup to help users get started quickly. First, click the Software Selection button to enter the configuration interface, as shown in Figure 1-39.
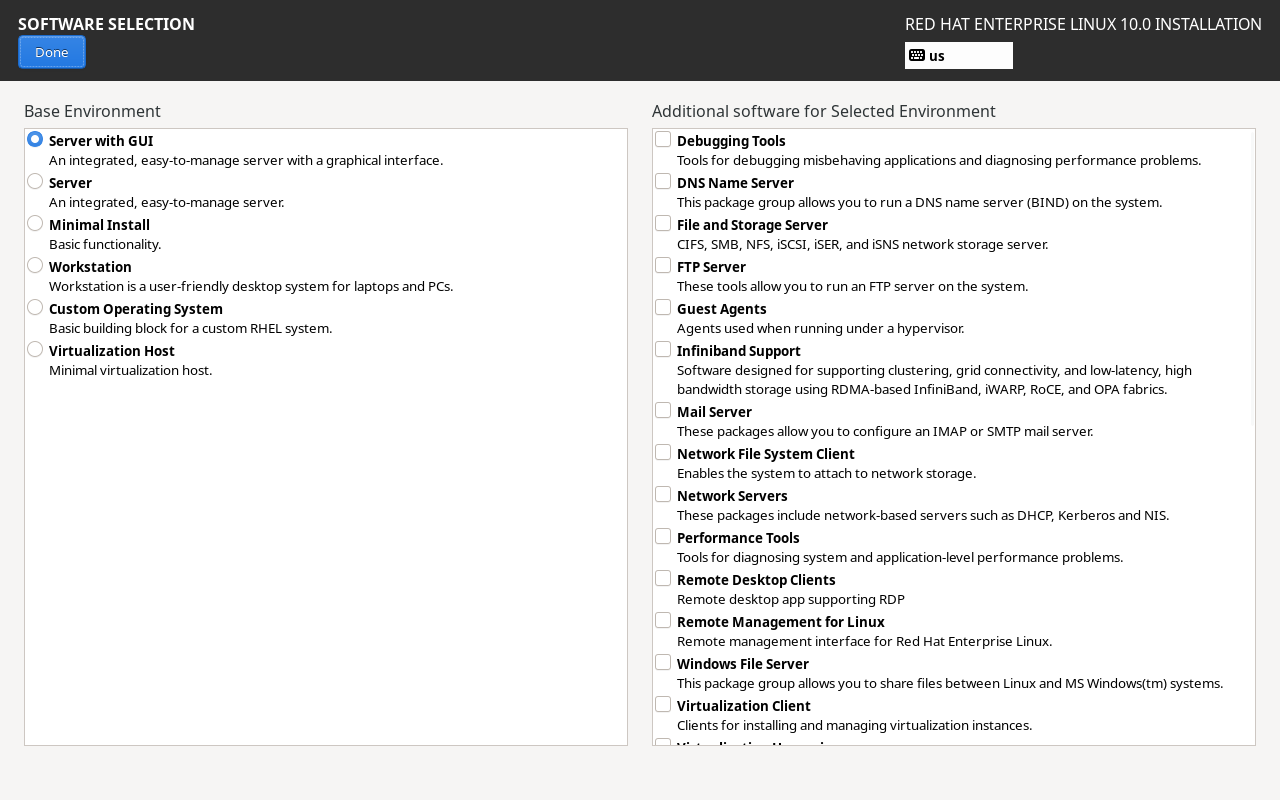
Figure 1-39 Configuring the Default System Environment
RHEL 10 provides six basic software environments: Server with GUI, Server, Minimal Install, Workstation, Custom Operating System, and Virtualization Host.Simply verify that the current environment is the default Server with GUI. Do not select any additional packages on the right side of the interface; these can be installed gradually during your learning process, which makes it more enjoyable. Click the Done button in the upper-left corner.
I once read a news story about an Apple employee adding the line "You're not going to read this anyway" at the end of an iOS user manual.This anecdote aptly describes some readers' learning habits. Instructor Liu Chuan would never include useless information in this book, yet even such a prominent screenshot often goes unnoticed. As a result, some readers select the Minimal Install radio button to install RHEL 10, ultimately failing to execute many commands or successfully set up services. Please pay close attention!
Return to the installation summary screen and proceed by clicking the Root Account button to set the administrator password, as shown in Figure 1-40. First, select the Enable root account radio button to activate the root administrator account, then enter the same password twice. This step is critical, as the password will be required immediately upon logging into the system.A note here: While password strength matters little during virtual machine experimentation, production environments absolutely require a complex root password. Otherwise, the system faces severe security risks. Finally, check the Allow root SSH login with password box to permit root SSH access (covered in Chapter 9). After confirming, click the Done button in the upper-left corner.
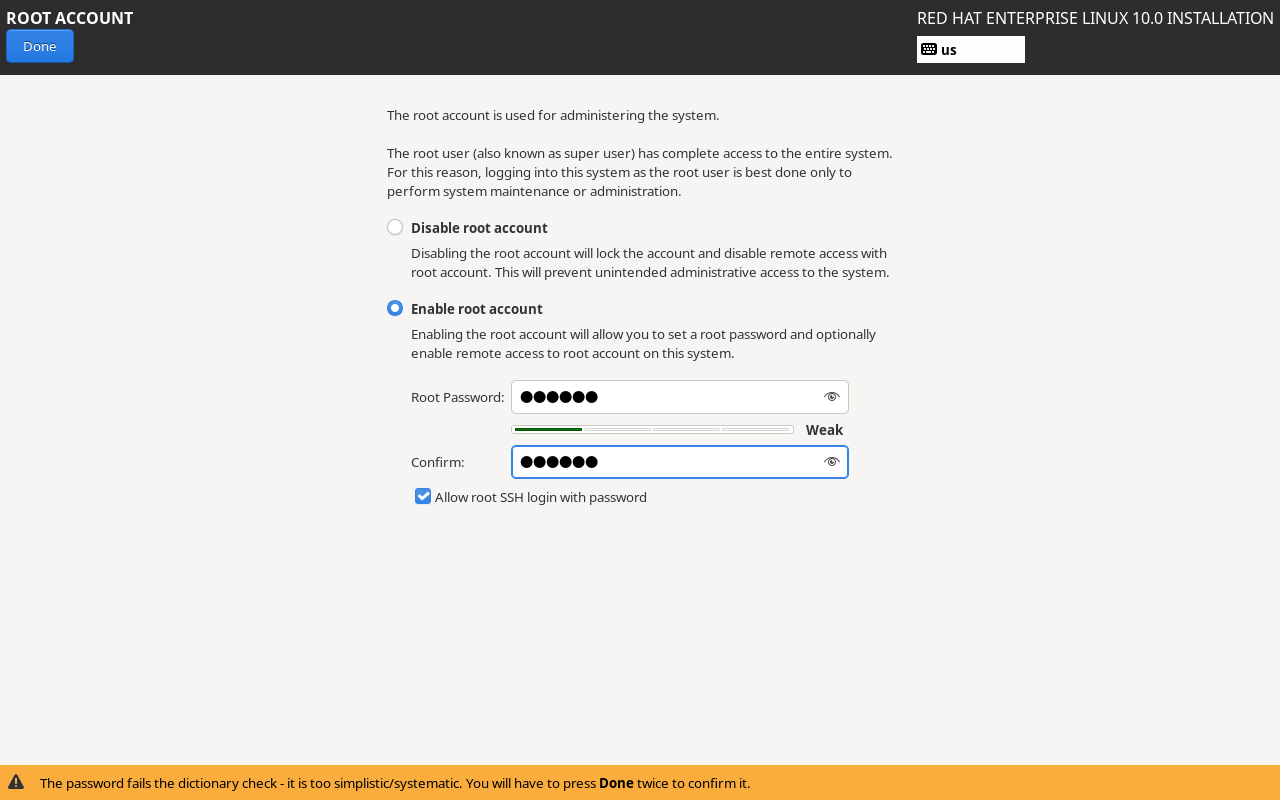
Figure 1-40 Setting the Administrator Password
Continue by clicking the User Creation button to create a local regular user for the RHEL 10 system. This account is named linuxprobe, with a uniform password set to redhat. This account will be used in Chapter 5.After confirmation, click the Done button, as shown in Figure 1-41.
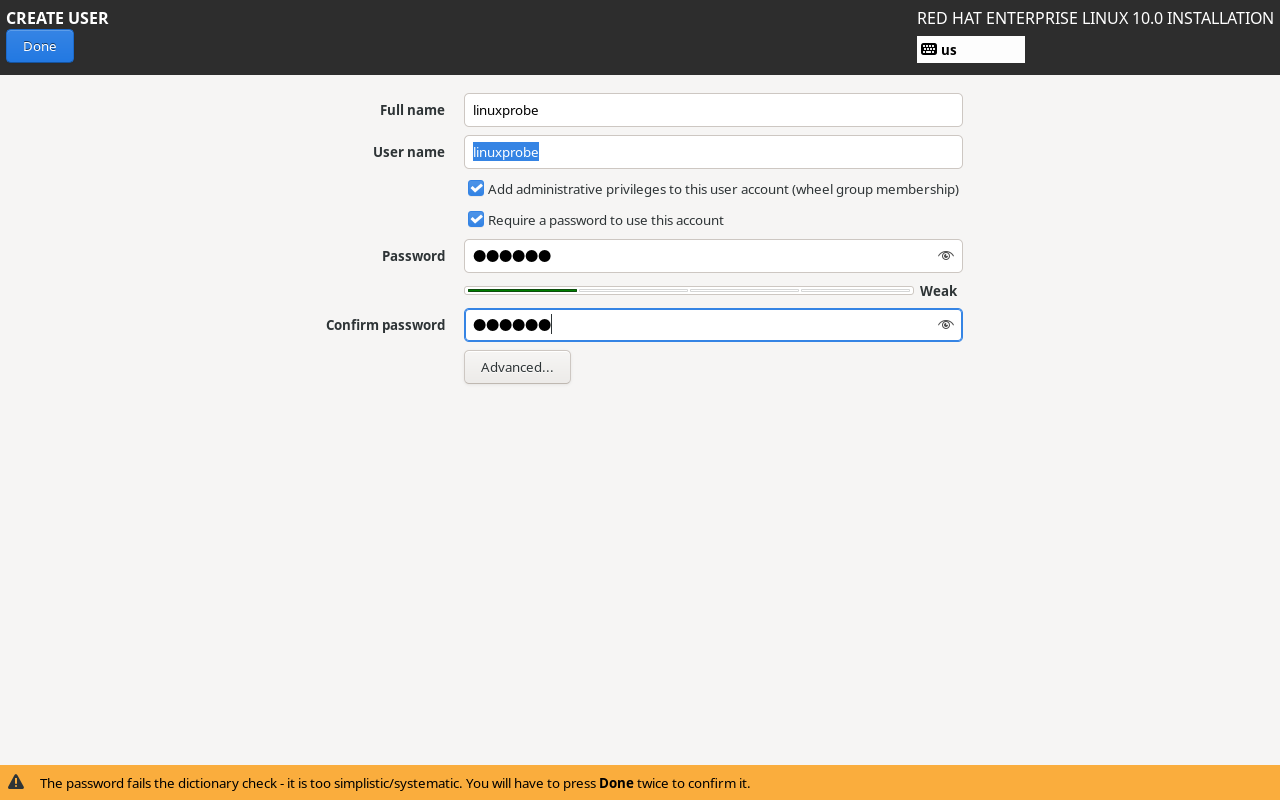
Figure 1-41 Creating a Regular User Account
After completing all settings, return to the installation summary screen, as shown in Figure 1-42. Then click the Begin Installation button in the lower-right corner to formally install the Linux system. The entire installation process takes approximately 20–30 minutes. Upon completion, the screen appears as shown in Figure 1-43.
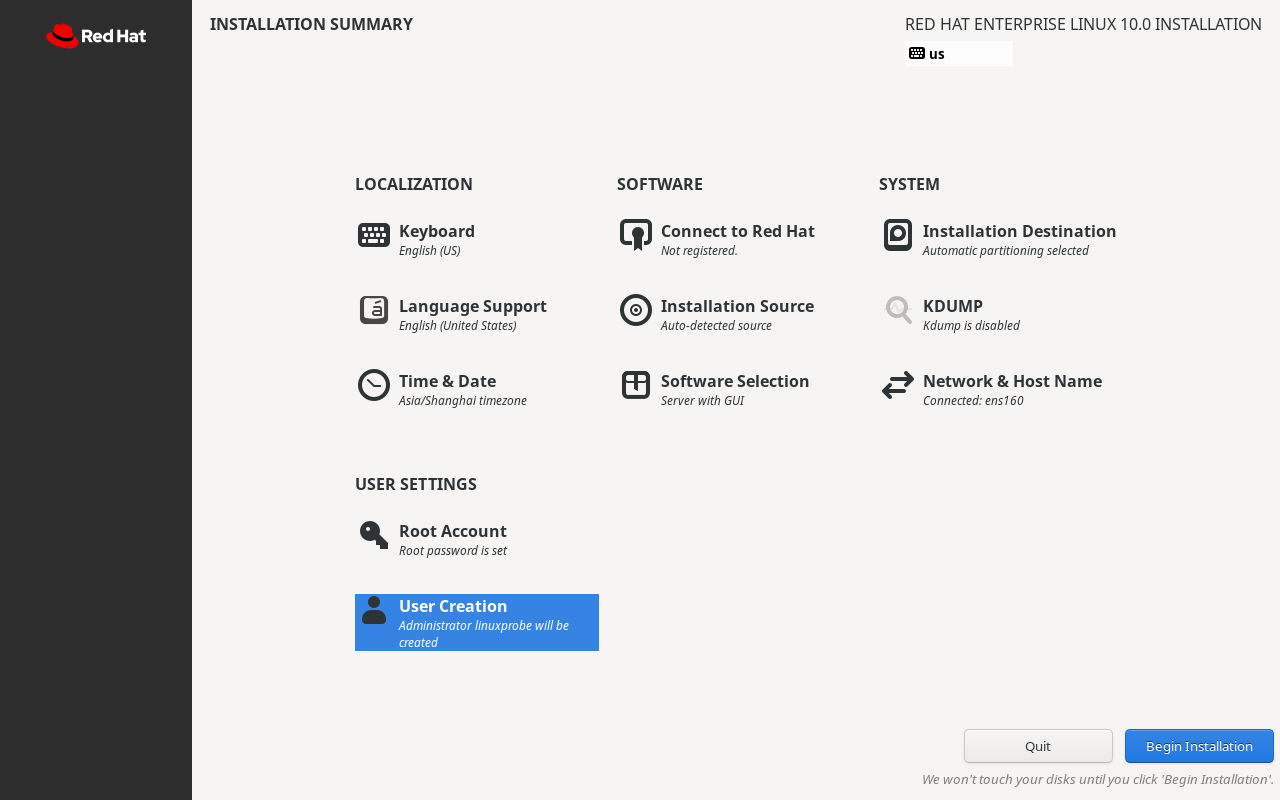
Figure 1-42 Preparing to begin system installation
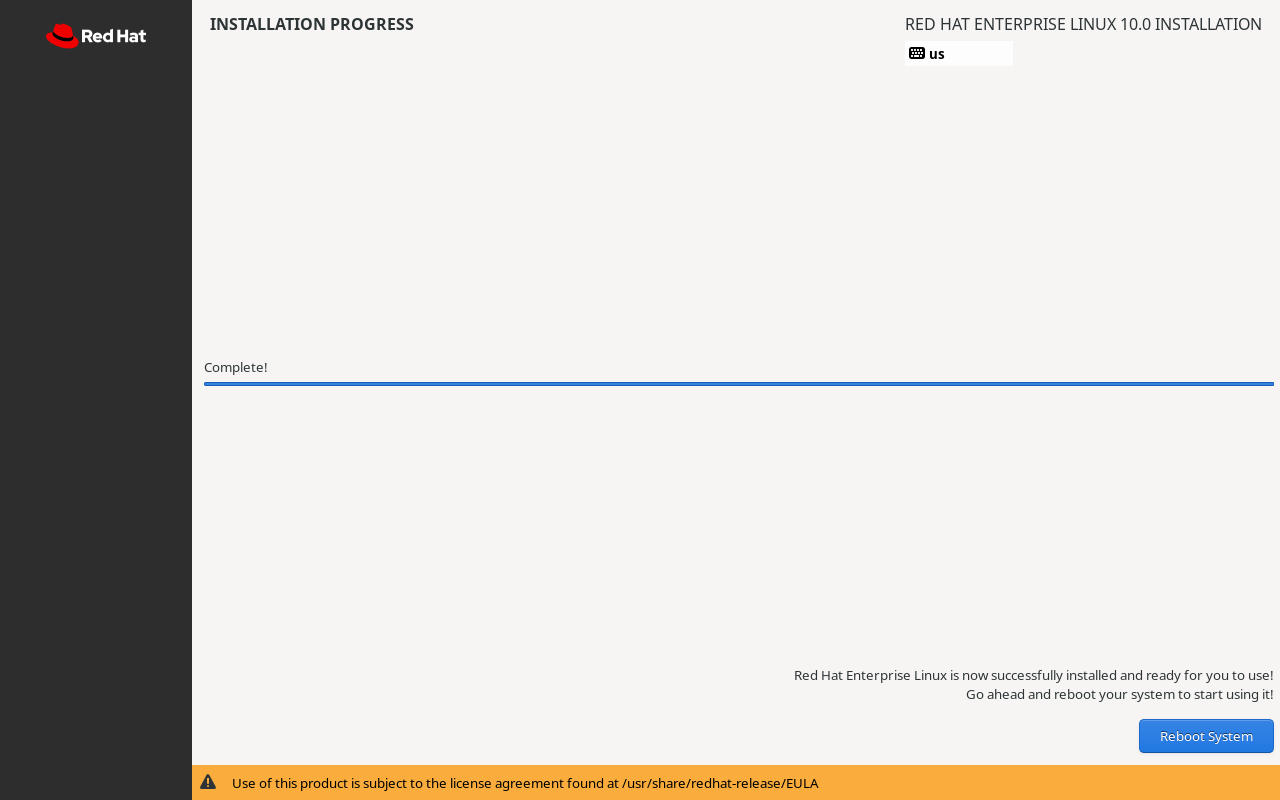
Figure 1-43 System installation in progress
Click the Reboot System button to initiate the final reboot.After approximately 2 minutes of waiting, you will see the login interface shown in Figure 1-44. To ensure you are not restricted by permissions before reaching Chapter 5, students must click "Not listed?" below the user section, manually enter the administrator account (root) and the password you set, as shown in Figures 1-45 and 1-46.
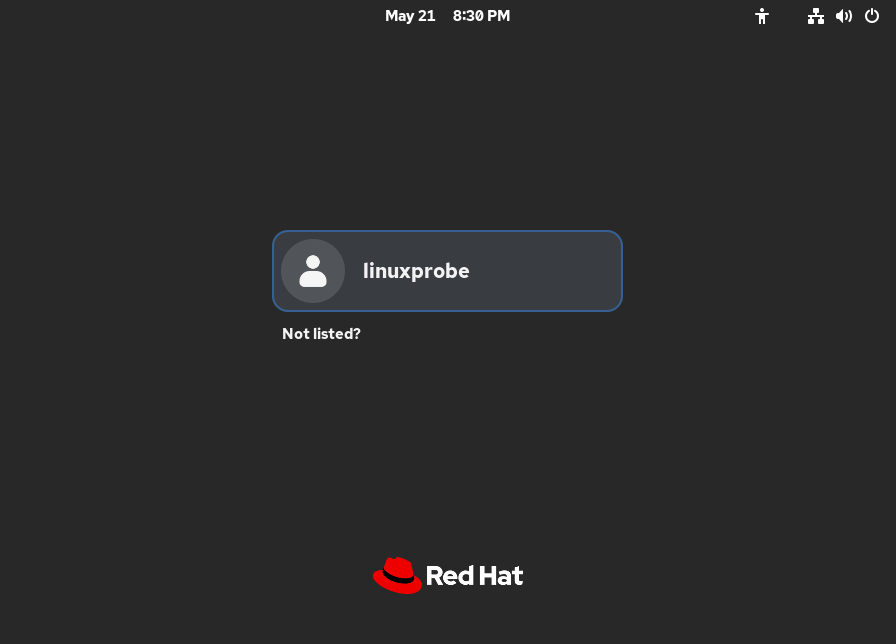
Figure 1-44 Selecting to log in with another user
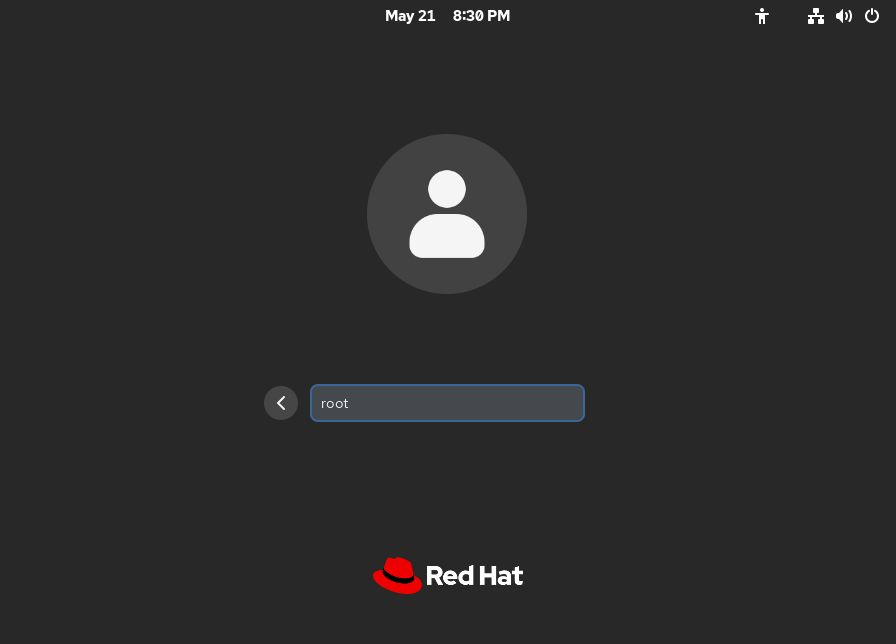
Figure 1-45 Entering the administrator account
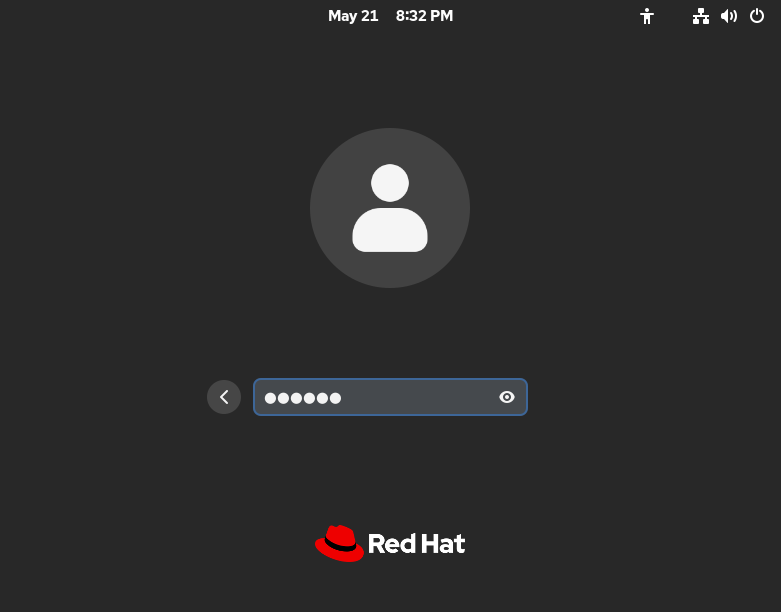
Figure 1-46 Entering the Administrator Password
Pressing Enter successfully boots the system, revealing the system interface as shown in Figure 1-47. This completes the entire installation and deployment of the RHEL 10 system.

Figure 1-47: Begin Using the System
Great! Let's start learning the Linux system.
1.4 Methods for Installing Software
In the early 1990s, Linux was still in its infancy. Under the GNU open-source initiative and most open-source licensing agreements, software publishers were only required to provide their source code. The tasks of compiling the software and resolving dependencies fell entirely to system administrators. This process was not only cumbersome but also prone to errors.To successfully install a service program, system administrators needed not only extensive knowledge and advanced skills but also considerable patience. Chapter 20 of this book will let readers experience this process firsthand and understand its challenges.
By 1995, to reduce the complexity of software installation, Red Hat introduced RPM (Red Hat Package Manager). RPM manages package information through a unified database, includes scripts with built-in installation rules, and automatically handles dependencies between software components. This approach resembles the Control Panel in Windows systems, significantly simplifying the installation, upgrade, and removal processes for software packages in Linux. The RPM package structure is illustrated in Figure 1-48.
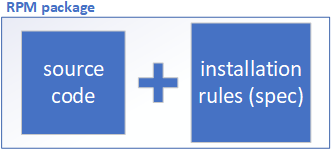
Figure 1-48 Schematic Diagram of RPM Package Technology
Table 1-1 lists some commonly used RPM package commands. There's no need to memorize them yet; just getting a general sense of them is sufficient for now.
Table 1-1 Common RPM Package Commands
| Common Command Pairs | Functionality |
|---|---|
| rpm -ivh filename.rpm | Install software |
| rpm -Uvh filename.rpm | Install or upgrade software |
| rpm -e filename.rpm | Uninstall software |
| rpm -qpi filename.rpm | Query description information of RPM package (uninstalled) |
| rpm -qpl filename.rpm | Query files contained in an RPM package (uninstalled) |
| rpm -qc filename | Query configuration files of an installed package |
| rpm -qR filename | Query software dependencies |
| rpm -qf /path/to/file | Query which installed RPM package owns a file |
| rpm -V filename | Verify if a package has been modified |
| rpm -qa | List all installed RPM packages |
Although RPM helps users query dependencies between software packages, issues arising during installation still require resolution by system administrators. Large software packages may depend on dozens or even hundreds of other programs, making the installation process cumbersome. To further simplify software installation, the initial version of YUM (Yellowdog Updater, Modified), built on RPM, was released in June 2002.
YUM analyzes required packages and their dependencies based on user needs, then interacts with software repositories to perform package installation, updates, and removal—functioning much like Apple's iOS App Store. Users need only specify a package name; YUM's repository locates it and automatically gathers, organizes, analyzes, downloads, and deploys its associated dependency services.The technical schematic of the YUM repository is shown in Figure 1-49, while the technical topology diagram is presented in Figure 1-50.
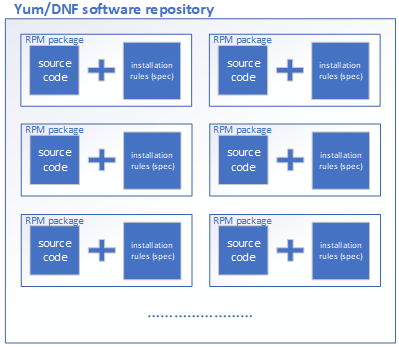
Figure 1-49 Technical Schematic Diagram of the Software Repository
Users can automatically download and install software from the YUM repository by connecting to it via HTTP, FTP, or local mounting (using a file:// URL).
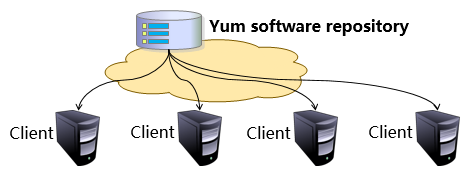
Figure 1-50 Technical Topology Diagram of YUM Software Repository
RPM packages within the YUM software repository may originate from official Red Hat releases, third-party sources, or even be self-compiled.The system image accompanying this book (not a physical disc; downloadable from the book's companion website https://www.linuxzone.net/tools) already includes a large number of usable RPM Red Hat packages. These are used both for system installation and for configuring software repositories, which will be detailed later.Table 1-2 lists some common YUM commands. For now, simply familiarize yourself with them.
Table 1-2 Common Yum Commands
| Command | Function |
|---|---|
| yum repolist all | List all repositories |
| yum list all | List all packages in a repository |
| yum info package_name | View package information |
| yum install package_name | Install package |
| yum reinstall package_name | Reinstall package |
| yum update package_name | Upgrade package |
| yum remove package_name | Remove package |
| yum clean all | Clear all repository caches |
| yum check-update | Check for available updates |
| yum grouplist | View installed package groups |
| yum groupinstall package_group | Install specified package group |
| yum groupremove package_group | Remove specified package group |
| yum groupinfo package_group | Query specified package group info |
Let's use an analogy from everyday life.The YUM repository is like a restaurant with a complete menu. Users don't need to buy chicken breast, cucumbers, or peanuts (RPM packages) themselves, nor do they need to know whether to add dark soy sauce or cooking wine first (dependencies). They just tell the chef (YUM repository) they want Kung Pao Chicken (package name), and that's it. They don't have to worry about anything else. Just wait patiently for a few minutes, and everything will be done automatically.
We thought the story ended there, but people soon discovered that while YUM solved dependency issues, it suffered from flaws like inaccurate analysis, high memory consumption, and inability to handle simultaneous installations by multiple users.Finally, in 2015, with the release of Fedora 22, Red Hat offered us a new choice—DNF (Dandified YUM). DNF is essentially an enhanced version of the YUM repository that addresses these issues, known in the industry as YUM v4. It significantly improves dependency analysis capabilities and processing speed.
As the successor to YUM v3, DNF thoughtfully retains the original command syntax and usage conventions. Veteran users can seamlessly transition to the new installation method without any learning curve. Consider this example: Previously, installing software required the command "yum install package_name." Now, it's simply "dnf install package_name" (i.e., replace yum with dnf).
Of course, RHEL 10 accommodates legacy user habits by maintaining compatibility with both yum and dnf commands. Users can freely choose either in practice. Even the command prompts are nearly identical, making the transition virtually seamless.
1.5 System Initialization Process
The Linux boot process involves several key steps: first, the BIOS/UEFI is initialized, followed by the Boot Loader (such as GRUB). Next, the system kernel is loaded and initialized, ultimately launching the init process. The init process is the very first process running after Linux boots up. It handles all necessary system initialization tasks to provide users with a functional working environment. This process can be simply understood as the entire journey "from pressing the power button to seeing the system desktop."
In RHEL 10, the traditional System V init has been replaced by the systemd init process service, with systemctl as the corresponding management command. While this change might seem minor for daily use, the reality is different.With the RHEL 10 update, numerous service management commands have been replaced. Therefore, for readers who previously learned and became familiar with older system versions, and who are accustomed to using the service and chkconfig commands for service management, this transition may cause some confusion. It will likely take some time to adapt to the new systemctl commands.
Tables 1-3 and 1-4 present a comparison between the new and old system versions.
Table 1-3 Common commands related to service startup, restart, stop, reload, and status checking (using sshd as an example service)
| Old System Command (RHEL 6) | New System Command (RHEL 10) | Function |
|---|---|---|
| service sshd start | systemctl start sshd | Start service |
| service sshd restart | systemctl restart sshd | Restart service |
| service sshd stop | systemctl stop sshd | Stop service |
| service sshd reload | systemctl reload sshd | Reload configuration file (without stopping service) |
| service sshd status | systemctl status sshd | View service status |
Table 1-4 Commands for service startup, disabling, and checking service status at various levels (using sshd as an example service)
| Legacy System Command | New System Command | Function |
|---|---|---|
| chkconfig sshd on | systemctl enable sshd | Enable automatic startup at boot |
| chkconfig sshd off | systemctl disable sshd | Disable automatic startup at boot |
| chkconfig sshd | systemctl is-enabled sshd | Check if a specific service is set to start at boot |
| chkconfig --list sshd | systemctl list-unit-files sshd | View whether a specific service is enabled or disabled |
Furthermore, systemd not only replaces the traditional System V init but also introduces the concept of "targets" to replace the original runlevels. This allows the system to manage services and processes more flexibly. Table 1-5 details the correspondence between System V init runlevels and systemd targets, along with their functions.
Table 1-5 Differences and Functions Between systemd and System V init
| System V init Runlevel | systemd Target Name | systemd Target Function |
|---|---|---|
| 0 | poweroff.target | Shutdown |
| 1 | rescue.target | Rescue mode |
| 2 | multi-user.target | Multi-user text interface |
| 3 | multi-user.target | Multi-user text interface |
| 4 | multi-user.target | Multi-user text interface |
| 5 | graphical.target | Multi-user graphical interface |
| 6 | reboot.target | Reboot |
| emergency | emergency.target | Rescue mode |
In RHEL 10, service management has become exceptionally streamlined due to a comprehensive overhaul of system initialization and service management commands. Users no longer need to switch between different commands; instead, they can perform all service management tasks using the single systemctl command. This highly efficient management experience stems from the underlying adoption of the systemd initialization process.This process employs a parallel service startup model, eliminating bottlenecks in traditional startup sequences where subsequent services were blocked while waiting for specific services like network services to start or system self-checks to complete. This fully unleashes hardware performance potential. This optimization is particularly evident in boot speed. Comparing servers running older versions (such as RHEL 5/6) reveals that RHEL 10's boot speed is nearly doubled.
Review Questions
- Why is it recommended that readers verify system files after downloading them rather than installing them directly?
Answer: To ensure the security and integrity of the system and software packages, preventing installation failures caused by external factors—better safe than sorry.
- When installing Linux using a virtual machine, why should you select "Install the operating system later" instead of choosing the RHEL 10 system image file?
Answer: If you directly select the RHEL 10 system image file in the configuration interface, VMware Workstation will automatically use its built-in installation wizard. This results in a system environment that differs from the one required for our subsequent experiments.
- If an error like "CPU does not support virtualization" appears during installation, how should it be resolved?
Answer: The most likely cause is that the VT feature is not enabled in the BIOS. Manually enable it and restart the system.
- Is RPM (Red Hat Package Manager) only used by Red Hat Enterprise Linux?
Answer: RPM is adopted by numerous Linux systems including CentOS Stream, Fedora, and openSUSE. It's truly very useful!
- Briefly describe the roles of RPM and software repositories.
Answer: RPM simplifies software installation by packaging source code with installation rules. Software repositories like YUM and DNF bundle common RPM packages, resolving dependency conflicts and further streamlining overall installation.
- RHEL 10 uses systemd as its init process. How do you check the running status of a service?
Answer: Execute the command systemctl status service_name to view the service's operational status.
- When the
service sshd restartcommand fails in RHEL 10, what should be done?
Answer: In RHEL 10, the service management command is systemctl. Therefore, replace it with the command systemctl restart sshd.
- Among the three network connection modes for VMware Workstation virtual machines, which one definitely cannot access the internet?
Answer: "Host-Only Networking" definitely cannot access the internet, while "Bridged network" and "Network Address Translation (NAT)" can access the internet.
- Why should the KDUMP service be disabled during system installation? Under what circumstances should it not be disabled?
Answer: Disabling the KDUMP service saves approximately 160MB of physical memory usage. However, it should not be disabled when users need to analyze kernel error information for troubleshooting.
- Does selecting the "Server with GUI" software base environment mean only a graphical user interface is available, with no command terminal?
Answer: No. Both the graphical user interface and command-line terminal are available. This software environment also installs many commonly used tools and commands by default, such as ifconfig and tar. Consequently, even system administrators accustomed to pure command-line operations can efficiently complete initial system configuration tasks using the default tools and commands provided in the Server with GUI environment.