Chapter 17 · Deploying Network Storage Using iSCSI
Chapter Overview
This chapter begins by introducing different interface technologies for computer hardware storage devices and their respective advantages and disadvantages, serving as an entry point to the topic of iSCSI technology. iSCSI seamlessly integrates physical disk devices with the TCP/IP network protocol, enabling users to conveniently access shared storage resources provided by remote data centers over the internet. Subsequently, this chapter guides readers through deploying an iSCSI server program on a Linux system and demonstrates how to access these remote storage resources from both Linux and Windows systems. By studying this chapter in conjunction with Chapters 6 and 7, readers will deepen their understanding of managing disk devices and storage resources in Linux systems, laying a solid foundation for future operational roles.
17.1 Introduction to iSCSI Technology
Disks are indispensable components of computer hardware, and the read/write speed of disk storage devices directly impacts a server's overall performance.In Chapters 6 and 7, we discussed storage technologies such as disk storage architecture, RAID disk array technology, and LVM technology. Although these technologies differ in their implementation at the software or hardware level, they all aim to address the read/write speed issues of disk storage devices and ensure data security.
To further enhance the read/write speed and performance of disk storage devices, continuous efforts have been made to improve the interface protocols of physical disk devices. Currently, the three most common types of disk interfaces are as follows:
IDE: A mature, stable, and cost-effective parallel interface suitable for budget-conscious devices.
SATA: A serial interface offering faster transfer speeds and more reliable data verification, widely adopted in modern computers.
SCSI: A system-level interface standard commonly used between computers and devices like hard disks and optical drives. It boasts low system resource consumption, high rotational speeds, and rapid data transfer rates.
Regardless of the disk interface used, disk data always exchanges with the CPU and memory via the bus on the computer motherboard. However, this physical limitation creates significant inconveniences for sharing disk resources. To address this issue, IBM developed a new storage technology based on TCP/IP and SCSI—Internet Small Computer System Interface (iSCSI).iSCSI technology integrates SCSI with Ethernet, enabling users to transmit SCSI commands and data over networks. This breaks the physical constraints of traditional SCSI devices, facilitates cross-regional storage resource sharing, and allows storage capacity expansion without interrupting system operations.
To ensure readers understand both the "what" and the "why" of this technology for flexible application in their work, the following section will outline the advantages and disadvantages of iSCSI technology in production environments. iSCSI storage technology offers exceptional convenience. It transforms traditional methods of accessing storage resources, liberates access from physical constraints, and enables multiple servers to share storage resources, making it highly suitable for enterprise use. However, iSCSI technology is constrained by network speed.Whereas disk devices previously transmitted data directly via the motherboard bus, they now rely on the internet as the carrier and channel for data transfer. Consequently, transmission speed and stability represent bottlenecks for iSCSI technology. Nevertheless, with the continuous advancement of network technology, improvements to iSCSI are anticipated.
Since data from disk devices is transmitted over Ethernet, does this mean data enters the computer via the network interface card (NIC)? This leads us to introduce the iSCSI-HBA (Host Bus Adapter) hardware card (see Figure 17-1).Unlike standard NICs (which connect the network bus to system memory for general internet access), iSCSI-HBA hardware cards connect SCSI or FC (Fibre Channel) buses to memory. They are designed specifically for storage data exchange between hosts and use protocols that differ substantially from those of standard NICs. Servers running Linux encapsulate disk device commands and data into standard TCP/IP packets based on the iSCSI protocol, then transmit them over Ethernet to the target storage device. Upon receiving these packets, the target storage device must decode the TCP/IP packets back into disk device commands and data using the iSCSI protocol.
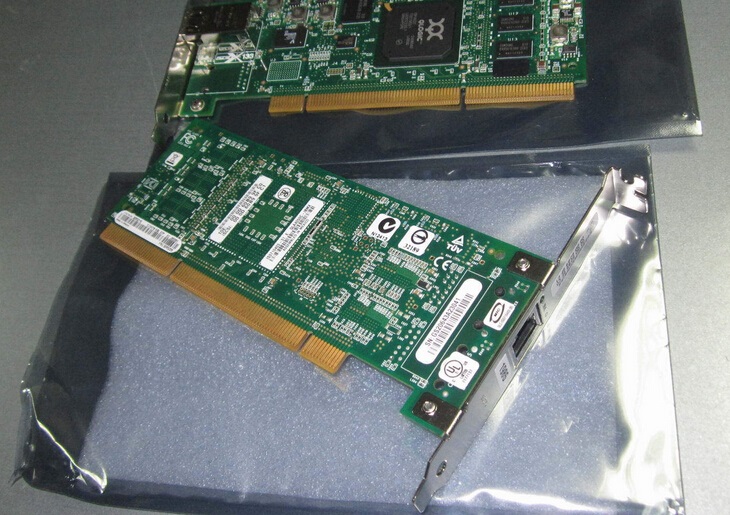
Figure 17-1 Actual photo of an iSCSI-HBA hardware card
In summary, iSCSI technology offers advantages such as low hardware costs, simple operation, easy maintenance, and strong scalability. It provides centralized data storage services, and its block-based storage approach simplifies storage management while enhancing storage flexibility.For users, it appears as if a new "local disk" has been added to their computer. This remote storage space can be managed using the local computer's operating system, just like a local disk. This highly scalable, low-cost, and low-maintenance integrated storage solution is particularly well-suited for small and medium-sized businesses and offices with limited budgets.
17.2 Creating a RAID Disk Array
When deploying iSCSI storage technology to provide shared resources for remote users, ensuring the stability and availability of the resource-hosting server is paramount. Failure during operation would result in maintenance challenges significantly more complex and difficult than those encountered with local disk devices.Therefore, we recommend readers deploy a RAID disk array group following the knowledge covered in Chapter 7 of this book to ensure data security. The following explanation uses configuring a RAID 5 disk array group as an example. Since Chapter 7 already provided a detailed explanation of RAID disk array technology and configuration methods, this section will not repeat the meaning and purpose of related parameters. Readers who have forgotten can refer back to that chapter.
First, add four new disks to the virtual machine for creating the RAID 5 array and backup disk, as shown in Figure 17-2.
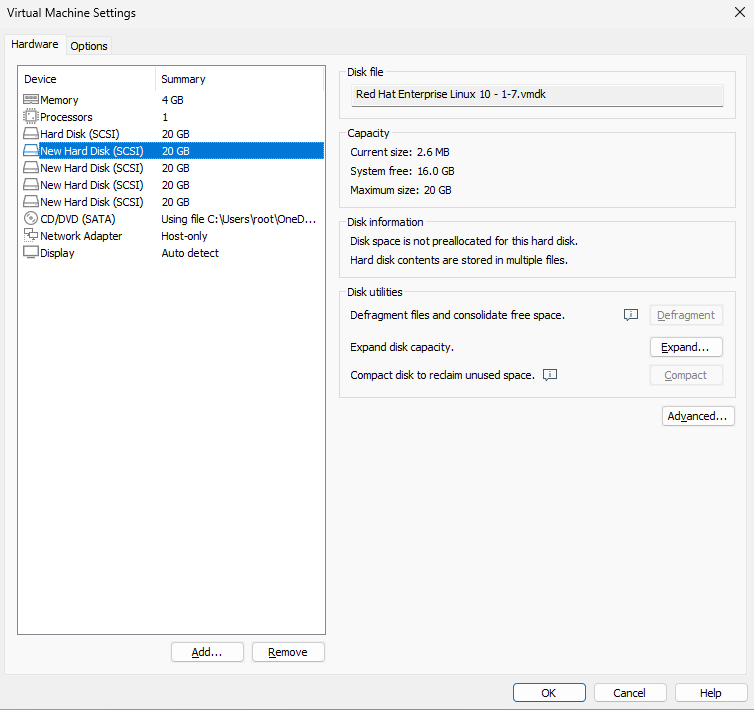
Figure 17-2 Adding 4 new hard disks for creating a RAID 5 level disk array
Boot the virtual machine system and use the mdadm command to create the RAID disk array. Here, the -Cv parameter creates the array and displays the process, /dev/md0 is the array device name, -n 3 specifies the number of disks required for a RAID 5 array, -l 5 defines the RAID level, and -x 1 sets the number of spare disks.The names of the disks to be used must be specified sequentially after the command. Additionally, wildcards as explained in Chapter 3 can be used to specify disk device names. Interested readers are encouraged to experiment with this.
root@linuxprobe:~# mdadm -Cv /dev/md0 -n 3 -l 5 -x 1 /dev/sdb /dev/sdc /dev/sdd /dev/sde
mdadm: layout defaults to left-symmetric
mdadm: chunk size defaults to 512K
mdadm: size set to 20954112K
mdadm: Defaulting to version 1.2 metadata
mdadm: array /dev/md0 started.
After successfully executing the above command, a new device named /dev/md0 is created. This is a RAID 5 disk array, with an additional spare disk to safeguard the data.You can use the mdadm -D command to view detailed device information. Additionally, since device recognition order may change when using remote devices, directly specifying device names like /dev/sdb or /dev/sdc in the fstab mount configuration file risks mounting the wrong storage device next time. The UUID value serves as a unique identifier for devices, enabling precise differentiation between local and remote devices. We should record this value now to enter it into the mount configuration file later.
root@linuxprobe:~# mdadm -D /dev/md0
/dev/md0:
           Version : 1.2
     Creation Time : Fri Apr  4 02:17:44 2025
        Raid Level : raid5
        Array Size : 41908224 (39.97 GiB 42.91 GB)
     Used Dev Size : 20954112 (19.98 GiB 21.46 GB)
      Raid Devices : 3
     Total Devices : 4
       Persistence : Superblock is persistent

       Update Time : Fri Apr  4 02:19:29 2025
             State : clean
    Active Devices : 3
   Working Devices : 4
    Failed Devices : 0
     Spare Devices : 1

            Layout : left-symmetric
        Chunk Size : 512K

Consistency Policy : resync

              Name : linuxprobe.com:0  (local to host linuxprobe.com)
              UUID : af6bd598:f912ea12:d45fb1b8:8aeb9c2d
            Events : 18

    Number   Major   Minor   RaidDevice State
       0       8       16        0      active sync   /dev/sdb
       1       8       32        1      active sync   /dev/sdc
       4       8       48        2      active sync   /dev/sdd

       3       8       64        -      spare   /dev/sde
17.3 Configuring the iSCSI Server
iSCSI technology operates in two roles: server (target) and client (initiator). The iSCSI server is the server that stores disk storage resources. It serves as the storage end for the previously created RAID disk array, providing users with accessible storage resources. The iSCSI client is the software used by users to access storage resources on the remote server.
Configure the IP addresses for the iSCSI server and client according to Table 17-1.
Table 17-1 Operating Systems and IP Addresses for the iSCSI Server and Client
| Hostname | Operating System | IP Address |
|---|---|---|
| iSCSI Server | RHEL 10 | 192.168.10.10 |
| iSCSI Client | RHEL 10 | 192.168.10.20 |
Step 1: On RHEL/CentOS Stream 10 systems, the iSCSI server software is pre-installed by default. Users need to configure the software repository and then install the interactive configuration tool for the iSCSI server. Compared to directly modifying configuration files, using the interactive configuration process to set parameters is both convenient and secure. Adding the -y parameter after the dnf command eliminates the need for manual confirmation during installation.
root@linuxprobe:~# dnf install -y targetcli
Updating Subscription Management repositories.
Last metadata expiration check: 0:00:28 ago on Fri 04 Apr 2025 02:21:55 AM CST.
Dependencies resolved.
================================================================================
 Package                      Arch      Version              Repository    Size
================================================================================
Installing:
 targetcli                    noarch    2.1.58-2.el10        AppStream     95 k
Installing dependencies:
 python3-configshell          noarch    1:1.1.30-7.el10      BaseOS        92 k
 python3-kmod                 x86_64    0.9.2-5.el10         BaseOS       114 k
 python3-pyparsing            noarch    3.1.1-5.el10         BaseOS       273 k
 python3-rtslib               noarch    2.1.76-8.el10        AppStream    128 k
 python3-typing-extensions    noarch    4.9.0-5.el10         BaseOS        81 k
 python3-urwid                x86_64    2.5.3-3.el10         BaseOS       1.1 M
 python3-wcwidth              noarch    0.2.6-4.el10         BaseOS        50 k
 target-restore               noarch    2.1.76-8.el10        AppStream     17 k
[... output omitted ...]
Installed:
  python3-configshell-1:1.1.30-7.el10.noarch
  python3-kmod-0.9.2-5.el10.x86_64
  python3-pyparsing-3.1.1-5.el10.noarch
  python3-rtslib-2.1.76-8.el10.noarch
  python3-typing-extensions-4.9.0-5.el10.noarch
  python3-urwid-2.5.3-3.el10.x86_64
  python3-wcwidth-0.2.6-4.el10.noarch
  target-restore-2.1.76-8.el10.noarch
  targetcli-2.1.58-2.el10.noarch

Complete!
iSCSI is a cross-platform protocol, so users can also set up an iSCSI server on a Windows system and then share it with Linux host systems. However, based on the author's past experience, software such as DataCore's SANmelody or FalconStor's iSCSI Server for Windows typically requires a commercial license on Windows systems.
Step 2: Configure the iSCSI server to share resources. targetcli is a dedicated configuration command for managing iSCSI server storage resources. It provides interactive configuration functionality similar to the fdisk command, abstracting iSCSI shared resource configurations into a "directory" structure. We simply need to fill the corresponding "directories" with various configuration details.The main challenge lies in understanding the function of each "parameter directory." Once configuration parameters are correctly entered into the "directories," the iSCSI server can provide shared resource services.
After executing the targetcli command, an interactive configuration interface appears. This interface supports numerous Linux commands, such as using ls to view directory parameter structures or cd to navigate between directories.
root@linuxprobe:~# targetcli
targetcli shell version 2.1.58
Copyright 2011-2013 by Datera, Inc and others.
For help on commands, type 'help'.
/> ls
o- / ..................................................................... [...]
  o- backstores .......................................................... [...]
  | o- block .............................................. [Storage Objects: 0]
  | o- fileio ............................................. [Storage Objects: 0]
  | o- pscsi .............................................. [Storage Objects: 0]
  | o- ramdisk ............................................ [Storage Objects: 0]
  o- iscsi ........................................................ [Targets: 0]
  o- loopback ..................................................... [Targets: 0]
  o- vhost ........................................................ [Targets: 0]
/backstores/block is where the iSCSI server configures shared devices. We need to add the newly created RAID 5 disk array device /dev/md0 to the "resource pool" of configured shared devices and rename it to disk0. This way, users won't know which disk in the server provides the shared storage resource; they'll only see a storage device named disk0.
/> cd /backstores/block
/backstores/block> create disk0 /dev/md0
Created block storage object disk0 using /dev/md0.
/backstores/block> cd /
/> ls
o- / ..................................................................... [...]
  o- backstores .......................................................... [...]
  | o- block .............................................. [Storage Objects: 1]
  | | o- disk0 ..................... [/dev/md0 (40.0GiB) write-thru deactivated]
  | |   o- alua ............................................... [ALUA Groups: 1]
  | |     o- default_tg_pt_gp ................... [ALUA state: Active/optimized]
  | o- fileio ............................................. [Storage Objects: 0]
  | o- pscsi .............................................. [Storage Objects: 0]
  | o- ramdisk ............................................ [Storage Objects: 0]
  o- iscsi ........................................................ [Targets: 0]
  o- loopback ..................................................... [Targets: 0]
  o- vhost ........................................................ [Targets: 0]
Step 3: Create the iSCSI target name and configure the shared resource. The iSCSI target name is automatically generated by the system. This is a unique string used to describe the shared resource. Users will see this string later when scanning the iSCSI server, so there is no need to memorize it.
/> cd iscsi
/iscsi> create
Created target iqn.2003-01.org.linux-iscsi.linuxprobe.x8664:sn.bdf25f04da95.
Created TPG 1.
Global pref auto_add_default_portal=true
Created default portal listening on all IPs (0.0.0.0), port 3260.
/iscsi> ls
o- iscsi .......................................................... [Targets: 1]
  o- iqn.2003-01.org.linux-iscsi.linuxprobe.x8664:sn.bdf25f04da95 .... [TPGs: 1]
    o- tpg1 ............................................. [no-gen-acls, no-auth]
      o- acls ........................................................ [ACLs: 0]
      o- luns ........................................................ [LUNs: 0]
      o- portals .................................................. [Portals: 1]
        o- 0.0.0.0:3260 ................................................... [OK]
Tips:
Note that in iSCSI auto-generated names, the final . is a period and not part of the name.
After generating this target name, the system also creates a new "directory" with the same string name in the /iscsi parameter directory to store shared resources. We need to add the disk devices previously added to the iSCSI shared resource pool to this new directory. This way, when users log in to the iSCSI server, they can use the shared storage resources provided by these disk devices by default.
/iscsi> cd iqn.2003-01.org.linux-iscsi.linuxprobe.x8664:sn.bdf25f04da95/
/iscsi/iqn.20....bdf25f04da95> cd tpg1/luns
/iscsi/iqn.20...a95/tpg1/luns> create /backstores/block/disk0
Created LUN 0.
Step 4: Configure Access Control Lists (ACLs). The iSCSI protocol authenticates via client names. This means users accessing shared storage resources do not need to enter passwords; authentication succeeds if the iSCSI client name matches an entry in the server's ACL. Therefore, a list of names capable of verifying user identities must be written into the iSCSI server configuration. The acls parameter directory stores client names authorized to access the iSCSI server's shared storage resources. It is recommended to append parameters like client after the system-generated iSCSI target name. This ensures client names are unique while facilitating management and readability.
/iscsi/iqn.20...a95/tpg1/luns> cd ..
/iscsi/iqn.20...5f04da95/tpg1> cd acls
/iscsi/iqn.20...a95/tpg1/acls> create iqn.2003-01.org.linux-iscsi.linuxprobe.x8664:sn.bdf25f04da95:client
Created Node ACL for iqn.2003-01.org.linux-iscsi.linuxprobe.x8664:sn.bdf25f04da95:client
Created mapped LUN 0.
Step 5: Configure the iSCSI server's listening IP address and port number. Servers in production environments may have multiple network interfaces. Which interface or IP address should provide shared storage resources externally? By default, the configuration allows all network interfaces to offer iSCSI services. If you consider this slightly insecure, you can manually remove them.
/iscsi/iqn.20...a95/tpg1/acls> cd ../portals/
/iscsi/iqn.20.../tpg1/portals> ls
o- portals ........................................................ [Portals: 1]
  o- 0.0.0.0:3260 ......................................................... [OK]
/iscsi/iqn.20.../tpg1/portals> delete 0.0.0.0 3260
Deleted network portal 0.0.0.0:3260
Continue configuration to enable the system to provide iSCSI shared storage services externally via port 3260 on the server IP address 192.168.10.10.
/iscsi/iqn.20.../tpg1/portals> create 192.168.10.10
Using default IP port 3260
Created network portal 192.168.10.10:3260.
Step 6: After configuring the parameter file, review the information you just set up to ensure all "directory" entries mentioned above contain the correct content. Once verified, enter the exit command to exit configuration. Note: Do not habitually press Ctrl+C to terminate the process, as this will not save the configuration file and render your work useless.
/iscsi/iqn.20.../tpg1/portals> cd /
/> ls
o- / ..................................................................... [...]
  o- backstores .......................................................... [...]
  | o- block .............................................. [Storage Objects: 1]
  | | o- disk0 ....................... [/dev/md0 (40.0GiB) write-thru activated]
  | |   o- alua ............................................... [ALUA Groups: 1]
  | |     o- default_tg_pt_gp ................... [ALUA state: Active/optimized]
  | o- fileio ............................................. [Storage Objects: 0]
  | o- pscsi .............................................. [Storage Objects: 0]
  | o- ramdisk ............................................ [Storage Objects: 0]
  o- iscsi ........................................................ [Targets: 1]
  | o- iqn.2003-01.org.linux-iscsi.linuxprobe.x8664:sn.bdf25f04da95 .. [TPGs: 1]
  |   o- tpg1 ........................................... [no-gen-acls, no-auth]
  |     o- acls ...................................................... [ACLs: 1]
  |     | o- iqn.2003-01.org.linux-iscsi.linuxprobe.x8664:sn.bdf25f04da95:client  [Mapped LUNs: 1]
  |     |   o- mapped_lun0 ............................. [lun0 block/disk0 (rw)]
  |     o- luns ...................................................... [LUNs: 1]
  |     | o- lun0 .................. [block/disk0 (/dev/md0) (default_tg_pt_gp)]
  |     o- portals ................................................ [Portals: 1]
  |       o- 192.168.10.10:3260 ........................................... [OK]
  o- loopback ..................................................... [Targets: 0]
  o- vhost ........................................................ [Targets: 0]
/> exit
Global pref auto_save_on_exit=true
Configuration saved to /etc/target/saveconfig.json
Configure the firewalld firewall to allow iSCSI service or port 3260/TCP:
root@linuxprobe:~# firewall-cmd --permanent --add-port=3260/tcp
success
root@linuxprobe:~# firewall-cmd --reload
success
17.4 Configuring the Linux Client
We've configured numerous Linux services in previous sections. Generally speaking, client configuration steps are simpler than server configuration steps for any given service. The iSCSI initiator utilities (package iscsi-initiator-utils) are installed by default on RHEL 10 systems. If they are not present on your system, you can manually install them using the software repository.
root@linuxprobe:~# dnf install iscsi-initiator-utils
Updating Subscription Management repositories.
BaseOS                                          2.7 MB/s | 2.7 kB     00:00
AppStream                                       2.7 MB/s | 2.8 kB     00:00
Package iscsi-initiator-utils-6.2.1.9-21.gita65a472.el10.x86_64 is already installed.
Dependencies resolved.
Nothing to do.
Complete!
As mentioned earlier, the iSCSI protocol authenticates using the client name, which serves as the client's unique identifier. This name must match the information in the server's access control list (ACL) configuration file. Otherwise, when the client attempts to access the storage share, the system will display an authentication failure error.
Next, edit the initiator name file in the iSCSI client, enter the server's access control list name, then restart the client's iscsid service and add it to the boot startup items:
root@linuxprobe:~# vim /etc/iscsi/initiatorname.iscsi
InitiatorName=iqn.2003-01.org.linux-iscsi.linuxprobe.x8664:sn.bdf25f04da95:client
root@linuxprobe:~# systemctl restart iscsid
root@linuxprobe:~# systemctl enable  iscsid
Created symlink '/etc/systemd/system/multi-user.target.wants/iscsid.service' → '/usr/lib/systemd/system/iscsid.service'.
The steps for an iSCSI client to access and utilize shared storage resources are straightforward. Just remember Instructor Liu Chuan's mnemonic: first discover, then log in, and finally mount and use. iscsiadm is a command-line tool for managing, querying, inserting, updating, or deleting iSCSI database configuration files. Users must first use this tool to scan and discover remote iSCSI servers, then view the available shared storage resources on the found servers.The -m discovery parameter scans for available storage resources, -t st specifies the scan type Simple Target, and -p 192.168.10.10 sets the iSCSI server's IP address.
root@linuxprobe:~# iscsiadm -m discovery -t st -p 192.168.10.10
192.168.10.10:3260,1 iqn.2003-01.org.linux-iscsi.linuxprobe.x8664:sn.bdf25f04da95
After discovering available storage resources on the remote server using the iscsiadm command, proceed to log in to the iSCSI server.Here, the -m node parameter tells iscsiadm to operate on discovered iSCSI nodes (targets), the -T parameter specifies the storage resource to use (you can directly copy the scanned result from the previous command to avoid input errors), and the -p 192.168.10.10 parameter remains the IP address of the remote iSCSI server. Finally, use the --login or -l parameter for login authentication.
root@linuxprobe:~# iscsiadm -m node -T iqn.2003-01.org.linux-iscsi.linuxprobe.x8664:sn.bdf25f04da95 -p 192.168.10.10 --login
Logging in to [iface: default, target: iqn.2003-01.org.linux-iscsi.linuxprobe.x8664:sn.bdf25f04da95, portal: 192.168.10.10,3260]
Login to [iface: default, target: iqn.2003-01.org.linux-iscsi.linuxprobe.x8664:sn.bdf25f04da95, portal: 192.168.10.10,3260] successful.
After successfully logging in to the iSCSI server, a new device file named /dev/sdb appears on the client host. As discussed in Chapter 6, the udev service assigns disk names independently of physical disk slots. You can now operate this device file just like any local disk on the host.
root@linuxprobe:~# ls -l /dev/sdb
brw-rw----. 1 root disk 8, 16 Apr  3 18:37 /dev/sdb
root@linuxprobe:~# file /dev/sdb
/dev/sdb: block special (8/16)
Now proceed with standard disk operations. Since you've already covered this in Chapter 6, and given this device file's limited 40GB capacity, there's no need for partitioning. Instead, format and mount it directly.
root@linuxprobe:~# mkfs.xfs /dev/sdb
log stripe unit (524288 bytes) is too large (maximum is 256KiB)
log stripe unit adjusted to 32KiB
meta-data=/dev/sdb               isize=512    agcount=16, agsize=654720 blks
         =                       sectsz=512   attr=2, projid32bit=1
         =                       crc=1        finobt=1, sparse=1, rmapbt=1
         =                       reflink=1    bigtime=1 inobtcount=1 nrext64=1
data     =                       bsize=4096   blocks=10475520, imaxpct=25
         =                       sunit=128    swidth=256 blks
naming   =version 2              bsize=4096   ascii-ci=0, ftype=1
log      =internal log           bsize=4096   blocks=16384, version=2
         =                       sectsz=512   sunit=8 blks, lazy-count=1
realtime =none                   extsz=4096   blocks=0, rtextents=0
root@linuxprobe:~# mkdir /iscsi
root@linuxprobe:~# mount /dev/sdb /iscsi
If you're unsure, you can use the df command to check the mount status:
root@linuxprobe:~# df -h
Filesystem             Size  Used Avail Use% Mounted on
/dev/mapper/rhel-root   17G  3.8G   13G  23% /
devtmpfs               4.0M     0  4.0M   0% /dev
tmpfs                  1.9G   84K  1.9G   1% /dev/shm
efivarfs               256K   56K  196K  23% /sys/firmware/efi/efivars
tmpfs                  776M  9.7M  767M   2% /run
tmpfs                  1.0M     0  1.0M   0% /run/credentials/systemd-journald.service
/dev/sda2              960M  272M  689M  29% /boot
/dev/sr0               6.5G  6.5G     0 100% /media/cdrom
/dev/sda1              599M  8.3M  591M   2% /boot/efi
tmpfs                  388M  124K  388M   1% /run/user/0
/dev/sdb                40G  816M   40G   2% /iscsi
From this point onward, this device file functions just like a disk on the client's local machine. It's important to note that since the udev service names disk devices based on the order in which the system identifies them, if the client host uses multiple remote storage resources simultaneously and the order of remote device identification changes next time, the files in the client's mount directory will become disorganized. To prevent such issues, mount the device using its UUID in the /etc/fstab configuration file. This ensures the system correctly locates the corresponding directory regardless of changes in the remote device's recognition order.
The blkid command displays a device's name, file system, and UUID. You can use a pipe symbol (see Chapter 3) to filter output, showing only information related to the /dev/sdb device:
root@linuxprobe:~# blkid | grep /dev/sdb
/dev/sdb: UUID="075956f7-ec81-420e-8e11-e165a4e2fb66" BLOCK_SIZE="512" TYPE="xfs"
One more thing to note: Since /dev/sdb is a network storage device and the iSCSI protocol transmits data over TCP/IP networks, the _netdev parameter must be added to the /etc/fstab configuration file. This ensures the device mounts only after the system connects to the network, preventing prolonged boot times or boot failures:
root@linuxprobe:~# vim /etc/fstab
#
# /etc/fstab
# Created by anaconda on Wed Mar 12 20:08:04 2025
#
# Accessible filesystems, by reference, are maintained under '/dev/disk/'.
# See man pages fstab(5), findfs(8), mount(8) and/or blkid(8) for more info.
#
# After editing this file, run 'systemctl daemon-reload' to update systemd
# units generated from this file.
#
UUID=016bb74f-bfa8-4d80-aa6d-d5693c39a844 /             xfs     defaults        	0 0
UUID=c34124dd-c66e-4cbe-ba04-528666d30dc0 /boot         xfs     defaults        	0 0
UUID=9A1A-B195          /boot/efi               vfat    umask=0077,shortname=winnt  0 2
UUID=299dacfd-f999-48d8-bca4-e5274ac600a8 none          swap    defaults        	0 0
/dev/cdrom 								  /media/cdrom  iso9660 defaults 			0 0
UUID="075956f7-ec81-420e-8e11-e165a4e2fb66" /iscsi      xfs     defaults,_netdev    0 0
If you no longer need to use the iSCSI shared device resources, first unmount any filesystems using the device, then log out of the iSCSI session using the -u parameter of the iscsiadm command:
root@linuxprobe:~# iscsiadm -m node -T iqn.2003-01.org.linux-iscsi.linuxprobe.x8664:sn.bdf25f04da95 -u
Logging out of session [sid: 1, target: iqn.2003-01.org.linux-iscsi.linuxprobe.x8664:sn.bdf25f04da95, portal: 192.168.10.10,3260]
Logout of [sid: 1, target: iqn.2003-01.org.linux-iscsi.linuxprobe.x8664:sn.bdf25f04da95, portal: 192.168.10.10,3260] successful.
This method for accessing iSCSI remote storage relies on the iSCSI initiator software included with RHEL 10. This software virtualizes the Ethernet card into an iSCSI card to receive data, then facilitates data transfer between the host and iSCSI storage device over TCP/IP. This approach requires only the host and network, making it the most cost-effective solution. However, when using this method for data transfer, command data related to iSCSI and TCP/IP consumes the client's own CPU processing power, resulting in some additional overhead. It is generally recommended for environments with low I/O or low bandwidth requirements.
For production environments requiring extensive remote data storage, it is advisable to procure dedicated iSCSI-HBA hardware cards and install them on the iSCSI server. This enables efficient data transfer between the iSCSI server and switches, as well as between the iSCSI server and clients.Compared to the software-based initiator approach, iSCSI-HBA hardware cards do not consume CPU processing power and are dedicated remote storage devices, offering superior iSCSI support. However, iSCSI-HBA hardware cards are slightly more expensive, requiring a trade-off between performance and cost.
17.5 Configuring Windows Clients
Windows-based clients can also access shared storage resources on the iSCSI server normally. The operational principles and steps are essentially identical to those for Linux clients. Before proceeding with the following experiment, shut down the Linux client to prevent potential issues arising from both client hosts simultaneously accessing the iSCSI shared storage resources. Configure the IP addresses for the iSCSI server and Windows client according to Table 17-2.
Table 17-2 Operating Systems and IP Addresses for iSCSI Server and Client
| Hostname | Operating System | IP Address |
|---|---|---|
| iSCSI Server | RHEL 10 | 192.168.10.10 |
| Windows Client | Windows 11 | 192.168.10.30 |
Step 1: Run the iSCSI Initiator. The iSCSI client is pre-installed in Windows 11. Simply navigate to the "System and Security" tab in Control Panel, then click "Windows Tools" (see Figure 17-3). The "iSCSI Initiator" icon will appear on the Windows Tools page. Double-click this icon. When running the iSCSI Initiator for the first time, the system will prompt "The Microsoft iSCSI service is not running." Click the "Yes" button to automatically start and run the iSCSI Initiator, as shown in Figure 17-4.
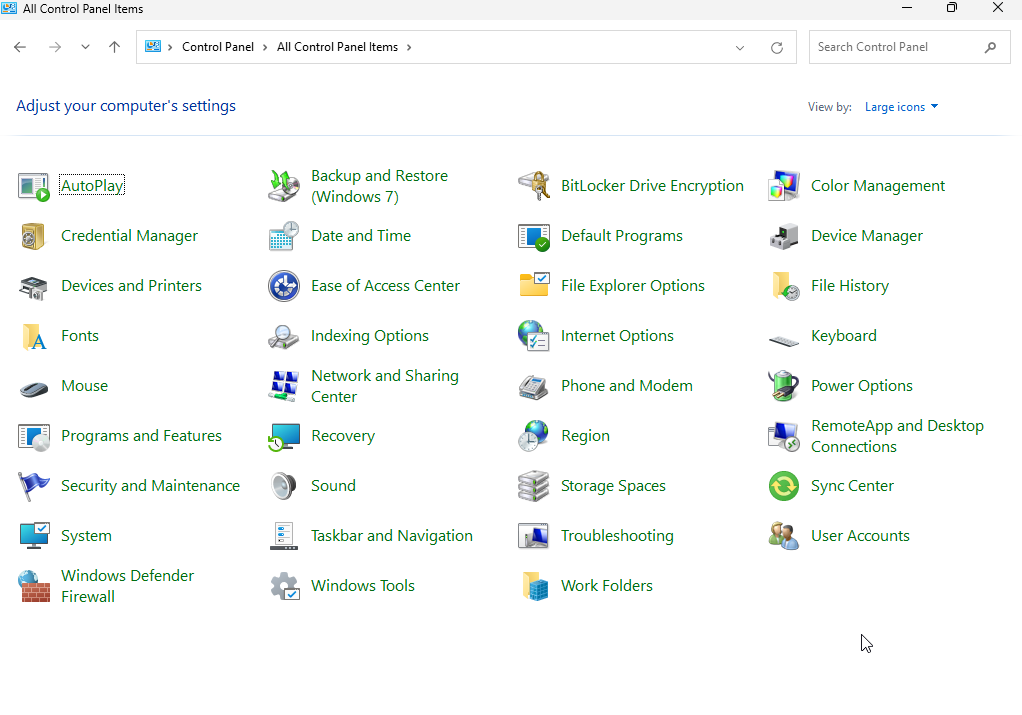
Figure 17-3 Clicking "Windows Tools" in Control Panel
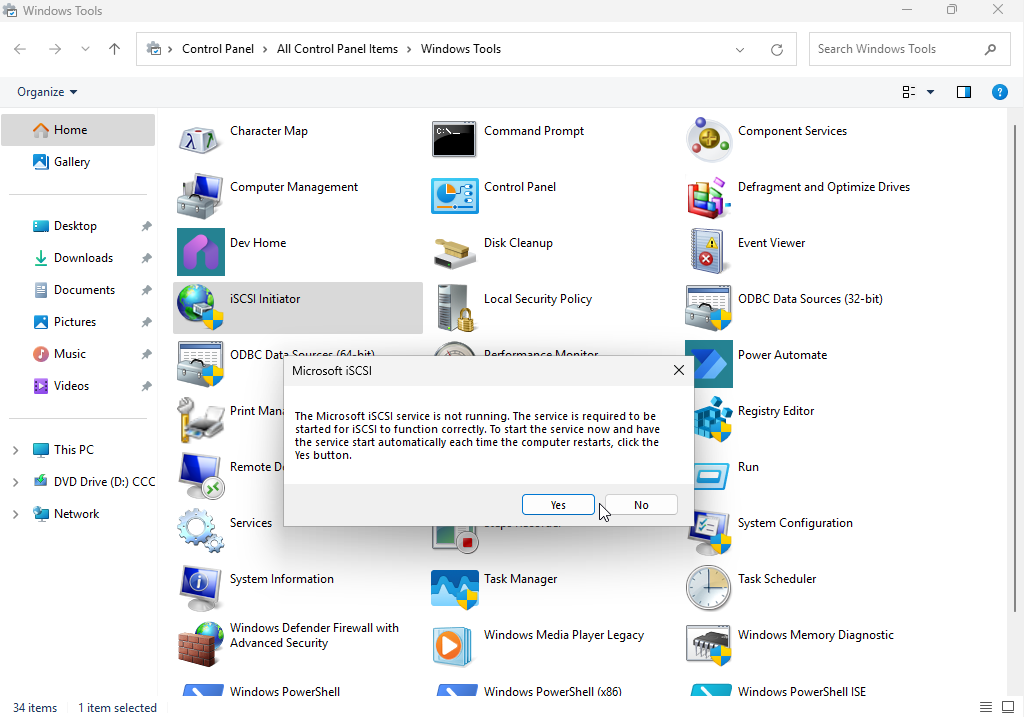
Figure 17-4 Double-clicking the "iSCSI Initiator" icon
Step 2: Scan and discover available storage resources on the iSCSI server. Whether using Windows or Linux systems, scanning and discovery must be performed before accessing iSCSI shared storage resources. After launching the iSCSI Initiator, enter the IP address of the iSCSI server in the "Target" text box under the "Target" tab, then click the "Quick Connect" button, as shown in Figure 17-5.
In the "Quick Connect" dialog box that appears, you can view the shared disk storage resources. Seeing the message "Unable to log in to the target" is normal. Simply click the "Finish" button, as shown in Figure 17-6.
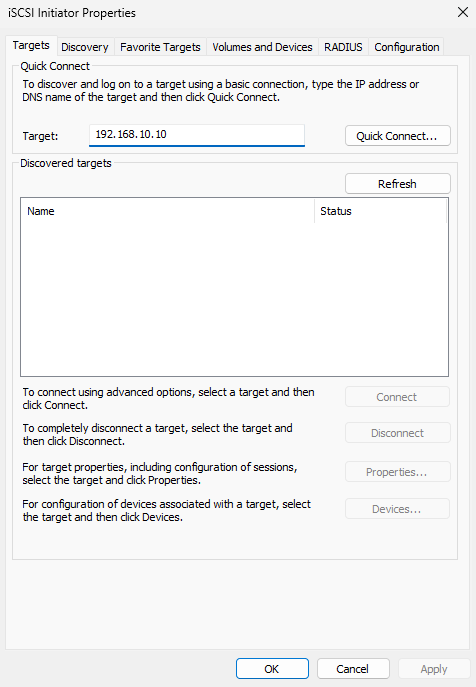
Figure 17-5 Entering the iSCSI server's IP address
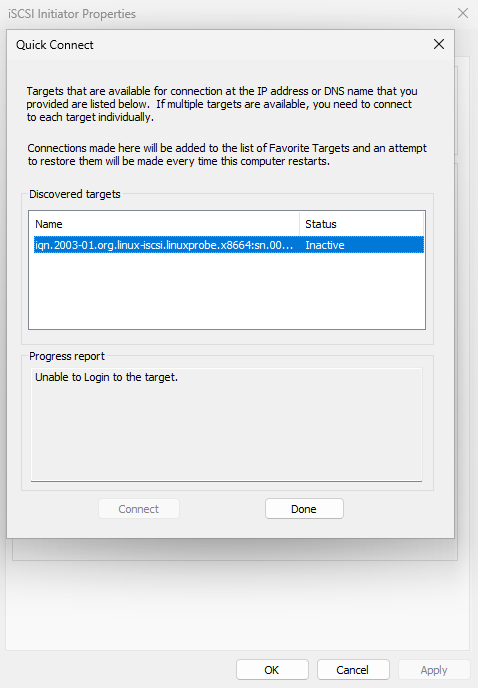
Figure 17-6 Shared disk storage resources visible in the "Quick Connect" prompt
Return to the "Targets" tab to see the shared storage resource name displayed, as shown in Figure 17-7.
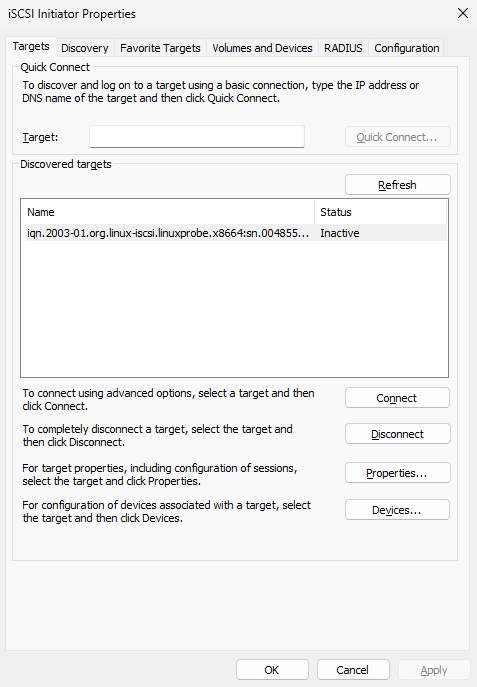
Figure 17-7 Shared storage resource visible in the "Targets" tab
Step 3: Prepare to connect to the shared storage resource on the iSCSI server. Since ACLs are configured on the iSCSI server program, allowing access only when the client name matches the name in the ACL policy, you must first click the "Change" button in the "Configuration" tab (see Figure 17-8). Then, enter the ACL policy name configured on the iSCSI server in the modification interface (see Figure 17-9). Finally, return to the "Targets" tab interface of the iSCSI Initiator program (see Figure 17-10).
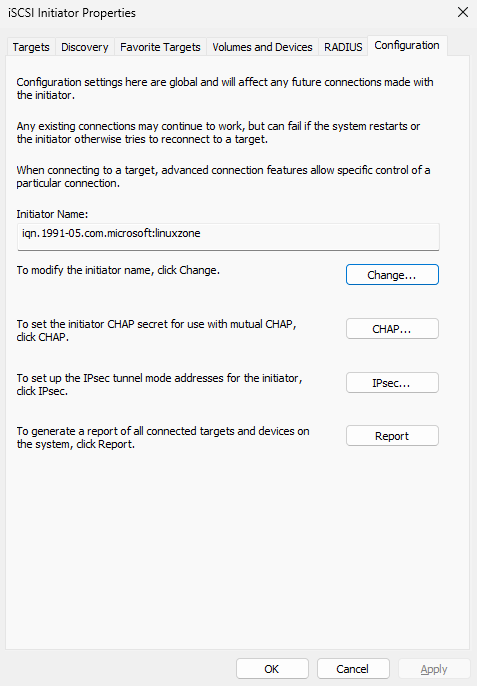
Figure 17-8 Changing the Client Initiator Program Name
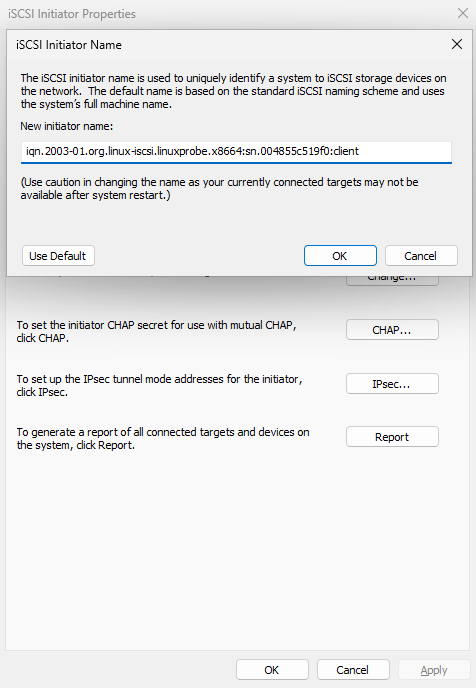
Figure 17-9 Modifying the iSCSI initiator name
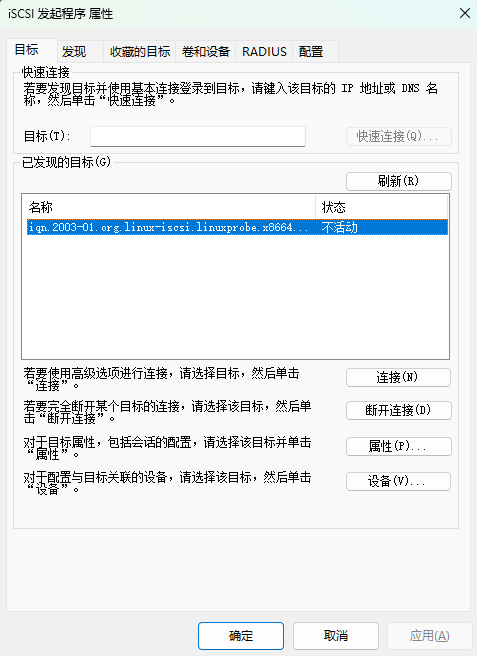
Figure 17-10 Returning to the "Target" interface
After confirming the iSCSI initiator name matches the iSCSI server ACL policy, click the "Connect" button again as shown in Figure 17-11, then click "Confirm." After approximately 1–3 seconds, the status will update to "Connected" as shown in Figure 17-12.
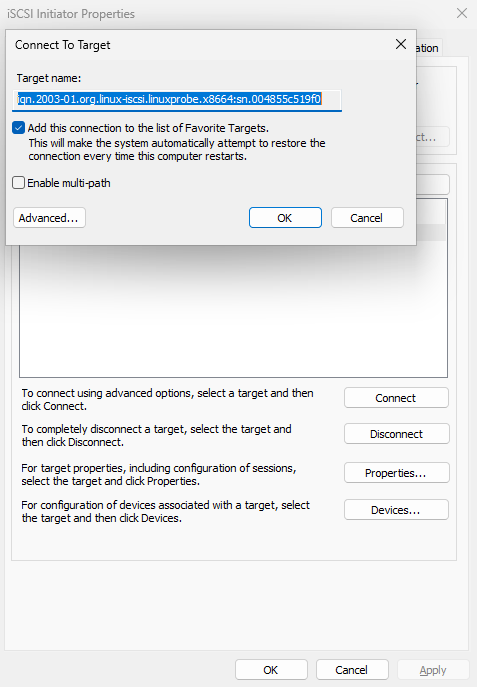
Figure 17-11 Attempting to connect to iSCSI storage target
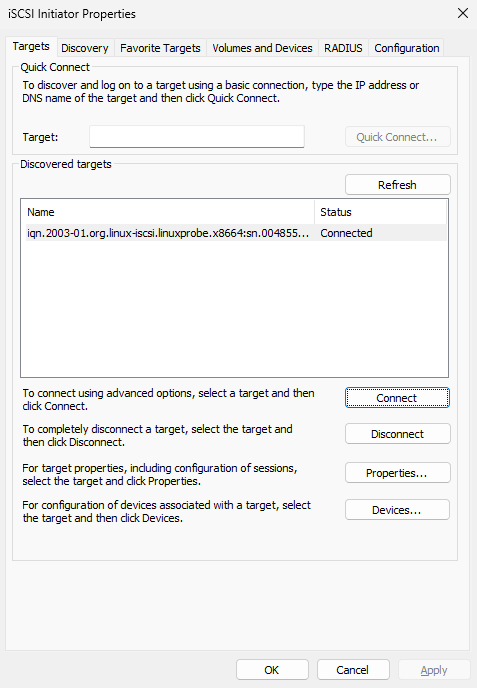
Figure 17-12 Successfully connected to remote shared storage resource
Step 4: Access the iSCSI remote shared storage resource. Right-click the "Computer" icon on the desktop to open the Computer Management program, as shown in Figure 17-13.

Figure 17-13 Computer Management Interface
Begin initializing the disk, as shown in Figure 17-14. Windows' disk device initialization process is straightforward. If you can handle Linux systems, Windows should be even easier. The initialization steps in Windows are illustrated in Figures 17-15 through 17-21.
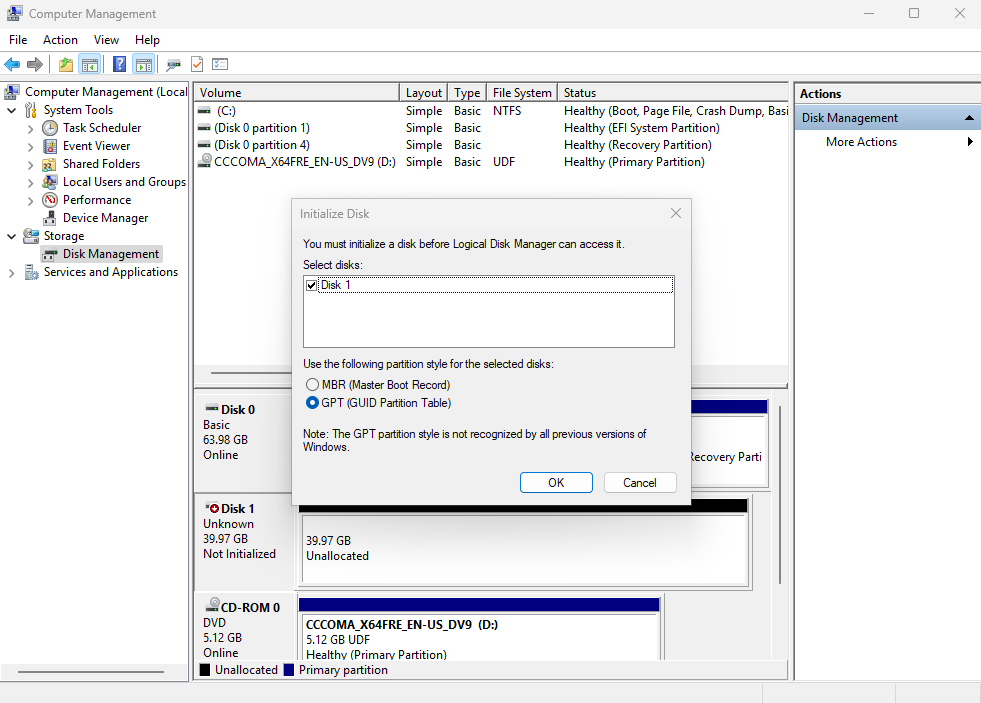
Figure 17-14 Initializing the Disk Device
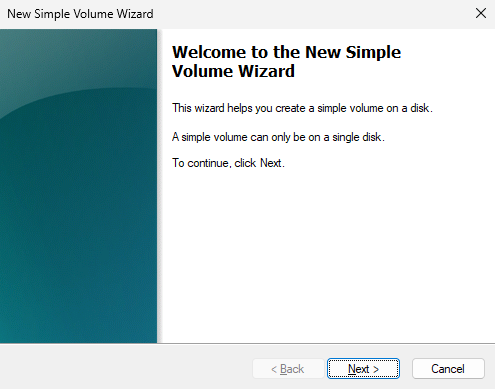
Figure 17-15 Starting the New Simple Volume Wizard
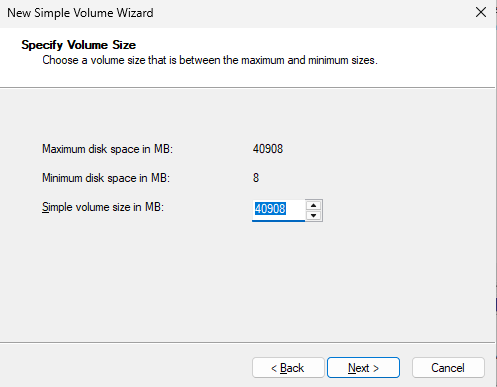
Figure 17-16 Partitioning the disk device
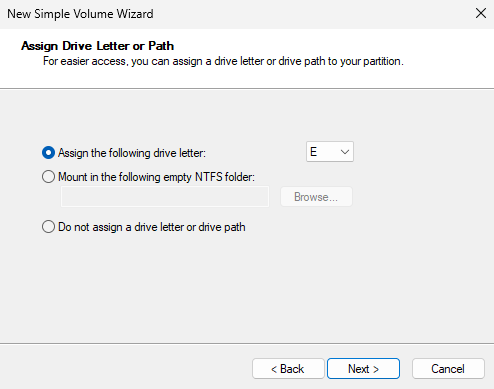
Figure 17-17 Setting the drive letter displayed in the system
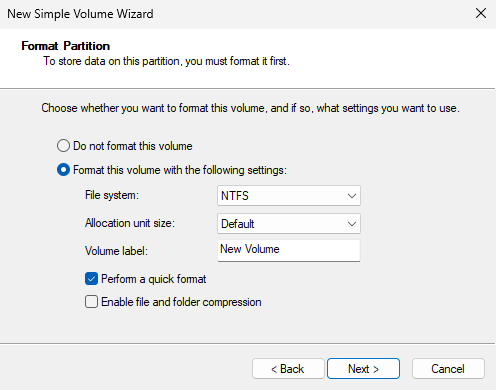
Figure 17-18 Configuring the disk device format and volume label
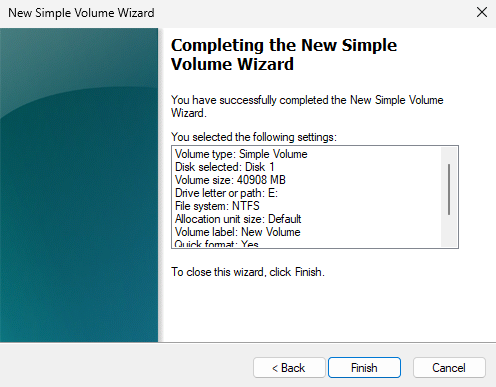
Figure 17-19 Verifying Disk Initialization Information
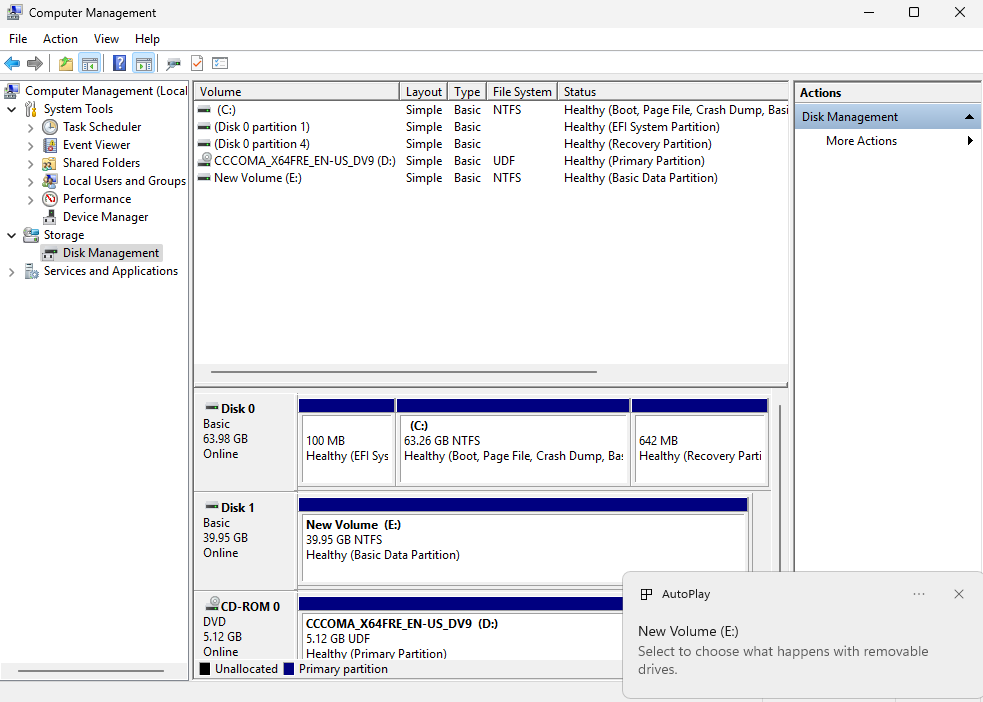
Figure 17-20 Waiting for disk device initialization to complete
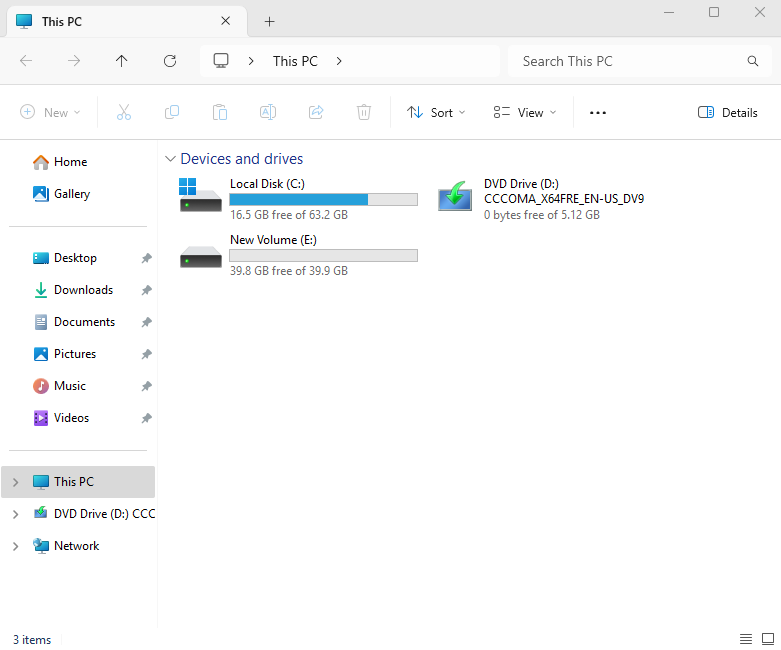
Figure 17-21 Device icon appears after disk initialization completes
You can now proceed with normal usage. Since the entire transfer process is completely transparent and as stable as a local disk, unaware users may not even realize this is a remote storage device. However, this is only in theory. In practice, iSCSI struggles to match the data transfer rates of local disks and is more or less affected by network bandwidth, though the difference is often subtle.Another key advantage of iSCSI technology is its high security, which is particularly crucial for centralized data storage. Therefore, iSCSI is definitely worth considering for data storage and transmission!
Review Questions
- Briefly describe the role of iSCSI technology in production environments.
Answer: By integrating hardware storage devices with the TCP/IP network protocol, iSCSI technology enables users to conveniently access shared storage resources provided by remote data centers over the internet.
- What are the service programs used for the iSCSI server and iSCSI client in Linux systems?
Answer: On Linux, the iSCSI target is provided by the LIO subsystem and managed with the targetcli tool; the iSCSI client (initiator) is provided by the iscsi-initiator-utils package (for example, the iscsiadm command).
- When configuring the iSCSI server configuration file using the targetcli command, what content is stored in the acls and portals parameter directories respectively?
Answer: The acls parameter directory stores client names authorized to access the iSCSI server's shared storage resources. The portals parameter directory defines which IP addresses of the server provide shared storage services externally.
- Which protocol and port number does the iSCSI protocol occupy on the server?
Answer: The iSCSI protocol uses TCP port 3260 on the server.
- When configuring the fstab device mount file, users typically enter the UUID (rather than the device name) of the remote storage resource. Why is this?
Answer: In Linux systems, device names are managed by the udev service. The device naming rules of udev are determined by factors such as device type and system recognition order. Considering that network storage devices often exhibit unstable recognition sequences, UUIDs are used for mounting operations to avoid mounting errors caused by chaotic recognition sequences.
- When accessing iSCSI shared storage resources using a Windows system, two steps are identical to those on Linux systems. Please specify which two steps.
Answer: Scan and discover available iSCSI shared storage resources on the server; authenticate and log in.
- If there is no budget for purchasing an iSCSI-HBA hardware card, can the host's network interface card be used instead?
Answer: Yes, it is acceptable.
- After configuring with the
targetclicommand, how do you save and exit?
Answer: Execute the exit command to save and exit. Do not use the Ctrl+C key combination, as this will not save the configuration file.
- What should be done if the system does not have an iSCSI client installed by default?
Answer: Run the command dnf install iscsi-initiator-utils to install it.
- How do I stop using the iSCSI service when no longer needed?
Answer: Use the iscsiadm command with the -u parameter to log out of the iSCSI session (after unmounting any filesystems that are using the device).