Chapter 05 · User Identities and File Permissions
Chapter Overview
Linux is a multiuser, multitasking operating system renowned for stability and security. Behind the scenes, keeping a Linux system safe depends on careful configuration. This chapter explains ownership and permissions—how the owner, group, and others interact with read (r), write (w), and execute (x) privileges—and shows how to add, delete, and modify user accounts.
We will also explore special permission bits—SUID, SGID, and the sticky bit (SBIT)—which let you express more nuanced policies than basic rwx flags alone. Hidden file attributes add an invisible shield: even if an attacker can read sensitive logs, they can’t tamper with or erase them. Access Control Lists (ACLs) go further by granting user‑ or group‑specific permissions on files and directories to enforce least privilege for real workflows.
The chapter closes with the su command and the sudo service, which let ordinary users perform administrative tasks safely without handing out the keys to the kingdom.
5.1 User Identities and Capabilities
Shaped by the computing realities of the 1970s, Linux was designed for many users working at once. It must isolate faults so a single service problem does not bring down the entire server. In Chapter 1 you installed Linux and set the root administrator’s password. Root is the superuser found on all UNIX‑like systems—the counterpart of Windows’ administrator. It has the highest authority: adding or deleting users, starting or stopping services, enabling or disabling hardware, and much more.
Working as root bypasses most safeguards, so a single mistaken command can wreck a system. In training, however, using root can be helpful: when a configuration fails, you won’t waste time wondering whether it is a real error or simply insufficient privileges. With virtual machines and snapshots, you can always roll back quickly. In class, I recommend learning as root; in production, choose appropriately for the environment.
Important clarification: on Linux, root is “the administrator” not because of its name, but because its user ID (UID) is 0. The UID is unique—like a national ID number—and the system uses it to determine identity. On RHEL 10, accounts generally fall into these ranges:
Administrator (UID 0): the superuser.
System users (UID 1–999): restricted service accounts that limit the blast radius of vulnerabilities.
Regular users (UID ≥ 1000): human users created by administrators.
UIDs must be unique. By default, new regular users begin at UID 1000 even if lower numbers are free.
To manage users in groups, Linux also has group IDs (GID). By assigning users to a group, you can grant permissions once to the group rather than to each user. For example, a company might create a technical‑department group that alone can read a database. When new colleagues join, you add them to the group and they inherit the same access.
Each user has a primary group (created automatically with the same name as the user at account creation) and can be added to any number of supplementary groups.
Tips:
A primary group is like your family of origin—created at birth (account creation) and you only have one. Supplementary groups are like teams at work—you join them as needed, and you can belong to many.
1) id
Show details about a user. Format: id username.
root@linuxprobe:~# id linuxprobe
uid=1000(linuxprobe) gid=1000(linuxprobe) groups=1000(linuxprobe),10(wheel)
2) useradd
Create a new user account. Format: useradd [options] username.
By default, useradd creates a home directory under /home, sets /bin/bash as the login shell, and creates a primary group with the same name. You can change these defaults with the options in Table 5‑1.
Table 5‑1 useradd options
| Option | Purpose |
|---|---|
| -d | Specify home directory (default /home/username) |
| -e | Account expiry date, YYYY-MM-DD |
| -u | Set the user’s UID |
| -g | Set the initial primary group (must already exist) |
| -G | Set one or more supplementary groups |
| -N | Do not create a same‑named primary group |
| -s | Set the user’s default shell |
Create a user and confirm:
root@linuxprobe:~# useradd linuxcool
root@linuxprobe:~# id linuxcool
uid=1001(linuxcool) gid=1001(linuxcool) groups=1001(linuxcool)
Create a user with a custom home, UID, and a non‑login shell. Setting the shell to /sbin/nologin prevents interactive logins:
root@linuxprobe:~# useradd -d /home/linux -u 8888 -s /sbin/nologin linuxdown
root@linuxprobe:~# id linuxdown
uid=8888(linuxdown) gid=8888(linuxdown) groups=8888(linuxdown)
3) groupadd
Create a group. Format: groupadd [options] groupname.
To assign the same permissions efficiently to several users, add them to a shared group. For example:
root@linuxprobe:~# groupadd winston
4) usermod
Modify account properties (user modify). Format: usermod [options] username.
User data ultimately lives in /etc/passwd and related files, so usermod is a safer, structured way to update it. Table 5‑2 lists common options.
Table 5‑2 usermod options
| Option | Purpose |
|---|---|
| -c | Comment (GECOS) |
| -d -m | Move home to new path and migrate old data |
| -e | Account expiry date, YYYY-MM-DD |
| -g | Change primary group |
| -G | Change supplementary groups |
| -L | Lock the account (disable login) |
| -U | Unlock the account |
| -s | Change login shell |
| -u | Change UID |
Check defaults:
root@linuxprobe:~# id linuxprobe
uid=1000(linuxprobe) gid=1000(linuxprobe) groups=1000(linuxprobe),10(wheel)
Add the user to the root group as a supplementary group (primary group unchanged):
root@linuxprobe:~# usermod -G root linuxprobe
root@linuxprobe:~# id linuxprobe
uid=1000(linuxprobe) gid=1000(linuxprobe) groups=1000(linuxprobe),0(root)
Change the UID:
root@linuxprobe:~# usermod -u 9999 linuxprobe
root@linuxprobe:~# id linuxprobe
uid=9999(linuxprobe) gid=1000(linuxprobe) groups=1000(linuxprobe),0(root)
Change the login shell to nologin and observe the effect:
root@linuxprobe:~# usermod -s /sbin/nologin linuxprobe
root@linuxprobe:~# su - linuxprobe
This account is currently not available.
5) passwd
Change passwords and related policy. Format: passwd [options] [username].
Regular users can change their own passwords; root can change anyone’s without supplying the old password—useful for administration. Table 5‑3 lists common options.
Table 5‑3 passwd options
| Option | Purpose |
|---|---|
| -l | Lock the account (disable login) |
| -u | Unlock the account |
| --stdin | Read the new password from standard input |
| -d | Allow empty password (no password) |
| -e | Force password change at next login |
| -S | Show lock status and hash algorithm |
Change your own password:
root@linuxprobe:~# passwd
New password: <enter new password>
Retype new password: <retype>
passwd: password updated successfully
Change another user’s password:
root@linuxprobe:~# passwd linuxprobe
New password: <enter>
Retype new password: <retype>
passwd: password updated successfully
Noninteractive update with a pipeline—ideal in batch scripts:
root@linuxprobe:~# echo "NewPass0107" | passwd --stdin linuxprobe
Changing password for user linuxprobe.
passwd: all authentication tokens updated successfully.
Temporarily disable and re‑enable logins:
root@linuxprobe:~# passwd -l linuxprobe
passwd: password changed.
root@linuxprobe:~# passwd -S linuxprobe
linuxprobe L 2025-03-13 0 99999 7 -1

root@linuxprobe:~# passwd -u linuxprobe
passwd: password changed.
root@linuxprobe:~# passwd -S linuxprobe
linuxprobe P 2025-03-13 0 99999 7 -1
6) userdel
Delete an account (user delete). Format: userdel [options] username.
By default, the user’s home directory is preserved. Use -r to remove it too. Table 5‑4 lists options.
Table 5‑4 userdel options
| Option | Purpose |
|---|---|
| -f | Force deletion |
| -r | Remove the home directory as well |
Delete the account but keep the home directory, then clean up later:
root@linuxprobe:~# userdel linuxprobe
root@linuxprobe:~# id linuxprobe
id: ‘linuxprobe’: no such user

root@linuxprobe:~# cd /home
root@linuxprobe:/home# ls
linuxcool  linuxdown  linuxprobe
root@linuxprobe:/home# rm -rf linuxprobe
root@linuxprobe:/home# ls
linuxcool  linuxdown
Best practice: split deletion into two steps—remove the account, then remove the files—so you have a safety buffer against irreversible mistakes.
5.2 File Permissions and Ownership
Every file has an owner and group, plus rwx permissions for the owner, the group, and others. For ordinary files, the meanings are intuitive: read means viewing content; write means editing, adding, or removing content; execute means running a script or binary. For directories the meanings are different and often misunderstood: read lists entries; write creates, deletes, or renames entries; execute allows you to enter the directory.
Common operations differ between files and directories; see Table 5‑5.
Table 5‑5 What read/write/execute mean for files vs. directories

You can also express permissions numerically: r = 4, w = 2, x = 1. The three triplets (owner, group, others) are independent; see Table 5‑6.
Table 5‑6 Character and numeric permission mapping

For example, rwx (7) is 4+2+1 and rw (6) is 4+2. If a file has owner rwx, group rw, and others r, the character form is rwxrw-r-- and the numeric form is 764. Do not add the three numbers together—each triplet is separate.
Example conversion: for rw-r-x-w-, first replace each position with its number (see Figure 5‑1), then sum by column to get 652.
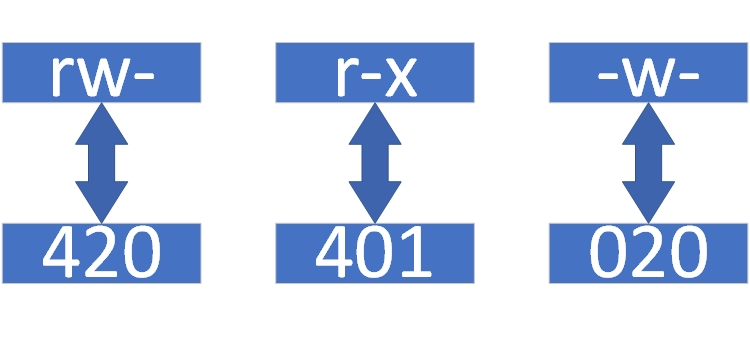
Figure 5‑1 Character to numeric conversion
Converting numbers back to characters is a bit trickier. For 652, note that 6 = 4+2, 5 = 4+1, and 2 = 2+0+0. Lay them out in order and convert to rw-r-x-w- (see Figure 5‑2).
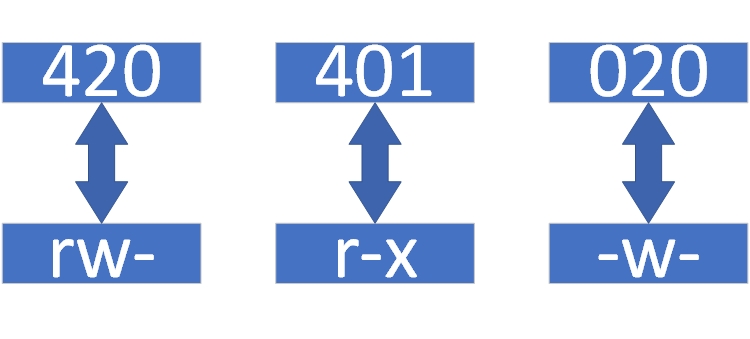
Figure 5‑2 Numeric to character conversion
Remember: the owner, group, and others triplets are unrelated. Place each rwx in the correct position—rw-r-x-w-, not a scrambled “rrwwx---”.
Let’s analyze the ls -l output in Figure 5‑3.
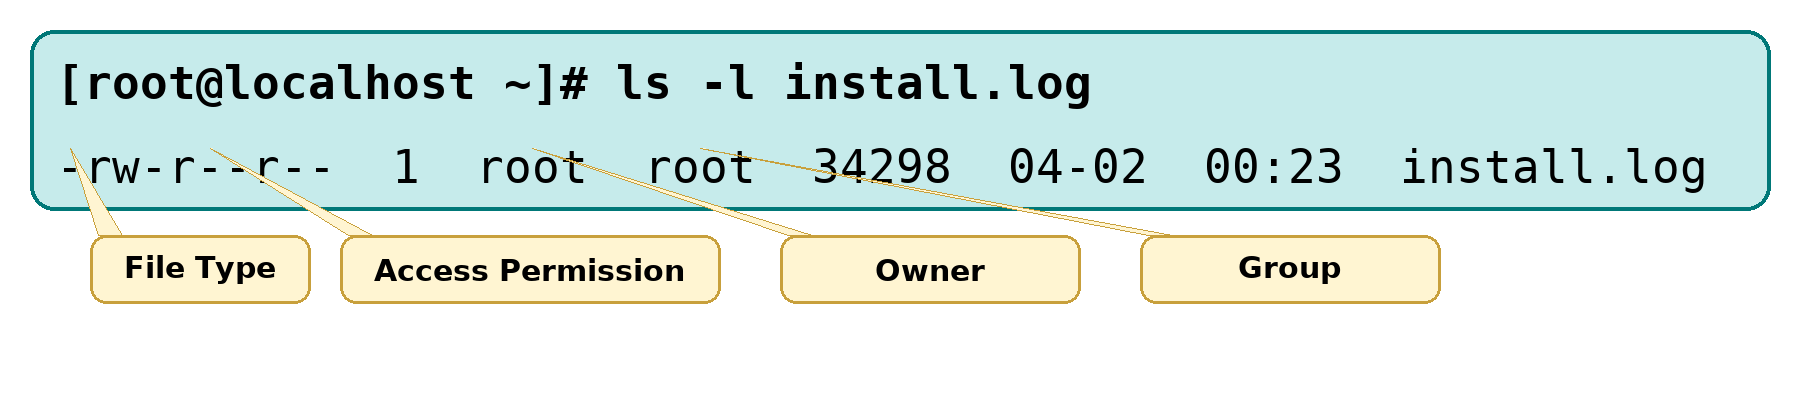
Figure 5‑3 File attributes in ls output
From left to right: type, permissions, owner, group, size, last modification time, and name. Here the type is a regular file (-), owner permissions are rw-, group permissions r--, others r--. The file is 34,298 bytes, modified on April 2 at 00:23, named install.log.
The first leading character is the file type: - for regular file, d for directory, l for symlink, p for pipe, b for block device, c for character device. Most directories contain ordinary files and directories; device files appear under /dev.
5.3 Special Permission Bits
Basic rwx flags aren’t always enough. Special bits SUID, SGID, and the sticky bit (SBIT) enable specific, nuanced behaviors and can be combined with normal permissions.
1) SUID
SUID applies to executable programs and makes a process run with the file owner’s privileges (effective UID) while it executes. For example, any user can run passwd to update their password in /etc/shadow. /etc/shadow is mode 000 by default—only root can read or write it—so passwd must run with elevated rights. The SUID bit on /bin/passwd provides this.
If the owner’s execute bit is present, x becomes s; if owner execute is absent, an uppercase S appears.
root@linuxprobe:~# ls -l /etc/shadow
----------. 1 root root 1048 Mar 13 13:11 /etc/shadow
root@linuxprobe:~# ls -l /bin/passwd
-rwsr-xr-x. 1 root root 91616 Jun 24  2024 /bin/passwd
Tips:
Treat SUID with care. Anyone who runs a SUID program temporarily has the owner’s privileges. Never set SUID on editors or general tools likevim,cat, orrm.
2) SGID
SGID has two uses. On executables, it runs with the file’s group (effective GID). Historically, tools like ps needed SGID to read certain kernel data. On directories, SGID makes new files inherit the directory’s group—perfect for shared departmental folders.
Example: set SGID on a directory so files inherit its group.
root@linuxprobe:~# cd /tmp
root@linuxprobe:/tmp# mkdir testdir
root@linuxprobe:/tmp# ls -ald testdir
drwxr-xr-x. 2 root root 6 Mar 13 13:16 testdir
root@linuxprobe:/tmp# chmod -R 777 testdir
root@linuxprobe:/tmp# chmod -R g+s testdir
root@linuxprobe:/tmp# ls -ald testdir
drwxrwsrwx. 2 root root 6 Mar 13 13:16 testdir
Create a file there as a regular user and note the group:
root@linuxprobe:/tmp# su - linuxprobe
linuxprobe@linuxprobe:~$ cd /tmp/testdir
linuxprobe@linuxprobe:/tmp/testdir$ echo "linuxprobe.com" > test
linuxprobe@linuxprobe:/tmp/testdir$ ls -al test
-rw-r--r--. 1 linuxprobe root 15 Mar 13 13:16 test
linuxprobe@linuxprobe:/tmp/testdir$ exit
Two related workhorses:
chmodsets both ordinary and special permissions. For example,chmod 760 filemakes ownerrwx, grouprw, others---.
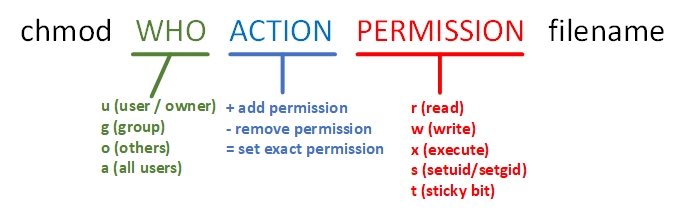
Figure 5‑4 chmod usage
root@linuxprobe:/tmp# cd ~
root@linuxprobe:~# ls -l anaconda-ks.cfg
-rw-------. 1 root root 1064 Mar 13 03:41 anaconda-ks.cfg
root@linuxprobe:~# chmod 760 anaconda-ks.cfg
root@linuxprobe:~# ls -l anaconda-ks.cfg
-rwxrw----. 1 root root 1064 Mar 13 03:41 anaconda-ks.cfg
chownchanges owner and group usingowner:groupformat.
root@linuxprobe:~# chown linuxprobe:linuxprobe anaconda-ks.cfg
root@linuxprobe:~# ls -l anaconda-ks.cfg
-rwxrw----. 1 linuxprobe linuxprobe 1064 Mar 13 03:41 anaconda-ks.cfg
3) SBIT (sticky bit)
For shared drop folders like /tmp, SBIT ensures users can delete only their own files. On directories with the sticky bit set, the execute bit for “others” displays as t (or T if execute is not otherwise set).
root@linuxprobe:~# ls -ald /tmp
drwxrwxrwt. 17 root root 4096 Oct 28 00:29 /tmp
Even if a file in /tmp is 777, other users cannot remove it due to the directory’s sticky bit:
root@linuxprobe:~# cd /tmp
root@linuxprobe:/tmp# echo "Welcome to linuxprobe.com" > test
root@linuxprobe:/tmp# chmod 777 test
root@linuxprobe:/tmp# ls -al test
-rwxrwxrwx. 1 root root 26 Mar 13 13:18 test

root@linuxprobe:/tmp# su - linuxprobe
linuxprobe@linuxprobe:~$ cd /tmp
linuxprobe@linuxprobe:/tmp$ rm -f test
rm: cannot remove 'test': Operation not permitted
Table 5‑7 shows symbolic forms for setting special bits with chmod.
Table 5‑7 Setting special bits with chmod
| Option | Effect |
|---|---|
| u+s | Set SUID |
| u-s | Clear SUID |
| g+s | Set SGID |
| g-s | Clear SGID |
| o+t | Set sticky bit |
| o-t | Clear sticky bit |
You can also express special bits numerically: SUID = 4, SGID = 2, SBIT = 1. Prepend this digit to the usual three‑digit mode. Thus the maximum is 7777, not 777.
Example: rwxr-xr-t is ordinary 755 plus sticky bit 1 → 1755.
A trickier case: rwsrwSr--. The uppercase S means execute wasn’t set originally. Ordinary permissions are rwxrw-r-- → 764. Special bits include SUID (4) and SGID (2) → 6. Combined, 6764 (see Figure 5‑5).
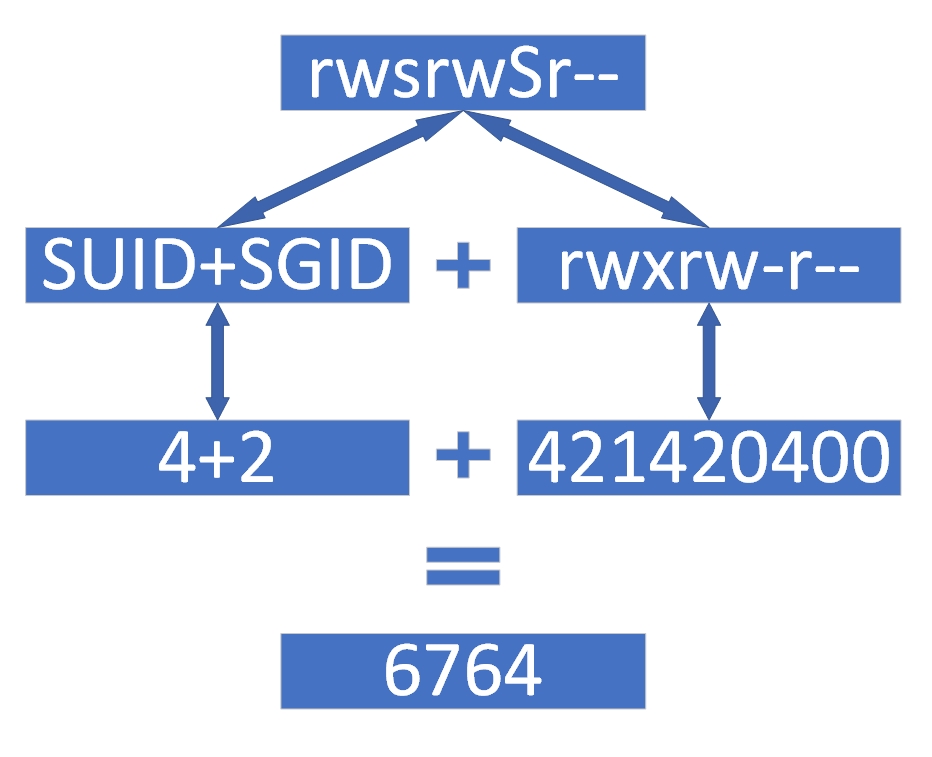
Figure 5‑5 Character to numeric with special bits
To go from numbers back to characters, consider 5537. Special 5 means SUID (4) + SBIT (1). Ordinary 537 becomes r-x-wxrwx; add SUID and sticky to get r-s-wxrwt (Figure 5‑6).
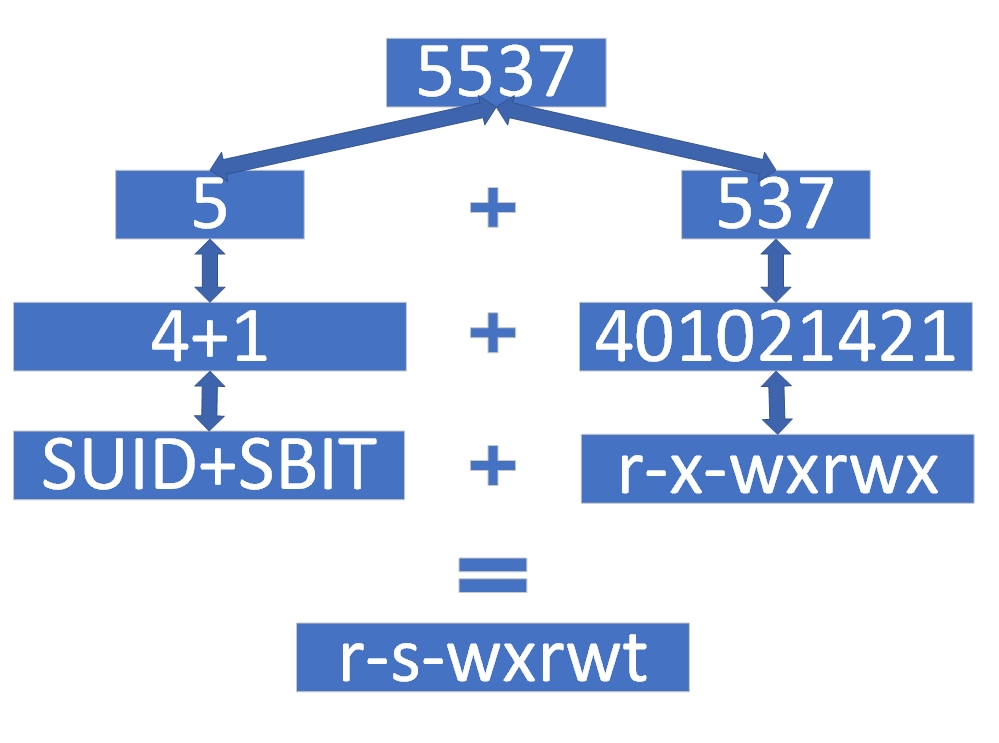
Figure 5‑6 Numeric to character with special bits
Tips:
On Linux, a single bit can carry a lot of meaning—treat permission bits with respect.
5.4 Hidden File Attributes
Beyond ordinary and special permissions, Linux files can carry hidden attributes that typical ls output won’t show. These attributes underpin scenarios such as “append‑only log files” or “immutable files,” which help defend against tampering.
Use chattr to change attributes and lsattr to view them.
1) chattr
Format: chattr [options] filename. Use +flag to add an attribute and -flag to remove it. Table 5‑8 lists common flags.
Table 5‑8 Common chattr flags
| Flag | Meaning |
|---|---|
| i | Immutable: cannot be changed; on a directory, subfiles can change but new files cannot be created or deleted |
| a | Append‑only: data may be appended but not overwritten or deleted |
| S | Synchronous updates: write‑through to disk |
| s | Secure deletion: overwrite with zeros so data cannot be recovered |
| A | Do not update atime |
| b | Do not update access bookkeeping |
| D | Check compressed file consistency |
| d | Omit from dump backups |
| c | Store data compressed by default |
| u | Keep data after deletion so it can be recovered |
| t | Enable tail‑merging (filesystem dependent) |
| x | Allow direct access to compressed data |
Demonstrate append‑only protection:
root@linuxprobe:~# echo "for Test" > linuxprobe
root@linuxprobe:~# chattr +a linuxprobe
root@linuxprobe:~# rm linuxprobe
rm: remove regular file 'linuxprobe'? y
rm: cannot remove 'linuxprobe': Operation not permitted
2) lsattr
View attributes:
root@linuxprobe:~# ls -al linuxprobe
-rw-r--r--. 1 root root 9 Mar 13 13:20 linuxprobe

root@linuxprobe:~# lsattr linuxprobe
-----a---------------- linuxprobe
Remove the attribute and delete the file:
root@linuxprobe:~# chattr -a linuxprobe
root@linuxprobe:~# lsattr linuxprobe
---------------------- linuxprobe
root@linuxprobe:~# rm linuxprobe
rm: remove regular file 'linuxprobe'? y
In practice, +a is perfect for system logs so attackers cannot erase their tracks, while +i makes a file fully immutable. The +s flag enforces secure deletion by zeroing disk blocks.
5.5 Access Control Lists (ACLs)
So far, permissions target classes (owner, group, others). Sometimes you need per‑user or per‑group overrides on a specific file or directory. That’s what ACLs provide. When an ACL is set on a directory, new files inherit it; ACLs set directly on a file supersede inherited entries.
As a baseline, a regular user cannot enter /root:
root@linuxprobe:~# su - linuxprobe
linuxprobe@linuxprobe:~$ cd /root
-bash: cd: /root: Permission denied
linuxprobe@linuxprobe:~$ exit
1) setfacl
Manage ACLs. Format: setfacl [options] file. Use -R for directories, -m to modify, -x to remove a single entry, and -b to remove all. Table 5‑9 summarizes options.
Table 5‑9 setfacl options
| Option | Purpose |
|---|---|
| -m | Modify entries |
| -M | Read entries from a file |
| -x | Remove one entry |
| -b | Remove all entries |
| -R | Recurse into subdirectories |
Grant a specific user access to /root:
root@linuxprobe:~# setfacl -Rm u:linuxprobe:rwx /root
Now they can enter and list files:
root@linuxprobe:~# su - linuxprobe
linuxprobe@linuxprobe:~$ cd /root
linuxprobe@linuxprobe:/root$ ls
anaconda-ks.cfg  Documents  Music     Public     Videos
Desktop          Downloads  Pictures  Templates
linuxprobe@linuxprobe:/root$ exit
You can spot an ACL by a + at the end of the permission string:
root@linuxprobe:~# ls -ld /root
dr-xrwx---+ 14 root root 4096 Mar 13 13:22 /root
2) getfacl
Display ACLs. Format: getfacl [options] file.
root@linuxprobe:~# getfacl /root
getfacl: Removing leading '/' from absolute path names
# file: root
# owner: root
# group: root
user::r-x
user:linuxprobe:rwx
group::r-x
mask::rwx
other::---
Grant a group read/write access to /etc/fstab:
root@linuxprobe:~# setfacl -m g:linuxprobe:rw /etc/fstab
root@linuxprobe:~# getfacl /etc/fstab
getfacl: Removing leading '/' from absolute path names
# file: etc/fstab
# owner: root
# group: root
user::rw-
group::r--
group:linuxprobe:rw-
mask::rw-
other::r--
Remove an entry or clear them all:
root@linuxprobe:~# setfacl -x g:linuxprobe /etc/fstab
root@linuxprobe:~# getfacl /etc/fstab
getfacl: Removing leading '/' from absolute path names
# file: etc/fstab
# owner: root
# group: root
user::rw-
group::r--
mask::r--
other::r--
ACLs take effect immediately. To avoid mistakes, back them up and restore when necessary. When backing up a directory tree, switch to the filesystem root and run getfacl -R with output redirection:
root@linuxprobe:~# cd /
root@linuxprobe:/# getfacl -R home > backup.acl
root@linuxprobe:/# ls -l backup.acl
-rw-r--r--. 1 root root 945 Mar 13 13:24 backup.acl
Restore with:
root@linuxprobe:/# setfacl --restore backup.acl
5.6 The su Command and the sudo Service
In a lab, it is convenient to work as root. In production, caution is essential. The su command switches identity without logging out; sudo grants targeted privileges so users can do their jobs without knowing the root password.
Switch fully to another user (- resets the environment):
root@linuxprobe:/# su - linuxprobe
linuxprobe@linuxprobe:~$ id
uid=1000(linuxprobe) gid=1000(linuxprobe) groups=1000(linuxprobe),10(wheel) context=unconfined_u:unconfined_r:unconfined_t:s0-s0:c0.c1023
Switching from a regular user to root requires authentication:
linuxprobe@linuxprobe:~$ su - root
Password: <enter root password>
sudo is safer: you authorize specific commands for specific users. It logs each use and can avoid repeated password prompts for a while. Table 5‑10 shows common options.
Table 5‑10 sudo options
| Option | Purpose |
|---|---|
| -h | Help |
| -l | List commands the current user may run |
| -u user or UID | Run as another identity |
| -k | Invalidate the cached authentication; next sudo prompts again |
| -b | Run the command in the background |
| -p | Customize the password prompt |
Use visudo to edit /etc/sudoers safely (it does syntax checking and prevents conflicting edits). The general rule format is:
who may use = hostlist (runas) commandlist
- who may use: the user being granted rights
- hostlist:
ALLor a CIDR‑restricted list like192.168.10.0/24 - runas: the target identity (often
ALLfor root) - commandlist:
ALLor comma‑separated absolute paths
Add a line near the standard rule, save, and exit:
root@linuxprobe:~# visudo
 99 ## Allow root to run any commands anywhere
100 root            ALL=(ALL)       ALL
101 linuxprobe      ALL=(ALL)       ALL
Test as the user. The first run explains the ground rules and prompts for the user’s own password:
root@linuxprobe:~# su - linuxprobe
linuxprobe@linuxprobe:~$ sudo -l
...
User linuxprobe may run the following commands on linuxprobe:
    (ALL) ALL
Compare behavior with and without sudo:
linuxprobe@linuxprobe:~$ ls /root
ls: cannot open directory '/root': Permission denied
linuxprobe@linuxprobe:~$ sudo ls /root
anaconda-ks.cfg  Documents  Music     Public     Videos
Desktop          Downloads  Pictures  Templates
For least privilege, restrict the command list to absolute paths. Use whereis to discover paths:
root@linuxprobe:~# whereis cat
cat: /usr/bin/cat /usr/share/man/man1/cat.1.gz
root@linuxprobe:~# whereis reboot
reboot: /usr/sbin/reboot /usr/share/man/man2/reboot.2.gz /usr/share/man/man8/reboot.8.gz
Edit the rule accordingly:
root@linuxprobe:~# visudo
 99 ## Allow root to run any commands anywhere
100 root       ALL=(ALL)   ALL
101 linuxprobe ALL=(ALL)   /usr/bin/cat,/usr/sbin/reboot
Demonstrate restricted commands:
root@linuxprobe:~# su - linuxprobe
linuxprobe@linuxprobe:~$ cat /etc/shadow
cat: /etc/shadow: Permission denied
linuxprobe@linuxprobe:~$ sudo cat /etc/shadow
root:$y$j9T$pg8bgLsCm0JreeO8laDHb8qW$cNPfXxGES.qDqkCTrpJUgM3GKju1jD3T9qQ1HMcxvr/::0:99999:7:::
...
linuxprobe@linuxprobe:~$ exit
If you prefer not to re‑enter a password repeatedly, add the NOPASSWD tag for the allowed commands:
root@linuxprobe:~# visudo
 99 ## Allow root to run any commands anywhere
100 root       ALL=(ALL)   ALL
101 linuxprobe ALL=(ALL)   NOPASSWD:/usr/bin/cat,/usr/sbin/reboot
Now sudo runs without prompting:
root@linuxprobe:~# su - linuxprobe
linuxprobe@linuxprobe:~$ reboot
User root is logged in on tty2.
Please retry operation after closing inhibitors and logging out other users.
Alternatively, ignore inhibitors and users with 'systemctl reboot -i'.
linuxprobe@linuxprobe:~$ sudo reboot
Note: only root may run
visudo.
Review Questions
-
In Linux, who is root?
Answer: The user with UID 0—the most privileged (and most responsible) administrator. -
Which commands add and delete users?
Answer:useraddanduserdel. -
If a file’s owner has rwx and everyone else has r only, what is the numeric mode?
Answer:744(rwx=7,r--=4,r--=4). -
Convert
rwxrw-r--to a numeric mode.
Answer:764. -
What does the sticky bit on a directory enforce?
Answer: Users may delete only their own files in that directory. -
How do SUID and SGID appear in permission strings?
Answer: Lowercasesreplacesxwhen execute is set; uppercaseSappears when execute is not set. -
If a file has the hidden
+iattribute, what does that imply?
Answer: It is immutable—cannot be changed; on a directory, subfiles can change but new files cannot be created or deleted. -
Use ACLs to restrict the
linuxprobegroup so members cannot write to/tmp.
Answer:setfacl -Rm g:linuxprobe:r-x /tmp. -
Must a regular user enter a password when using
sudo?
Answer: By default, yes—the user’s own password. You can allow no‑password use for specific commands withNOPASSWD. -
How can user
linuxproberun sudo without a password for all commands?
Answer: Addlinuxprobe ALL=(ALL) NOPASSWD:ALLto/etc/sudoers(viavisudo).